Rydoo, an expense management software program, can process business expenses and streamline your expense processing and approval without the need for excessive paperwork and labor hours. It accepts corporate card programs, or you can get the Rydoo Cards add-on to issue cards to your employees.
Its other add-ons are third-party software connectors, such as NetSuite for enterprise resource planning (ERP) and BambooHR for human resources (HR) systems. Because these are add-ons, you might pay an additional fee for the integration, but Rydoo doesn’t disclose if add-ons are free. Rydoo offers plans that start at $12 per active user, per month. Those who left a Rydoo review said that they like the platform’s clean and intuitive interface.
At Fit Small Business (FSB), we are committed to delivering thorough and dependable software reviews. In adherence to the FSB editorial policy, we seize every opportunity to try the accounting practice software we review firsthand, allowing us to test how the features work in real-world scenarios. This approach allows us to customize our reviews and provide more relevant insights and recommendations tailored to the unique needs of your accounting firm.
Pros
- Integration with accounting software and enterprise ERP systems
- Expense approval flows and expense policies
- Record mileage and per diems
- Cheaper monthly fees if paid annually
- Third-party corporate card integration but also offers Rydoo prepaid cards as an add-on
Cons
- No reimbursement system
- Not a bookkeeping system alternative
- A bit expensive for small businesses
Rydoo Alternatives & Comparisons
Monthly Pricing | Enroll Third-party Corporate Cards | Card Feed Transactions | Issue Employee Cards | |
|---|---|---|---|---|
Starts at $12 per user | ✓ | ✓ | ✓ | |
Starts free | ✓ | ✓ | ✕ | |
Starts at $8.99 per user | ✓ | ✓ | ✕ | |
Free | ✕ | ✓ | ✓ | |
Best For | Learn More | |
|---|---|---|
Affordable expense tracking: Among all the alternatives here—with the exception of Ramp—Zoho Expense is the most affordable expense tracker on the list. Its lowest-paid plan only starts at $5 per user, per month. It’s even a more convenient pick than Ramp because Ramp has strict application requirements for businesses. | ||
Real-time Visa and Mastercard feeds: Fyle offers real-time card feeds for Mastercard and Visa card transactions. Real-time feeds help approvers and submitters process expenses without having to wait for reports. | ||
Card programs: Businesses that can meet Ramp’s application requirements can enjoy its free platform and unlimited card issuance features. Ramp accepts registered corporations, limited liability companies (LLCs), and limited liability partnerships (LLPs) with at least $75,000 in any United States bank and most of their corporate spend is in the US. It’s a better pick than Rydoo since the platform is free and its expense tracking capabilities revolve around Ramp card usage. |
Rydoo Reviews From Users
| Users Like | Users Dislike |
|---|---|
| Intuitive UI | App doesn’t sync properly with the web version |
| Easy to set up and implement | Inconsistencies in OCR |
| Mobile app | Slow response times for the web app |
Most users who gave a Rydoo review mentioned that they like the software for its clean and sleek user interface. On top of that, Rydoo’s integration with other software makes it easy to implement within the business. Those who left negative feedback pointed out that Rydoo should fix minor problems, such as recognizing correct company users when using OCR.
Here are Rydoo’s ratings on top user review websites:
- G2.com[1]: 4.4 out of 5 based on around 730 reviews
- Capterra[2]: 4.4 out of 5 based on around 200 reviews
Although not the most affordable pick, Rydoo offers a lot of flexibility to users, which is the major reason why our score for Rydoo pricing is excellent. You can try the software right away by going for the 14-day free trial—or if you want to learn more about the software, you can request a demo. On top of that, it has custom-priced plans that might help you find the best price for your company’s needs.
Essentials | Pro | Business | Enterprise | |
|---|---|---|---|---|
$12 | $14 | Custom priced | Custom priced | |
$10 | $12 | Custom priced | Custom priced | |
Scanning of Receipts | ✓ | ✓ | ✓ | ✓ |
Submit & Track Mileage | ✓ | ✓ | ✓ | ✓ |
Trip & Project Allocation | ✓ | ✓ | ✓ | ✓ |
User Permissions | ✓ | ✓ | ✓ | ✓ |
Expense Approval Flows | ✓ | ✓ | ✓ | ✓ |
Integration With QuickBooks, Xero, Slack, Uber & Lyft | ✓ | ✓ | ✓ | ✓ |
Spending Rules & Policies | ✕ | ✓ | ✓ | ✓ |
Per Diems | ✕ | ✓ | ✓ | ✓ |
Application Programming Interface (API) Access | ✕ | ✕ | ✓ | ✓ |
Single Sign-on (SSO) | ✕ | ✕ | Add-on | ✓ |
Dedicated Customer Success Manager | ✕ | ✕ | ✕ | ✓ |
ERP Integration | ✕ | ✕ | Add-on | Add-on |
Aside from Rydoo Cards, other add-ons include ERP (NetSuite, SAP, and Microsoft D365) and HR (Personio and BambooHR) connectors and controlling services.
Rydoo Features
As one of our best business expense trackers, Rydoo’s main features focus on expense processing. You can create workflows to organize and structure processing.
Rydoo scored excellently in the expense tracking criteria. Its clean interface makes it easy for users to learn how the expense submission process works. We believe that its outstanding features compensate for its higher price point than its competitors. Let’s look at Rydoo’s expense tracking system in greater detail.
Once a user logs in to the web version of Rydoo, they’ll see the dashboard. The dashboard shows a summary of information about the user’s expenses. They’ll also see upcoming bookings that have been logged using Rydoo:
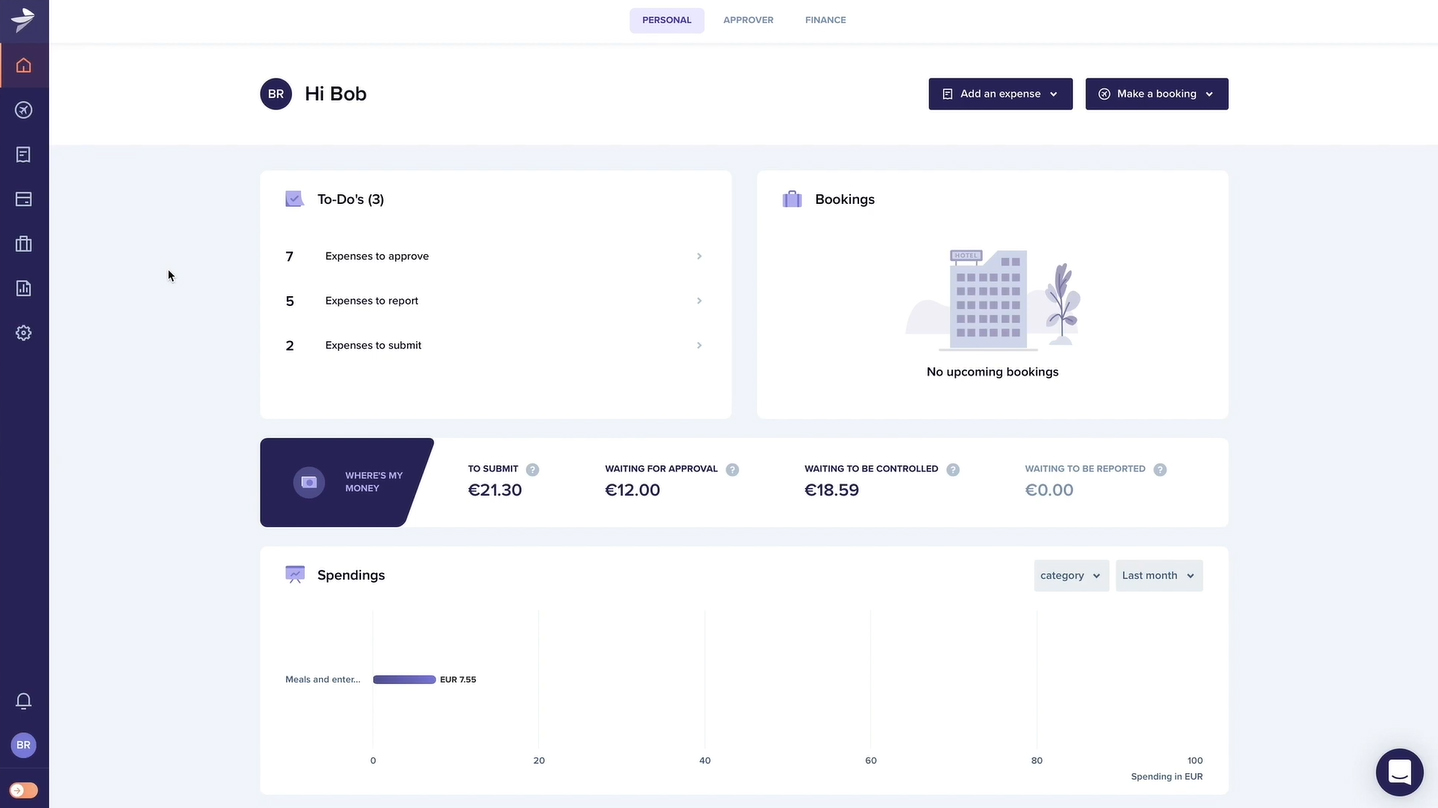
Personal role dashboard on Rydoo (Source: Rydoo Tutorial Videos)
On the dashboard, you can see expenses classified based on their status. Each status has a corresponding amount to show the expense to be accounted for along the workflow. The Approver dashboard (see image below) shows the list of all submitted expenses. You can view these expenses under Expenses for Approval. As an approver, you can also see the unsubmitted expenses of employees, including your expenses.
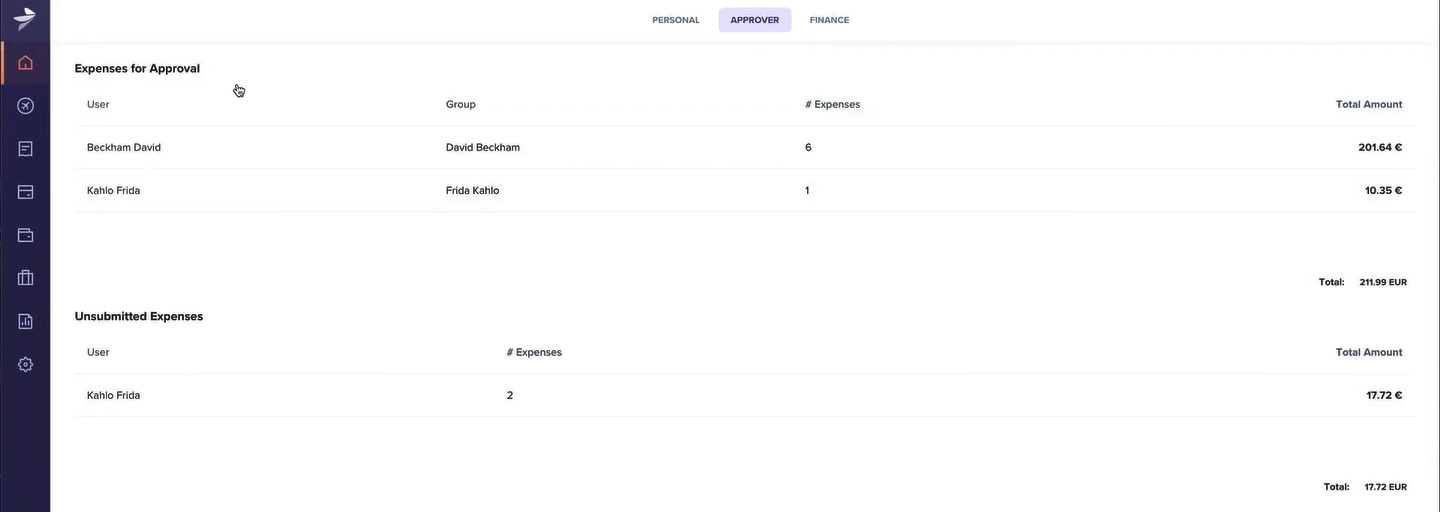
Approver dashboard on Rydoo (Source: Rydoo Tutorial Videos)
There are different modes of submitting an expense in Rydoo. At the upper-right corner, click “Add an expense.” A drop-down menu will appear and show the ways to submit an expense:

Different ways to submit expenses on Rydoo (Source: Rydoo Tutorial Videos)
- Upload: You can upload a receipt directly from your computer
- Email: Digital receipts sent to your inbox can be forwarded to Rydoo by forwarding them to receipts@rydoo.com
- Manual: A form will appear so that you can fill in the expense manually
- Mileage: You can input miles and let Rydoo apply the standard mileage rates
- Per diem: Employees on business trips can submit per diem based on the lists uploaded in Rydoo
Users can also submit expenses using Rydoo’s mobile app, which is available on both Android and iOS platforms. A significant advantage of having the mobile app is that users can capture receipts with their smartphone’s camera and upload them directly to Rydoo:
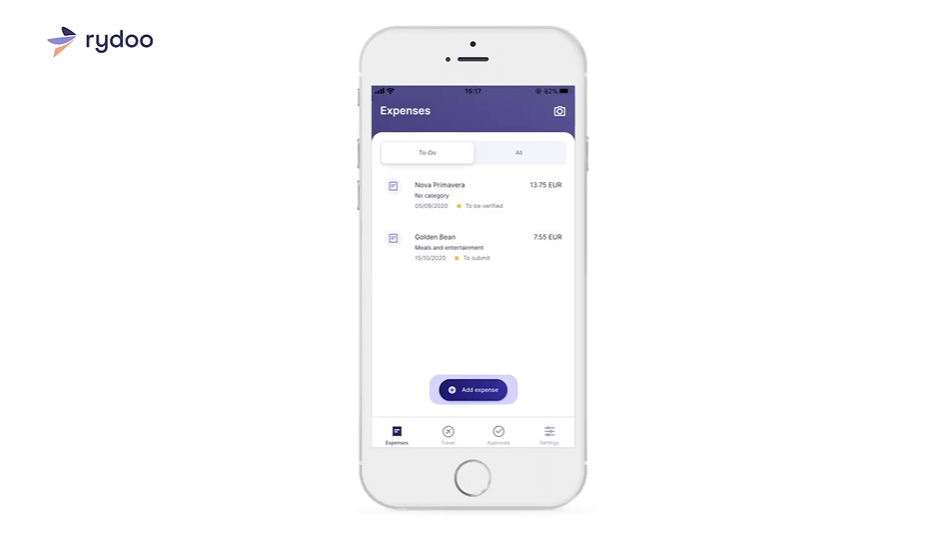
User Account view on Rydoo Mobile (Source: Rydoo Tutorial Videos)
When users capture receipts, Rydoo will scan the receipts and extract the date, amount, merchant, and currency automatically. If you want to add more information, fill in the blank fields in the expense submission form:
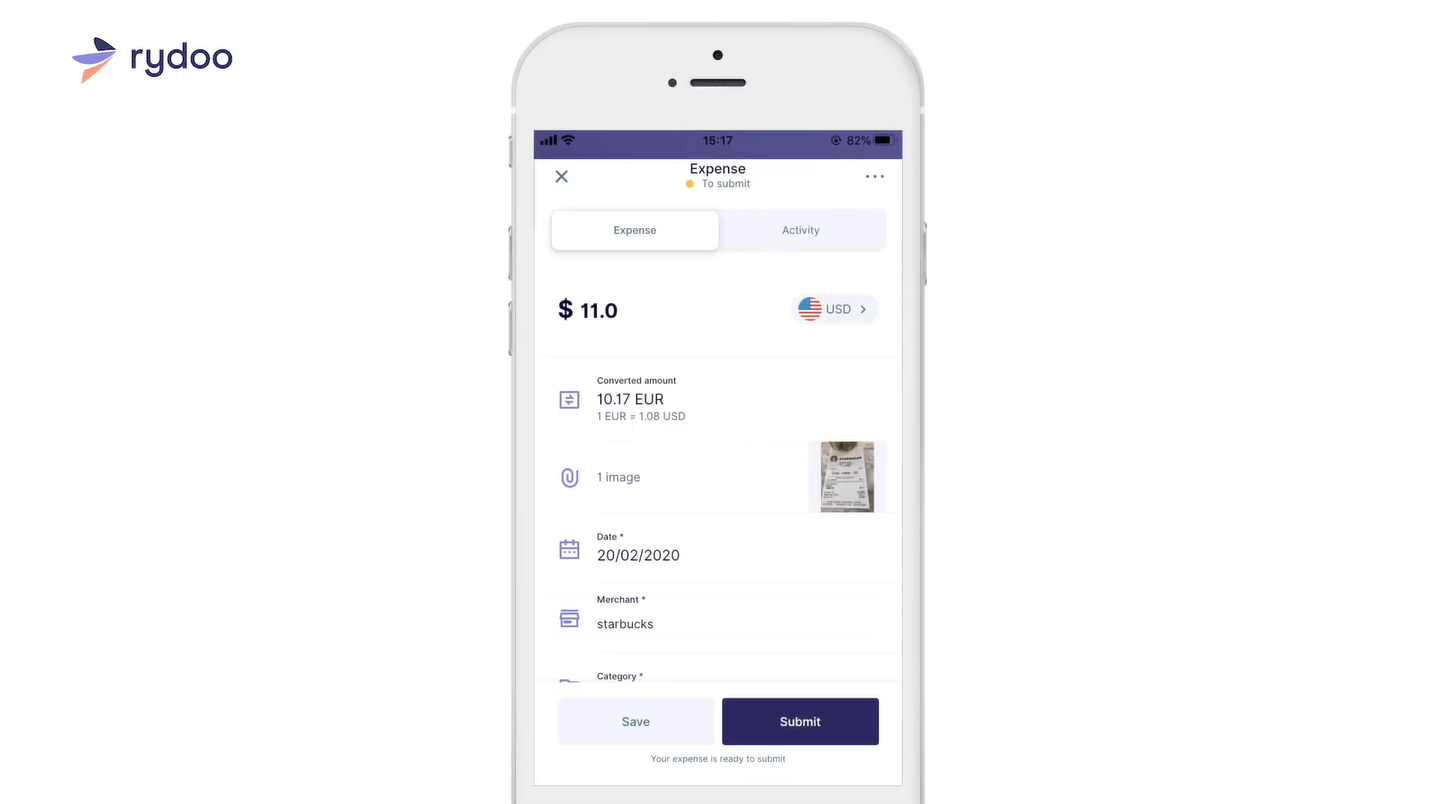
Expense information on Rydoo Mobile (Source: Rydoo Tutorial Videos)
Whether on the web or mobile version, every expense has a status to keep you informed of its position in the approval workflow:
- To Be Verified: Incomplete and unsubmitted expenses.
- Duplicate: Expenses marked as duplicate or detected by Rydoo as potential duplicates
- Unreadable: Receipts that can’t be read by Rydoo’s OCR
- To Submit: Complete but unsubmitted expenses.
- Submitted: Completed and submitted expenses awaiting action from the approver.
- Recalled: Submitted but unapproved expenses that have been pulled out from the approver’s queue
- Rejected: Expenses rejected by the approver. As a user, you’ll see a rejection reason.
- Approved: Submitted expenses approved by the approver.
- Controlled: Second optional level of approval—can be disabled in the settings menu.
- Reported: Approved expenses awaiting reimbursement.
- Reimbursed: Reported expenses that have been reimbursed
If you click the name of an employee, you’ll see the summary of all expenses. The summary will provide basic information like the date, merchant, amount, type, status, and category. At the bottom right of the list, you’ll see the total amount of the expense:
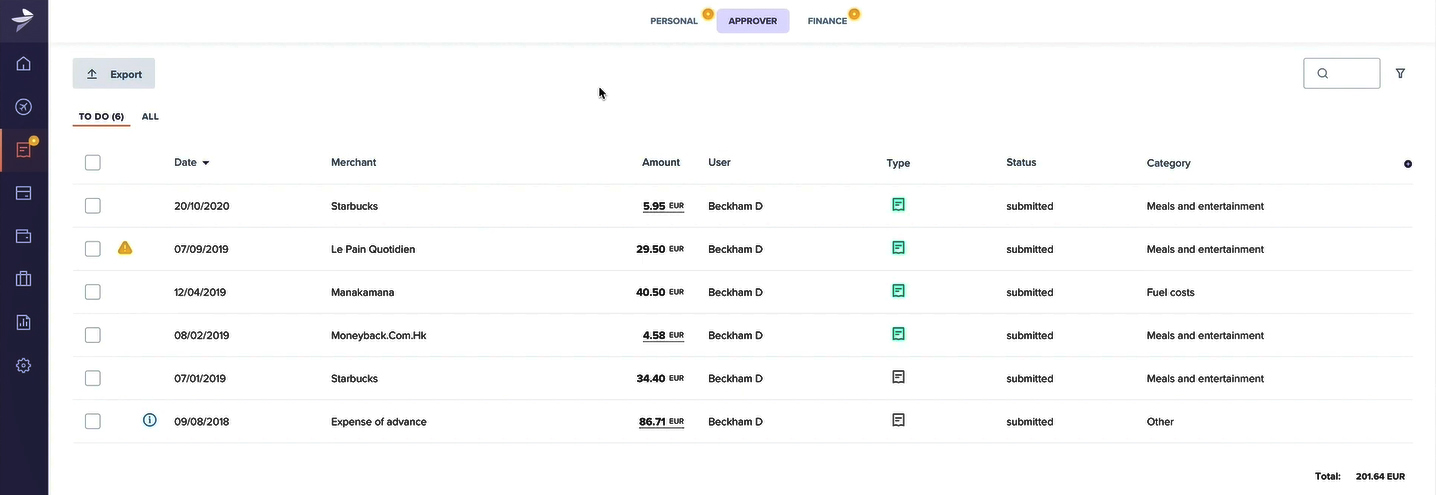
Viewing expense details on Rydoo (Source: Rydoo Tutorial Videos)
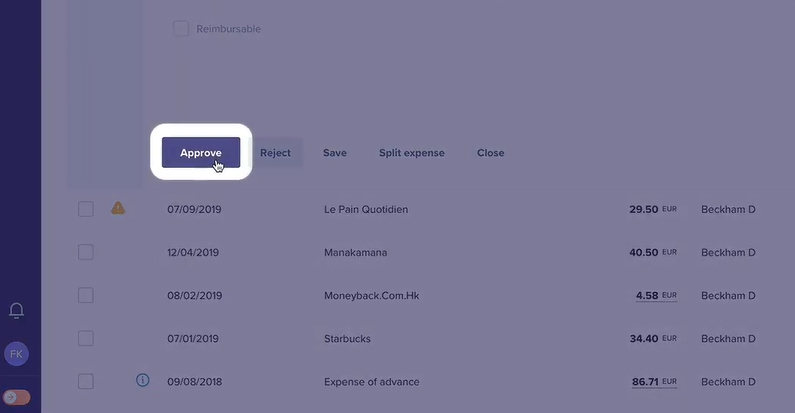
By clicking on the item, Rydoo will show more detailed information about the expense. As an approver, you have to check if the expense complies with company policies, such as limits and documentation requirements. Moreover, you can save time by setting expense policies to limit or remind submitters to comply with all the requirements.
When the approver rejects the expense, they must state the reason for rejection. By clicking the Reject button, a pop-up window will prompt the approver to include a reason for rejection. Below the rejection reason, approvers can add additional notes or instructions:
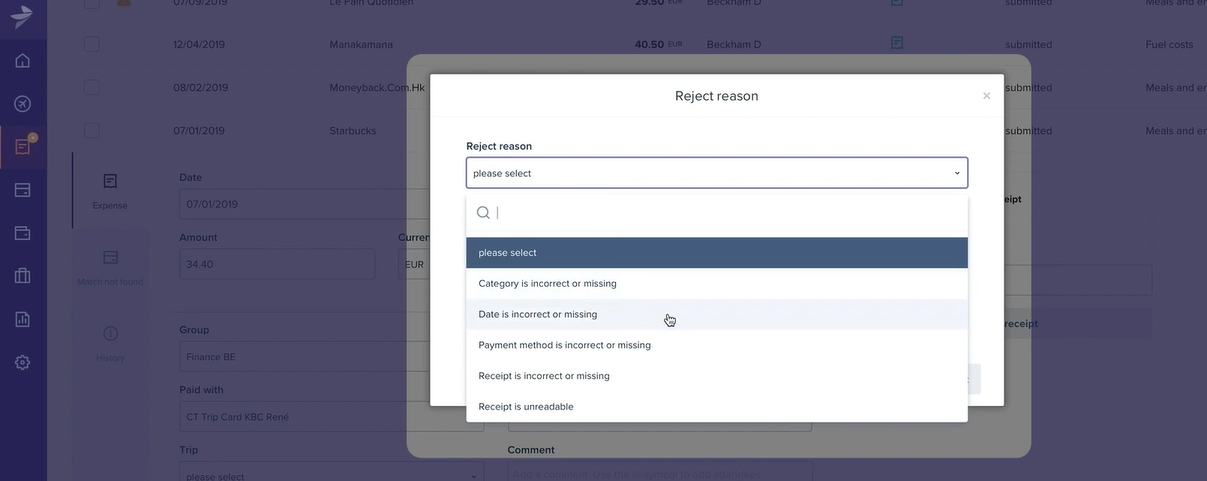
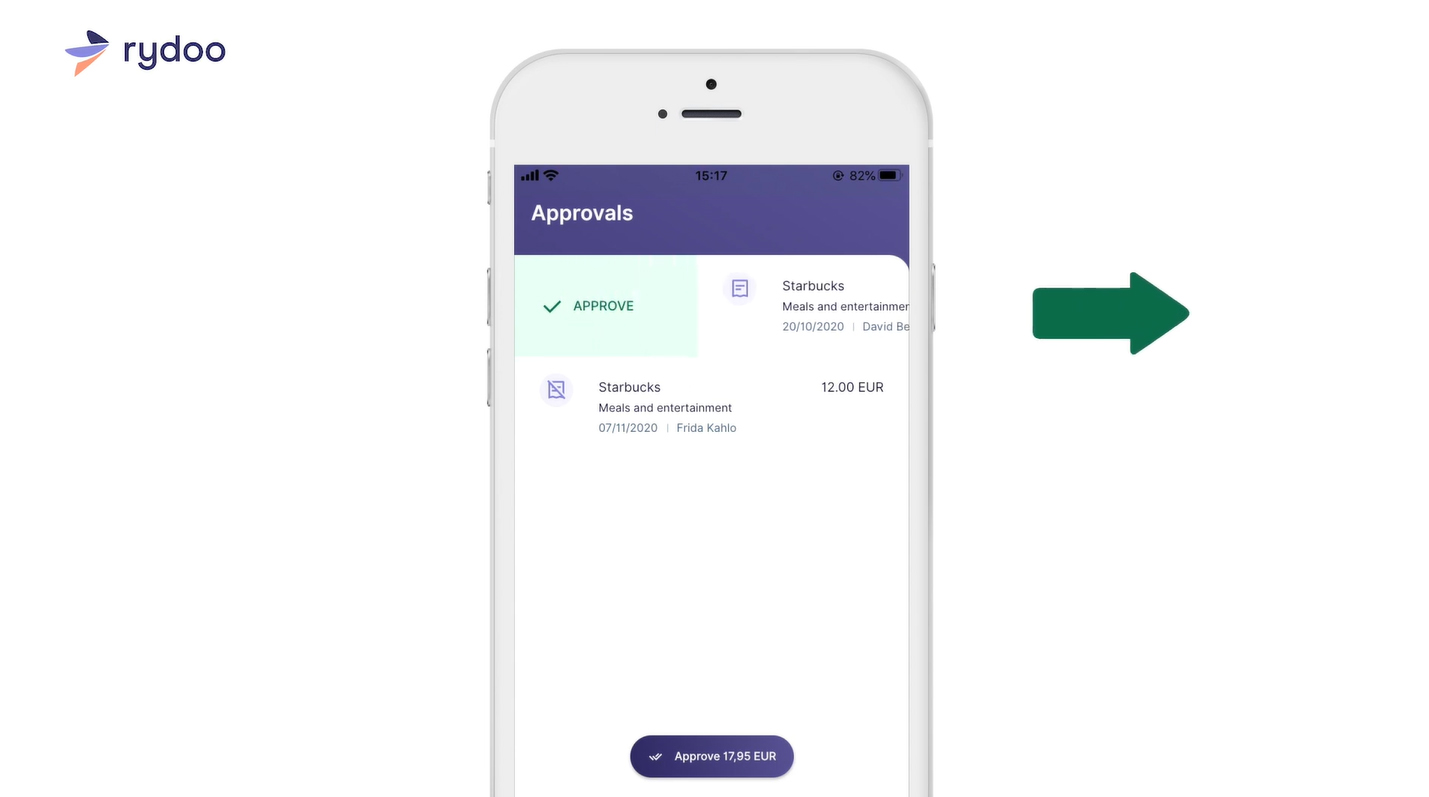
If the approver is on a business trip, they can keep up with expense submissions via the mobile app. As with the web version, approvers can scrutinize and review expenses. It’s easier and more comfortable to approve and reject expenses this way because you don’t need to open your laptop or computer all the time. Through your smartphone, you can manage company expenses wherever and whenever you want:
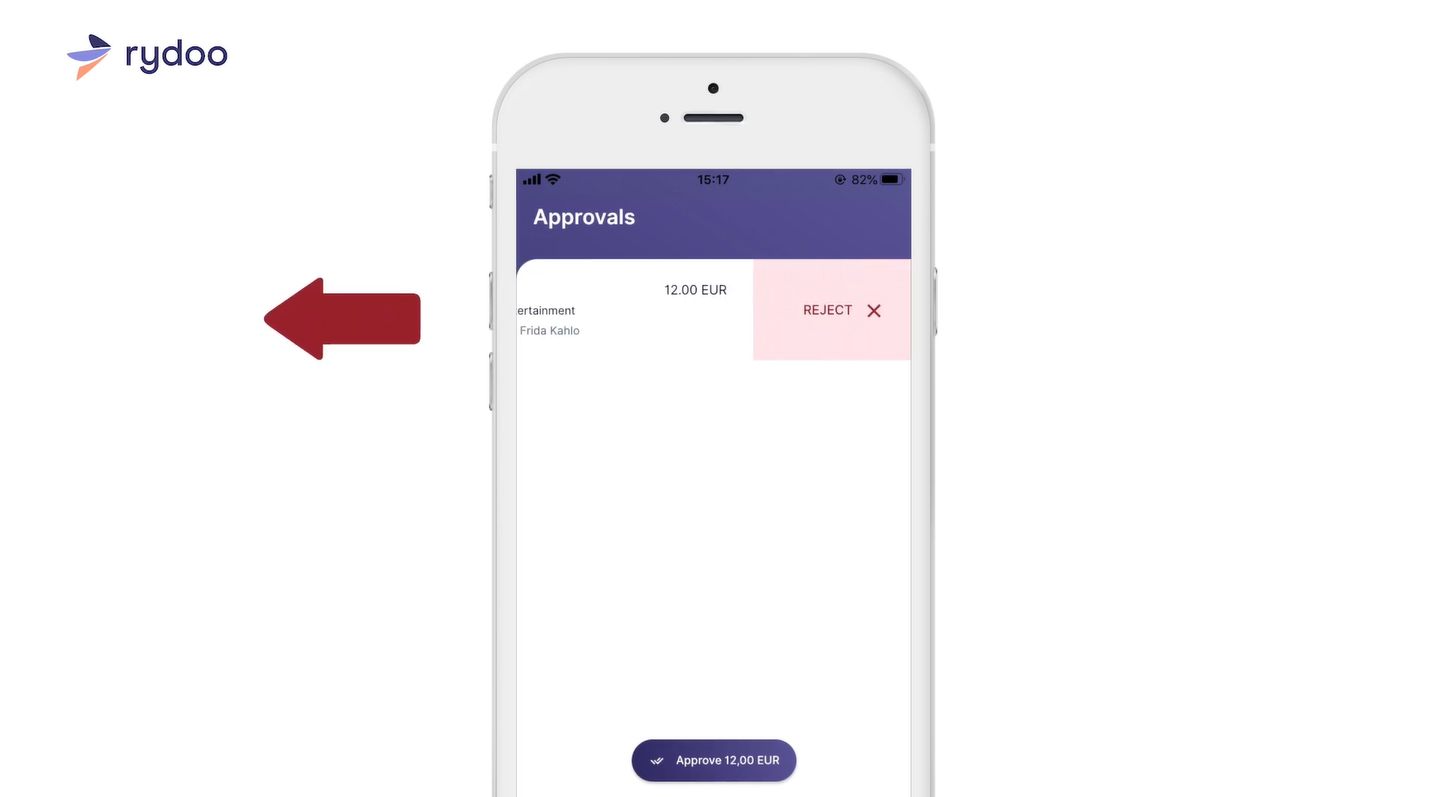
When you reject an expense on mobile, the app will also require you to include a reason for rejection.
If there are unsubmitted expenses, you can remind employees to submit them. This feature is helpful if your company’s workforce is working from home:

Expense rules dashboard on Rydoo (Source: Rydoo Tutorial Videos)
To remind employees, you have to click “unsubmitted expense,” then head to Actions. Click “Send Reminder.”
Another helpful feature of Rydoo is its expense rules. You can reduce the work of approvers by setting up expense rules and letting Rydoo filter out expenses that don’t comply with expense limits, minimum documentation requirements, or that have incomplete descriptions. The dashboard shows the list of rules you have set previously. You can edit or delete existing rules as you see fit:
Expense rules dashboard on Rydoo (Source: Rydoo Tutorial Videos)
You can access expense rules in the Admin Tab. On the right-side panel, click “Admin” and head to “Expense Rules.” Then, on the top right corner, click “Add Expense Rule.” A new window will appear where you can set the limits and applicability of the rules.
When you want to create a new rule, there are four main items you need to fill out:
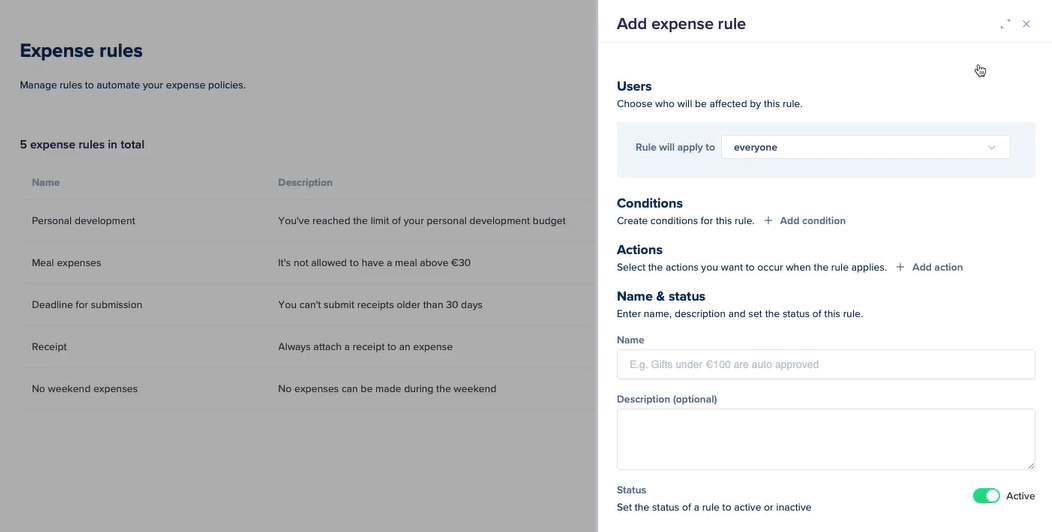
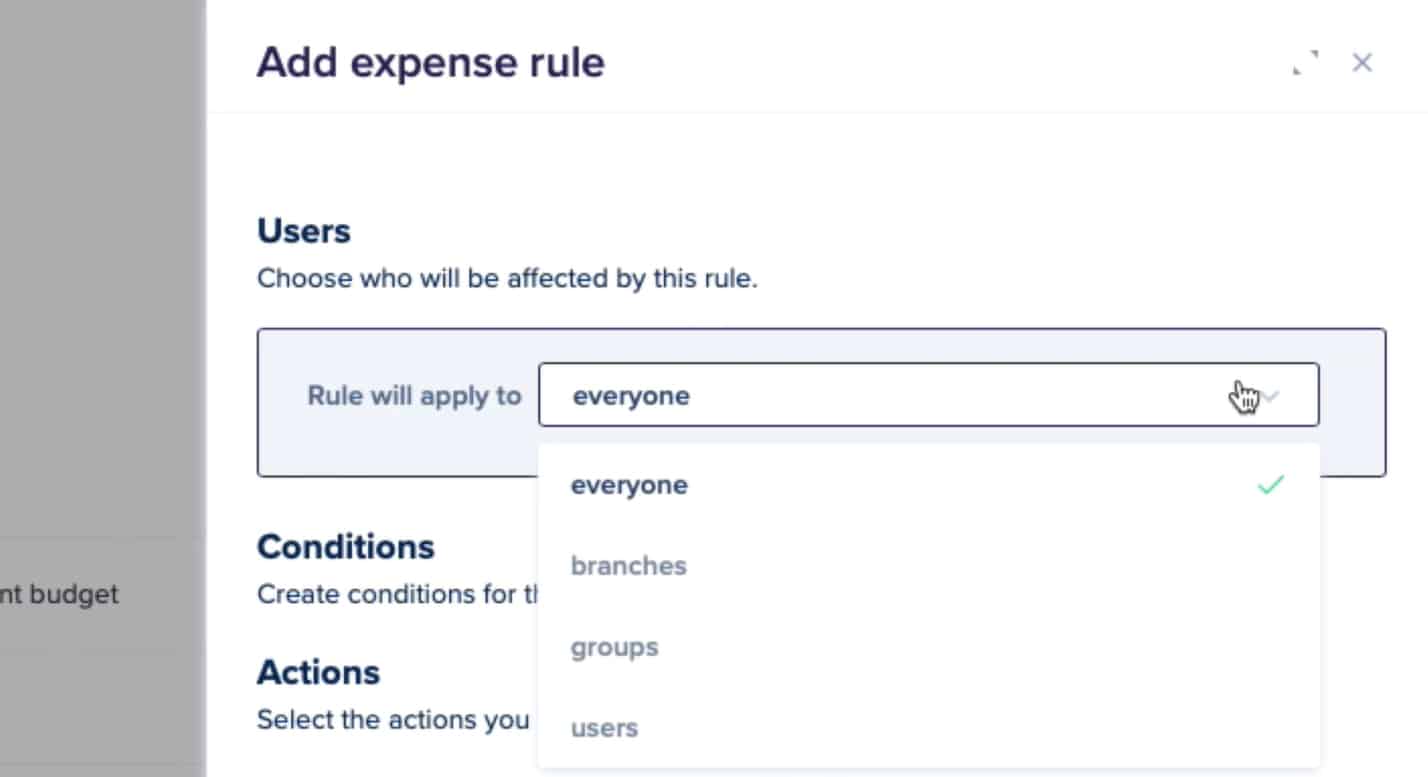
You can limit rules to a specific group or set them to everyone. Setting the rule to “everyone” makes the expense rule applicable to all. For “branches,” the rule applies only to a particular branch of your company. “Groups” pertain to organizational divisions within your company, such as the finishing department or HR. Lastly, “users” refers to a specific employee like company president, chief financial officer (CFO), or production manager:
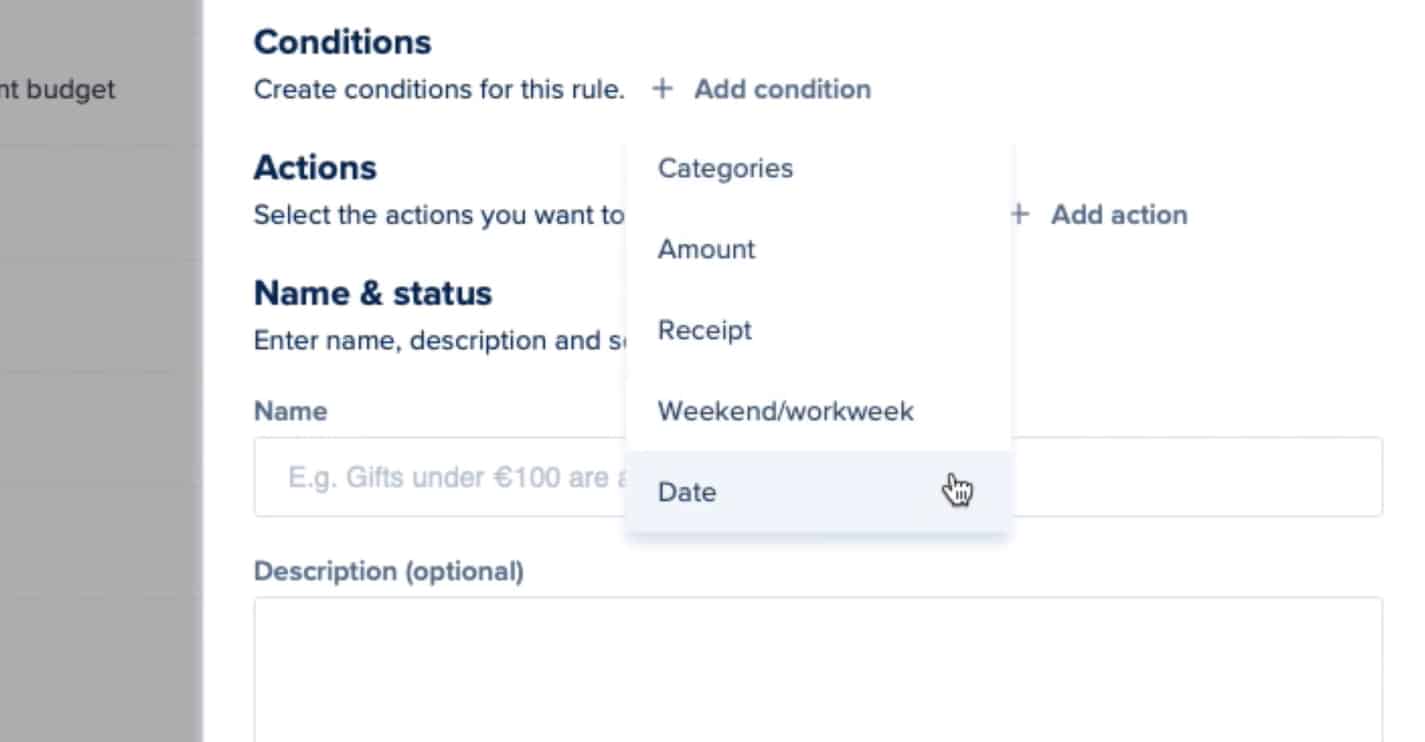
Setting the conditions for expense rules (Source: Rydoo Tutorial Videos)
“Conditions” defines the scope of the rule. You can set conditions by clicking “Add Condition” to place a rule for particular activities:
- Categories: You can set a rule based on the expense category, such as parking or postage.
- Amount: You can set a rule based on a threshold amount. It can be more than, equal to, or less than a particular dollar amount. You can set this rule based on the amount per individual or frequency, such as per night, day, week, or month. It also lets you limit the condition per country, which is ideal for overseas employees.
- Receipt: Setting this condition checks if a receipt is attached or not.
- Weekend or Workweek: This condition triggers based on the option you choose. For weekends, expense rules only apply if the expense was incurred on the weekend. The same applies to the workweek.
- Date: Using the date condition prevents submitters from submitting expenses outside the allowable period.
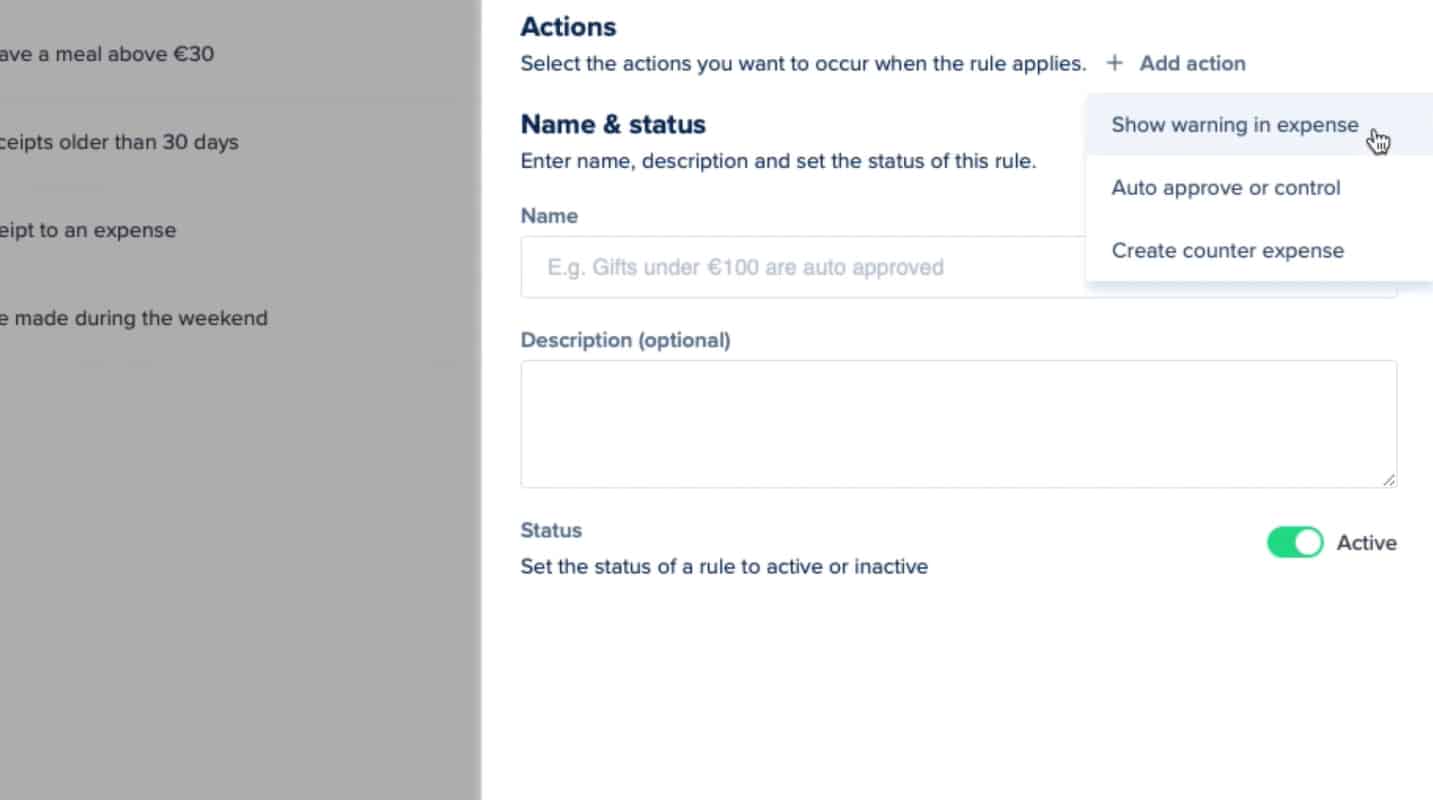
Setting the actions on expense rules (Source: Rydoo Tutorial Videos)
Once you’ve set the conditions, you need to set up an action. “Actions” allows you to set a warning or a countermeasure when conditions are met. On Rydoo, you can select one of three action options:
- Show warning in expense: If a submitter violates an expense rule, a warning will appear when the submitter submits the expense. In this way, users can immediately ratify the expenses and save the approver some time.
- Auto approve or control: Auto approving and controlling expenses can help you expedite expenses. You can use this feature for fixed and recurring expenses like monthly telecommunication bills.
- Create counter expense: Expenses that go beyond limits can be controlled through counter expenses. A counter expense can be set to the excess amount or a fixed amount. This feature is helpful for you if you want to reimburse employees on allowable amounts.
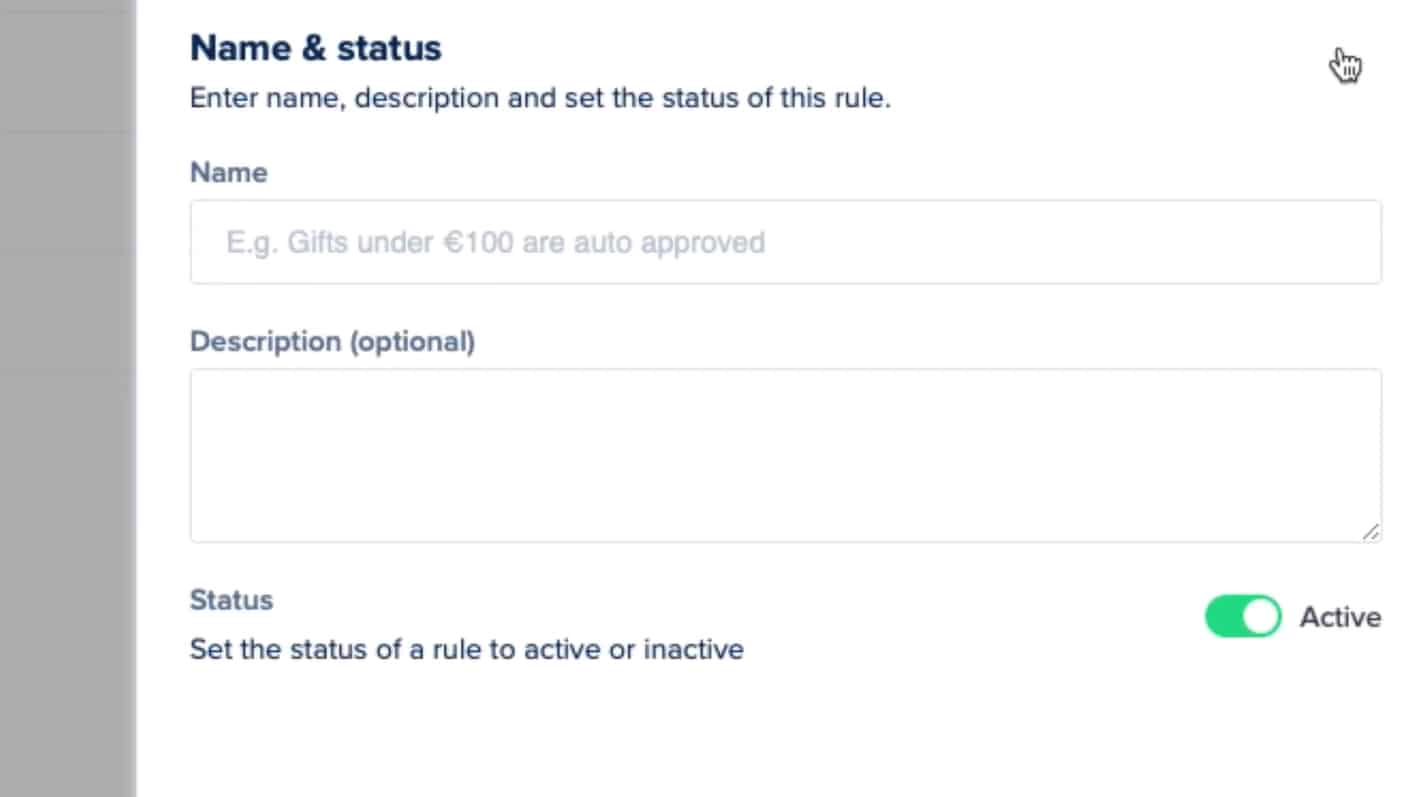
Setting the name of the expense rules (Source: Rydoo Tutorial Videos)
You set the name of the policy for easier identification
Rydoo’s score is good in this criteria because the platform can either integrate with third-party corporate cards or issue prepaid cards (Rydoo Cards). We didn’t award higher marks because Rydoo Cards is an add-on to the expense tracker. Also, Rydoo doesn’t disclose pricing information about its cards, so we’re uncertain whether this add-on will be costly for some small businesses. However, it’s still a win-win for users, especially if they don’t want to let go of the corporate card program.
- Integrating third-party corporate cards means that Rydoo has a direct feed connection with the provider—and all transactions will feed into the expense management system automatically.
- Issuing Rydoo Cards provides more convenience since expenses are reported in real time when someone uses their card—and we believe that this is the edge of Rydoo Cards over third-party corporate cards. Users may also control card spending limits, restrict use, and monitor all expenses charged to the cards. If your business is planning to get corporate cards for business spending, you might want to consider Rydoo Cards.
Rydoo support can be accessed via chat bot, knowledge base, and email. It would be a big plus if Rydoo also has phone support. Its knowledge base is also commendable because it is detailed. You can use it as your main source of information before reaching out to technical support.
We gave it a good ease-of-use score because of its adequate support features. Its multiple integration options make it a flexible pick, but some integrations are add-ons. We can’t say if add-ons come at an additional cost, and it would be a big help for potential customers if Rydoo would disclose add-on pricing.
How We Evaluated Rydoo
As part of our roundup of the best business expense tracker apps, we evaluated Rydoo’s features and capabilities based on the following criteria:
15% of Overall Score
Pricing is an important part of your decision. In evaluating this criterion, we considered factors, such as a free trial, monthly and annual billing options, scalability, plan customizability, and price comparison with competitors.
40% of Overall Score
Since we’re evaluating expense trackers, we placed significant weight on expense tracking features. We evaluated this criterion based on the major expense workflow steps: recording, review, approval, and reimbursement.
25% of Overall Score
We include card programs in our rubric since we believe that expense tracking should be tied to the business’ card program. Here, we considered whether the provider can issue cards or enroll in third-party corporate programs.
20% of Overall Score
The ease of use score revolves around customer support channels, integrations, user reviews, and our expert rating. The software must make it easy for users to access support in case of problems. Moreover, it must have adequate integrations with other software so that it would be easier to insert it into existing business processes. We looked at user reviews from third-party websites for the user review scores. We weighed the comments and made sure that we remained objective in our evaluation.
Frequently Asked Questions (FAQs)
You can try Rydoo for free for 14 days, but there is no free subscription plan.
Yes. However, Rydoo Cards is an add-on to the expense management app. Rydoo doesn’t disclose the pricing for this feature, so you will have to reach out to Rydoo for information.
Bottom Line
Rydoo Expense Management is an app that can help your company report expenses properly because it has application control features that prevent employees from submitting expenses that violate expense rules. However, it lacks a reimbursement system, so you’ll have to process the checks or automatic deposits elsewhere. Overall, it works best for expense management and control, especially if your business has an accounting software or ERP system.