






QuickBooks Free makes it easy for a new business to start keeping its books, but getting the initial setup right is important. Your chart of accounts, opening balances, bank connection, and transaction categories all affect the accuracy of your financial records going forward.
This guide shows you how to set up QuickBooks Free step by step, from creating your account and entering your business information to connecting your bank, reviewing transactions, and checking your first financial reports. I’ll also share practical bookkeeping tips along the way to help you avoid common setup mistakes and start with cleaner books.
QuickBooks Free setup at a glance
Before you start, it helps to know what you'll be setting up and why each step matters. Here's the process we'll follow:
| Step | What you'll do | Go to |
| 1. Create your account | Sign up for QuickBooks Free and create your business account | QuickBooks Free signup page |
| 2. Add your business information | Enter your business name, industry, and other company details | Signup page |
| 3. Review your settings | Check the accounting and company preferences available to you | Settings (upper-right gear icon ⚙) → Your Company → Account and settings |
| 4. Review your chart of accounts | Check the accounts QuickBooks creates and add or edit accounts when needed | Settings → Your Company → Chart of accounts |
| 5. Connect your bank account | Link your business bank account to QuickBooks | All Apps (left menu) → Accounting → Bank transactions → Connect account |
| 6. Add customers and vendors | Create records for the people and businesses you regularly transact with | All Apps → Expenses & Bills → Vendors All Apps → Customer Hub → Customers |
| 7. Set up your starting balances | Enter or verify the balances you had before starting QuickBooks | Settings → Your Company → Chart of accounts → New account |
| 8. Review your transactions | Categorize and verify your first imported transactions | All Apps → Accounting → Bank transactions |
| 9. Review your reports | Check your available financial reports | Reports (left menu) → Standard reports |
Why you can trust Fit Small Business
I have hands-on experience setting up and managing QuickBooks Online for US-based businesses, including onboarding company information, managing accounts payable and receivable, reconciling bank accounts, and preparing monthly financial reports.
I'm also QuickBooks Online certified and have worked with businesses at different stages, from setting up their accounting systems to managing their day-to-day books. For this guide, I personally went through the QuickBooks Free setup and navigation so the steps reflect the actual interface rather than simply relying on the standard QuickBooks Online workflow.


Before you set up QuickBooks Free
Before creating your QuickBooks Free account, gather a few basic details about your business. You won't necessarily need all of them during signup, but having them ready will make it easier to complete the setup without stopping to look for information later.
I recommend having the following on hand:
- Business information: Your legal or operating business name, business type, industry, address, and contact information.
- Business bank and credit card details: Know which accounts you plan to use for the business, especially if you intend to connect them to QuickBooks.
- Starting account balances: If your business was already operating before moving to QuickBooks, note the balances of your bank, credit card, loan, and other accounts as of your chosen start date.
- Customer information: Gather the names and contact details of customers you regularly do business with. You don't need to add every customer during the initial setup.
- Vendor information: Prepare details for suppliers, contractors, and other vendors you regularly pay.
- Existing income and expense categories: If you've been tracking your finances in a spreadsheet or another accounting system, review the categories you've been using. This can help when reviewing your QuickBooks chart of accounts.
- Your QuickBooks start date: Decide when you want to begin keeping your books in QuickBooks. This is particularly important if you're moving an existing business into QuickBooks rather than starting the books on the first day of operations.
How to set up QuickBooks Free
Once you have your business information ready, you can start setting up your account. I recommend completing the following steps in order, particularly if you're setting up the books for a new business.
Step 1: Create your QuickBooks Free account
Go to the QuickBooks Free sign-up page and create your account. Sign in with an existing Intuit account, or create one if you're new to QuickBooks.
During sign-up, QuickBooks will ask for some basic information about you and your business. Follow the prompts to create your company and access the QuickBooks Free dashboard.
If you already use another Intuit product, make sure you're signing in with the Intuit account you want associated with this business. This can help avoid accidentally creating the company under a different login.
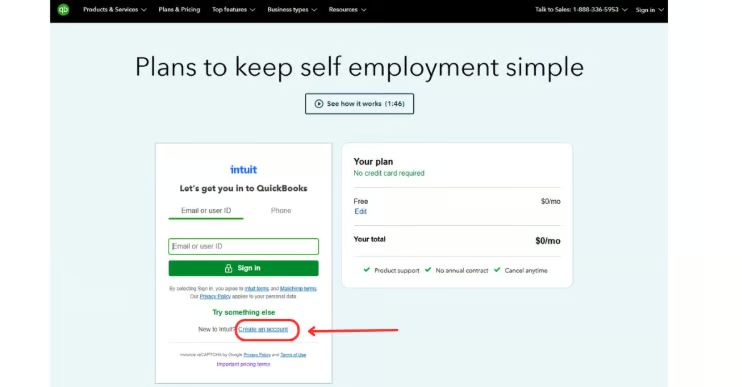
What to check before moving on: Once you're in QuickBooks Free, confirm you're working in the correct company before continuing the setup.
Step 2: Add your business information
As part of the sign-up process, QuickBooks Free asks for some basic information about your business. Take the time to enter these details accurately, as QuickBooks uses them to set up your company and tailor the initial experience to your business.
You'll be asked to provide the following:
- Business name: Use the business name you normally use for your records so it's easy to recognize your company later.
- Industry: Choose the option that most closely matches what your business does. If you can't find an exact match, select the closest available industry.
- Business tax type: Select how your business is structured for tax purposes from the options provided. Make sure you choose the correct type, especially if your business is already established.
- Previous year's annual revenue: Select the revenue range that best represents how much your business earned in the previous year. If you're setting up a brand-new business, choose the option that best reflects your situation.
- Your business role: Tell QuickBooks your role in the business, such as whether you're the owner or responsible for managing the books.
- Number of employees: Select the option that reflects the current size of your workforce.
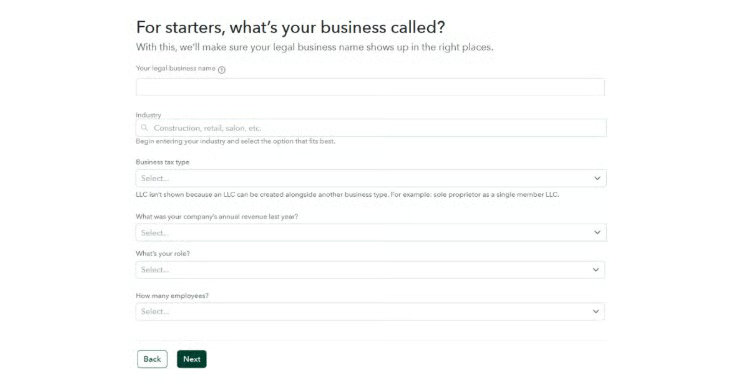
If QuickBooks asks additional questions about how you plan to use the software, answer based on what your business needs today rather than selecting features you might use someday. You can continue configuring your account after signup.
Step 3: Review your settings
After completing the initial sign-up, review your company settings before you start recording transactions. QuickBooks Free provides default settings, but I recommend checking them yourself to make sure the information and preferences match how your business operates.
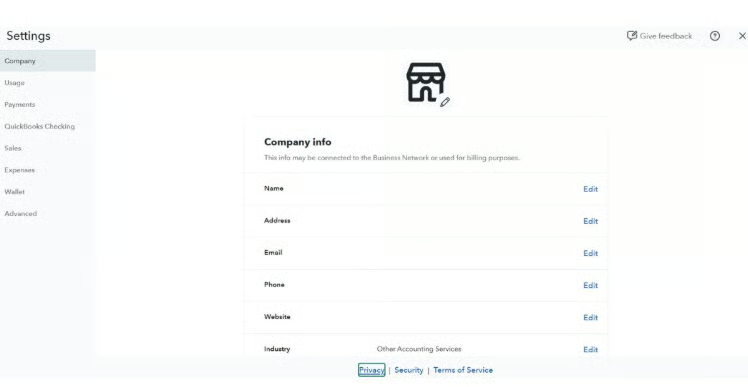
Go to Settings (gear icon in the upper-right corner) → Your Company → Account and settings.
Start by reviewing the business information you entered during signup. Check your company name, contact details, address, and other available company information, and correct anything that's incomplete or inaccurate.
Next, work through the available settings and preferences. You don't need to change something simply because an option is available. For a new business, I recommend focusing on settings that affect how transactions are recorded, how your business information appears in QuickBooks, and the accounting period you use.
Pay particular attention to these areas when available:
- Company information: Confirm your business name, address, email, and other identifying details.
- Accounting preferences: Review settings related to your accounting year and how QuickBooks handles your books.
- Sales and expense preferences: Check the available options based on how your business receives income and pays expenses.
- Advanced settings: Review accounting-related options rather than automatically accepting every default.
Step 4: Review your chart of accounts
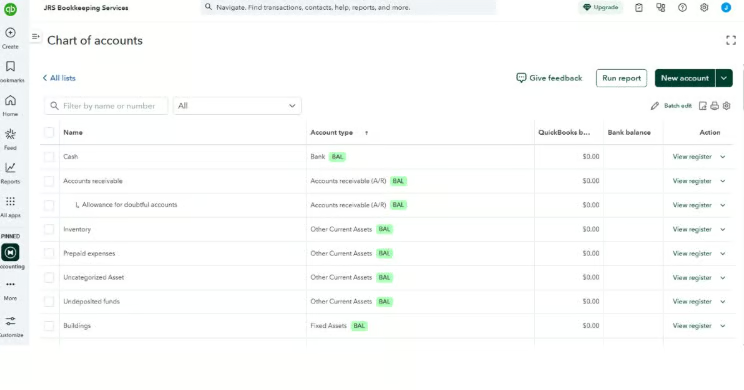
Your chart of accounts is the foundation of your bookkeeping because it determines where QuickBooks records and organizes your financial activity. Before you start categorizing transactions, review the accounts QuickBooks Free has created and make sure they fit your business.
Go to Settings → Your Company → Chart of accounts.
You'll see accounts used to organize your assets, liabilities, equity, income, and expenses. QuickBooks may already provide many of the accounts a new business needs, so don't assume you need to create a new account for every type of transaction.
Start by reviewing the existing accounts and ask whether they reflect how you want to track your business. For example, a service business might need separate income accounts for consulting and other services, while a business spending heavily on advertising may want an expense account that clearly separates those costs from other operating expenses.
To add an account, click New account and select the appropriate account type and other information requested by QuickBooks. Use clear account names that will still make sense when you review your reports months later.
Accounts a new business may need
Your exact chart of accounts will depend on your business, but these are some common examples:
| Account | Account type | Example |
| Business checking | Bank | Primary operating bank account |
| Business credit card | Credit card | Credit card used for business purchases |
| Accounts receivable | Accounts receivable | Money customers owe the business |
| Accounts payable | Accounts payable | Bills the business owes vendors |
| Sales or service income | Income | Revenue from your primary business activity |
| Advertising and marketing | Expense | Online ads, promotions, and marketing costs |
| Rent | Expense | Office or commercial space rent |
| Software and subscriptions | Expense | Business software and online services |
| Professional fees | Expense | Accounting, legal, or consulting fees |
| Owner's equity | Equity | Owner contributions and other equity activity |
You don't need to create every account in this table. Only add accounts that apply to your business, and first check whether QuickBooks has already created an appropriate account.
Step 5: Connect your bank account
Connecting your business bank account is one of the most useful setup steps in QuickBooks Free because it allows transactions to flow automatically into QuickBooks instead of requiring you to enter each one manually.
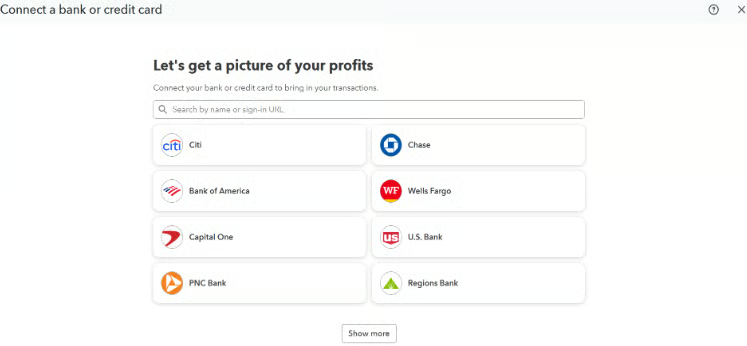
Go to All Apps → Accounting → Bank transactions → Connect account.
Search for your financial institution and follow the prompts to sign in and authorize the connection. QuickBooks will then ask which bank or credit card accounts you want to connect. If you have several accounts with the same bank, select only those you use for the business.
Depending on the connection, QuickBooks may also ask how far back you want to import transactions. Pay close attention to the starting date you select, especially if you plan to enter opening balances or import historical transactions separately. Overlapping periods can result in duplicate transactions that you'll have to clean up later.
Once the connection is established, downloaded transactions will appear in Bank transactions for you to review. QuickBooks may suggest categories or matches, but you should still verify them before adding or confirming transactions in your books.
What to check after connecting your bank
Before moving on, confirm that:
- The correct bank or credit card account is connected.
- The account is mapped to the appropriate account in your chart of accounts.
- The imported transaction period starts where you intended.
- You haven't imported transactions that were already entered manually.
- The opening balance and downloaded transactions won't result in the same activity being recorded twice.
Note: Don't categorize all of the downloaded transactions yet. We'll handle that separately in Step 8: Review your transactions, where we can explain matching, categorization, transfers, and avoiding duplicates in more detail.
Step 6: Add customers and vendors
You don't need to add every customer and vendor before you start using QuickBooks Free. However, setting up the people and businesses you regularly transact with makes it easier to keep income and expenses organized as transactions flow into your books.
QuickBooks Free keeps customers and vendors in separate areas, so you'll set them up individually.
Add your customers
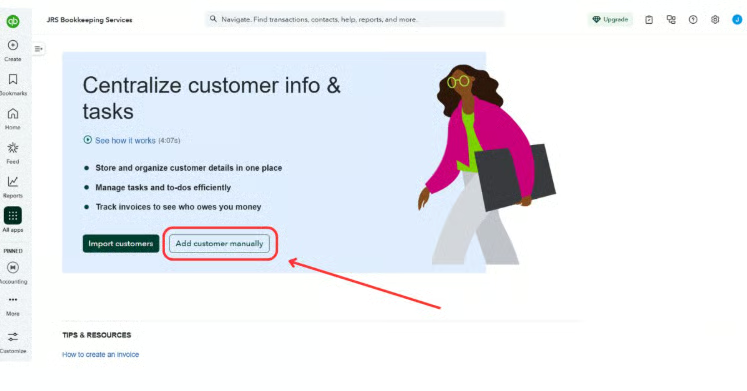
Go to All Apps → Customer Hub → Customers.
Add customers you expect to do business with regularly. Depending on the information available in QuickBooks Free, you can enter details such as the customer's name, company, email address, phone number, billing address, and other contact information.
You don't have to build a complete customer database on day one. For a new business, I recommend starting with active customers and adding new ones as you begin working with them.
Add your vendors
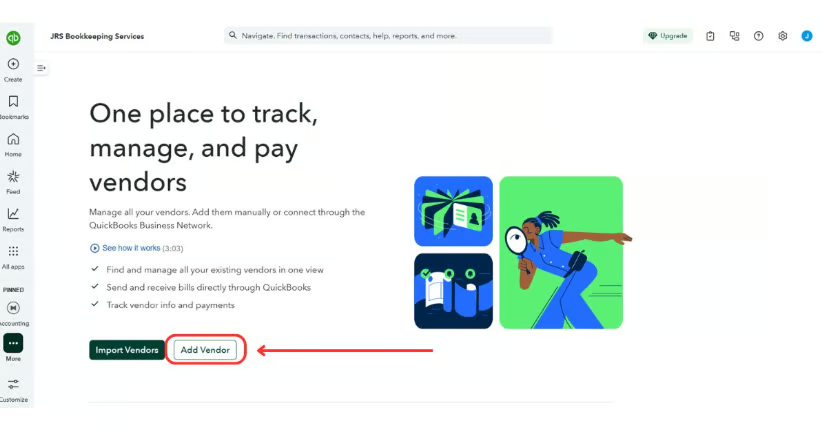
Go to All Apps → Expenses & Bills → Vendors.
Vendors are the businesses or individuals you purchase goods or services from. These might include suppliers, contractors, landlords, professional service providers, or other businesses you pay regularly.
Enter the vendor's name and relevant contact information. Using consistent vendor names is especially important because it makes it easier to track spending with the same supplier and review vendor activity later.
Who should you add during setup?
Focus on the contacts you're likely to use immediately:
| Add now | Add later as needed |
| Regular customers | One-time customers |
| Major suppliers | Occasional suppliers |
| Contractors you pay regularly | Vendors used for infrequent purchases |
| Landlord or other recurring vendors | New vendors you haven't transacted with yet |
There's no benefit to filling QuickBooks with customer and vendor records you may never use. You can always add a new contact when the first transaction occurs.
Step 7: Set up your starting balances
If your business already had money in the bank, credit card balances, loans, or other assets and liabilities before you started using QuickBooks Free, you need to establish where your books will begin. These are your opening balances.
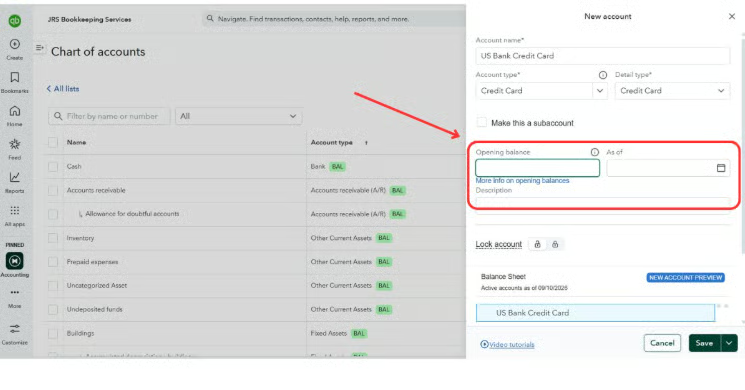
Go to Settings → Your Company → Chart of accounts → New account.
When creating an account, select the appropriate account type and enter the opening balance information when available. The balance should reflect what the account actually held as of the date you begin tracking it in QuickBooks.
For example, suppose you decide to start your QuickBooks books on September 1, and your business checking account had a balance of $8,000 at the end of August 31. That $8,000 represents the balance you're bringing into QuickBooks—not income earned on September 1.
This is why the opening balance date matters just as much as the amount. Your opening balance, start date, and the historical transactions you bring into QuickBooks need to work together.
Be careful when you've connected your bank account
If you connected your bank in Step 5 and downloaded historical transactions, don't automatically enter an opening balance without considering the transactions being imported.
For example, if your opening balance already includes transactions through August 31 and you also bring those same transactions into QuickBooks as historical activity, you could end up overstating the account balance.
Decide where your QuickBooks records will begin and use that date consistently.
Opening balances you may need to review
Depending on how established your business is, this could include your bank accounts, credit cards, loans, other assets and liabilities, and owner equity. A brand-new business starting QuickBooks from day one may have very few opening balances to enter.
Once you've entered your starting balances, don't assume they're correct simply because QuickBooks accepted them. Compare them with your source records before moving on.
Step 8: Review your transactions
After connecting your bank account, QuickBooks Free will bring downloaded activity into the Bank transactions area for review.
Go to All Apps → Accounting → Bank transactions.
This is where you'll decide how each downloaded transaction should be recorded in your books. QuickBooks may suggest a category based on the transaction details, but don't assume every suggestion is correct. Review each transaction before accepting it.
For each transaction, check the date, description or payee, amount, and suggested category. Make sure the category reflects what the transaction was actually for. For example, a payment to an internet provider might belong under an internet or utilities expense account rather than a generic expense category.
Pay particular attention to these types of transactions:
- Income: Make sure customer payments and other deposits are recorded to the appropriate income account rather than automatically treating every deposit as sales.
- Expenses: Categorize purchases based on their business purpose, not simply the merchant name.
- Transfers: Money moved between two of your own accounts generally shouldn't be recorded as income or an expense.
- Credit card payments: A payment from your checking account to your business credit card is generally a transfer between accounts, not another expense. The individual credit card purchases are what generate the expenses.
- Owner contributions and withdrawals: Money you put into or take out of the business may need to be recorded to an equity account rather than income or expense.
- Potential matches: If QuickBooks finds an existing transaction that appears to correspond with the downloaded bank activity, review the match before creating a new transaction.
Watch for duplicate transactions
Duplicates are especially important to catch when you're first setting up QuickBooks. They can occur when you manually enter a transaction and then add the same transaction again after it downloads from your bank.
For example, suppose you already recorded a $500 expense in QuickBooks. When the $500 payment later appears in your bank feed, adding it as a new expense would record $1,000 of expenses even though only $500 actually left your bank account.
If QuickBooks identifies an existing transaction, review whether it should be matched rather than added as something new.
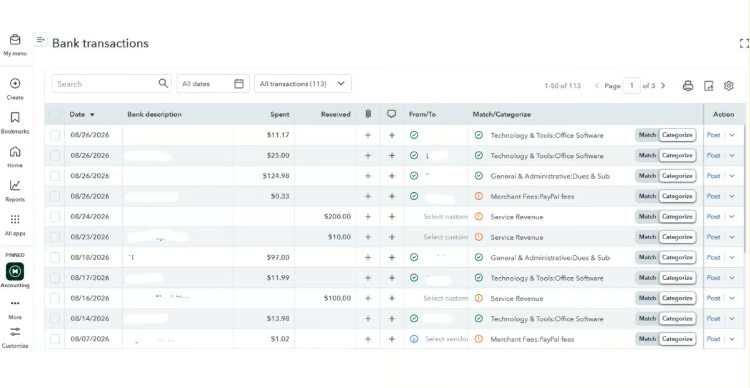
You don't have to review months of transactions all at once. For ongoing bookkeeping, it's better to review the bank feed regularly while transactions are still familiar and supporting documents are easier to find.
Step 9: Review your financial reports
Before considering your QuickBooks Free setup complete, review your financial reports. This gives you a chance to spot incorrect balances, unusual categories, or other setup issues before you continue adding transactions.
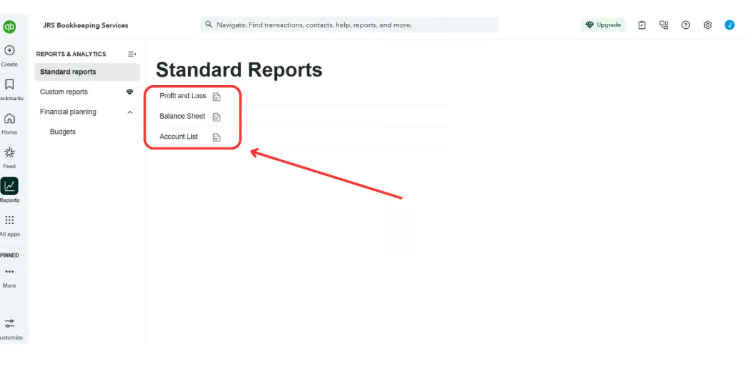
Go to Reports → Standard reports from the left menu.
Start with the core reports available in your QuickBooks Free account. In particular, review your Profit and Loss and Balance Sheet, if available. These reports show different sides of your business finances: the Profit and Loss summarizes income and expenses over a period, while the Balance Sheet shows what your business owns and owes at a specific point in time.
At this stage, you're not necessarily looking for sophisticated financial insights. You're checking whether the numbers make sense based on what you know about the business.
What to check in your reports
When reviewing your first reports, look for:
- Unexpected income or expenses: A large amount in the wrong category could indicate that transactions were miscategorized.
- Unusual account balances: Compare bank and credit card balances with your actual records, especially if you entered opening balances.
- Negative balances that don't make sense: These can sometimes point to missing transactions, incorrect opening balances, or transactions posted to the wrong account.
- Uncategorized transactions: Review transactions that haven't been assigned to the appropriate account.
- Duplicate amounts: If income or expenses appear higher than expected, check whether transactions were both manually entered and added again through the bank feed.
- Transfers recorded as income or expenses: Moving money between your own accounts shouldn't normally increase your revenue or expenses.
If something doesn't look right, click into the report details when possible and trace the amount back to the underlying transactions. It's much easier to correct a setup problem now than after several months of additional activity have been recorded.
Once your balances and reports look reasonable, you've completed the initial QuickBooks Free setup. From here, the focus shifts from setting up your books to maintaining them regularly.
QuickBooks Free setup checklist
Before you start using QuickBooks Free for your day-to-day bookkeeping, use this checklist to make sure the essentials are in place:
☐ QuickBooks Free account created: You can access the correct company using your Intuit account.
☐ Business information entered: Your business name, industry, tax type, and other sign-up information are correct.
☐ Company settings reviewed: You've checked the available settings and accounting preferences.
☐ Chart of accounts reviewed: The accounts you need are properly set up without unnecessary or duplicate accounts.
☐ Bank and credit card accounts connected: The correct business accounts are linked and importing transactions.
☐ Customers and vendors added: Your regular customers and vendors are set up as needed.
☐ Starting balances verified: Opening balances and dates agree with your bank statements or other source records.
☐ Downloaded transactions reviewed: Transactions are properly categorized or matched, with transfers and credit card payments handled correctly.
☐ Financial reports checked: You've reviewed your initial reports and investigated balances or amounts that don't look right.
Completing the setup doesn't mean your bookkeeping is finished. From this point forward, you'll need to keep your transactions reviewed and your books up to date. But starting with a clean setup makes that ongoing work much easier.
Common QuickBooks Free setup mistakes to avoid
QuickBooks Free is relatively easy to set up, but a few mistakes at the beginning can create problems that become harder to find once you have months of transactions in the books. Based on the bookkeeping cleanups I've handled, these are the areas I would pay particular attention to.
Using personal accounts for business transactions
Connecting a personal bank or credit card account can bring hundreds of unrelated transactions into your business books. Even if you can categorize personal spending separately, it adds unnecessary work and increases the chance of errors.
Whenever possible, use dedicated business bank and credit card accounts and connect only those accounts you actually want included in your bookkeeping.
Creating too many accounts
It's tempting to create a new expense account every time you encounter a different type of purchase. Over time, however, this can leave you with a long and difficult-to-manage chart of accounts.
Create separate accounts when the information will actually be useful for reporting, tax preparation, or business decisions. You probably don't need separate expense accounts for every individual vendor you pay.
Accepting bank feed suggestions without reviewing them
QuickBooks can suggest categories for downloaded transactions, but those suggestions still need your review. A merchant name alone doesn't always tell QuickBooks the business purpose of a purchase.
For example, two purchases from the same retailer could be for office supplies and equipment. Categorizing both automatically into the same account could make your financial reports less accurate.
Recording transfers as income or expenses
Moving $2,000 from your business checking account to your business savings account doesn't mean your business earned another $2,000. Likewise, paying your business credit card from your checking account doesn't create another expense.
These transactions generally need to be recorded as transfers between accounts so you don't overstate your income or expenses.
Entering an incorrect opening balance
Your opening balance establishes where an account begins in QuickBooks. An incorrect amount or date can cause problems later, particularly when you try to reconcile the account.
Use an actual bank, credit card, or loan statement to support the opening balance rather than estimating it.
Recording the same transaction twice
This often happens when a transaction is entered manually and then downloaded through the bank feed. If you add the downloaded transaction instead of matching it to the existing entry, the transaction can appear twice in your books.
Always check for an existing transaction before adding downloaded activity.
Setting up QuickBooks and never reviewing the reports
A transaction can look reasonable by itself but still create an obvious problem when viewed as part of your financial statements. That's why I recommend reviewing your reports after the initial setup and regularly afterward.
If an account balance, income figure, or expense suddenly looks much higher or lower than expected, investigate it rather than assuming the books are correct simply because all the bank transactions have been reviewed.
What to do after setting up QuickBooks Free
Once QuickBooks Free is set up, the goal is to keep your books current rather than letting transactions pile up until tax time. You don't necessarily need to work in QuickBooks every day. For many new businesses, a simple weekly and monthly routine is enough to keep the books organized.
Weekly bookkeeping tasks
Set aside time each week to:
- Review downloaded bank transactions. Categorize new income and expenses and check QuickBooks' suggested categories before accepting them.
- Match existing transactions. If a downloaded transaction was already recorded, match it rather than creating another entry.
- Review transfers and credit card payments. Make sure movements between your own accounts aren't being recorded as additional income or expenses.
- Add new customers and vendors as needed. There's no need to create every contact in advance.
- Investigate unfamiliar transactions. It's much easier to determine what a purchase was for a few days later than several months later.
Monthly bookkeeping tasks
At the end of each month:
- Review your bank and credit card activity. Check that the transactions recorded in QuickBooks agree with your financial institution's records.
- Look for uncategorized or duplicate transactions. Clean these up before moving into another month.
- Review your Profit and Loss. Compare income and expenses with what you expected for the month and investigate unusual amounts.
- Review your Balance Sheet, if available. Pay particular attention to bank, credit card, loan, and equity balances.
- Correct errors while they're still recent. Don't allow a known issue to carry forward simply because the overall numbers appear close.
As your business grows, this routine may become more involved. You may eventually need more detailed reporting, additional users, inventory tracking, or other accounting features that aren't available in QuickBooks Free.
When QuickBooks Free may no longer be enough
QuickBooks Free can work well when your bookkeeping needs are relatively simple. As your business grows, however, you may reach a point where the features you're missing cost you more in time and manual work than you're saving by using free software.
Consider moving to a paid QuickBooks plan when you need:
- More users: If a business partner, employee, or bookkeeper needs regular access to your books, the single-user limitation can become restrictive.
- More advanced reporting: Growing businesses may need greater reporting detail to analyze performance, expenses, profitability, and other financial information.
- Inventory tracking: If you start buying, stocking, and selling physical products, you'll likely need accounting software that can properly track inventory activity.
- More advanced accounting tools: More complex bookkeeping may require features and workflows that aren't included with QuickBooks Free.
Don't upgrade simply because your revenue has increased. The better question is whether QuickBooks Free still supports the way you need to manage your books.
For example, a service-based business earning significantly more than when it started might still have simple bookkeeping needs and be perfectly comfortable with QuickBooks Free. Meanwhile, a smaller product-based business could outgrow it much sooner because it needs inventory tracking.
I’ve taken a deeper look at where QuickBooks Free works well and where its limitations start to matter. For a complete breakdown of its features, benefits, limitations, and ideal users, read my QuickBooks Free for Freelancers and Solopreneurs: Benefits, Limits & Setup.
Frequently asked questions (FAQs)
How long does it take to set up QuickBooks Free?
The initial setup can be relatively quick if you already have your business information and financial records available. However, connecting accounts, reviewing your chart of accounts, entering opening balances, and reviewing historical transactions can take longer, particularly if your business has already been operating for some time.
I recommend focusing on accuracy rather than speed. Spending additional time getting your opening balances and accounts right can save considerably more time on cleanup later.
Do I need an accountant or bookkeeper to set up QuickBooks Free?
Not necessarily. A new business with straightforward finances can follow the setup process and manage QuickBooks Free independently.
Professional help may be worthwhile if you're moving existing books into QuickBooks, have multiple bank or credit card accounts, aren't sure how to enter opening balances, or have transactions you don't know how to categorize. Even a one-time setup review can help identify problems before they carry forward.
What date should I use when starting QuickBooks Free?
Choose a clear date from which you want QuickBooks to become your accounting record. For an existing business, the beginning of a month or fiscal year can provide a cleaner starting point, but the best date depends on how much historical information you need in QuickBooks.
Whatever date you choose, make sure your opening balances and imported transactions use the same starting point so you don't create gaps or duplicates.
Can I use QuickBooks Free if my business is already operating?
Yes, but setting up an existing business usually requires more work than starting with a brand-new business. You'll need to determine your starting date, establish accurate opening balances, and decide how much historical transaction activity you want to bring into QuickBooks.
Use bank statements and existing accounting records rather than estimating your starting balances.
Can I change my QuickBooks Free setup later?
Yes, you can update many business details, accounts, customers, vendors, and preferences as your business changes. However, be more cautious when changing accounting-related information after you've begun recording transactions.