

QuickBooks Online can help you organize and track your personal finances, just like it helps small businesses manage their accounting tasks. I’ll show you how to use QuickBooks for personal use, from adding income and expense accounts and creating classes, to classifying imported transactions and creating a budget.
- Step 1: Create income and expense accounts.
- Step 2: Add vendors and customers.
- Step 3: Create balance sheet accounts.
- Step 4: Create classes.
- Step 5: Connect bank and credit card accounts.
- Step 6: Classify imported transactions.
- Step 7: Record and track your finances.
- Step 8: Create a budget.
- Other ways you can use QuickBooks for personal finances
- Frequently asked questions (FAQs)
Step 1: Create income and expense accounts.
Imagine this: Every type of financial transaction has its own labeled folder, like sales, expenses, and payroll. You file each document into the appropriate folder so that you can easily find it later. Then, all those folders live inside a filing cabinet that keeps everything organized and accessible.
That filing cabinet? That’s your chart of accounts. Each account is a folder, and the chart of accounts is the master cabinet that holds them all.
The chart of accounts in QuickBooks is a list of all the accounts you will use to manage your personal finances. By default, QuickBooks Online has no special chart of accounts for personal use, but you can add accounts to fit your needs.
An expense is any transaction that involves using up a resource or spending money. Paying for professional fees? That’s an expense. Using office supplies? Also an expense.
In QuickBooks Online, expenses represent the things your business spends money on. You’ll also track the vendors, people, or companies you pay for those goods or services. Below are examples of expenses and their respective expense account title.
| Type of expense | Expense account title |
|---|---|
| Paid $1,400 to Riverdale Apartments for June rent | Housing expenses |
| Paid $165.42 to City Utilities Authority for electricity, gas, and water bills | Utilities |
| Spent $238.76 at Trader Joe's on groceries and home essentials | Food and supplies |
| Hired HomeFix Pros to repair the A/C and paid $320 | Home maintenance costs |
| Made a $375 payment to Auto Loan Services toward the car loan | Auto loan |
| Charged $212.50 to BrightHealth Insurance for the monthly premium | Health insurance |
| Grabbed lunch at Chick-fil-A and spent $18.42 | Meals & entertainment |
| Streaming services billed: $15.49 from Netflix and $10.99 from Spotify | Subscription expenses |
| Booked a summer rental on Airbnb for $842 for the Asheville trip | Travel & entertainment |
To add a new expense account, click on the cog wheel (⚙︎) in the top right corner of your dashboard and then select Chart of accounts under the YOUR COMPANY column, as shown below. Remember this step, as this is also where you’ll add your other accounts, including assets and loans.
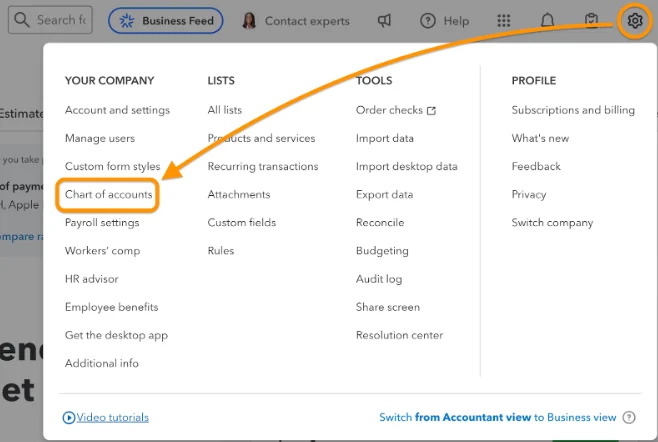
Navigating to “Chart of accounts” in QuickBooks Online
From the Chart of accounts window, click the green New button on the top right, and complete the form in the new account panel. Name your new account, choose “Expenses” as the account type, and select the appropriate detail type that best describes the account. You may also add a description if needed.
When you’re done, click Save.
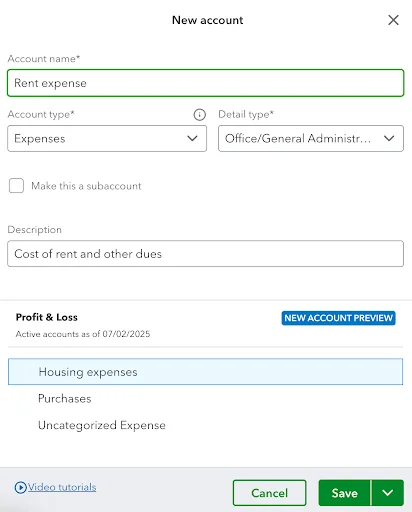
Creating a new expense account in QuickBooks Online
Want more guidance in creating expense accounts? Read my guide to QuickBooks expense categories, where I go into more detail about how to design your expense accounts intuitively.
Income accounts record your sources of income, such as sales or fees earned. Below is a list of sample income sources and their corresponding account titles.
| Type of income | Income account title |
|---|---|
| Received $3,800 from Acme Corp as net pay for June. | Full-time job salary |
| Received $750 from a freelance project with Apex Media | Freelance income |
| Collected $1,200 from tenant for June rent on the apartment | Rent income |
| Received $92.30 in dividend payouts from index fund | Dividend income |
Using the same form in expense account creation, you must create an income account with appropriate details. Name your new income account, select “Income” as the account type, and pick the appropriate detail type.
Click the green Save button to finish.
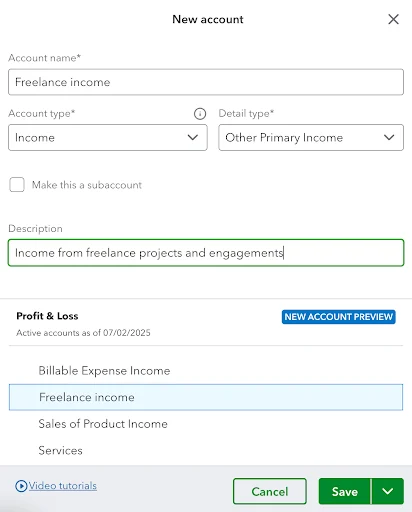
Adding a new income account in QuickBooks Online
Step 2: Add vendors and customers.
Think of your business like a storybook. Each income or expense is a scene, and the story becomes much clearer when you include the characters involved.
- Vendors are like supporting characters who provide tools, supplies, or services to move the plot forward.
- Expenses are always linked to vendors since you purchase from them.
- Customers are your main audience, the ones you’re delivering value to.
- Income is always linked to customers since you sell to them.
To add a new vendor or supplier, click Expenses in the left menu bar, and select Suppliers.
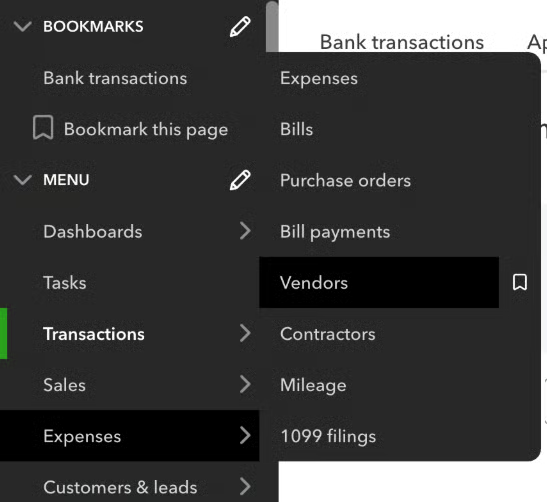
Navigating to “Suppliers” in QuickBooks Online
From the new form, provide the required information, such as the vendor’s name, company if applicable, address, and contact details. At the very least, you must provide the name and the display name.
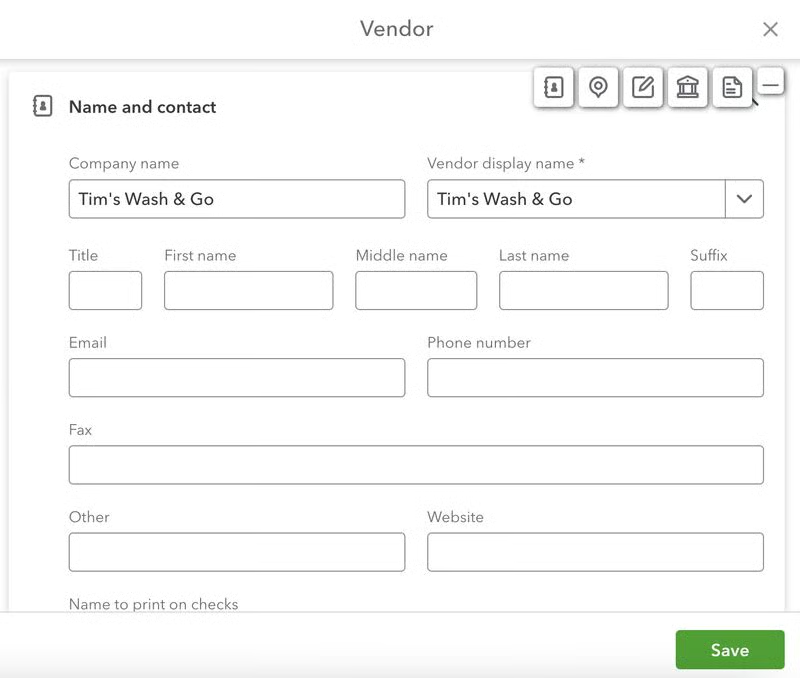
Adding a new vendor or supplier in QuickBooks Online
To record a new customer, click on the Customers & leads menu and then choose Customers.
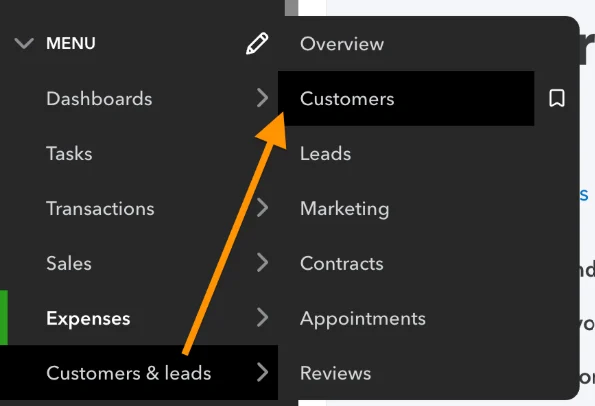
Navigate to “Customers” in QuickBooks Online
Click the New customer button in the Customer screen and complete the new customer creation form.
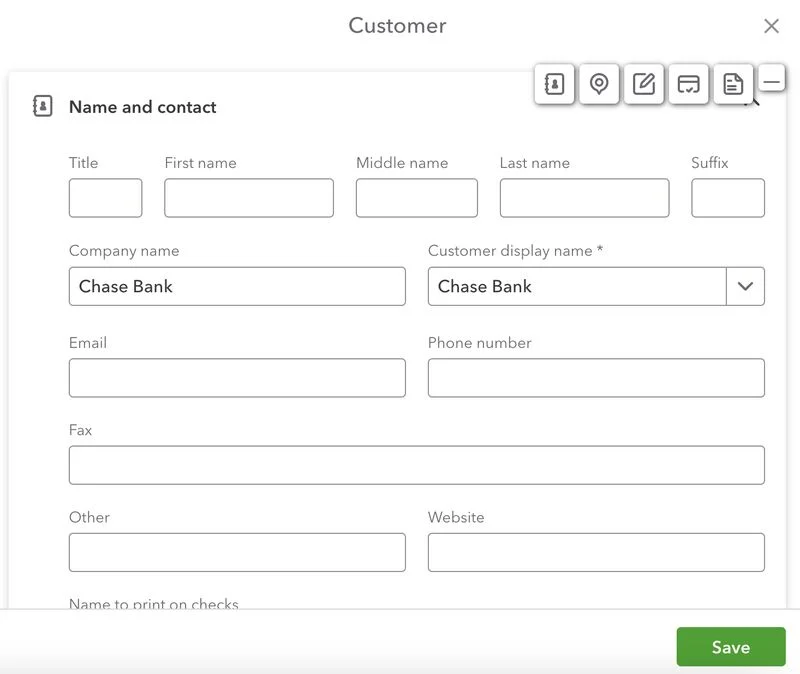
Adding a new customer in QuickBooks Online
Step 3: Create balance sheet accounts.
Besides monitoring your income and expenses, QuickBooks can track what you own and owe using a balance sheet. Make a list of your assets (like cars, jewelry, computers, and bank accounts) and your debts (such as student loans, mortgages, or credit lines), then enter them into the chart of accounts.
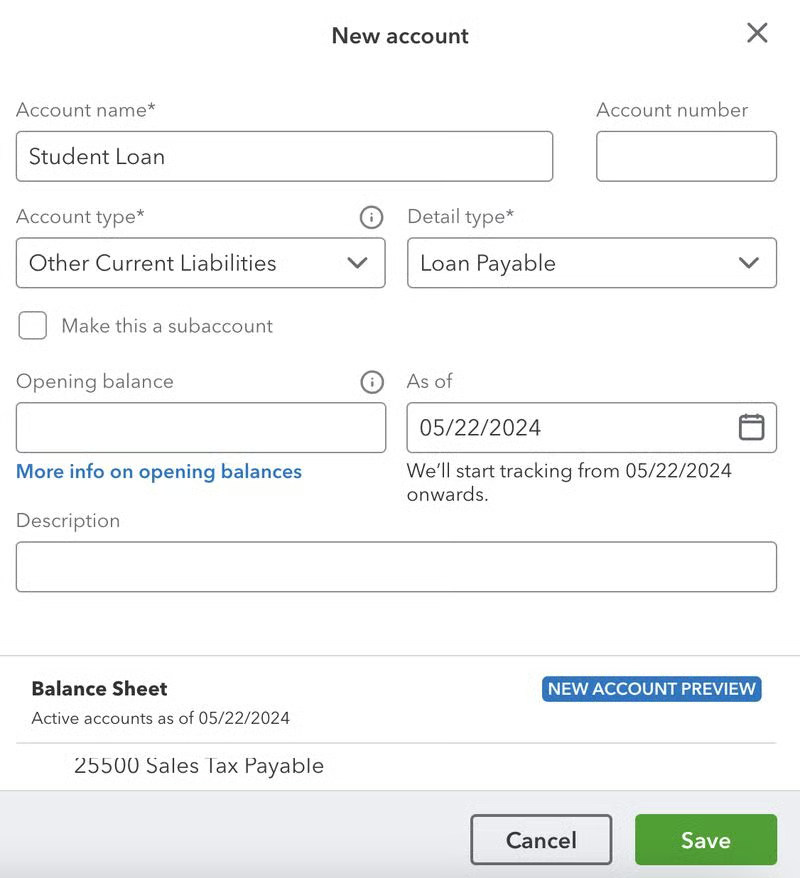
From the chart of accounts creation window, name your asset, select “Current Assets” as the account type, and choose the appropriate detail type. Also, select the starting date (As of field) and the current value of your asset account (Opening balance field).
Click the Save button when you’re done.
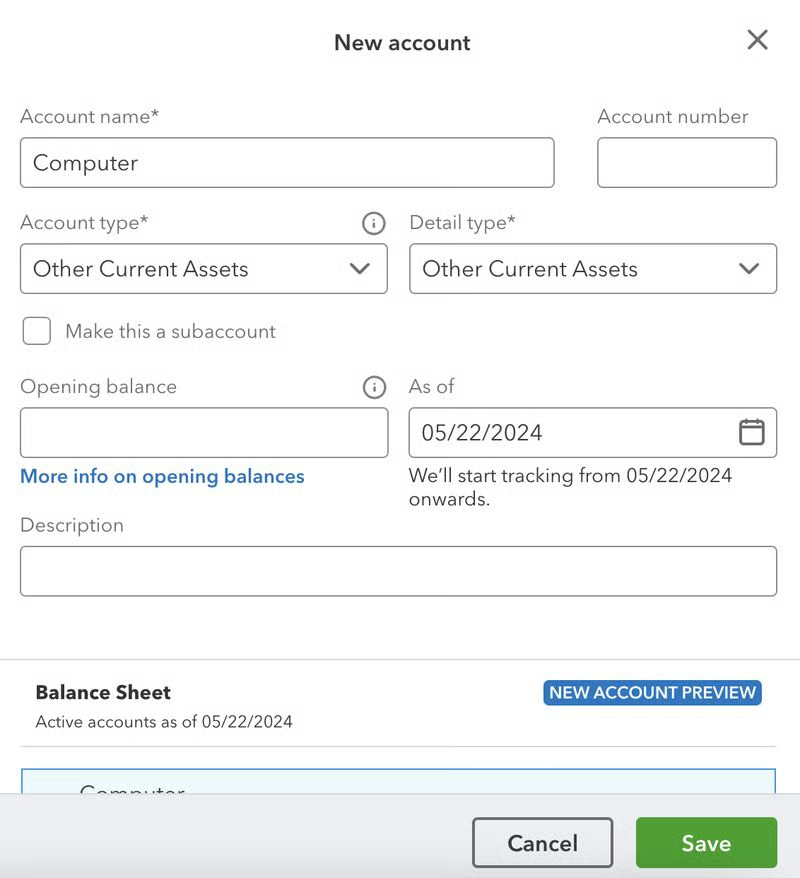
Adding asset accounts in QuickBooks Online
To record a liability account, select “Current liabilities” as the account type, and specify the name, detail type, and the unpaid balance as of the date.
You can later run a balance sheet report, which will provide meaningful insights into your financial situation. Follow our step-by-step tutorial on
creating a balance sheet in QuickBooks Online
.
Step 4: Create classes.
Think of classes in QuickBooks like labeled envelopes for your cash: one for groceries, one for rent, one for your side hustle. They let you see exactly where your money is coming from and going to.
Classes in QuickBooks Online allow you to track all your activity by very specific elements of your finances. This feature is particularly useful if you have several income sources and expense accounts and want to track them separately. You’ll need at least QuickBooks Plus to use the Classes feature.
Here are examples of classes you may use in QuickBooks Online:
- Personal: Any transaction without tax deductions can be tagged as “Personal.”
- Itemized deductions for Schedule A: You may create “Schedule A” classes for items that are eligible for deductions, including qualified medical expenses, mortgage interest, sales tax payments, state and local taxes, and charitable contributions.
- Part-time gigs: You can create a separate class for each part-time job (e.g., “Bartending,” “Delivery driving,” and “Landscaping”). You can even create a subclass, like “Delivery driving-nightshift” and “Delivery driving-dayshift.”
- Rental expenses: If you have both personal rent and business rent expenses, then you can create classes for “Personal Rent” and “Business Rent” to track them separately.
By default, the class tracking feature in QuickBooks Online is disabled. To turn it on, click the cog wheel, select Accounts and Settings, and then click Advanced on the left menu panel. Under Categories, toggle Track classes to “on” and then click the Save button.

Toggling class tracking on in QuickBooks
After you turn class tracking on, click on the cog wheel, and select All Lists from the Lists section. Then, from the Lists window, click on Classes, and from here, you’ll be able to add a new class and see existing classes.
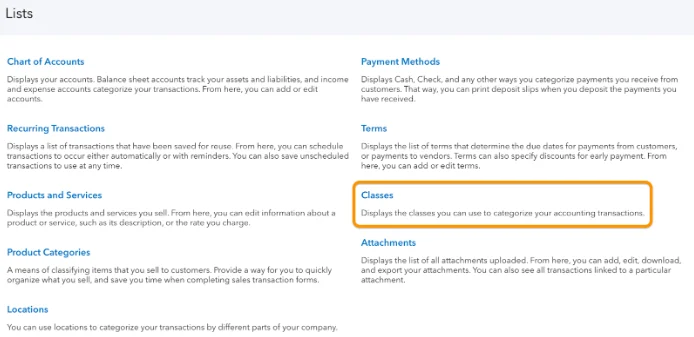
Navigate to classes in QuickBooks Online
Select the New button, and name the new class. If it has a parent class, then tick the Is sub-class option and enter the parent class. Click Save to continue.
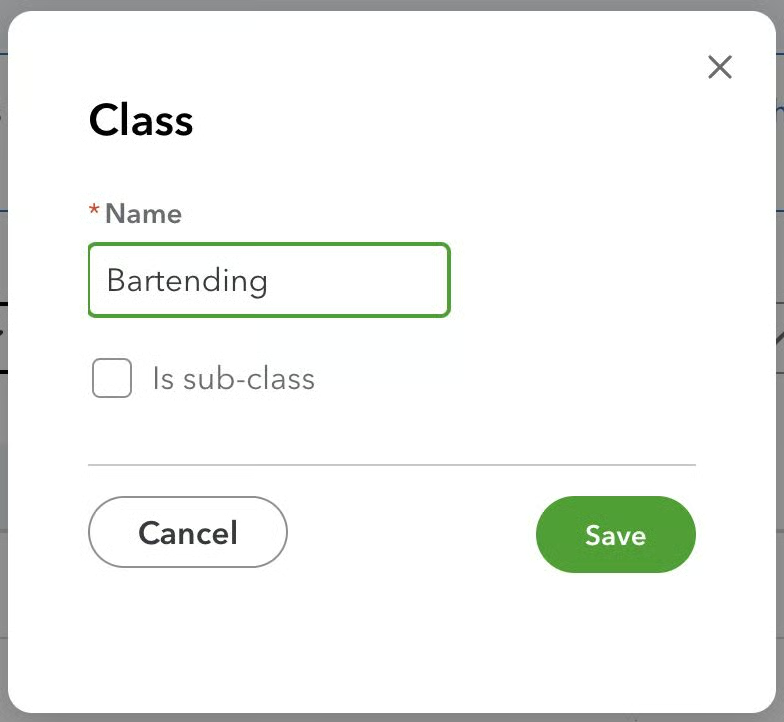
Adding a new class in QuickBooks
Step 5: Connect bank and credit card accounts.
While you can manually add banks in the chart of accounts, you might prefer to connect them to QuickBooks Online to save time. When you connect your bank and credit card accounts to QuickBooks, the program will download your transactions automatically daily.
To connect your bank and/or credit card account, navigate to Bank Transactions under Transactions on the left panel menu. Click Connect account or Link account, and find your bank on the display list. You may also type your bank in the search bar if you don’t see yours on the list.
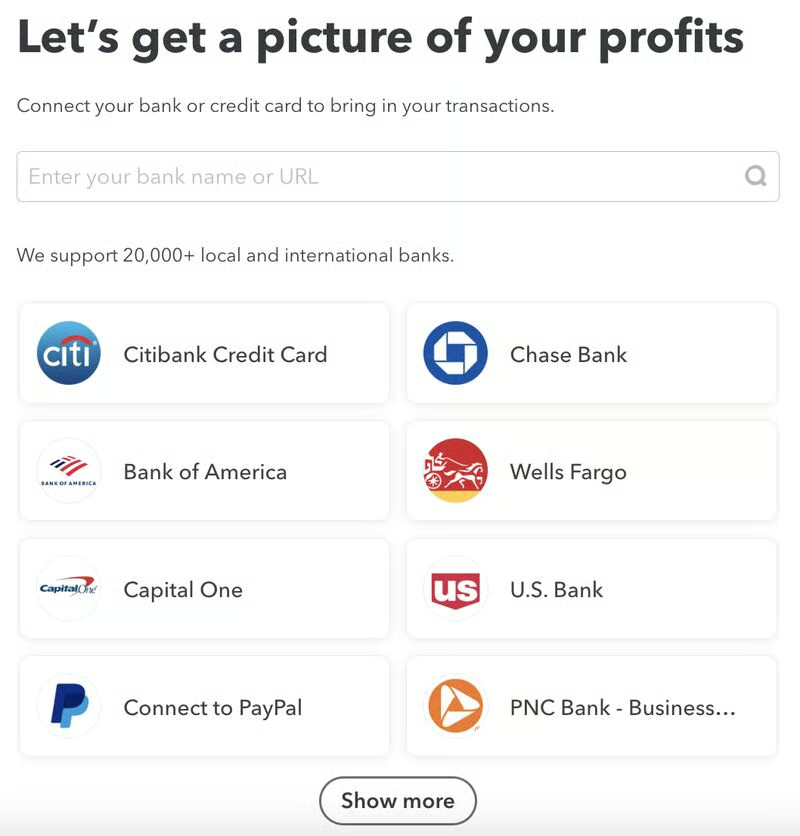
Connecting your bank to QuickBooks
Follow the prompts until you connect your bank or credit card account successfully. The steps may vary depending on your bank or credit card provider. On rare occasions when QuickBooks Online does not support your bank, you can manually add it through the chart of accounts.
Step 6: Classify imported transactions.
Now that your bank and credit card accounts are connected, QuickBooks Online will automatically download your latest transactions. It will try to match them with ones you’ve already entered. If it can’t find a match, it creates a new record for you to review.
To categorize transactions imported to QuickBooks Online, navigate to Transactions under the Bookkeeping tab. If you don’t see the tab because your account is set up for personal use, you should see Bank transactions or something similar.
You will then see the Bank transactions tab, showing a list of your connected banks, along with three sub tabs: For review, Categorized, and Excluded. Transactions awaiting review are found in the For review tab.
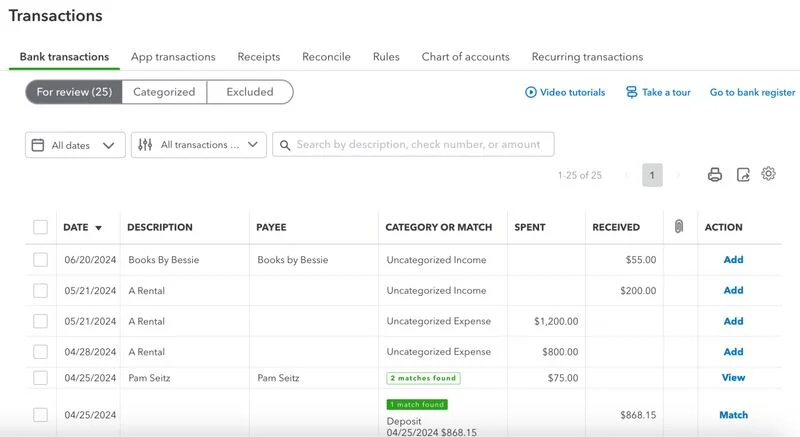
Transactions awaiting review in QuickBooks Online
When QuickBooks finds a match, you will see a green 1 match found button under the CATEGORY OR MATCH column. Click the Match button under the ACTION column to match the transaction to an existing one. If there’s no match, you’ll see an Add button, which allows you to record the new transaction.
You can also categorize transactions from uploaded receipts. After you upload a receipt using the mobile app, QuickBooks will create a transaction, and you can review it and categorize it properly.
For more detailed instructions, head to our tutorial on
managing QuickBooks Online bank feeds
.
Step 7: Record and track your finances.
You can record your income using the sales receipt feature in QuickBooks and enter expenses using the expense form. To enter income, click on + New on your dashboard and then select Sales receipt.
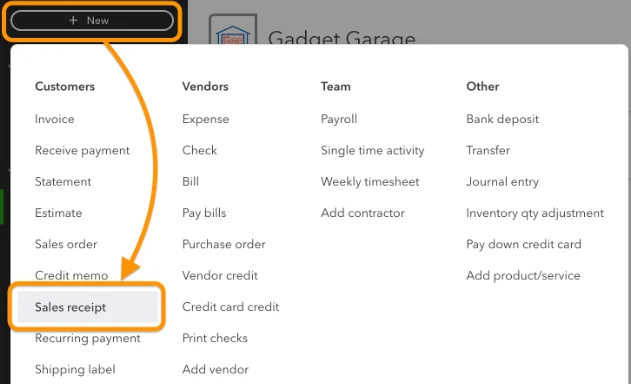
Navigating to “Sales receipt” in QuickBooks Online
Proceed to complete the sales receipt form by providing the required information, such as the customer’s name and the work’s details. For example, in the screenshot below, we are recording a $150 income we received from Mark’s Trucking for driving for six hours.
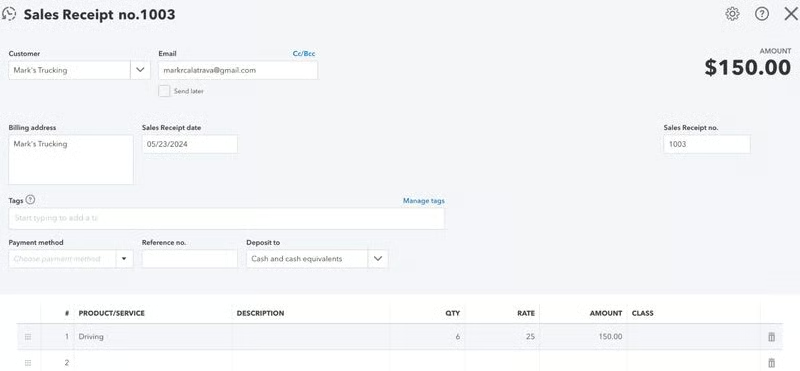
Recording an income as a sales receipt in QuickBooks Online
Meanwhile, to record expenses, click on + New and then select Expense.
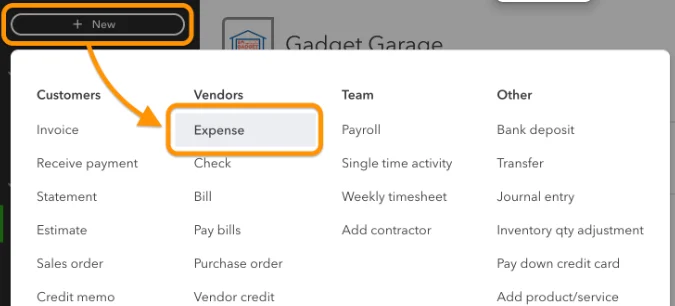
Navigating to “Expense” in QuickBooks Online
Complete the expense form by providing the necessary information, including the vendor’s name and expense details like the category and amount. Below, we’re recording a $250 electricity expense paid to Florida Power & Light.
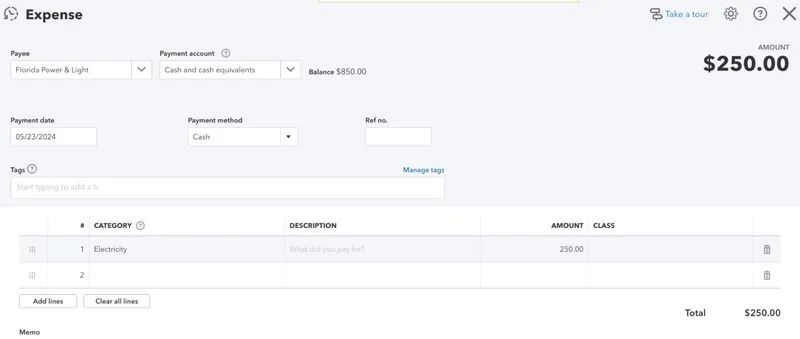
Recording a new expense in QuickBooks Online
You can track your income and expenses by running reports, like expenses by supplier summary, income by customer summary, and profit and loss reports. You can find these reports under the Reports menu in your left navigation bar.
Step 8: Create a budget.
Budgeting is one of the best ways to stay in control of your money. It helps you plan ahead, avoid overspending, and work toward financial goals. A budget in QuickBooks is simply a datasheet with the predicted amounts of your transactions for a certain period (each month, quarter, or year).
For personal finance, it’s usually a monthly budget. To generate a forecast, you must enter the estimated or predicted amounts for each period, and QuickBooks will compare them to the actual transaction results. To set a budget in QuickBooks Online, click on the cog wheel, then select Budgeting under the TOOLS column.
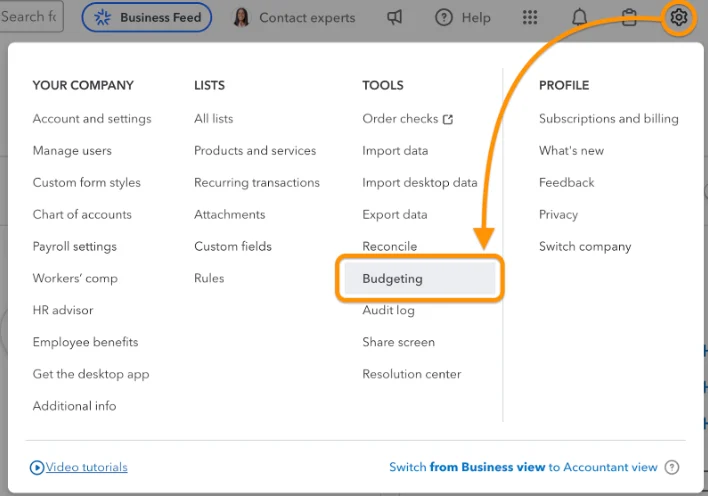
Navigating to “Budgeting” in QuickBooks Online
From the New Budget window, provide the budget type and select which fiscal year it’s for. You may leave the Pre-fill data field blank as it is not applicable for personal finances. Once done, click the green Next button.
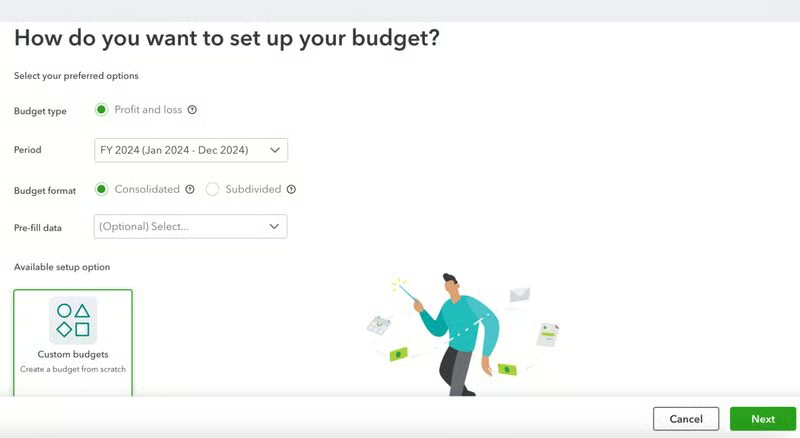
Setting up your budget in QuickBooks Online
Next, enter your estimated amounts for each month. Click Save to finish.
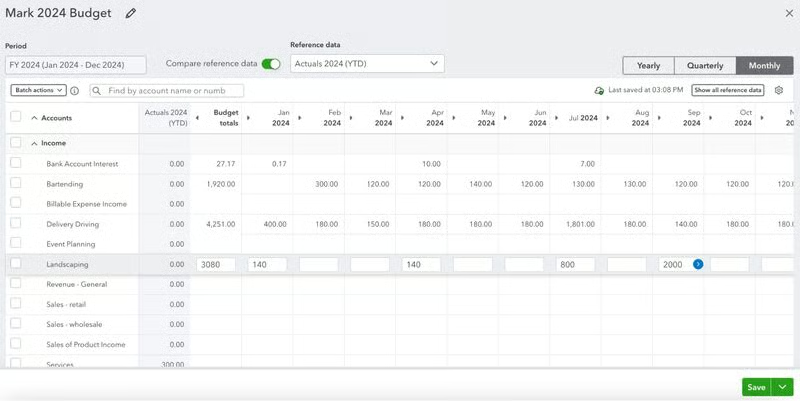
Entering estimated amounts for each period to create a budget in QuickBooks
You can view your projected budgets by selecting Run Budget Overview report.
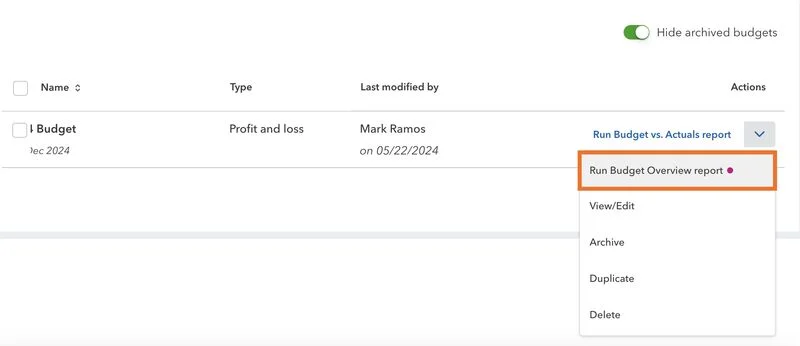
Running a Budget Overview report in QuickBooks
Below is a sample budget vs actual report in QuickBooks Online.
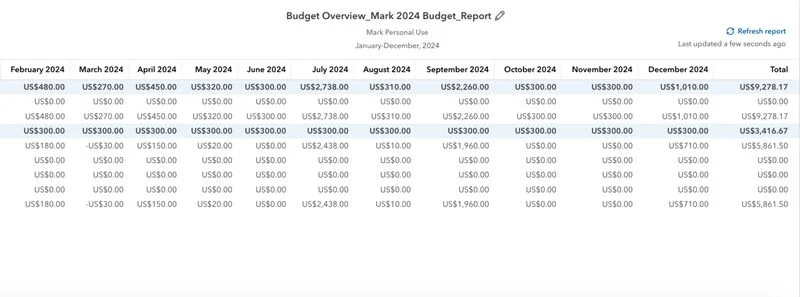
Sample Budget Overview report in QuickBooks Online
You may also select Run Budgets vs Actuals report to see the differences between your estimated and actual costs for each month. This allows you to determine which months you are financially healthy and identify areas of concern.
If you have a small business or are planning to start one, you can use QuickBooks Online to organize your finances. Read our detailed
to see how the platform can help you manage business accounting.
Other ways you can use QuickBooks for personal finances
QuickBooks Online, our best small business accounting software, is a flexible accounting tool designed for a wide range of business uses. While it’s built for general accounting tasks, it can also be adapted to help manage your personal finances.
1. Keep business and personal finances separate.
To report your income for taxes properly, you need to keep track of freelance business income and expenses separately from your personal transactions. As discussed above, this can easily be done in QuickBooks by creating a separate class for each freelance gig.
By having separate classes, creating separate expense accounts for each activity is unnecessary. For instance, you can have one “Gas Expense” account and use it for both personal gas and business gas, as long as you specify the appropriate class every time you enter a transaction.
2. Track charitable and medical mileage.
If you do volunteer work and often drive for charitable and medical purposes, you should have clean mileage records. The QuickBooks Online mobile app, available on iOS and Android devices, is the easiest way to track your charitable mileage. Simply launch the app while driving, and it will automatically log your mileage using GPS tracking instead of manually recording your vehicle’s odometer.
3. Run and print reports.
Another benefit of QuickBooks Online is that it provides reporting tools to help you manage your personal finances. To create a report in QuickBooks Online, click on Reports on the left menu bar, and then find the report you wish to create. You will see the most frequently used reports on the Favorites tab.
A basic profit and loss report is an easy way to get started, but some users prefer to compare their reports to previous periods. If needed, you can also print your reports.
4. Scan receipts.
If you bought something with a receipt and are afraid of losing that piece of paper, you can use QuickBooks Online to make a digital copy of the receipt. Simply take a photo of the receipt from your smartphone using QuickBooks Online’s mobile app and then upload it to QuickBooks.
The program will extract information from it and generate a transaction for you to review. Then, you can edit the receipt, match it to an existing transaction, or create a new account if needed.
5. Automate bill payments.
QuickBooks Online allows you to enter a new bill and pay the bill directly from the platform. It even lets you schedule bill payments in the future, helping you reduce late or missed payments.
Another feature you can use is recurring billing, which allows you to automate payments for bills that you pay regularly, such as monthly telephone bills and software subscription fees. You can specify the frequency and number of occurrences and set an end date.
6. Perform regular reconciliations.
Regularly reconciling your bank and credit card transactions is a good practice as it helps you identify any discrepancies and ensure that your personal finances and books match. Regularly clearing your transactions allows you to spot and account for discrepancies quickly. You might want to perform reconciliation each week or at least once every two weeks.
Frequently asked questions (FAQs)
Yes. Doing so helps you manage personal finances in different ways. You can create a budget to help you avoid overspending, track expenses and pay bills, keep your business and personal expenses separate, and run simple reports to track your cash flow.
Budgeting, class tracking, receipt scanning, online banking, and bill payment automation are some of the most useful QuickBooks features for personal finances.
Of course! If you are planning to start a business or already have one, you can use QuickBooks to organize your finances.