







QuickBooks Online Advanced users can use the built-in Fixed Asset Manager to store key fixed asset information and compute depreciation. In this guide, we’ll go over how to use the QuickBooks Online Fixed Asset Manager by showing you how you can add and edit fixed assets and generate a depreciation schedule.
Viewing the Fixed Asset Manager Page
Open QuickBooks Online and navigate to the Advanced accounting page. Click Fixed assets to open the Fixed Asset Manager. You’ll be redirected to the fixed asset page, where you’ll see all fixed asset information. If you already have at least one asset entered in the Fixed Asset Manager, the page will look like this:
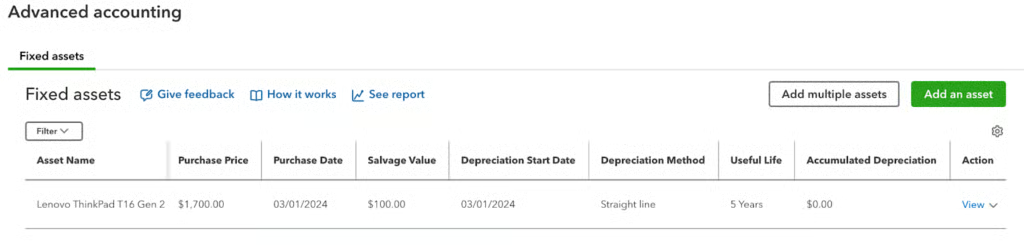
You’ll see all fixed assets—including important information such as purchase price, depreciation start date, depreciation method, and current values—listed on this page. In the image above, the following columns are not shown: asset account, current value, status, and disposal date.
Adding New Fixed Assets in the Fixed Asset Manager
To add new fixed assets in the Advanced accounting page, click the green Add an asset button to open the form.
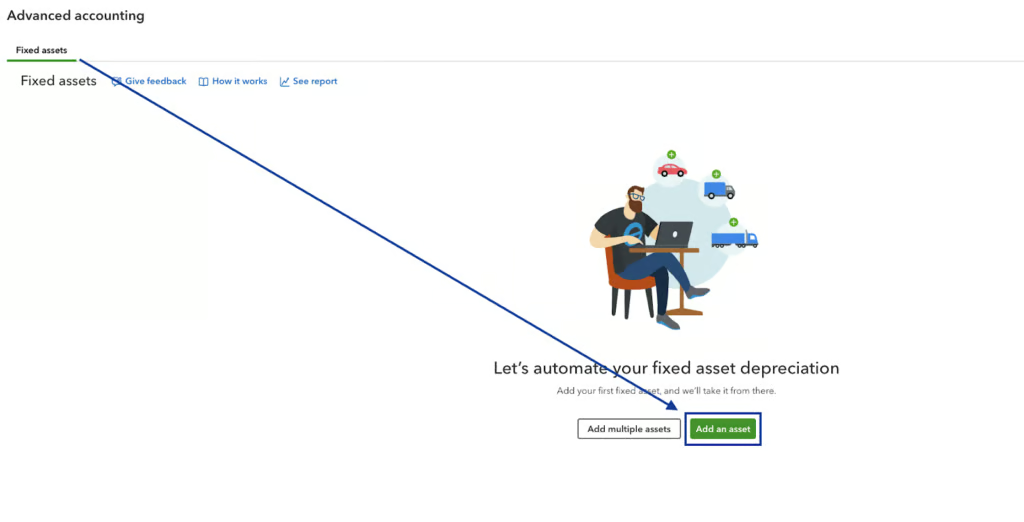
Once you have added at least one asset, you’ll see the green Add an asset button at the top right portion of the page.
Add a Single Asset
After you click the Add an asset button, a form will appear on the right side of your window (see image below for a sample). Fill out all the required fields, such as those with asterisks, to complete the setup.
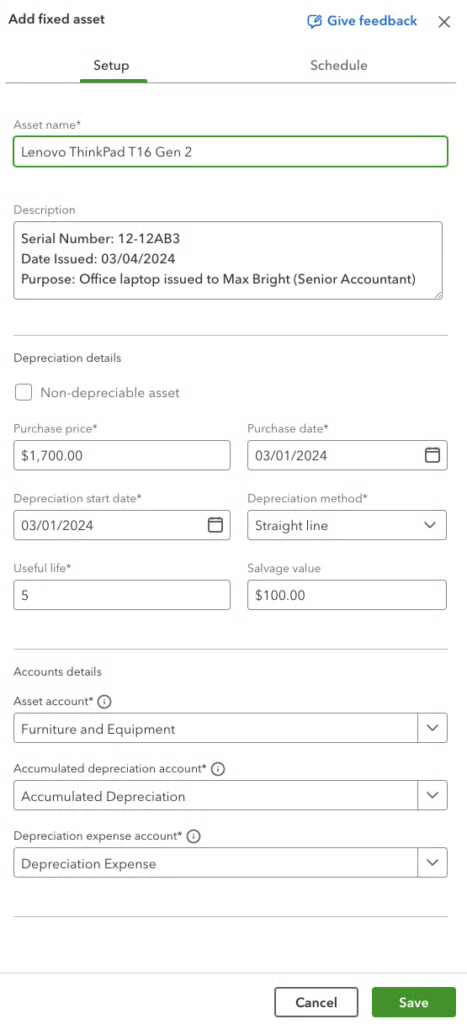
Click through the tabs below for details of the form.
Fixed Asset Details
- Asset name: Input the name of the asset. Keep it short, unique, and identifiable to other fixed assets.
- In the example below, the name of the asset is, “Lenovo ThinkPad T16 Gen 2.” If you use other Lenovo ThinkPads of a different model, it will be easy to distinguish the T16 Gen 2 model from the other models.
- If you have multiple units of the same asset, e.g., 20 units of the T16 Gen 2 model, you must add multiple entries in QuickBooks Online. Our recommendation is to add a unique identifier, such as the name of the person who will use the asset. Given our example below, the asset name could be, “Lenovo ThinkPad T16 Gen 2 – Max Bright.”
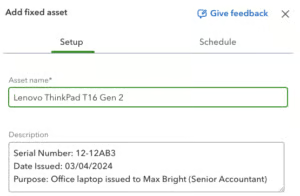
- Description: Add relevant information about the fixed asset. Feel free to attach links that will redirect to a file showing more details about the fixed asset or simply add a short description. At the minimum, we recommend adding the following:
- Serial number
- Date issued
- Purpose
- Responsible employee
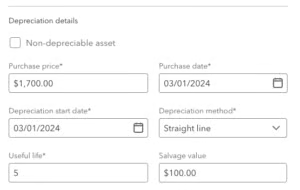
Depreciation Details
- Purchase price is the amount on the sales invoice when you purchased the asset.
- Purchase date is the date on the sales invoice.
- Depreciation start date is the date when the asset was put in service.
- Depreciation method is the method the asset is depreciated. In QuickBooks Online, you can choose among straight line depreciation, double-declining balance, and 150% declining balance.
- Useful life is the estimated number of years that the asset will be put in service. Our guide on how to determine asset useful life can help you in this matter.
- Salvage value is the estimated value of the asset at the end of its useful life. If you’re unsure, set it to zero.
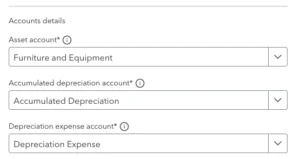
Account Details
- Asset account: This is where all fixed assets will be aggregated. The Fixed Asset Manager will serve as a repository for all fixed asset information, but all of it will be summarized into one account in the general ledger.
- Accumulated depreciation: This is what will hold all depreciation from previous years. You may add multiple accumulated depreciation accounts with unique identifiers like, “Accumulated Depreciation – Office Equipment” or “Accumulated Depreciation – Buildings.”
- Depreciation expense: This is what will report depreciation expense on the income statement. We recommend using a single depreciation expense account for all depreciation entries unless there’s a need to create separate expense accounts.
Add Multiple Assets (Batch Entry)
If this is your first time adding fixed assets into QuickBooks, you may add them as a batch. The image below shows a table where you’ll add all fixed asset information. Alternatively, you may also import a comma-separated values file for convenience.
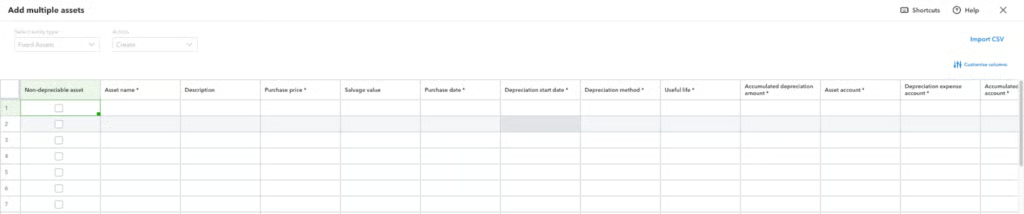
Here are the steps for adding multiple assets:
- Step 1: In the Non-depreciable asset column, tick the check box if the asset is a nondepreciation, such as land. Otherwise, leave it blank.
- Step 2: Ensure to fill out the columns with asterisks. Those without asterisks can be left blank. Here are the required columns for quick reference:
- Asset name
- Purchase price
- Purchase date
- Depreciation start date
- Depreciation method
- Useful life
- Accumulated depreciation amount
- Asset account
- Depreciation expense account
- Accumulated depreciation account
- Step 3: Click the Save button at the bottom right corner of the screen.
Adding the New Fixed Assets in the Fixed Asset Register
QuickBooks doesn’t record entries automatically in the Fixed Asset Manager to their parent accounts in the chart of accounts. Unfortunately, you have to do this manually.
First, navigate to the left sidebar menu and click Transactions. In the drop-down menu, select Chart of accounts.
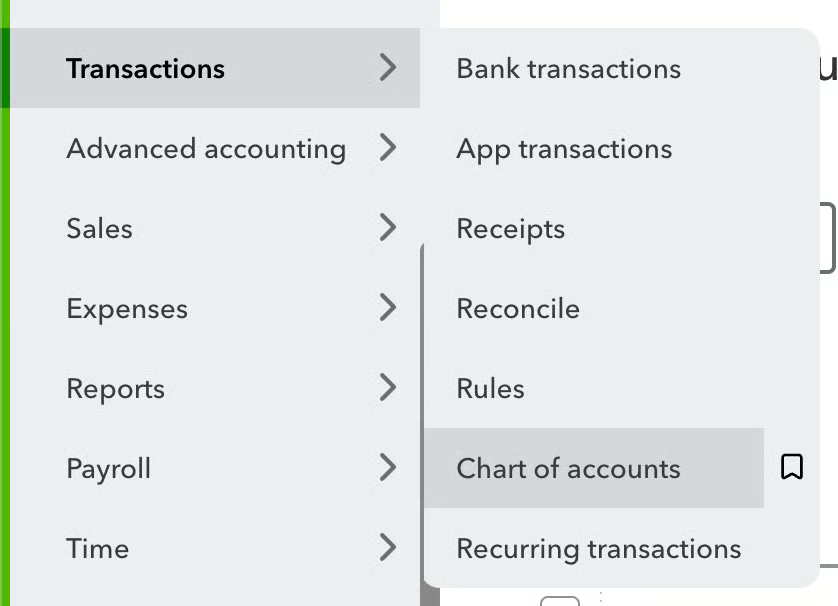
Once you’re in the chart of accounts page, navigate to the search bar to search for the parent fixed asset account. Go to the Action column and click View register.

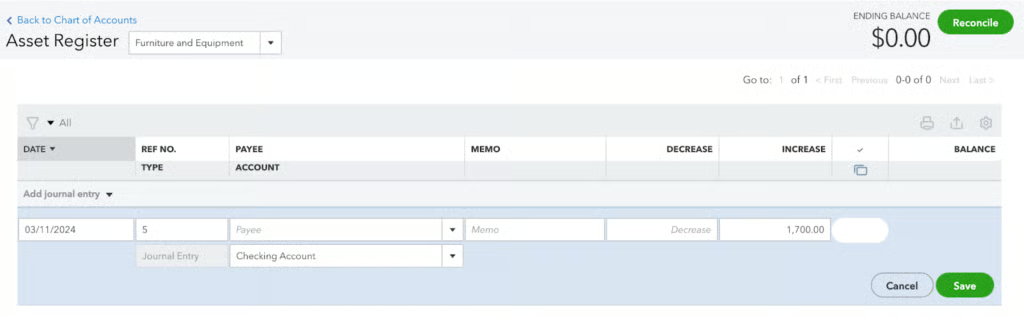
In the register, click Add journal entry and fill out the form that will appear below. Add the cost of the fixed asset in the Increase column. Be sure to indicate how the fixed asset was paid for on the second line of the entry. In the example below, the asset was purchased from the checking account.
Viewing the Depreciation Schedule
Right after you add an asset in the Fixed Asset Manager, QuickBooks will prepare and redirect you to the depreciation schedule automatically or you click the Schedule tab beside Setup.
The image below shows what the depreciation schedule looks like.
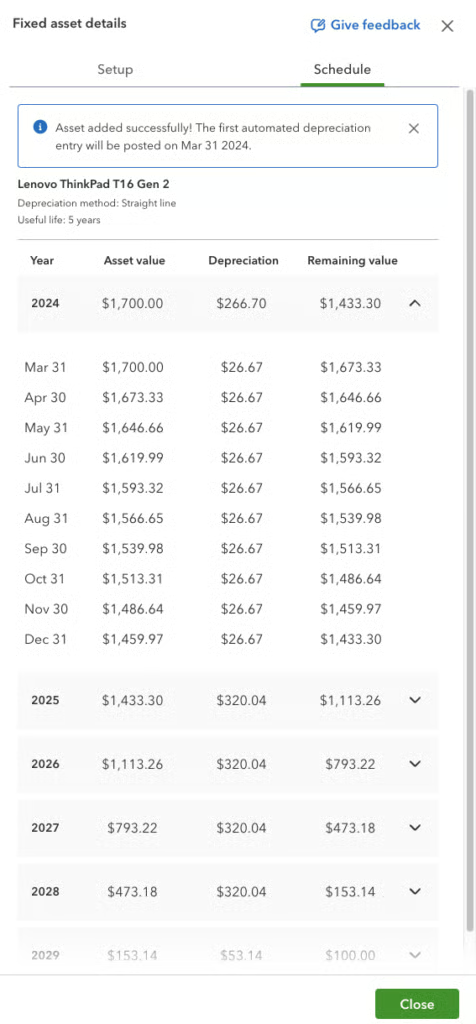
QuickBooks Online will make a depreciation journal entry automatically for these fixed assets monthly, so you don’t have to do it manually. If you click the drop-down arrow, QuickBooks will show you the monthly depreciation charges.
Viewing the Depreciation of all Fixed Assets
Since the Fixed Asset Manager can only show the depreciation per fixed asset. If you want to view the depreciation of all fixed assets, you may do so by clicking See Report above the columns. QuickBooks Online will redirect you to the Reports page and you’ll see this screen:
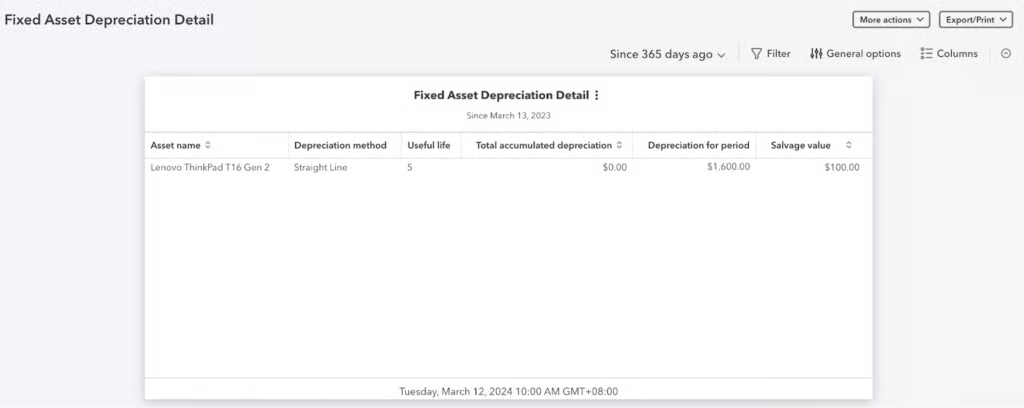
In the sample image above, we removed some columns to retain only the relevant columns. You can do that by clicking Columns at the top right portion of the report.
By using the report above, you can manually check if all fixed assets have been recorded in the chart of accounts. If not, make the necessary journal entries or transaction entries. The total accumulated depreciation in this fixed asset depreciation detail report should match the accumulated depreciation in the chart of accounts.
Disposing of Fixed Assets
The Fixed Asset Manager will not record future depreciation when you dispose of the asset. However, you still need to make a journal entry manually to remove the asset from general ledger accounts.
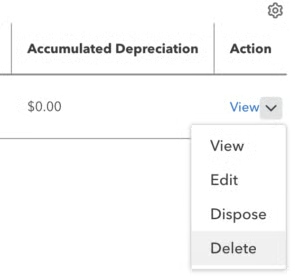
To dispose of a fixed asset, go to the Action column and click View. A drop-down menu will appear (see image below). Select Dispose to proceed.
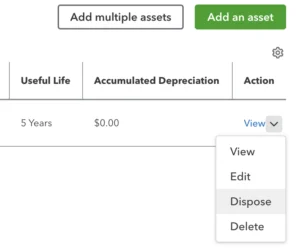
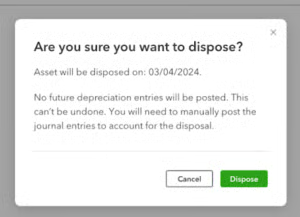
A warning will appear before QuickBooks disposes of the fixed asset. If you’re sure about this transaction, click the green Dispose button to proceed.
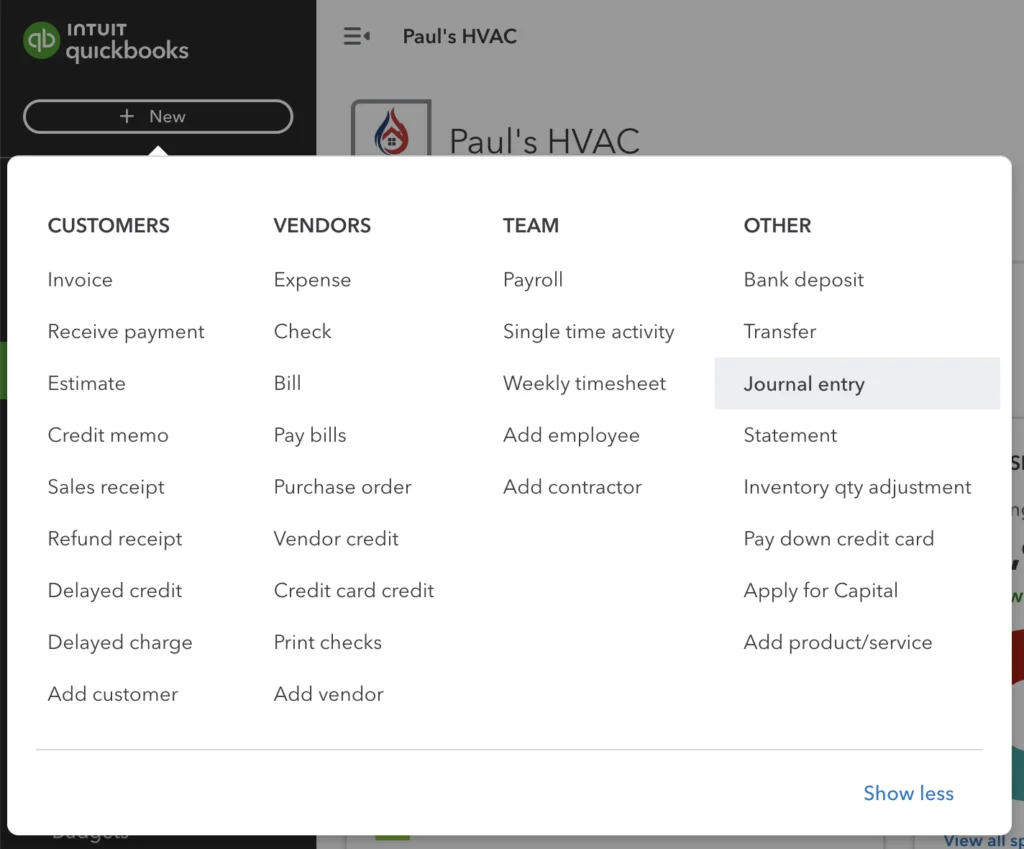
Now, go to the dashboard by clicking the QuickBooks logo on the upper left corner of the screen. Click the New button and select Journal Entry.
- The debit to Chase Checking Account is the proceeds of the sale of the fixed asset. If you will retire the fixed asset, write it off as a loss.
- The debit to Accumulated Depreciation is the latest balance of depreciation as of the disposal date.
- The credit to Furniture and Equipment writes down the fixed asset.
Learn the journal entries in fixed asset disposal since disposal affects several balance sheet and income statement accounts. You’ll also learn the different journal entries when there is a gain or loss from the sale of a fixed asset.
Deleting Fixed Assets
Deleting a fixed asset isn’t the same as a disposal. When you delete an asset, it’s gone forever—and you’ll have no record of it in QuickBooks. You only want to delete an asset if it was incorrectly placed on the fixed asset schedule. Otherwise, you should dispose of it.
To delete an asset, go to the Action column and click View. From the drop-down menu, select Delete.
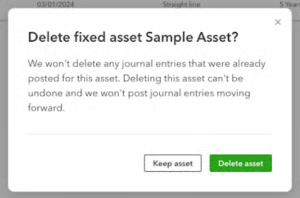
The image below shows the warning message when you delete a fixed asset. Click Delete Asset if you’re sure about this action.
Frequently Asked Questions (FAQs)
Does QuickBooks Online do fixed assets?
Yes, but only with a QuickBooks Online Advanced subscription. The Fixed Asset Manager is unavailable in lower plans.
How to use the QuickBooks Online Fixed Asset Manager?
Open your QuickBooks Online Advanced account and go to Advanced Accounting in the left menu bar. Click Fixed Assets to open the Fixed Asset Manager page.
Bottom Line
We hope this article taught you how to use the QuickBooks Online Fixed Asset Manager. This feature is easy to use. It computes and records depreciation journal entries for you automatically, making it a useful feature for businesses that track a lot of assets.
