Benefits are an important part of an employee’s paycheck—and vital to remaining in compliance with the law. QuickBooks Payroll monitors compliance issues in all 50 states and can help you secure health benefits and workers’ compensation. Also, if you’re working with an outside broker, you can still integrate your benefits into the payroll. We’ll cover how to set up benefits with QuickBooks Payroll Online plus how to choose which benefits you want to offer.
This tutorial is based on QuickBooks Online Elite Payroll, the most premium plan. Some features may not be available on other plans, but instructions for common features should be the same. QuickBooks Payroll offers complete payroll, including tax filing and payments, plus health insurance. Advanced plans offer time tracking, workers’ comp, HR assistance, and more. Visit QuickBooks Payroll to find the best plan for you.
Choosing Health Insurance Benefits in QuickBooks Payroll
You can select the health insurance benefits you want to offer employees directly within the QuickBooks Payroll system. There are a variety of national insurance providers to choose from, and they all have multiple plan options to fit your employees’ needs. We’ll also show you how to set up fringe benefits with QuickBooks, in the event that you want to make contributions to cover some of the cost of your employees’ benefits.
Before you start: Make sure you have all your employees entered in the system. QuickBooks uses their information to help find the best plans for you. Also, prepare and download a payroll summary of the last month from the Reports section. Save it as a PDF—you’ll need this for the application.
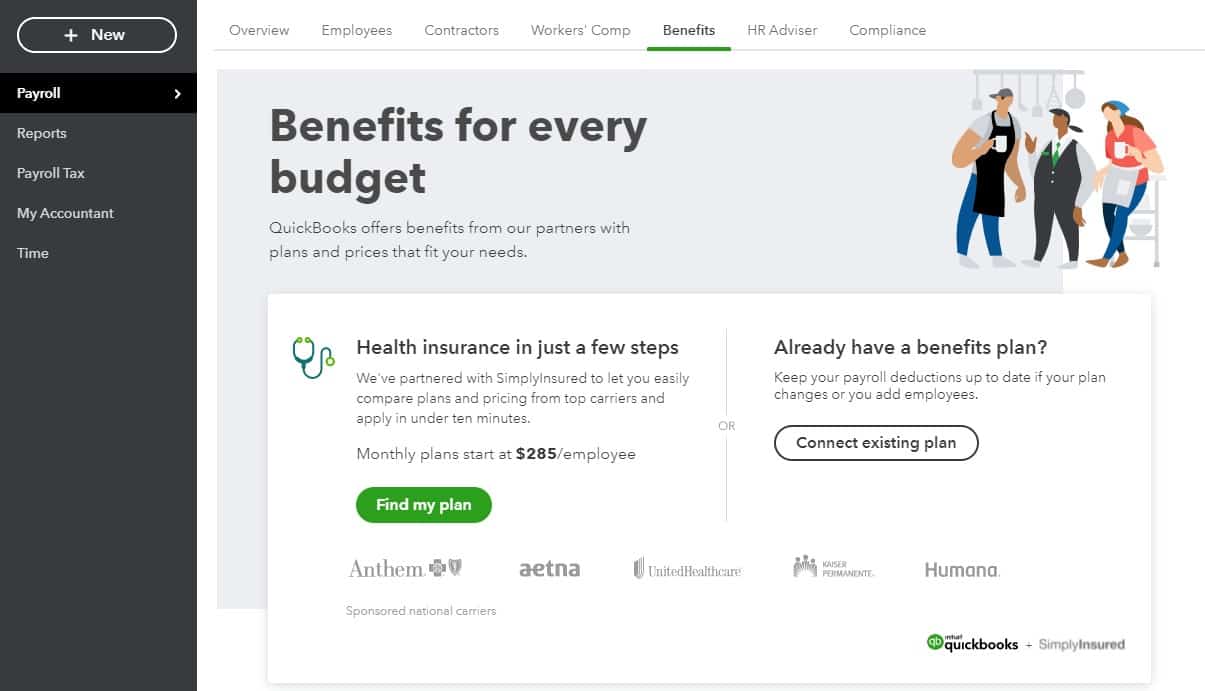
It’s easy to purchase or connect health insurance to QuickBooks Payroll at any plan level.
To get started, follow the steps below:
- From the QuickBooks dashboard, click Payroll on the side menu.
- Go to the Benefits Tab.
- Click Find My Plan. QuickBooks then uses your employee data to select the best plans for you.
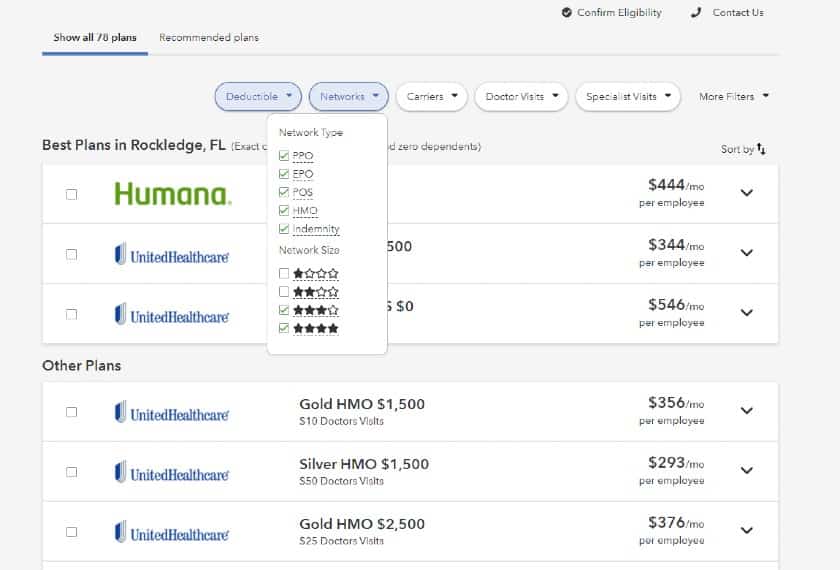
There are several ways to narrow choices down to get the best plan for your team.
4. Narrow your choices. QuickBooks provides you with a list of plans. You may have hundreds to choose from, so use the filters at the top to narrow down your choices. Be sure to consider the types of employees you have, especially if you have a large number of a single demographic (high schoolers vs seniors vs new parents). Some plans are a better fit for certain groups.
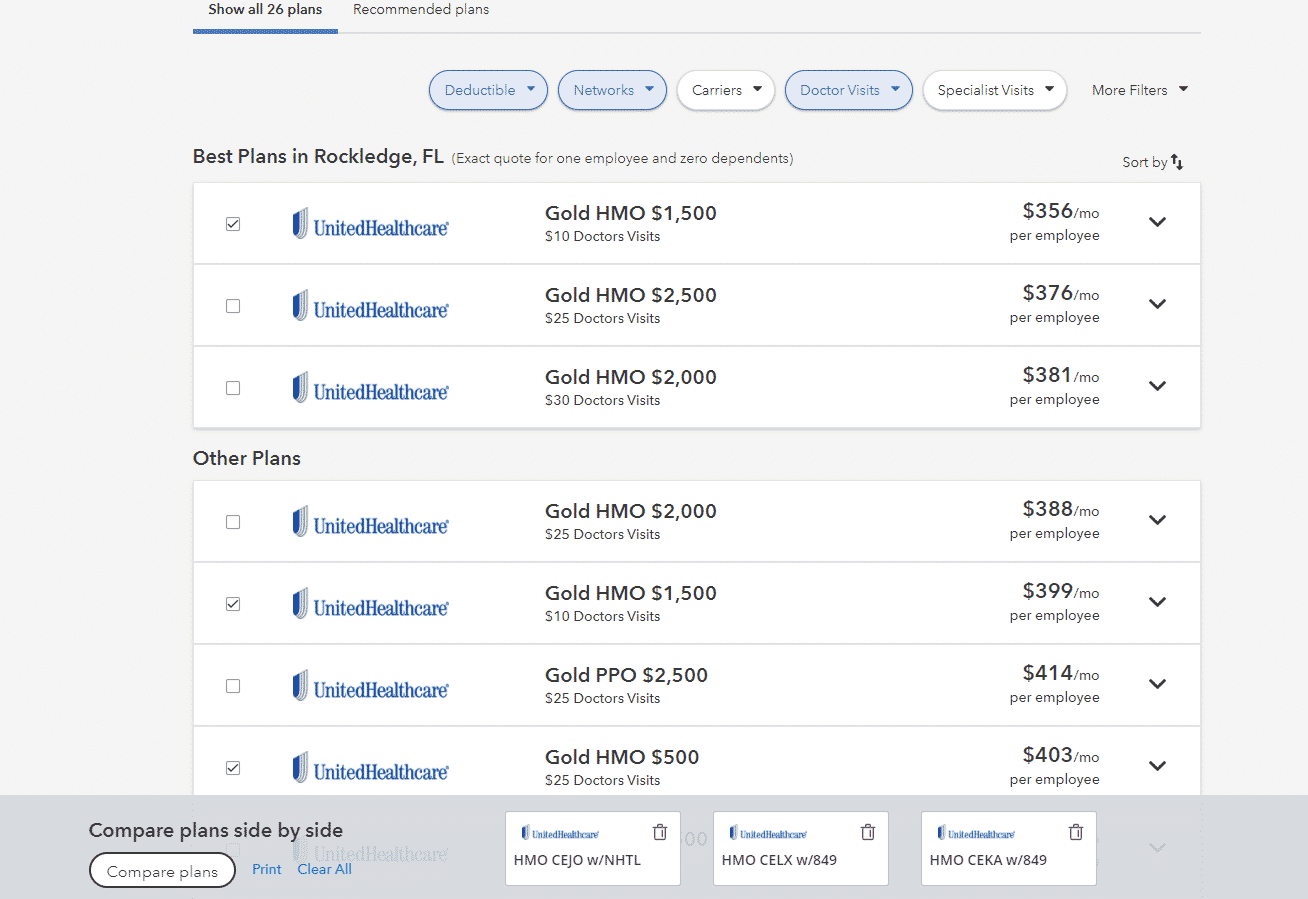
5. Compare the best plans. Click on the plans that interest you to do a side-by-side comparison. You can also print the comparisons if it’s easier for you.
6. Click on Start Application for the plan you want. The process takes 15–20 minutes.
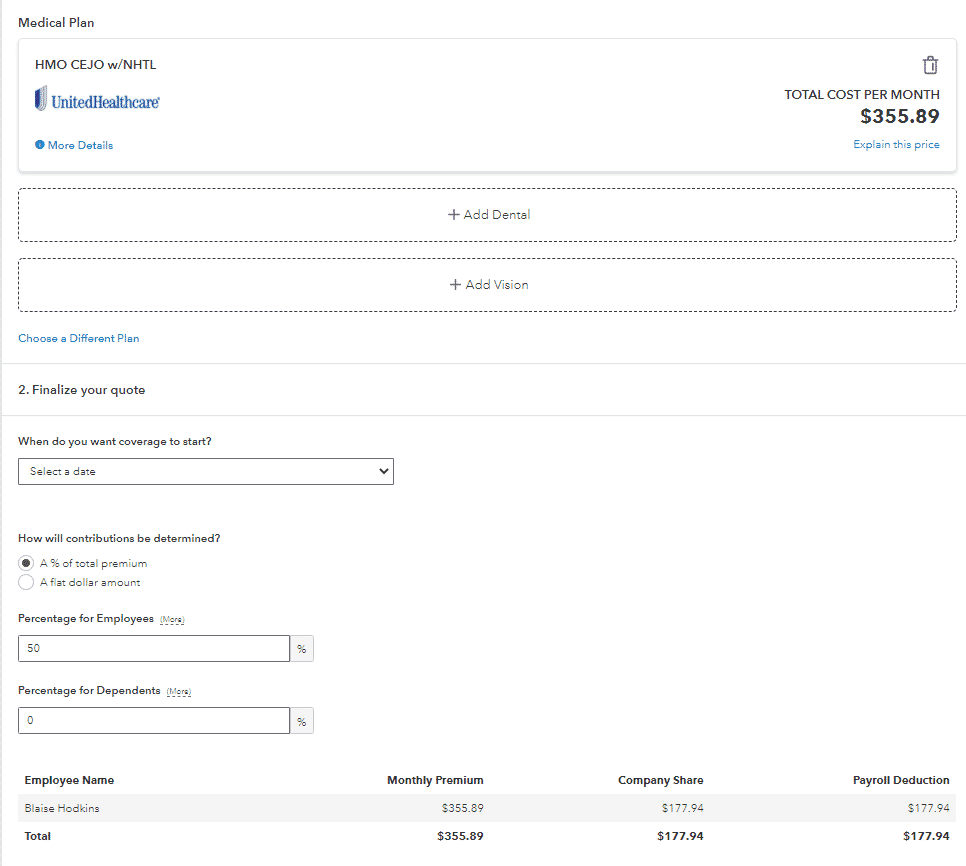
7. Add vision and dental insurance if desired. The software populates complementary plans.
8. Select the coverage start date.
9. Choose how contributions are determined by deciding whether you want to split payments by a flat dollar amount or percentage of the total premium. The software will display the amount your employee will pay—and your company, if you want to set up fringe benefits.
10. Choose whether or not to include part-time employees or domestic partners under coverage. By law, you’re required to offer health insurance coverage to eligible employees once you reach the equivalent of 50 full-time employees (FTE). However, you don’t have to offer coverage to part-time employees unless you choose to.
11. Set waiting periods for new employees. This is a good idea for businesses with high turnover such as restaurants, or for businesses with a probationary period for new hires.
12. Add employee information. Employees will then get an invitation to apply for insurance. Once everyone has filled out their forms, the full application can be sent to the insurance company.
13. Upload documents. Different insurance companies require different documents. The application includes links for getting the files. You may also need to submit the most recent payroll journal. You can get this from the Reports section of QuickBooks.
Choosing Retirement or 401(k) Benefits in QuickBooks Payroll
Retirement plans are another benefit QuickBooks offers its customers. It partners with Guideline to provide several 401(k) packages.
Before you start: Make sure you have all your employees put into the system. QuickBooks uses their information to help find the best plans for you. Also, prepare and download a payroll summary of the last month from the Reports section. Save it as a PDF.
1. From QuickBooks, click Payroll on the side menu.
2. Go to the Benefits Tab
3. Click Find My Plan in the 401(k) plans box. QuickBooks takes you to the Guideline website. You have three plans to choose from. There’s also a cost estimator on the webpage.
4. Click on the plan you are interested in and begin the application process. It will ask you who does payroll. Click QuickBooks. An agent will contact you to finish the application.
If you decide to select a different provider or type of insurance plan, you’ll need to get it on your own and add it manually to payroll. We’ll cover that later.
Setting Up Other Paid Benefits
Other paid benefits, such as pet insurance, child care, or mileage need to be manually added. The process is the same regardless of the QuickBooks Payroll plan you have.
Benefits Needing Employee Contributions
If it’s a benefit the employee pays part of, such as child care or other insurance, enter it under Add Deductions.
1. Click on Payroll in the side menu. Then select Employee.
2. Scroll to Does {employee} have any deductions.
3. Click on Add a new deduction. Already established deductions are listed. If you do not find the one you are looking for, click New Deduction/contribution.
4. Select from the dropdown the new deduction. If it’s not listed, click Other deductions and add it.
5. And remember, you have a dropdown menu of choices. If the option you’re looking for is not there, click on Other after tax deductions and create a name for it.
When adding a new deduction, give it a name the employee understands. This helps the employee to have a provider name that is recognizable at a glance. For example, do not assume your employees will remember the bank name of their 401(k). Adding a simple note can prevent confusion.
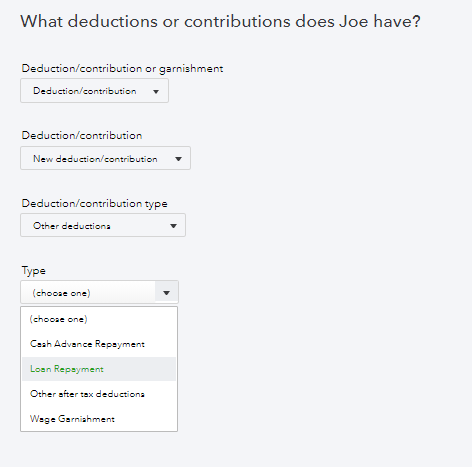
6. Some standard benefits have several fields to fill out, such as the amount deducted per paycheck in terms of dollar amount or percentage of the paycheck. In the case of a flat dollar amount, you may need to do the calculations yourself.
7. Indicate if the benefit is taxable. If not, then select pre-tax. The money will be removed from tax calculations. If you are not sure, consult the plan administrator or QuickBooks for guidance.
Note: If you integrate your insurances into QuickBooks Payroll, some of these fields may automatically populate for you.
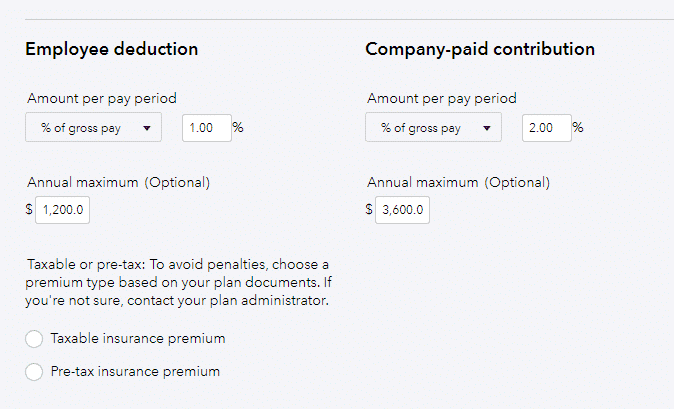
You can set how much your company will contribute to employee benefit plans each pay period. This can be shown as a percentage of gross pay or a flat rate.
Additional Pay
If the benefit you provide involves additional pay, like bonuses or commissions, housing, or per diem, you can find these in Add Pay Types.
Note: Group Term Life Insurance is included under Additional Pay Types.
1. Click on Payroll in the side menu. Then select Employee.
2. Go to Add Pay Types.
3. Scroll to Common Pay Types.
4. Click on pay type if listed or create your own.
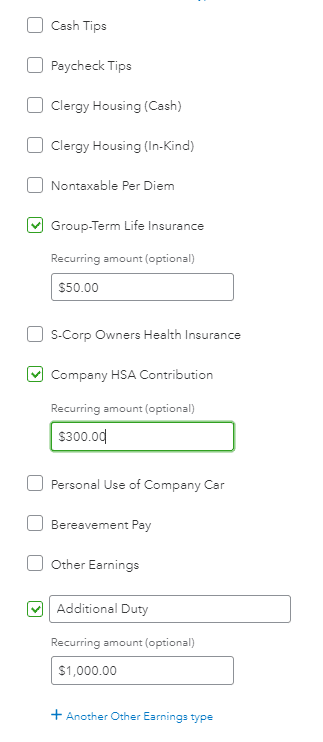
You can add additional pay options, if the one you’re looking for isn’t showing.
5. Click Save.
Once you’ve set these for one employee, they are available for all other employees as well.
COVID-19 Benefits
If you provide sick leave for employees who contracted COVID-19, you can opt to pay employees for it and apply a credit to your payroll tax bill. To apply this in QuickBooks Payroll, go to the Families First Coronavirus Response Act tab in Add Pay Types. The CARES act, which provided benefits that helped employers retain employees during the pandemic, is also listed under Add Pay Types.
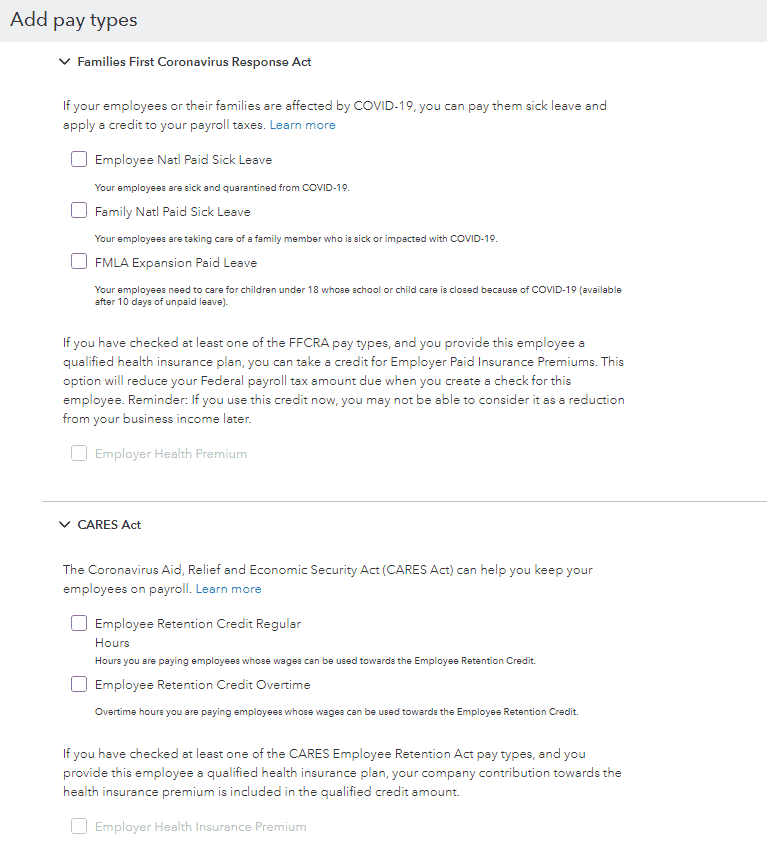
You can label eligible funds you pay out under the CARES Act and FFCRA to ensure you have enough support to receive your tax credits.
Setting Up Time Off Benefits in QuickBooks Payroll
Paid time off (PTO) and unpaid time off are important considerations. The federal government doesn’t have any strict regulations regarding PTO. However, your state might; it can also make you a more desirable employer. With QuickBooks Payroll, PTO is easy to set up for tracking, and employees can use their portal to request when they need to use it.
Follow these four steps to set up your company’s PTO benefits:
1. Click on Payroll in the side menu. Then select Employee.
2. Go to Add Pay types.
3. A popup window appears; scroll to Time Off Pay Policies and click on Add New Policy.
4. Fill in the rules for accrual, hours earned, and maximum hours allowed. Click Save.
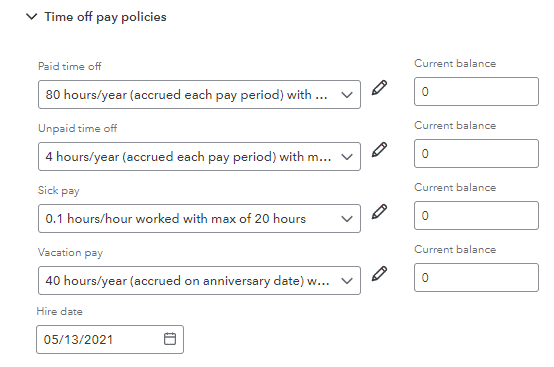
You can add time off policies to help automate your PTO calculations and accruals.
Please note: Once you’ve added a policy, it’s available on the dropdown menu for you to add to other employees’ profiles.
Setting Up Benefits in QuickBooks Desktop Payroll
QuickBooks Desktop has different menus from the online version, but the steps are similar. It offers two ways to set up benefits: EZ Setup, which provides a wizard to lead you through the process, and Custom Setup, which has more steps but gives you more options.
The help center on the website has step-by-step instructions—more, in fact, than it does for the online version.
Bottom Line
Employee benefits are important not only for legal compliance but also for attracting and keeping great workers. QuickBooks Payroll offers health and other benefits and can help you administer and track benefits beyond what it offers. This tutorial offers the basics for choosing and setting up benefits in QuickBooks Payroll. For more information, sign up for a free trial of QuickBooks Payroll and explore for yourself.
