




Paying vendors by Automated Clearing House (ACH) transfer moves money straight from your business bank account to theirs. You skip printing, signing, and mailing checks, and you get an electronic record of every payment. For businesses that already keep their books in QuickBooks Online (QBO), QuickBooks Bill Pay sends standard ACH payments at no charge and records each one against the vendor's bill.
I'll walk you through paying vendors via ACH using QuickBooks Bill Pay, including how to set up vendors, schedule payments, and reconcile transactions. I'll also explain how to record ACH payments made directly through your bank and share some practical controls to help prevent payment errors and fraud.
Option | Best for | ACH cost | Standard delivery |
| QuickBooks Bill Pay (inside QBO) | QBO users who want payments sent and recorded in one step | Free for standard ACH; $10 for Faster ACH | 3 to 5 business days (next business day with Faster ACH) |
| Your bank's ACH service, then record in QBO | Businesses that already originate ACH through their bank or need limits above Bill Pay's | Set by your bank | Depends on your bank and whether you use Same Day ACH |
Why you can trust Fit Small Business
My recommendations come from years of hands-on experience in banking, bookkeeping, and managing business finances. Here's the experience I bring to this guide:
- 10 years in banking: Worked as a bank manager, handling financial operations, transactions, and internal controls.
- Hands-on accounts payable experience: Manage vendor bills, payment processing, and bank reconciliations for US-based businesses.
- QuickBooks expertise: Certified QuickBooks Online ProAdvisor and Xero Advisor with practical experience using QuickBooks Bill Pay and Melio for vendor payments.
- Small business experience: Have managed businesses myself, so I understand the importance of timely vendor payments, accurate records, and preventing duplicate payments.


- What you need before you pay a vendor via ACH
- How to pay a vendor via ACH in QuickBooks Online
- How to pay a vendor via ACH from your bank and record it in QuickBooks
- ACH delivery times, limits, and fees
- How to protect ACH vendor payments from fraud
- What to do if an ACH payment is rejected
- Frequently asked questions (FAQs)
What you need before you pay a vendor via ACH
Collect the following before you schedule the first ACH payment to a new vendor:
| Item | Why you need it |
| Vendor's legal business name | Should match the name on the receiving bank account and on the vendor's W-9 |
| Bank routing number and account number | Tells the ACH network where to deliver the money |
| Account type (checking or savings) | Most bank ACH services ask for it when you set up a payee |
| Form W-9 | Gives you the vendor's taxpayer identification number (TIN) for year-end 1099 reporting |
| A verified bank account on your side | QuickBooks Bill Pay verifies your account through micro-deposits, or you can pay from a QuickBooks Checking account |
| An entered bill in QBO | The ACH payment applies against the bill and closes it |
In QuickBooks Bill Pay, you don't always have to collect banking details yourself. You can invite a vendor to add their own payment information, and vendors in the QuickBooks Business Network can be paid without you entering their ACH details at all. Once connected, you and the vendor can see each other's contact details, but neither of you sees the other's bank account information.
How to pay a vendor via ACH in QuickBooks Online
QuickBooks Bill Pay is Intuit's built-in tool for paying vendors from QBO. Bill Pay Basic comes with your QBO subscription, which starts at $38 per month, and standard ACH payments are free on every Bill Pay plan.
Step 1: Activate QuickBooks Bill Pay
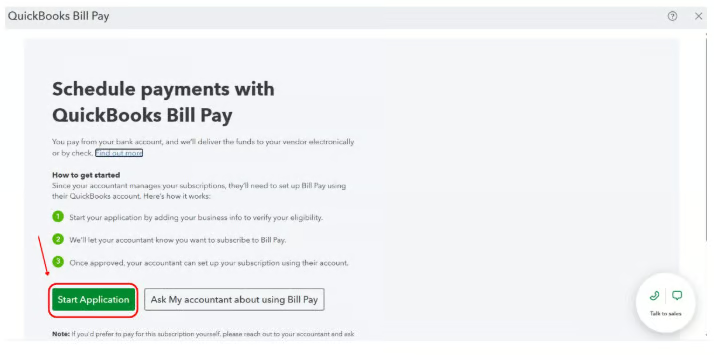
Go to Expenses, select Bills, then select Schedule payment. Pick a plan (Basic, Premium, or Elite) and complete the application with your business details, the owner's information, and the bank account you'll pay from. Intuit says the application takes under 10 minutes and that most applicants get an instant decision.
For a full walkthrough of the Bills page, see our guide on how to pay bills in QuickBooks Online.
Step 2: Add the vendor's ACH details or invite the vendor
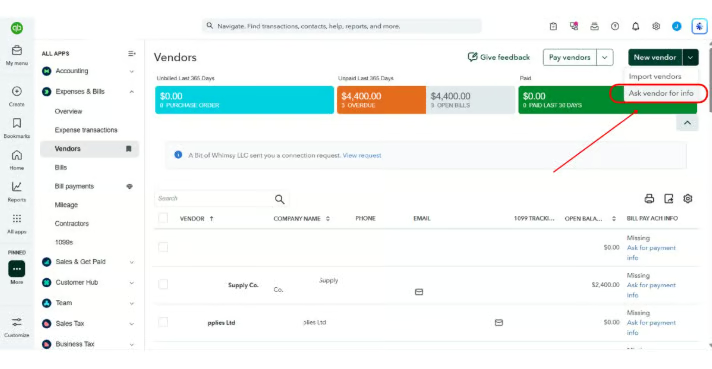
To ask the vendor for their payment information, go to Expenses & Bills, then Vendors, open the vendor, and select Ask for payment info. Enter the vendor's company name and email, then send the invite. If the vendor is already in the QuickBooks Business Network, send a connection request instead.
If the vendor isn't connected, you can enter their bank details yourself when you schedule the first payment. QuickBooks saves those details for future payments.
Step 3: Enter the vendor's bill
Every Bill Pay payment applies to a bill. Upload or email the vendor's invoice so QuickBooks can create a pre-filled bill, or enter it by hand. Our tutorial on how to enter bills in QuickBooks Online covers the fields.
Step 4: Select the bill and choose Schedule payment
Go to All apps, then Expenses & Bills, then Bills, and open the Unpaid tab. Select the bill and choose Schedule payment from the Action column. To pay several vendors at once, check the boxes and select Schedule payment from the table header. Bill Pay Basic handles up to 20 bills at a time, and Premium and Elite handle up to 50.
Step 5: Set ACH as the payment method
Fill in the payment fields:
- Bank account: The account Intuit withdraws the money from.
- Withdrawal date: The date Intuit starts processing. Delivery time counts from here.
- Payment speed: Standard ACH is free. Faster ACH costs $10 and usually arrives the next business day when your account is eligible.
- Amount: The full bill or a partial payment.
- Note: A reference the vendor sees in the payment email, such as the invoice number.
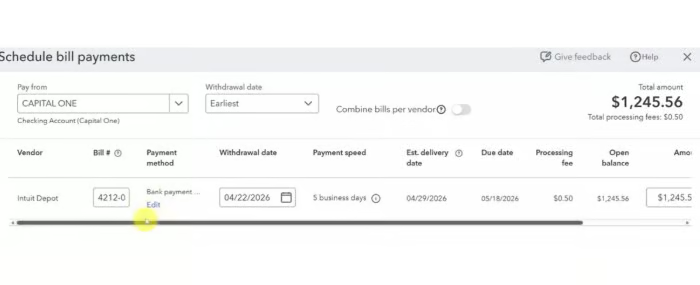
Step 6: Review and schedule
Select Continue, review the details, and select Schedule payment. QuickBooks may send an authentication code to the phone of the person making the payment. You and the vendor both receive an email confirmation, and another one when the payment starts processing.
Step 7: Track and reconcile the payment
Check the status on the Bill payments page. Payments made through Bill Pay sync with your books, and QuickBooks auto-matches them to the transactions in your bank feed. I still review each suggested match before I accept it, especially when two payments share the same amount or date.
How to pay a vendor via ACH from your bank and record it in QuickBooks
Some businesses already send ACH payments through their bank's online portal, or they need payment sizes above what Bill Pay allows for their account. In that case, you send the money from the bank and record the payment in QBO.
Step 1: Set up ACH payments with your bank
Ask your bank to enable ACH origination (sometimes called ACH payments or business bill pay) on your business account. Banks set their own fees, cutoff times, and daily limits, so get those in writing before you plan your payment schedule.
Step 2: Add the vendor as a payee
Enter the vendor's legal name, routing number, account number, and account type in your bank's portal. If your bank offers dual approval, turn it on so a second person has to release new payees and large payments.
Step 3: Send the ACH payment
Create the payment, choose standard or Same Day ACH if your bank offers it, and add the invoice number in the memo or addenda field so the vendor can apply it.
Step 4: Record the bill payment in QuickBooks Online
In QBO, select + New, then Pay bills. Choose the bank account you paid from, enter the date the payment went out, select the vendor's bill, and select Save. This closes the bill without sending a second payment.
Step 5: Match the bank transaction
When the ACH withdrawal downloads into Bank transactions, select Match to link it to the bill payment you recorded. Don't select Add, or the expense will hit your books twice. Our guide on how to prevent duplicate invoice payments covers more controls for this.
ACH delivery times, limits, and fees
| ACH option | Typical timing | Limit | Cost |
| QuickBooks Bill Pay standard ACH | 3 to 5 business days | Your account's processing limit (rolling 30 days) | Free |
| QuickBooks Bill Pay Faster ACH | Next business day if scheduled by 5 p.m. PT | $25,000 per payment, subject to eligibility | $10 |
| Same Day ACH through your bank | Same business day when submitted before your bank's cutoff | $1 million per payment under Nacha rules (your bank may set a lower limit) | Set by your bank |
| Standard ACH through your bank | Set by your bank | Set by your bank | Set by your bank |
QuickBooks Bill Pay also limits how much you can schedule in a rolling 30-day period. Intuit sets that limit based on your payment history and risk profile, and new QBO companies typically start lower. Each payment counts against the limit for 30 calendar days from its withdrawal date.
You can view the limit and request an increase under Account and Settings, then Expenses, then Bill Pay, then Processing limit. Apply early if you know a large vendor payment is coming.
Bill Pay's plan prices don't change the ACH fee. Basic costs $0, Premium costs $15 per month, and Elite costs $45 per month (included with QBO Advanced). Premium adds unlimited 1099 e-filing, and Elite adds roles, approval workflows, and payment release approval.
Read our QuickBooks Bill Pay review for the full plan breakdown.
How to protect ACH vendor payments from fraud
One ACH payment risk I pay particular attention to is a request to change a vendor's bank account details. Fraudsters can impersonate legitimate vendors and send convincing emails asking businesses to redirect future payments. If nobody verifies the change, the next payment could end up in the wrong account.
These are the controls I put in place for ACH vendor payments:
- Verify bank changes by phone: Call the vendor at a number you already have on file, not one in the email, before you change any routing or account number.
- Let vendors enter their own details: Bill Pay's Ask for payment info invite keeps account numbers out of your inbox.
- Separate entering and approving: Bill Pay Elite lets you set roles and require a designated approver before a payment is released. Many bank portals offer dual approval too.
- Review the payment list before release: Check vendor names, amounts, and new payees against the bills before you schedule a batch.
- Reconcile monthly: A reconciliation catches payments that went to the wrong vendor or posted twice. Our guide on how to do a bank reconciliation walks through the process.
What to do if an ACH payment is rejected
An ACH payment can come back when the vendor's account number is wrong, the account is closed, or the receiving bank can't match the account. If that happens:
- Check the payment status on the Bill payments page, or your bank's ACH report, for the reason.
- Contact the vendor at a known phone number and confirm the correct bank details.
- Update the vendor's payment information, or send a new Ask for payment info invite.
- Reschedule the payment and confirm the bill still shows the right open balance in QBO.
If you need help with a Bill Pay rejection, Intuit's help center has an article on fixing payments rejected because of the vendor's account, and you can reach support from the Help menu in QBO.
Frequently asked questions (FAQs)
Does QuickBooks charge to pay vendors via ACH?
Not for standard ACH. Intuit charges $0 for standard ACH payments on every QuickBooks Bill Pay plan. Faster ACH costs $10, and Instant Payment costs 1% of the payment with a $100 maximum fee.
How long does an ACH payment to a vendor take in QuickBooks?
Standard ACH takes 3 to 5 business days from the withdrawal date. Faster ACH usually arrives the next business day when you schedule it by 5 p.m. PT, for payments up to $25,000.
Does my vendor need QuickBooks to receive an ACH payment?
No. Vendors only need a U.S. bank account. Vendors in the QuickBooks Business Network can share their payment details through the connection, so you don't have to enter them.
Can I pay vendors via ACH in QuickBooks without Bill Pay?
QuickBooks doesn't send ACH payments without Bill Pay. You can send the payment through your bank, then record it in QBO with + New, then Pay bills, and match it in your bank feed.