


In this tutorial, we will teach you how to enter bills in QuickBooks Online. Additionally, we will show you how to review the bill you just added and how to check outstanding bills specifically related to a vendor.
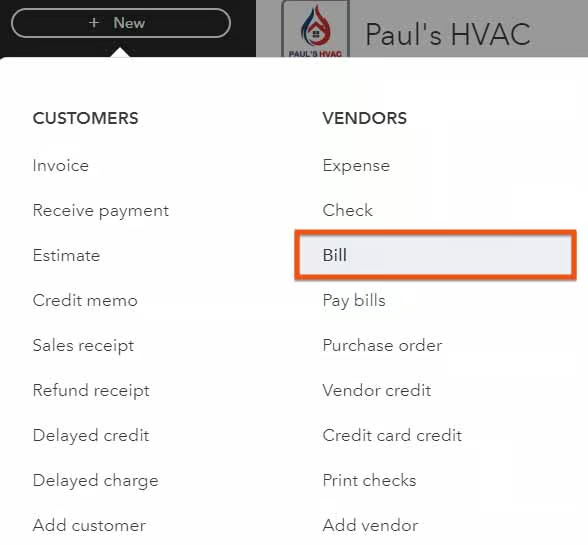
Click + New button at the top of the left-hand menu bar, then select Bill under Vendors in the second column, as shown below.
QuickBooks Online will display a screen to input the bill information. The actual fields that appear for your company will depend on your advanced option setup, as explained in our guide on how to set up advanced settings in QuickBooks Online.
To help you better understand how to enter a bill in QuickBooks Online, let’s consider a sample scenario where Paul HVAC, an HVAC company, receives a bill from its supplier, Pacific Paint Supplies, for two ductwork installation coatings. The GIF below shows how the fields are completed based on this scenario.
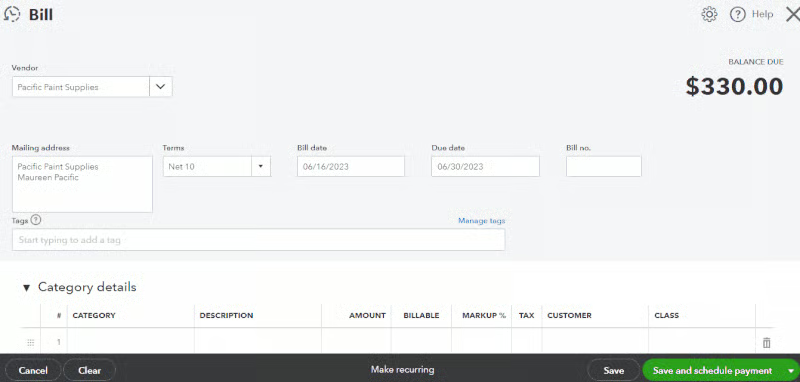
Some of the important fields you need to complete when creating a bill include:
- Vendor: From the vendor drop-down list, choose the vendor that sent you the bill. Once you select a vendor, the fields for mailing address and terms will populate automatically. In our sample scenario, we selected Pacific Paint Supplies from our customer list. If it’s a new vendor, then simply click on Add new from the drop-down and complete the vendor setup form, as covered in our guide on how to set up new vendors in QuickBooks Online.
- Bill date: Enter the invoice date from the bill. The due date is determined by applying the payment terms to the invoice date, so the bill date must be the invoice date—not the date the bill was received or entered.
- Due date: The due date should calculate automatically based on the terms and bill date, but we recommend verifying that the calculated date matches any due date shown on the bill.
- Bill no.: Enter the bill or invoice number from the vendor’s bill. This will be very helpful if you need to contact the vendor with questions about the bill.
- Category: Assign the bill to a category if you want to track general expenses that are not directly tied to specific items or products. For instance, you may assign expenses such as rent and utilities to relevant categories instead of specific items. If this is the case, select the category from the drop-down or click Add new to create a new one, as explained in our tutorial on how to set up a chart of accounts in QuickBooks Online.
- Description: Provide a description of the expense.
- Amount: Enter the amount of the expense.
- Billable: Place a checkmark here to make the expense billable to the customer. However, the better way to handle billable expenses is to assign them to product or service items instead of a category.
- Tax: Place a checkmark here if you are required to collect sales tax when the expense is billed to the customer.
- Product/Service Item: Purchases of items you will sell to customers must be assigned to an inventory item, and services and expenses billed to customers must be assigned to a service item. Select a product or service item or click Add new to set up a new product or service item. Once you select a product or service item, the fields for description, rate, billable, markup %, tax, and class will populate automatically. In our example, we assigned the expense to a service item since it’s part of the company’s ductwork installation service.
- Qty.: Enter the quantity of goods or hours of services purchased. After you enter the quantity, the amount will calculate automatically as quantity times rate, and the sales amount will calculate as amount times markup percentage.
When you are finished inputting the required information, click the green Save button in the bottom right-hand corner. If you want to schedule a payment for the bill at a later date, click on the Save and schedule payment button.
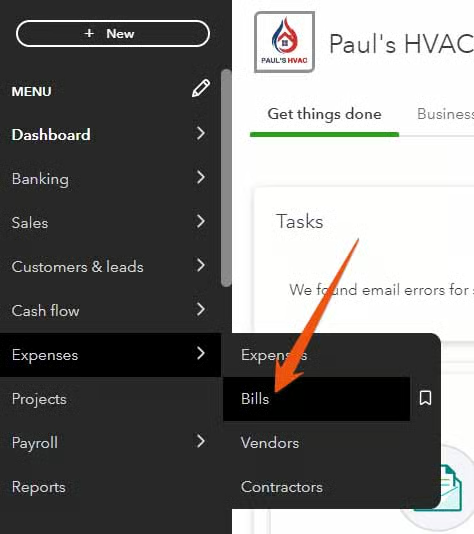
After entering the bill, you can verify if the bill is correct by navigating to the bills tab. Hover over Expenses in the left-hand menu bar and then click Bills.
Seeing a Different Left-side Navigation Menu?
QuickBooks has two user views: Business View and Accountant View. Your left-side navigation menu may look different depending on the user view you are in.
If your sidebar menu is not what is shown in our tutorial, it means that you are on Business View. We prefer and recommend using the Accountant View because it shows a full range of business accounting features and tools that you can use in QuickBooks.
To verify whether you’re using the Business View, click on the cog wheel at the top right-hand corner of your QuickBooks dashboard, and check whether the button on the lower right-hand says Switch to Accountant view, as shown below. If so, then it means you are on Business View.
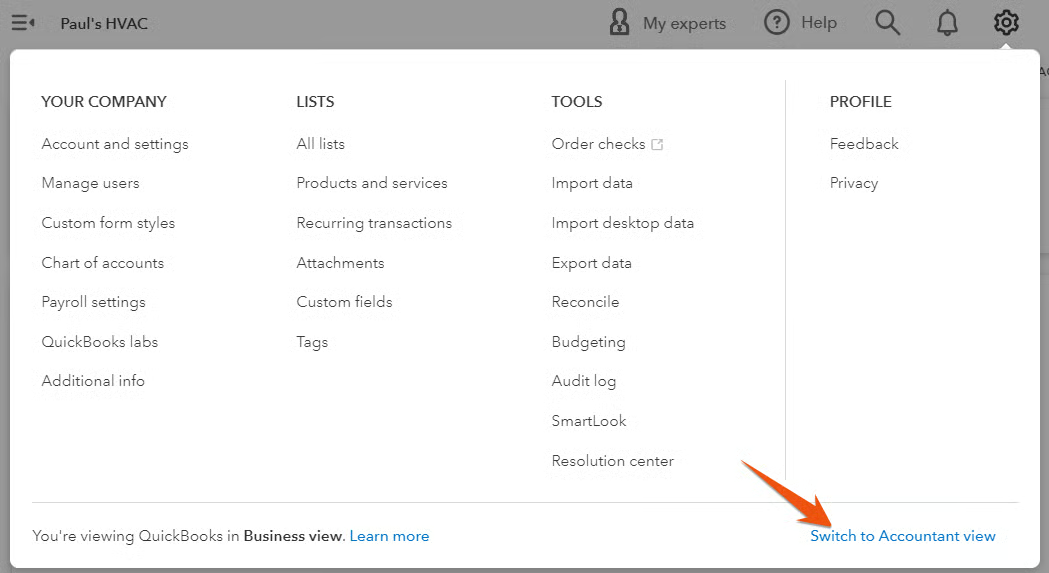
Once you verify that you are on Business View, click on Switch to Accountant view to update the appearance of your sidebar menu. In a few seconds, you should see the same left-side menu bar illustrated in this tutorial.
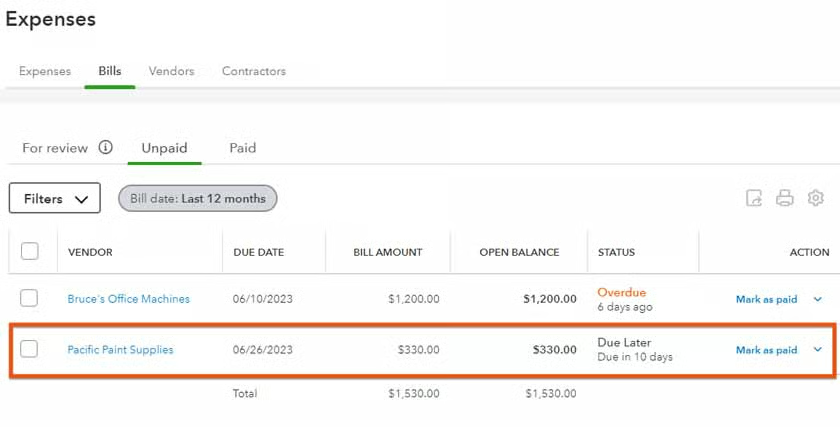
The Bills tab shows a list of all the bills you added in QuickBooks Online, sorted into three categories: For review, Unpaid, and Paid.
Click on the Unpaid tab to view the bill that you just added. In the screenshot below, we can see that our bill was successfully entered in QuickBooks. Click anywhere on the grayed entry line to review the details. If you need to make changes, click on the small drop-down arrow next to Mark as paid under the Action column, then select View/Edit bill.
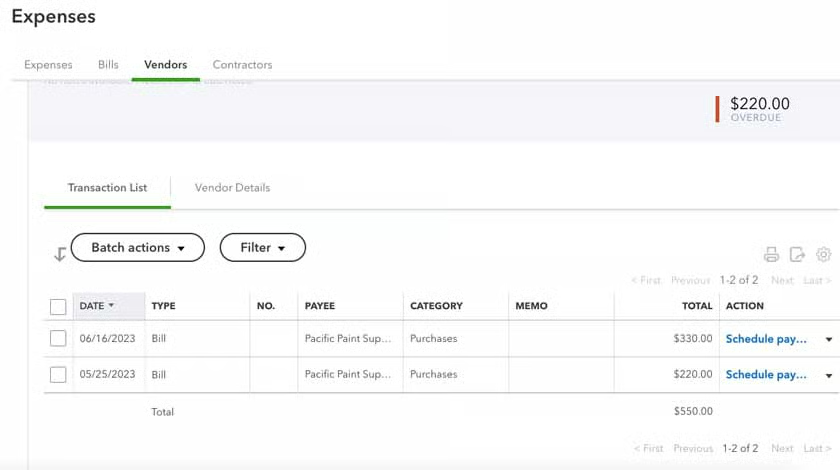
If you need to view the outstanding balance to see how much is still owed to the vendor, click on the Transaction List tab. From here, you will see the transactions associated with that vendor and all the bills you owe to them.
Why Entering Bills in QuickBooks Is Important?
Vendors that allow you to make purchases on credit will send a bill with a due date for payment. By entering bills when received, QuickBooks Online can help you track upcoming due dates to make sure bills are paid on time. It’s also helpful to know the total amount of bills or accounts payable (A/P) that your company owes. In a later tutorial, you’ll learn how to run an A/P aging report, which depends upon all bills being entered.
As our best small business accounting software, QuickBooks Online provides many benefits, including improved cash flow. By entering bills in QuickBooks Online and paying them as close to the due date as possible, you’ll be able to manage your cash flow effectively.
Frequently Asked Questions (FAQs)
Can I see the outstanding balance for a vendor in QuickBooks Online?
Yes, you can view an outstanding balance by clicking on the vendor’s name on the Bills or Vendors tab under the Expenses section.
Can I set up automatic bill payments in QuickBooks Online?
Yes, you can set up automatic bill payments through the platform’s Bill Pay feature, as discussed in our guide on how to pay bills in QuickBooks Online.
Can I attach receipts to bills in QuickBooks Online?
Yes, you can upload receipts or other supporting documents to associate them with the bill.
Wrap Up
Congratulations on learning how to enter bills in QuickBooks Online. The next tutorial is how to pay bills in QuickBooks Online, where you’ll learn how to pay bills by either printing checks or making electronic payments.