

Did you make a mistake on a deposit in QuickBooks Desktop? No worries! You can delete it and send the check right back to the Undeposited Funds account. From there, you’ll be able to edit or remove it altogether. I’ll show you step-by-step instructions on how to delete a deposit in QuickBooks.
Go to the Banking menu at the top of your screen, and choose Use Register from the drop-down menu. Or, if you’re on the QuickBooks Desktop homepage, you can just click Check Register under the Banking section — both options get you to the same place.
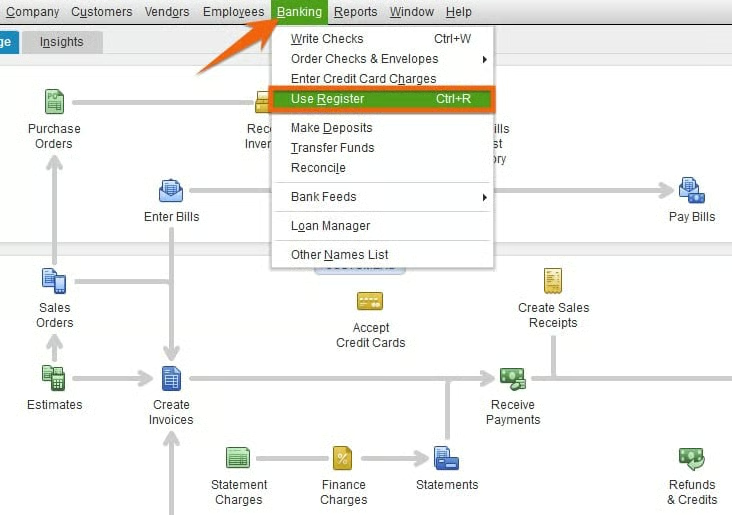
Navigate to the check register in QuickBooks Desktop
From the Select Account drop-down menu, choose the bank account where the incorrect deposit was recorded. In my screenshot below, I selected Company Checking Account.
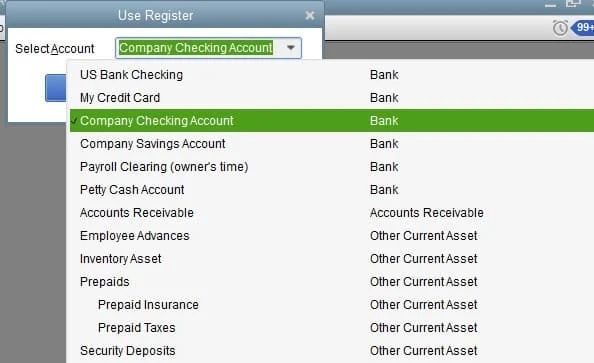
Select the bank deposit account
In the check register, look for the deposit you want to delete. You may notice that many deposits come from the Undeposited Funds account, which is where QuickBooks temporarily holds checks as they’re received and matched to invoices or sales receipts.
When those checks are deposited into the bank, QuickBooks groups them into one deposit transaction. There won’t be a problem if you delete that deposit because all the individual checks should automatically return to the Undeposited Funds account so that you can review or reprocess them.
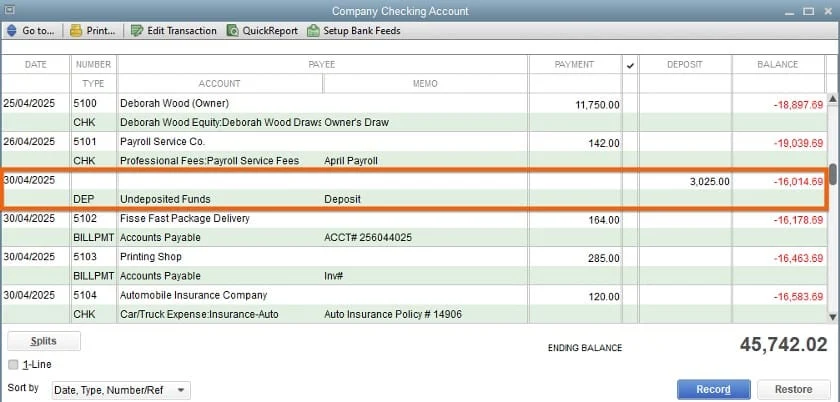
Select the deposit you want to delete
Once you’ve selected the deposit, its details will appear on the screen. You might notice there’s no delete button — but don’t worry, because that’s normal. To remove the deposit, go to the Edit menu at the top of your screen and choose Delete Deposit from the drop-down menu.
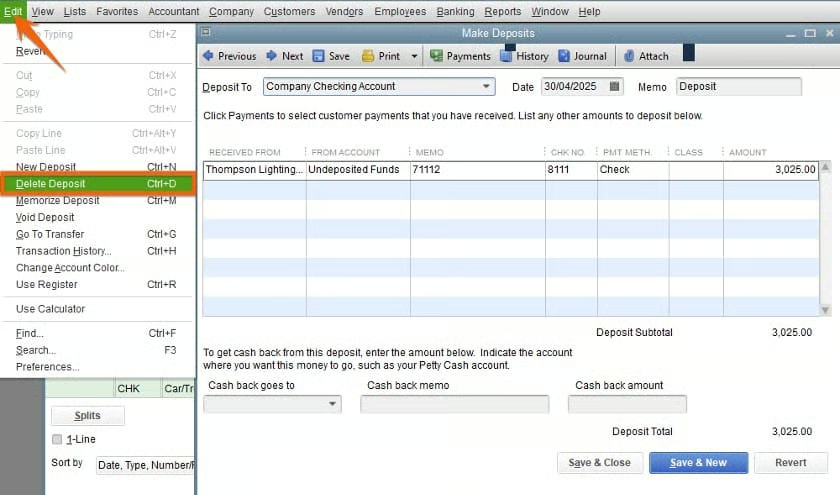
Delete a deposit in QuickBooks Desktop
While you can delete the deposit, you’ll see that there’s also an option to void it.
- Deleting a deposit completely removes it from QuickBooks.
- Voiding a deposit turns the amount to zero, but the transaction is still recorded in QuickBooks.
To void a deposit, select the Void Deposit option under the Edit menu. Next, click the Save & Close button, then click Yes if QuickBooks asks you to confirm the change.
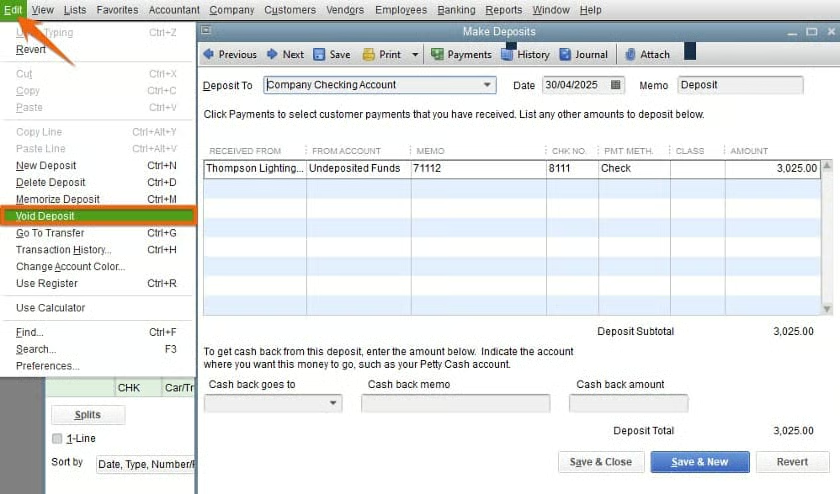
Void a deposit in QuickBooks Desktop
The checks included in the deleted deposit return to the Undeposited Funds account, which can be found in Record Deposits under the Banking menu.
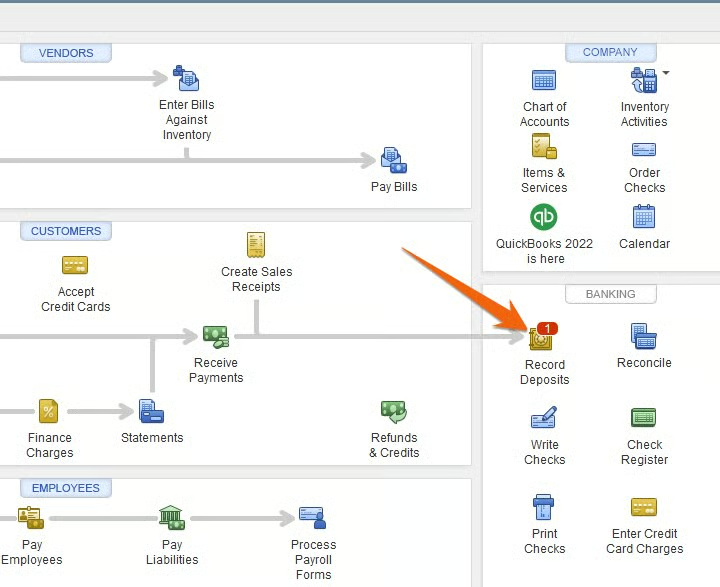
Click Record Deposits to view undeposited checks
Now that the customer checks have been returned to the undeposited funds screen, you can edit, delete them, or combine them into a new deposit.
Also read:
Delete a deposit when not made from undeposited funds
While I recommend always running your deposits through undeposited funds, the alternative is to record a check immediately deposited in your bank account when received. For instance, when receiving a check against a customer invoice, deposit the check immediately.
The process for deleting that deposit is almost the same as the steps above. The difference is that, rather than appearing in the Undeposited Funds account after deletion, the customer’s check will be deleted, and any invoice it offsets will now have an open balance.
Common reasons for deleting deposits
Even experienced bookkeepers occasionally run into mistakes, such as a missed entry, a tech glitch, or a simple slip-up. Based on what I’ve read in forums and QuickBooks communities, these are some of the most common reasons deposits need to be deleted in QuickBooks Desktop:
- Duplicate deposits sneaked in: Sometimes, automation and manual entry overlap. For example, the bank feed brings in a $5,000 batch from yesterday, but someone also keyed it in manually, so you’ve now got two deposits and inflated income.
- Wrong checks were batched together: It’s easy to accidentally select too many customer payments when making a deposit. If a check doesn’t belong (e.g., maybe it was already deposited the day before), the whole batch ends up wrong.
- Money landed in the wrong bank account: With clients who juggle multiple bank accounts, it’s not uncommon to record a deposit to “Operating” when it should’ve gone to “Payroll.” When you encounter this, the by-the-book fix is to create a reclassification journal entry. However, I suggest just deleting or voiding the deposit to reduce complexities.
- The amount or date was off and affected reconciliation: All it takes is a small typo. It can be a deposit of “$8,542” turning into “$8,452” or a date slipping into the next month. When the bank rec doesn’t match, don’t waste time hunting line by line. Delete the deposit, then go to Undeposited Funds, where you can correct it.
- A check in the deposit bounced or was charged back: If a customer’s check bounces after being deposited, the original deposit no longer matches reality. Delete the deposit to return the check to the Undeposited Funds account and then use the Bounced Check feature or a journal entry to log the reversal and tack on the bank fee.
Frequently asked questions (FAQs)
Some reasons you need to delete a deposit in QuickBooks Desktop include incorrect data entered, incorrect checks added to the deposit, a duplicate deposit created, or the deposit added to the wrong customer account.
The checks associated with the deleted deposit are reverted to the undeposited funds screen, where they can be deleted, edited, or deposited again. If the original deposit wasn’t from the Undeposited Funds account, deleting the deposit will reverse the original entry.
Yes, but you have to be using QuickBooks Enterprise.
Wrap up
Congratulations on completing our lesson on how to delete or void a deposit in QuickBooks Desktop. If you’re considering a switch to QuickBooks Online, be sure to check out our tutorial on how to convert QuickBooks Desktop to QuickBooks Online.