

I’ll walk you through how to convert QuickBooks Desktop to QuickBooks Online, a move that gives you the flexibility to access your financial data from anywhere. I’ll cover the key steps you need to take before the switch, including how to update QuickBooks Desktop to the latest version, prep your company file, and choose what data you want to carry over to the online platform. Once your file is ready, I’ll show you how to export it to QuickBooks Online.
If you haven’t signed up for QuickBooks Online, you can choose between getting 90% off the first three months (Fit Small Business limited time offer; valid through June 30, 2025) or a 30-day free trial.
- Step 1: Prepare the desktop file for export.
- Step 2: Initiate the migration process.
- Step 3: Specify the data that needs to move.
- Step 4: Sign in to QuickBooks Online or create a new account.
- Step 5: Select the company to move the file to.
- Step 6: Export your data to QuickBooks Online.
- Step 7: Check your email for confirmation.
- What’s not imported when you convert QuickBooks Desktop to Online
- Considerations for a smooth transition
- Features not supported by QuickBooks Online
- When to move from QuickBooks Desktop to QuickBooks Online
- Frequently Asked Questions (FAQs)
- Wrap Up
Step 1: Prepare the desktop file for export.
Before switching from QuickBooks Desktop to Online, ensure that your desktop file is ready to export by following this process:
Step 1a: Clean up and update files.
Clean up your desktopQuickBooks files so that your bookkeeping is up to date. Review all account balances, reconcile all bank accounts, process payroll, and adjust inventory before getting started.
Step 1b: Update QuickBooks Desktop.
To avoid compatibility issues, update your QuickBooks Desktop to the latest version. To do this, click Help at the top menu bar, select Update QuickBooks Desktop, and then click the Update Now button to initiate the update process.
Step 1c: Check file size requirements.
QuickBooks allows you to import data that is no more than 750,000 targets
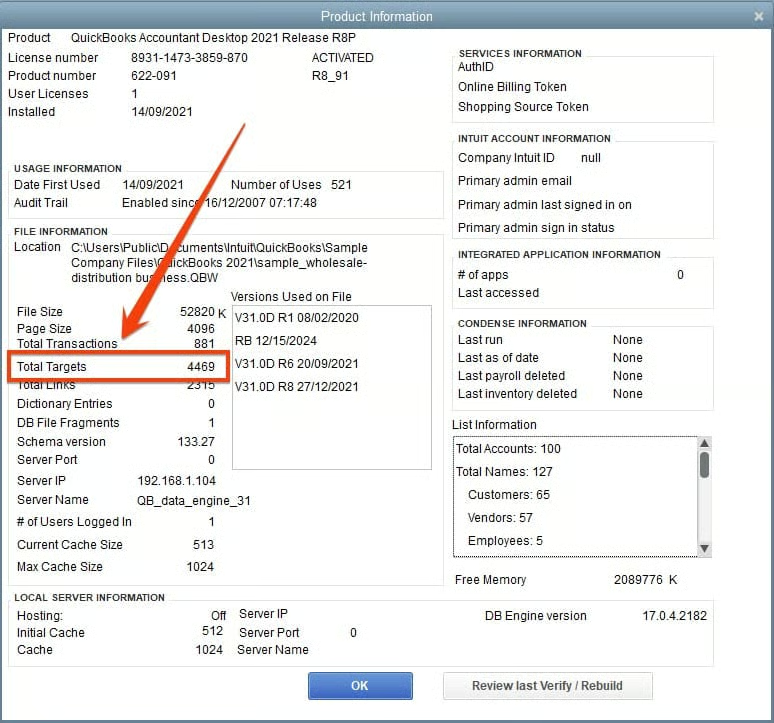
Product information screen in QuickBooks Desktop
If your file is too large, reduce the targets by condensing your QuickBooks file. To do so, click File, select Utilities, and then Condense Data. You can condense data while keeping all transactions or removing selected items. If condensing doesn’t work, then you’ll have to export specific data, such as lists and account balances.
Step 1d: Back up the file.
It’s a good idea to create a local backup of your company file in case anything goes wrong. While you can always refer back to your QuickBooks Desktop files after the migration, having a backup provides peace of mind in case any errors or issues arise during the conversion. To do this, click on File, then Back Up Company, and then select Create Local Backup.
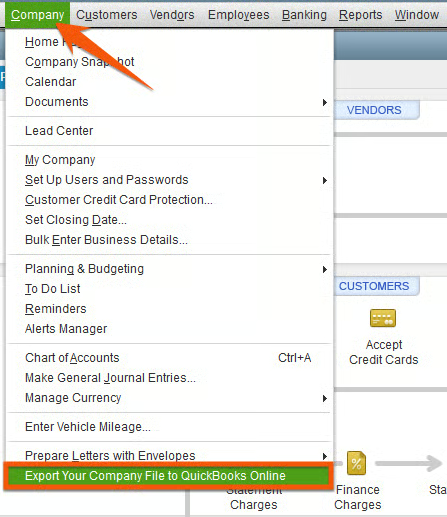
Step 2: Initiate the migration process.
Now that your QuickBooks Desktop file is ready to export, click on Company at the top menu bar and select Export Your Company File to QuickBooks Online, as shown below.
Export your QuickBooks Desktop file to QuickBooks Online
QuickBooks Desktop will then display a new window where you can get started with the migration process. From this window, I clicked on Get Started to continue.
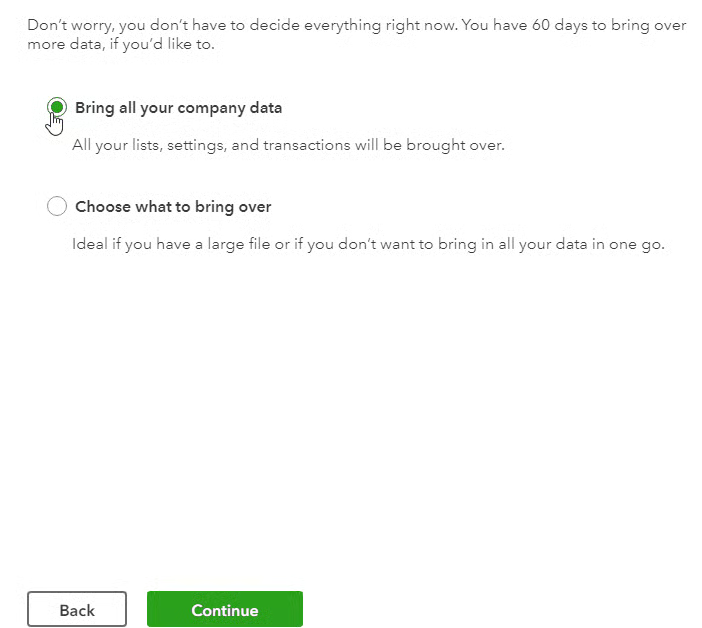
Step 3: Specify the data that needs to move.
QuickBooks will then ask what data you want to bring over to QuickBooks Online. There are two options:
- Bring all your company data: This brings all company data — including customers, vendors, settings, and transactions — to QuickBooks Online.
- Choose what to bring over: If you have a large file and don’t need to migrate all company data, then select specific items you want to move, such as lists and balances.
Export all company files or only specific data
Additionally, indicate whether you want to import inventory into QuickBooks Online. If you say yes to this, inventory will be recalculated in QuickBooks Online using the first-in, first-out (FIFO) inventory method from the start date provided.
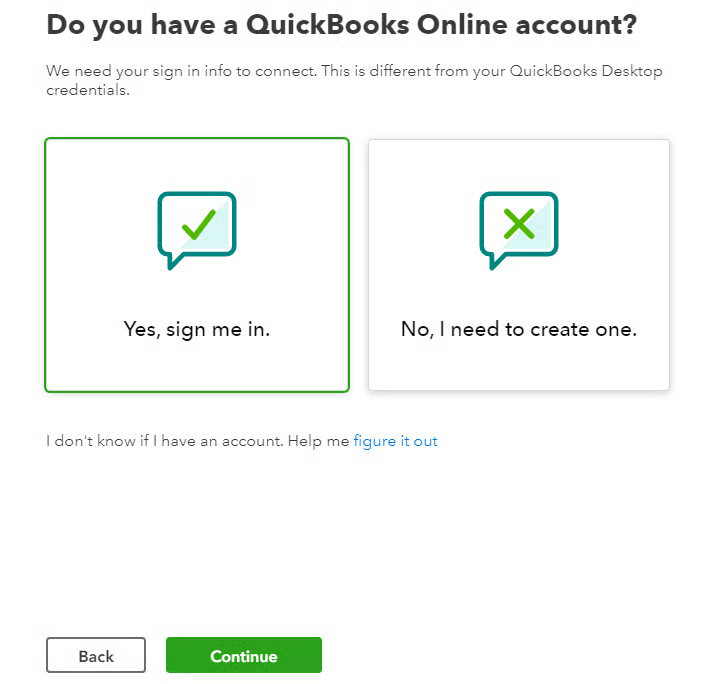
Step 4: Sign in to QuickBooks Online or create a new account.
After selecting which data to move, you can now sign in to the QuickBooks Online account where you want to migrate your files.
Since I have a QuickBooks Online account, I clicked Yes, sign me in, and then hit the green Continue button to proceed.
Sign in to your QuickBooks Online account or create a new one
Step 5: Select the company to move the file to.
Once logged in, QuickBooks will show a list of my QuickBooks Online companies; and from here, select the specific QuickBooks Online company to which you intend to move your desktop file. Then, click the green Continue button.
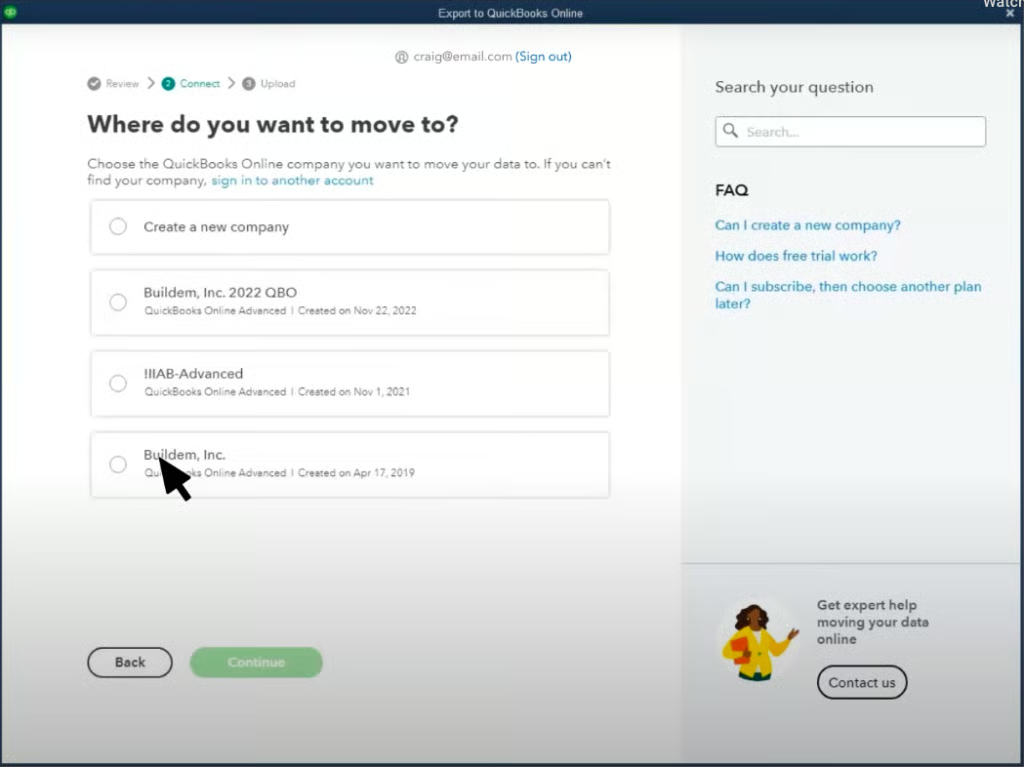
Select which company to move your QuickBooks file to (Source: QuickBooks)
Step 6: Export your data to QuickBooks Online.
After clicking Continue, confirm that you want to proceed with the migration by clicking Upload. It will take a few minutes for data to fully migrate into QuickBooks Online.
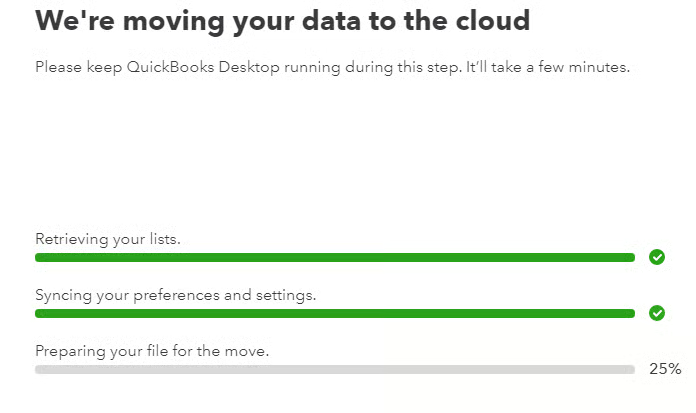
QuickBooks data file transfer confirmation
Step 7: Check your email for confirmation.
QuickBooks emails you when your QuickBooks Online company is ready, but this could take several hours for a large file. Once I received the email indicating that my migration was successful, I clicked on the Complete your setup button to log in to QuickBooks Online and review my data.
What’s not imported when you convert QuickBooks Desktop to Online
While most of your data will import when switching from QuickBooks Desktop to Online, there are a few items that won’t convert, including the following:
- Bank and credit card account reconciliation reports: Once you convert to QuickBooks Online, you’ll need to start your reconciliations from where you last ended them. If you need access to prior reconciliation reports, you can still get them from your desktop version as long as you don’t delete the files.
- Recurring credit card charges: You’ll need to cancel your existing recurring credit card transactions in the Merchant Center. Once that’s done, rebuild them in QuickBooks Online by creating recurring sales receipts.
- Audit trail: There’s nothing you can do about your past audit trail other than retain a copy of your desktop version and the information contained in it. You will, however, get an improved audit trail with QuickBooks Online going forward.
- Inventory from QuickBooks for Mac: While you can’t transfer your inventory from a Mac computer, if you have access to a computer running Windows, you can make the transfer there.
- Reports: QuickBooks Online contains a variety of reports that can replace many of those you’ve been using in the desktop version. The best solution is to find a new QuickBooks Online report and begin using it.
Considerations for a smooth transition
- Condense your data file if it exceeds the target limit.
- Move the company file to the local drive and switch to single-user mode before exporting.
- Address payroll data by removing existing records or setting up a new company file without payroll.
- Manually re-enter any data elements that do not transfer automatically, such as custom templates.
When you convert QuickBooks Desktop to Online, you may encounter challenges that can disrupt the migration process. One common issue is attempting to convert a company file that exceeds the target limit. This is addressed in Step 1c above — so do not skip that. Another frequent problem arises when the company file is stored on a network drive or is open in multi-user mode, leading to export errors. Ensuring the file is located on a local drive and switching to single-user mode can help prevent such issues.
Payroll data can also pose complications during migration. QuickBooks Online cannot overwrite existing employee records linked to payroll items, which may result in errors. To get around this, you may need to manually re-enter payroll from previous periods to get payroll to report properly.
As this process can be tricky, you may want to contact QuickBooks Online’s customer support for assistance. In addition to some payroll characteristics, certain data elements, such as custom templates and some reports, may not transfer automatically and will require manual re-entry post-migration.
Features not supported by QuickBooks Online
Not every feature you’re used to in QuickBooks Desktop is available in QuickBooks Online. Here are a few that are not in Online:
- Barcode scanning for inventory management
- Inventory assemblies
- Certain customized forms
- QuickBooks Statement writer
- Processing for multiple vendor ship-to addresses
- Use of the average cost inventory method
However, many of the features that are not directly supported in QuickBooks Online can still be obtained through the integration of third-party apps.
When to move from QuickBooks Desktop to QuickBooks Online
QuickBooks Online is our overall best small business accounting software. If you’re an existing QuickBooks Desktop user, you might want to switch to QuickBooks Online if you
- Manage your own books or work with remote accountants: QuickBooks Online is more convenient and easier to use than QuickBooks Desktop, making it ideal for DIY accounting. Since it’s cloud-based, you can easily share files with your accountants. In contrast, with Desktop, you have to create and send an Accountant’s Copy to your bookkeeper, which is not as straightforward as file sharing in QuickBooks Online.
- Need to track expenses and send invoices on the go: QuickBooks Online has a mobile app that allows you to perform various accounting tasks from your mobile devices, including tracking income and expenses and sending invoices. This makes it suitable for business owners who frequently work on the go. QuickBooks Desktop also has a mobile app, but it’s only for capturing receipts and tracking mileage.
- Require ample integration with third-party business apps: QuickBooks Online integrates with over 750 apps, while QuickBooks Desktop has only around 200. This means QuickBooks Online is better for those who tend to use various third-party tools to handle various aspects of their business, like CRM, ecommerce, and industry-specific applications.
- Anticipate business growth and need a scalable solution: QuickBooks Online provides four scalable subscription options. You can select a plan based on the features and number of users you need — meaning as your business grows and needs additional features, you can easily upgrade to a more suitable plan.
Frequently Asked Questions (FAQs)
No. User roles and permissions must be manually recreated in QuickBooks Online, which has its own user access structure. Given, you’ll need to assign roles to users after the migration.
QuickBooks Online is generally more affordable for multiple users than QuickBooks Desktop. Other meaningful incentives include the ability to access company files remotely, collaborate with team members easily, and integrate with third-party applications.
No, once your data has been converted to QuickBooks Online, the process can’t be reversed. If you want to return to Desktop, you’d need to manually re-enter your data or restore from a backup of your Desktop company file created before the migration.
The best time to convert QuickBooks Desktop to Online is at the beginning of the year or month. This ensures clean financial data and easier reconciliation. However, with proper preparation, you can transition at any time and simply identify your start date in QuickBooks Online.
Wrap Up
There you go—we were able to successfully convert QuickBooks Desktop to Online. Be sure to check out our free QuickBooks tutorials to learn the basics of using QuickBooks Online.