


If you’re using credit cards to purchase items or pay bills in QuickBooks Desktop, then you need to know how to enter the charges correctly so that you have accurate financial statements. Today, we’ll teach you how to enter credit card charges in QuickBooks Desktop Pro and Premier. We’ll cover the regular method and a shortcut to consider.
If you don’t have QuickBooks Desktop, our best small business accounting software, there are several QuickBooks Desktop products to choose from. All of them, including Premier, come with a 60-day money-back guarantee.
Step 1: Select “Enter Credit Card Charges”
From your QuickBooks Desktop homepage, tap on the Banking menu on the top of the screen, then select Enter Credit Card Charges from the drop-down menu. Alternatively, you may click on the Enter Credit Card Charges icon under the Banking menu on the lower right-hand side of the homepage.
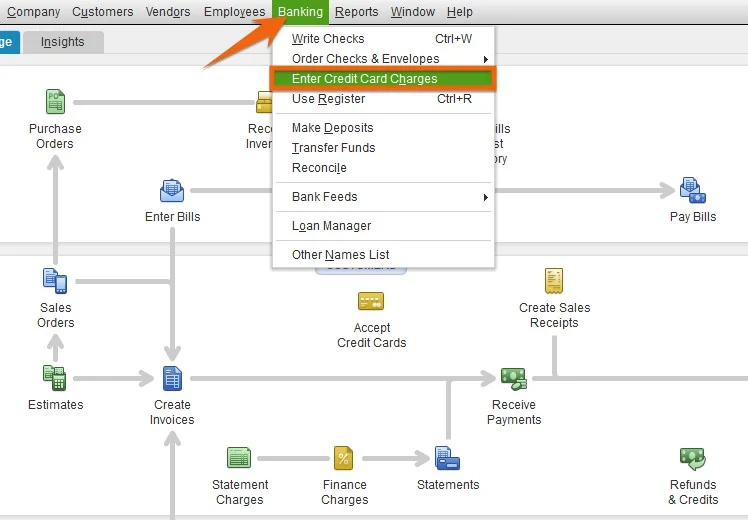
Step 2: Enter Credit Card Charges
After clicking on Enter Credit Card Charges, the credit card charge screen will appear, asking you to provide several important pieces of information.
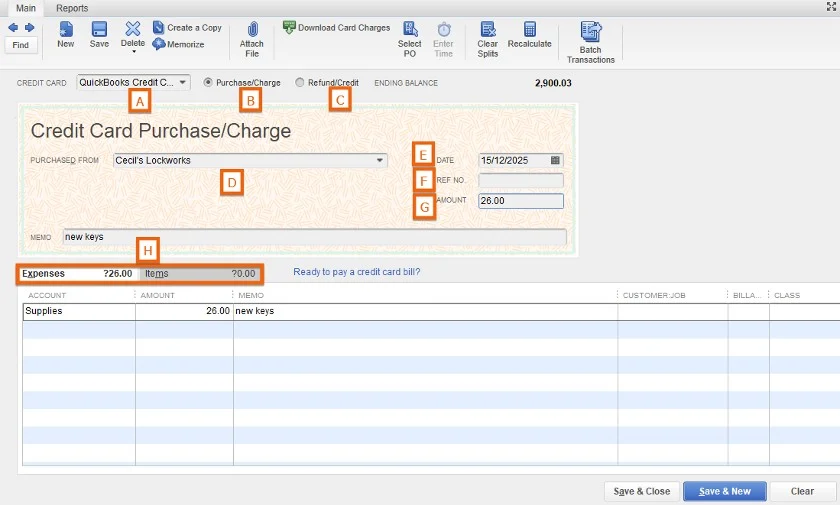
- Credit Card: If you have multiple credit cards set up in QuickBooks Desktop, make sure to select the appropriate credit card for the charge you want to enter. If you only have one credit card, QuickBooks Desktop will select that credit card account automatically.
- Purchase/Charge: Select this to record purchases.
- Refund/Credit: Choose this to refund or credit from a credit card company.
- Vendor: Click the vendor associated with the credit card charge from the drop-down list. You may also create a new vendor on the fly.
- Date: Enter the date the credit card was charged.
- Ref. No: Assign a unique reference number to a transaction (optional).
- Amount. Indicate the credit charge amount.
- Expenses/Items tabs: Use the Expenses tab to record a business expense directly to an account listed in your chart of accounts. Select the Items tab if you purchased something that you’ve already set up as a Product or Service Item.
Since we are recording a business expense, let’s fill in the Expenses tab, which contains the following fields.
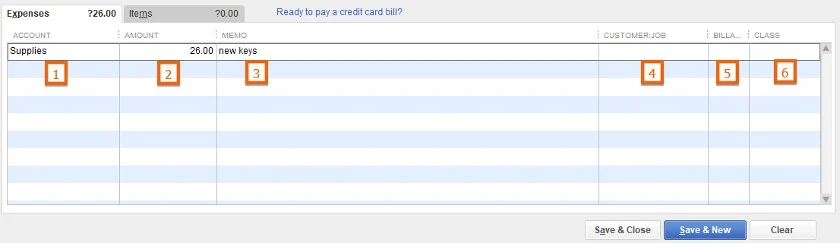
- Account: From the account drop-down list, choose the appropriate expense or asset account associated with the credit card charge.
- Amount: Enter the charge amount.
- Memo: Add a memo to help you remember the purpose of the credit card charge (optional).
- Customer Job: Assign the expense account to a customer (optional).
- Billable: Mark the expense account as billable if you wish to pass the cost through to your customer on a future invoice (optional).
- Class: Assign a class to your expense account (optional).
The Items tab contains additional fields, such as description, cost, and quantity.
Review your entry and then click the Save & Close button.
How To Enter Credit Card Charges Using the Shortcut Method
Step 1: “Select Use Register”
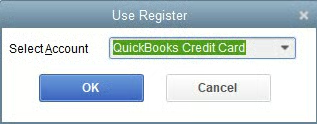
Click on the Banking menu at the top of the screen, then select Use Register from the drop-down list.
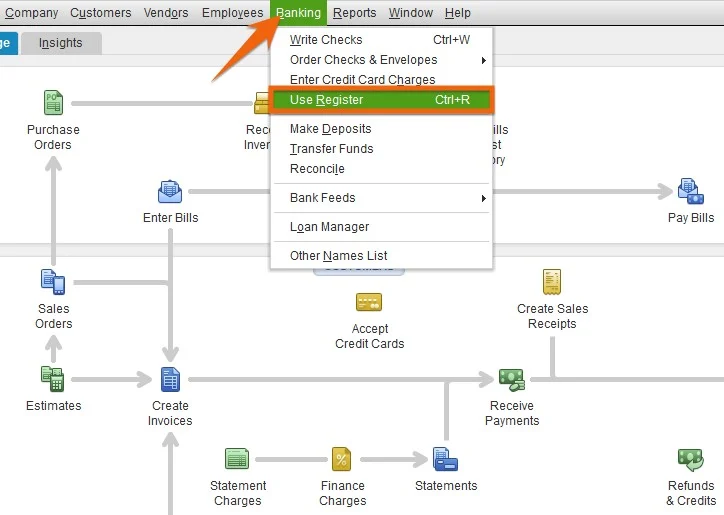
Step 2: Select the Credit Card Account
Choose your credit card account from the drop-down list and then click the OK button.
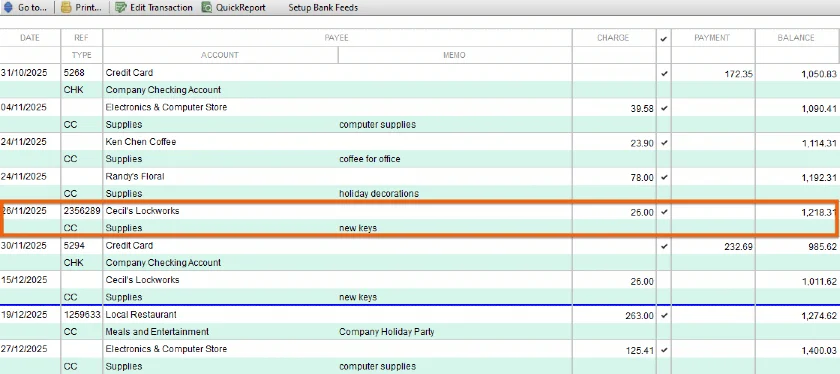
After clicking OK, the credit card register will appear. You will notice that the credit card charge we just entered is now in the register:
Step 3: Enter the Credit Card Charge
From here, you can record a new credit card charge instantly. Click on the bottom-most entry in the register, choose the appropriate account, and add other relevant information like amount and memo:
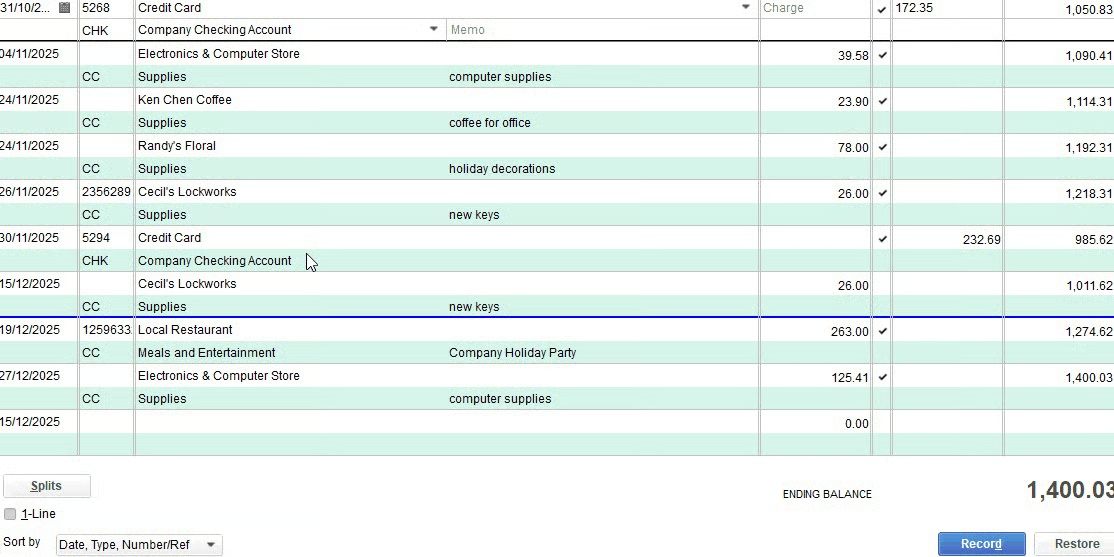
Click Record, and you’re done.
Why Enter Credit Card Charges in QuickBooks Desktop
Recording credit card charges in QuickBooks Desktop helps you:
- Reconcile your credit card account easily
- Catch billing errors in your credit card account
- Take better control of your finances with a detailed analysis of your spending
- Make life easier during tax time
Wrap Up
You now know how to enter credit card charges in QuickBooks Desktop using the regular and shortcut methods. Again, be cautious when using the shortcut because while it’s faster, the information you can record in QuickBooks Desktop is limited.
If you’re considering switching to QuickBooks Online, be sure to check out our tutorial on how to convert QuickBooks Desktop to QuickBooks Online.
