







We’ll cover how to import bank transactions into QuickBooks Desktop through two methods, with the first one via setting up a direct connection, or bank feed, between your bank account and QuickBooks Desktop. The second is by WebConnect (.qbo files), which doesn’t require QuickBooks to access your online bank account.
We’re glad you’re taking the time to learn QuickBooks Desktop, one of our best small business accounting software. Read our comparison of all QuickBooks Desktop products to help you determine which is best for your business. You can check out Intuit’s website to learn more about the products.
- How To Import Bank Transactions to QuickBooks Desktop Through Bank Feeds
- How To Import Bank Transactions to QuickBooks Desktop Through WebConnect (.qbo File)
- Why Import Your Bank Transactions to QuickBooks Desktop?
- How Often Should You Import Transactions to QuickBooks Desktop?
- Frequently Asked Questions (FAQs)
- Wrap Up
How To Import Bank Transactions to QuickBooks Desktop Through Bank Feeds
Step 1: Set the Bank Feed Mode in QuickBooks
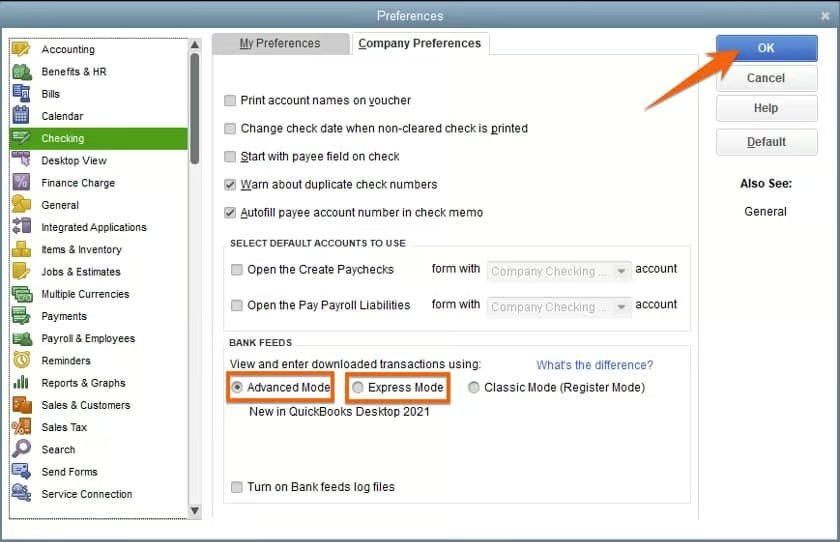
Before you proceed, ensure that your bank feed mode is set to either Advanced or Express mode. Advanced and Express are similar, except Advanced offers more options to categorize your transactions. See that you don’t select Classic or Register mode accidentally because it won’t allow you to import your transactions to QuickBooks.
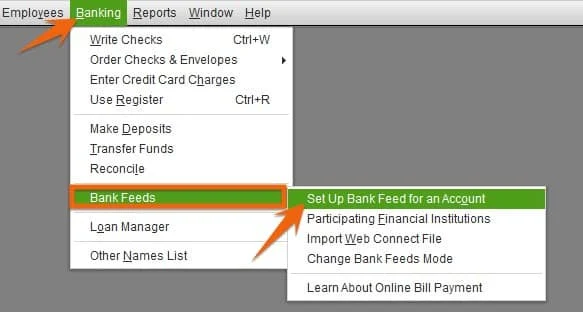
To set your bank feed preferences, click on the Banking menu, select Bank Feeds, and then click on Change Bank Feeds Mode as shown below.
You should now see a pop-up screen where you can set your bank feed preferences. Under the Checking menu, make sure that it’s either in Advanced or Express mode. By default, QuickBooks Desktop sets it to Advanced mode. Click the blue OK button to continue.
Step 2: Log Into Your Bank Account Through QuickBooks Desktop
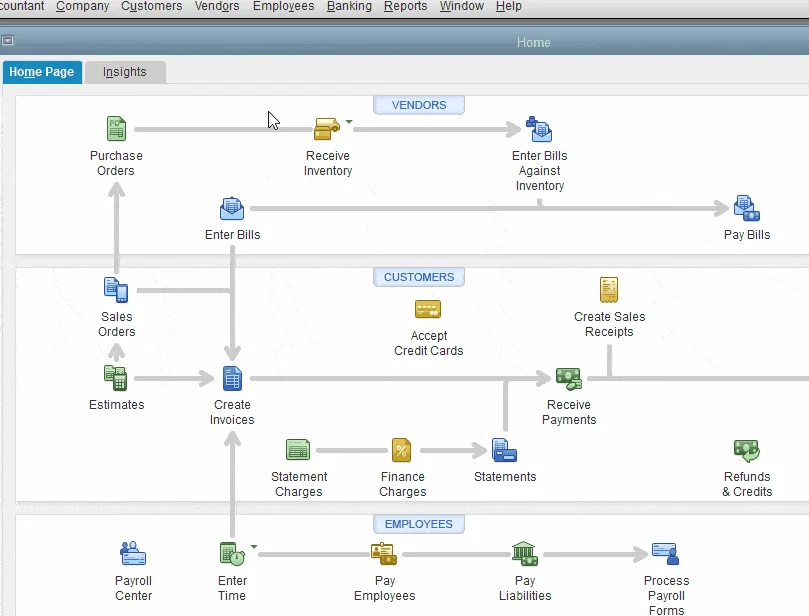
From your QuickBooks Desktop homepage, click on the Banking menu on the top of the screen. Select Bank Feeds and then click on Set Up Bank Feed for an Account.
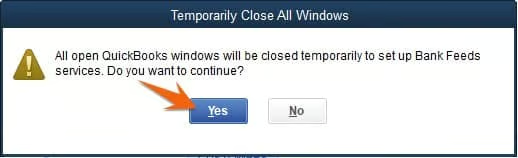
A pop-up screen telling you to close all open QuickBooks windows will appear temporarily. Click Yes to continue.
Step 3: Connect Your Bank Account to QuickBooks
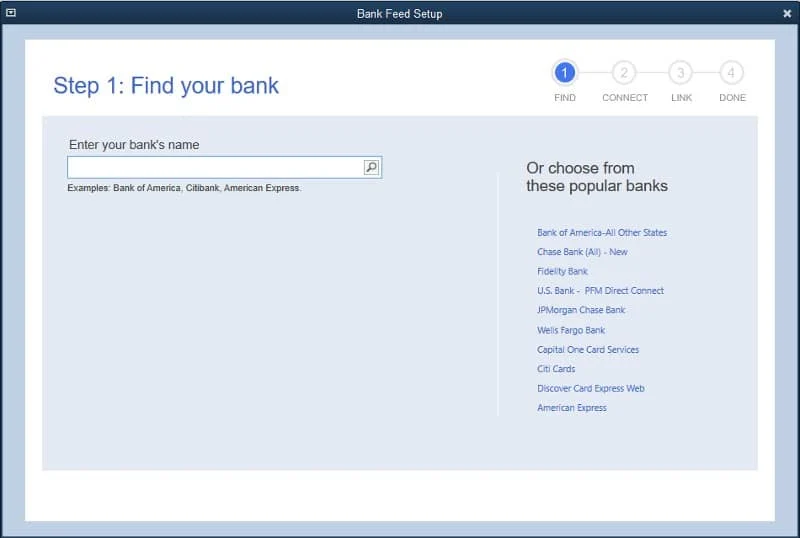
After clicking Yes, the bank feed setup screen will appear. From here, you’ll need to enter your bank’s name. Connecting your bank account to QuickBooks varies from bank to bank, so we can’t include detailed instructions for your bank. Follow the on-screen prompts.
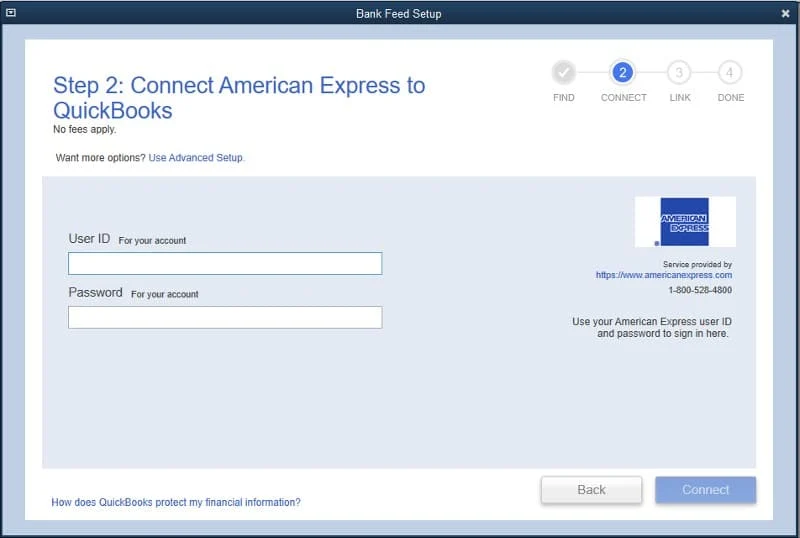
Next, a log-in screen will appear, requesting you to enter the bank account log-in credentials you use to access your bank account information on your bank’s website. If you haven’t already signed up for online access at your bank, you must do so before continuing. From here, follow the prompts when connecting with your bank.
Step 4: Review the Checking Account Register
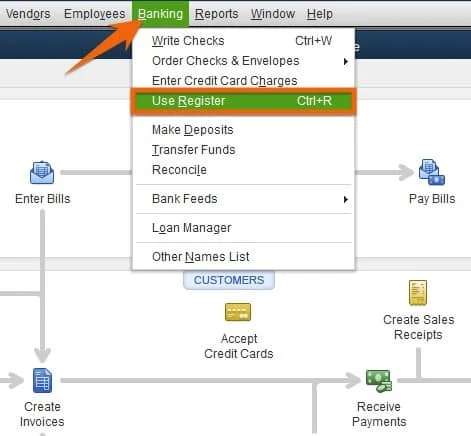
Before importing your transactions, review what’s in your checking account register. This will help you check if your new transactions are successfully recorded to the register. To do this, click on Use Register, which is found under the Banking menu.
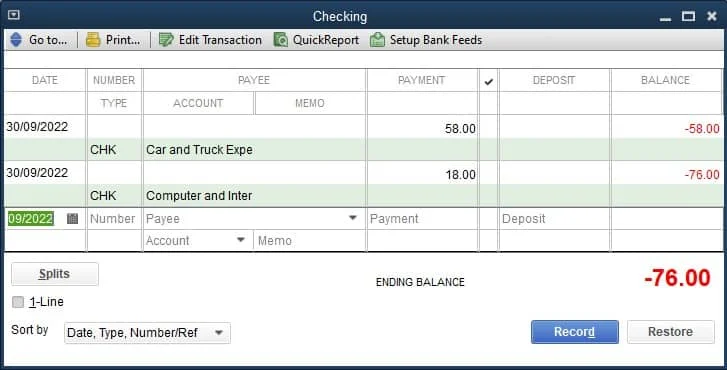
In the screenshot below, there are two transactions recorded in the checking account register. Later, you should see the transactions that we’re going to import to QuickBooks Desktop.
Step 5: Import Your Bank Transactions to QuickBooks
With the bank feed established, your bank transactions will be imported automatically into QuickBooks daily. A huge benefit of importing transactions through bank feeds is that you don’t have to import your files of bank transactions into QuickBooks manually, reducing accuracy and efficiency.
Step 6: Review & Manage Your Transactions in the Banking Center
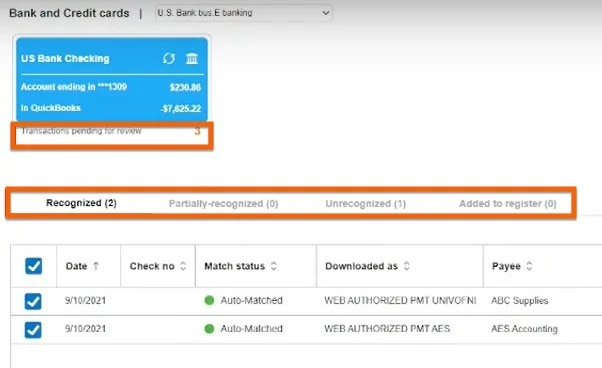
Once you import your transactions, you’ll be taken straight to the Bank Feeds Center, where those new transactions show up in the Transactions pending for review tab. You’ll see four categories: Recognized, Partially recognized, Unrecognized, and Added to register.
In the screenshot below, two of the transactions we added are recognized, and one is unrecognized. Below, we’ll explain how the transactions are categorized and the steps you need to take to manage them.
Managing Recognized Transactions
When QuickBooks matches a bank transaction to one that’s already recorded in your books automatically, it’ll go straight to the Recognized tab. We recommend that you always review the details before clicking on the Confirm button. Under the Recognized tab, on the left side of the screen, you’ll see the Confirm button (not shown) with three drop-downs: View Details, Not a Match, and Ignore.
- View Details: Clicking this takes you to the actual check. Click Confirm if it matches your bank transaction.
- Not a Match: Select this if the transaction from your bank isn’t the same transaction to which it has been matched in QuickBooks. The transaction will go to the Unrecognized tab.
- Ignore: Click this if you wish to do nothing about the transaction.
When you confirm a recognized transaction, it’ll be entered into the account register, as reflected in the Added Register tab. Your goal is to enter the three transactions into the register.
Managing Unrecognized Transactions
There are some instances where QuickBooks doesn’t match a bank transaction to what’s in your books. In this case, you need to review and add it to the account register manually.
However, before we proceed, we need to provide additional details. To do this, click on the Add more details drop-down under the Add button on the far left side of the screen.
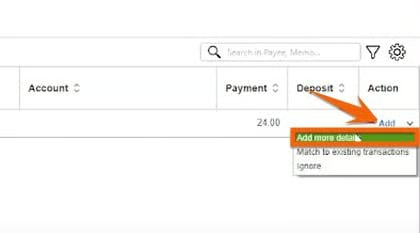
After clicking on Add more details, a pop-up screen will appear, requesting you to enter information.
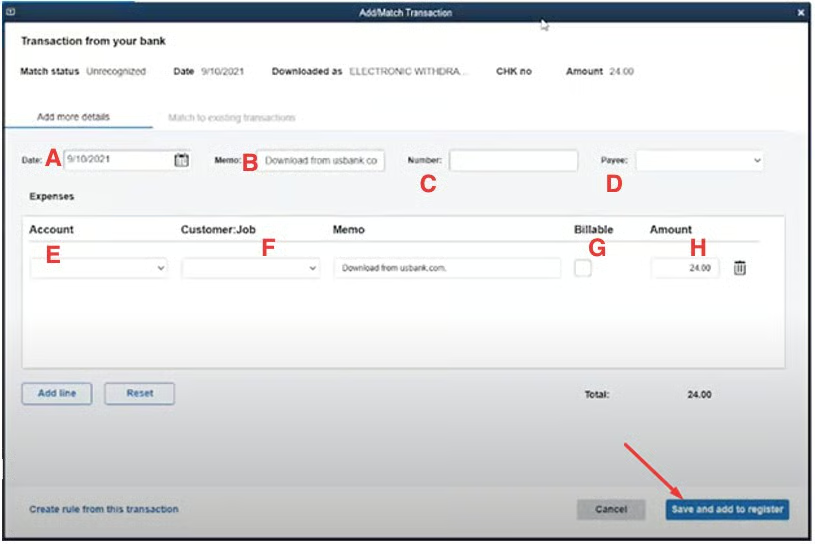
- Date: Enter the date the transaction occurred.
- Memo: Indicate additional information, such as the purpose of the transaction.
- Number (optional): Assign a unique number to your transaction.
- Payee: Enter the vendor’s name.
- Account: Assign the transaction to the appropriate expense account.
- Customer/Job (optional): Assign to a customer or job.
- Billable: Tick the box if you want to bill the transaction to a customer.
- Amount: Verify the amount of the transaction is correct.
Click the blue Save and add to register button—and you’re done.
All of your imported transactions will have moved to the Added to Register tab.
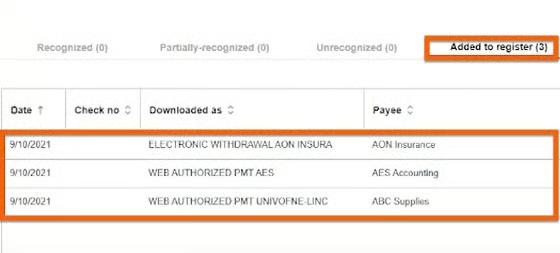
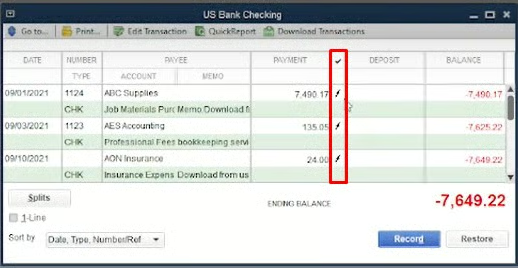
Now, when you check the checking account register, you should see the transaction you just imported to QuickBooks Desktop. In the check register, you’ll see a lightning bolt indicating that the transaction was imported from your bank.
How To Import Bank Transactions to QuickBooks Desktop Through WebConnect (.qbo File)
Step 1: Download the WebConnect File From your Bank
Log in to your bank’s website and download a QuickBooks Online file for the period that you’re importing into QuickBooks. Ensure that the file has a .qbo extension.
Step 2: Import the WebConnect File Into QuickBooks
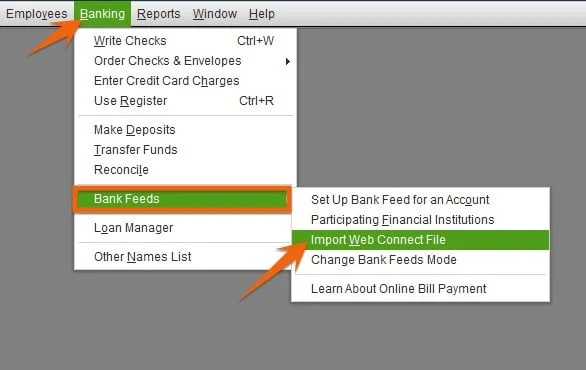
To import your WebConnect file into QuickBooks, click on the Banking menu, select Bank Feeds, and then choose Import Web Connect File.
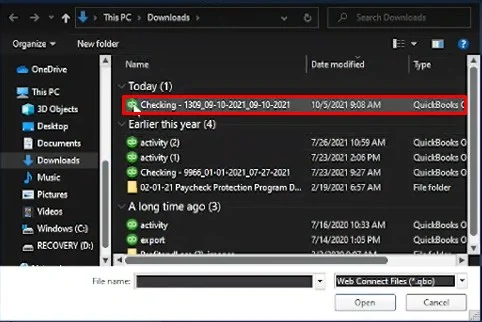
In the screenshot below, we’ve saved the .qbo file from our bank in our Downloads folder. Select the .qbo file you downloaded from your bank, and click Open.
Step 3: Review & Manage Your Transactions in the Banking Center
Your WebConnect file is now transported to QuickBooks Desktop. You can review and manage your transactions in the banking center just like what we did earlier after importing transactions through bank feeds.
Why Import Your Bank Transactions to QuickBooks Desktop?
The ability to import your bank transaction to QuickBooks Desktop is one of the software’s biggest time-saving features. Most banks have digital banking features that make it simple to 1) allow QuickBooks access to your account or 2) export transactions that can then be imported into QuickBooks. Moving your bank transactions to QuickBooks helps you:
- Save time from entering your data manually
- Keep your books updated regularly
- Simplify the reconciliation process
How Often Should You Import Transactions to QuickBooks Desktop?
A good rule of thumb is to import transactions to QuickBooks Desktop no less than once per month—but do it more often if you actively use QuickBooks to monitor your expenses and bank account balances. At the very least, you should import your bank and credit card transactions whenever you receive a statement—but prior to reconciling the account. Check out our tutorial on how to reconcile a credit card balance in QuickBooks Desktop.
Frequently Asked Questions (FAQs)
How far back can I import to QuickBooks Desktop?
Most financial institutions allow you to import up to 90 days of transactions. If you need to import transactions before those 90 days, then you need to seek assistance directly from your bank.
Is my bank information secure with QuickBooks Desktop?
Yes, it is. QuickBooks uses multiple layers of network, storage, and physical access security measures to ensure that your banking information is always safe and secure.
What if my bank doesn’t support WebConnect file download?
If WebConnect download is unavailable, then you’ll need to import your transactions through bank feeds. Alternatively, you can manually import transactions in Excel, but you have to download and install the QuickBooks Import Excel and comma-separated values (CSV) toolkit.
Wrap Up
Congratulations on finishing our lesson on importing bank statements into QuickBooks Desktop. If you’re considering a switch to QuickBooks Online, check out our tutorial on how to convert QuickBooks Desktop to QuickBooks Online.
