




How To Use the QuickBooks Online Undeposited Funds Account

Transcription

hi this is Tim Yoder with fit small business I've been a CPA for 28 years today I want to teach you how to use the unposed funds account in QuickBooks Online before we get into how to do it let's talk about why we're doing it this undeposited funds account in QuickBooks Online is awesome I really haven't seen it in any of their competitors and it's extremely useful so let's talk about why so the undeposited funds account it lets you bundle cash and paper checks together into a single bank so we don't use undeposited funds for anything electronic credit card transactions automatic Bank transfers nothing like that it's only for the physical payments that we take to the bank right so it's cash and it's checks and it allows us to bundle these together well why do we want to bundle those multiple payments together because that's how it's going to show up on our bank statement right if you take a pile of checks to your bank you fill out a deposit slip you give it to the bank your bank statement just shows one lump sum well when you go to reconcile your checking register in QuickBooks Online to your bank statement at the end of the month you need to have a onetoone match there you don't want 30 checks showing in your check register and just the lump sum amount showing in your bank statement right that would be incredibly hard to reconcile so what this does it makes the reconciliation Easy by allowing you to lump cash and physical checks together into a single deposit which then matches perfectly your bank statement so that's why we want to use our undeposited funds account okay so how do we do it it's actually fairly straightforward um as you receive cash and checks you don't want to show them being deposited to a checking account you want to show them being deposited to the undeposited funds account when you do that it basically sets it aside into account into an account that waits for you to make a bank deposit so at the end of the day at the end of the week hopefully no longer than the end of the week you're going to take all of this cash and paper checks you're going to take it to the bank so when you do that you're going to create a bank deposit in QuickBooks Online you can easily select exactly which check uh and payments you want to include in that deposit and make the deposit very slick so let's get into showing you exactly what that looks like in QuickBooks Online so the first thing we need to do is we need to actually record the receipt of some payments so let's do that so uh let's go over here to our sales and let's look at what open invoices we have and let's just clients have finally paid us so let's go down oh maybe Aaron D owes us $350 so let's receive that payment okay so we're going to assume they paid us today they paid us with a check number whatever 5498 and here is the key we're going to deposit this check into the undeposited funds account so notice we could deposit it directly into a checking account if we wanted to but we don't want to do that because if we do that it's going to show up on the check register in QuickBooks Online as a single amount and that's not how it's going to show on the bank statement the bank statement is going to show it grouped together with all the other checks for that day Okay so we're going to make it to the undeposited funds account $350 uh let's save and close Okay and let's do another one uh let's look here we'll do we'll do this one Castillo let's just uh hit receive payment again let's assume it was a check put in the check number and again we're making it to undeposited funds for $150 save and cl so that's two checks now that we want to be able to group together into a lump sum okay and let's do one more instead of receiving a payment on an invoice Let's uh say somebody came in and bought something in cash so we're just going to issue them a sales receipt so somebody Brian Cook came in and paid us chat and let's just put some information in here so it was uh today and paid for some AC repair and we'll just say like $80 okay so we're receiving $880 again into undeposited funds so this is Cash putting it with our checks we're going to deposited into our bank account okay so let's hit save and close okay so now it's the end of the day we have three things sitting in our envelope waiting to be taken to the bank so let's take them to the bank now way we do that is we're going to go to new we're going to go over here to bank deposit and look here here are the three items we have sitting in our envelope waiting to be deposited in the bank it's the check from Castillo the check from Davies and the cash from cook so our total bank deposit is going to be $586 we're going to deposit that that's going to show that lump sum will show in our check register and that'll match perfectly with our bank statement making it very easy to reconcile our account now other things in this bank deposit screen um if there are other items we're depositing that haven't already been entered into our accounting system we can actually enter them here generally you don't want to do this so especially if it's from a customer if it's income of some sort it needs to go through your normal process so it needs to be you know if they just bring it in and if they just come in and buy something it needs to be a sales receipt um if you've invoiced them and they pay it then it needs to go through that process issuing an in voice receiving uh the payment so um very rarely would you use this one instance perhaps you would use this might be I don't know let's say your your owner gives an owner's contribution um to the company something like that so this works very much just like all the other forms here you can choose the account um that you want to uh debit or credit so you know if it was construction income again if it's income you really shouldn't run it through here um but say if it was an owner's contribution here we have partner contribution so we're set up as a partnership so you could put a partner contribution in here and then make it uh with the deposit of all the uh other checks from the customers but again generally you don't want to use that but that's there if you need okay so we have our three deposits let's just hit save and close or one deposit our three items that are being included in the one deposit and there we go we've made our okay so let's see what that looks like now in our uh check registry so let's go to transactions and then down here to our chart of accounts and then we made that deposit to our Bank of America checking account so let's view that Reg and here we can see the deposit we just made of $586 okay good well if we want to see exactly what was in that $586 we're going to have to click on the transaction and then hit edit and here it shows us the three items if we if we made a mistake and let's say oh you know what we didn't actually include that cash in the deposit we can simply uncheck it and that will take it out of the deposit okay up here is where we indicate which checking account so if you have multiple checking accounts you're going to want to make sure that you choose the correct one here so we made it to the Bank of America now we've unchecked this Brian Cook let's hit save and close and the new amount should only be $500 okay good so now we have a $500 differ but what happened to that $86 in cash well because we've taken it out of the deposit it's now sitting back in undeposited funds so we can always view what's in undeposited funds by making bank deposit and there we go so when we took the Brian Cook cash out of the deposit it moved it back to the undeposited fund okay if you want to remove something then from undeposited funds we're going to have to go back to the underlying transaction so you can't delete anything here from undeposited funds we'd have to go back to the sales receipt for Brian Cook and we'd have to show it being deposited to our petty cash account rather than to our undeposited funds then that would remove it from this Bank excellent so there you go that's how you use the undeposited funds account in QuickBook online it is an incredibly handy tool that none of the competitors have makes your bank reconciliation incredibly easy uh we talked about a lot of different things in this tutorials that I've assumed you know how to do receive payments on invoices issue sales receipts of things like that if you're still learning about QuickBooks Online we have some fantastic resources for you go to fits smallbusiness.com backf free QuickBooks Online tutorials we have 55 free tutorials uh they're all in writing with annotated screenshots if that's the way you prefer to learn uh all real fantastic uh tutorials we also have these video videos attached to those tutorials as well as being available in QuickBooks as sorry as well as being available in YouTube so please like our channel in YouTube visit all of our QuickBooks Online uh material we have for you again my name was Tim Yoder it's been a pleasure I look forward to seeing you again in our next QuickBooks Online

This transcript was generated automatically from the video's captions and may contain errors.

Published: Apr 11, 2024
Updated: Jun 3, 2025
8 minute read

When you receive cash and check payments from customers, you first place them into the Undeposited Funds account instead of directly depositing them in your actual bank account. When all checks and cash payments are entered and you’re ready to deposit them, you can take them out of the Undeposited Funds account and make a single deposit in your bank account. You can then review your deposit to see if the amount recorded matches the total fund deposited.

In this article, we’ll show you the step-by-step process of using the Undeposited Funds account in QuickBooks Online. We’ll also show you how to add and remove a payment from a deposit and how to delete an entire deposit.

Step 1: Put Checks and Cash Received Into the Undeposited Funds Account

Record the payment received from your customer and place it into the Undeposited Funds account. Use the Receive payment form when your customer pays you for an invoice and the Sales receipt form when you receive immediate payments.

Processing Invoice Payments

When you receive a paper check or cash for payment of an invoice, click on the + New button at the upper left portion of your QuickBooks Online dashboard and then select Receive payment, as shown below.
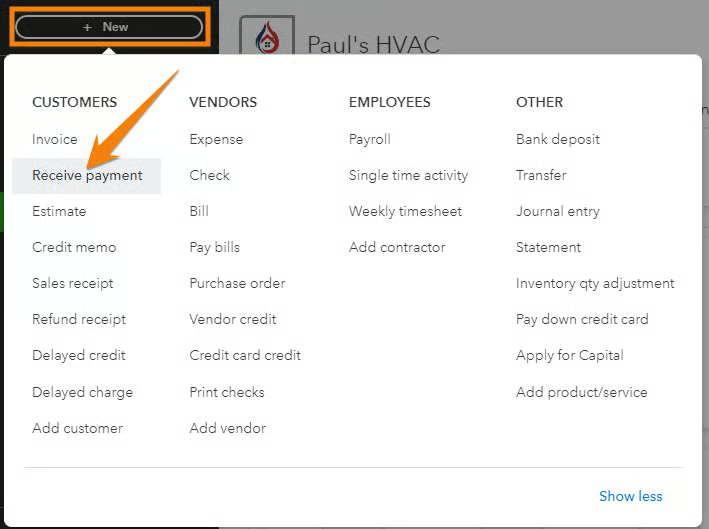
Screen showing how to navigate to the Receive payment screen in QuickBooks
Navigate to the Receive payment form in QuickBooks

Next, fill in the required information in the Receive payment form. To help you better understand how to complete the form, let’s use an example. Say we received a $1,700 check payment from Aaron Berhanu for a heating, ventilation, and air conditioning (HVAC) installation invoice.
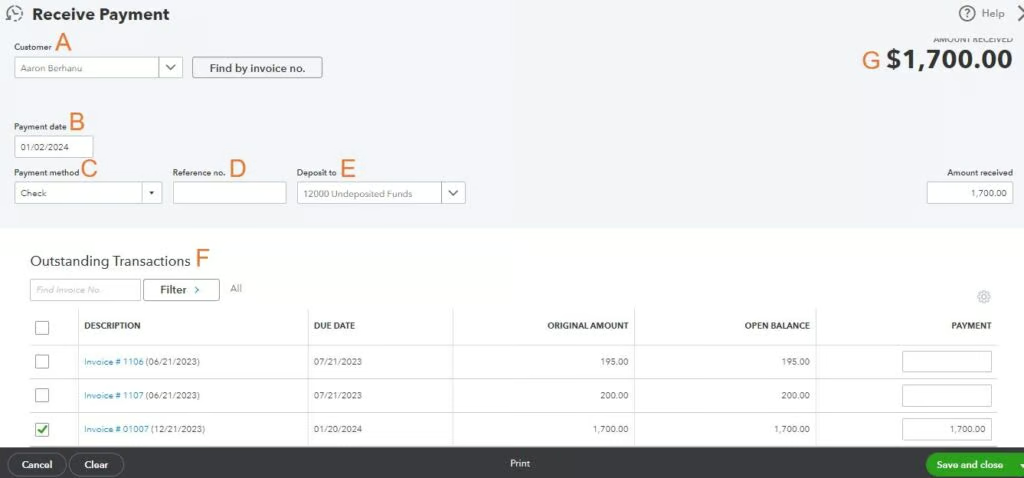
Receive payment screen in QuickBooks showing fields like Customer, Payment date, and Payment method
Receive payment screen in QuickBooks
  1. Customer: Select the customer who made the payment. You can choose from your list of customers (in our case, we selected Aaron Berhanu). If needed, you can add a new customer on the fly. You can check out our tutorial on how to set up customers in QuickBooks Online for detailed instructions.
  2. Payment date: Enter the date the payment was received.
  3. Payment method: Specify the method the customer used to make the payment, such as cash, check, or credit card. In our case, we selected “check.”
  4. Reference no. (optional): Enter a unique identifier to track and reference the payment. It might be a check number or a transaction ID associated with the payment.
  5. Deposit to: This field allows you to specify the account where the payment will be deposited. If the payment will be grouped with other payments and deposited in a single transaction, then select Undeposited Funds.
  6. Outstanding transactions: This section displays any outstanding invoices associated with the customer, allowing you to apply the received payment to specific invoices. Mark the checkbox before the invoice that is being paid with the transaction. You can see in the image below that we marked the $1,700 invoice.
  7. Amount: This reflects the total amount of the invoice payment.

Once done, click Save and close, and your received payment will automatically be reflected in the Undeposited Funds account.

For more detailed instructions, head to our tutorial on how to receive payments in QuickBooks Online.

Processing Sales Receipts

When you immediately receive a cash or a check for a sales transaction without having created an invoice, then you must use the Sales receipt form to record the check and revenue. Select + New and then click Sales receipt.
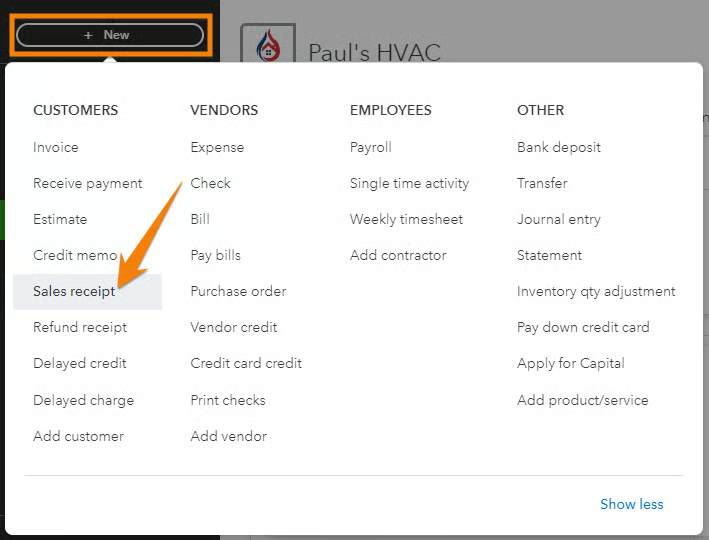
Screen showing how to navigate to the Sales receipt screen in QuickBooks
Navigate to the Sales receipt screen in QuickBooks

From the Sales receipt form, you’ll need to provide the requested details. For guidance, let’s use another example. Suppose we recently received an upfront payment of $150 in cash from Robert Allard for an A/C repair service.
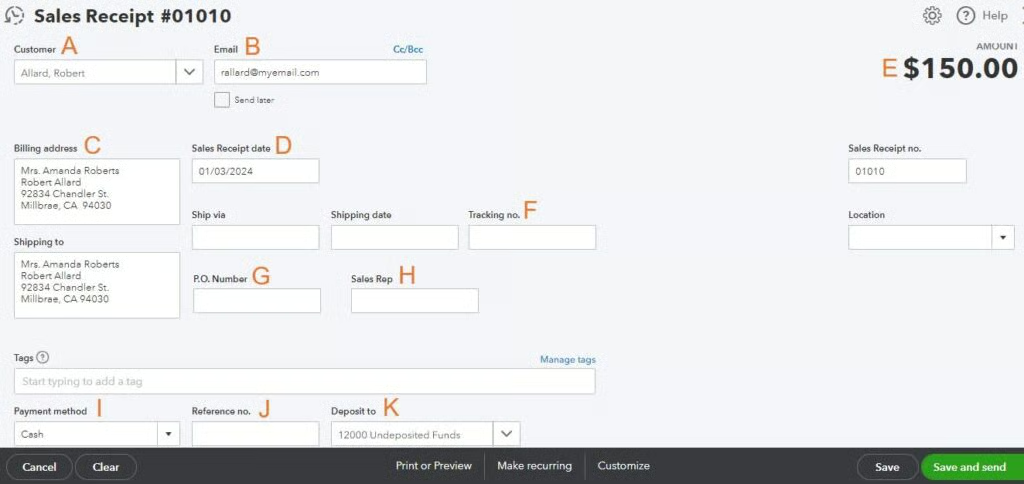
Sales receipt screen in QuickBooks showing fields like customer name, email, and payment method
Sales receipt form in QuickBooks (1 of 2)
  1. Customer: Select the customer for whom the sale is being recorded. You can add a new customer if needed. In this case, we selected Robert Allard.
  2. Email: This field populates automatically based on the email address you entered when setting up the customer profile.
  3. Billing Address: As with the email address, this field also populates automatically based on your customer profile setup.
  4. Sales receipt date: Enter the date the sales receipt is made.
  5. Amount: This section displays the total amount of the sales receipt, summarizing the combined total of all line items, taxes, and additional charges
  6. Tracking no (optional): You can add a unique tracking number that can be used to monitor the progress of the shipment.
  7. P.O. Number (optional): Enter the purchase order number for the transaction, if any.
  8. Sales rep (optional): If applicable, you can associate a sales representative with the transaction by selecting their name in this field.
  9. Payment method: Specify how the payment was made, such as check, cash, or credit card. In our example, we selected “cash.”
  10. Reference no (optional): This is often used for additional tracking information associated with the sales receipt, such as a customer’s order number or a project code.
  11. Deposit to: Similar to the Receive Payment screen, this field allows you to specify the account where the payment will be deposited. If the payment will be grouped with other payments and deposited in a single transaction, then select Undeposited Funds.

When you scroll down the Sales receipt form, you’ll see additional sections, including information about the product purchased by the customer or service rendered. Here, you can select the product or service from your list or create a new one if needed. For this, we have a detailed guide on how to set up the products and service list in QuickBooks Online.

Additionally, you can add a description of the product or service, enter the quantity and rate, and add taxes if applicable. In the screenshot below, we have indicated the details of the A/C repair service rendered, including the rate which is $150.
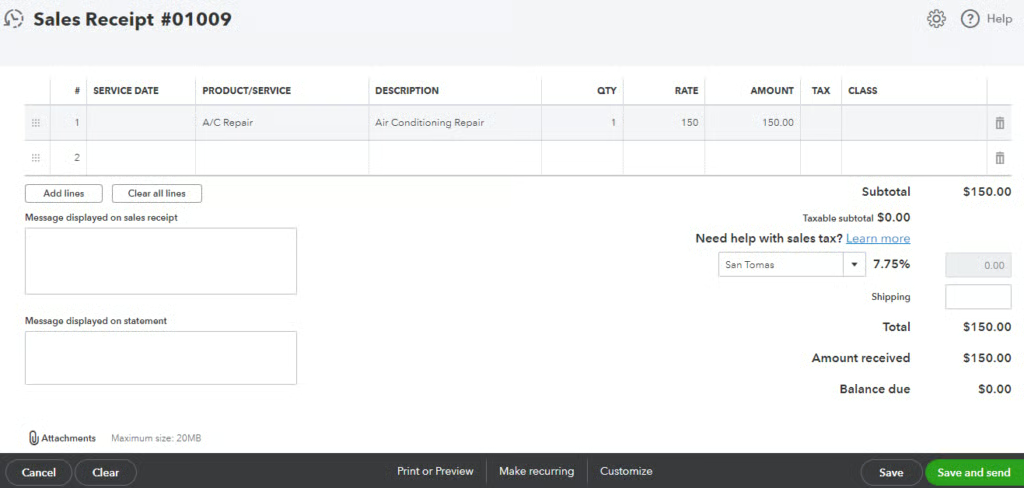
Lower portion of the sales receipt screen in QuickBooks where you can specify products or services rendered to the customer
Sales receipt form in QuickBooks (2 of 2)

Once you provide all the required details, click Save or Save and send on the lower part of the screen. Your payment will be recorded automatically in the Undeposited funds account.

Step 2: Combine Checks and Cash With a Bank Deposit

Using your deposit slip as a reference, combine the check and cash payments with a bank deposit. Select + New and then select Bank deposit.
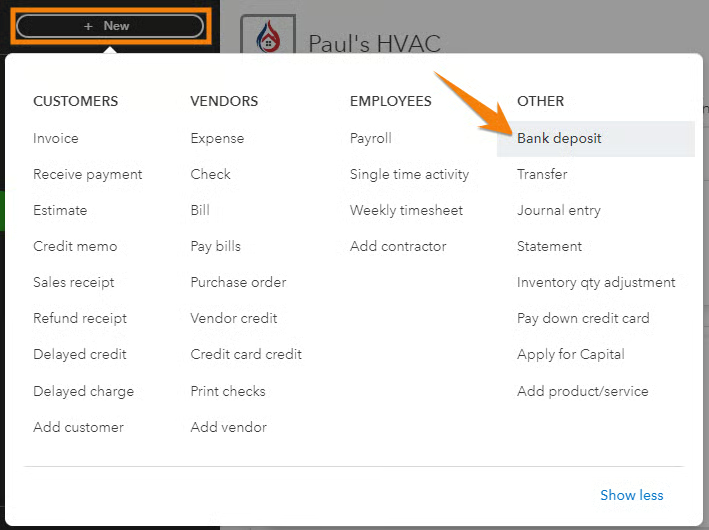
Screen showing how to navigate to the Bank Deposit screen in QuickBooks
Navigate to the Bank deposit screen in QuickBooks

From the Bank deposit form, you’ll see the following fields and sections:
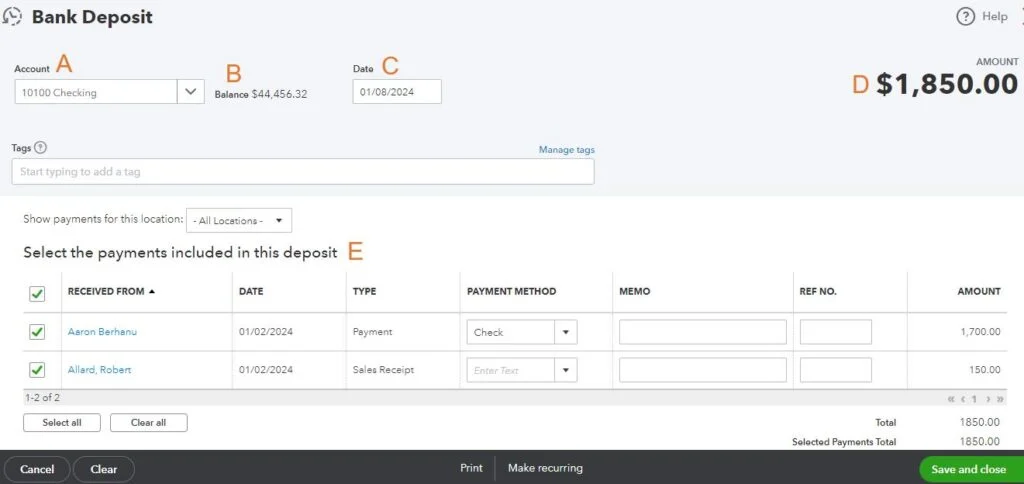
Bank Deposit screen in QuickBooks showing fields like account and balance
Bank deposit screen in QuickBooks (1 of 2)
  1. Account: Specify the bank account into which you are depositing the funds. In the screenshot below, we used our checking account.
  2. Balance: This section displays the current balance of the selected bank account.
  3. Date: Specify the date on which the deposit is being made.
  4. Amount: Enter the total amount of the deposit.
  5. Select the payments included in this deposit: Here, you can choose the specific customer payments that are included in the deposit. Click the box before the payment item. In the image below, we are combining the payments we received from Aaron Berhanu and Robert Allard.

Including Additional Checks Into Your Deposit

If you have checks to deposit that didn’t come through the normal invoicing and sales receipt process, you can add those checks in the Add funds to deposit section. For instance, if you receive a $500 paper check from a partner as a capital contribution, you’ll use this section to record the details of that check, including the account (e.g., “Partner Contribution”, an equity account) and any other relevant information.
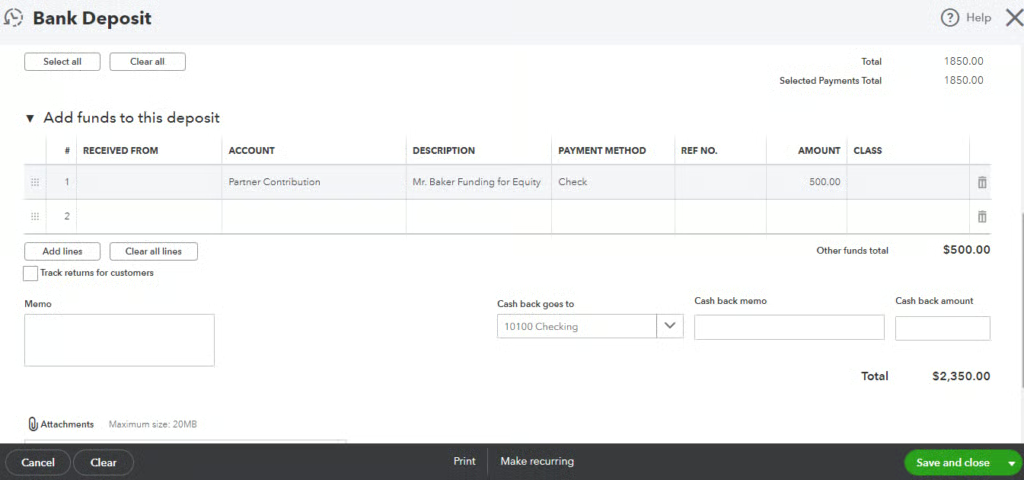
Lower part of the Bank deposit screen where you can add include additional funds like a partner contribution
Bank deposit screen in QuickBooks (2 of 2)

Verify that the total on your bank deposit screen matches the total deposit on your physical deposit slip. Once done, click Save and close or Save and new to complete the deposit.

Step 3: Review and Manage Deposits

Review your deposits to verify that the amounts recorded accurately reflect the total funds you deposited into your bank account. This will help catch errors and discrepancies and ensure a more efficient bank reconciliation. To do this, click Reports in the left menu bar and then select Deposit detail under the Sales and customers section, as shown below.
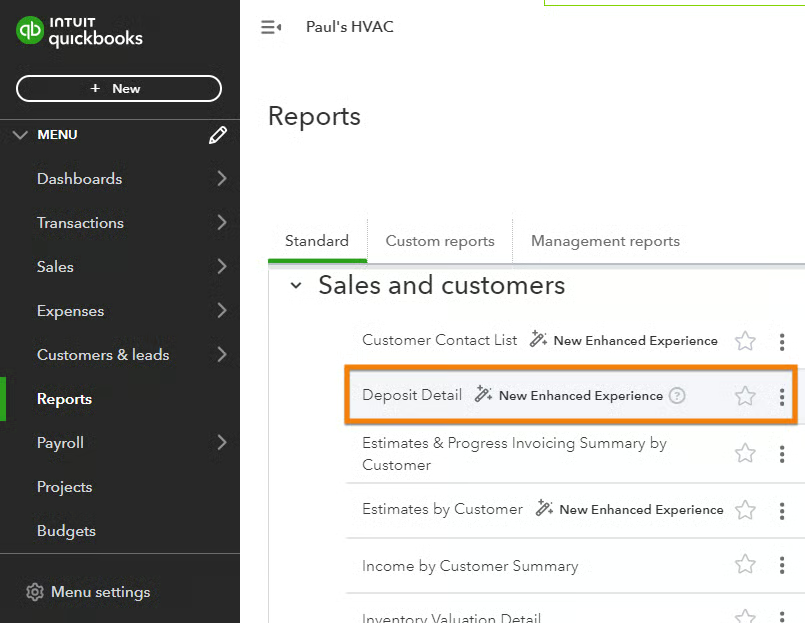
Screen showing how to create a Deposit Detail report in QuickBooks
Preparing to run a Deposit Detail report in QuickBooks

The report shows a list of all your completed bank deposits. You can select individual deposits to open more details.
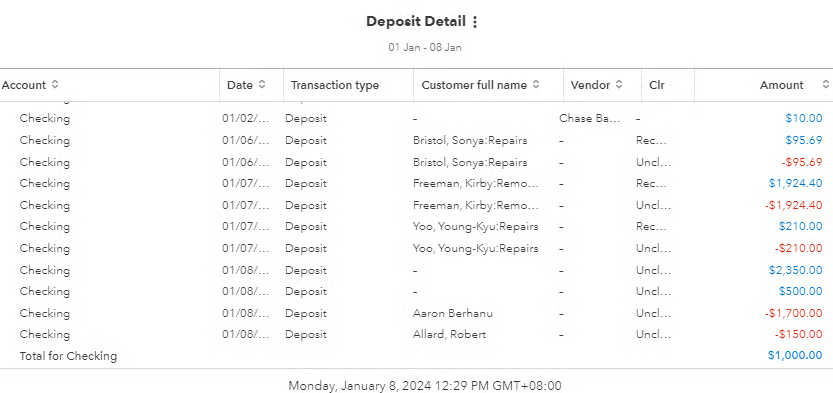
Sample Deposit Detail report in QuickBooks showing details like the transaction type and customer name
Sample Deposit Detail report in QuickBooks Online

Removing a Payment From a Bank Deposit

If you added a payment to a deposit by mistake, you can remove that payment easily by clicking on the deposit or amount field in the deposit entry line in the Deposit Detail report. It will take you to the bank deposit screen where you can uncheck the checkbox for the payment you wish to remove, and then click Save and close. The payment will automatically go back to the Undeposited Funds account.
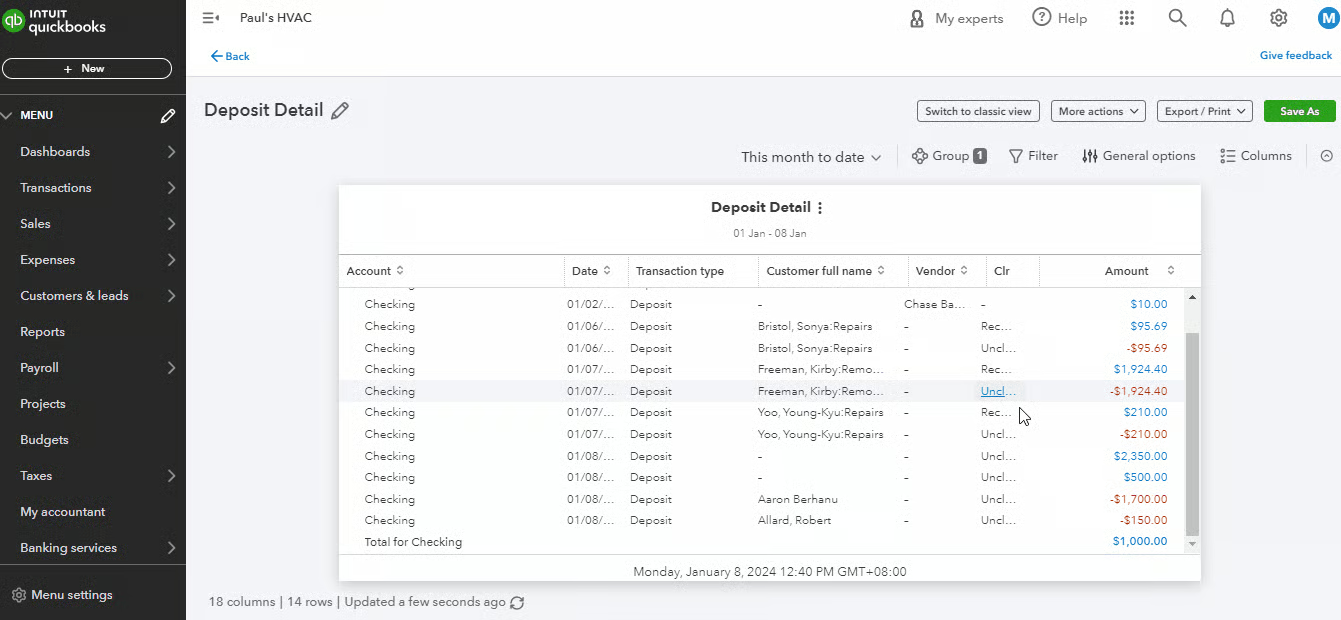
Screens showing how to remove a payment from a bank deposit in QuickBooks Online
Removing a payment from a bank deposit in QuickBooks


Adding a Payment to a Deposit

You can add payments to your deposit slip in a similar fashion. Any undeposited payments sitting in the Undeposited Funds account will appear in the list of payments without a checkmark. Tick the checkbox to add the payment.

Deleting a Bank Deposit

If you need to delete a bank deposit, click the deposit or amount field in the Deposit Detail report and then click More at the lower part of the screen and then select Delete as shown below.

Screens showing how to remove a payment from a bank deposit in QuickBooks Online
Removing a payment from a bank deposit in QuickBooks

Importance of the Undeposited Funds Account in QuickBooks

The main purpose of the Undeposited Funds account is to make bank reconciliations easier. It does this by allowing you to group cash and paper checks into a single deposit, mirroring how banks process and deposit your payments. When reviewing your transactions, it’s easier to spot discrepancies and missing deposits since your QuickBooks records align with the combined deposits on your bank statement.

When To Use the Undeposited Funds Account in QuickBooks

You will need to use the Undeposited Funds account in QuickBooks Online when depositing more than one check or a combination of cash and checks on a single deposit slip.

For instance, you run a small retail business and in a single day, you receive payments from customers in checks and cash:

  • Customer A pays with a $100 check
  • Customer B pays with $50 in cash
  • Customer C pays with a $75 check

Instead of directly recording these transactions as separate deposits into your bank account, you can use the Undeposited Funds account to record a lump sum deposit that will match your bank statement.

Frequently Asked Questions (FAQs)

What is the Undeposited Funds account in QuickBooks?

The Undeposited Funds account in QuickBooks Online is a holding account where you temporarily record customer payments before grouping and depositing them as a lump sum into your bank account.

Do I need to set up an Undeposited Funds account?

No, as it is set up in QuickBooks Online automatically. However, if needed, you may rename it in your chart of accounts (COA).

Do I need to reconcile the Undeposited Funds account?

No, the Undeposited Funds account itself doesn’t need to be reconciled. Reconciliation is done when you move undeposited funds in QuickBooks to your actual bank account.

Bottom Line

You just learned how to use the Undeposited Funds account in QuickBooks Online, its importance, and when to use it. If you want other free resources to learn how to better use QuickBooks for your business, check out our free QuickBooks Online tutorials.

Mark Calatrava

Mark Calatrava

Accounting Expert at Fit Small Business

Mark Calatrava is an accounting expert for Fit Small Business. He has covered more than 50 accounting software for small businesses and niche industries and has developed an in-depth knowledge of the important features of accounting software, including how the importance of these features vary by business. As a QuickBooks ProAdvisor, Mark has extensive knowledge of QuickBooks products, allowing him to create valuable content that educates businesses on maximizing the benefits of the software.

Fit Small Business Logo

Our mission is to provide small business owners with the information you need to succeed. Learn how to start, market, run, and grow your business today!

Property of TechnologyAdvice. © 2026 TechnologyAdvice. All Rights Reserved

Advertiser Disclosure: Some of the products that appear on this site are from companies from which TechnologyAdvice receives compensation. This compensation may impact how and where products appear on this site including, for example, the order in which they appear. TechnologyAdvice does not include all companies or all types of products available in the marketplace.