FitSmallBusiness
  • HR
  • Retail
  • Sales
  • Marketing
  • Accounting
  • Real Estate
  • More Categories
    • Starting a Business
    • Banking
    • Credit Cards
    • Financing
    • Insights and Trends
    • Insurance
    • Office Technology
    • Online Business
    • Taxes
    • Restaurants
  • BE A PARTNER
  • WORK AT FSB
  • About
  • HR
  • Retail
  • Sales
  • Marketing
  • Accounting
  • Real Estate
  • More Categories
    • Starting a Business
    • Banking
    • Credit Cards
    • Financing
    • Insights and Trends
    • Insurance
    • Office Technology
    • Online Business
    • Taxes
    • Restaurants

Accounting | How To

How To Receive Payments in QuickBooks Online

Published May 3, 2023

Published May 3, 2023

Tim Yoder, Ph.D., CPA

REVIEWED BY:
Tim Yoder, Ph.D., CPA

Mark Calatrava

WRITTEN BY:
Mark Calatrava

This article is part of a larger series on Accounting Software.

Learn More With Our QuickBooks Online Course
Explore the chapters in the guide.
  1. How to Set Up QuickBooks Online
  2. Module 1: Setting up QuickBooks Online
    1. How To Set Up Company Information
    2. How to Customize Your Dashboard
    3. How To Set Up Sales Form Content
    4. How To Customize Invoices, Sales Receipts & Estimates
    5. How To Set Up Products and Services
    6. How To Set Up Messages
    7. How To Set Up Customer Statements
    8. How To Customize Expenses
    9. How To Set Up Advanced Settings
    10. How To Set Up Multiple Users
    11. How To Set Up the Chart of Accounts
    12. How To Set Up the Products and Services List
    13. How To Set Up Customers
    14. How To Set Up Vendors
  3. Module 2: Managing Sales and Income
    1. How To Create Quotes, Bids, and Estimates
    2. How To Create and Send Invoices
    3. How To Receive Payments
    4. How To Create & Send Sales Receipts
    5. How to Enter Partial Payments
    6. How to Track Billable Hours
  4. Module 3: Managing Bills and Expenses
    1. How To Write & Print Checks
    2. How To Enter Bills
    3. How To Pay Bills
    4. How To Make Expenses Billable
    5. How To Write off a Bad Debt
  5. Module 4: Managing Banking Transactions
    1. How To Import Bank Transactions
    2. How To Enter Banking Transactions Manually
    3. How To Manage Downloaded Banking Transactions
    4. How To Record Bank Deposits
    5. How To Use the Undeposited Funds Account
    6. How To Transfer Funds Between Bank Accounts
    7. How To Record Bounced Checks From Customers
    8. How To Process Bank Reconciliations
  6. Module 5: Managing Business Credit Card Transactions
    1. How To Import Credit Card Transactions
    2. How To Manage Downloaded Business Credit Card Transactions
    3. How To Enter a Credit Card Refund
    4. How To Reconcile Business Credit Card Accounts
    5. How To Process Credit Card Sales With QuickBooks Payments
    6. How To Record Credit Card Sales With a Third-party Credit Card Processor
  7. Module 6: Setting Up and Managing Payroll
    1. How To Process Payroll
    2. How To Set Up & Pay Payroll Tax
    3. How To Add Historical Payroll Data
    4. How To Set Up QuickBooks Payroll Direct Deposits
    5. How To Print Payroll Checks
    6. How To Run Payroll Reports
    7. How To Reconcile Payroll Liabilities
  8. Module 7: Reporting
    1. How To Run a Profit and Loss Statement
    2. How To Create a Balance Sheet Report
    3. How To Run a Statement of Cash Flows
    4. How To Run an A/R Aging Report
    5. How To Run an A/P Aging Report
  9. Module 8: Advanced Accounting in QuickBooks Online
    1. How To Make a Journal Entry
    2. How To Use Classes and Locations
    3. How To Create Recurring Transactions
    4. How to Create and Manage Projects
Related Content
  • QuickBooks logo.
    QuickBooks Online Review: Features & Pricing
  • QuickBooks Online Dashboard in Desktop and mobile screen.
    Top 25 QuickBooks Online Tips (Including Keyboard Shortcuts)
  • Close up shot of a young woman using laptop and calculator while working on a project.
    5 Best Accounting Software for Small Retail Businesses

In this tutorial, you’ll learn how to receive payments in QuickBooks Online while offsetting the accounts receivable created when you issued an invoice. We will also show you how to verify whether the payment was applied correctly. If you’re looking to learn how to receive payment when no invoice has been issued, then head over to our tutorial on how to create and send QuickBooks Online sales receipts.

Click on the + New button at the top of the left menu bar and then select Receive payment in the first column under Customers, as shown below.

Screen showing how to navigate to the Receive payment screen in QuickBooks

Navigate to the QuickBooks Online Receive Payment screen


When you open the Receive Payment screen, you will see a list of outstanding invoices for the customer you have selected. To receive a payment against an outstanding invoice, you need to complete several fields on the Receive Payment screen.

Receive payment screen in QuickBooks with highlighted required fields, like customer, payment date, and payment method

QuickBooks Online Receive Payment screen

To illustrate the process, we’ll use the following sample scenario: a customer named John Davis owes us $3,075 for a furnace installation service. He then paid us the full amount in check.

A. Customer: Select the customer from which you received a payment. In our sample, we selected John Davis.

Tip:

Ensure that you apply the payment to the correct customer invoice. Your customer may get upset if they find their invoice still appears as unpaid.

B. Payment date: Input the date you received the payment.

C. Payment method: This is how the customer paid you, such as cash, check, credit card, or bank transfer. In our example, we chose “check” since John Davis paid us with a check. If your customer is paying by credit card, see our tutorial on how to manage credit card sales in QuickBooks Online.

D. Reference no.: Enter the check number or leave it blank if cash was received.

E. Deposit to: If this is the only check to be deposited in your bank account, you can select the appropriate bank account. However, if this check will be combined with other checks or cash, then you should record the payment received in Undeposited Funds. You might wish to peek ahead at our tutorial on how to record bank deposits in QuickBooks Online to understand what happens to customer checks after being posted to Undeposited Funds. For newer QuickBooks Online accounts, the default name for the undeposited funds account is Payments to Deposit.

The reasons behind Undeposited Funds:

Undeposited Funds allows you to group multiple checks and cash into a single deposit in your check register. Without Undeposited Funds, each check received shows as a separate deposit in the check register, making it difficult to trace to the bank statement where checks are combined into a single deposit amount.

F. Amount received: Input the amount of the cash or check received. In our example, we entered “$3,075” since we received the full amount.

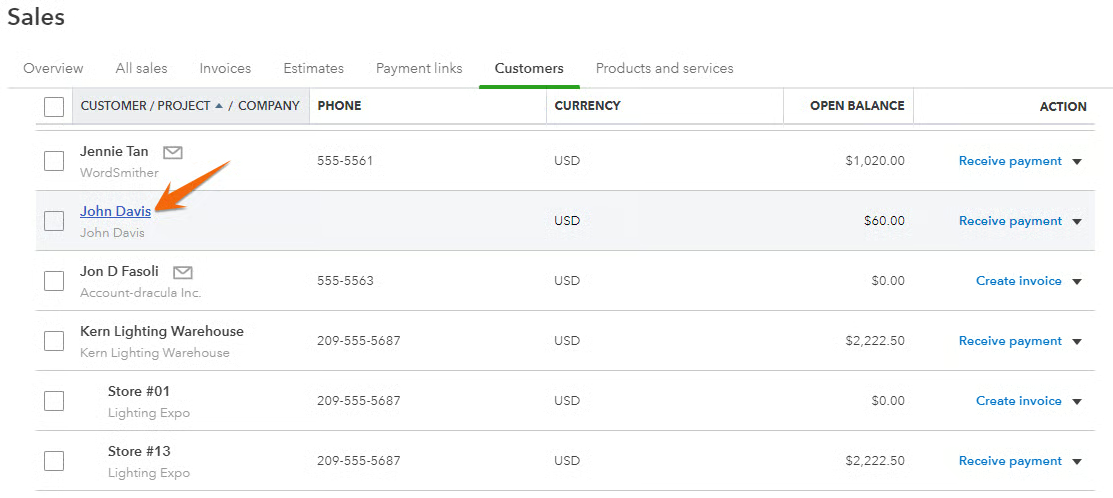
G. Invoice detail: The invoice detail will appear automatically for each outstanding invoice once a customer is selected in field A. Multiple invoices will appear if a customer has more than one outstanding invoice. You’ll notice in the labeled screenshot above that we have two outstanding invoices sent to John Davis: one is for the furnace installation service, and the other is a $60 invoice for air filter replacement.

H. Payment: Enter the portion of the amount received in F to apply to each invoice listed in G. This will usually populate automatically but can be changed as long as the total payments applied match the total amount received.

When you’re satisfied with your payment details, click the green Save and close button to record the transaction.


Now, let’s verify whether the $3,075 payment we received from John Davis was applied correctly. From the left menu bar, hover over Sales and then select Customers:

Arrow navigating to customer listing in QuickBooks Online.

Navigate to customer listing in QuickBooks Online

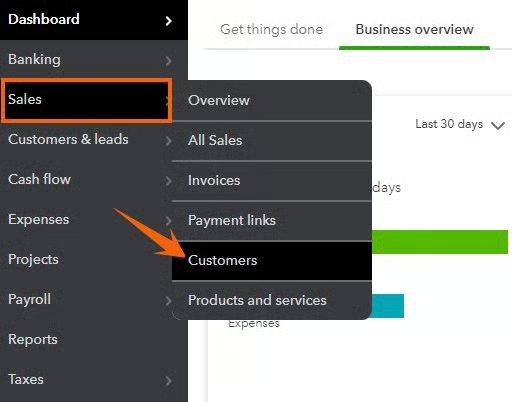
Next, locate the customer for which you recorded the payment and click on their name or anywhere on the grayed entry line. In our case, we clicked on John Davis.

Customers tab where you can check payments received from a specific customer in QuickBooks

Display customer details in QuickBooks Online

QuickBooks Online will display a list of recent transactions for John Davis. As seen in the transaction list below, the $3,075 payment was successfully applied against the outstanding invoice.

Transaction lists tab in QuickBooks showing all invoices created for and payments received from a specific customer in QuickBooks

Customer transaction details in QuickBooks Online

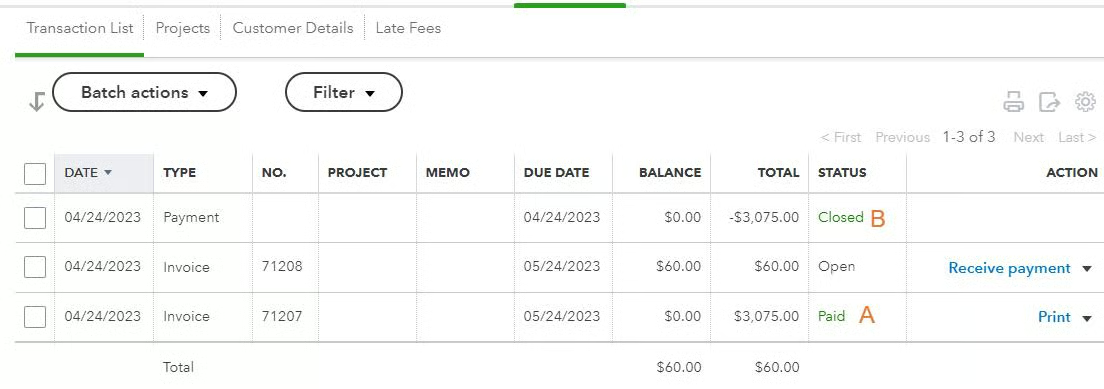
When confirming whether a payment received is applied correctly, we recommend verifying two items.

A. Invoice marked Paid: Verify that the invoice for which payment was received is now marked as “Paid.”

B. Payment recorded: Verify that the payment recorded is marked as “Closed.” If a payment is marked as “Open,” it hasn’t been applied against an invoice properly.


Why Receiving Payments in QuickBooks Online Is Important

As our best small business accounting software, QuickBooks Online offers the necessary tools to receive and manage payments effectively. When a customer pays an invoice in QuickBooks, it’s important to apply the payment against the invoice, as demonstrated in this tutorial. If you record the invoice payment using a sales receipt or bank deposit, the income will be double-counted, and the invoice will still be shown as outstanding.

Record a sales receipt:

If the customer doesn’t have any open invoices, then follow the steps in the sales receipt tutorial to record the payment received as income.

When payments aren’t recorded properly in QuickBooks, the common issues that may arise are:

  • Paid invoices remain open: If payments aren’t applied to the right invoice, the invoice shows as outstanding even though the customer has paid it. This will lead to inaccurate collection efforts and could affect your relationship with customers.
  • Overstated accounts receivable balances: The amount owed by customers will be inaccurate if payments aren’t correctly applied.
  • Overstated sales and income: Payments received and incorrectly recorded as deposits or on sales receipts will be recorded as income. However, income was already recorded when the original invoice was created.

Frequently Asked Questions (FAQs)

Yes, you can. If there was no prior invoice issued, you should create a sales receipt to record the payment in QuickBooks.


Yes, you can. To do this, select the customer and invoice you want to apply the payment to and enter the amount of the partial payment in the Payment column on the Receive payment screen. You can then save the payment and apply additional payments to the same invoice as needed.


Wrap Up

You’ve just learned how to receive payments in QuickBooks Online. You now know how to record payments received on outstanding customer invoices, and you understand the importance of using the undeposited funds account. The next tutorial in our QuickBooks Online training course is how to create and send QuickBooks Online sales receipts, where you’ll learn how to receive payments from customers when an invoice hasn’t been issued.

← Previous Tutorial

QuickBooks Online Tutorials

Next Tutorial →

About the Author

Mark Calatrava

Find Mark OnLinkedIn

Mark Calatrava

Mark Calatrava is an accounting expert for Fit Small Business. He has covered more than 50 accounting software for small businesses and niche industries and has developed an in-depth knowledge of the important features of accounting software, including how the importance of these features vary by business. As a QuickBooks ProAdvisor, Mark has extensive knowledge of QuickBooks products, allowing him to create valuable content that educates businesses on maximizing the benefits of the software.

Fit Small Business

Facebook Instagram Pinterest LinkedIn YouTube

Company

  • About Us
  • Editorial Policy
  • Careers

Partners

  • Work With Us

Contact Us

info@fitsmallbusiness.com

Facebook Instagram Pinterest LinkedIn YouTube

© Fit Small Business 2025

California Privacy Rights | Privacy | Terms | Sitemap

Join Fit Small Business

Sign up to receive more well-researched small business articles and topics in your inbox, personalized for you. Select the newsletters you’re interested in below.

Please select at least one newsletter.