

When you’re in a rush, it may be tempting to get your payments into QuickBooks as quickly as you can and ignore some of the finer details. Don’t do it. Knowing how to record a deposit in QuickBooks Online and doing it properly will help you avoid headaches and keep your blood pressure down. So, if you don’t do it for financial accuracy, do it for your health!
For further insight, watch my video and follow along with the step-by-step details provided.
- Step 1: Record receipt of payments.
- Step 2: Record the bank deposits in QuickBooks.
- Step 3: Add customer checks from undeposited funds.
- Why recording deposits in QuickBooks Online is important
- How to correct or edit bank deposits in QuickBooks Online
- How to record bank deposits using the QuickBooks mobile app
- Frequently asked questions (FAQs)
- Wrap up
Step 1: Record receipt of payments.
If you prepared an invoice for your customer and the payment received is in satisfaction of an invoice, you’ll need to use QuickBooks’ function for “receiving payments” (as referenced in Step 1a.) If you did not prepare an invoice for your customer and the payment received is similar to a walk-in sale, you’ll need to record the payment as a “sales receipt” (as referenced in Step 1b).
Step 1a: Record payments related to an invoice.
Note: If the payment being recorded is not related to an invoice, proceed to Step 1b.
Before recording a deposit, you must record the receipt of customer payments. You can learn how to do this in our tutorial on how to receive payments in QuickBooks Online.
Step 1b: Record payments without an invoice.
Note: Use this method only for payments for which an invoice was not prepared.
If you’re unsure how to record payments for which no invoice is required, see our guide on how to create online sales receipts in QuickBooks Online.
All payments recorded should have a “Deposit To” account of “Undeposited Funds.” Using a bank account as the “Deposit To” account is not best practice and will likely make your month-end bank reconciliation more difficult.
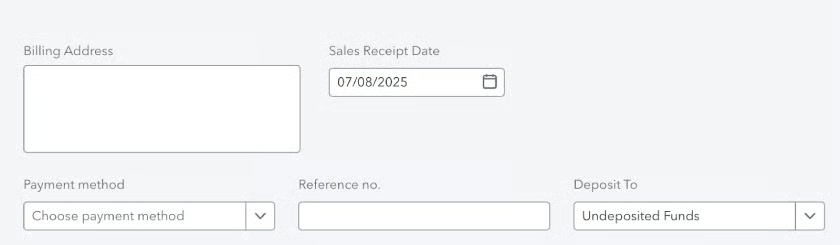
Depositing to “Undeposited Funds”
Why use Undeposited Funds? Using QuickBooks Online’s Undeposited Funds account makes tracing from your check register to the bank statement easy. It groups customer payments into a single deposit, which will show up in the check register as one amount. Since your bank will be accepting your deposit of one lump sum, your records will then match your books without any extra calculations. When it’s time to do your bank reconciliation, you won’t have to manually sum QuickBooks deposits to identify the components of one bank statement deposit.
Think of the Undeposited Funds account as a temporary holding area, such as a cabinet or an envelope. Just as you might collect checks from customers and keep them in a drawer until you’re ready to deposit them in the bank, you can record those payments in QuickBooks and assign them to the Undeposited Funds account.
Once you’re ready to deposit the payments to your bank, you can transfer the total amount from the Undeposited Funds account to your bank account in QuickBooks. This is like taking the checks out of the drawer and bringing them to the bank for deposit, which brings me to our next step.
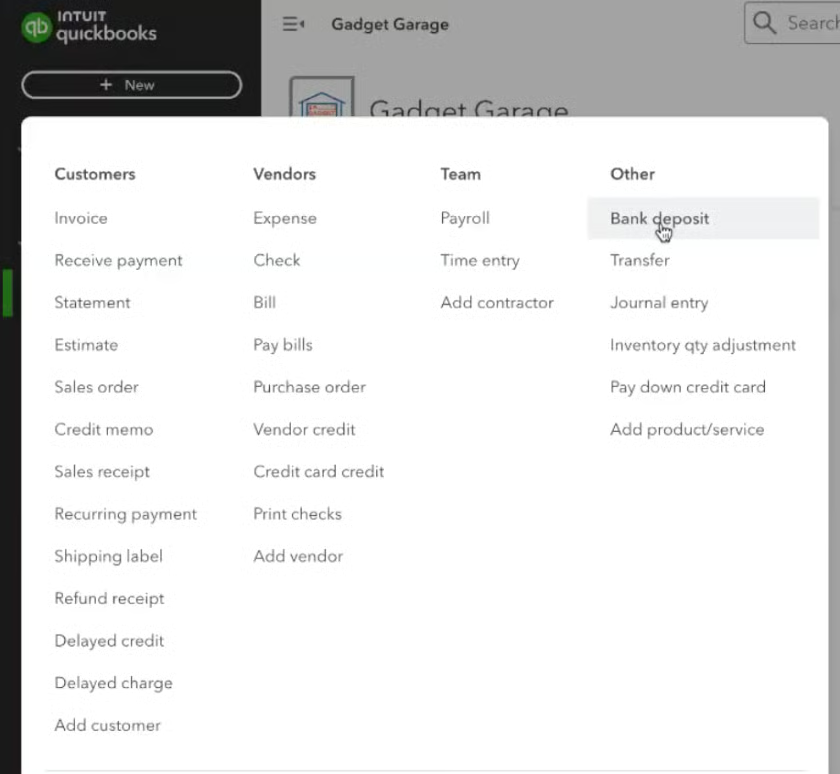
Step 2: Record the bank deposits in QuickBooks.
To create a new deposit, click the + New button above the left menu bar and then select Bank deposit from the far-right column, OTHER, as shown below.
Creating a new bank deposit in QuickBooks Online
Next, you have to complete the bank deposit form, which consists of several sections and fields. To help you understand how to complete the Bank Deposit screen better, let’s use this scenario.
You received a check from a client named Ivy N. Voice for $200 for services rendered. You wish to record the deposit in QuickBooks. Here’s how you would input that transaction.
Choose a bank account and input the date of the deposit from the top portion of the Bank Deposit screen. In our case, I selected 1000 Cash.
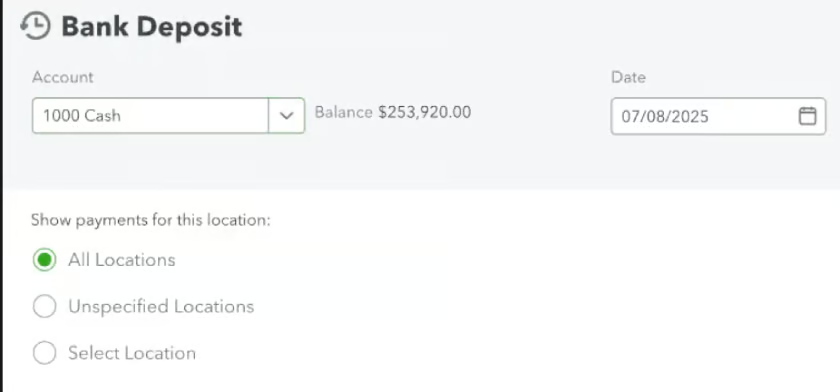
Selecting the bank account and date for a bank deposit
While QuickBooks allows you to choose current asset accounts, such as prepaid expenses, it would be very unusual to do so. Be sure to select the bank account where you’ll be depositing the funds. Then, scroll down to the next section, which allows you to choose the customer checks that will be included in the deposit.
Step 3: Add customer checks from undeposited funds.
QuickBooks Online provides a list of the checks you have received from customers and placed in Undeposited Funds. All the information on this screen is carried over from when you recorded the receipt of the payment. Place a checkmark next to each customer check that will be included in this deposit, and then scroll down to add noncustomer checks in the next step.
In the screenshot below, I’ve placed a checkmark next to the payments to be deposited.
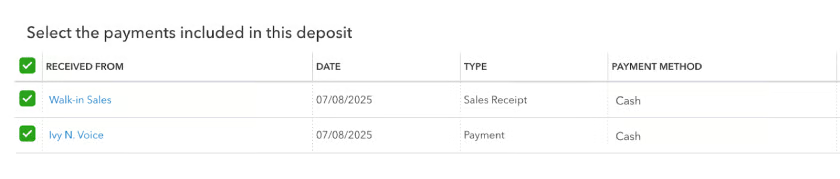
Selecting checks in Undeposited Funds to include in the QuickBooks Online deposit
The next section of the Bank Deposit screen allows you to add checks that are excluded from Undeposited Funds. Generally, these are noncustomer checks, such as tax refunds, insurance proceeds, and vendor refunds.
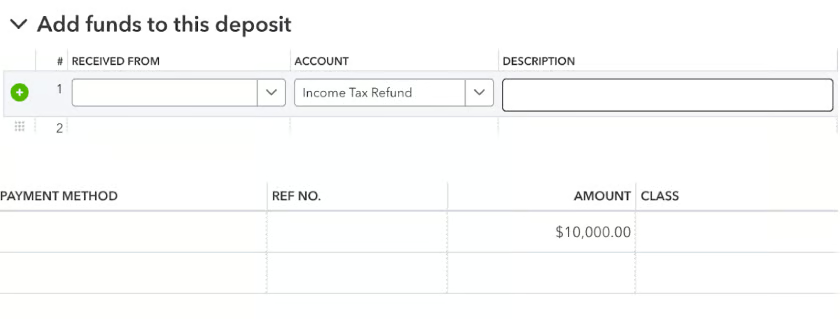
Adding noncustomer checks to a QuickBooks Online bank deposit
The bottom of the Bank Deposit screen allows you to record any cash back you receive from the deposit. This can happen if you are depositing a check that is greater than the amount you need to deposit, and the bank returns the excess amount to you in cash.
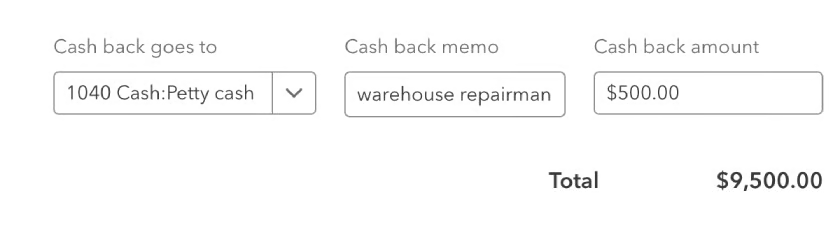
Recording cash bank from a bank deposit in QuickBooks Online
If you receive cash back at the time of the deposit, then you must specify the amount and an account or category. Any cashback will reduce the deposit recorded in your check register to match the actual deposit on your bank statement.
If you’re making the deposit in person, I recommend printing a deposit summary to give to the teller. To do this, click on the Print button at the bottom of the screen and then select Deposit Summary. Be sure to click the green Save and new button to complete the deposit.
Why recording deposits in QuickBooks Online is important
As our overall best small business accounting software, QuickBooks Online helps you keep your bank transactions accurate and updated, which is one of the tenets of good bookkeeping. Recording deposits is crucial as it helps you keep track of your cash flow by providing an accurate record of the money coming into your business. This is true even for deposits that aren’t income, such as investments by the business owner.
How to correct or edit bank deposits in QuickBooks Online
If you need to edit or fix a bank deposit, you can do so by finding the original deposit and making changes directly.
- Click on the cogwheel icon (⚙︎), then select Chart of accounts.
- Locate the bank account where the deposit was recorded, then click View register.
- Find the deposit transaction and click on it to expand the details.
- Select Edit, which opens the original deposit form.
- Make the necessary changes. Examples of appropriate adjustments would include adding/removing customer payments, changing the deposit date, or adjusting the cashback fields.
- Click Save and Close.
If the deposit has already been reconciled, QuickBooks will give a warning. In that case, you should proceed with caution. Editing reconciled transactions may require undoing and redoing part of your reconciliation process to preserve accuracy. If you would like to proceed, head over to our guide on how to undo a bank reconciliation in QuickBooks Online.
How to record bank deposits using the QuickBooks mobile app
The QuickBooks Online mobile app provides a simplified method for recording bank deposits, but its capabilities are slightly more limited than the web version.
- Open the QuickBooks Online app and tap the “+” (Create) button.
- Select Bank Deposit.
- Choose the bank account, input the deposit date, and select payments from Undeposited Funds. You can also manually add other income or refunds in the same form.
- Tap Save to record the deposit.
While the mobile app is convenient for basic deposits, you may not have access to advanced features, like cash back recording or attaching deposit summaries. For more detailed deposit tasks, it’s best to use the web version.
Frequently asked questions (FAQs)
A deposit in QuickBooks Online is a transaction that records money being added to your bank account, such as cash or checks received from your customers. This also includes payments received that are not related to customer sales, such as contributions by the business owner to cover expenses.
Yes, you can record a deposit of customer payments without an invoice in QuickBooks Online as a sales receipt. Money that isn’t tied to a customer sale (such as loan proceeds, owner contributions, or refunds) should be deposited in the “add funds to this deposit” section of the bank deposit entry section.
Identify the duplicate entry in the Bank Deposit screen. Then, locate the duplicate transaction in your sales or customer center. Delete the duplicate (most often a Sales Receipt). Be sure to record a transaction only once: either as a sales receipt or a received payment tied to an invoice, but not both.
Wrap up
Congratulations on completing our tutorial on how to record a deposit in QuickBooks Online. You’ve learned how to deposit customer checks previously received and placed in Undeposited Funds, how to deposit noncustomer checks, and how to record cash back on your deposit. Head over to our next guide on how to transfer funds between bank accounts in QuickBooks Online.