


We prepared some of the best QuickBooks Online tips and tricks that can save you time by reducing repetitive tasks and minimizing scrolling for the data you need. Discover how to work more effectively by using keyboard shortcuts, automating some of your work, displaying data in different ways, and making your files more accessible.
Productivity Tips
Tired of doing the same thing over and over again? Here are some productivity tips that you can do within QuickBooks Online to reduce repetitive tasks and speed up your work. From utilizing multiple browsers to using the mobile app, we’re sure that the tips below will help you become a more efficient bookkeeper. Most of these are explained in detail in our free QuickBooks Online tutorials.
1. Open Multiple Browser Windows
When using QuickBooks Online, opening multiple windows is a huge timesaver, allowing you to flip back and forth between screens. It’s also an easy way to compare multiple reports or QuickBooks features. You may need to update the window by clicking Refresh on your browser for changes to appear.
You can open multiple browser windows within the same company file by duplicating the tab you’re working on (right-click your browser tab and select Duplicate). If you’re using Internet Explorer, you can hit Ctrl+K to duplicate your tab.
Now that you have two tabs logged in to your account, you can pull one out of the window so that you can work on two screens side-by-side.
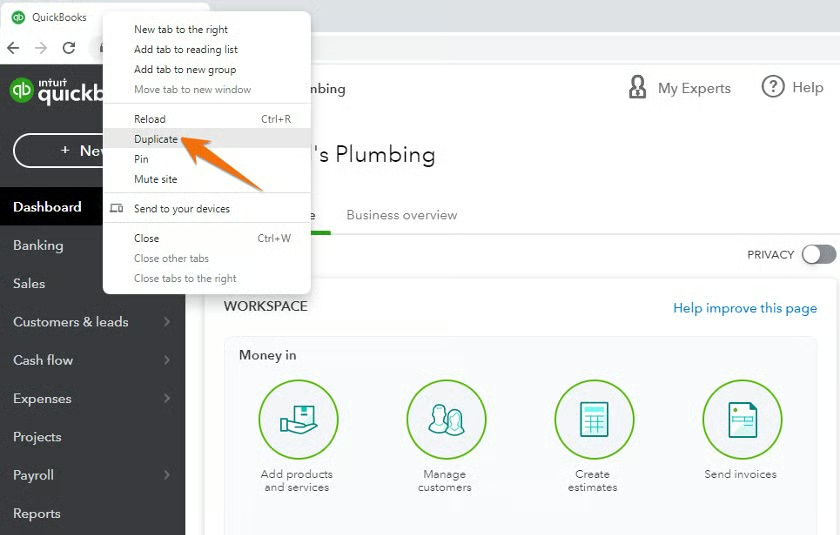
You can only use this simple method of opening multiple tabs if each tab is viewing the same company. To view different companies simultaneously, you have two options: incognito mode (or private browsing) or two different browsers, such as Chrome and MS Edge.
There are a few ways to open separate windows for different companies. This depends on which browser you’re using:
- Google Chrome: Ctrl + Shift + N
- Firefox, Internet Explorer, and Microsoft Edge: Ctrl + Shift + P
- Safari: Command + Shift + N
After opening an incognito window, log in to QuickBooks as normal and select the company you wish to view. This won’t affect any other tabs when QuickBooks is open. Without using a private browser, navigating to QuickBooks Online will automatically open whatever company is already open in that browser.
You can also use two different browsers to view multiple companies in separate windows. For example, try logging into QuickBooks Online through Chrome and open your company file. Then, log in to QuickBooks Online through Microsoft Edge and open your second company file. QuickBooks should work independently for each company.
2. Memorize These Handy Keyboard Shortcuts
Another one of our QuickBooks Online tips is that keyboard shortcuts help save you time and allow you to keep your hands on the keyboard as you enter information. Use the QuickBooks Online shortcuts summarized in the table below when working in a transaction window.
| Function | Windows PC | Mac |
|---|---|---|
| Open the Expense Window | Ctrl+Alt+X | Ctrl+Option+X |
| Open the Estimate Window | Ctrl+Alt+E | Ctrl+Option+E |
| Open the Invoice Transaction window | Ctrl+Alt+I | Ctrl+Option+I |
| Open the Receive Payment Window | Ctrl+Alt+R | Ctrl+Option+R |
| Display the Lists Page | Ctrl+Alt+L | Ctrl+Option+L |
| Display the Customers Page | Ctrl+Alt+C | Ctrl+Option+C |
| Display the Vendors Page | Ctrl+Alt+V | Ctrl+Option+V |
| Display the Chart of Accounts page | Ctrl+Alt+A | Ctrl+Option+A |
| Display the Search Transactions Page | Ctrl+Alt+F | Ctrl+Option+F |
| Display Keyboard Shortcuts | Ctrl+Alt+/ | Ctrl+Option+/ |
| Print the Transaction | Ctrl+Alt+P | Ctrl+Option+P |
3. Set Up Recurring Transactions
Rather than manually entering individual transactions that occur repeatedly, you can automate the process by setting up recurring transactions. These include bills, rent payments, income, and purchase orders from suppliers. This helps save you time and serves as a reminder for upcoming transactions.
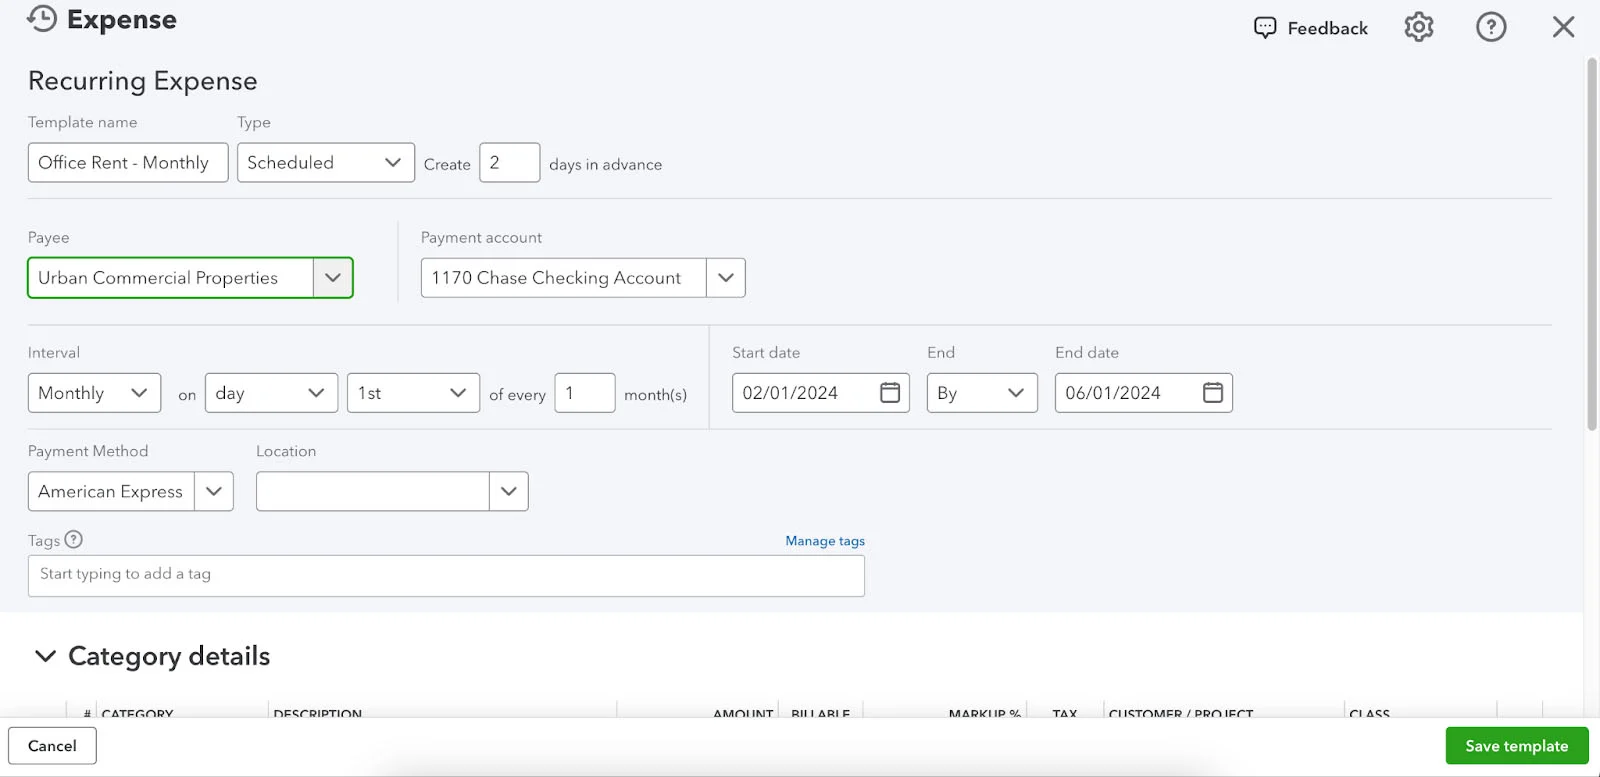
Recurring transactions are available with QuickBooks Online Essentials and Plus, and you can create them by following this process:
- Step 1: Select the gear icon (⚙) at the top right of the screen.
- Step 2: Under Lists, select Recurring Transactions.
- Step 3: Click New.
- Step 4: Select the type of transaction to create and select OK.
- Step 5: Enter a template name.
- Step 6: Choose a type, such as scheduled, unscheduled, or reminder.
- Step 7: Enter the necessary information.
- Step 8: Save the template.
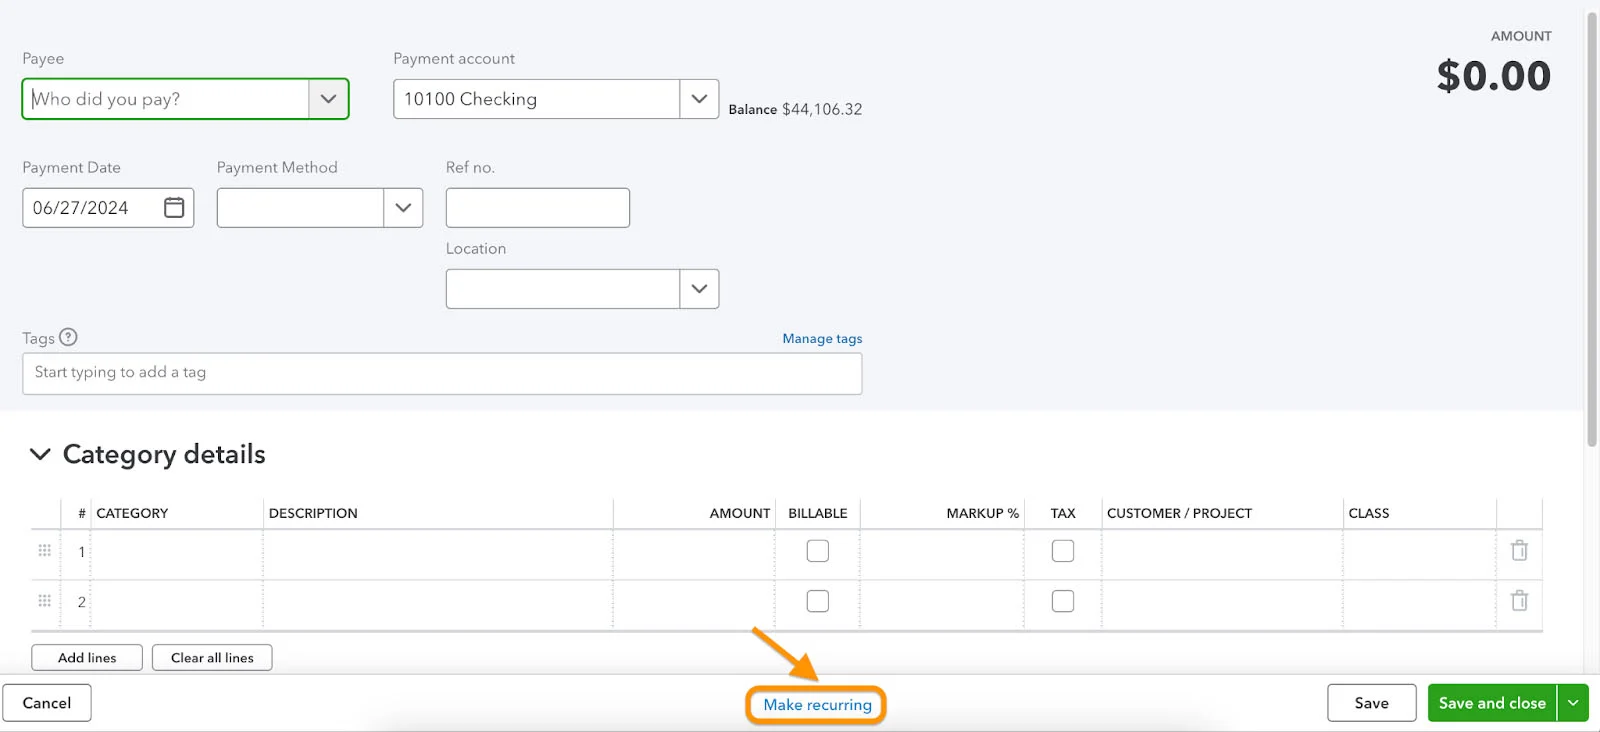
You can also set up recurring invoices by clicking the Make recurring option at the bottom of the invoice window.
4. Add Custom Fields to Your Sales Forms
Sometimes, the fields provided on the standard sales forms in QuickBooks Online may not be sufficient to capture all the data you need for your business. For instance, law firms require special fields that are unavailable on a standard invoice template, including matter or case numbers and client reference numbers.
To capture data unique to your business or industry, QuickBooks Online allows you to add custom fields to various sales forms. These include invoices, estimates, credit memos, sales receipts, refund receipts, and even purchase orders.
You can set up custom fields by clicking the gear icon (⚙) in your QuickBooks Online dashboard and then selecting Custom fields under Lists.

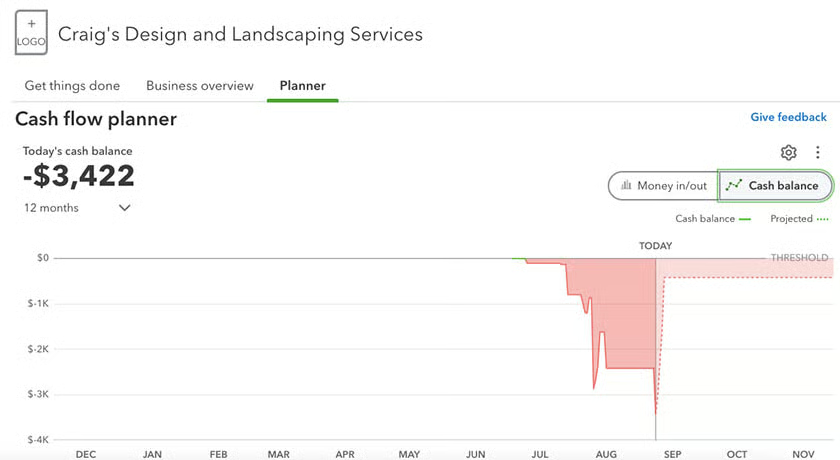
5. Predict Income and Expenses Using the Cash Flow Planner
Whether you want to track when money is expected to come in, identify potential cash flow challenges, or create a budget, you should take advantage of QuickBooks Online’s cash flow planner. It’s a tool that allows you to forecast your expected cash flow over a specified time period, typically the next 30, 60, or 90 days.
Using your data like historical income and expenses, upcoming bills, and invoices, the cash flow planner allows you to project your cash flow into the future. You can create “what-if” scenarios to understand how specific changes in your monthly savings, debt payments, or investments can affect your financial situation. You can even adjust the scenarios, such as increasing or decreasing your sales projections, to see how they affect your cash flow.
6. Save Your Favorite Reports
To view available reports, click on the Reports menu item on the left navigation bar. On the Reports page, you’ll see that it’s divided into three tabs: Standard, Custom, and Management Reports.
At the top of the Standard page is the Favorites page. You can add any report to this list by clicking the star button next to it. This is one of our QuickBooks Online shortcuts that can help save you time if you frequently need access to the same report.

7. Install the QuickBooks Online Mobile App
With mobile accounting becoming a norm among modern businesses, it’s crucial to have a mobile app that lets you access your favorite accounting features from your smartphone. The QuickBooks Online mobile app includes nearly all the features found in the desktop interface, with some added functions, like receipt capture and mileage tracking. Check out QuickBooks Online on Google Play or QuickBooks Online on App Store.
| QuickBooks Feature | Accessible on the Mobile App |
|---|---|
| Send Invoices | ✓ |
| Record Customer Payments | ✓ |
| Upload Receipts | ✓ |
| Categorize Expenses From Bank Feeds | ✓ |
| View Reports | ✓ |
| Enter Unpaid Bills | ✕ |
| Record Billable Time | ✕ |
8. Use the QuickBooks Online Desktop App
In addition to its cloud interface, QuickBooks Online offers a desktop app, QuickBooks Online desktop app, which has several benefits, including easy accessibility. The app allows you to access your QuickBooks data on your computer without having to open a web browser or log in to the website.
Also, it provides a more user-friendly interface, with a streamlined dashboard and simplified navigation. You can choose a layout similar to QuickBooks Desktop Premier, and you can also collaborate with others in real time, making it easy for you to work with your team and your accountant. It has many time-saving features as well, such as the ability to import bank transactions, create recurring invoices, and set up automatic reminders.
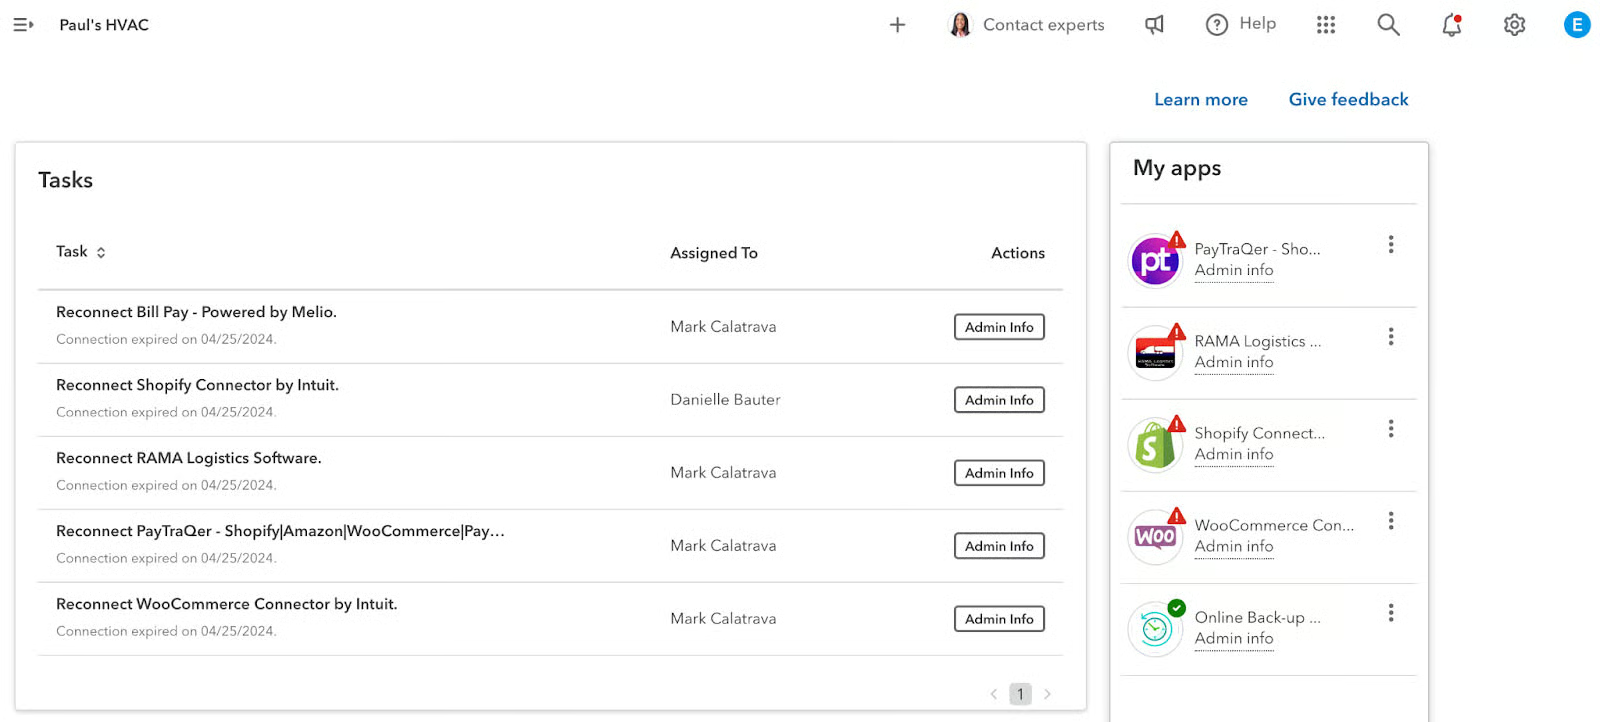
9. Use the New Diagnostic Dashboard for Your Integrated Apps
A new feature in QuickBooks Online, the diagnostic dashboard allows you to better manage the apps that are connected to your QuickBooks Online account. Accessible from the My Apps window in QuickBooks, it enables you to track the status of your integrated apps and identify connection issues.
You will be notified when syncing errors occur with your integrated apps. QuickBooks will also provide recommended actions, such as reconnecting accounts, so that you can address the issue promptly.
10. Use the Audit Log
Sometimes, we make mistakes that affect multiple items in our QuickBooks Accounts. The fastest and easiest way to review every transaction is to check the audit log. You can see all the changes that happened in your account, the date the change was made, and the person who made the change.
To access the audit log, click the gear icon (⚙) to access Settings, then select Audit Log. From there, you can go over multiple transactions simultaneously to spot where the error occurred.
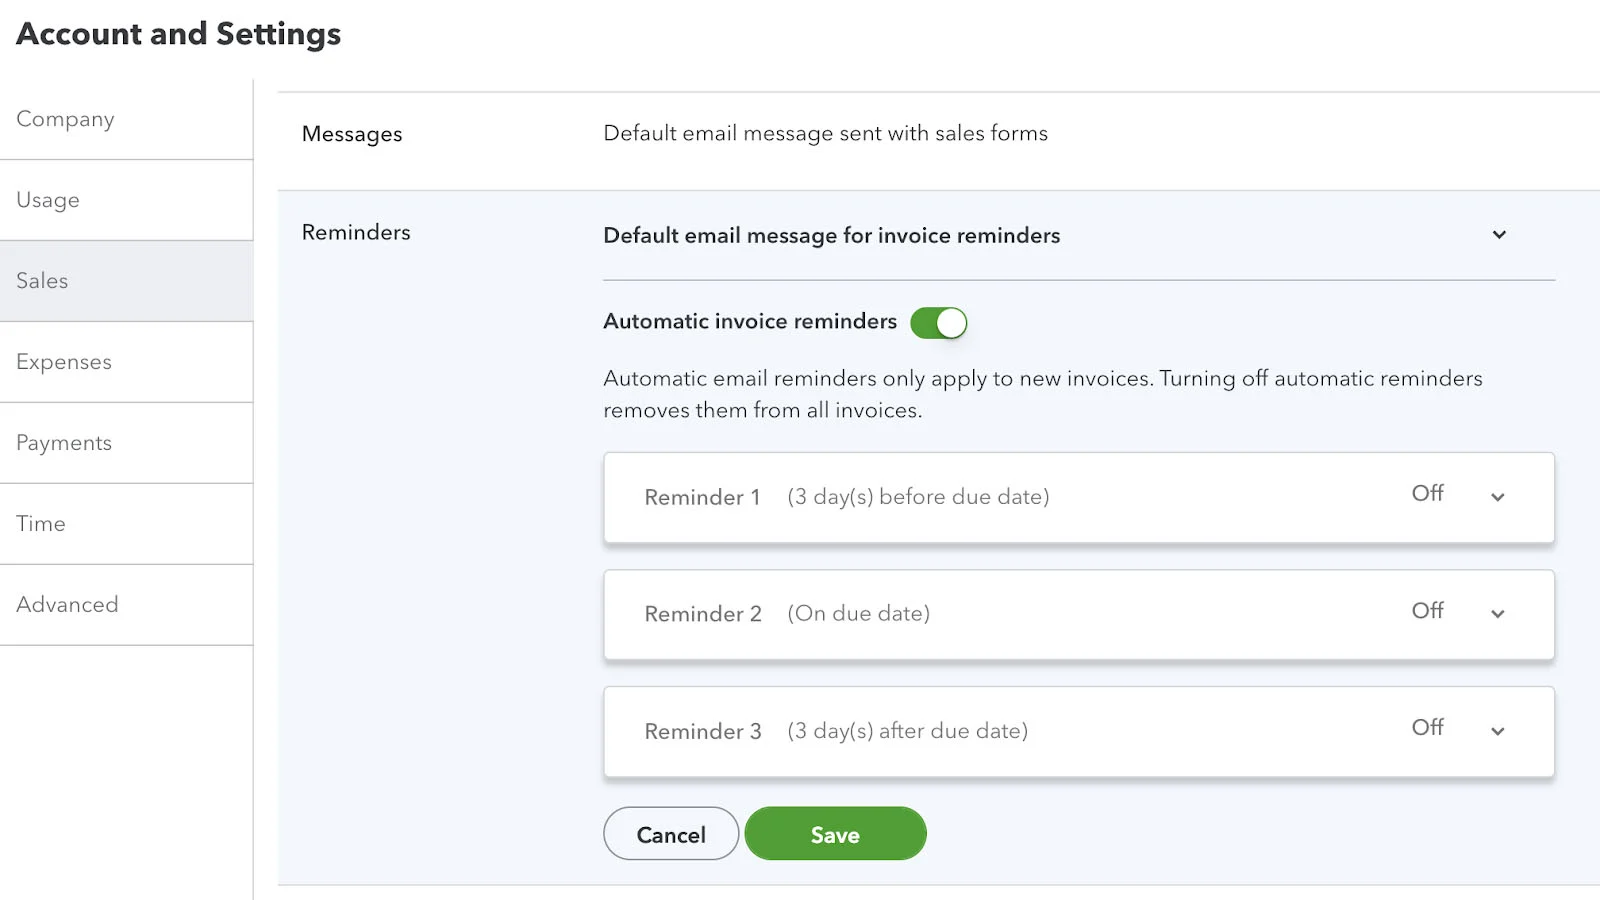
11. Set Up Invoice Reminders
Are you tired of manually reminding customers to pay their overdue invoices? QuickBooks Online can send reminders so that you don’t have to constantly monitor due dates. In this way, customers will be notified that their invoices are nearing their due date.
To set automatic reminders, click the gear icon (⚙) to access Settings. From there, select Accounts and Settings and click over to Sales. Turn on invoice reminders by clicking the dropdown arrow. QuickBooks Online can set up three automatic reminders.
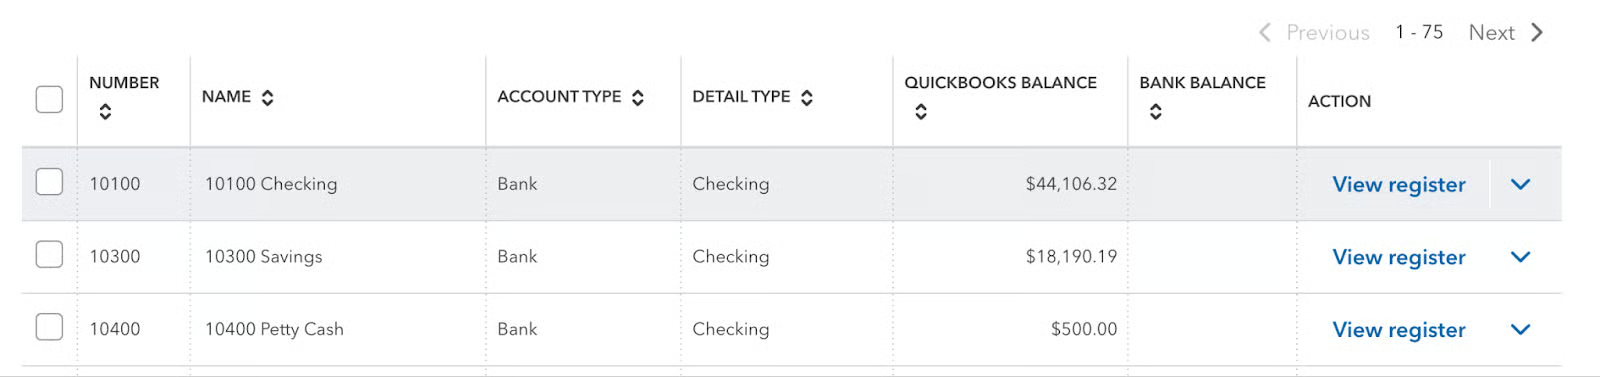
12. Use the Chart of Accounts to Check Account Balances Right Away
If you want to check account balances quickly, go to the Chart of Accounts to see real-time balances. You don’t need to generate a report just to check an account balance. Simply navigate to Transactions, and click Chart of accounts. From there, you’ll see the account balance. You can also click View register to get a more detailed view of the transactions affecting the account.
Workflow Tips
Things can get hectic if your workload is piling up. We provide the following workflow tips to help you organize your work and reduce bottlenecks in your workflow. By using the features that are already in QuickBooks Online, you can streamline your workload and allocate more time to tasks that need it most.
1. Connect Your Bank & Credit Card Accounts
Online banking, also known as bank feeds, is one of QuickBooks Online’s most helpful and time-saving features. When you connect an account, QuickBooks downloads and categorizes bank and credit card transactions for you automatically―you only need to approve the work. You can connect as many accounts as necessary.
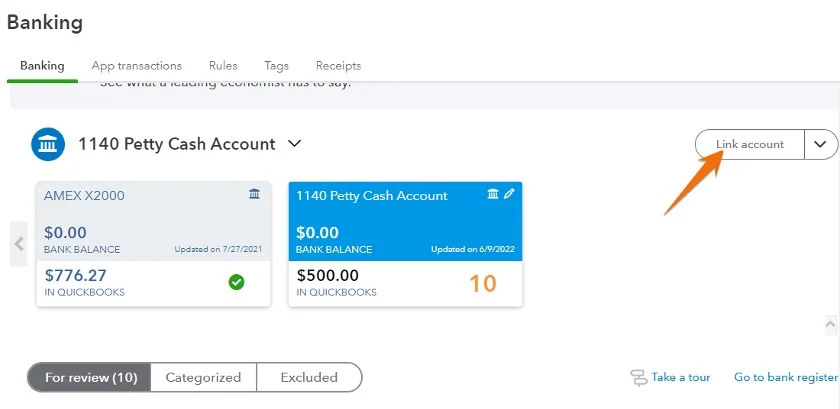
To connect bank transactions and credit card accounts in QuickBooks Online, select Link Account on the Banking tab, add your account, and then follow the onscreen steps to link your account information.
Our related resources:
- How to Import Bank Transactions Into QuickBooks
- How to Import Credit Card Transactions Into QuickBooks Online
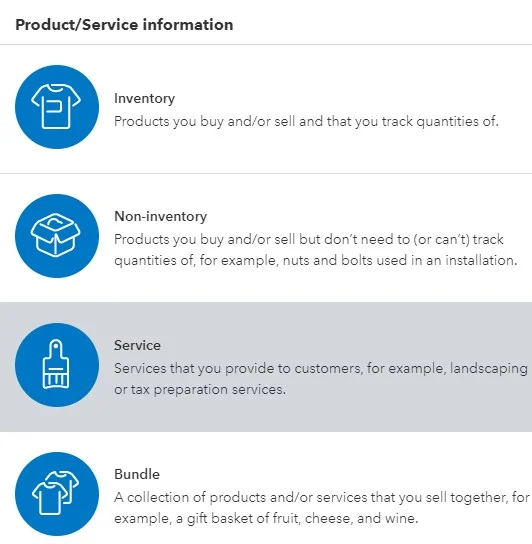
2. Set Up Items for Every Product or Service You Provide
QuickBooks Online has two basic sales items: products and services. We recommend creating items for every product or service you provide so that issuing invoices and entering purchases will be much quicker. This will also give you more detail with reports, allowing you to track financial info by product or service.
Our related resource: How to Set Up the Products and Services List in QuickBooks Online
When creating an item, you’ll have four types to choose from: Noninventory, Service, Bundle, and Inventory.
- Non-inventory items are used for tracking supplies used by multiple departments (e.g., paper, pens).
- Service items are for types of services you offer as a service provider.
- Bundle lets you package and sell multiple items as a single product or service.
- Inventory allows you to track the exact quantities and costs of products on hand.
Bundle and Inventory tracking are only available with QuickBooks Online Plus and Advanced.
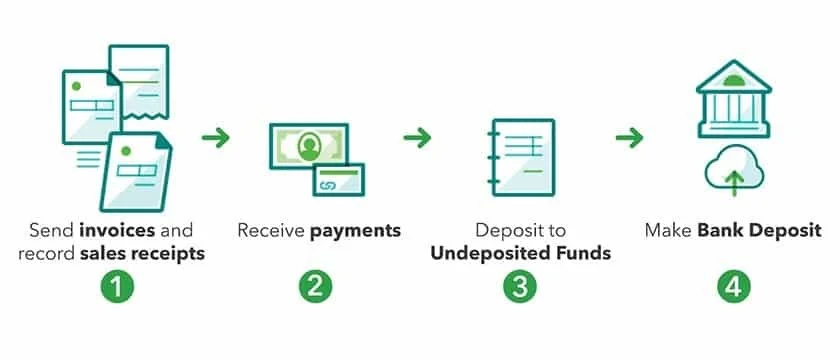
3. Use the Undeposited Funds Account When Making a Deposit
The Undeposited Funds account keeps a record of payments in QuickBooks until you deposit the same payments at your bank. You can think of the account as a virtual “lockbox” in which you store your payments until you’re ready to take them to the bank.
Banks often combine all the cash and checks you deposit into a single transaction. Once you have your deposit slip and know which payments your bank combined, you can do the same in QuickBooks. This makes tracing the deposits in your account register in QuickBooks to your bank statements much easier.
Our related resources:
- How to Use the QuickBooks Online Undeposited Funds Account
- How to Record Bank Deposits in QuickBooks Online
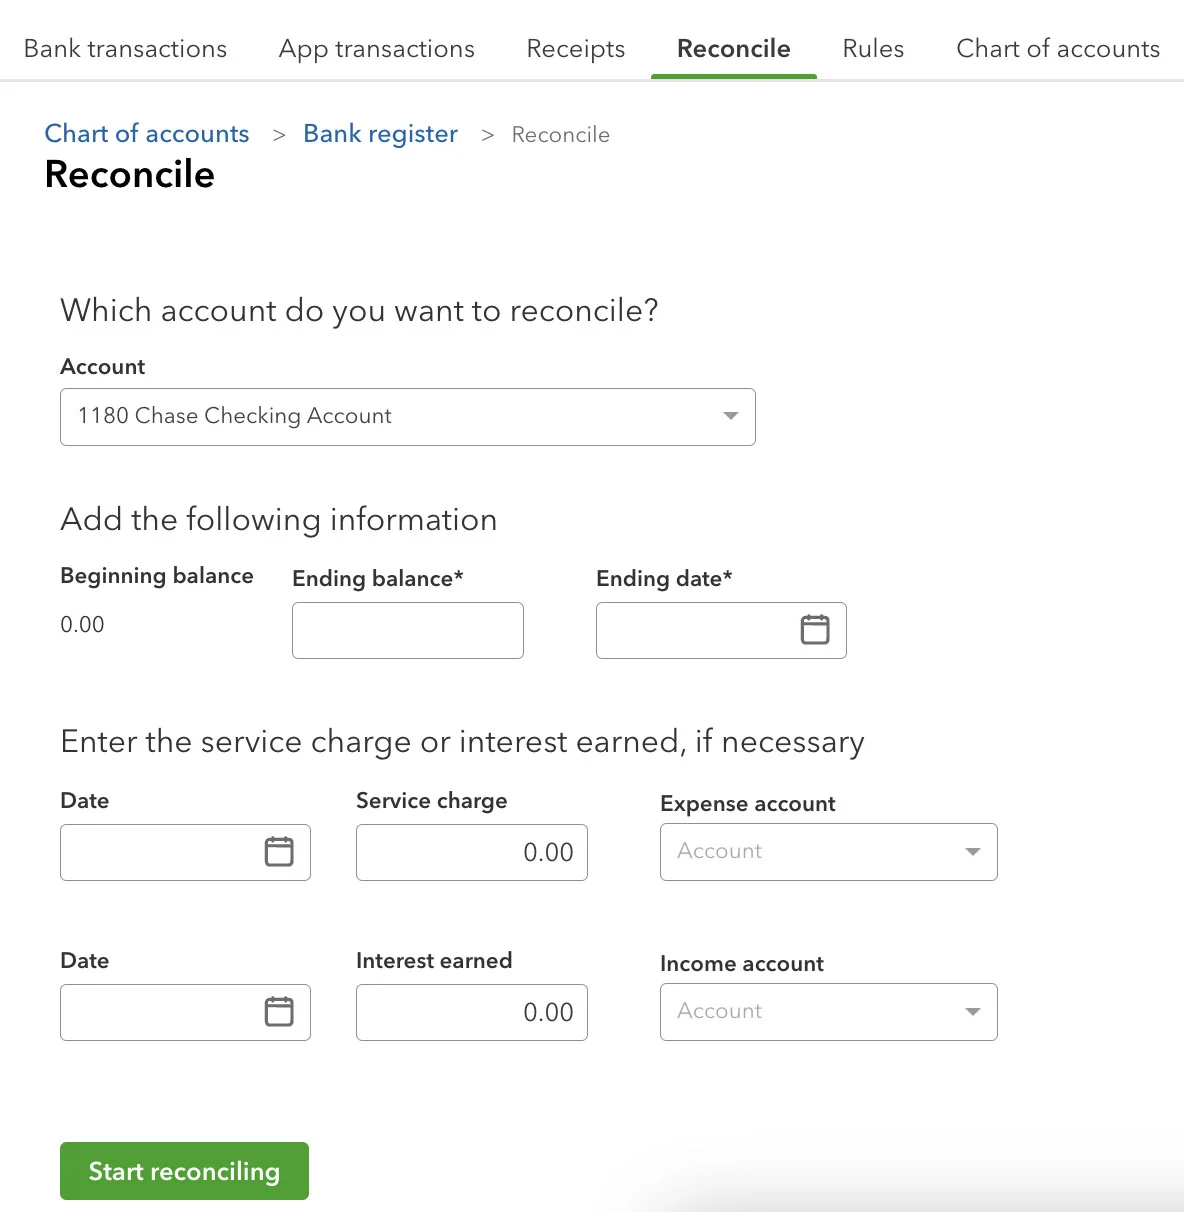
4. Reconcile Your Bank Account at Least Monthly
To ensure accurate financial data, you must reconcile your bank accounts monthly, ideally when you receive the alert that your bank statement is available. The process can be done quickly if you connect your online bank accounts to QuickBooks Online and perform regular upkeep throughout the month.
By reconciling, errors like duplicate entries and incorrect amounts can be identified because you’re matching transactions entered in QuickBooks Online against transactions shown on the bank statements. To reconcile your bank account:
- Step 1: Click on Accounting from the left menu bar, and select Reconcile.
- Step 2: Choose the account you wish to reconcile.
- Step 3: Enter the ending account balance and date from your bank statement. You may also enter the service charge or interest earned if needed.
- Step 4: Match your transactions until the bank reconciliation has a difference of zero.
- Step 5: Click Finish now to save your changes.
Our related resource: How to Process Bank Reconciliations in QuickBooks Online
5. Use Class & Location Tracking
Classes represent different aspects of your business like departments or product lines. You can use classes to obtain deeper insights into the sales, expenses, and profitability of each part of your business. Once you turn on the feature, you can assign classes to transactions.
Here’s how to enable class and location tracking:
- Step 1: From your dashboard, click on the gear icon (⚙), and select Account and Settings.
- Step 2: Select Advanced, then choose the Categories section to edit.
- Step 3: Toggle the Track classes and Track location buttons to on.
- Step 4: Under Assign classes, select One to entire transaction or One to each row in transaction, whichever you prefer. Check Warn me (not shown) when a transaction isn’t assigned a class. This is optional, but it’s good to turn it on so that when you look at reports, you know that everything has been classified.
- Step 5: Select Save and then Done.
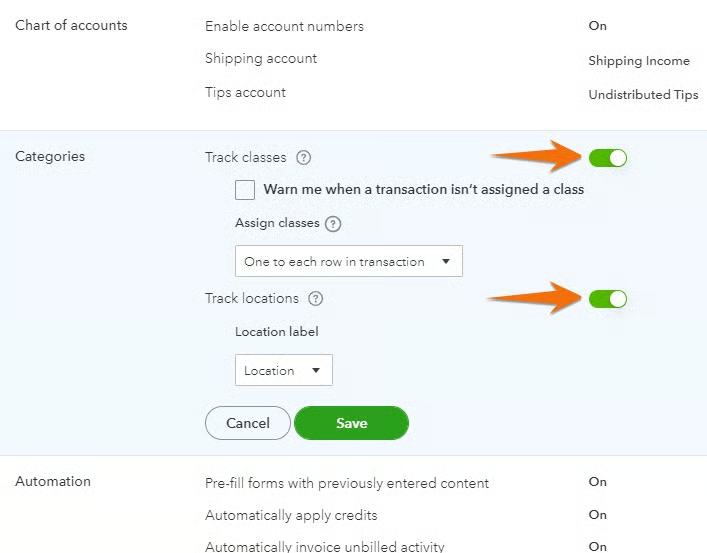
After completing the steps above, class and location fields or columns are added to your forms, so you can assign each transaction a class and location. After assigning transactions, you can print many reports separately for each class or location.
You may want to read our guide on how to set up advanced settings in QuickBooks Online
—class and location tracking setup can be found in Step 4.
6. Attach Source Documents
QuickBooks Online lets you upload and save attachments to any transaction. This makes referencing source documents easier and more efficient.
To add an attachment, follow these steps:
- Step 1: Open an invoice or other transaction.
- Step 2: Click the Attachments icon in the bottom left corner.
- Step 3: Browse for the files you want to attach.
- Step 4: Click Save.
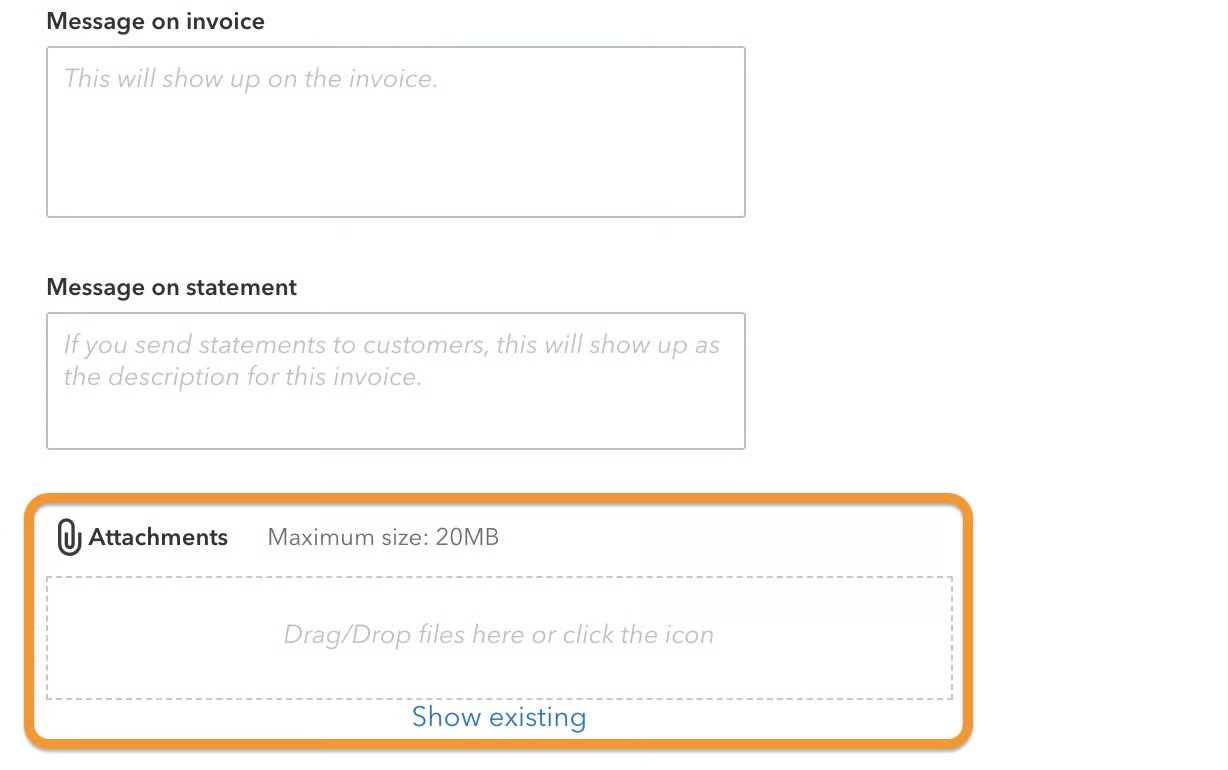
QuickBooks Online lets you view the source document when viewing the transaction. This is helpful for receipts, bank statements, copies of transactions, and so on.
7. Pay Bills Online Directly From QuickBooks
Instead of using separate software to pay your bills online, you can pay directly without having to leave QuickBooks. Using Online Bill Pay, you can pay bills and send checks easily without asking your vendors to set up anything on their end. It lets you use a credit card to pay a bill, and then QuickBooks Online will send a check to your vendor. You can also pay 1099 contractors with paper checks and bank transfers, pay invoices, and schedule bill payments in real time.
You need to activate Online Bill Pay from your QuickBooks Online account before you can use it. To do this:
- Step 1: Click on + New.
- Step 2: Select Pay bills online.
- Step 3: Set up your bank account information.
- Step 4: Follow the prompts to connect your bank account then save your changes.
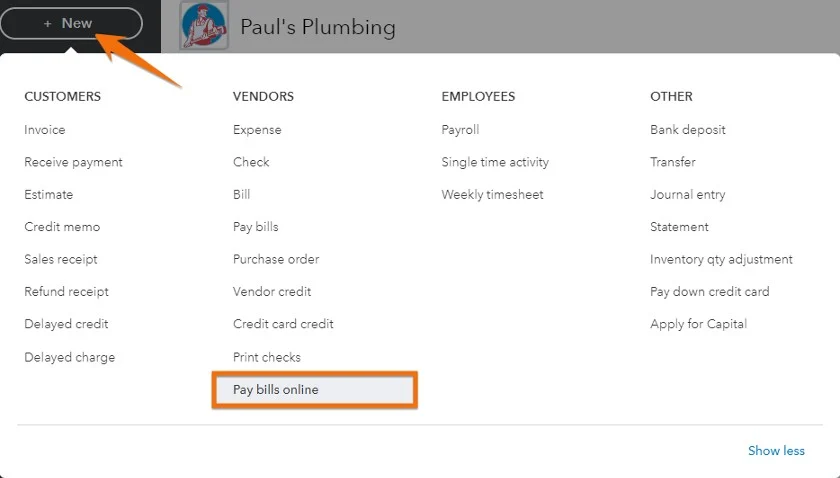
Note that QuickBooks Online Bill Pay is available in all versions of QuickBooks Online, except Accountant.
Our related resources:
8. Find a QuickBooks ProAdvisor
If you’re new to QuickBooks Online, you can benefit from the QuickBooks Online ProAdvisor program. One of the reasons QuickBooks Online is so popular is that it sets you up with Intuit-certified local bookkeepers and accountants—experts who have demonstrated their proficiency with QuickBooks products by passing a series of exams.
With the program, a local certified public accountant (CPA) or bookkeeping expert will help you accomplish various tasks in QuickBooks, such as setting up your QuickBooks company, reconciling bank and credit card transactions, and generating the reports you need to file tax returns. If needed, they can also teach you some useful QuickBooks Online shortcuts that are specific to your industry.
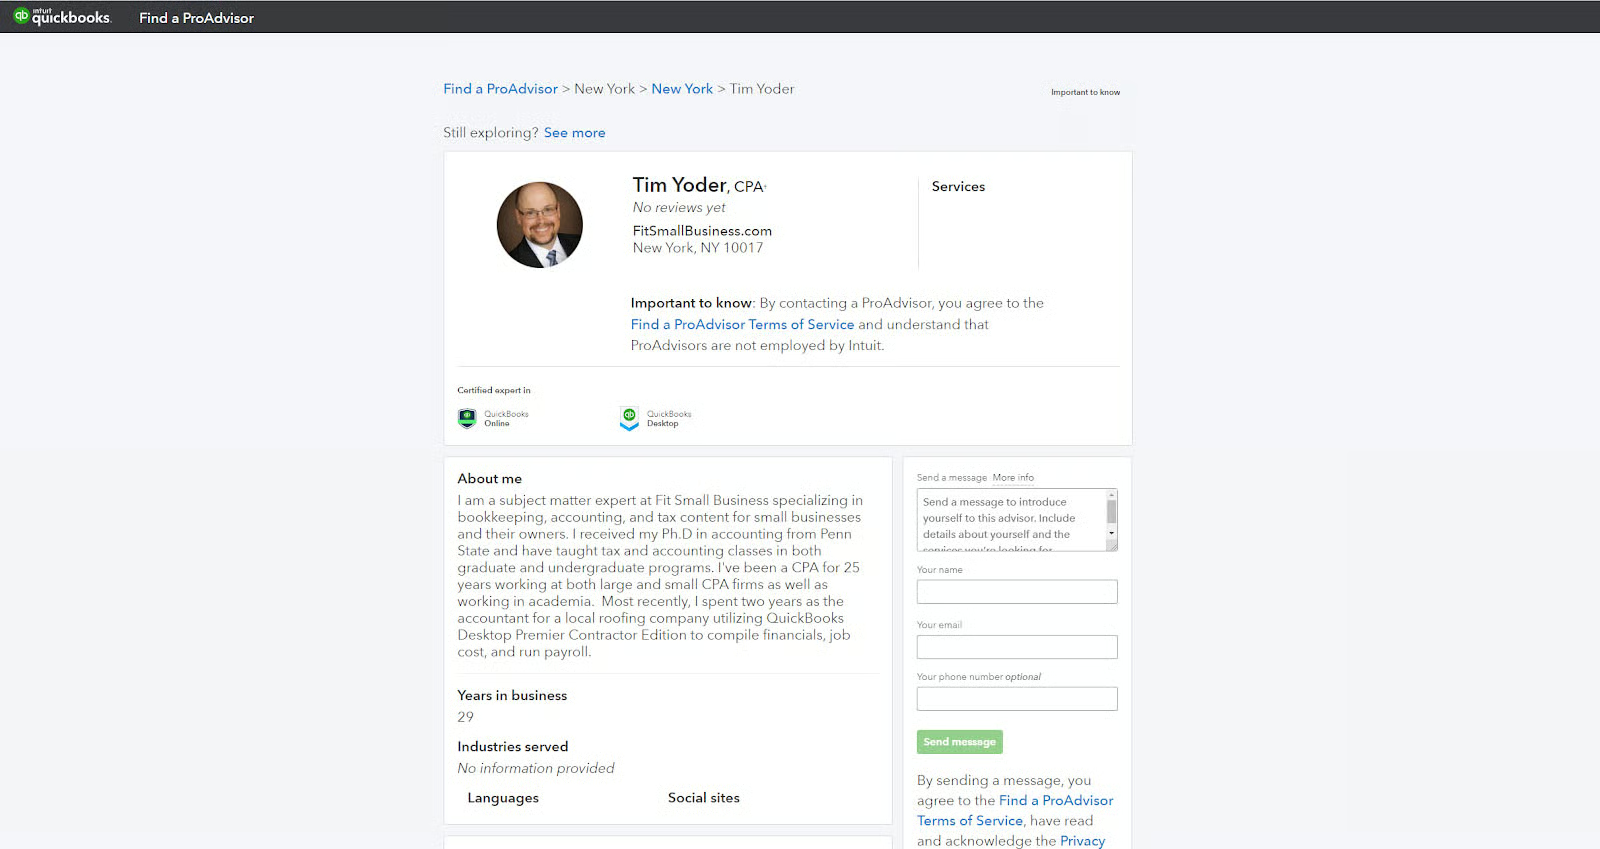
To find a QuickBooks ProAdvisor, you may browse through Intuit’s directory to find an accountant near you, depending on your city, state, and ZIP code. You can narrow your preferences down by specifying the type of services you need and the industry you’re in, such as manufacturing, construction, property management, and nonprofit.
Our related resource: How to Find a QuickBooks ProAdvisor
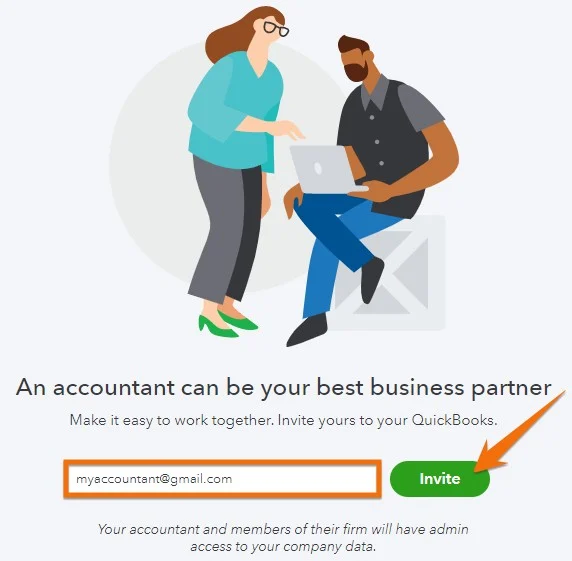
9. Add an Accountant User
Setting up your accountant as a user in your QuickBooks Online account is a good idea because it gives them access to your company. They can review your books, make corrections if needed, and collaborate on any issues.
Accountant users have additional privileges that allow them to undo entire reconciliations, write off invoices, and reclassify transactions. Accountant users also don’t count toward your usage limit—unless you make them your company’s primary admin.
To send an invitation to your accountant:
- Step 1: Sign in to your QuickBooks Online as the primary admin.
- Step 2: Select Settings, then Manage users.
- Step 3: Select the Accountants or Accounting Firms tab.
- Step 4: Enter your accountant’s email address, then select Invite.
Your accountant will receive an email about the invitation and a link to access your QuickBooks Online company if they already have QuickBooks Online Accountant. If they don’t, they’ll need to sign up, which is free and gives them access to all of the features available in your version of QuickBooks Online at no additional cost to you.
Our related resources:
- QuickBooks Online Accountant Review: Features & Price
- QuickBooks Accountant Desktop: Review for Accounting Firms
10. Utilize Popular QuickBooks Online Third-party Integrations
One of the benefits of using QuickBooks Online is that you have access to hundreds of third-party integrations. There are a few in particular that can be especially helpful to small business owners:
- Shopify: Especially useful for retail businesses, Shopify integrates with QuickBooks Online and allows users to sync their sales and transaction data with their accounting software. Check out our Shopify review to learn more about the solution’s features.
- Gusto: Gusto is a payroll and HR software that integrates with QuickBooks Online to simplify payroll processing and tax filings. Read our review of Gusto for more information about the services it provides.
- HubSpot: HubSpot’s integration with QuickBooks Online helps businesses manage their customer relationships, marketing campaigns, and sales data in one place. If you’re especially interested in customer relationship management, read our HubSpot CRM review.
- Expensify: Helping businesses manage employee expenses, Expensify integrates with QuickBooks Online to automate expense reporting and tracking, with features like individual tracking, expense policies, and approvals. Our review of Expensify shares more details about the platform.
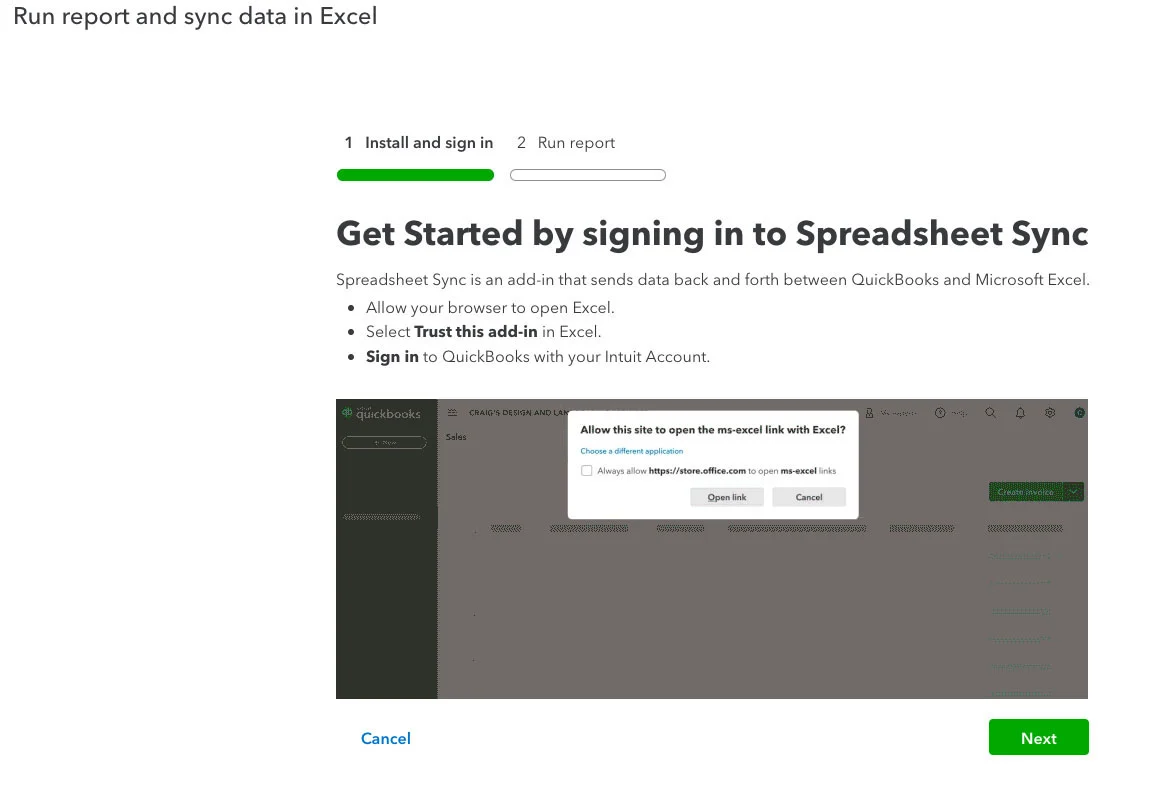
11. Use Spreadsheet Sync
QuickBooks Online Advanced or Accountant users can use Spreadsheet Sync to push and pull data to and from QuickBooks. You can easily connect QuickBooks to Microsoft Excel for advanced data processing if you need to manipulate data using complex models and formulas. You can also create advanced and dynamic reports using Excel’s capabilities. Check out QuickBooks’ guide on how to access Spreadsheet Sync.
12. Apply Tags on Transactions
Tags help you get better insights into granular aspects of your business. If you want to track expenses for a specific area only, you can use tags instead of classes. For instance, if you wish to track the expenses for a holiday party or in-person meetup, you can use tags instead of classes.
To turn on tags, go to Settings and select Accounts and settings. You have to turn on tags for sales and expenses.
- Step 1: Navigate to Sales and click Sales form content to turn on tags in invoices.
- Step 2: Go to Expenses and click Bills and expenses. Turn on Show Tags field on expense and purchase forms to show tags in expense entries.
- Step 3: Click Save afterwards.
Frequently Asked Questions (FAQs)
What are the five basic functions of QuickBooks Online?
The basic functions of QuickBooks Online are 1) sending invoices to customers; 2) tracking and paying bills; 3), compiling revenue and expenses for financial statements; 4) tracking employee time for billing and payroll; and 5) and making online payments to vendors.
Can QuickBooks Online be self-taught?
Yes, there are many good resources available to learn QuickBooks Online, including our free QuickBooks Online tutorials.
Is QuickBooks becoming obsolete?
As part of Intuit’s goal of streamlining its products, QuickBooks Desktop products will be discontinued this 2024. These products include QuickBooks Desktop Pro Plus, Premier Plus, Mac Plus, and Enhanced Payroll. If you’d like to continue using desktop accounting software, QuickBooks recommends choosing QuickBooks Desktop Enterprise.
Is customer support available for QuickBooks Online?
Yes, customer support is available for QuickBooks Online users, including phone and chat support, online resources, and a community forum.
How much does QuickBooks Online cost?
The cost of QuickBooks Online depends on the plan. The plans range from $35 to $235 per month, with the option of additional features for an extra cost.
Bottom Line
As our best small business accounting software, QuickBooks Online has a variety of tricks to make your experience more efficient. Some features, such as setting up recurring transactions, creating a product and services list, and automating transactions, save you time.
Using keyboard shortcuts allows you to keep your hands on the keyboard while you’re entering transactions. Also, connecting your bank and credit card accounts and using the Undeposited Funds account assists you with reconciling your accounts.