

Making a journal entry in QuickBooks should be rare and done only for specific purposes. Most of QuickBooks Online’s input screens automatically generate the necessary entries in the background. However, if you do need to create one manually, the process of how to make a journal entry in QuickBooks Online is as follows:
- Step 1: Navigate to the journal entry module.
- Step 2: Select the date and double-check the journal number.
- Step 3: Enter debits and credits.
- Step 4: Provide additional information.
- Step 5: View the entry in the Journal report.
I’ll also cover how to edit, delete, and reverse a journal entry, as well as how to make it recurring.
Step 1: Navigate to the journal entry module.
Click on the +New button in the upper left corner of your QuickBooks Online dashboard, and then select Journal entry under the Other column.
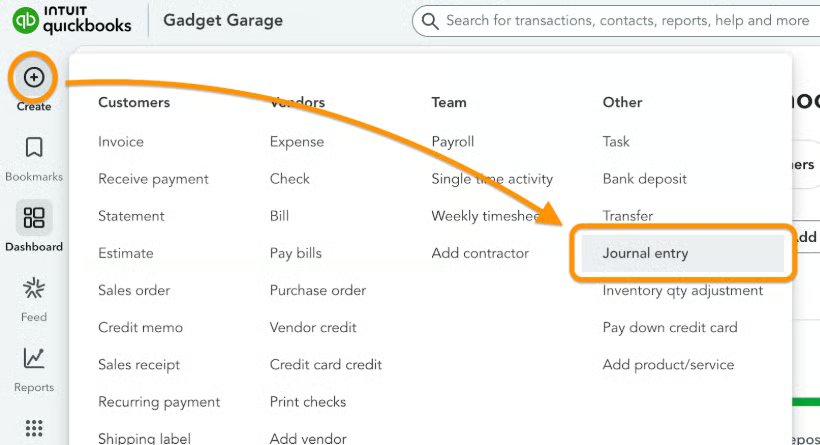
Navigate to the journal entry in QuickBooks
Journal entries affect at least two accounts, with the total debits matching the total credits. If you want to learn more, check out our guide to
.
Step 2: Select the date & double-check the journal number.
Select the date of the transaction or adjustment in the Journal date field at the top of the journal entry form. As for the Journal no., QuickBooks Online will generate a number automatically, but it’s best to double-check to avoid duplicate numbers.
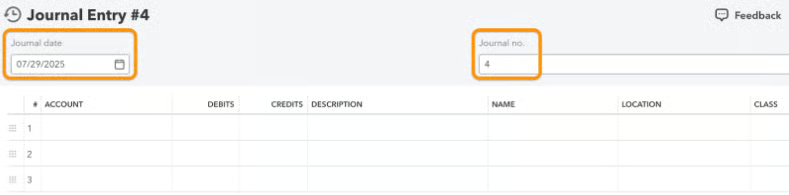
Double-checking the journal number and date in QuickBooks
Step 3: Enter debits and credits.
Enter all debit amounts before entering credits. For example, in the depreciation journal entry below, the first line typically shows the debit, followed by the credit on the second line.

Entering debits in the journal entry form in QuickBooks
If your entry involves multiple debits, list them all first before adding the corresponding credit entries. In the journal entry window, QuickBooks automatically foots the debit and credit columns to ensure their equality. QuickBooks will notify you if debits and credits aren’t balanced, so you don’t need to worry about saving a wrong journal entry.
To better understand depreciation, including the basic journal entry for this process, see our article on
what depreciation is and how it works
.
Step 4: Provide additional information.
The description field is useful to add context about the journal entry. Your future self will thank you if you leave helpful descriptions because you’ll easily understand what the transaction is all about.
Other fields you can fill out are as follows:
- Name if the transaction affects a customer, vendor, or employee
- Class if the transaction needs to be reported to a class
- Location if the transaction to be included in a location
Once done, click Save or Save and new at the bottom of the journal entry form. If you wish to stay in the journal entry form, choose Save.
Step 5: View the entry in the Journal report.
If you want to look at all journal entries, you can go to Reports and look for the Journal report, which shows all transactions in journal entry form. QuickBooks already creates the journal entry whenever you create an invoice or bill, so there’s really no need to fixate on the journal entry screen.

Journal report for Gadget Garage, Fit Small Business’s fictitious company
Although the report isn’t formatted like a traditional journal, it still displays the affected accounts along with their corresponding debit and credit amounts.
To view the full journal entry, you have two options.
- Check the journal report and click on the description. For example, if you hover over the “Opening balance” description in the report, it will become a clickable link. Selecting it will open the complete journal entry for further review.
- Go to the check register in the chart of accounts. Go to the Chart of Accounts and select the account you wish to check. Click on View register and look for entries tagged “Journal.”
While most transactions should be entered using QuickBooks Online’s input screens, there are a few reasons why you might need to create a journal entry:
- Entering the disposal of fixed assets
- Adjusting for depreciation of fixed assets
- Entering journal entries provided to you by your CPA or tax professional
- Recording new loans or notes payable
- Recording new owner contributions to equity
If you need to update a journal entry, open the entry form and make direct changes as if you’re just making a new entry. Once you’re done, hit Save.
If the journal entry was created by mistake, you can delete it permanently by clicking More at the bottom of the form and selecting Delete.
To reverse entries, you can either click on the report line in the journal report or click the Edit button in the Register. This will open up the original journal entry. From here, click on Reverse at the bottom of the journal entry. Once done, click Save or Save and new.
Reversing journal entries simplifies the handling of temporary accruals or adjustments; it reverses the debits and credits and doesn’t delete your original entry. They are essentially the mirror image of the original accrual and are recorded at the beginning of the following month.
This approach allows the actual expense or revenue to be recorded normally, without needing to account for or adjust the previously accrued amount.
To make a journal entry recurring, simply click on the Make recurring button at the bottom, set up schedules and intervals, and then save the template.
Let’s say you have a fixed asset depreciated in the straight-line method. You can create recurring entries to automate the recording of depreciation so that you don’t have to go in every month just to do that.
Frequently asked questions (FAQs)
A journal entry in QuickBooks is a manual method of recording financial transactions. It involves debiting and crediting the appropriate accounts to adjust account balances, record depreciation, or make corrections.
Open the new journal entry form by clicking on +New in your dashboard and selecting Journal entry under the Other column. Next, complete the journal entry form by providing the necessary details, like the impacted accounts, credit and debit amounts, and descriptions. Once done, click Save or Save and new.
Yes, you can. You can also reverse a journal entry or make it recurring if needed.
No. I recommend using standard forms, such as invoices, bills, and checks, for most transactions.
Wrap up
You’ve just learned how to make a journal entry in QuickBooks Online. However, note that it should be very rare and that you should always use the standard forms when recording routine transactions, like bills, invoices, and deposits.
If you’re new to QuickBooks Online, check out our other free QuickBooks Online tutorials.