Today, I’ll show you how to become a QuickBooks ProAdvisor. I’ll cover the entire process I did—from signing up for a QuickBooks Online Accountant to taking the ProAdvisor certification exam and completing your ProAdvisor profile. I’ll also share the benefits of becoming a QuickBooks ProAdvisor and some tips that helped me pass the exam.
Step 1: Sign Up for QuickBooks Online Accountant
First, I visited the QuickBooks Online Accountant website and clicked on the Sign up for free button to create an account. Signing up and creating a profile is free, and no credit card or other sensitive information is required.
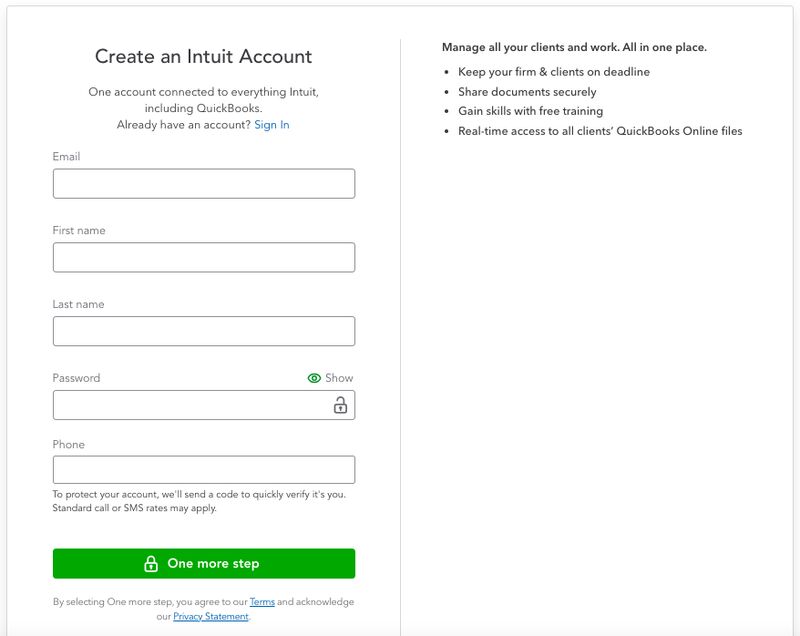
Sign up for a QuickBooks Online Accountant
Step 2: Go to ProAdvisor
From my QuickBooks Online Accountant dashboard, I clicked on ProAdvisor in the left menu bar, as shown below.
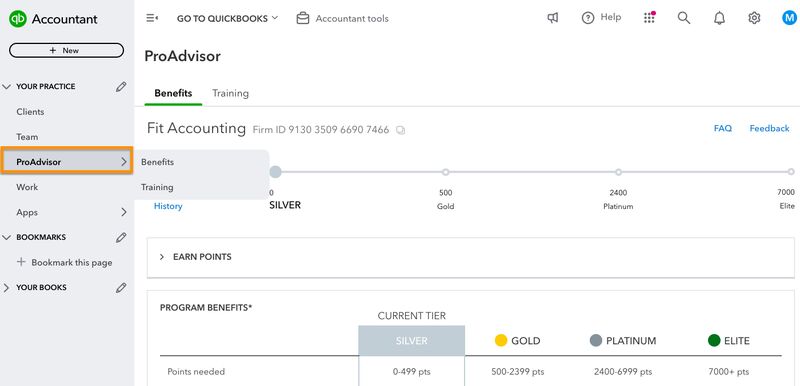
Navigate to the ProAdvisor tab
The ProAdvisor is organized into two tabs:
- Benefits: This is where I accessed and tracked the points I earned through various ProAdvisor activities, like completing certifications and getting new clients. The more points I earned, the higher the ProAdvisor status—which also unlocks additional benefits, like access to special events and discounts. In the screenshot above, you’ll see that there are no points earned yet, as it’s a new ProAdvisor account.
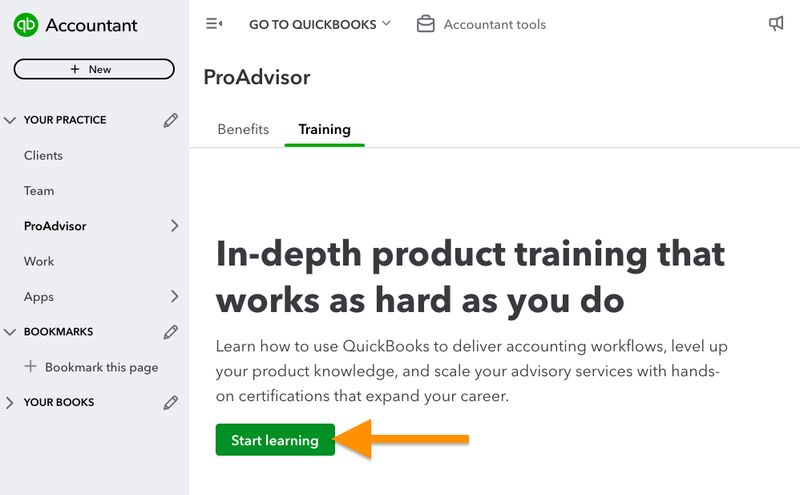
- Training: Here, I was able to access QuickBooks’ specialized learning courses to prepare for the exam and get certified. This tab used to be the central hub for the ProAdvisor training resources and exams, but QuickBooks has revamped the ProAdvisor experience by introducing the ProAdvisor Academy.
Step 3: Access ProAdvisor Academy & Enroll in a Course
From the Training tab under ProAdvisor, I clicked on the Start learning button to access the ProAdvisor Academy and enroll in a QuickBooks course.
The ProAdvisor Academy is organized into five tabs:
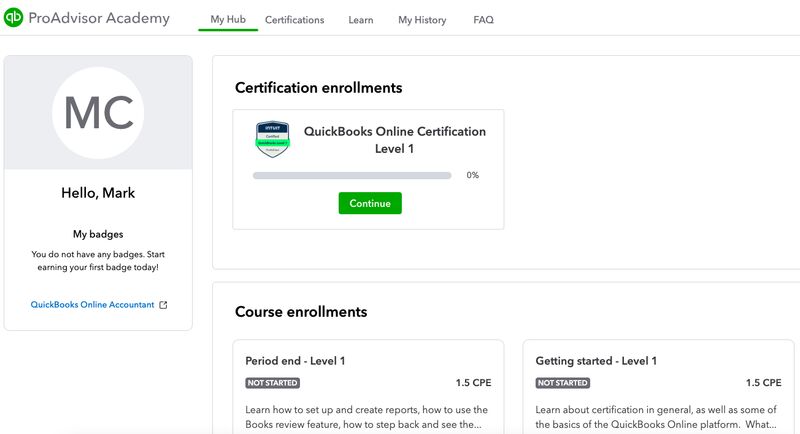
1. My Hub: This is where I can see all the courses I have enrolled in and the specific courses I’m actively working on, including course allotments and an option to start each session within a course. This served as my personalized dashboard, and it allowed me to easily resume courses where I left off and track my development as I moved through the training materials.
2. Certifications: I was able to browse the different courses available and select one to enroll in by clicking the Enrol button (not shown). The courses are grouped into two categories:
1. Foundation: These courses are designed to build core QuickBooks knowledge, covering the basic features of QuickBooks Online. There are three courses available here:
1. QuickBooks Online Certification Level 1: This course touches on basic features and functions like setup, navigation, and basic bookkeeping tasks. You need to pass this exam before you are able to take Certification Level 2.
2. Certification Level 2: This covers more advanced functions, including how to set up more complex workflows and generate advanced reports.
3. Intuit Bookkeeping Certification: This introduces core accounting principles, where you’ll learn to review and reconcile accounts, record business transactions, and balance books. Note, however, that this doesn’t formally make you a certified bookkeeper.
2. Specialty: These courses are for those looking to get certified in QuickBooks Online Payroll and QuickBooks Desktop products. It includes three courses:
1. QuickBooks Online Payroll Certification: This covers payroll processing in QuickBooks Online, including payroll setup, tax management, direct deposit, and compliance with regulations.
2. QuickBooks Desktop Certification: This provides training on desktop-specific features, like job costing, setting up a data file, and using accountant tools in QuickBooks Desktop.
3. QuickBooks Desktop Enterprise Certification: This advanced course is for those working with QuickBooks Desktop Enterprise. You need to complete QuickBooks Desktop Certification before you can take this course and the exam.
3. Learn: This tab allowed me to explore a wider range of modules by accessing QuickBooks’ comprehensive training library. I was able to select from various courses, which was ideal if I wanted to brush up on a topic or if I was interested in gaining additional knowledge.
4. My History: This is where I was able to download my earned badges and proof of continuing education credits.
5. FAQ: This tab provides answers to common questions about the ProAdvisor certification, such as course structure and certification requirements.
Step 4: Take the Course & Prepare for the Exam
Once I enrolled in a course, I studied the training materials at my own pace to prepare for the exam. Under the My Hub tab, I simply clicked on the Start or Continue button to access the learning resources. I was able to track my progress, pause and resume from where I left off, skim through sections, and focus on areas that I needed to review the most.
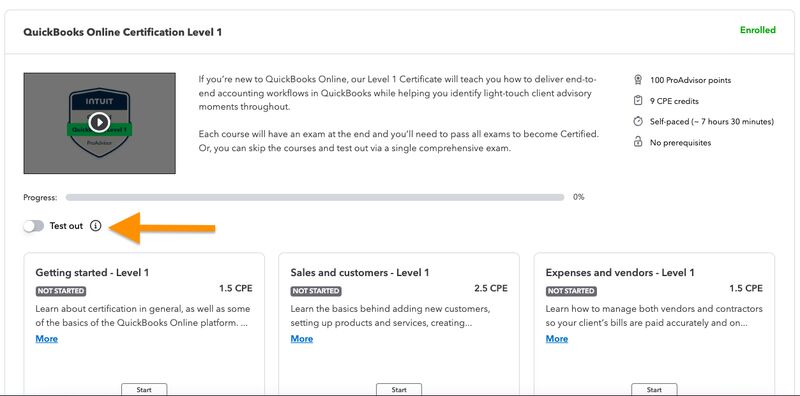
Turn on Test out to skip the course and proceed to the ProAdvisor exam
After toggling the Test out button, I clicked on the Take Exam button (not shown in image). This opened a separate window with a brief overview of the assessment instructions and summary. I agreed to the terms by clicking the Agree button below and then selected Next step.
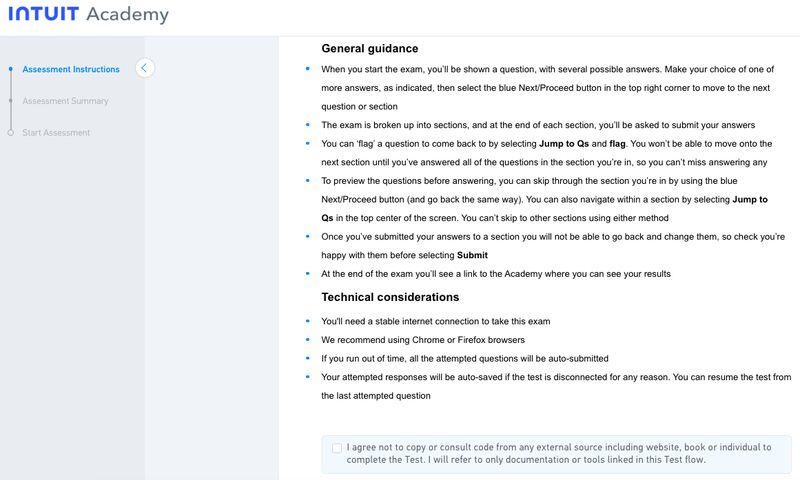
General guidance for taking the ProAdvisor exam
QuickBooks then displayed an assessment summary, showing the number of sections included, the questions per section, the estimated time to complete the exam, and my current attempt.
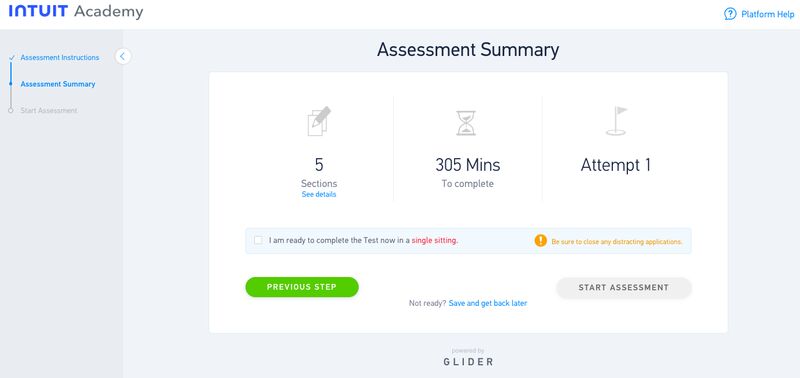
QuickBooks ProAdvisor assessment summary
You can start the test by clicking the Start Assessment button (shown in the screenshot above) and then selecting Start Section Test in the next pop-up screen (shown below).
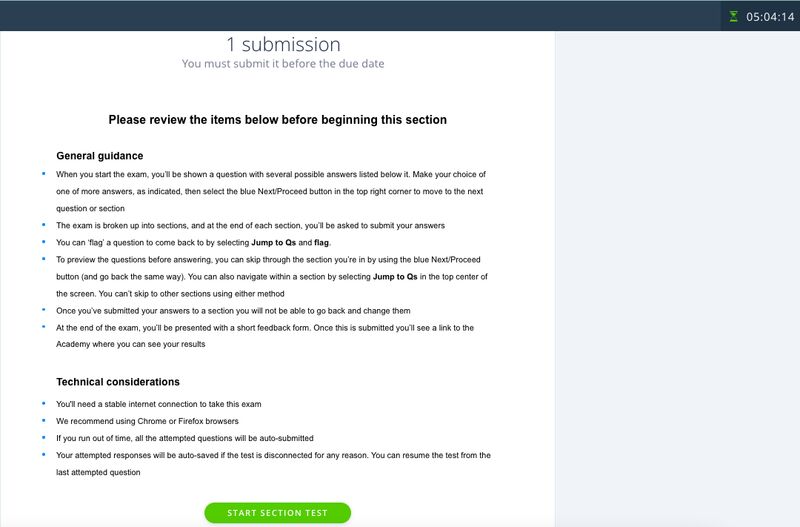
Before you take the exam, take note of these important pointers:
- You need to get a score of at least 80% to pass the exam and become certified.
- Each question offers multiple answers; select the indicated number of answers and then click the Next button in the top right of the questionnaire to continue to the next item.
- The exam is divided into multiple sections (e.g., QuickBooks Online Certification Level is divided into five). At the end of each section, you must submit your answers.
- Once a section is submitted, you cannot go back to change your answers, so double-check before submitting.
- At the top of the questionnaire, there’s an option to flag a question and revisit it later.
- You must answer all questions in a section before moving on; you can’t skip entire sections.
- If you don’t pass the exam within three attempts, you’ll need to wait 30 days before you can retake the exam.
Step 5: Take the Exam
Once I started the exam, the time ran in the background. It continued to run even if I closed the tabs, so I had to dedicate a couple of hours to complete the exam in one sitting. Note that if you run out of time, all the attempted questions will be automatically submitted.
Step 6: Receive Your Certification
When I passed the QuickBooks Online ProAdvisor exam, I received a digital copy of my certification and badge in my email inbox. I was given the option to download my certificate and badge from the ProAdvisor Academy, under the My History tab.
Step 7: Complete Your ProAdvisor Profile
Be sure to complete your profile as soon as possible. It includes the certification badges you have earned, an “About me” section, the number of years in business, the services you offer, any industries that you have experience in, and your social media links.
Below is a screenshot of a QuickBooks Advisor profile (view the ProAdvisor profile of Tim Yoder, CPA).
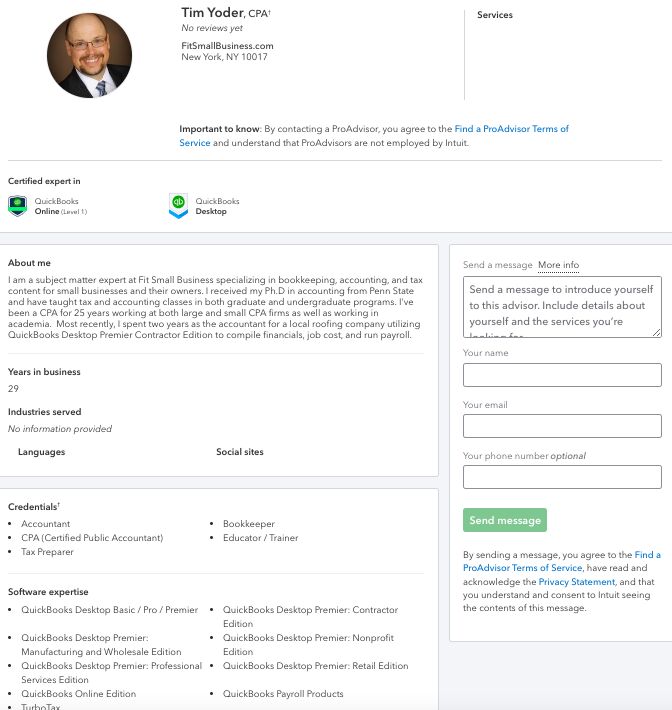
Sample QuickBooks ProAdvisor profile page
Tips for Passing the ProAdvisor Certification Exam
- Review the course material thoroughly. While you can skim through the content and skip some parts, I suggest going through each section thoroughly, as each part builds on previous knowledge. You can skip the course if you’re actively using QuickBooks, but if you only have casual knowledge, then it’s safer to go through the courses.
- Don’t waste too much time on a single question. If you’re unsure about a question, you can use the flag feature to keep moving forward. You can return to it later and answer the question.
- Double-check answers before submitting. Note that once you submit a section, you won’t be able to make changes, so you must review all answers thoroughly before submitting them. Do a quick scan to ensure you haven’t overlooked any questions or answers.
- Maximize your time effectively. As I mentioned earlier, you have up to five hours to complete the exam. Ideally, this is plenty of time, so don’t rush through each question. Also, have some short breaks, but be mindful of the time.
- Avoid any distractions. Choose a quiet environment so that you can stay focused. Close unnecessary apps or websites while taking the exam.
QuickBooks ProAdvisor Recertification
To keep your QuickBooks Online certification valid, you need to take a short recertification exam between May 1 and June 30. I recommend that you take the updated exam each year to stay current. Members who are certified on the latest version of QuickBooks Online are listed in the top section of the QuickBooks Find a ProAdvisor website.
Earning CPE Credit for QuickBooks Online
CPAs can earn CPE credit for learning QuickBooks Online. The number of credits they can earn depends on the specific program they choose, and these include free simulation-based training and interactive lessons via webinars, virtual conferences, or an in-person event. For example, QuickBooks Online training materials provide credits ranging from 1 to 2.5 for each module.
However, it is important to note that not all states allow CPE credits for QuickBooks ProAdvisor training, and each individual state board of accountancy has final authority on the acceptance of individual training for CPE credit. Therefore, you must check with them to determine how many CPE credits, if any, are available to earn.
Benefits of Becoming a QuickBooks ProAdvisor
- Gain valuable knowledge of the most popular small business accounting software
- Get discounts on Intuit products and services and dedicated telephone and chat support
- Get added to the Find a ProAdvisor online directory listing—this allows you to connect with potential clients, build your client list, and earn their trust
- Can display your ProAdvisor certification badge on your website, emails, and business cards
- Boost your credibility and increase your profile ranking
- Distinguish yourself as a true expert with QuickBooks software
- Access unlimited United States-based phone support from QuickBooks experts
- Receive free or discounted products and supplies
- Unlock the QuickBooks Online Advanced Certification exam, which helps improve your visibility on the directory, giving you more opportunities to connect to new clients
- Advance in rankings (your ProAdvisor Profile climbs in the ranking as you earn more points), and as you do, you can grow your business and take advantage of more features of this program, discounts, product support, and training opportunities
Frequently Asked Questions (FAQs)
A QuickBooks ProAdvisor is a certified professional who can advise and assist clients with QuickBooks products, particularly QuickBooks Online. Earning this designation shows expertise and can help you attract clients who need help with their accounting software.
The time frame depends on your existing knowledge and how much time you can dedicate to studying. Intuit offers a variety of resources, including self-paced courses and live webinars, to help you learn at your own pace.
Yes, it will, and recertification frequency depends on the type of certification you hold. QuickBooks Online ProAdvisors need to recertify each year, typically between May 1 and June 30.
Bottom Line
Congratulations! You’ve just learned how to become certified in QuickBooks. To get started, I recommend that you sign up for a free account with QuickBooks Online Accountant. For additional assistance, be sure to check out our free QuickBooks tutorials.
