In this tutorial, we’ll walk you through the step-by-step process of how to reconcile a credit card balance in QuickBooks Desktop, which is crucial to keep your financial transactions accurate and your company safe. We’ll teach you how to trace transactions from QuickBooks to your credit card statement and vice versa.
If you aren’t a QuickBooks Desktop user yet, you can choose from a Pro, Premier, Enterprise, or Accountant package. We compare QuickBooks Desktop products to help you decide which one is right for you. If you decide to purchase Pro, one of our best small business accounting software, you will get a 33% discount on your first year.
Here’s a tutorial video of the credit card reconciliation process in QuickBooks Desktop Pro and Premier.
From your QuickBooks Desktop dashboard, click Banking from the top menu bar and then select the Reconcile dropdown. Another option is to Click on the Reconcile icon under the Banking menu of your QuickBooks Desktop homepage.
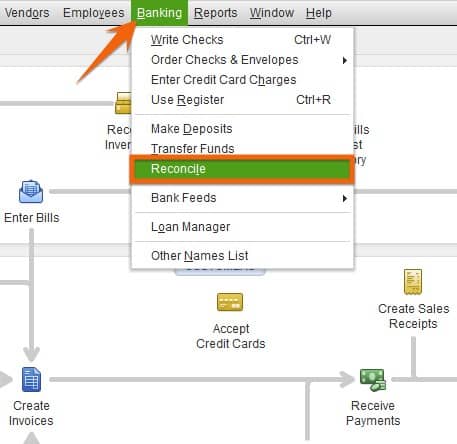
Launch the reconcile screen in QuickBooks Desktop
After clicking on the Reconcile icon, a pop-up screen will appear, requesting information from your account statement, including the following:
A. Account: Choose the credit card account that you want to reconcile.
B. Statement Date: Enter the ending date of the statement period.
C. Beginning Balance: The beginning balance is the ending balance from your last reconciliation. This will be generated automatically by QuickBooks Desktop.
D. Ending Balance: Enter the ending balance on your credit card statement.
E. Finance Charge: Input the finance charge, or interest, assessed on your credit card statement, including the date and the expense account you wish to charge. This will create a credit card transaction for interest expense, so if you’ve already entered the expense, leave this field blank:
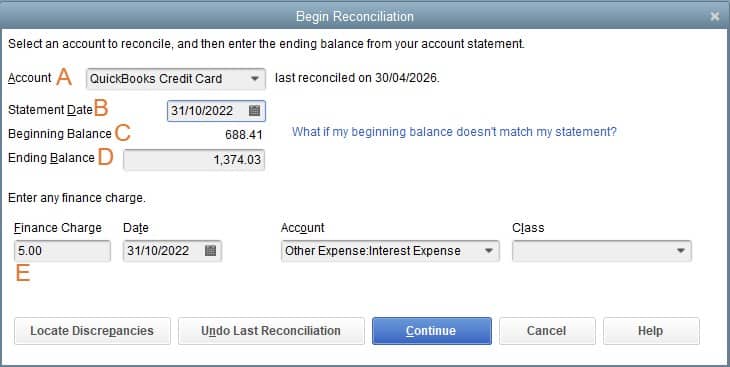
Enter credit card statement information in QuickBooks Desktop
After entering all information, click the Continue button at the bottom of the screen.
After you click Continue, a screen showing the summary of the reconciliation will appear, as shown below. The transactions listed are all the uncleared transactions from your credit card account register:
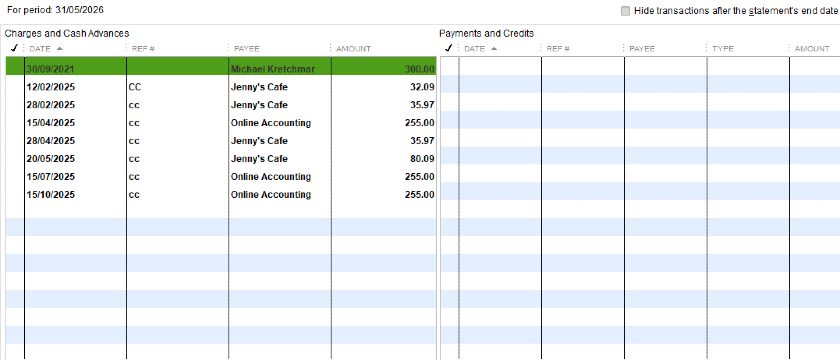
Reconciliation screen showing uncleared transactions in QuickBooks Desktop
Below is a sample credit card statement used to illustrate the reconciliation process in this tutorial. Take a moment to review the data in this sample statement as it will be used throughout the process.
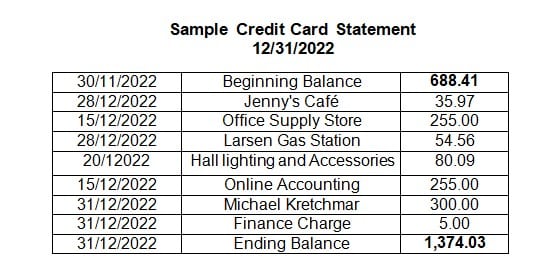
Sample credit card statement
To reconcile your account, review your transactions and trace them in both directions—from your books to your credit card statement, and from your credit card statement back to your books.
Trace From QuickBooks to Your Credit Card Statement
Review every transaction in the QuickBooks Reconcile screen and match it to those on your credit card statement. For every transaction that matches your statement, click on the checkbox next to the transaction. As you put a checkmark on a transaction, you’ll notice that the cleared balance and difference on the lower right side of the screen adjust. Your goal is to make the difference $0.
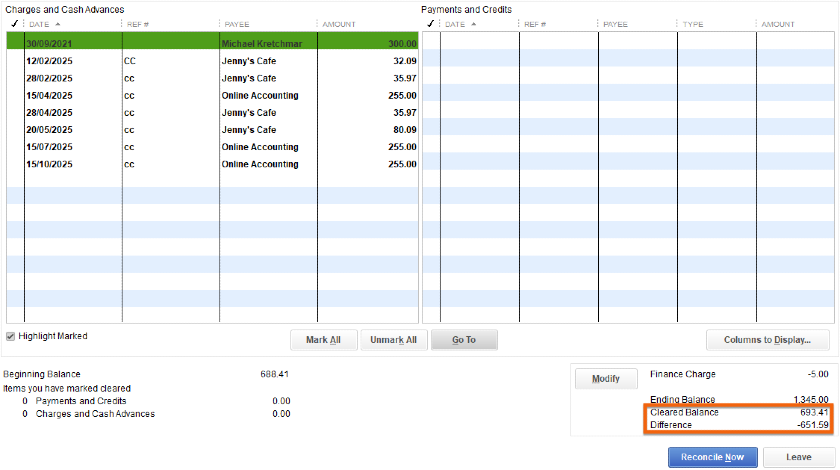
Cleared balance and difference adjust with every cleared transaction
If you see a transaction in QuickBooks that isn’t on your credit card statement, don’t delete it. It’s most likely a transaction that will show up on next month’s statement. Any unmarked transaction this month will appear automatically in next month’s reconciliation. However, if the charge is more than a month old, then it needs to be investigated to see if the entry in QuickBooks is wrong.
In our sample credit card statement, you’ll notice that the transactions for Jenny’s Cafe, Office Supply Store, Larsen Gas Station, Hall Lighting and Accessories, and Online Accounting match the transactions in QuickBooks.
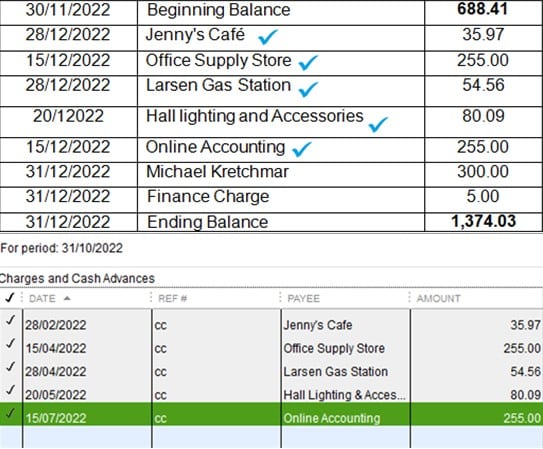
Matching transactions in QuickBooks to the credit card statement.
Trace From Credit Card Statement to QuickBooks
If there’s a transaction on your statement that isn’t in QuickBooks but the transaction is correct, then you need to add it to QuickBooks. In our sample credit card statement, you’ll notice that the transaction for Michael Kretchmar for the amount of $300 isn’t recorded in QuickBooks. In this case, since it’s a legitimate transaction, it should be added.
To create a new transaction, open the Enter Credit Card Charges screen from the Banking menu. Enter the correct information based on your credit card statement.
If you need help with this step, check out our tutorial on how to enter credit card charges in QuickBooks Desktop.
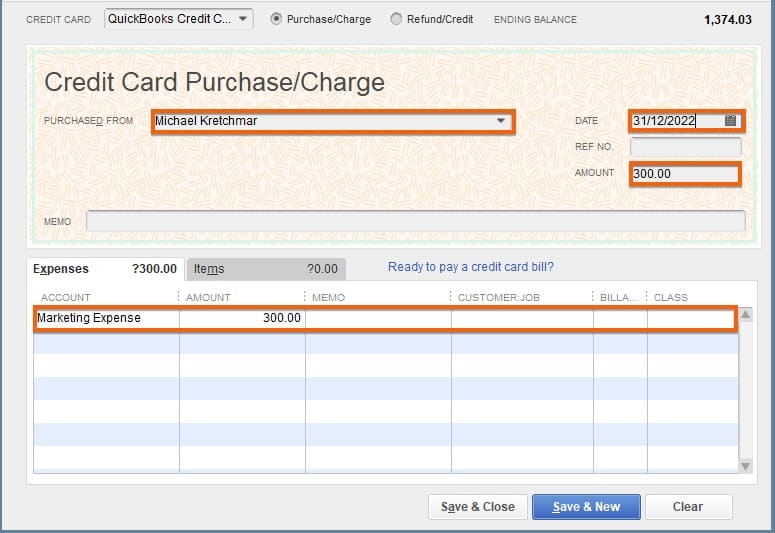
Recording a new credit card transaction in QuickBooks Desktop
Click Save & Close, and the transaction is added to the reconciliation screen.
You’ll know you reconciled your credit card balance successfully when the difference between your statement ending balance and cleared balance is zero.
You’ll also notice on the screen that there’s a Modify button, which allows you to change the amounts you entered in Step 1. If all information is correct, click Reconcile Now.
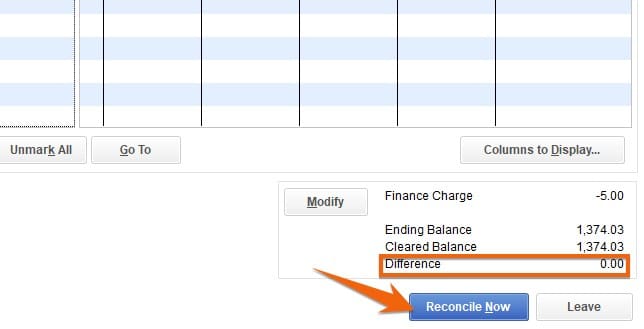
Confirm the $0 difference and then click Reconcile Now
After you click Reconcile Now, a pop-up screen will appear asking whether you want to write a check for payment now or enter a bill to pay later. If you don’t want to execute either of the two actions, click Cancel, and you’re done. Otherwise, choose your option and click OK.
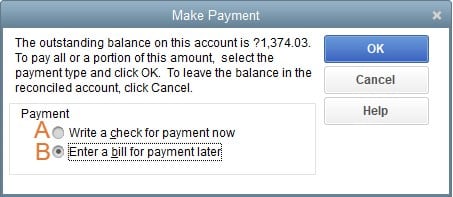
Write a check for payment now or Enter a bill for payment later
- Write a check for payment now: Create a check for the entire credit card balance or a portion of it that you want to pay.
- Enter a bill for payment later: Enter a bill to pay the balance by the due date. This creates a bill that will appear on your unpaid bills screen to remind you to make the payment.
Wrap Up
Congratulations on completing our lesson on how to reconcile credit cards in QuickBooks Desktop. If you are considering switching to QuickBooks Online, be sure to check out our tutorial on how to convert QuickBooks Desktop to QuickBooks Online.