A project timeline is a visual guide of the tasks and activities involved in a project—arranged in chronological order, from start to finish. The process of how to create a project timeline starts with drafting a project brief and defining the project scope. Next, identify the project milestones, list the individual tasks, and estimate the duration for each task. Finally, plot the actual to-do’s on the timeline.
Get started with creating a strategic schedule for your project by downloading our project timeline template. Our free guide features general activities involved in managing projects, so you’re able to customize it easily to your specific business needs.
Thank you for downloading!
Manage your projects more efficiently by using a reliable project management software solution. Use monday.com, an easy-to-use platform offering different project views, including timelines and Gantt charts.
1. Create a Project Brief
To learn how to create a project timeline, start by drafting the project brief. This important document provides a summary of the key project elements, which enables stakeholders and team members to quickly understand the requirements of the project. This document contains the following components necessary for effective project management:
- Description: State what the project is about. Add relevant background information, such as market insights or survey results, that you gathered on your own or from industry experts.
- Objectives: Before you create project timelines, be clear about what you want to achieve in the project. Set SMART (Specific, Measurable, Achievable, Relevant, and Time-Bound) goals for both internal and external stakeholders.
- Success metrics: Pin down the success indicators to which you’ll evaluate the project. Depending on your project, you may consider measuring gross profit margin, customer satisfaction, return on investment, and cost variance.
- Stakeholders: Identify who exactly will be part of the project, naming team members, clients, and vendors.
- Time frame: State the start and end date of the project. This is a crucial element when you create a project timeline, as it gives a rough idea of how long the project will take.
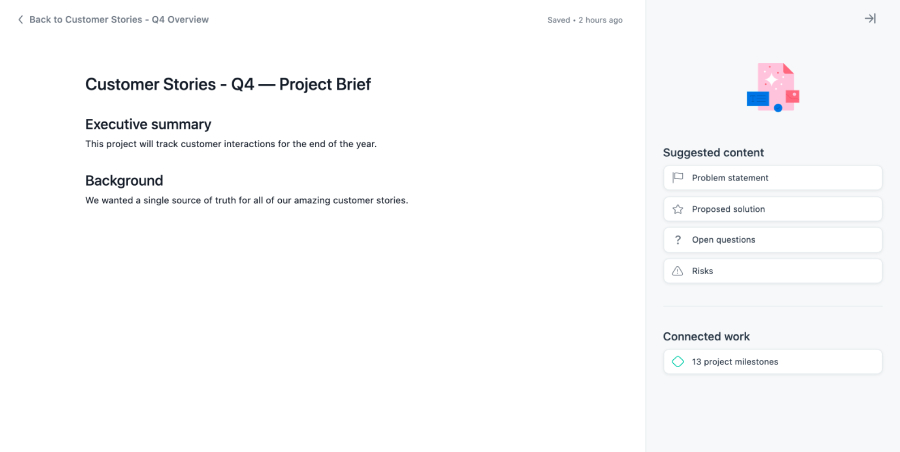
Write a project brief on Asana (Source: Asana)
Popular project management solution Asana features a project brief, wherein users are prompted to write an executive summary of the project and its background. Provide more context by following the platform’s suggested content: problem statement, proposed solutions, and risks. The project brief tool is available on Asana’s free version. But if you want to unlock more capabilities, consider its paid subscription plans, which start at $13.49 per user, monthly.
2. Determine the Project Scope
After drafting the brief, the next step in how to create a project timeline is establishing the project scope. This defines the boundaries of the projects, specifically in terms of resources, deadlines, and deliverables. The resources refer to the number of team members working on the project and their respective hours of work for a specific period. They also include the given budget for the materials and services you’ll use.
Defining the scope is crucial in project timeline management, as team leaders are able to reduce the likelihood of requirements constantly changing midway and the project being delayed. Once the project scope is defined, get the approval of project stakeholders. They should be able to confirm or challenge the resources to be used, deadlines to meet, and outputs to be delivered.
3. Break Down the Project Into Milestones
An important step in creating a project management timeline is plotting milestones, which mark significant developments in the project. For example, in a software development project, milestones include app design approval, completion of prototype, and quality assurance testing. To know which activities qualify as milestones, note the important events in your project where you accomplish something that pivots the project to the next stages.
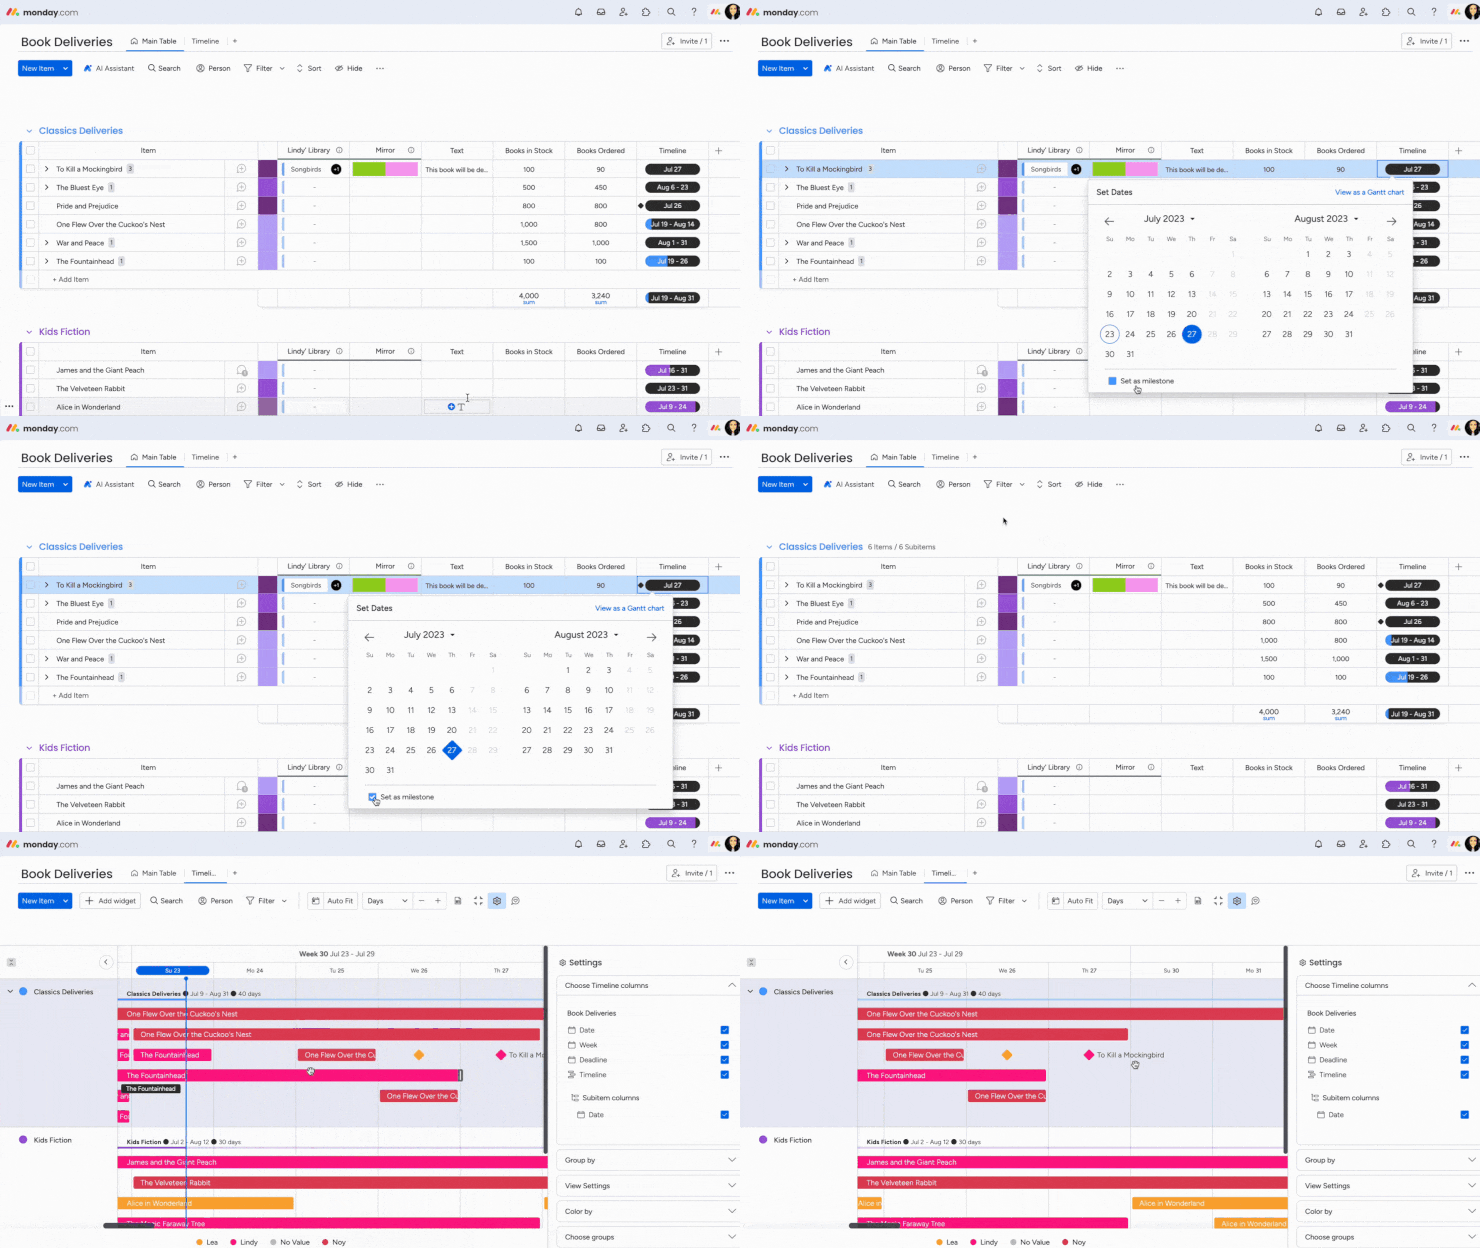
Set milestones on monday.com (Source: monday.com)
monday.com, a reliable project management software, allows users to set milestones on the table view and automatically displays it in a Gantt chart with a diamond icon for easy reference. It changes color according to its status. It appears green when the milestone was hit on time and goes red when it’s overdue. monday.com’s base-level plan is priced at $10 per user, per month. Learn more about its pricing and features in our comprehensive monday.com review.
4. List the Individual Tasks
The fourth step in creating project management timelines is to identify the important to-do’s under each milestone. In our software development example above, securing app design approval requires the following tasks:
- Develop a user flow
- Create a wireframe
- Ask for feedback from the team leader
- Make revisions based on the comments
- Submit again until approved
To further refine your project timeline chart later, break down complex tasks into smaller, more manageable to-do’s. For example, under creating the wireframe, you may have the following assignments:
- Identify essential app pages
- Plan the layout
- Illustrate page interactions with call-to-action buttons
- Select a color scheme
- Run a user audit
5. Forecast the Time Needed to Finish Tasks
Once you outline the important to-do’s from start to finish, project the duration of each task. This makes it easier to plot activities in the project tracking timeline later. Let’s take the app design approval example above and estimate the time it will take for tasks to be completed. Say you’re working on a five-page app design—here’s how the time breakdown may look like when you plug it into project timeline templates later:
- Develop a user flow: 1 hour
- Create a wireframe: 10 hours
- Ask for feedback from the team leader: 1 hour
- Make revisions: 5 hours
This means the app design approval will take roughly more than two working days when it’s laid out in your project timeline. To get a relatively accurate projection on task duration, consult team members. They should be able to give a more insightful estimate, especially if they’ve done the same tasks before.
While attempting to pin down accurate task duration for timeline planning, make room for extra time, as unexpected events may pop up, such as team members needing time off for emergencies, delays in delivery of necessary resources or supplies, or extended team meetings.
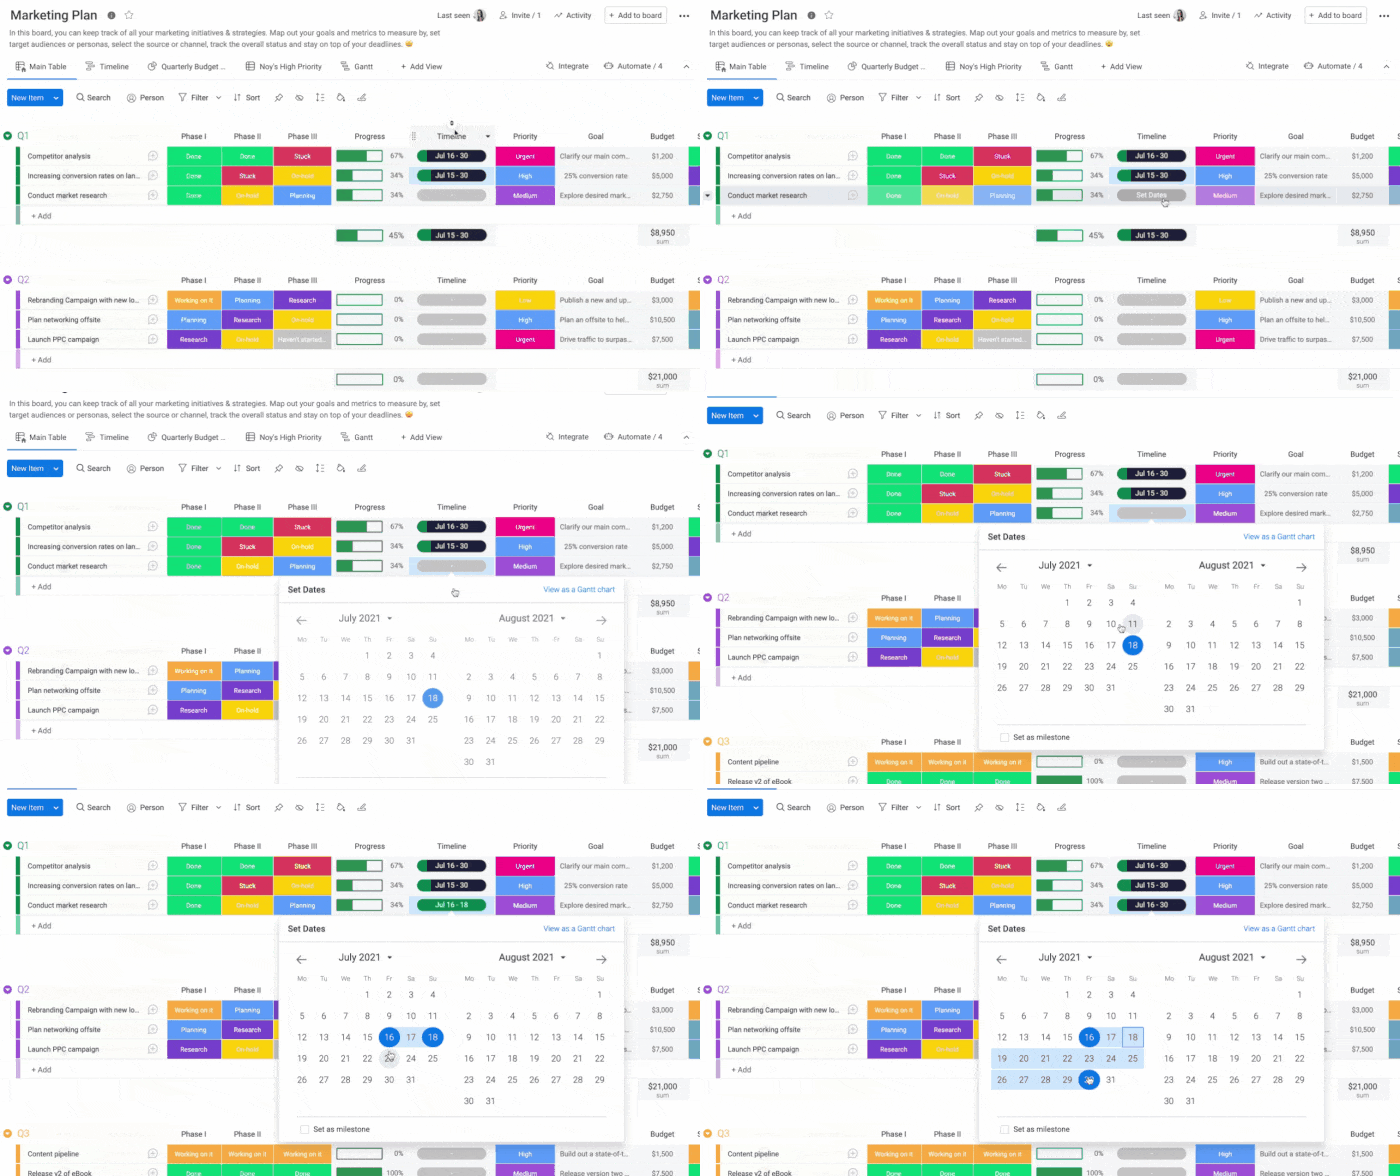
Fill out monday.com’s timeline column to set task duration (Source: monday.com)
6. Determine Dependencies
Once you have the list of tasks and their respective completion duration, it’s time to identify dependencies. While some tasks can be worked on and finished independently by different team members, some cannot move until others have been started or completed.
Determining dependencies is crucial in creating a timeline for a project, as it structures the plan in chronological order. Fortunately, many project management software solutions feature dependencies, allowing users to quickly see how tasks are interrelated.
Note that there are four kinds of task dependencies:
- Finish to Start (FS): The successor task (Task B) cannot begin until the predecessor task (Task A) is complete. In the case of app development, QA testing won’t start until the prototype is built.
- Start to Start (SS): The successor task (Task B) will only start once the predecessor task (Task A) has started. For example, you can’t create a good app design mockup if you don’t have a style guide that outlines fonts and color schemes yet. However, the app design mockup doesn’t have to be completed before you can start deciding which typography and color palette to use.
- Start to Finish (SF): The predecessor task (Task A) will only be finished once the successor task (Task B) has begun. For example, when transitioning to your new app, you won’t be able to disable the old platform until all the users have migrated to the new app.
- Finish to finish (FF): The successor task (Task B) cannot be completed until the predecessor task (Task A) is completed. For example, you can only finish the app roadmap after you’re done collecting all the product requirements.
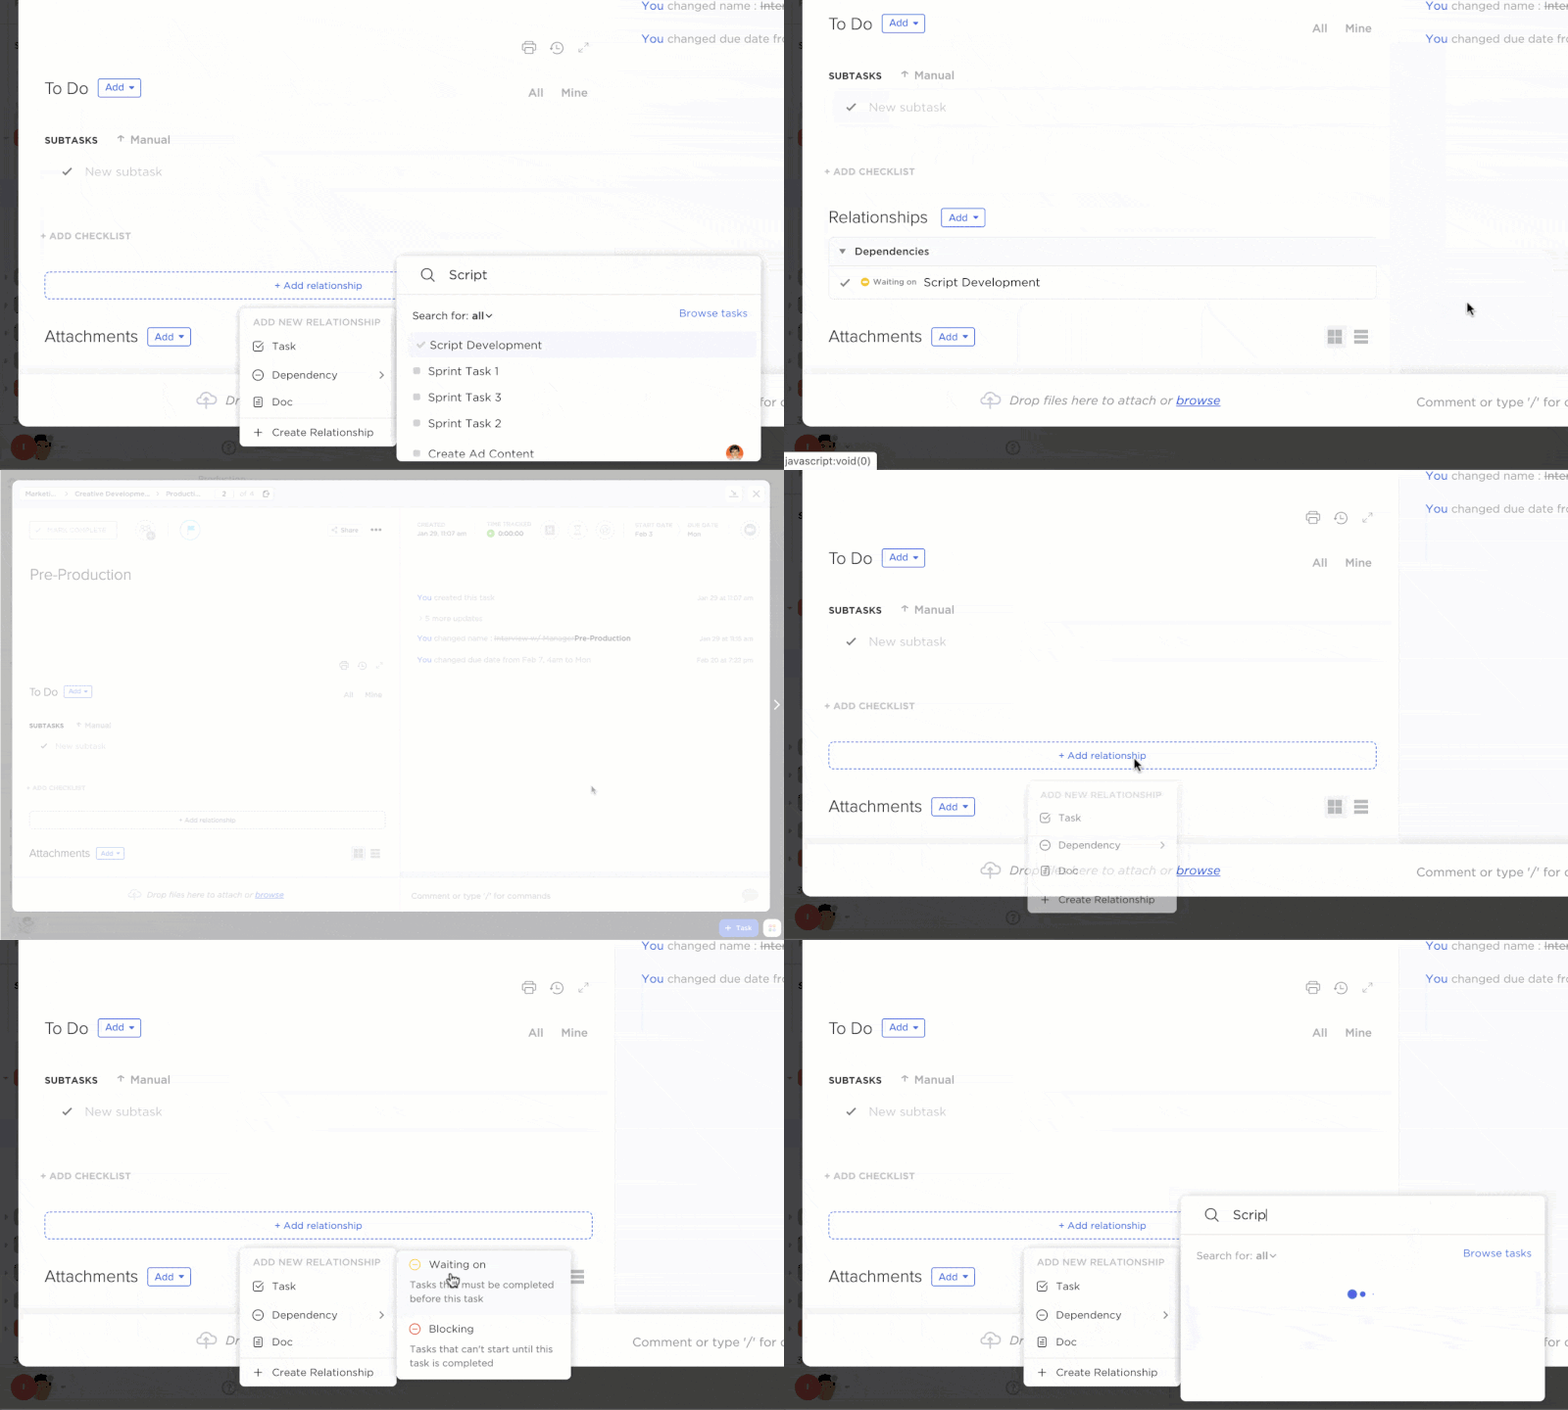
Add dependencies on ClickUp tasks (Source: ClickUp)
Popular project management solution ClickUp allows you to define relationships between tasks to create an orderly workflow. Within a task, you’ll find the Dependencies feature, where you’re able to set which tasks need to be completed to start another. Consider using this project management app in your business for only $10 per user, monthly.
7. Plot the Tasks on Your Timeline
Finally, the last step in how to set a timeline for a project is to put all the tasks you listed in a timeline format. Use the Gantt chart in team management apps to make the timeline easily readable. After plotting all the to-do’s, assign each task to team members and embed the necessary documents on task cards for proper guidance.
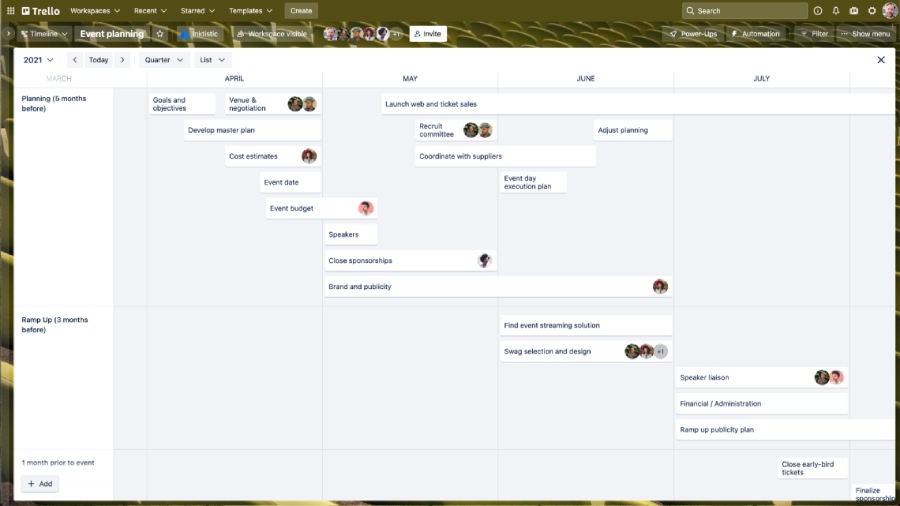
Lay out your tasks on Trello’s timeline (Source: Trello)
While Trello is popular for its Kanban board, it also enables users to plot tasks in a timeline. With this, it’s easier to monitor how long individual tasks take to complete. On top of that, you’re able to group tasks by member or label, allowing you to quickly find specific assignments you’re looking for. Trello’s entry-level plan starts at $5 per user, per month.
Reasons to Use Project Timelines
With a project timeline, you’ll be able to have a bird’s-eye view of the entire project and make your team more prepared for the work ahead. It helps you see the big picture, keeping you focused on what needs to be achieved. Here are more ways a project timeline helps teams:
- Guides team members about the next steps: Since all tasks are laid out in chronological order, it’s easier to see which tasks and activities need to be worked on after completing one. The progress is faster with everyone aligned.
- Enables managers to spot bottlenecks: When the pace of the progress doesn’t align with your estimated timeline, you’ll be compelled to check the causes of delays. As a result, you’re able to make adjustments in terms of allocating resources (people and finances) to ensure that you’re on track to deliver outputs on time.
- Increases accountability in the team: The tasks mapped out in the timeline are assigned to specific team members. With visibility on who’s working on what and which tasks are dependent on others, everyone carries a sense of responsibility in ensuring that they finish what’s designated for them.
Frequently Asked Questions
Many project management software solutions feature timeline and Gantt chart tools in their free plans. For instance, ClickUp allows 60 uses of its timeline and Gantt chart tools. Similarly, most platforms offer templates for different business needs, which serve as excellent project timeline examples.
The five phases of the project management lifecycle are initiation, planning, execution, monitoring, and closing.
- Initiation involves defining goals, enumerating stakeholders, and identifying constraints and the budget.
- Planning requires creating a project timeline and a risk mitigation plan.
- Execution entails implementing the plans.
- Monitoring involves looking at key performance indicators and ensuring that the project is on track for completion.
- Closing, the final phase, requires completing paperwork for handing off outputs to external stakeholders.
“Gantt chart” is named after the person who designed the chart, Henry Gantt, an American mechanical engineer. He developed the chart in 1910 to manage production planning in factories.
Bottom Line
A project timeline is useful for businesses, as it outlines what needs to be finished at a specific period and directs team members on when to start working on assignments and submit deliverables. Moreover, it allows managers to keep track of progress as the project moves along over time.
For small teams handling a project with many moving parts, a project planning timeline makes the huge initiative less overwhelming, as it’s broken into phases and actionable steps. Start planning your project today by downloading our project timeline template.