Squarespace Scheduling, a standalone app for small businesses that tops our best appointment scheduling software guide, can be added to any website. It includes integrated payment processing for pre- or post-service payments, card-on-file billing, video conferencing integration, intake forms, and automated booking confirmations, reminders, and follow-ups. You get notified of each scheduled appointment and can sync appointments with your personal Google, Outlook, iCloud, and Microsoft 365 calendar.
Below, we show you how to set up your Squarespace Scheduling account in six easy steps. You can also follow along with our video tutorial.
Squarespace Scheduling Video Tutorial
Step 1: Sign Up for Squarespace Scheduling
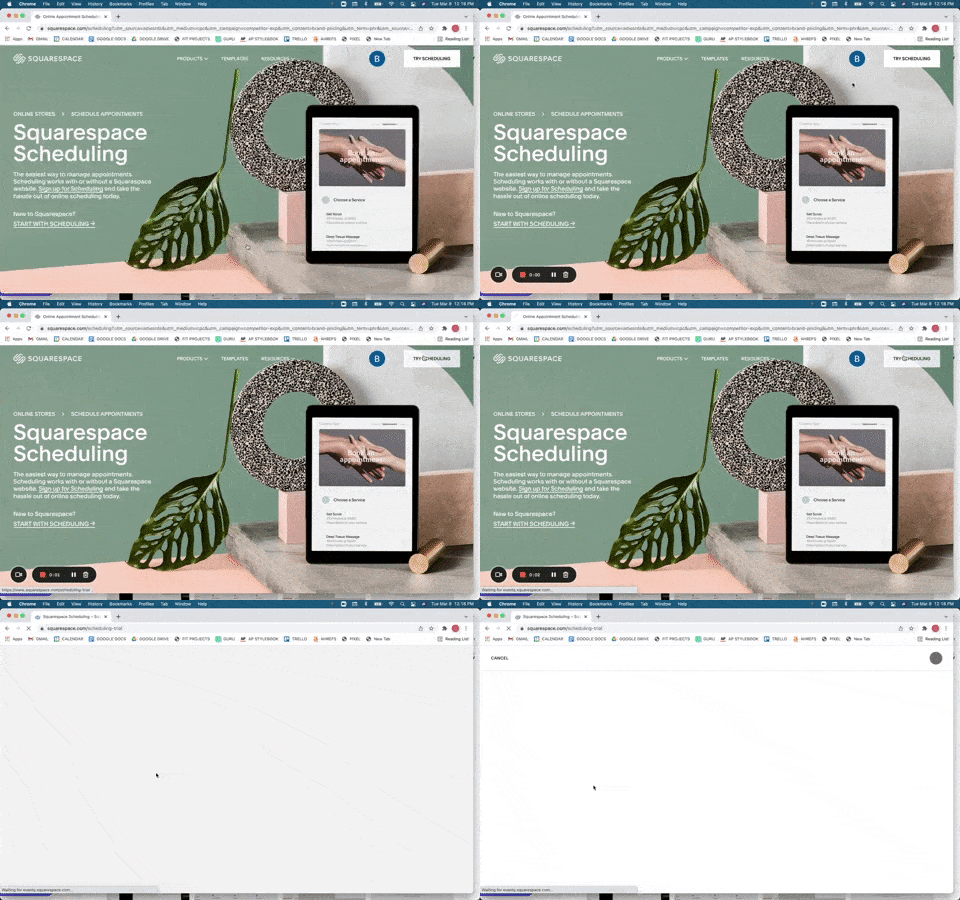
Signing up for Squarespace Scheduling is easy to do from the Squarespace website.
The first thing that you want to do is sign up for a Squarespace Scheduling account. This is easy to do—simply visit the Squarespace Scheduling website and sign up either for the Squarespace Scheduling seven-day free trial or one of its three scheduling plans.
Squarespace Scheduling Pricing Plans
Emerging | Growing | Powerhouse |
|---|---|---|
$15/month | $25/month | $50/month |
1 calendar | 2–6 calendars | 7–36 calendars |
| Everything in Emerging, plus
| Everything in Growing, plus
|
The plan you choose will primarily be based on the number of calendars you need, with higher packages offering more calendars. Additionally, as you can see in the table above, text appointment notifications are only available with the Growing tier, and several premium features, such as custom API and CSS, only come with the Powerhouse option. Overall, however, all of the plans will perform basic scheduling functions and should provide everything you need to streamline your appointments.
Squarespace Scheduling works with any website platform, and you do not need to have a Squarespace website to use Squarespace Scheduling.
Step 2: Set Up Your Calendar
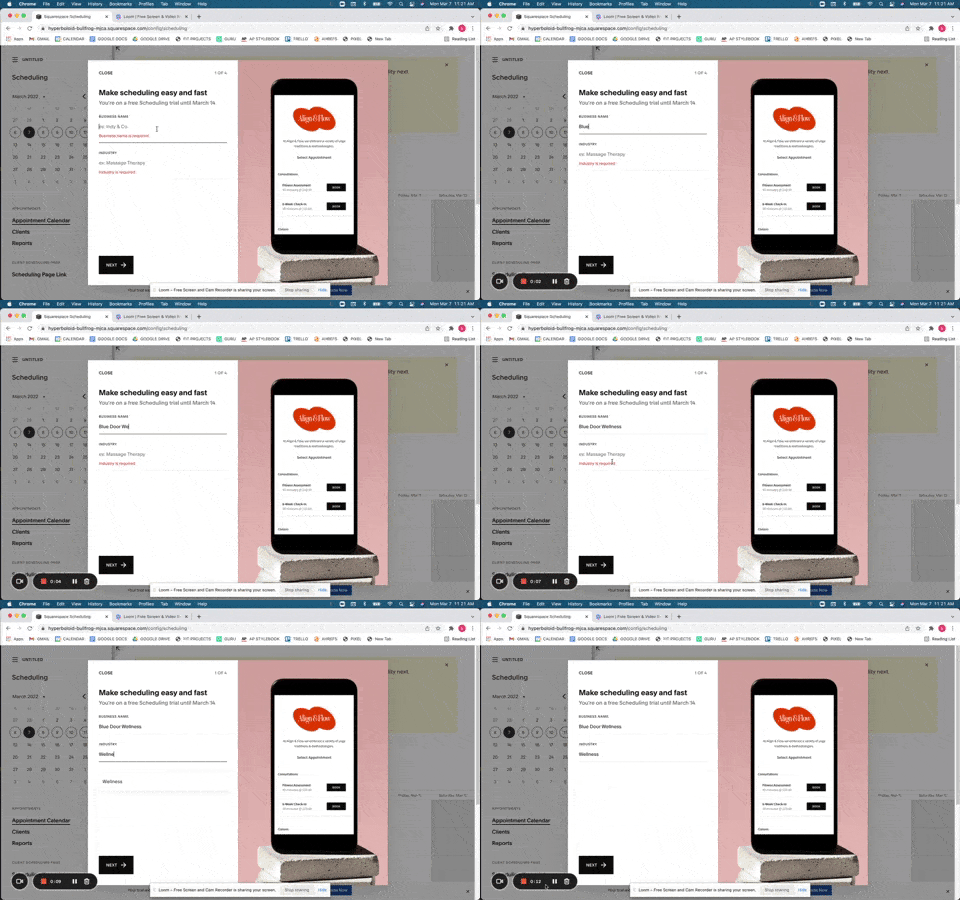
Squarespace helps you through the initial calendar setup with prompted questions.
Once you have decided on a scheduling plan and signed up for your accounts, it’s time to work on getting your calendar ready so that your clients can use it for booking. The first part of this process is easy. Squarespace will prompt you through a series of preliminary questions such as your store name and general hours.
From there, the first parts of your calendar will be ready to go. You can continue your setup from the Squarespace Scheduling homepage.
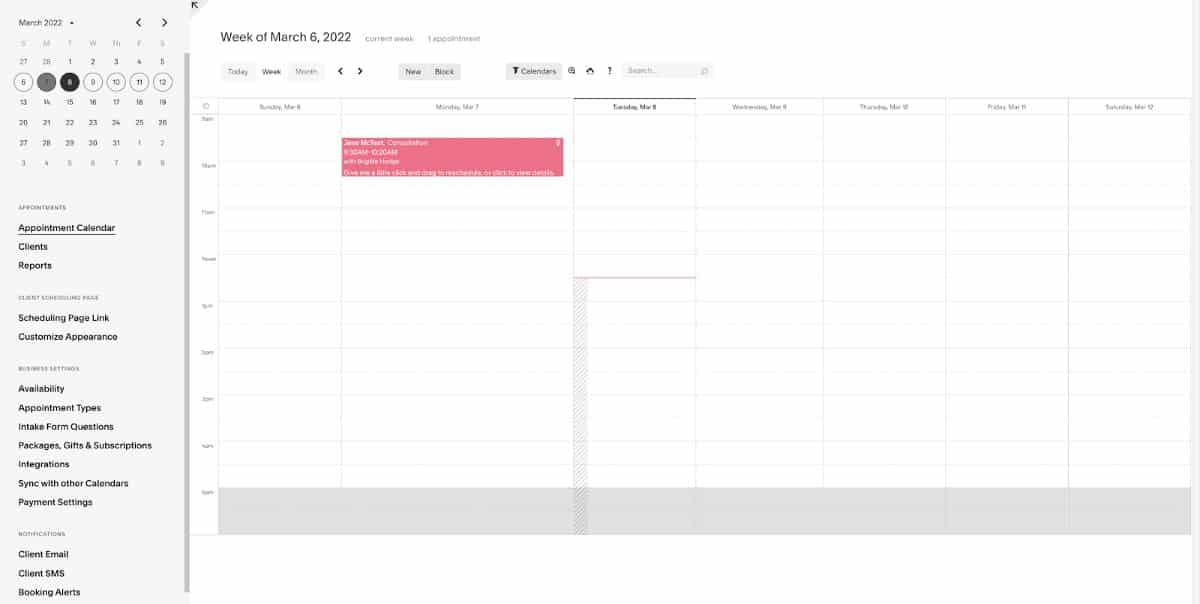
Squarespace Scheduling’s user homepage is where you can set up and manage your calendars and appointments. (Source: Squarespace)
Set Availability
The first thing you will want to do to get your calendar up and running is to set your availability. In the initial prompted setup section, Squarespace will ask you to set your preliminary available time slots. These times will then automatically be incorporated into your Squarespace calendar as your default store hours.
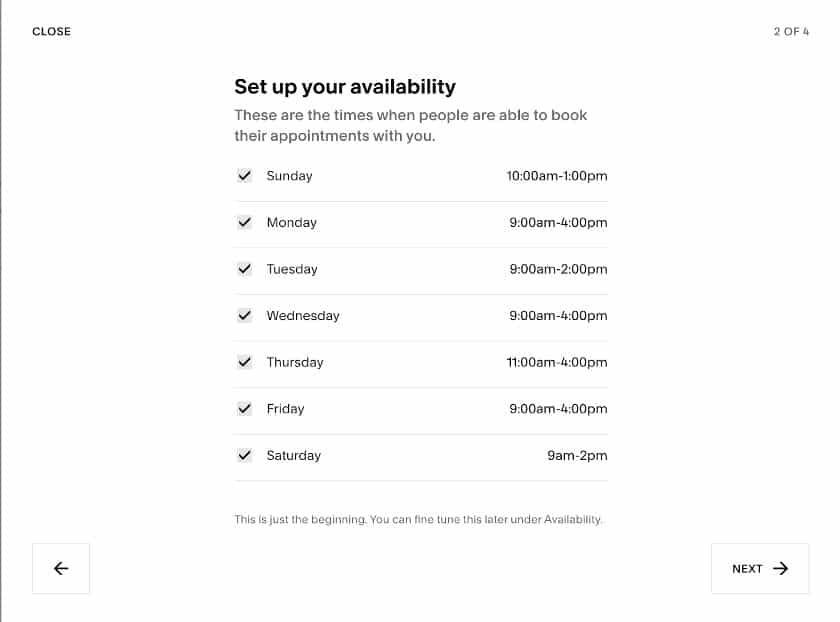
The platform lets you add your available times and will set up your calendar. (Source: Squarespace)
If you do decide you need to update your availability before you unveil your calendar or at some point down the road, Squarespace Scheduling makes it easy. All you have to do is toggle over to the “Availability” tab on the sidebar of your Squarespace Scheduling homepage, and from there, you can either adjust single days by selecting them on the calendar or edit your overall store hours by editing your default times from the setup process.
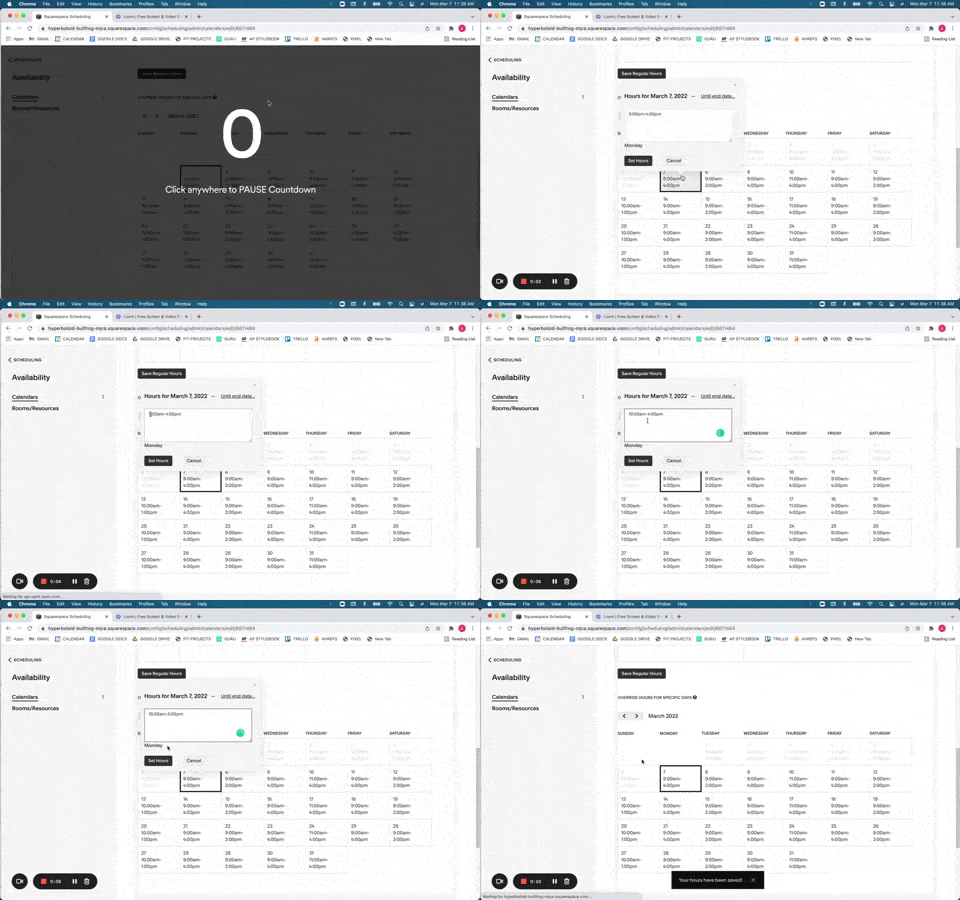
Squarespace makes it easy to adjust your store hours or daily availability.
In addition to setting your availability, you can create scheduling limitations during your calendar setup process. Within the calendar tab, all you have to do is click the “Edit Default Limits,” and you will be able to adjust scheduling items, including:
- Cancellation window: Set how much warning customers have to give to receive a full refund for a canceled appointment.
- Tardiness window: Set tardiness fees or a time window for how tardy guests can be before canceling their appointment.
- Intake forms: Set when customers are able to access and edit their intake forms before their appointment.
- Rescheduling permissions: Set whether or not customers are able to reschedule appointments.
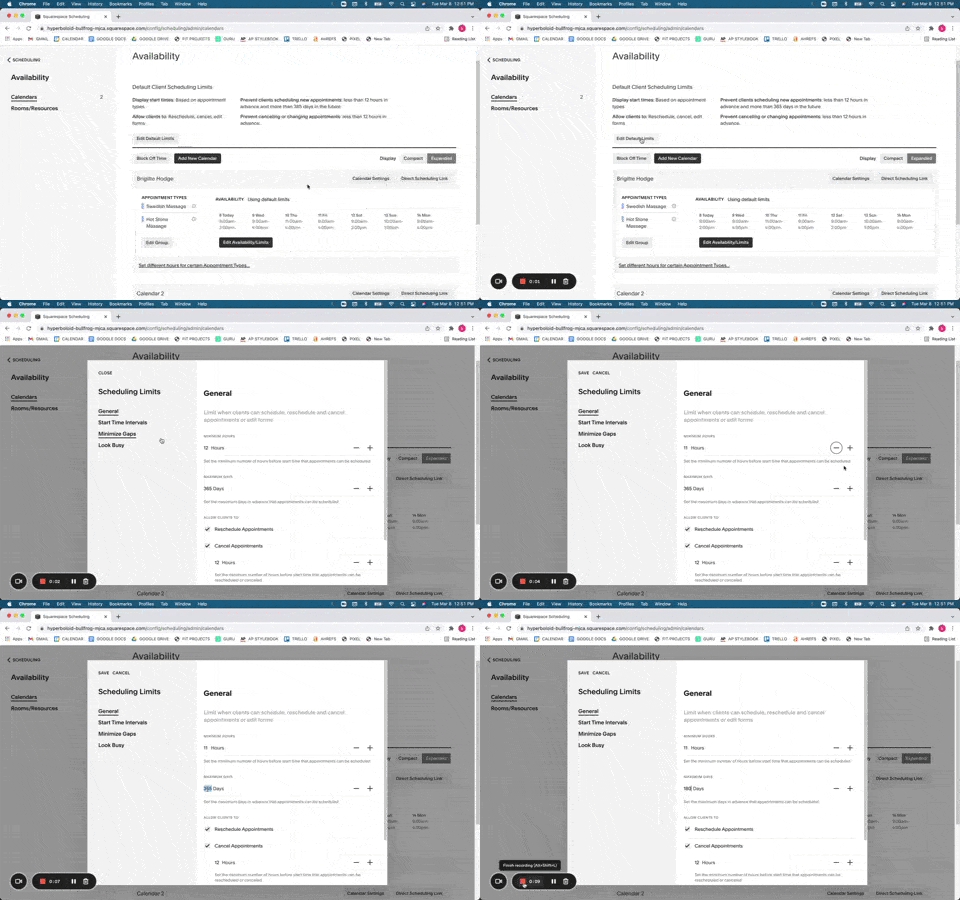
Easily adjust your scheduling limitations right from your Squarespace calendar.
Create Appointment Types
Once your availability is set and you have determined your appointment limitations, you should create your different appointment types. What you are essentially creating here is your menu of available service options, including their durations, availability, and costs. Once your schedule is live (something we will go over later in this article), customers can shop from this menu of options as they explore your calendar and sign up for classes or services.
Squarespace Scheduling will let you create and manage both individual appointments and group classes.
Creating your different types of classes or services is easy. All you need to do is return to the sidebar on your Squarespace Scheduling account and click over to the “Appointment Types” menu option. Then, you will be taken to a screen that displays your full menu of available services with two buttons on the top: “New Type of Service” and “New Type of Group Class.”
To add a new class or service, all you need to do is select one of the two button options, and Squarespace Scheduling will take you to a form where you can fill out service information.
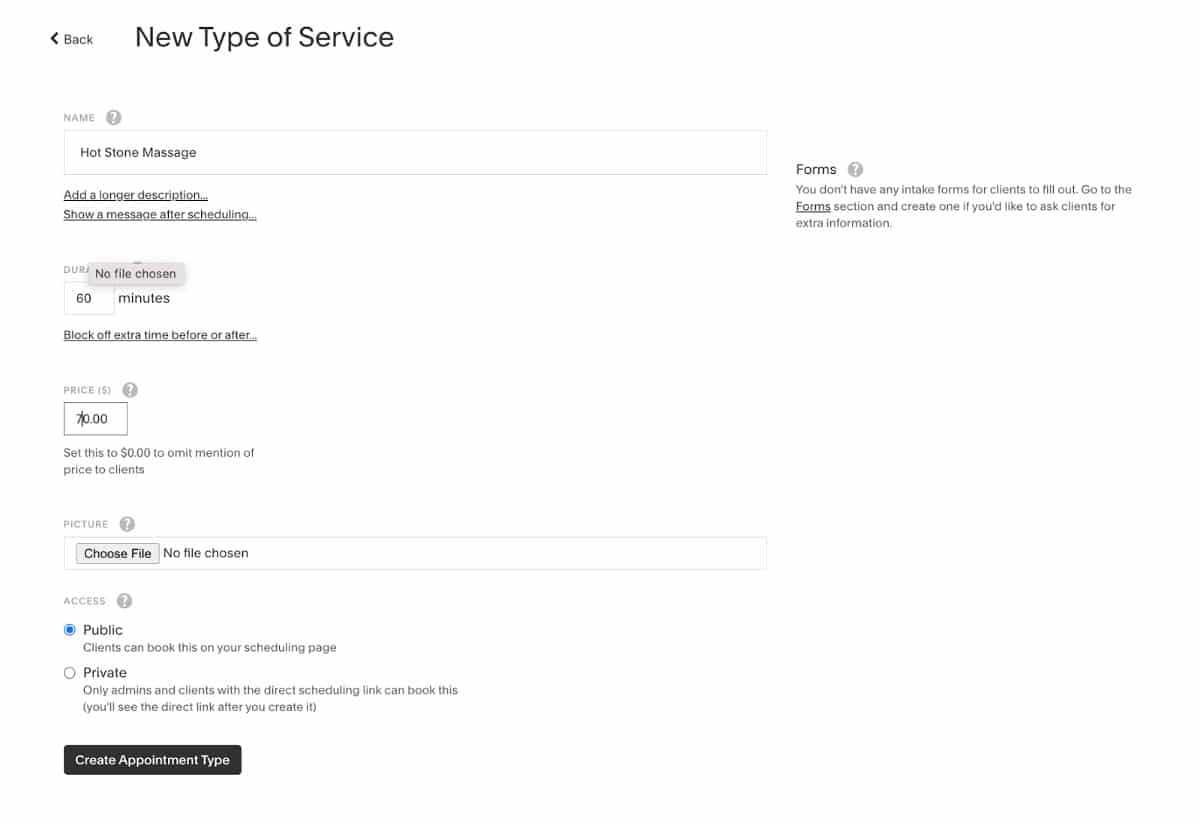
You can create as many services as you need and add them to your schedule. (Source: Squarespace)
One of the best features in this section is the ability to set different availabilities for different types of appointments and classes. This means that you can restrict when certain services appear on your calendar and are available for sign-up, so you only have to do what works for you.
Another great feature here is the ability to make certain appointment types private. With this setting, your private services will not appear on your main calendar, and clients will only be able to sign up for them via a custom link that you send directly to their emails or phones.
Add Rooms & Resources
In addition to creating different appointment types, if you run a business with a limited number of spaces or supplies, you can create rooms and resources that will sync with your appointments calendar to prevent double-booking.
Say you have five staff members at your massage therapy practice but only have three available massage rooms. The resource allocation tool will block available rooms as massage appointments are booked—when all the available massage rooms are booked, there will be no more calendar availability.
To create rooms and resources, toggle over to the sidebar and select the “Availability” menu option. Then, select the “Rooms/Resources” option on the left side of the screen, and you will go to a page where you can select the “New Resource” button. From there, click the button and fill out the resource page, including the resource’s quantity and the type(s) of appointments with which they are booked.
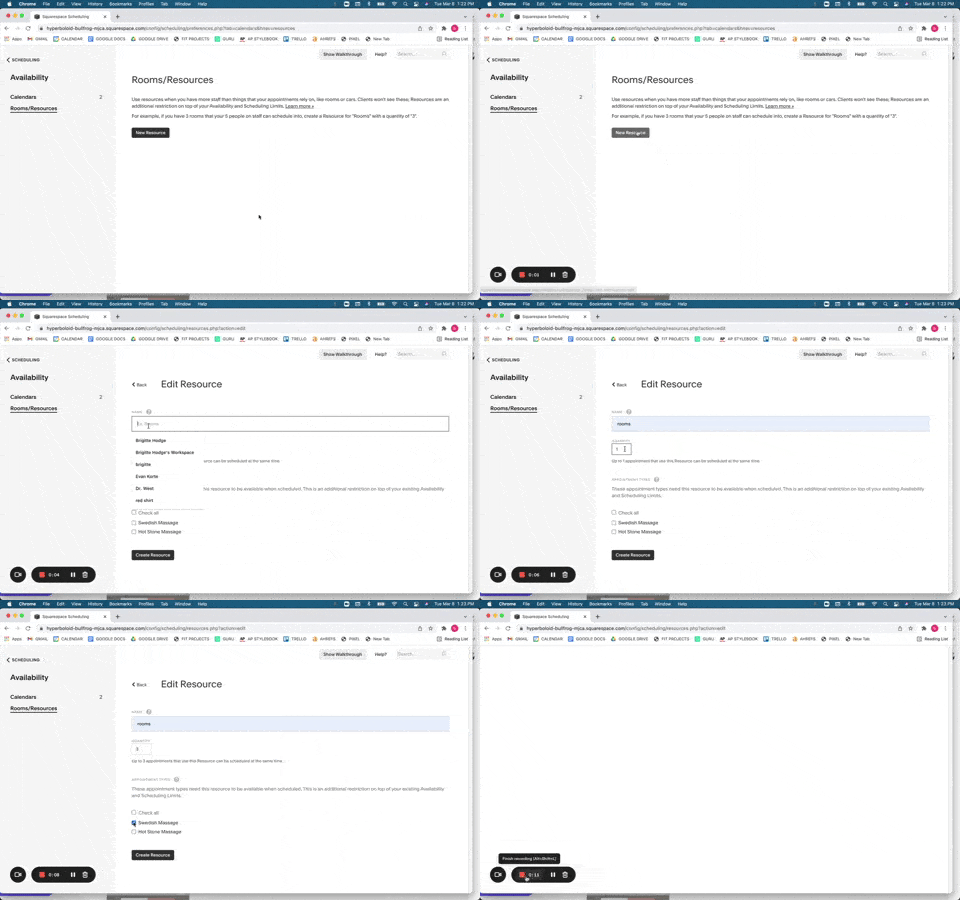
Create and allocate resources to different appointment types to avoid overbooking your supplies.
Add Clients
With your calendar and appointments set, you have the option to upload any client information that you may already have. You can do this via bulk uploading from a spreadsheet, syncing your calendar contacts, or manually adding clients to your database. All you have to do for this is click the “Client” menu option on the sidebar of your home screen, and then you can begin adding clients however you wish.
Squarespace Scheduling integrates with Square POS (point-of-sale), so all your POS contacts will automatically sync with your scheduling platform.
As time goes on and clients continue to sign up for appointments at your business, their information will be saved to your client list. The data includes:
- Contact information (phone/email)
- Client notes from your staff
- Intake forms
- Upcoming appointments
- Appointment history
Upload Intake Forms
For businesses wanting to gather information about their clients before their appointment or needing guests to agree to certain terms and conditions, you will want to create intake forms. As customers sign up for appointments online, these forms will pop up as part of the sign-up process. The forms, as well as their booking information, will automatically be uploaded to the customer’s individual client page.
Making intake forms is simple with Squarespace Scheduling. All you need to do is select the “Intake Form Questions” menu option on the sidebar of your home screen. Then, you will be taken to a page where all of your forms are listed. You will see three different actions buttons:
- New Custom Form
- New Terms and Conditions Agreement
- New SOAP Notes Form
Each option will take you to a form where you can either upload your own document or fill out the set prompts—and Squarespace will create the intake form for you. The platform makes it easy to create a detailed questionnaire with different question formatting options (e.g., multiple choice, check box, text box, yes/no, and dropdown), an address form, and the ability to automatically link forms with specific services or classes.
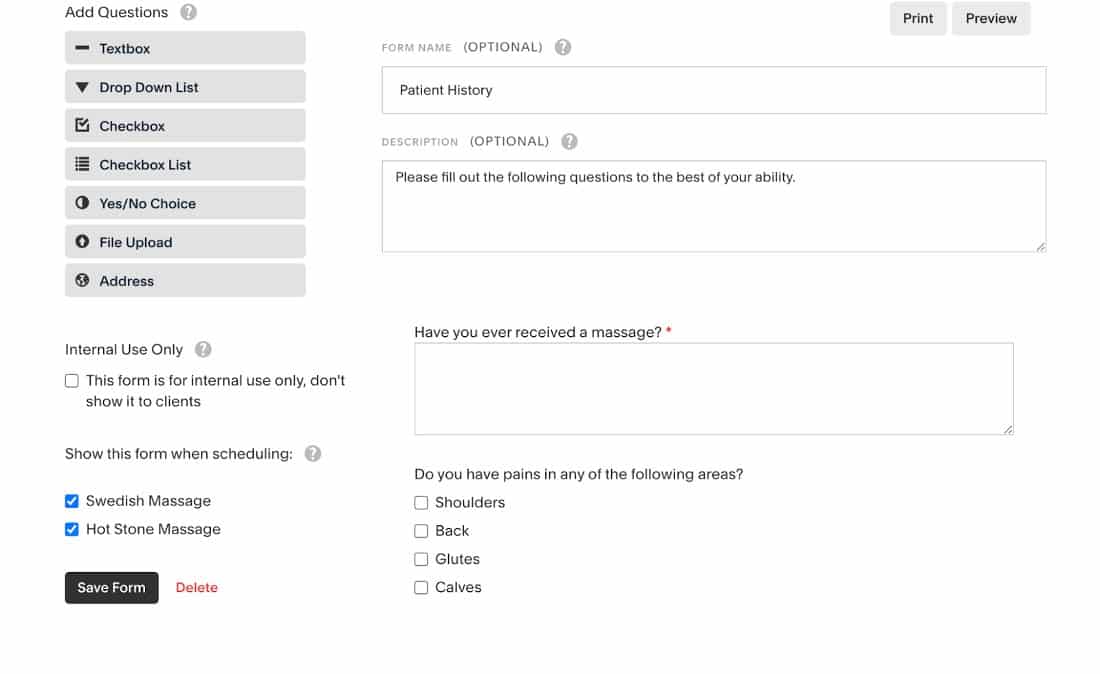
Ask the questions you need to know before service with Squarespace’s intake forms. (Source: Squarespace)
Program Email & Text Reminders
Another feature that Squarespace Scheduling offers is its appointment notifications. Essentially, it lets you design custom email and text notifications featuring your own branding and verbiage and automatically sends them out to your clients to help you avoid no-shows and client confusion.
Email notifications come with all Squarespace plans, but SMS is limited to the Growing and Powerhouse plans.
With your Squarespace Scheduling account, you can set when notifications go out, what they say, and what types of notifications you will send. You can send emails and texts for all of the following actions:
- Initial confirmation
- Appointment reminders
- Cancellation confirmation
- Reschedule confirmation
- Post-appointment follow-ups
- Package/gift certificate order confirmation
- Subscription paid
- Subscription canceled
To create custom appointment notifications, select the “Client Email” or “Client Text” menu options on the sidebar of your home screen. Then, you will come to a page with all the different notification options, as well as forms for each, where you can set when they go out, what they say, and what they look like.
Add Packages, Gift Cards & Subscriptions
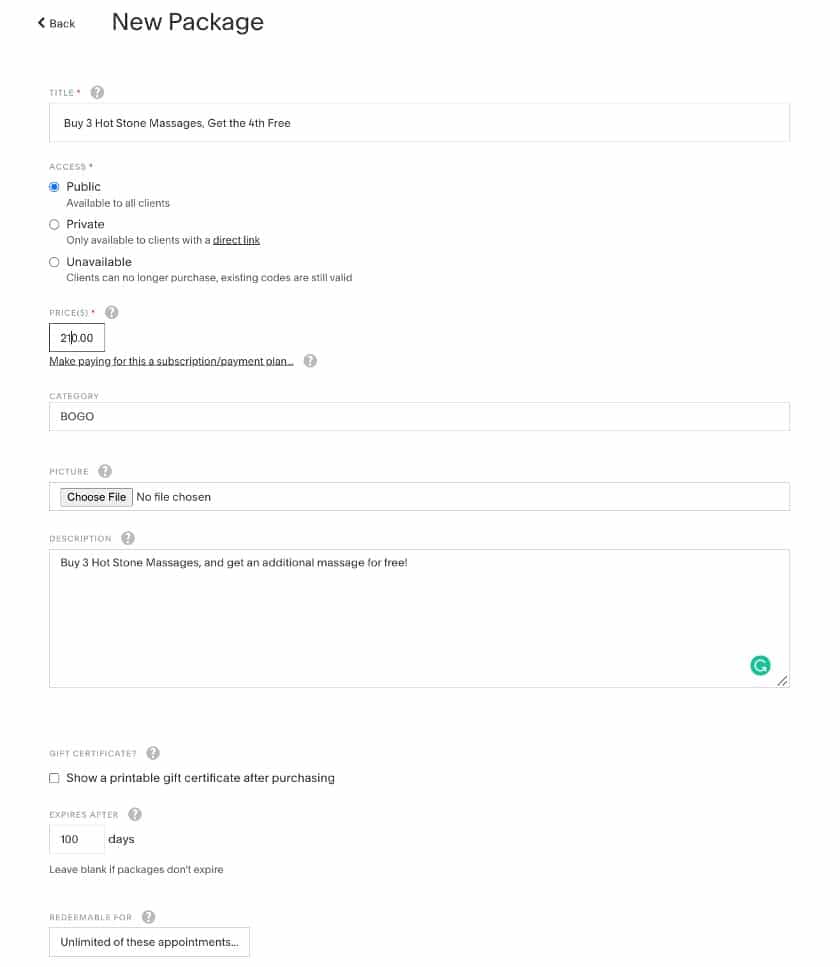
Add packages, gift cards, and subscriptions for customers to purchase to your appointment scheduling page. (Source: Squarespace)
One of the unique features from Squarespace Scheduling that you don’t find in many other appointment scheduling platforms is the ability for you to sell packages, gift certificates, and subscriptions from your scheduling page. In other words, as clients book appointments, they can also purchase class or service bundles, gift cards, and/or a subscription with your business. This is a great opportunity to capitalize on buying potential and drive sales through your appointment scheduling platform.
To begin selling through your scheduling page, head over to your Squarespace Scheduling homepage and select the “Packages, Gift Cards, and Subscriptions” option from the sidebar menu. You will then be taken to a landing page where all of your available products are listed and can be edited. You will also see three buttons for creating a “New Appointment Package,” “New Subscription,” and “New Gift Certificate.”
If you want to create a new item, simply select the appropriate button, and you will be taken to a form where you can add all the relevant information like cost, expiration, description, what it is good for, etc. From there, the products you create will be available to customers to purchase as they make appointments on your scheduling page.
Step 3: Customize Your Scheduling Page
Once you have input all the information and products into your schedule, it’s time to customize your scheduling page to reflect your brand. Squarespace’s website builder is known for its well-designed and easily customizable themes. Its scheduling platform is no different and offers a rich bank of customization features, including the ability to
- Add your logo to the schedule header
- Set how your schedule appears to customers with both daily or monthly views
- Choose custom accent colors
- Add custom schedule instructions that will appear at the top of the scheduling page
- Allow customers to make recurring appointments with an optional recurring appointment check box
- Add booking requirements (phone number, address, intake forms)
- Add a branded client confirmation pop-up page that appears after customers book their appointments
- Add QR code to the confirmation page so customers can add your contact to their Squarespace booking mobile app
- Make advanced CSS customizations (available exclusively with the Powerhouse Plan)
DID YOU KNOW?
There is a free Squarespace Scheduling app from Acuity that customers can download and use to favorite their top businesses and book appointments.
Getting started with your schedule design is simple. All you need to do is select the “Customize Appearance” option from the sidebar menu. From there, there are three separate customization categories with corresponding forms for you to fill out to your preferences.
- Appearance: This is where you can edit the way that your calendar page looks, including logo, accent color, and wording.
- Scheduling Page Options: This lets you choose the scheduling options you will provide to customers—including recurring appointments, appointment information displayed upon scheduling, time slots, and required customer information.
- Advanced CSS: This feature is available only with the Powerhouse tier and opens up advanced customization options, best suited for people with a computer science background.
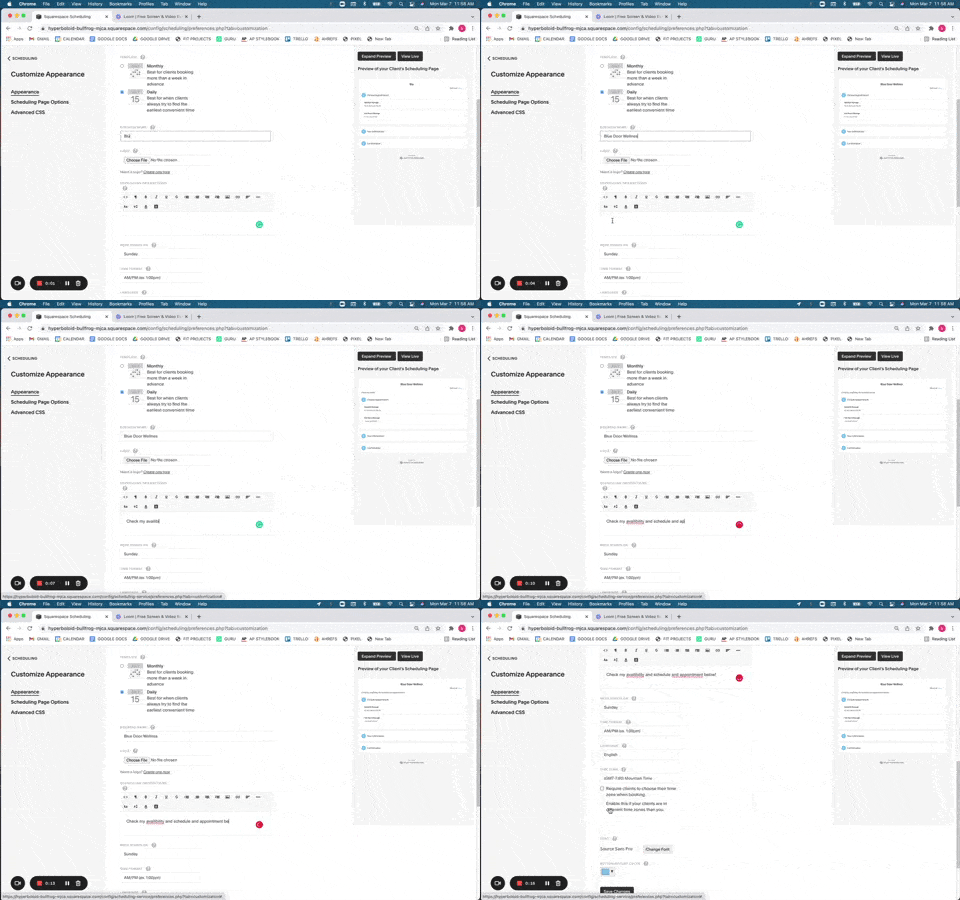
Adding your own logo and colors to your scheduling page will help you maintain a cohesive brand image.
Step 4: Set Up Payment Processing
One of the best features included in all Squarespace Scheduling accounts is the ability to process payments within the scheduling platform. That means that customers can book and pay for their appointments upfront online, all in one place, which not only simplifies their lives but yours as well.
To begin setting up payments, head over to the “Payment Settings” button on the side menu. From there, you can set up your payment terms and connect the processing platform of your choice.
- Payment Terms: Decide what customers have to pay upon booking (pay in full, pay a deposit, no payment required, etc.), allow for tips upon booking (pre-service), and establish currency preferences.
- Payment Processors: Squarespace Scheduling works with Stripe, Square, and PayPal for online payment processing. Simply log in to your payments account via your Squarespace Scheduling account, and your payment processor will connect with your scheduling account, allowing you to process payments within your scheduling page.
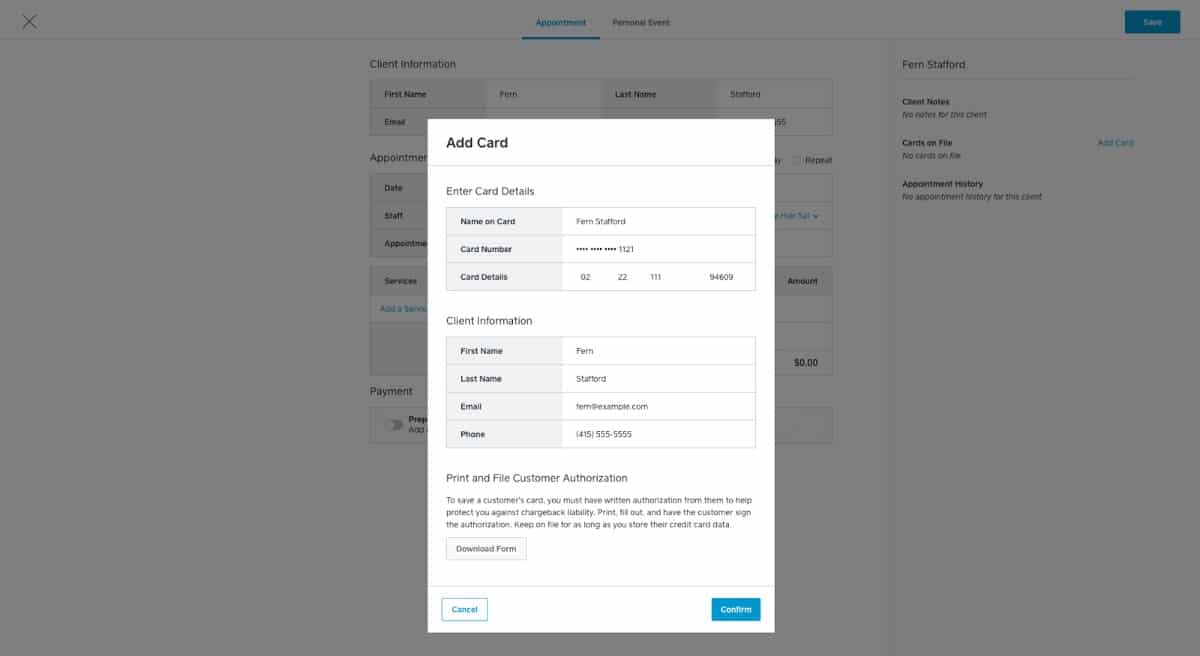
Squarespace Scheduling lets customers pay for their services or packages on the scheduling page. (Source: Squarespace)
Step 5: Sync Your Appointments to Your Personal Calendar
Now that everything customer-facing is set to go, it’s time to get your end of the scheduling platform in order. Namely, it’s time to sync your appointments with your personal schedule so you can stay on top of all your clients and upcoming engagements.
Squarespace Scheduling syncs with all of the major calendar platforms—including Google, Outlook, iCloud, and Microsoft 365.
With calendar syncing, every time a customer makes an appointment via your scheduling page, it will automatically appear on your personal calendar, and you will receive a notification that an appointment has been booked. You can also customize your notification windows, so you only get the notifications you need when you need them.
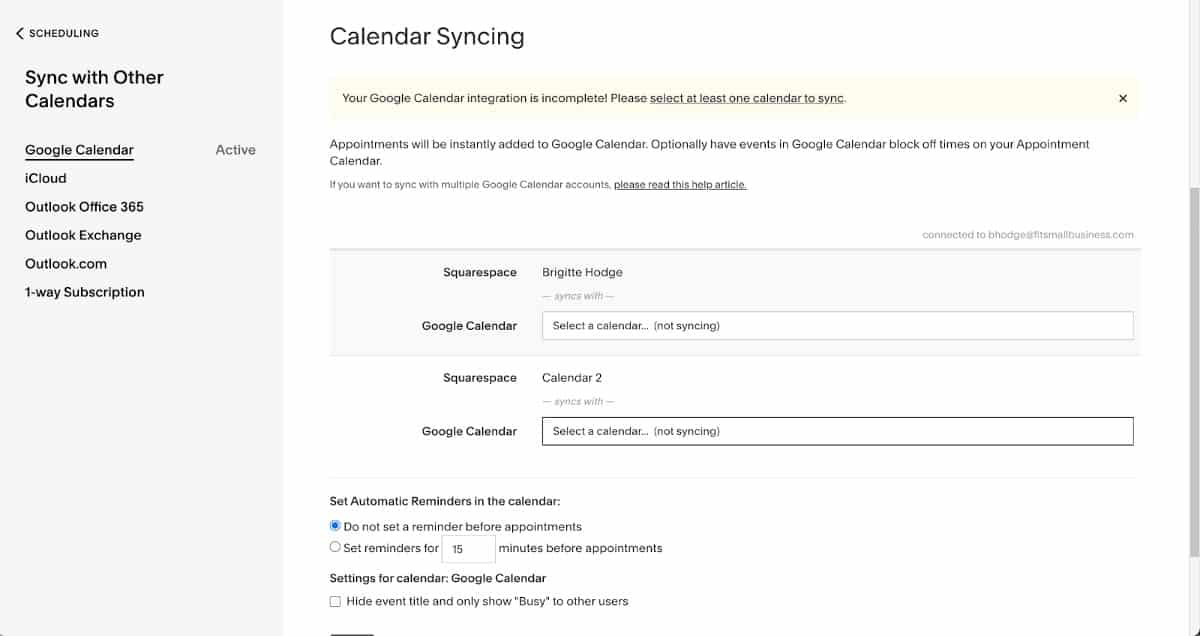
Squarespace Scheduling will sync with your personal calendar so you never miss a beat and can keep track of your appointments from anywhere. (Source: Squarespace)
Syncing your calendar with Squarespace Scheduling, like everything else on the platform, is simple. Just navigate over to the “Calendar Syncing” menu option on the sidebar, choose the calendar you want to sync from the menu on the left of the scheduling landing page, and fill out the form. From there, your calendar will be synced and you can start tracking your appointments from anywhere.
Other Integrations
Squarespace Scheduling doesn’t just sync with your calendar; it also has a rich bank of additional integrations that you can use to streamline Squarespace into your business seamlessly. These integrations include:
- ActiveCampaign
- Automate.io
- AWeber
- ClassPass
- Constant Contact
- ConvertKit
- Custom Conversion Tracking
- Custom Sidebar Integration
- Daylite
- Drip
- Facebook Business
- FreshBooks
- Go To Meeting
- Google Analytics
- Google Contacts
- Google Hangouts
- Google Sheets
- InfusionSoft
- JoinMe
- MadMimi
- Mailchimp
- PayPal
- Pipedrive
- QuickBooks
- Referral Candy
- Review Rail
- Salesforce
- Simplero
- Stripe
- Uplaunch
- Webhooks
- Wufo
- Xero
- Zapier
- Zoho
- Zoho Flow
- Zoom
Step 6: Share Your Scheduling Page
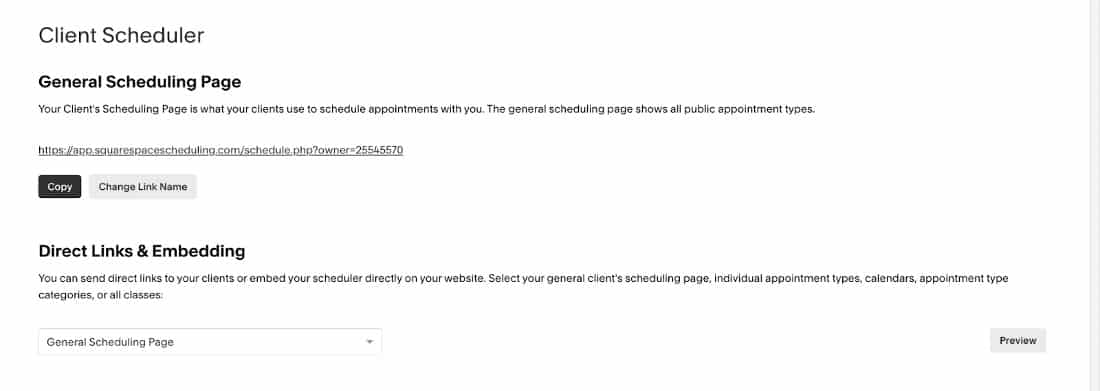
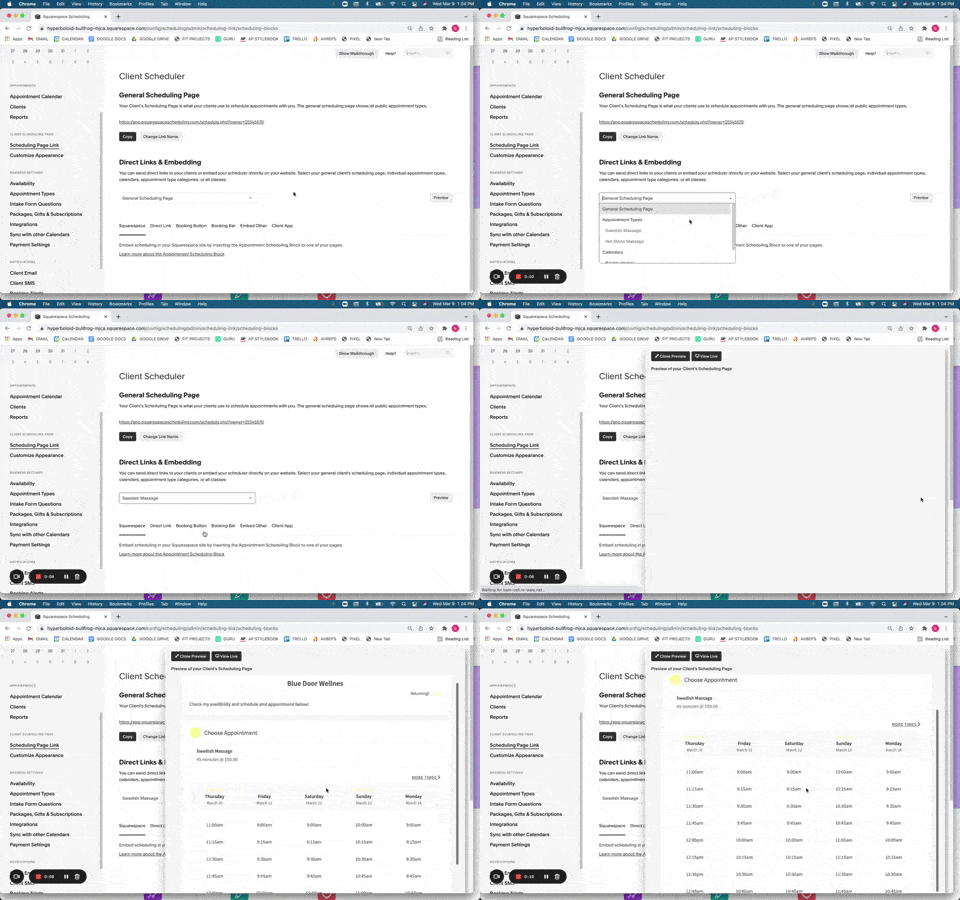
With the customer and business-facing parts of your Squarespace Scheduling platform ready to go, it’s time to put your scheduling page out into the world and start accepting appointments. Squarespace gives you two options here: You can share your scheduling page via direct links that you send to clients or you can add it straight to your website so that people can access your booking page on their own.
We will go over both options below.
Bottom Line
It can be challenging to keep track of your appointments, resources, and availability when running a small business. Squarespace Scheduling, however, can help take the pressure off and streamline your scheduling needs. From the easy-to-use client scheduling page and calendar syncing to automated notifications and payment processing, the platform takes the hassle out of appointment scheduling and makes it easy for you to stay on top of everything you have to manage.
With this guide, you are ready to get the most out of your Squarespace Scheduling account and start maximizing your business’s potential.
You May Also Like …
- Learn how to create a Squarespace website, or read our Squarespace review to see if it is right for you
- Set up an ecommerce site using Squarespace online store
