

If you have vendors that you pay regularly, consider setting up recurring payments in QuickBooks Desktop to streamline your transaction process. You can do this either by creating a new check or using an existing one. We’ll show you how to set up recurring payments to vendors in QuickBooks Desktop with a new and existing check, including how to edit and delete recurring payments.
- How To Set Up Recurring Payments With a New Check
- How To Set Up Recurring Payments With an Existing Check
How To Set Up Recurring Payments in QuickBooks Desktop With a New Check
If it’s your first payment, then you need to enter the first check to set up a recurring transaction. To do this, follow the steps below:
To write a new check, select the Write Checks icon under the Banking menu on your QuickBooks Desktop homepage:
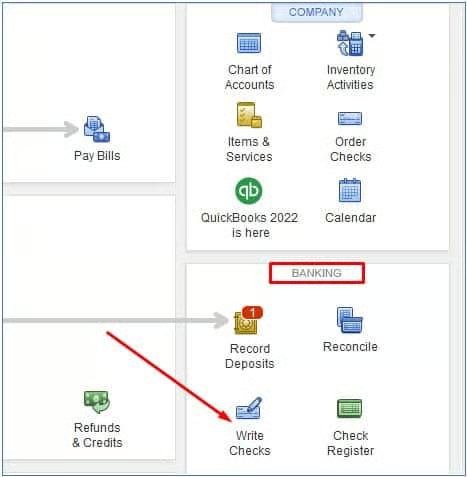
Write a New Check in QuickBooks Desktop
The Write Checks window will appear. To enter your check, you need to enter the following information in QuickBooks Desktop:
- Bank Account: Select the bank account from which the payment will be deducted.
- Print Later: Click the box if you want to create the check now but wish to print it later.
- Pay to the Order of: Select the vendor’s name.
- No.: If you’re printing the check now, enter the number from the check you’ll place in the printer.
- Date: Enter the date when you’re issuing the check.
- Amount: Enter the amount.
- Address: This field is populated automatically based on the information entered during the payee setup.
- Memo (optional): Enter additional information to describe the transaction.
- Expenses or Items tab: Assign the check to an expense account or item.
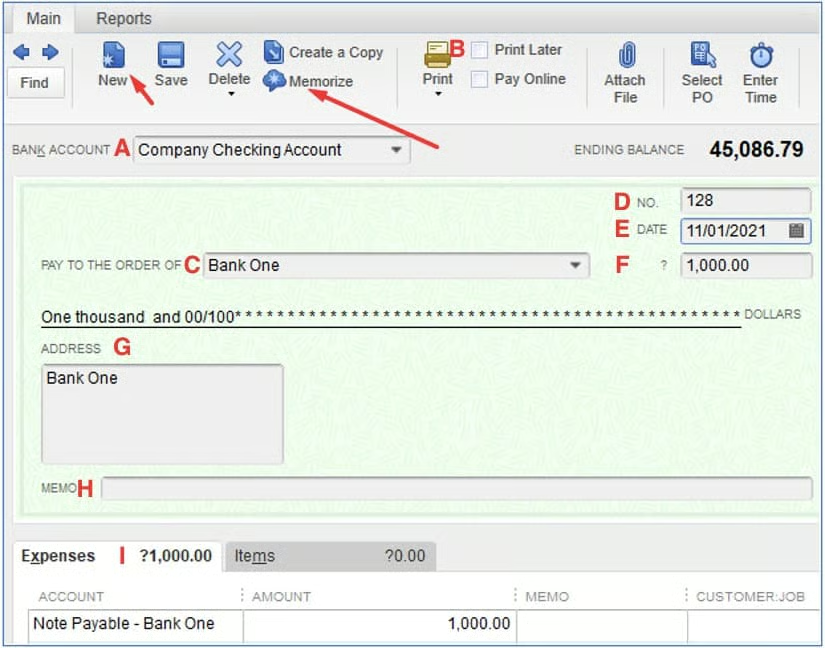
Write Checks Window in QuickBooks Desktop
Click on the Save menu on top of the screen.
To set up a recurring payment, you need to memorize the check that you created. To execute this, click on the Memorize button on top of the write check screen, as indicated by the long arrow in the screenshot above.
QuickBooks Desktop will display the Memorize Transaction screen. From here, select the Automate Transaction Entry button, and fill in the following fields:
- How Often: Select the frequency of the payment. Choose from the options provided, such as daily, weekly, every two weeks, and twice a month.
- Next Date: Enter the schedule of your next payment.
- Number Remaining: Indicate a specific number of payment times. For instance, if it’s a 24-month loan, enter 23 (24 including the first check).
- Days in Advance to Enter: Set a specific number of days prior to the transaction date.
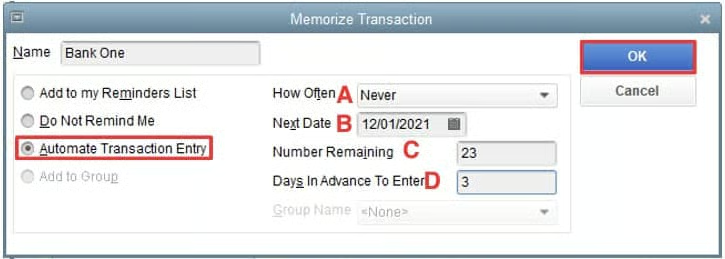
Memorize Transaction Screen in QuickBooks Desktop
Click OK to memorize the transaction.
The transaction is recorded in the check register. To view it, click on the Check Register icon under the Banking menu:
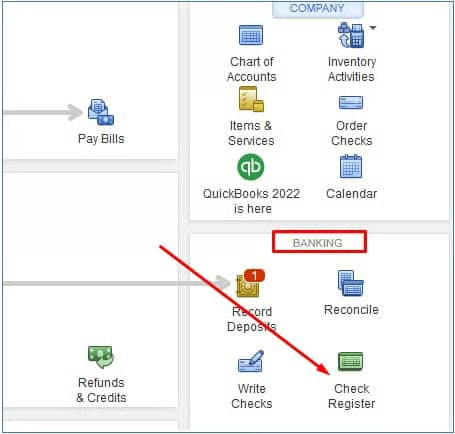
Open Check Register to View the New Check
From the check register, you will see the list of checks including the one you just added.
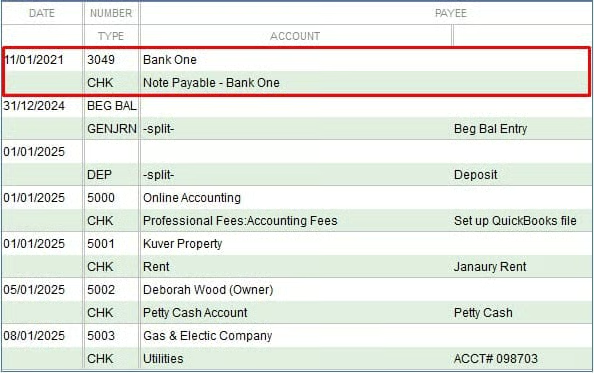
New Check is Recorded in the Register
How To Set Up Recurring Payments in QuickBooks Desktop With an Existing Check
Select Check Register from the Banking menu. Highlight the transaction you want to memorize by simply clicking anywhere on the line entry. Tap on the Edit button in the upper right corner of the screen, and then click the Memorize Check drop-down menu:
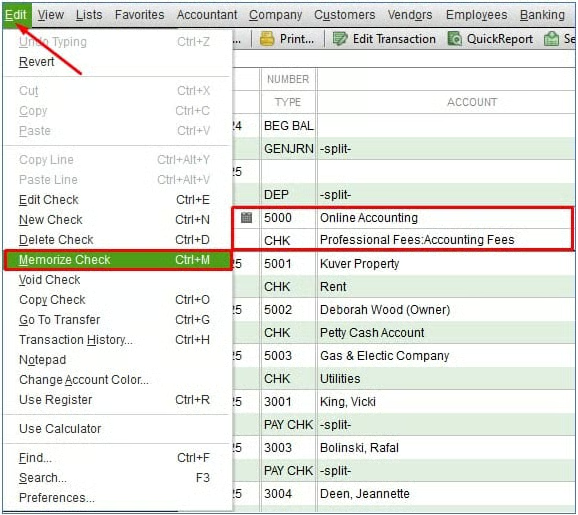
Memorize an Existing Transaction in QuickBooks Desktop
QuickBooks Desktop displays the same Memorize Transaction screen that appears when memorizing a new check. Select Automate Transaction Entry, provide the required information, and click OK to continue.
To view memorized transactions, click on the Lists menu on the top of the screen, and select Memorized Transaction Lists.
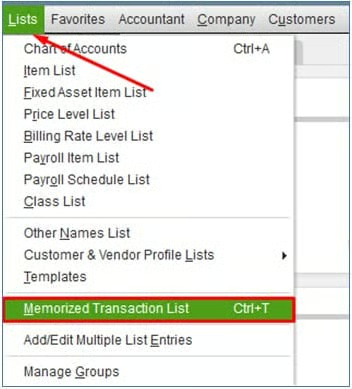
View Memorized Transaction List in QuickBooks Desktop
As you can see in the screenshot below, QuickBooks Desktop recorded our two memorized transactions:
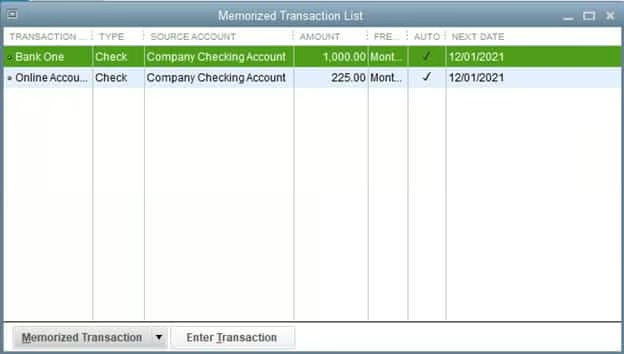
Transactions Recorded in the Memorized Transaction List
Edit or Delete a Recurring Payment
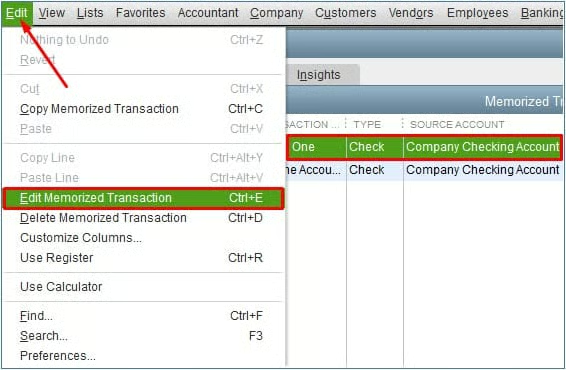
Edit a Memorized Transaction in QuickBooks
If you want to make some changes to your recurring transaction, click on Edit on top of the screen, and select Edit Memorized Transaction. Again, it’ll bring up the Memorize Transaction screen. Make your desired changes, and click OK to proceed:
Frequently Asked Questions (FAQs)
What is a recurring vendor payment in QuickBooks Desktop?
A recurring vendor payment, also called recurring billing, is a payment model that repeats multiple times on a predefined date range. Funds will be pulled from your credit card or debit card automatically as a payment for a regular service you purchase from a vendor. You can record these recurring payments automatically by using a memorized transaction in QuickBooks Desktop.
When to set up recurring vendor payments in QuickBooks Desktop?
You should set up recurring vendor payments in QuickBooks Desktop if you have vendors that charge you regularly (i.e., for monthly software subscription fees, telephone bills, and electricity bills).
Can I also set up recurring customer payments in QuickBooks Desktop?
Yes, you can set up recurring customer payments in QuickBooks Desktop if you have customers that pay you regularly. This would be appropriate when you charge a customer’s credit card automatically each month.
Wrap Up
That’s how easy it is to set up recurring payments to vendors in QuickBooks Desktop. Thank you for your time, and we hope you found this helpful.