As the former social media manager for a startup, one of my main responsibilities was handling our brand’s Facebook page. Facebook pages are still one of the most reliable ways to gain an online audience no matter how small your business. The process of how to create a Facebook business page involves seven steps (eight, including promoting it):
- Logging into your Facebook account and creating a new page
- Setting up your page’s information
- Adding a profile and cover photo
- Setting up your page’s “About” section
- Adding a call to action and page sections
- Linking your Instagram and Whatsapp accounts
- Adding admins to help manage your page
- Promoting your page
Keep reading for a full breakdown of these steps, with step-by-step screenshots. I also share tips and tricks I’ve found helpful on managing a Facebook page.
If you’re a small business and want to build a social media presence, consider hiring a social media agency to cater to your needs. One agency I recommend to small businesses in particular is Lyfe Marketing. Their team specializes in small business marketing and can craft both organic and paid social media campaigns.
Step 1: Log in to Facebook & create a new page
The first step in learning how to create a Facebook Business account is to log into your personal Facebook account — yes, you must have a personal Facebook account to create a Facebook business page.
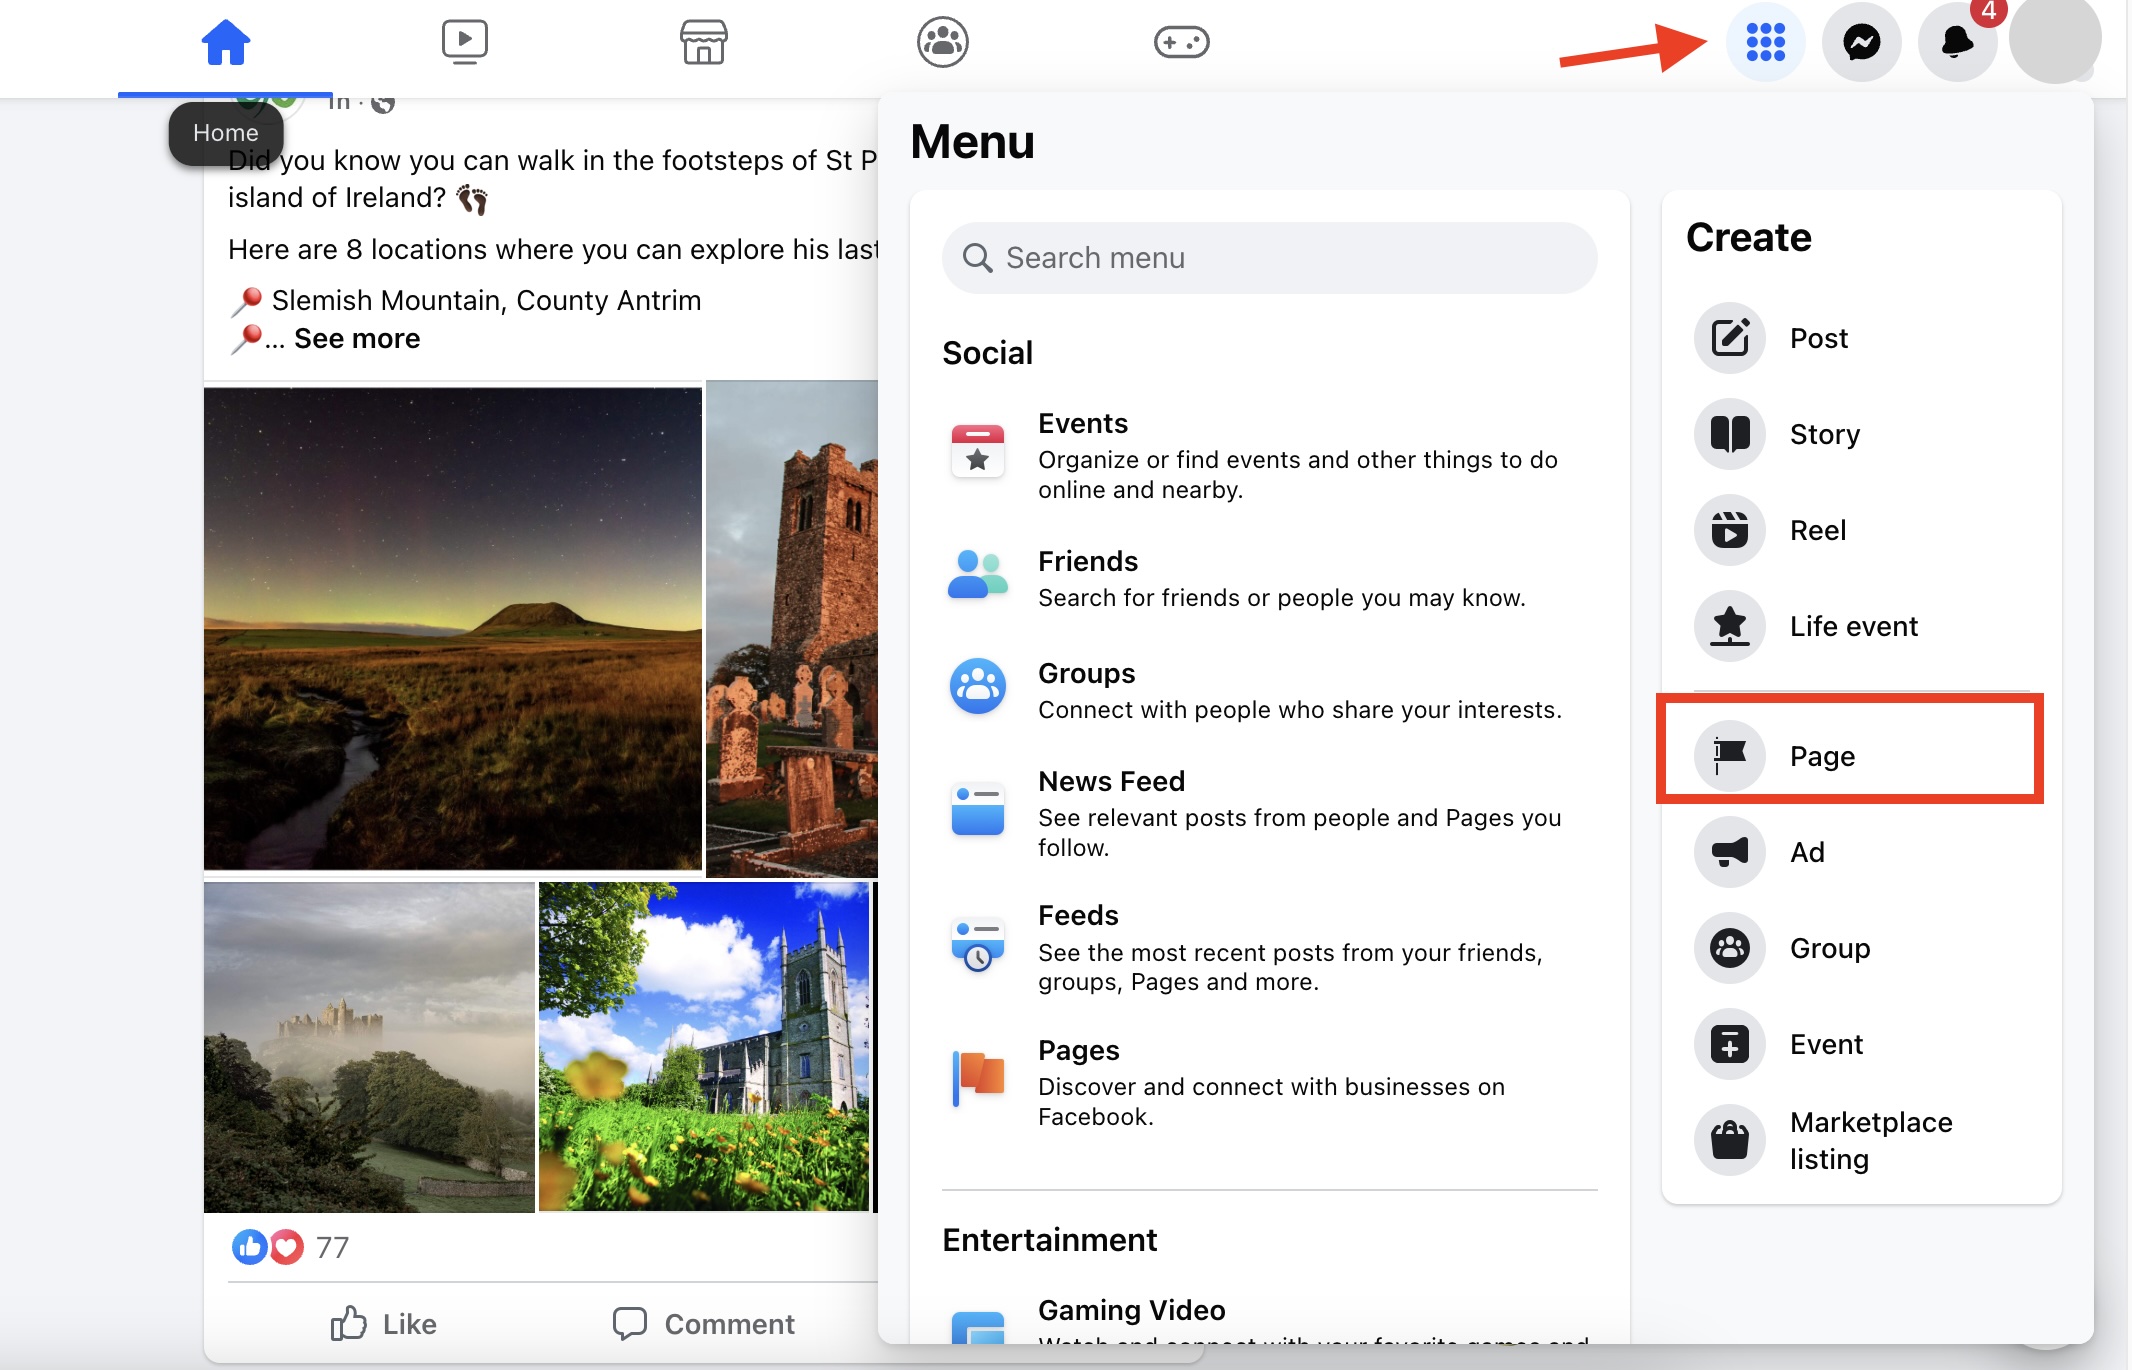
Once you’re logged in, select the grid icon in the upper-right corner. Under Create, click Page.
If you’re on mobile, tap your profile picture in the bottom-right corner of the Facebook app, then under Pages, tap Create.
Step 2: Add basic info about your page
Next, fill in the basic information about your page, like its name, category (for example, “cafe” or “consulting agency”), and a short description. Adding a brief description helps your page get found by the right people and builds your online brand presence.
Include details like your location and the products and services customers can expect. Then, click Create Page. The process is the same for both desktop and mobile.
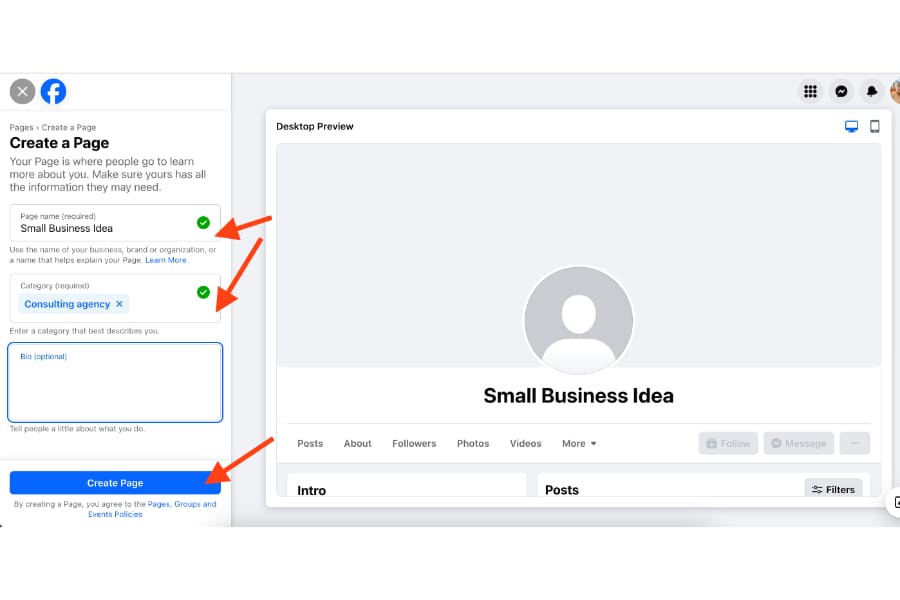
Add your page’s name, category, and bio, then click Create Page. (Source: Facebook)
After clicking Create Page, add your business’s location, website, and other contact details, such as your telephone number and email address, in the following prompts. Click Next when you’re done. This finalizes your page’s basic setup.
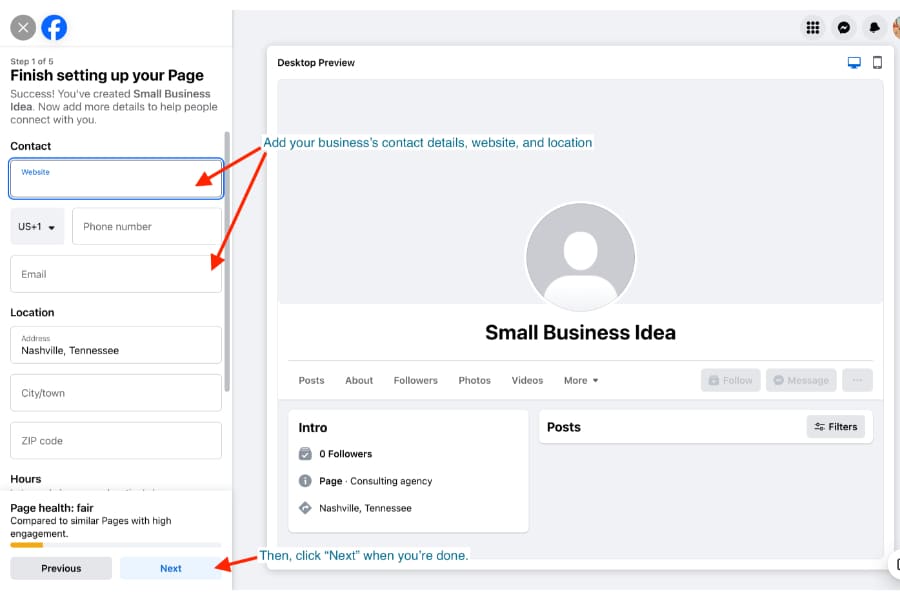
Add your business’s contact details, website, and location. (Source: Facebook)
Step 3: Add a profile picture & cover photo
Now, it’s time to make your page more visually attractive and memorable by giving it a profile and cover photo.
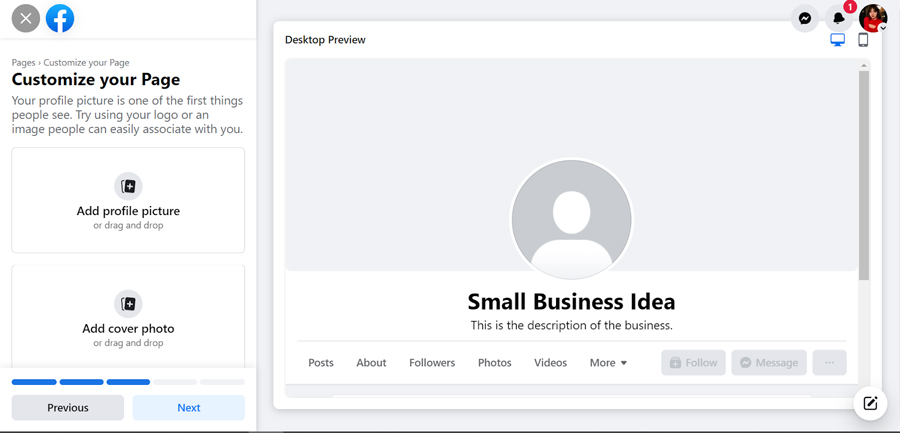
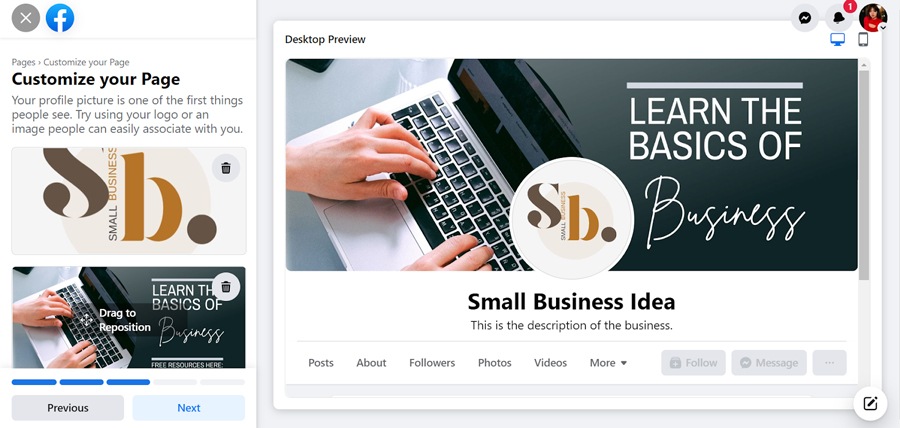
Click on Add profile picture and add a profile pic to your page. Then click Add cover photo and upload a rectangular (851px by 315 px) cover photo. As you upload your photos, you’ll also see a preview of how they’ll look on your page.
In the following screens, you’ll also have the option to invite your Facebook friends to like your page and to receive notifications. However, these aren’t required, and you can set them up later. When you’re finished, click Done to finish your page setup.
Step 4: Fill in your ‘About’ section
After clicking Done, your basic page is already created. But creating a Facebook business page isn’t just about filling in its basic information. It’ll also need a fully formed About section so customers can easily find the information they need about your business.
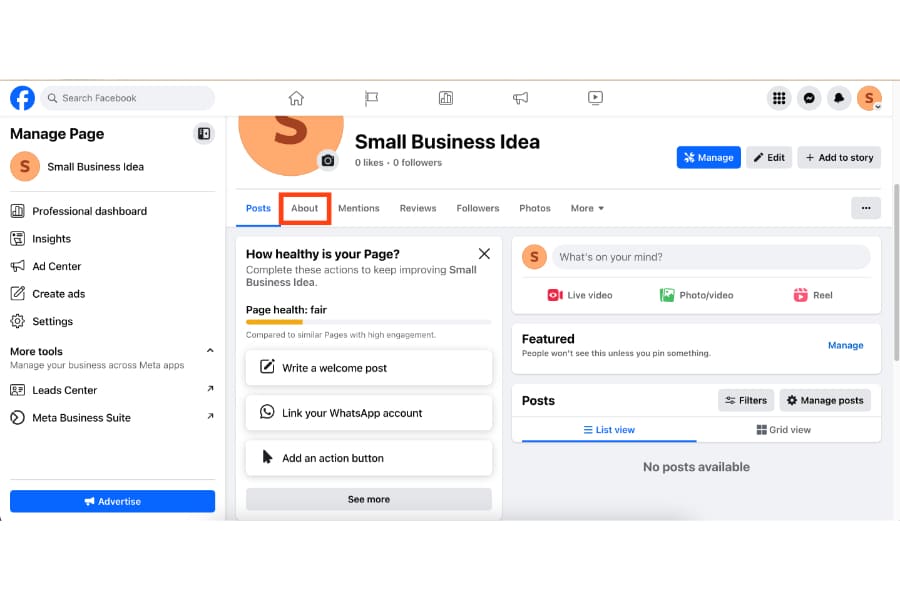
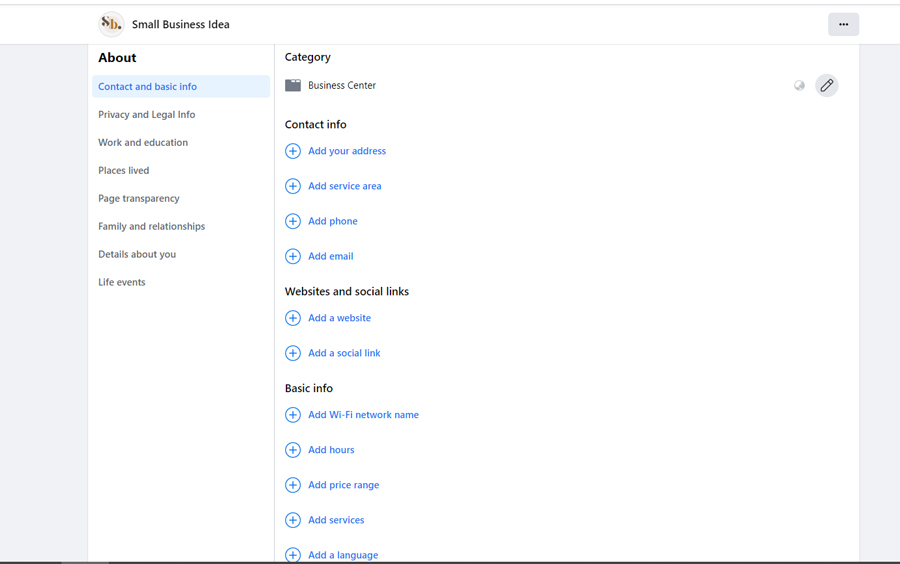
On your new page, click the About tab right below your profile photo. In the following screen, add your business’s address, phone number, email address, and website. The more information your page has, the easier it is to find when users search for your products or services.
Step 5: Add a call to action and page sections
Anytime I’m making a Facebook business page for any business, I always make it as actionable as possible. Customers should know what they need to do after visiting your page, whether it’s visiting your website or sending you a message. You can do that by adding a call to action button to your page and organizing your page sections.
Adding a call to action button
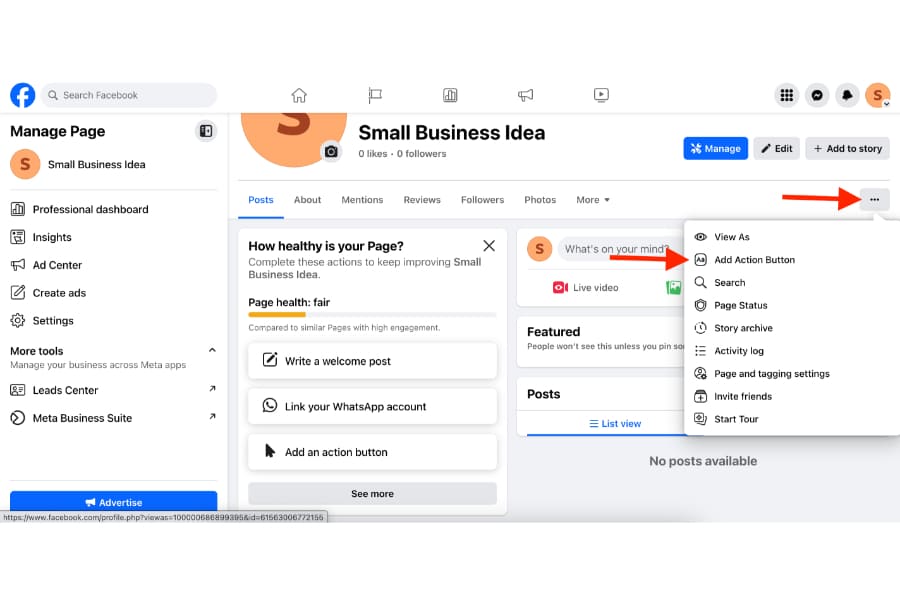
To add a call to action button, click on the ellipsis (…) button on the right side of your page, and then choose Add Action Button.
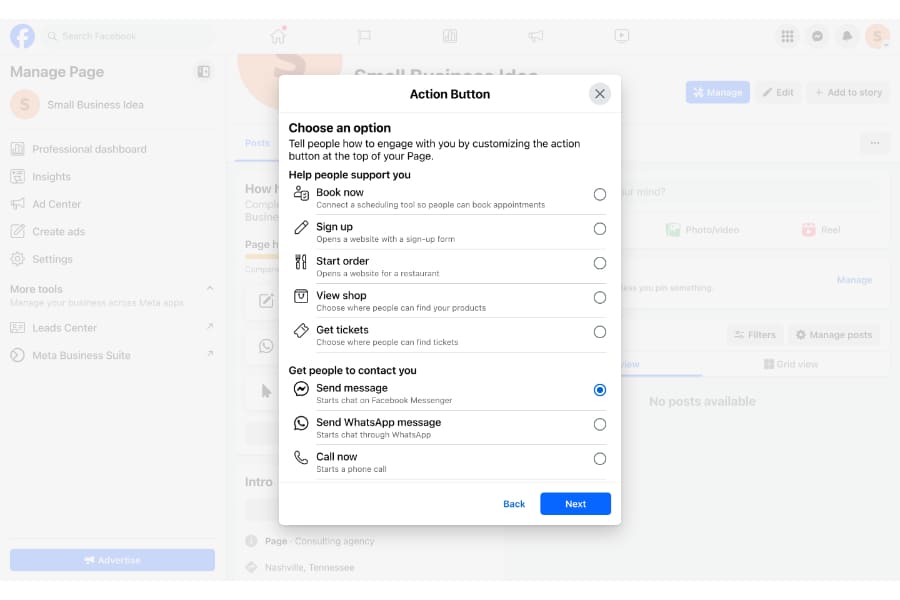
Choose the best call to action for your page in the following popup. The following are just some of the calls to action you can choose from.
- Book now
- Sign up
- Start order
- View shop
- Get tickets
- Send message
- Send Whatsapp message
- Call now
- Send email
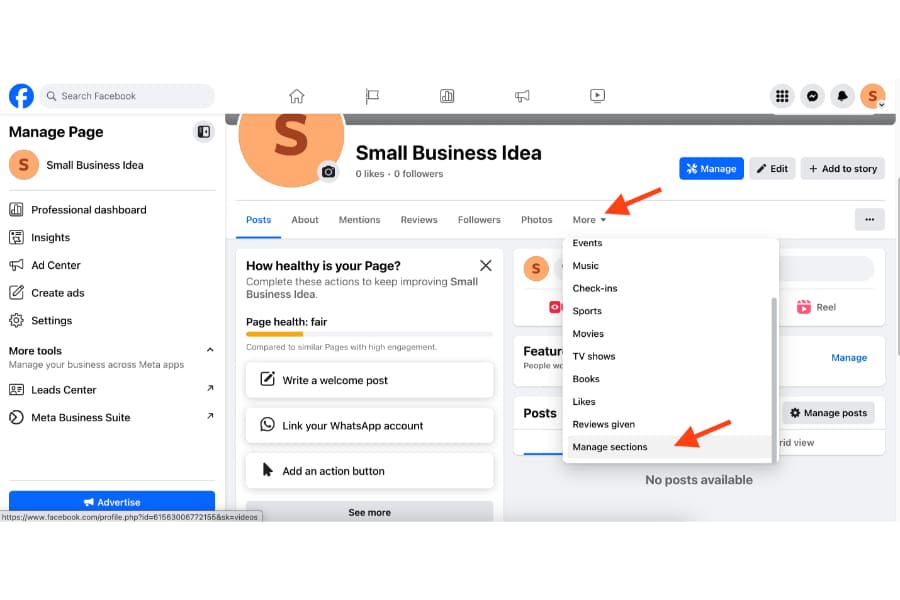
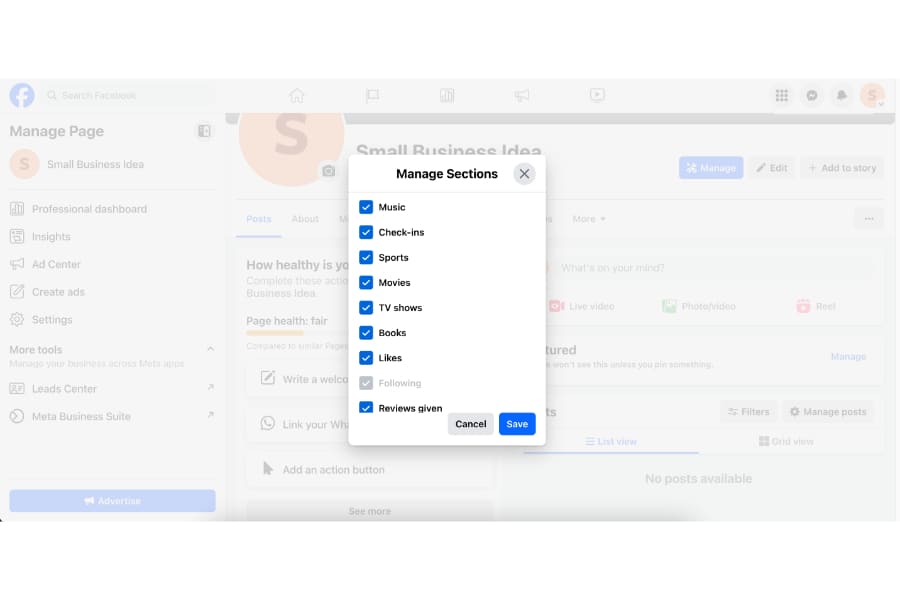
I also recommend editing your page’s sections, aka the tabs that appear when users visit your page, like your reviews, photos, and check-ins. To do this, click on the More tab on your page, then choose Manage Sections. In the following popup, check the sections you want to display on your page.
For instance, if you want to display your reviews, check Reviews given. Or, if you want people to see your photos, check Photos. It’s a small adjustment that helps users navigate your page more easily.
Step 6: Link your Instagram and WhatsApp accounts
Since Facebook, Instagram, and WhatsApp are all owned by Meta, you can link and manage your Instagram and WhatsApp accounts inside Facebook for easier management. It’s also handy for answering customer questions from all those platforms.
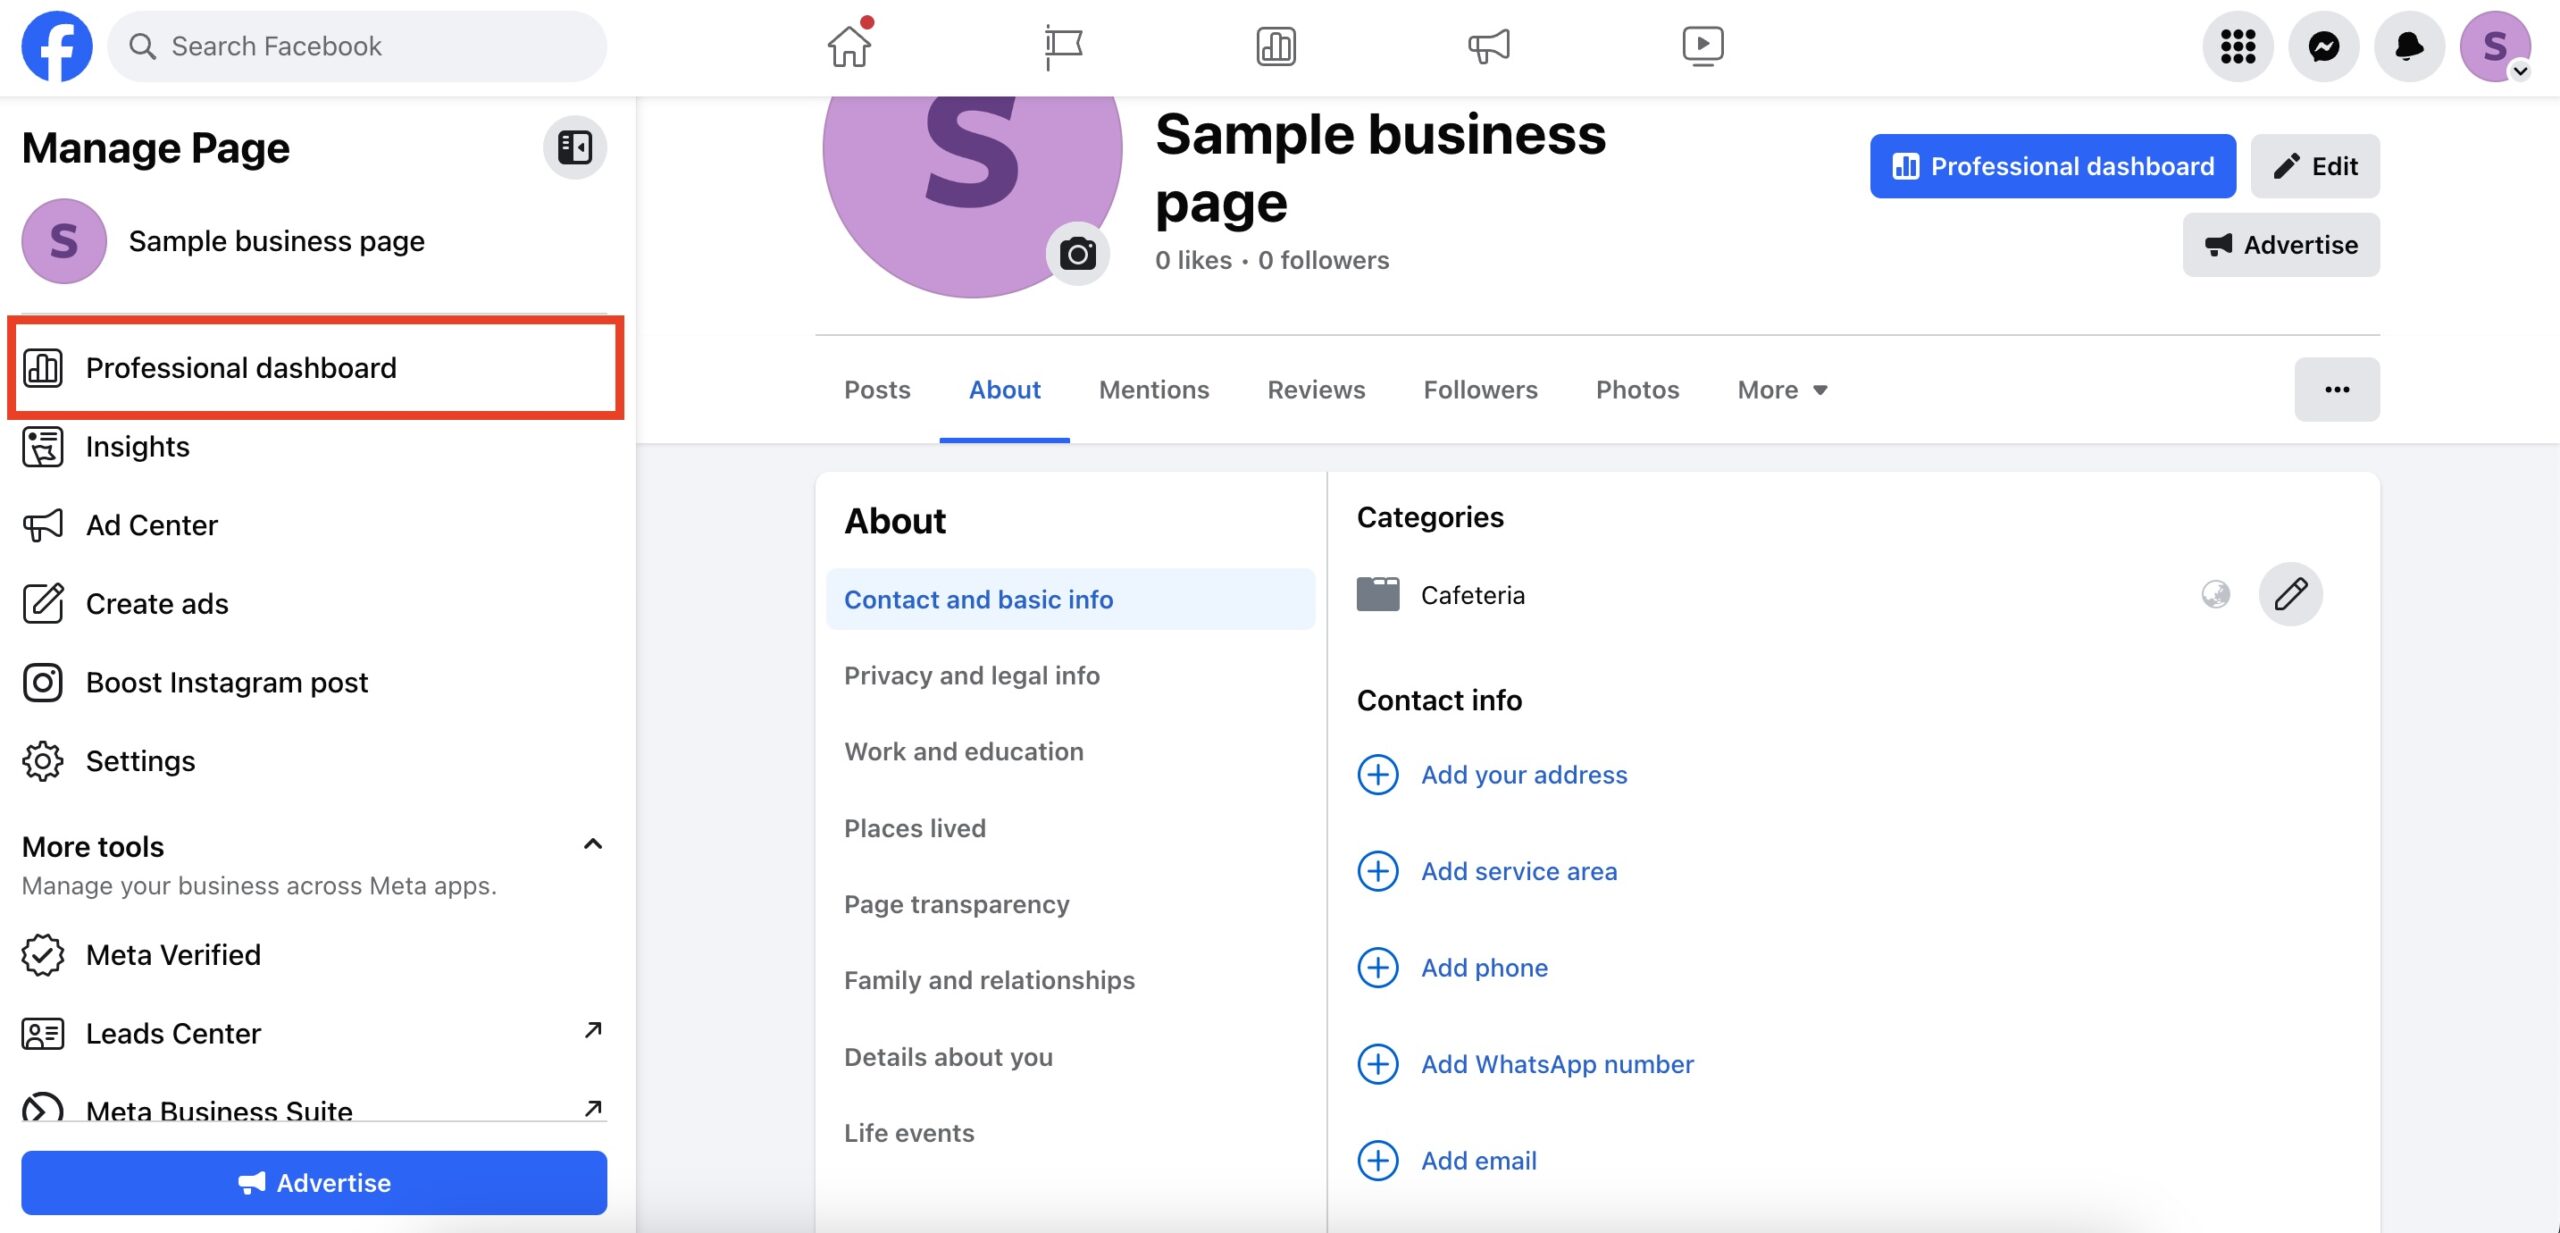
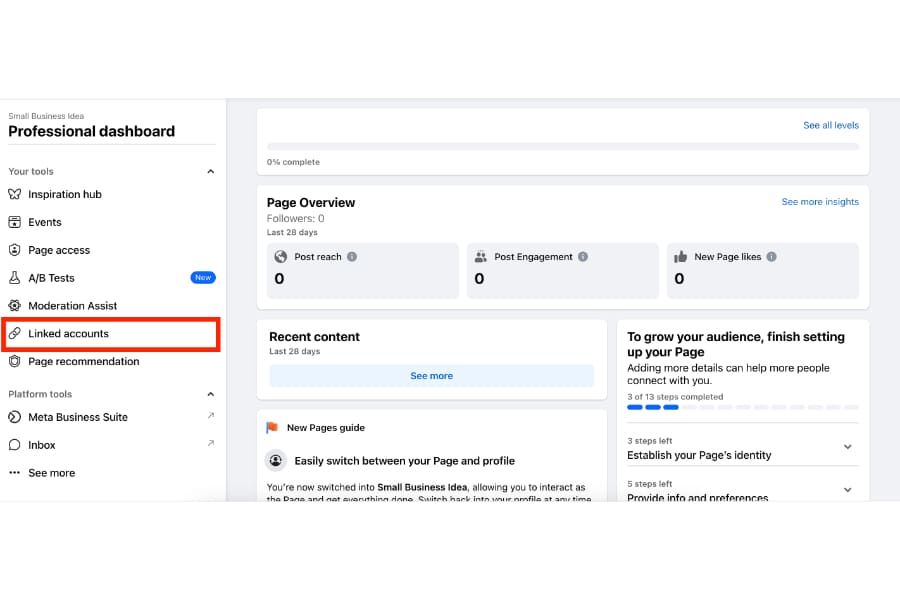
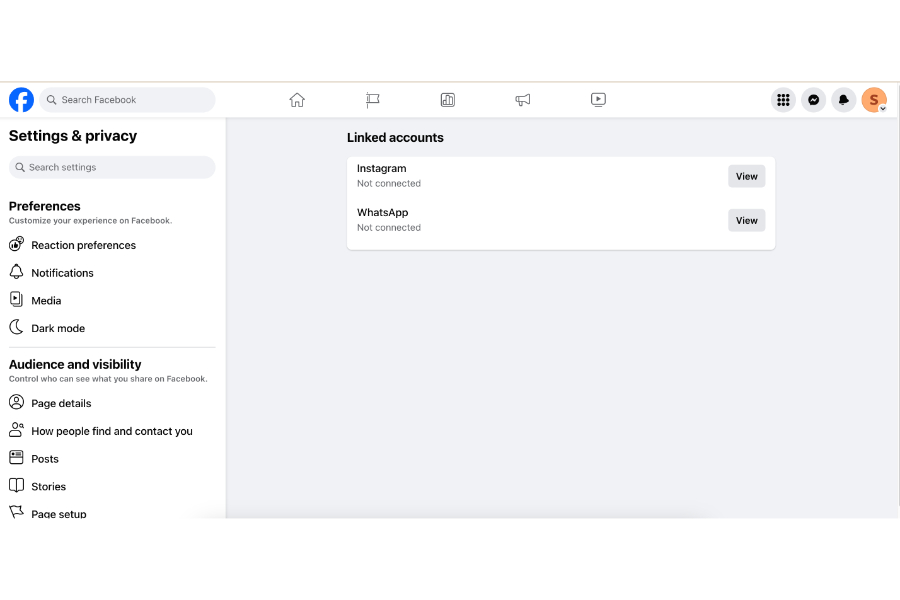
To link your accounts, navigate to the Professional Dashboard tab, then click Linked accounts. Link your Instagram and WhatsApp accounts in the following screens.
Step 7: Add admins to help manage your page
To let other people manage your page (for example, if you have a social media manager), you’ll need to make them page admins. I recommend creating page admins (as opposed to sharing your account password) because it lets you share management of your Facebook page without giving up your access. It also keeps your personal account secure.
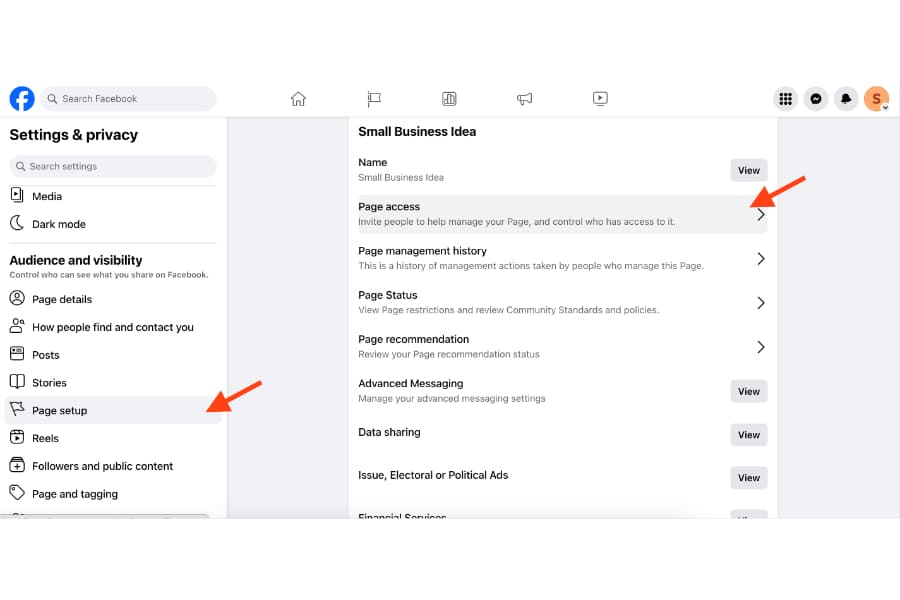
Click Settings from the left-hand menu on your page, then click Page Setup > Page Access. From there, you can add or remove people to manage your page and their level of access.
Step 8: Promote your new Facebook page
Learning how to create a Facebook business page is just half the journey. The saying that “if you build it, they will come” isn’t quite true on Facebook because there’s just so much competition from other brands. Below are some Facebook page marketing strategies I’ve found helpful once your page is published.
- Invite people to like your page: Your first followers will likely be your social circle. Inside your Professional Dashboard, click Invite people to connect to invite your Facebook friends to like your page.
- Join relevant Facebook groups: One of Facebook’s best qualities is its active interests-based user groups, which are a great way to interact with people who matter to your business. Take part in group discussions and offer valuable insights when appropriate, but don’t force it. Of course, only join groups relevant to your industry and always follow group rules and policies.
- Follow and interact with relevant pages: Interacting with other pages is the social media equivalent of business networking to grow your circle. The more people see your page in relevant topic discussions, the more interested they’ll be in your brand.
Facebook page marketing tips & best practices
Facebook is still the biggest social media platform in the world, which means both more opportunities and more competition. But more than anything, I’ve learned that Facebook is all about creating community, no matter your industry.
People go on Facebook as a pastime, not with the express intent of purchasing from a brand. So, to get them interested in your brand, you have to really connect with them as people, not customers.
That’s why making a business Facebook page isn’t just a one-time thing — it’s an ongoing commitment. Below are some other tips and best practices for promoting Facebook pages I’ve found to be effective.
- Feed your audience’s interests: Content drives social media, but good content specifically drives authentic engagement and gets people interested in your business. Your content should address your audience’s interests, questions, pain points, and concerns.
- Find your people. Don’t try to be everything to everybody and end up being relevant to nobody. Know your core group of people you want to engage with your brand and focus your efforts on them.
- Don’t be overly promotional: Social media marketing is all about authenticity. People won’t connect with a brand that constantly talks about itself. Talk to your audience and focus on their interests.
- Talk with users, not at them: One of the best lessons I’ve learned about social media is to talk with users like you’re one of them instead of a faceless brand talking at them. Use their language, tone of voice, and online behaviors.
- Relatability and authenticity are here to stay. In an age of brand and digital fatigue, being relatable, human, and honest can make you memorable. Always be honest about your brand, from campaign promotions to customer service messages.
- Comments and live videos are great for engagement. Posting isn’t everything! Getting engagement on Facebook also means being active in your comment sections. I’ve also found Facebook live videos good for real-time audience engagement.
- Focus on one goal a month (or quarter). This way, you don’t exhaust yourself trying to reach too many goals but instead have strategic, sustainable growth.
- Leverage Messenger and boosted posts. Facebook pages let you manage and reply to messages from your page’s dashboard and set up chatbots for your most frequent questions. Boosting posts for a fee also puts your content in front of specific audience demographics and is a great way for your page to reach new people.
Frequently asked questions (FAQs)
Yes, a Facebook page always has to be linked to a personal account. You can’t create a business Facebook page without first logging into your personal Facebook account. The account that created the Facebook page will be the page’s main admin and have complete page ownership. However, other admins and community managers can also be added.
Yes, it’s 100% free to make a Facebook business page. You only need to log in to your personal Facebook account first to create one. After logging into your personal Facebook account, create a new page from the menu and follow the prompts to set it up. You’ll only ever pay Facebook if you set up ad campaigns from Meta Business Suite.
The best way to use Facebook to promote a small business is to build an online community of loyal fans for your brand. Facebook is all about connecting people with shared interests. After creating a Facebook business page, publish content that caters to your target audience’s interests. Continue engaging with your audience through comments, reshares, and stories. Use accessible, relatable language so people can easily relate to your brand.
Bottom Line
Learning how to create a Facebook business account is one of the easiest ways to get an online presence and create an online community, no matter the size of your business. It’s also easy and free. Log into your account, create a new page from the menu, then follow the prompts to set up your page details. Customize your page with more information about your business, then promote it once it’s live.
