

Facebook advertising is one of the easiest ways to get your business in front of new audiences, in my experience. It also has a low cost barrier, thanks to its average daily or weekly budget setting — no outlandish expenses necessary. Facebook also lets you target audiences by demographic, interest, and behavior, and it’s available to anyone with a Facebook Business Page.
To advertise on Facebook, first make sure that you have a fully set-up Facebook Business Page. Then, from your page, go into your Ad Center, which you’ll find on the left-hand menu. Choose the type of ad you want to run, select your campaign objective, then upload your ad collateral, set a budget and audience, and launch! From there, you can track your ad campaign’s performance in the Ad Manager.
Is Facebook advertising a good idea for your small business? Ultimately, how well a Facebook ad campaign performs depends on how well you create your ad and target your audience. But on the whole, I’ve found that the benefits of Facebook ads outweigh the drawbacks.For one, they’re very effective at getting your brand out in front of a certain audience demographic at a fraction of the cost of traditional advertising.
- Facebook’s audience targeting measures are among the most precise — particularly its ad retargeting measures, which can target ads to people who’ve previously visited your website or profile. Once you get the hang of how to target audiences on Facebook, you can get high returns on your Facebook ads.
- You’re pretty much guaranteed an audience on Facebook, being the most visited social media platform in the world. Statista reports that there are over 3 billion active users on Facebook every month in 2025.
- Facebook also offers multiple ad formats, some of which are dynamic and immersive, and plenty of creative freedom. Virtually anything can be a Facebook ad. Once you learn what content engages your audience, you have a good chance of creating an attention-grabbing ad.
- 1. Choose the type of ad you want to run on Facebook
- 2. Open the Meta Ads Manager and select your ad goal
- 3. Upload your ad (or choose the post you want to advertise), and add a caption and headline
- 4. Add your campaign audience and budget
- 5. Launch and track your ad
- A few tips for making good Facebook ads
- Frequently asked questions (FAQs)
- Bottom line
1. Choose the type of ad you want to run on Facebook
Before learning how to advertise on Facebook, there are a few things to take note of, chiefly, the kind of ad you want to run. There are two general types of ads on Facebook: sponsored posts, which are regular posts you can boost as an ad, and traditional paid ads, like carousel ads or video ads.
Before anything else, decide on which type of ad you want to launch. Usually, I only use sponsored posts for general brand awareness, for instance, if I have a specific blog post I want to get in front of more people. Meanwhile, true-blue ads are better suited if you have a specific objective, like encouraging people to visit your website or to sign up for an event.
Facebook also has pretty much every ad format, from single images to carousels to videos. Collection and Slideshow Ads are also unique options that create a more immersive experience.
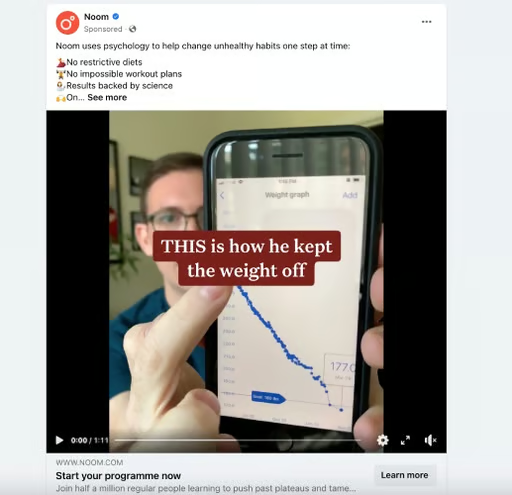
Video ads are one of the most popular types of Facebook ads — good for showing product demos, testimonials, or UGC. (Source: Noom via Facebook) 
Collection Ads create a more immersive, multi-image experience that’s great for showing a product catalog. (Source: Flora by HLMN via Facebook) 
Image Ads are the simplest type of ad. They come with a clickable button that takes viewers to a landing page of your choice. (Source: Strathberry via Facebook) 
Ads can also just be regular boosted posts. (Source: Social Media Week via Facebook)


2. Open the Meta Ads Manager and select your ad goal
Once you’ve decided on the kind of ad you want to run, open your Ads Center from your Facebook Business Page to start setting up your ad campaign. You’ll find it on the left-hand menu of your Facebook page’s home feed.
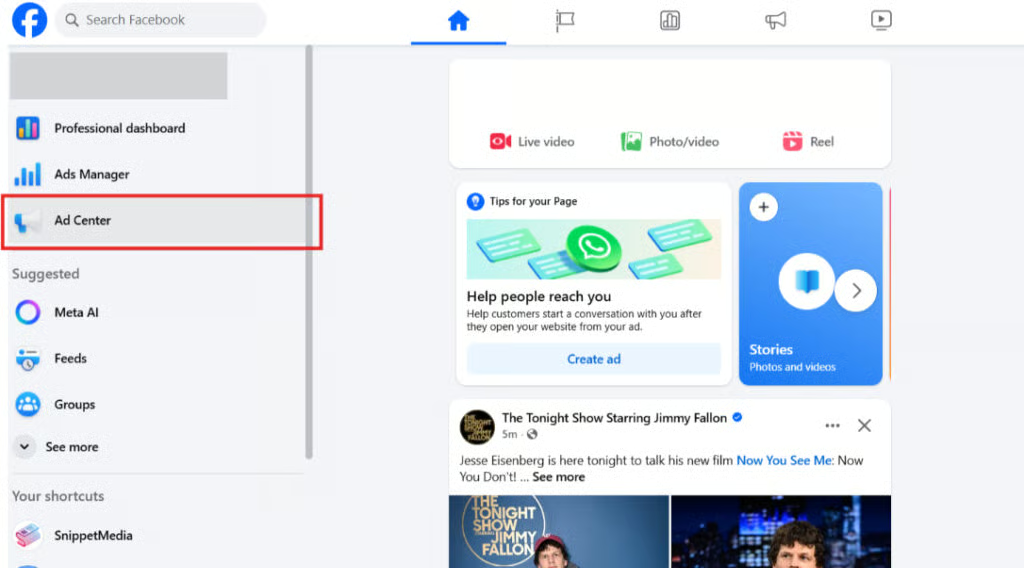
Open your Ad Center on the left-hand menu. (Source: Facebook)
Once you click it, you’ll enter your Ad Center’s home page, which will show a summary of the ads you’re running. Click on Advertise, then choose the main goal for your ad campaign on the next screen.
Facebook ads let you increase visits to your website, generate new leads, get more messages or calls, prompt app downloads, or gain more page followers.
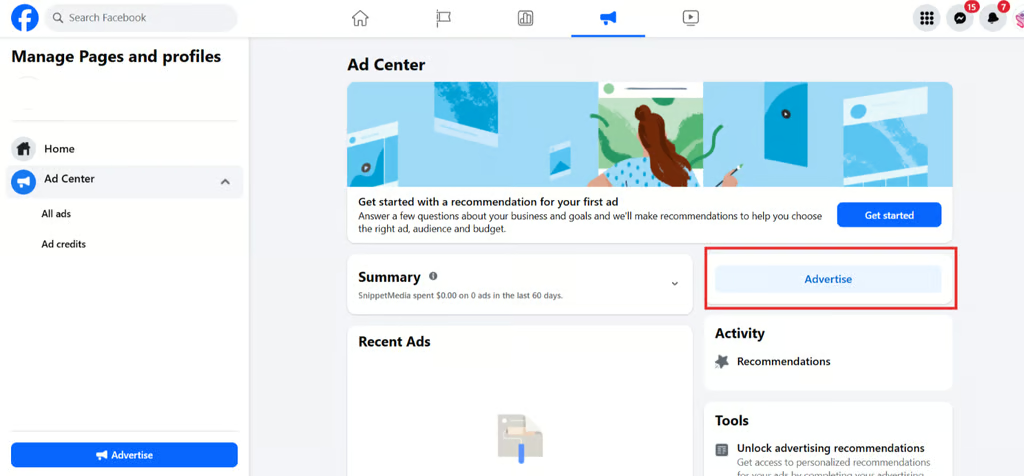
Click “Advertise” to set up your ad. (Source: Facebook) 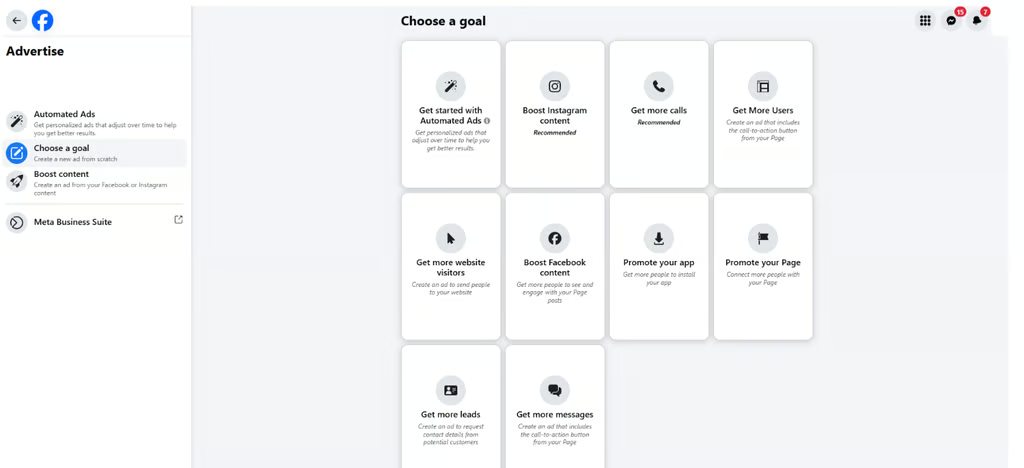
Choose a goal for your ad campaign. (Source: Facebook)


3. Upload your ad (or choose the post you want to advertise), and add a caption and headline
Once you’ve chosen the main objective of your ad, the next step is to upload your ad content — or choose the post you want to boost as an ad.
Upload the image or video you want to advertise, add a caption and headline, and the link to your landing page or website, if necessary. You’ll also see a live preview of your ad on the right side of the screen and its estimated reach.
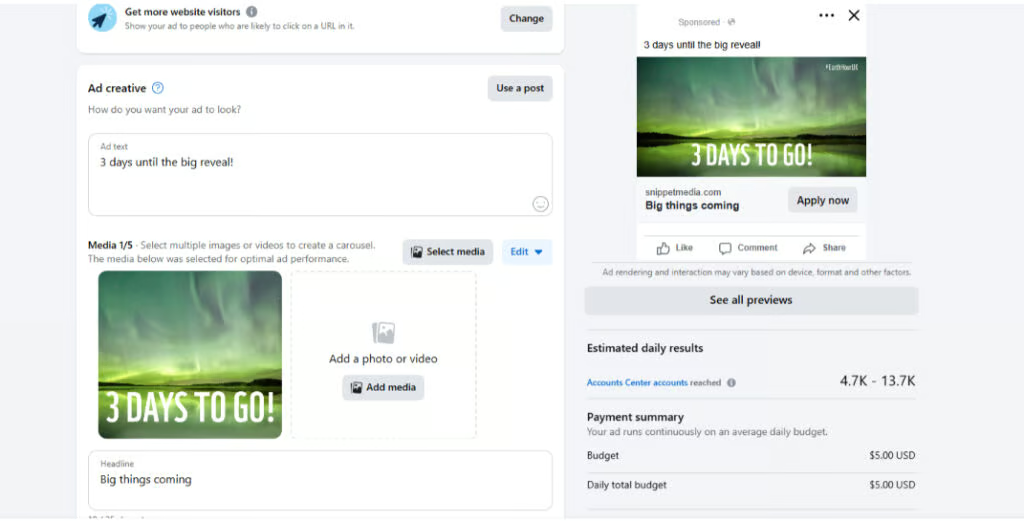
Upload your ad (or choose a post to boost) and add a headline and caption. (Source: Facebook)
4. Add your campaign audience and budget
Once you’ve uploaded your ad content and added your headlines and captions, you’re nearly ready to launch. The last things to take care of are your campaign audience and budget, which you’ll find when you scroll down.
Targeting your ad audience
Targeting the right audience is crucial, and one of the best things about Facebook advertising is its very precise targeting measures. You can target your ad’s audience by location, demographic, and the pages they interact with.
Another option is to use Facebook’s Advantage+ audience option, which automatically finds the best audience for your ad after you set a certain demographic (for instance, women over age 18 in Nashville, Tennessee), and continuously adjusts your targeting as necessary. It’s a pretty handy tool from Facebook, especially if you’re a beginner to advertising.
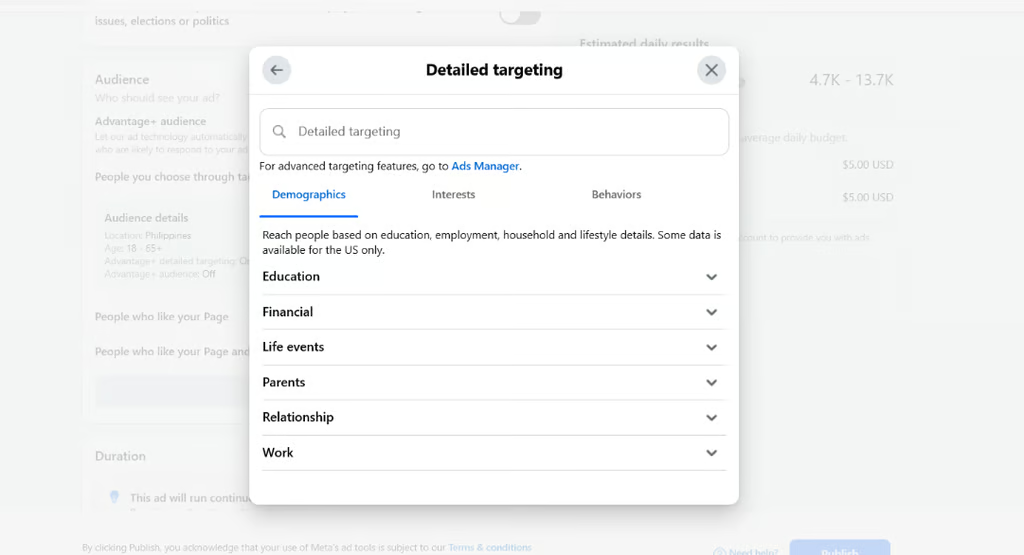
Facebook allows very precise audience targeting by demographic, interest, and behavior. (Source: Facebook) 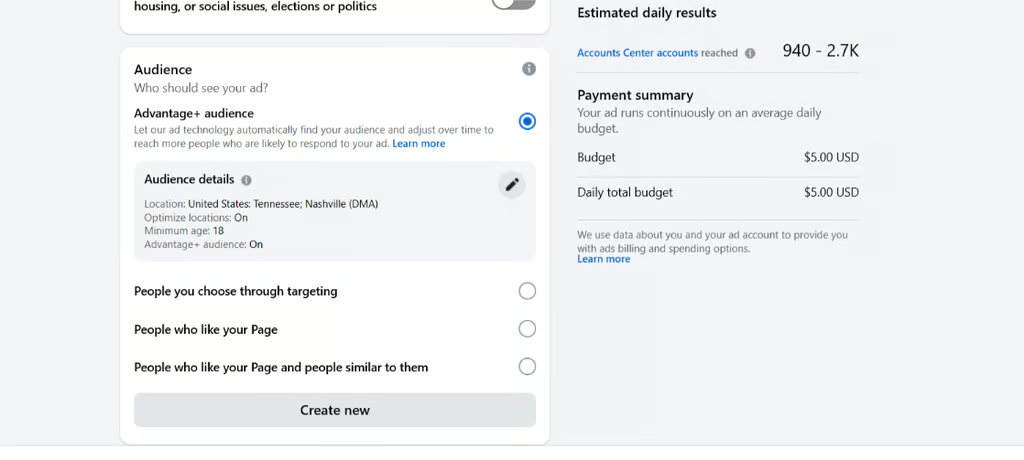
Facebook’s Audience Advantage+ can automatically target your ads for you. (Source: Facebook)


Setting your ad campaign budget
Then comes setting your campaign budget. There are two ways you can spend your ad campaign budget on Facebook: setting a daily average spend for your ad and letting it run continuously until you stop it, or setting a fixed duration and budget cap for your campaign.
Setting a daily average budget is the better option if you’re only advertising for general brand awareness and getting your business in front of new audiences.
Meanwhile, if you’re running a limited campaign, for instance, a holiday sale campaign, setting a fixed campaign and budget is the more suitable option as it gives your ad and budget a set time frame. After your campaign period, Facebook will automatically sunset your ad.
After setting your budget, you’ll need to input your payment details. Facebook takes most credit and debit cards, direct bank deposits, and PayPal.
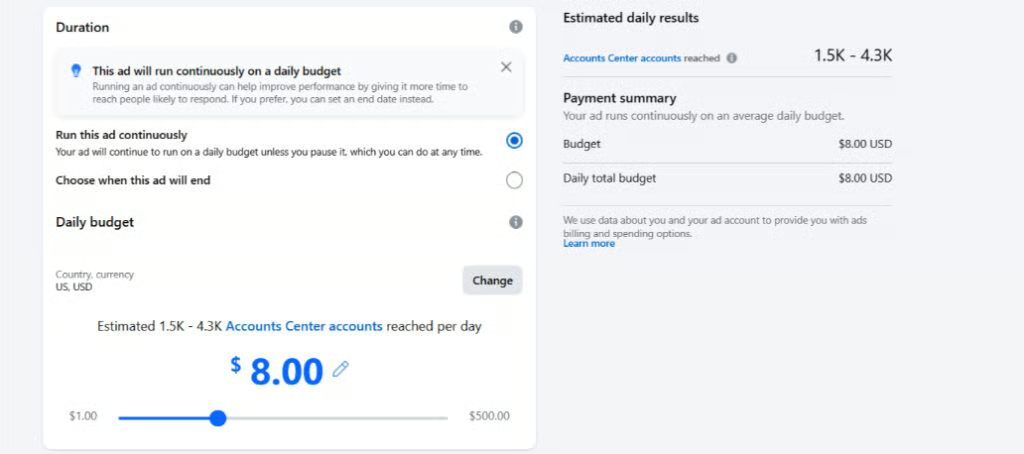
Set a budget for your Facebook ads campaign, whether a daily average spend or a total spending cap. (Source: Facebook)
Facebook tracking Pixels: Do you need them?
Meta Tracking Pixels are pixels that track how people are interacting with your Facebook ad and the actions they’re taking on your website. For instance, they can let you know if your testimonial ad is actually leading people to purchase from your online store. That being said, they’re only necessary if you’re advertising specifically to lead people to your website — and want a lot of details on what they’re doing once they get there.
You can turn on the Meta Pixel option below the ad budget section and connect your website to your Facebook ads account.
Setting up a Meta Pixel can be one of the more technically complicated parts of running Facebook ads. A previous company I worked for had to get its engineering team involved in this part of the process.
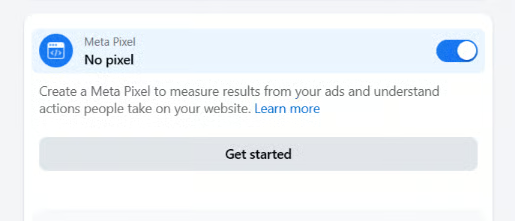
Turn on Meta Pixels if you’re leading people to a website. (Source: Facebook)
5. Launch and track your ad
After setting your budget and audience, you’re all ready to launch your ad live on Facebook. All that’s left is to click Publish at the bottom of the screen, and your ad will automatically be live on Facebook once it passes Meta’s advertising policies.
Facebook usually allows most ads to pass its internal checks. Generally, as long as it doesn’t have any violent or offensive content and isn’t misleading, your ad should be good to go.
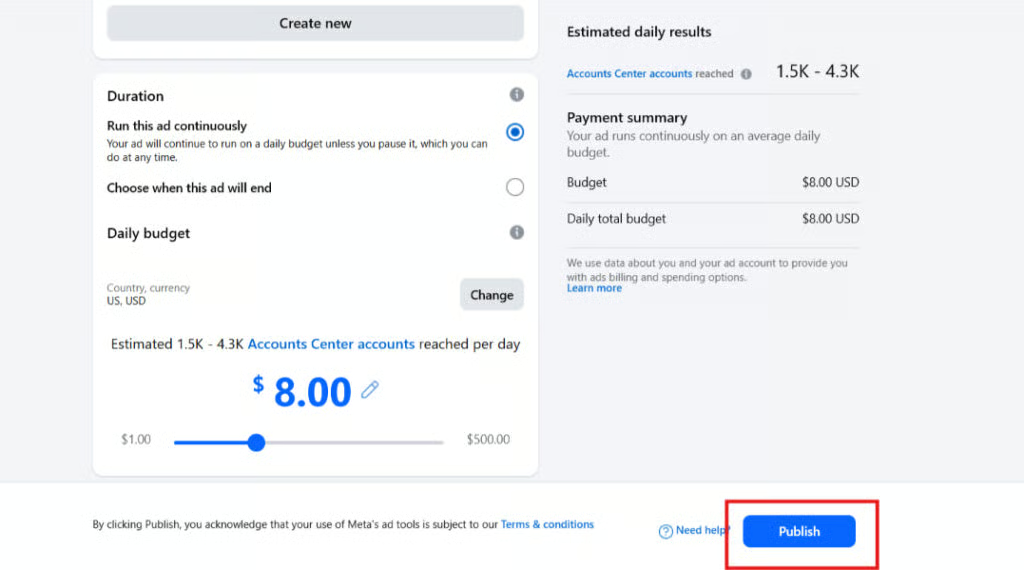
Click “Publish” to post your ad. (Source: Facebook)
Monitoring your ad performance
You can monitor your ad campaign’s performance inside your Ads Manager (it’s just below the Ads Center on the left-hand menu). Inside the Ads Manager, you’ll see all your ad campaigns, their results, budget spent, and total reach. Clicking on each ad will also show individual results and campaign activity.
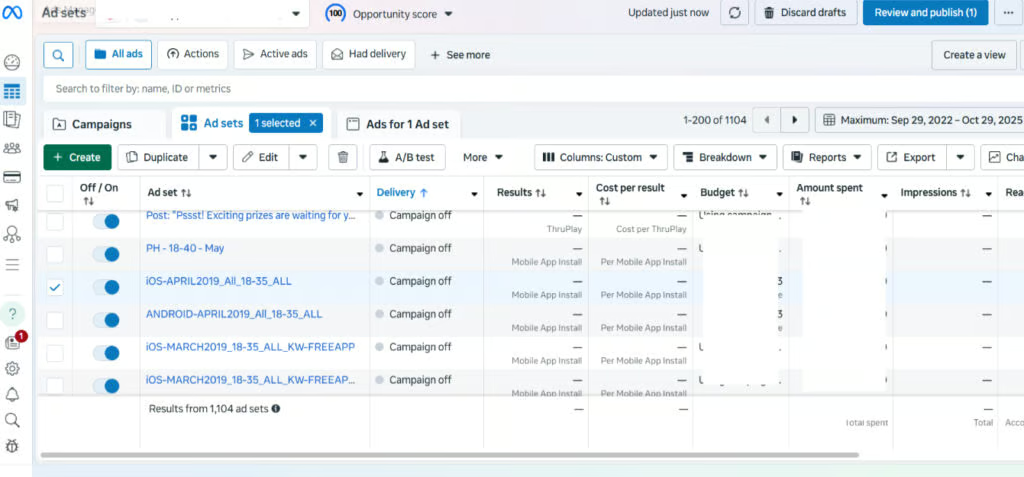
Review your ad’s performance, including the cost per result. (Source: Facebook)
A few tips for making good Facebook ads
As mentioned, Facebook Ad campaigns are very much a trial-and-error process. Campaigns and best practices will differ for every business.
However, there are still a few general guidelines that stick, no matter what campaign you launch, like having a clear objective and measurement metric, and not being overly promotional.
- Set a clear objective for every campaign. Even if it’s a simple brand awareness campaign, set a clear objective and metric for success. For instance, say you want your ads to increase your profile visits by 30% in two months.
- Work from what you know. Ad content is always one of the trickiest parts of learning how to advertise on Facebook. I always advise starting with what you know.
Take a look at your top-performing organic content and use that to guide your ad content. If product carousels are working, use a similar format for your ad. If videos are racking up more engagement, start with video ads, then learn and adjust with every campaign. - Don’t feel or sound like an ad. One thing about social media in 2025 is that being genuine and relatable are what interests audiences. Digital ad fatigue is real, and audiences these days only respond to brands that genuinely “get” them and understand their needs and interests. They want a brand that talks with them, not at them.
- Always check how your ad looks before launching it. First impressions are everything in Facebook advertising. Always do a final check to make sure your ad campaigns look good at first glance.
Imagine you’re a member of your target audience,seeing your ad on their feed while casually scrolling. Is it something that’ll make them pause scrolling? Always use high-quality photos to make sure your brand looks credible.
Frequently asked questions (FAQs)
To start advertising on Facebook, first decide on the type of ad you want to run: a video ad, carousel ad, image ad, or just a regular sponsored post. Then, open your Meta Ads Manager and select your ad goal. Upload your ad, add a headline, caption, and link, then set your target audience and ad budget. Publish your ad to let it go live and monitor its performance in the Ads Manager.
There is no set cost for running Facebook ads. You can set your own daily average budget or a total budget for your entire campaign. Facebook ads are typically priced on a cost-per-click (CPC) basis, where you only pay for every click your ad gets. The average CPC for Facebook ads is $1.72, according to Wordstream, but prices can be higher in more competitive industries, like tech and finance.
$10 a day is a good starting point for Facebook ads if you’re just starting out, you’re only advertising for brand awareness, or your industry isn’t too competitive. However, if you’re in a very competitive market and want to generate leads or conversions, you’ll likely need a higher budget. A good way to calculate your Facebook ads budget is by dividing your target profit by the number of sales you need to make.
Bottom line
Facebook advertising is a good first step to get your business in front of more people if you’re a beginner to digital advertising. Ultimately, knowing how to advertise on Facebook comes down to knowing your audience and what content works with them — and being authentic, not overly salesy or promotional. Being genuine is what will help your ad stand out in the competitive Facebook landscape.