Whether you’re new to using QuickBooks Time (formerly TSheets) or thinking of getting the software to track your employees’ time and attendance, this tutorial can help you navigate through the steps of setting up your company account. In addition to providing a guide on how to use QuickBooks Time, this article will cover most of its features, including the functionalities of its mobile app.
Did you know?
QuickBooks rebranded TSheets as QuickBooks Time in February 2021. The functionalities are still the same but with a few enhancements (such as improvements to the mobile app). Check out our QuickBooks Time review article to learn more about its features.
Tutorial 1: Getting Started With QuickBooks Time (for Administrators)
A great way to learn how to set up your company account is to follow along in your own QuickBooks account. If you don’t have one yet, sign up for the 30-day free trial—you may also want to consider a trial of QuickBooks as well. QuickBooks almost always ranks well in our accounting and payroll review because of its range of features and ease of use. If you already have an accounting or payroll program, you may be able to integrate QuickBooks Time, allowing you to take advantage of the functionalities that this versatile software offers.
When you first sign up with QuickBooks Time, you’ll be asked to provide basic information, like your name and contact details, your company’s name, the industry your business belongs to, and the number of employees you have. Once the signup process is complete, you’ll have immediate access to the software.
To help you set up your account, QuickBooks Time has a “Getting Started” online wizard to guide you through the process. Aside from the online wizard, the provider offers an in-product tour and a free one-on-one session with its setup specialist. You can also check its online help section, which includes refreshers on each task.
Note, however, that how you can use its platform and the features you have access to depend on your assigned role or permission level. QuickBooks Time has four user permission levels:
- Administrator: Full view, edit, and approve access
- Payroll manager: View and approve time sheet reports for all employees
- Worker: No edit/approval permissions but can access essential tools for tracking time and viewing schedules
- Custom: Administrators can set up custom user roles with special permissions such as allowing employees to edit their own time sheets without requesting an admin or manager to change/correct their time data.
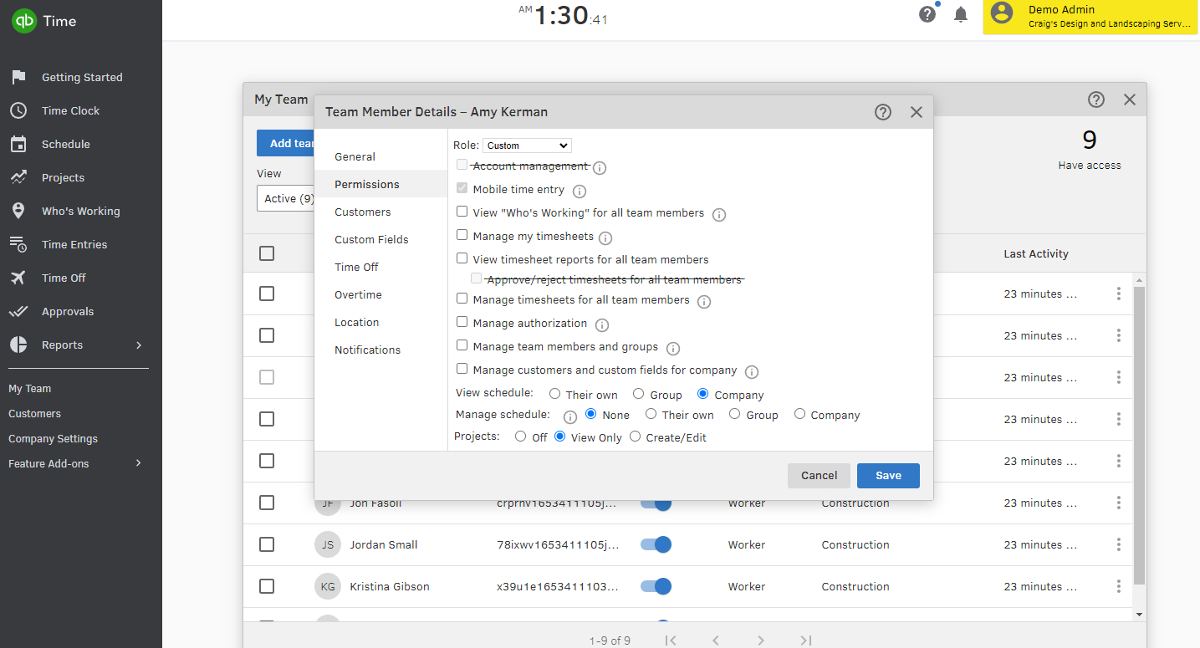
QuickBooks Time lets you create custom permissions for employees, but it won’t allow you to select the “account management” field, as it is limited to administrators only.
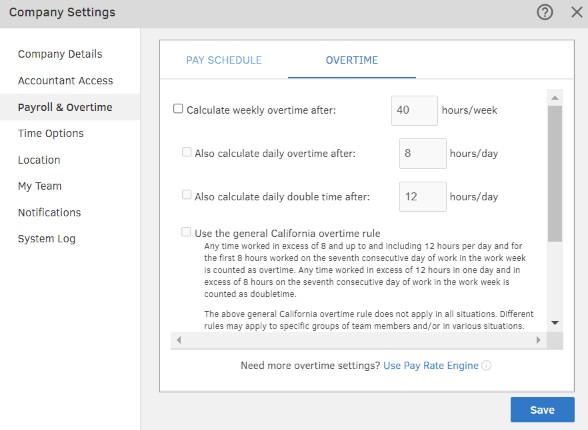
Only administrators have the capability to create and change company settings. If you have administrator access, go to “Company Settings” in the side menu to review and edit your company info, including your preferred date and time formats, time zone, and other system settings. You can also add a custom logo, provided it meets the recommended transparent PNG format and file size of 150 x 50 pixels.
Other information you need to update include the following:
QuickBooks Time integrates with many third-party applications. You can set these up by clicking “Feature Add-ons” > “Manage Add-ons” located in the side menu. Alternatively, you can integrate it through the third-party software’s API.
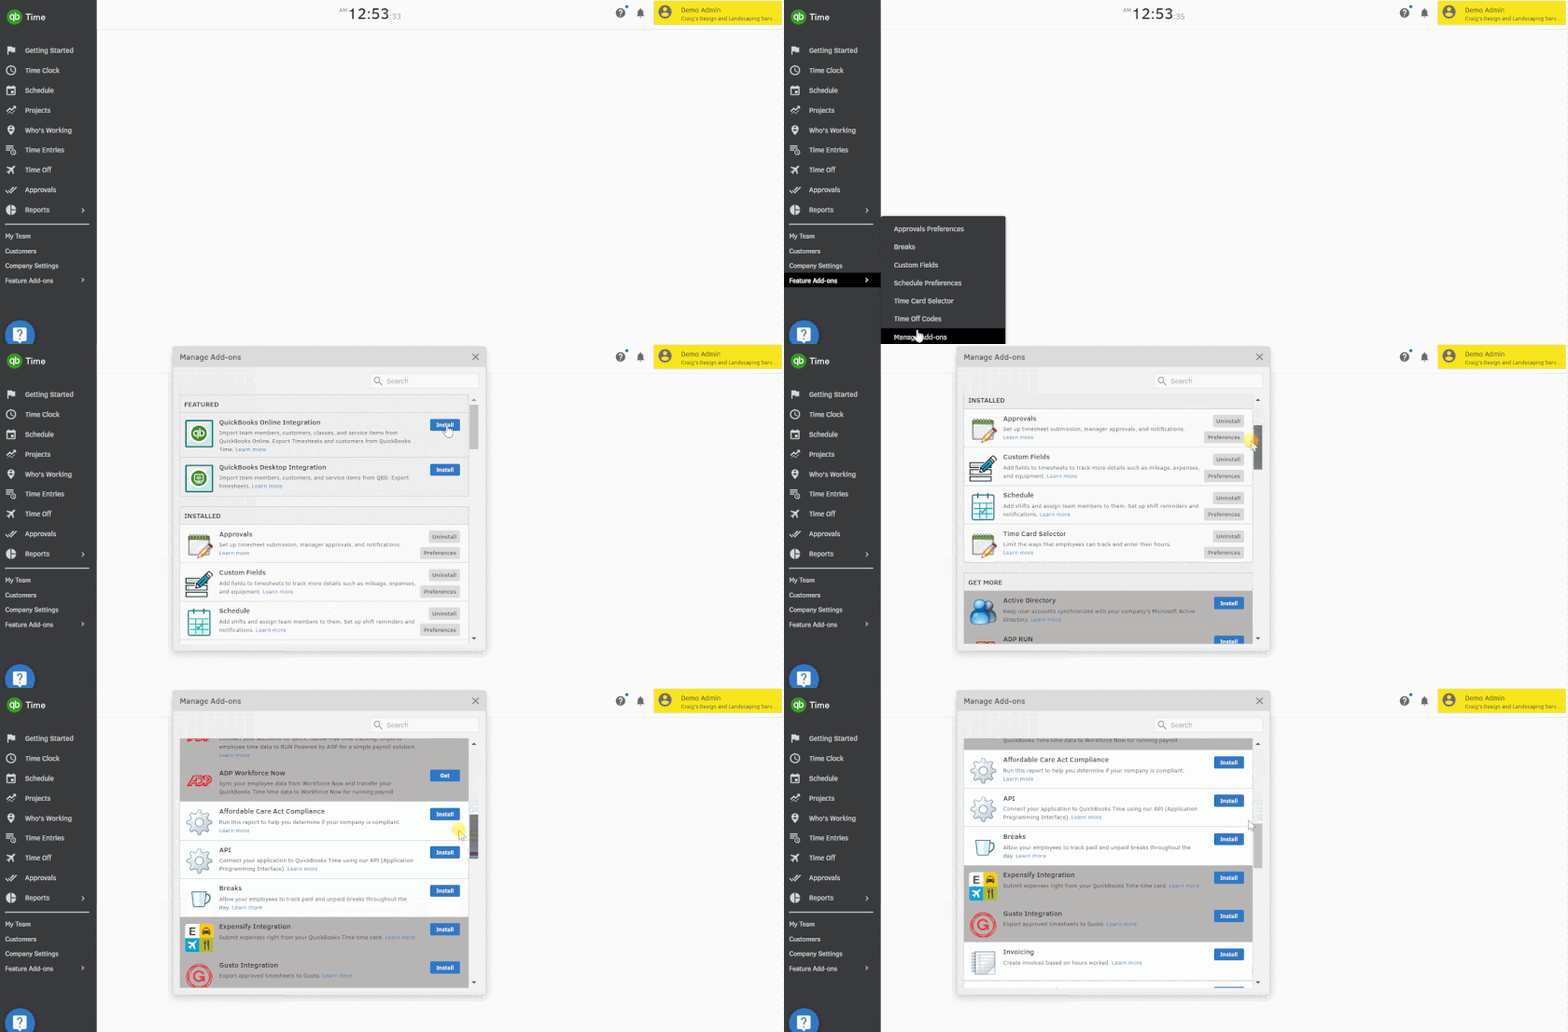
QuickBooks Time’s “Manage Add-ons” tool contains a list of integration options with other QuickBooks products and third-party partner software.
Integrate QuickBooks Time with QuickBooks Online and QuickBooks Payroll
QuickBooks Time also works seamlessly with QuickBooks Online and QuickBooks Payroll. If you need accounting, payroll, and time tracking all in one system, it’s an easy suite of products to use together to run your business. Learn more how to integrate QuickBooks Online and QuickBooks Payroll with QuickBooks Time.
You’ll need to add all of your employees to the software before you can start tracking their time. You can do this via the “Getting Started” online wizard or by clicking “My Team” in the side menu.
- Go to “My Team” and click “Add Manually.”
- An “Add Team Members” window will appear. Input the employee’s name and select the role (e.g., worker or payroll manager). Note that the system will automatically add a new row after you type in the worker’s last name, enabling you to add multiple employees in one go.
- You can invite a team member to use QuickBooks Time by entering their email or mobile number and choosing the delivery method. The invitation will guide the team member through setting up their own account.
- Choose the delivery method (via email or as a text message) on how you want the system to send the invitation to track time using QuickBooks Time. The invitation will guide the team member through setting up their own account.
- Click “Add X Team Member(s)” at the bottom of the window to upload the list. Note that “X” automatically reflects the number of employees that you have inputted into the system.
If you’re a QuickBooks Accounting user, you can import your employee list into QuickBooks Time. The system also allows data imports from a CSV spreadsheet file and from one of its partner systems (like Gusto, ADP Run, Xero, and Square).
Apart from manual data entry and data imports, you can add employees by using QR codes. When you click “My Team” > “Share Company Code,” QuickBooks Time automatically generates a QR code you can share with new employees. Once scanned, it will guide them through the process of setting up their accounts online. The system will also alert you to review the new employees’ profiles once the setup is complete.
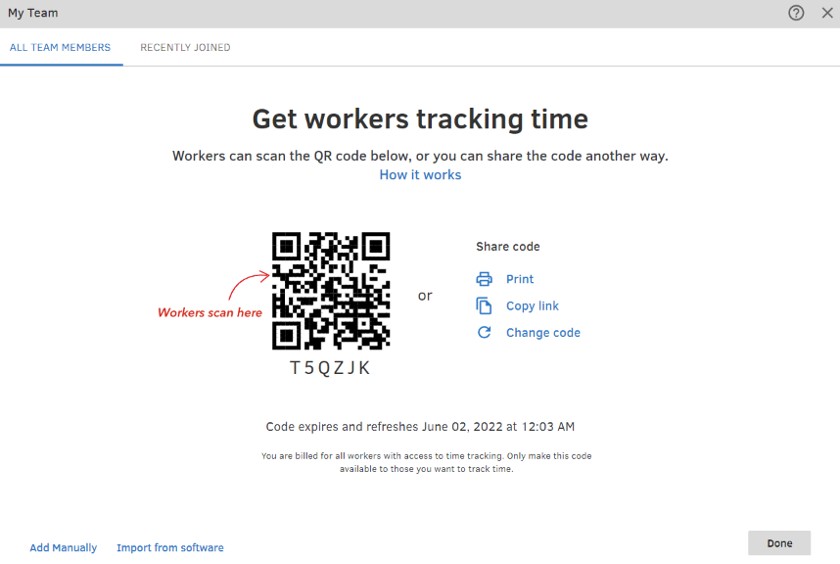
QuickBooks Time’s QR codes for new employees are valid only for seven days from the date that the system generated it.
Adding groups to QuickBooks Time is a great way to identify which employees belong to specific teams, sections, and departments. You can even select people managers or supervisors to be the “payroll manager” for the group.
- Go to “My Team” and click “Groups and Managers.”
- To add a group, select “Add Group” and give it a name. Click “Save.”
- From the “My Team” window, select a team member and then assign the employee to a group from the drop-down menu. Click “Save.” You do not need to add the manager here.
- Once you have the team members set, go back to “Groups and Managers” and click on “Managers,” then enter the manager’s name and select Add.
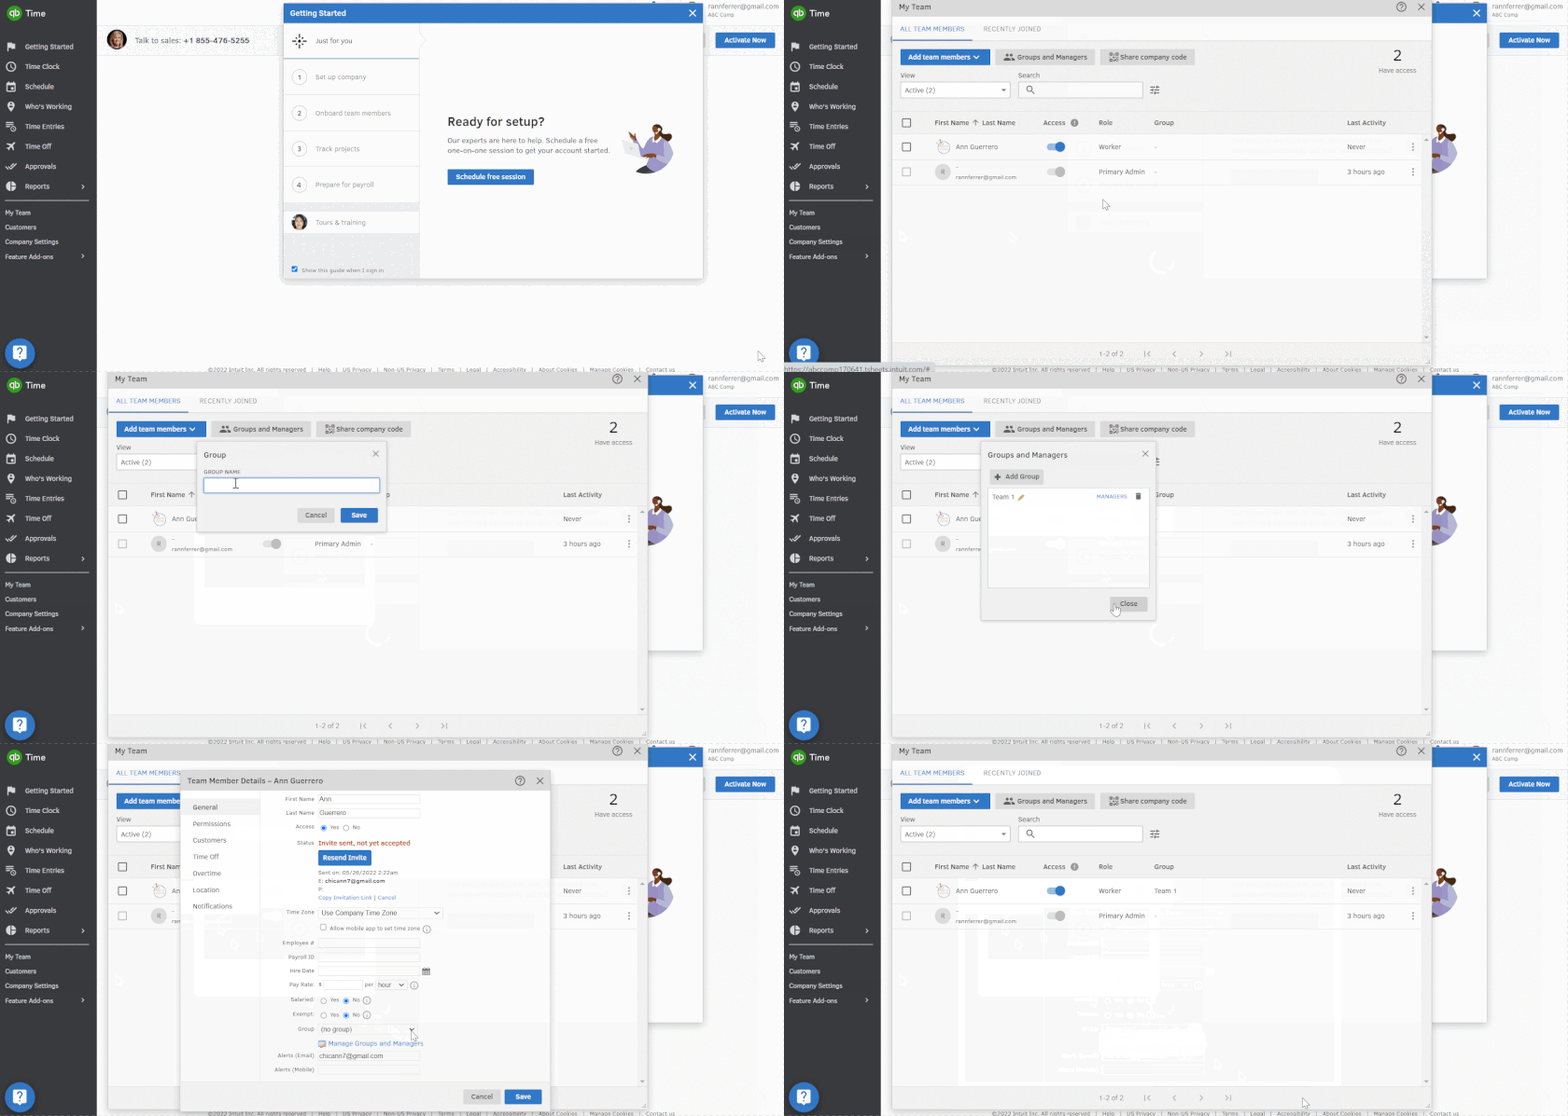
With QuickBooks Time, you can easily add employees to specific groups or teams.
If you need to assign work time to specific jobs, i.e., for software development companies that work on billable hours, QuickBooks Time will allow you to do so. You can add jobs with multiple levels, such as Client–Project–Task, or any other structure that helps you bill hours properly. Job names are limited to 64 characters, but shorter is better, as long as it’s unique and understandable.
If you integrate QuickBooks Time to QuickBooks, Reckon, or Xero, the term jobs populate as customers in QuickBooks Time. To change them to jobs—or another title—go to the “Customers” in the side menu. Click “More” > “Rename Customers Label,” input the name, and click “Rename” to save the settings.
If you need to create a job, a sub-level job, or assign a job to an employee, select the appropriate option in the drop-down below:
To Create a Job
- Go to “Jobs” in the side menu.
- Click “Add” to input a new job and give it a name.
- In the “Location” data field, enter an address or GPS coordinates that employees can use to clock in/out from when working on a job. The location will bring up a dropdown list. Check the correct suggestion.
- Select “Save.”
To Create a Sub-level Job
- Go to “Jobs and click the “+” to the right of the job you want to place it under.
- Enter a name.
- Click “Save” or hit “Enter” on the keyboard to start the next job.
- To change levels, go to the job you want and click the pencil icon. Select “More” > “Move,” then choose a new parent job window. Select the level.
- Click “Save.”
To Assign/Unassign a Job to Team Members
- Go to “Jobs.”
- Click on the pencil icon of the job you want.
- The system automatically assigns the job to all team members. Uncheck that option and select “Edit” to choose team members or a specific group.
- Click the arrow located at the top left of the screen. It will send you back to the “Edit Job” window. Select “Save.”
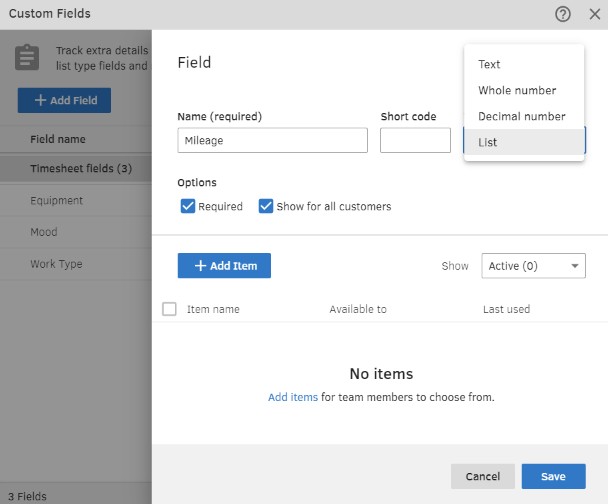
Custom fields let you add and track extra data like mileage, equipment, or anything else you need to cost out. You can also specify whether data fields are required or optional to fill out and if you want employees to input information as free-form text or choose options from a drop-down list.
Tutorial 2: How To Set Up Schedules in QuickBooks Time
If you do not see the “Schedule” option in the sidebar, go to “Feature Add-ons” > “Manage Add-ons” and install the schedule tool. Then, select “Schedule” in the side menu. A screen will pop up that shows a calendar with all the employees already pre-populated.
You can change the calendar view to daily, weekly, and monthly. If you need to see shifts by job, click the drop-down button beside “View By” located at the left side of the schedule screen. Toggle the option between “Team member” and “Job” (or “Customer”) to see shifts by team members and jobs.
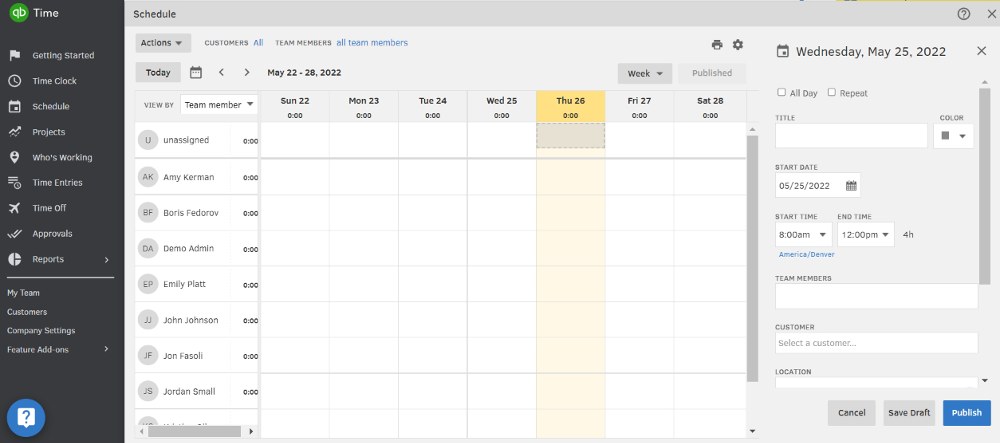
A snapshot of QuickBooks Time’s “Schedule” tool
Creating and managing schedules in QuickBooks Time is easy. To add a new shift, follow the steps below.
- Click on “Actions” > “Add a Shift” or click on a box that aligns with the employee’s name for a specific date. When you click on a box, the shift editor pops up with some items (like the employee’s name and the shift date) already filled out.
- You can choose to make the shift an all-day or repeating event.
- Title is optional, but you may want to use it for general shift titles. There’s a box below for assigning specific jobs.
- You don’t have to select a color, but it can make it easy to find something at a glance.
- Adjust the start date and start and end times as needed. Type them in manually or use the drop-down menu that shows up when you click on the arrow.
- You can add multiple team members if they are all on the same schedule.
- Select a specific job that has already been created in the setup. It may automatically populate with a location. This is especially helpful for employees because they can click on the location in the mobile app to pull up driving directions.
- Add notes, which could be specific directions or reminders.
- Save as a draft or publish. If you save it as a draft, it will show up on the schedule with an outline in the color you chose. When published, it is a full block of color.
- When the entire schedule is created, click on “Publish Week” in the upper right part of the calendar. QuickBooks Time will then give you the option to send notifications to the employees.
Once published, you can edit or delete by clicking on the box in question and selecting “Edit” to edit or the trash can icon to delete. It also lets you drag-and-drop a box to move a schedule piece to someone else.
- Unassigned: If you are not sure who should get a shift, you can park it in the unassigned area (above the team members’ names) and move it later.
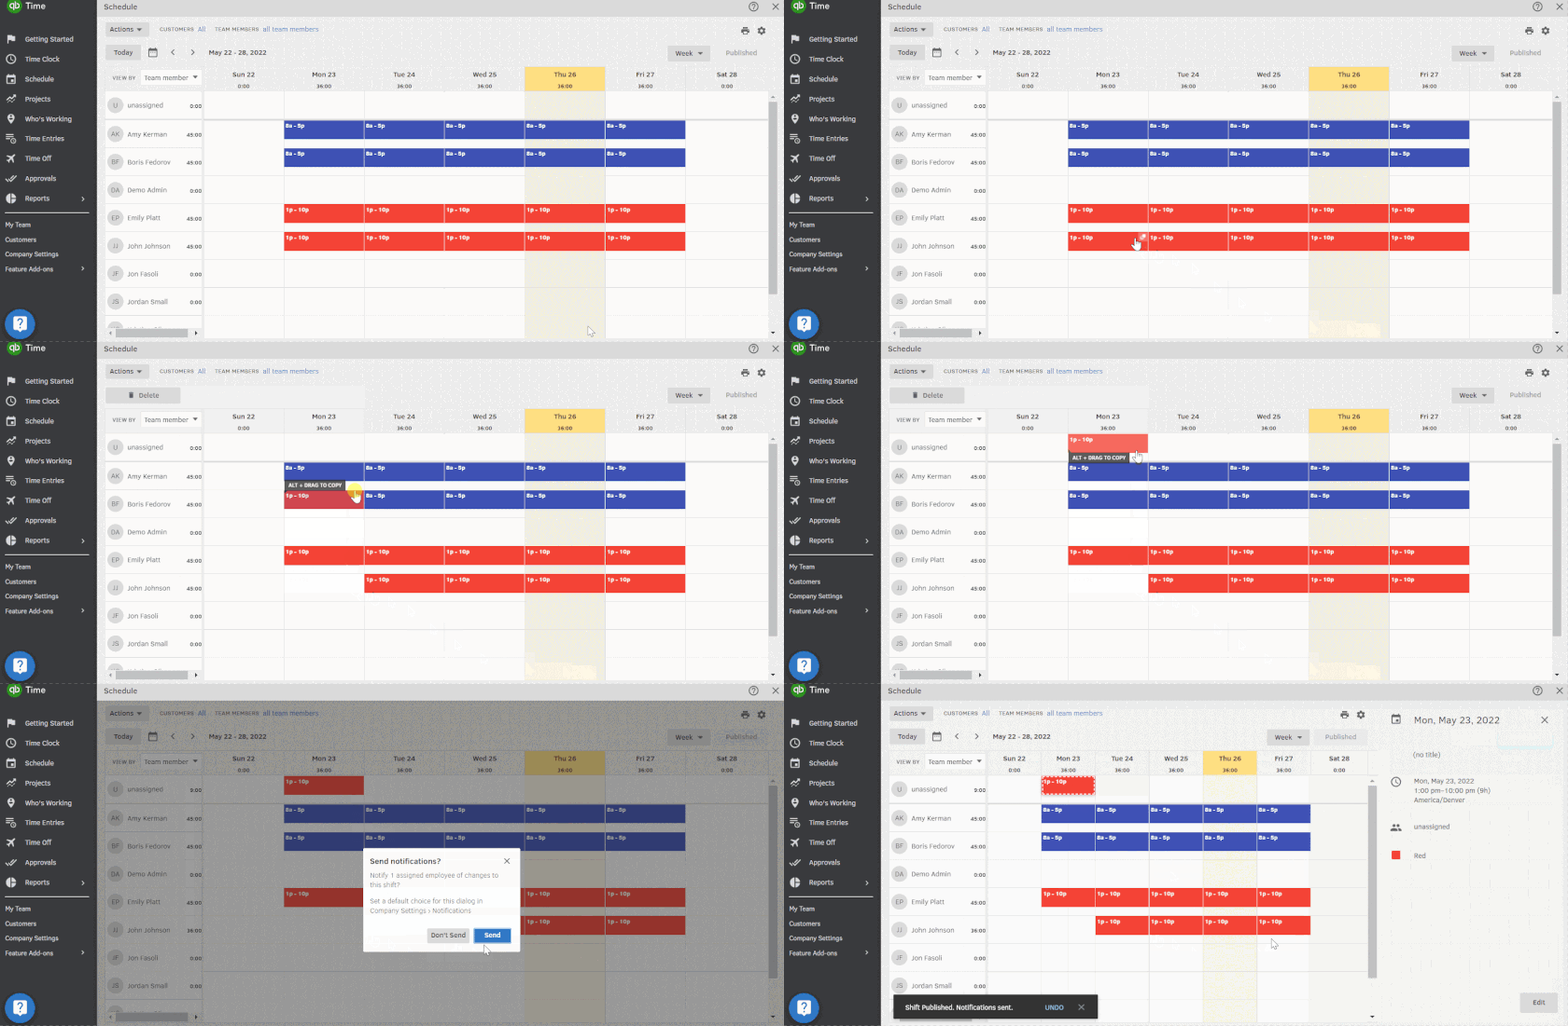
QuickBooks Time automatically notifies the employee if their shift has been moved to “unassigned.”
- Repeating Schedule: You can select “Repeat” if this is a standard schedule. If the schedule is one you use often but is not recurring, you can save it as a template by clicking “Actions” > “Save Week As Template.” You can also click “Copy Previous Week” to copy the week before.
- Save to another calendar: If you want to save the schedule to another calendar (such as Microsoft Outlook), click on “Actions” > “Subscribe to Calendar.” It will give you a URL for integrating the schedule into another calendar program.
Tutorial 3: How To Track Time With QuickBooks Time (for All Employees)
There are multiple ways to track employee hours. QuickBooks Time offers several options: clocking in and out on a computer, inputting time manually, using the mobile app, or using QuickBooks Time Kiosk. You can use any or all of these means and have the information fed into your admin account, giving everyone multiple options for logging time worked.
QuickBooks Time makes it easy to switch between jobs when tracking hours.
When employees click on “Time Clock” in the side menu, a small box pops up. At the lower right of the box is a button that employees can use to clock in or clock out. The following totals are displayed across the top.
- Current: Refers to hours worked on a specific job
- Day: Refers to total hours worked in a day at all jobs
- Week: Tracks total hours worked in a week at all jobs
If you are charging billable hours or have different pay rates for different jobs, then allowing your employees to select the job is vital. If they’re assigned different jobs, the options show up in the job list. You can easily change between jobs by clicking the new job, then “Switch.” In the “Current” time portion, the system will automatically reflect the total time worked that day on that particular duty. There’s no need for employees to clock out for the previous job and then clock back in for the new job!
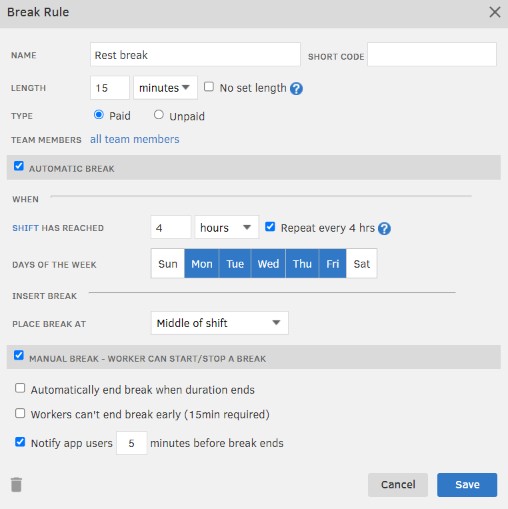
If your company mandates or allows breaks, there will be a break option for employees to select under “Options.” For lunch break rules that are not added and set up in the system, your staff can clock out and clock in again to capture each shift’s lunch breaks.
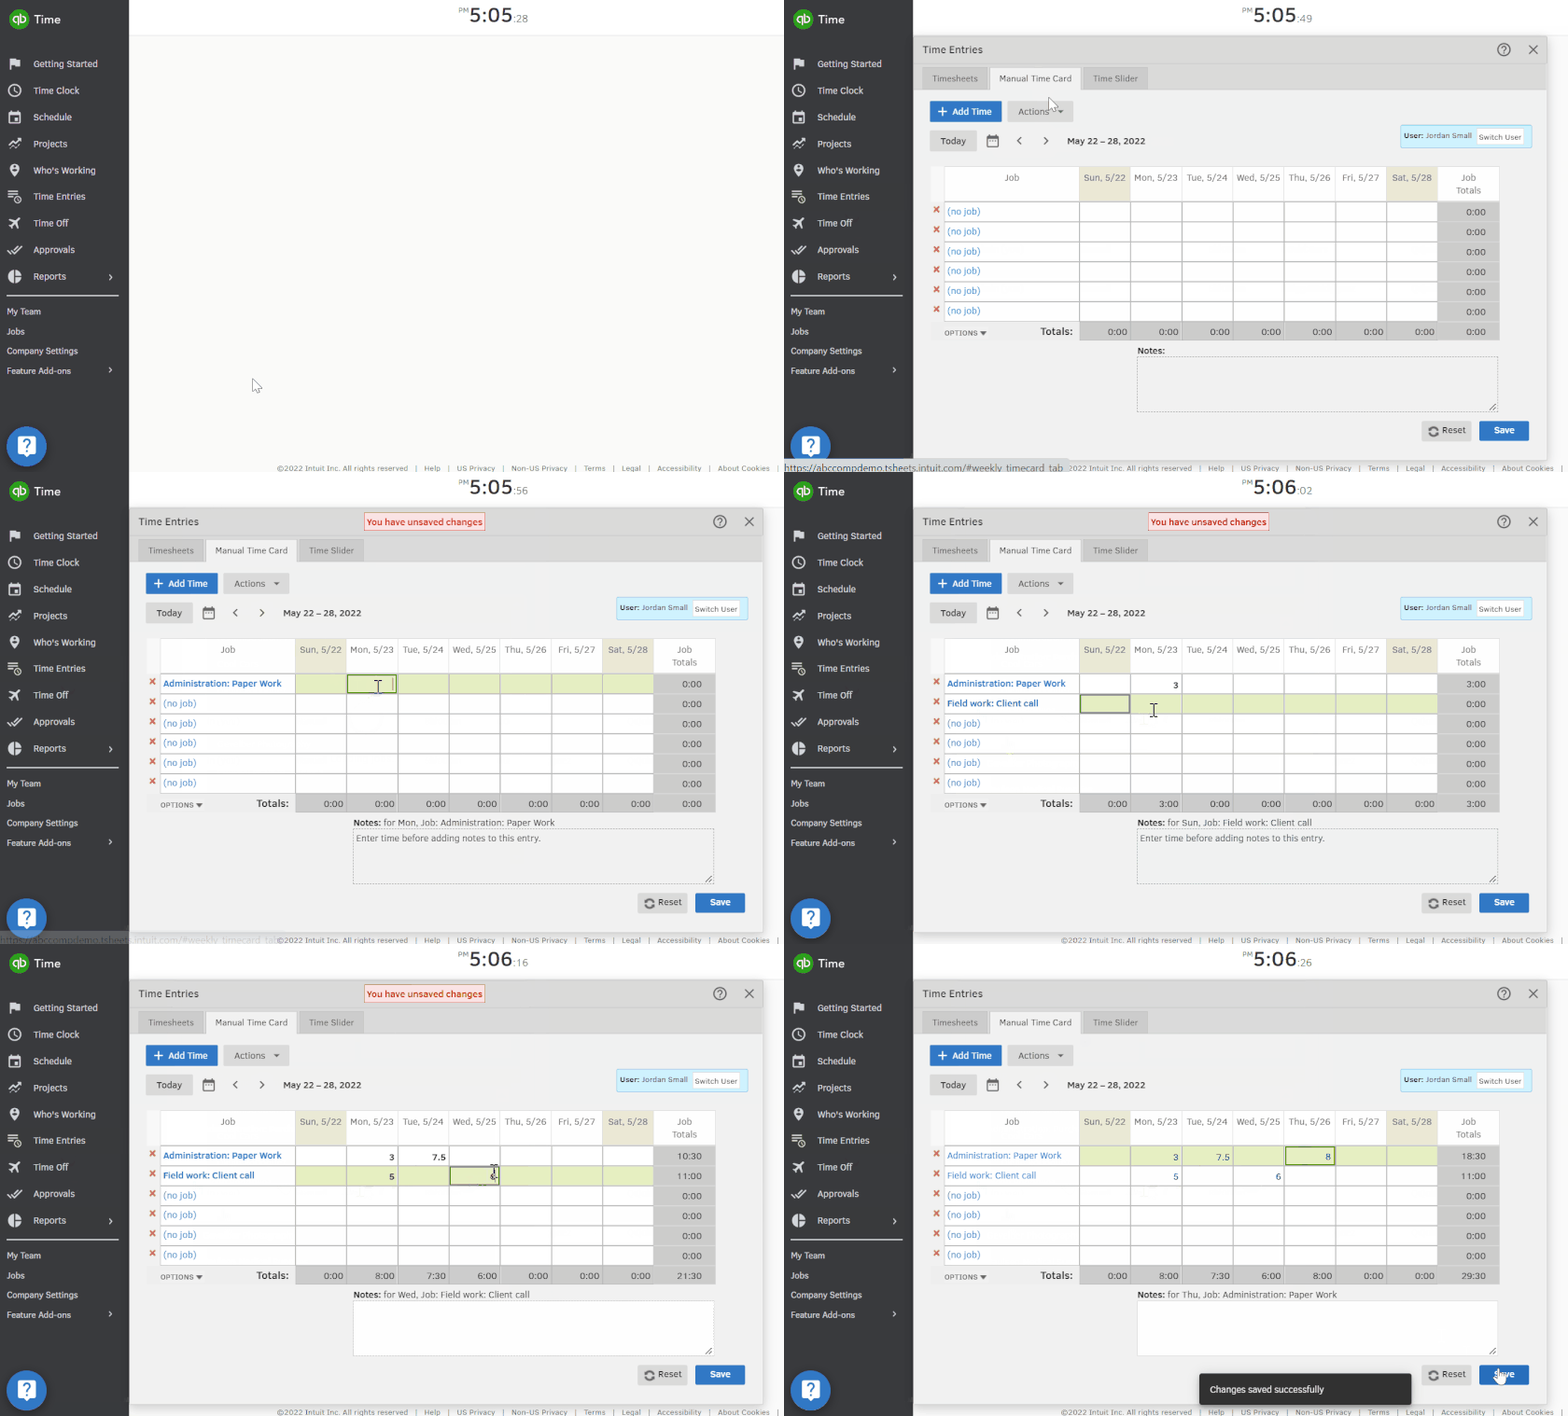
QuickBooks Time lets employees log work hours manually via its “Time Entries” feature.
“Time Entries” provides a manual way to log hours but not exact time in or time out.
- Employees click on “Time Entries” in the side menu and select “Manual Time Card.” This shows a blank time sheet for the week.
- They can select a job (or customer) and add bulk time worked by date.
- There’s a note section at the bottom of the time sheet. If they add notes, the system will create a red triangle in that box to show that there’s a note.
- If there are no changes to the work schedule, employees can click the “Actions” button and select “Copy Previous Week’s Jobs” or “Copy Previous Week’s Timesheet.” The system will automatically copy the previous week’s jobs or time sheet to the current week.
Admins can access the time entries of other workers. You can review and modify their time sheets if needed. You can also see the history of changes in the Actions Tab. This is useful if more than one person (such as team supervisors or managers) can modify a time sheet.
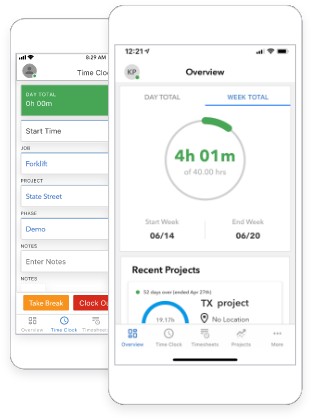
QuickBooks Time has mobile apps for Android and iOS devices. (Source: QuickBooks Time)
Employees can clock in and out or add manual time entries on the QuickBooks Time Tracking mobile app. It works in the same way as the desktop version.
You can set up geofencing, which has three advantages:
- Admins and managers can see where employees are at a given time
- Employees get reminders to clock in when they enter a geofenced area
- Employees are reminded to clock out when they leave a geofenced area
Like the computer version, the app has user roles for an administrator, payroll manager, and worker. The functions you can access are almost the same, just in a different setting optimized for mobile. For example, rather than all the functions listed in a side menu, you have the most common ones as buttons on the bottom, with the “More” button giving you access to other features, such as:
- Help: To access customer support or view help articles, click on “More” > “Settings” > “Help & Support”
- Account Information: Tap your profile photo to view account info, make changes to your profile, sync the app, or sign out
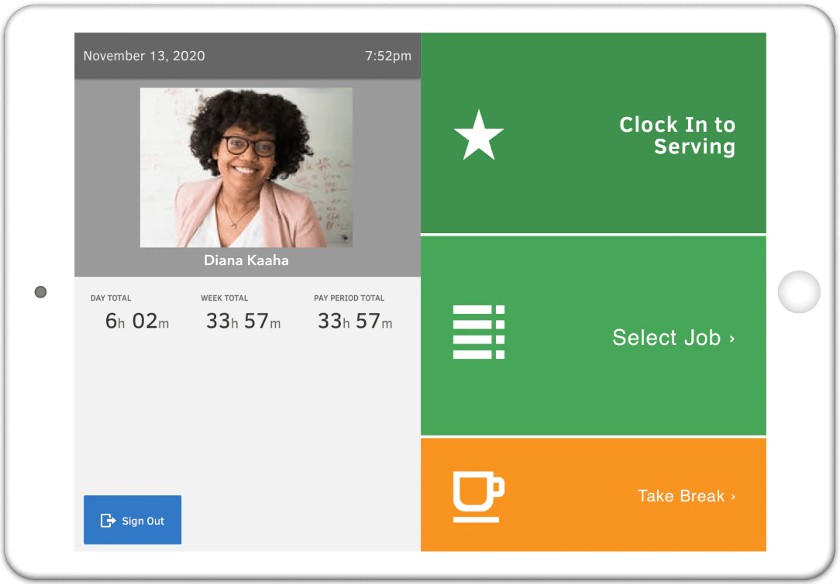
Aside from laptops and desktop computers, QuickBooks Time Kiosk works on Android and iOS tablets. (Source: QuickBooks Time)
QuickBooks Time Kiosk allows you to use a tablet, computer, or laptop as a dedicated time tracking device—provided an internet connection is available. To activate the time tracking tools for a kiosk, follow these steps:
- Go to “Feature Add-ons” in the side menu and select “Manage Add-ons.” Look for “Time Clock Kiosk” and click “Install.”
- Click “Preferences” and select “Add Device.”
a. If you choose “Use This Computer,” a small window will pop up that lets you edit your kiosk’s settings and system preferences. Naming the kiosk is optional but helpful, especially if you plan to set up several kiosks. You also have the option of enabling photo capture and facial recognition.
b. If you choose “Other Device,” the system will generate an authorization code. Copy the code and then download the QuickBooks Time Kiosk app on your preferred device. Input the authorization code, click “Authorize,” and then set up your preferences.
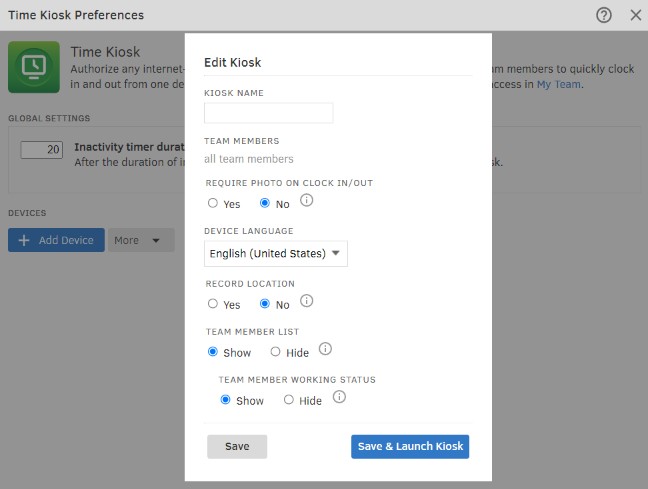
QuickBooks Time “Edit Kiosk” tool
Employees will need to input a four-digit PIN to clock in. While the system will automatically ask them to set a PIN when they first log into QuickBooks Time, you can opt to create PIN codes for all employees in the “My Team” module.
If you enable facial recognition, it will snap a photo of the person clocking in. If this does not match the image on file, admins will get a notification. This feature is a good way to avoid problems with buddy punching, where someone else clocks in for a fellow employee.
Tutorial 4: How To Manage Time Sheets & Approvals With QuickBooks Time (for Managers & Admins)
There are several ways to manage time sheets. You can do this by generating reports, accessing the “Who’s Working” tool, and looking at time sheets in a spreadsheet format via the “Time Entries” module.
To access employee information, click “Who’s Working” in the side menu. The box pops up on the upper right of the screen. Depending on the permissions granted, admins and managers can see members of their different teams or all workers. They can also sort by clock-in, day totals, names, locations, or jobs. They can also filter by who is actively on the clock.
To make changes, click on the pencil-and-paper icon. A new popup for that employee will appear. You can edit status (working/not working), time in/out, jobs, time zone, and add notes.
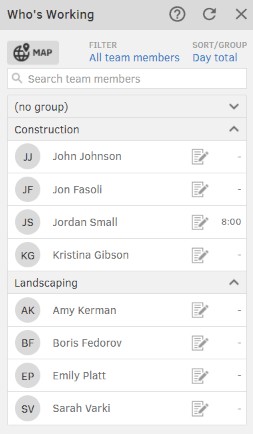
QuickBooks Time’s “Who’s Working” function is one way to edit time sheets.
If you click “Time Entries” in the side menu, you’ll see three tabs: “Timesheets,” “Manual Time Card,” and “Time Slider.” Select the “Timesheets” tab. This gives you the time sheets for all employees, which you can search by day, week, month, or pay period. You can also use the calendar icon to set a specific period of time.
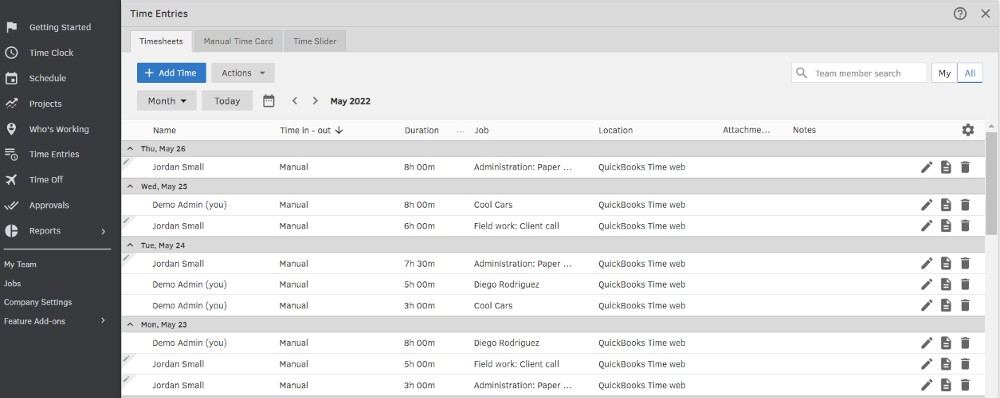
A snapshot of QuickBooks Time’s time sheets via the “Time Entries” module.
The spreadsheet can show up to six fields at a time (excluding the employee name column). If you need to view something else, click on the gear icon to select something different. Fields may include:
- Time in/out
- Job
- Location
- Attachments
- Equipment
- Work Type
- Billable hours
- Class
- Service item
- Tasks
- Notes
- Flags
The text for jobs and notes can get cut off when you view timesheets, but selecting “Wrap Text” in the gear icon allows you to see longer entries. Also, while you can choose to add the “Location” field, note that this refers to the way the user clocked in/out—via web, mobile, or kiosk—not the location of the work.
To view and edit timesheets via the “Time Entries” feature, follow these steps:
- Select your worker. If you cannot find them quickly, you can put the name in the team member search in the upper right corner. If you want to see your own time entries, click the “My” button beside the “Team Member Search” box.
- To make edits, click the pencil icon. A box pops up with all the information, so you can make changes. Click “Save.”
- To view previous edits of a line, click on the paper icon. To view all other manager edits, click “Actions” beside the “Add Time” button and select “View Manager Edits.”
- To delete an entry, click on the trash can icon.
- To add new timesheet information for an employee, click on “Add Time” in the upper left corner. A box will pop up where you can add information. Click “Save.”
When you run an “Itemized Total Time” report, you can access the time sheets used for the report by clicking “View Timesheets” at the top of the report, under the date range. From there, the time sheet pops up. Hover over an entry and a pencil icon shows up on the left-hand side. Click and edit the data in the popup box. Click “Save.” To delete an entry, click the red circle on the left-hand side by the pencil icon.
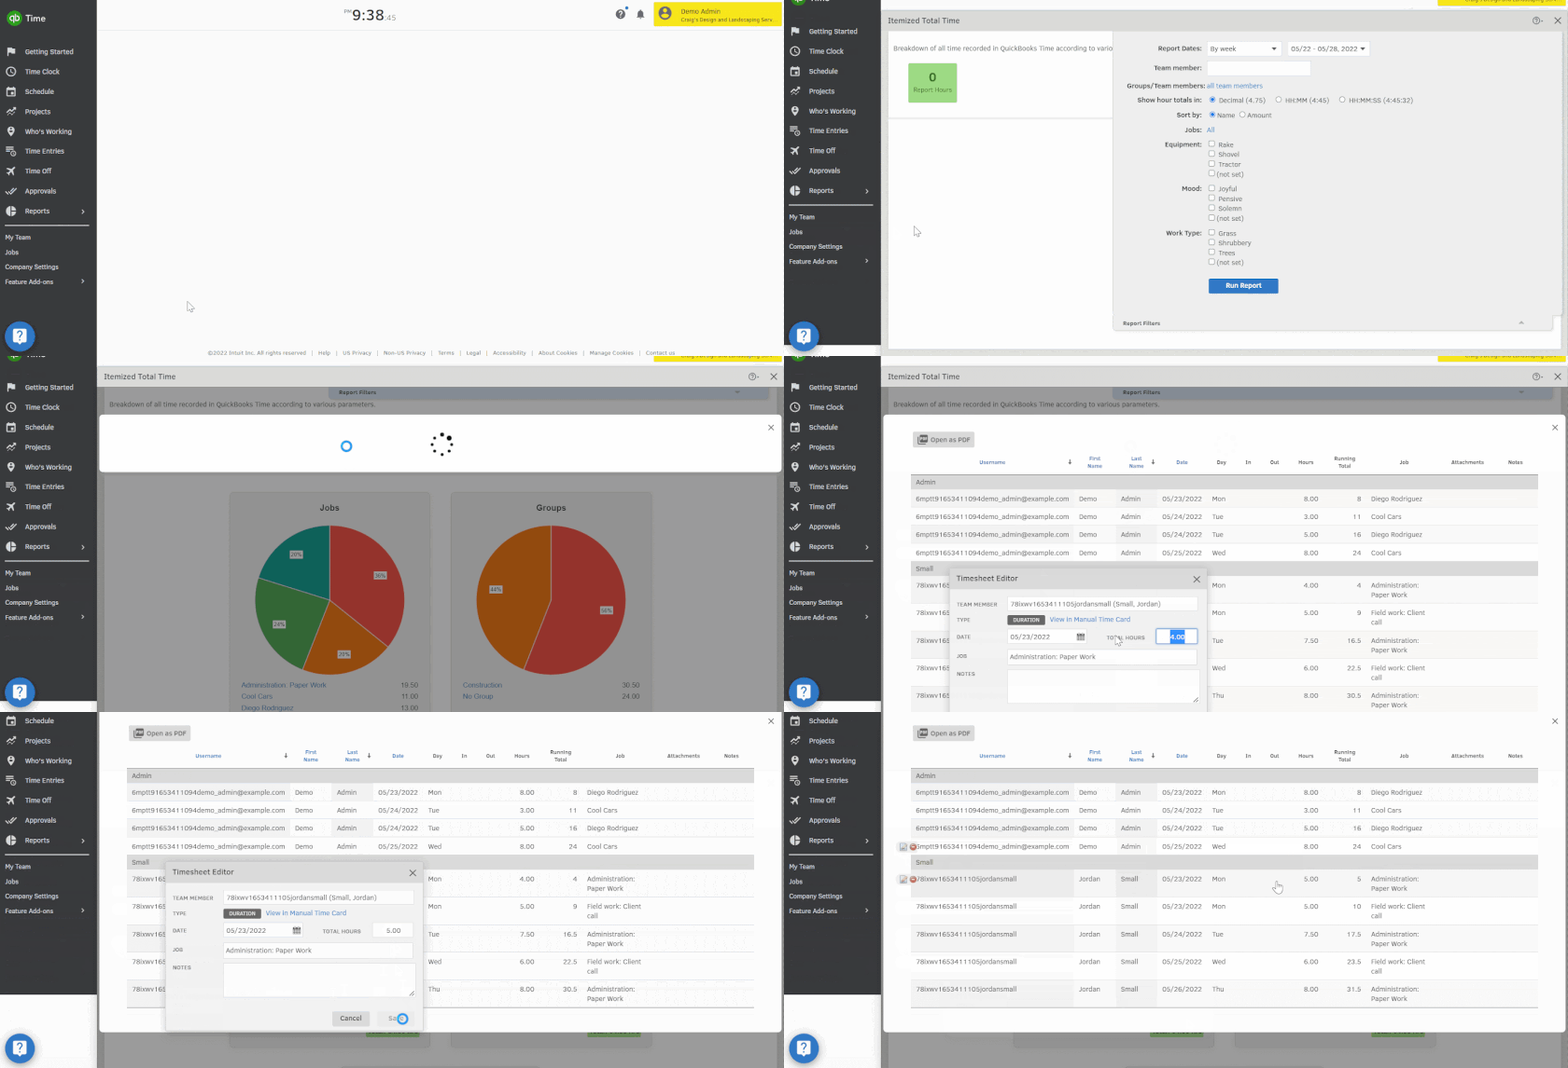
Reports offer another way to edit time sheets in QuickBooks Time.
With the “Approvals” tool, you or your managers can quickly review and approve schedules. You can also unapprove time transactions to make edits. There is an approval report in the “Reports” section as well.
If you do not see “Approval” in the menu, go to “Feature Add-ons” > “Manage Add-ons” and install it. To enable time sheet approvals and set up system alerts, click the “Preferences” button.
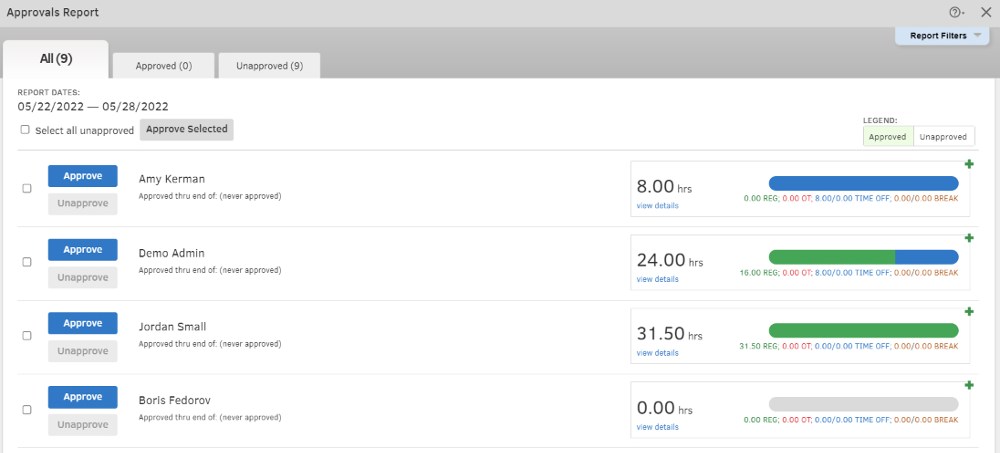
QuickBooks Time’s “Approvals Report”
Selecting the “Approvals” button in the side menu allows you to run an approvals report. Customize the report by choosing the date range (by week, pay period, or a custom date range) and how you want hour totals to be displayed (with decimal numbers or in HH:MM format). While you can go through each transaction to view details and approve or unapprove time sheet changes, you can do bulk approvals by placing a checkmark on the “Select all unapproved” option at the upper left part of the report and clicking “Approve Selected.”
If an employee has worked overtime, the OT hours will be in red. Also, once a time sheet has been approved, it will be locked, and you will see a lock icon beside it. To make changes, go to “Reports” > “Approvals” and click “Unapprove” by the person’s name.
Tutorial 5: How To Create Reports in QuickBooks Time
QuickBooks Time offers several pre-made reports, which you can customize, including reports on payroll, job costing, time off balances, approval history, and even time tracking exceptions. If you are unable to find a report to meet your needs, contact QuickBooks, and a rep can help you adjust one for the information you want.
To create reports in QuickBooks time, do the following:
- Click on “Reports” in the side menu.
- Select the report you want.
- Select the dates and fields you need. Note that you can select individuals or groups of people, like shifts or teams.
- The report will show up with pie charts, hours, and some buttons at the top for options to change fields or filters, print, or download information. The placement of these may vary by report but are usually at the top.
Here’s an example of how you would run the payroll report. Note this report does not do a pay run for you but tells you all the payroll information, such as hours worked, the amount paid, overtime paid, time-off given, and more.
- Click “Payroll Report.”
- Set the parameters for the fields.
- Run the report. The main report gives summaries of hours worked, overtime, and time off.
- To see the report details, click “Expand All” or the “+” (plus) sign beside the name of the individual you need to view. Details include a daily breakdown of hours worked, jobs each hour is assigned to, and the time sheets for that period.
- To edit the employee’s time sheet, click the pencil icon to the left of the line you need to modify. You can even add a new time sheet entry by clicking “Add Timesheet.”
- You can download the employee’s payroll report as CSV, PDF, or Microsoft Excel files. QuickBooks Time has specific buttons for each file format located under the employee name on the right side of the screen. However, if you want to download information for all users, click on the “Download” button just below the date range.
- To export reports, click the “Report Exports” button located in the upper right part of the screen. You can choose to export reports as payroll totals, payroll by day, or as individual timesheets. Note that the system won’t allow you to export reports if some time sheets have not been approved.
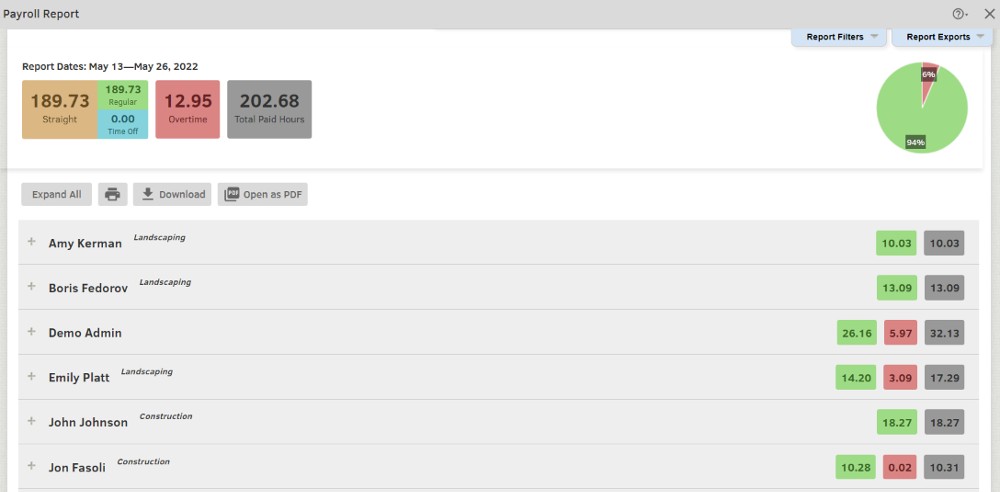
QuickBooks Time’s payroll reports are color-coordinated to reflect different types of hours and pay.
Bottom Line
QuickBooks may have rebranded TSheets into QuickBooks Time but the functionalities are mostly the same. It’s still a feature-rich, integratable, and easy-to-use system. If you need assistance, you can contact its support team via phone and chat. It also has an extensive help center with how-to articles accessible both online and in-app. You can even consult with other QuickBooks users through its community forum.
Discover for yourself how QuickBooks Time can help you better manage your employees as you track their attendance, time sheets, and billable hours. Sign up for a 30-day free trial today.
