



.jpg?w=288)
.jpg?w=288)

Gusto payroll software is built for small businesses. The setup process takes some time—from an hour to a day, depending on how many employees you have—but once you sign up, fill out your company’s information and tax details, and provide your employee details, running payroll with Gusto is a breeze.
Even if you haven’t signed up for Gusto, this article can help you decide whether it’s worth it. Gusto offers a free demo with a pretend company that you can use to try out the tools. Alternatively, you can follow along with the steps below. Plus, sign up today and get one month free when you run your first payroll. Offer will be applied to your Gusto invoice(s) while all applicable terms and conditions are met or fulfilled.
Depending on where you are in the process and how you initially access Gusto, some of the screenshots we provide may differ from what you actually see. Overall, the process and needed information should be the same.
Signing Up for a Gusto Payroll Account
To run payroll with Gusto, create an account first on its website. Enter your company name, number of employees, basic payroll industry (like office or restaurant), and phone number. Then set a password to secure the account.
Once you finish answering the questions, select Create My Account. You’ll be prompted to check your email for a message from Gusto, containing a link you’ll need to click to verify your email address.

If you have trouble at any point in time, you can chat with a Gusto support representative. Just click the chat tab on the bottom-right corner of the screen, and a chat window will open. You can also call the phone number if you want to talk to customer support instead.
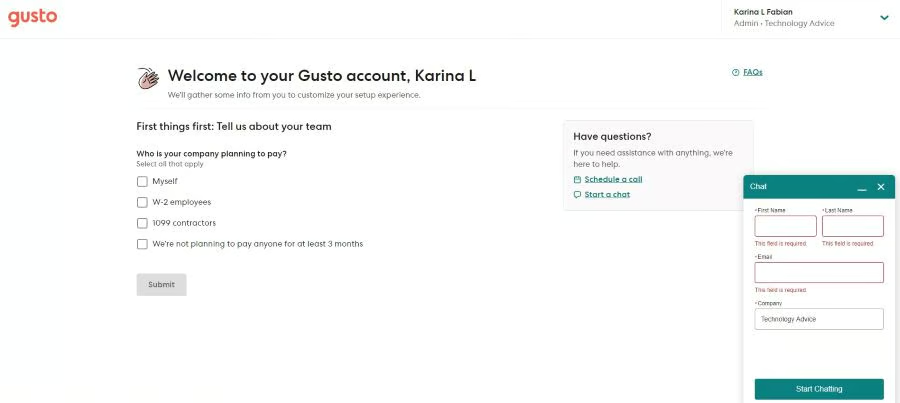
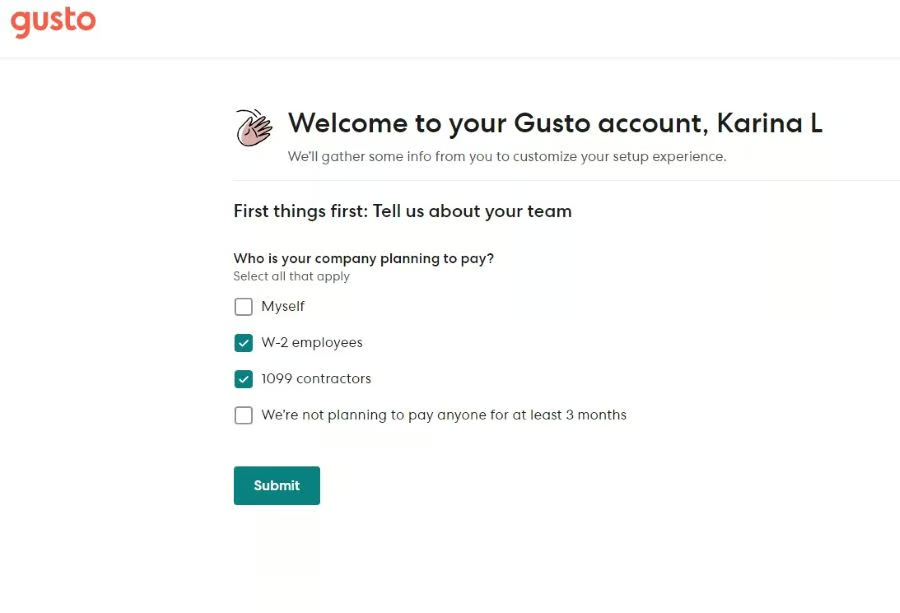
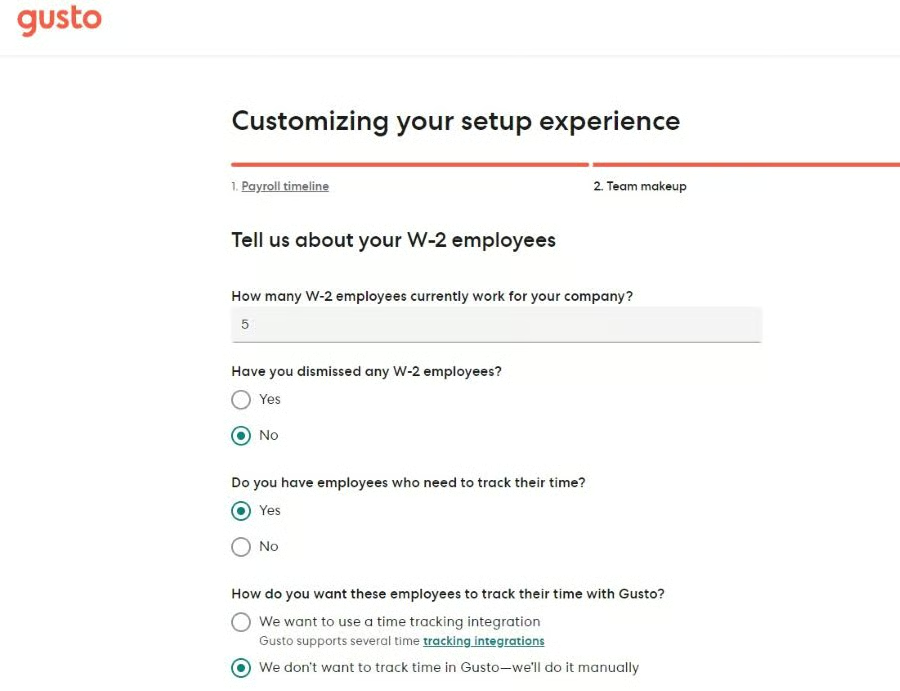
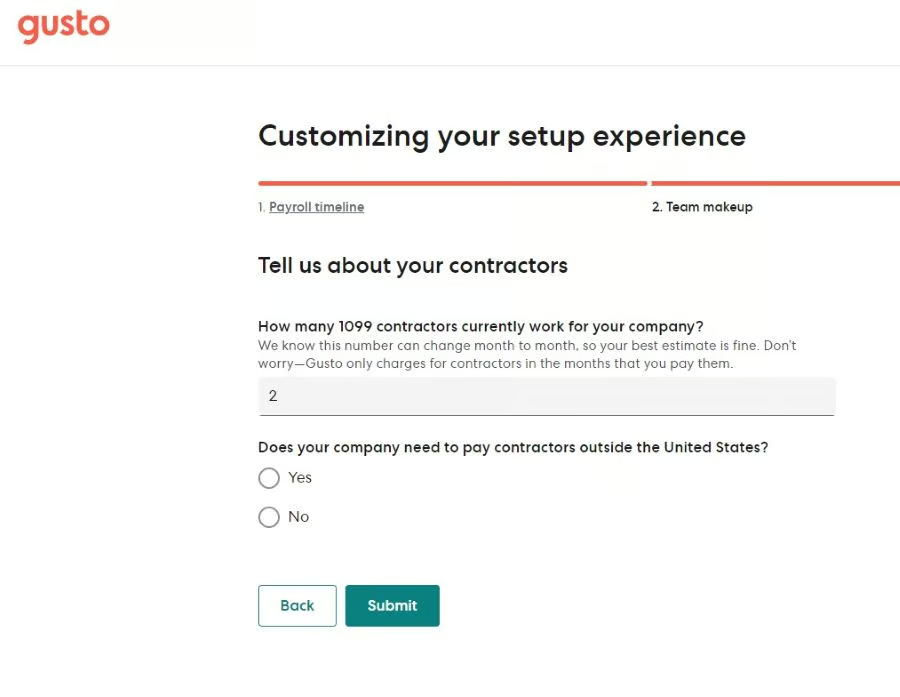
Before you get into the nitty-gritty of the program, Gusto will ask you a series of questions to customize the experience for you. Depending on how you answer these questions, you may not have to complete the steps below. Gusto will lead you through the ones you most need. These questions include:
- Employee type (W-2 vs 1099)
- First desired payroll date
- Previous payroll provider (if applicable)
- Employee locations, time-tracking needs
- Your role
- Contractor information
- Your company’s industry
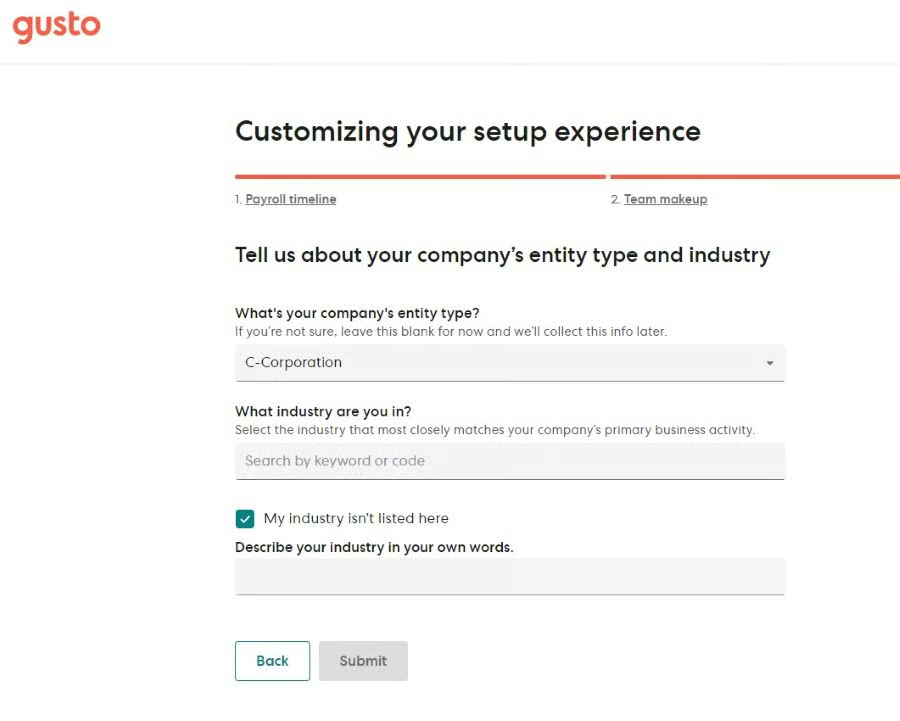
Gusto has to stay compliant with financial regulations and thus requests that you share your industry. It starts with the type of company (LLC, C-Corp, etc.) Then, when you enter the first few letters of your industry, you’ll see a drop-down menu that hopefully includes the one you need. If so, select it; if not, check the box beside “I can’t find my industry.” And enter a description of your industry below it. Then, select “Continue Gusto Setup.”






Gusto also sends you an email connecting you to a plan advisor who can help you during setup. You can schedule a meeting with them or call them at the number they provide.
Adding Details to Your Gusto Payroll Account
Gusto payroll setup is relatively easy. It will look at your general industry area to determine the initial steps to set up an account. After that, you can go in and add other details. This setup is for an office with 15 employees.
1. Add Company Information
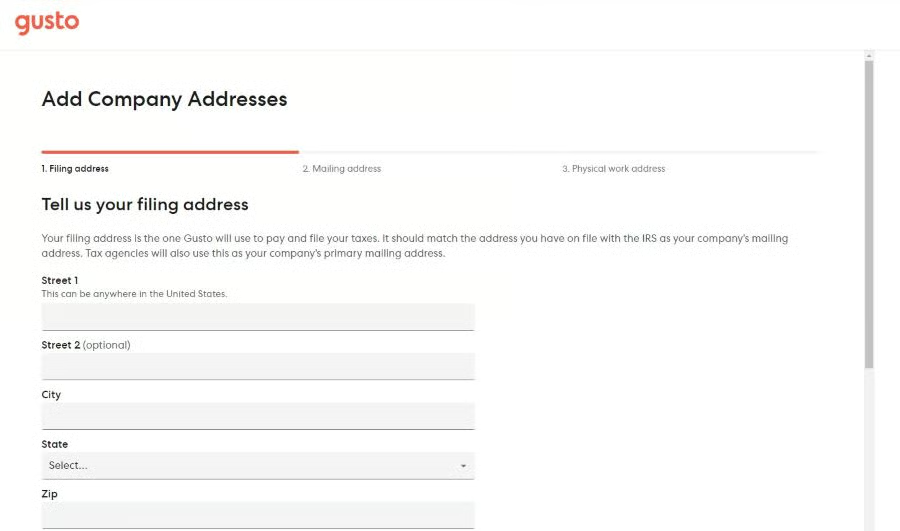
The first step is adding company information. You’ll be asked to add basic data, including your name, business name, phone number, and address(es). This helps Gusto determine what specific forms you need for your state.
If you have only one location, you’ll finish this step in no time. Gusto will populate the mailing and physical work address with the filing address information, allowing you to edit if necessary.
2. Add Your Accountant or Bookkeeper
The next step is to add your accountant or bookkeeper. If you have one, you’ll select Add Your Accountant, and add their name, email address, and other information so Gusto can give them secure access to your account. If you are looking for an accountant, Gusto offers a Partner Directory where you can find qualified candidates who are familiar with the Gusto payroll.
You can skip this step if you don’t need to give a bookkeeper administrative rights to your account. You can always add an accountant later.
3. Add Your Bank Account
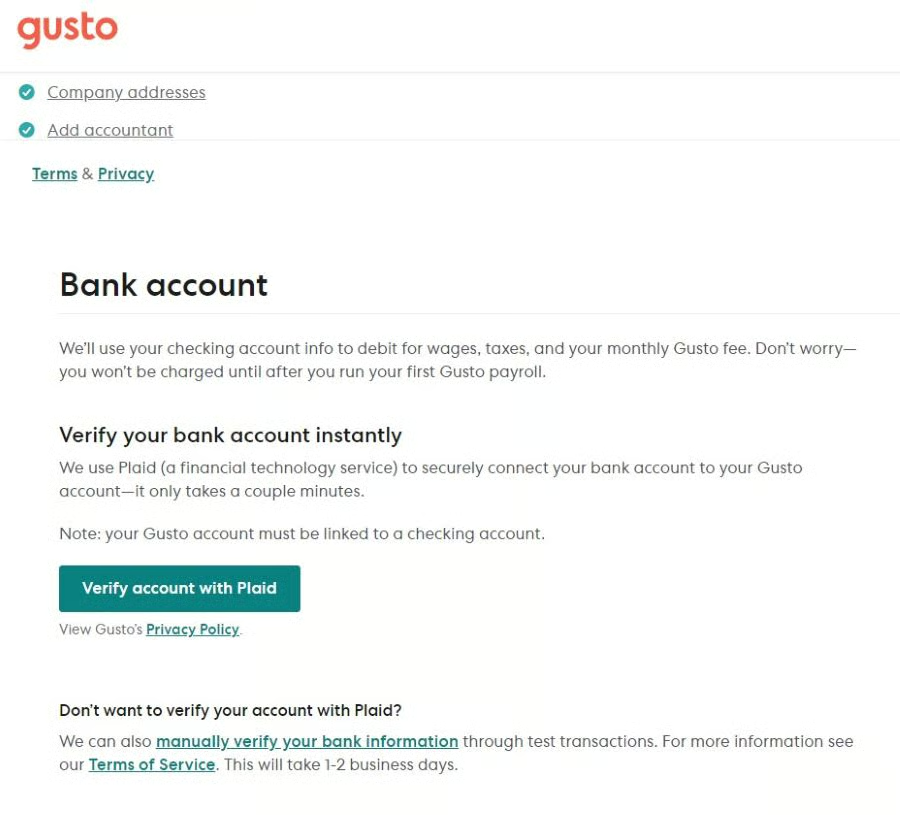
Next, you’ll link your business bank account with Gusto. This is required so that Gusto can pay employees from your business payroll checking account along with state and federal tax agencies on your behalf. You’ll need the bank routing and account number you plan to use for payroll.
First, select how you want your account verified. Gusto can use Plaid; this will link your account to Gusto for instant verification. Your bank needs to be qualified for Instant Bank Verification (IBV).
Alternatively, Gusto can manually verify the account. Gusto will make two small bank deposits (that will appear in a day or so) that you’ll enter into the system later to verify your account. To do this, click Company and then Company Details; next, click on Verify Now and enter two amounts for the test transactions. Please note, you won’t be able to run payroll for up to two business days until the bank verification is complete.
4. Add Federal Tax Details
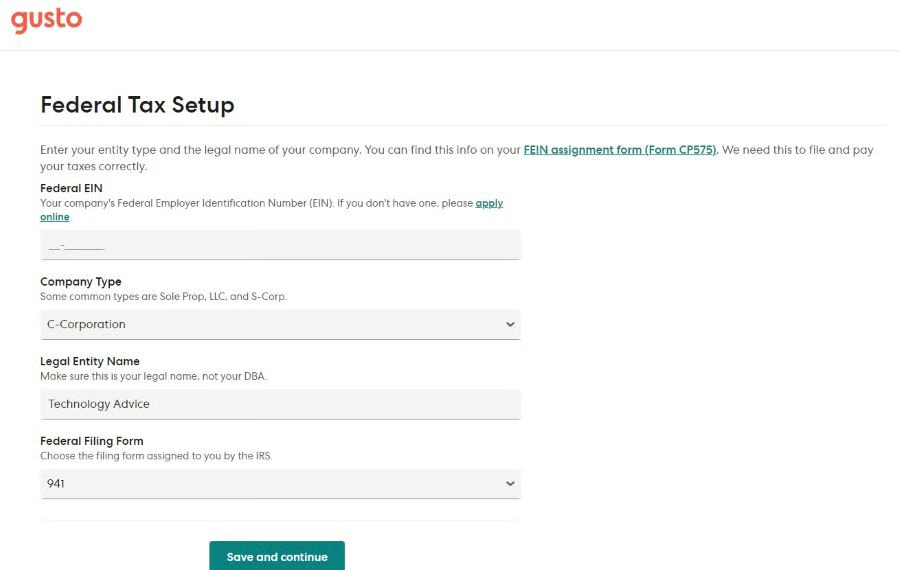
The next step is to add tax information Gusto will need to file your payroll taxes. If you’re unsure about any information Gusto requests, look to the right side of the page for more guidance. You’ll need to know your Employer Identification Number (EIN), entity type (sole proprietorship, partnership, or LLC), and official business name.
If you don’t yet have an EIN, click on the FAQs, and Gusto will give you a link to the IRS page you can visit to apply online. When you’re ready to enter the information Gusto needs, select Tax Setup under Taxes & Compliance in the menu.
There will also be a question about which federal filing form the IRS assigned you, Form 940, Form 941, or Form 944. Form 941 is used to file quarterly tax returns, and Form 944 is used to file them annually.
5. Add Benefits Management
If you are already providing benefits to your employees, you can easily transfer them over, choosing either to let Gusto operate as Broker of Record or by doing it yourself through setting up manual benefits deductions. Depending on your answers, Gusto will ask follow-up questions.
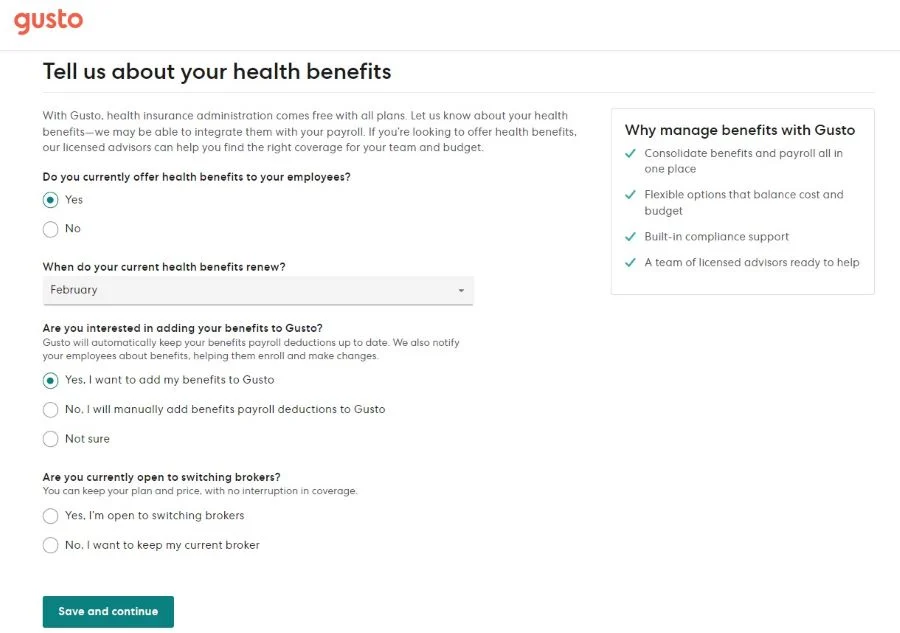
In the setup, Gusto asks how you want to manage benefits. (Source: Gusto) 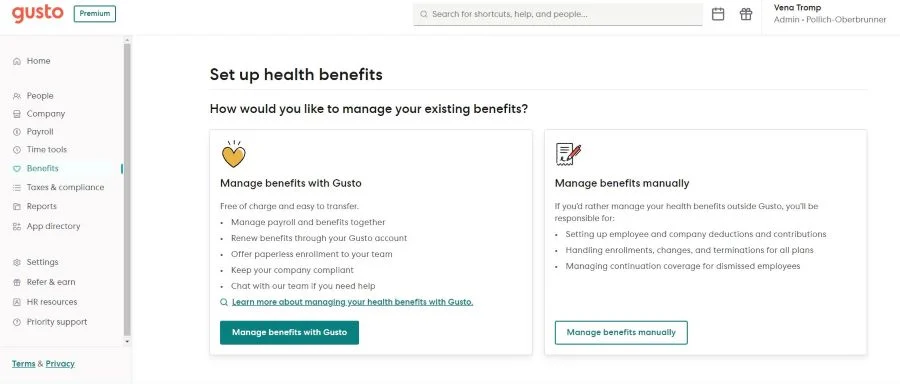
You can choose to let Gusto manage your benefits for free or handle them yourself. (Source: Gusto)


If you do not yet have employee benefits, you can contact Gusto about adding them. However, we recommend that you complete the setup first, so Gusto has all the information it needs to make an accurate quote. You can skip this step and come back to it later.
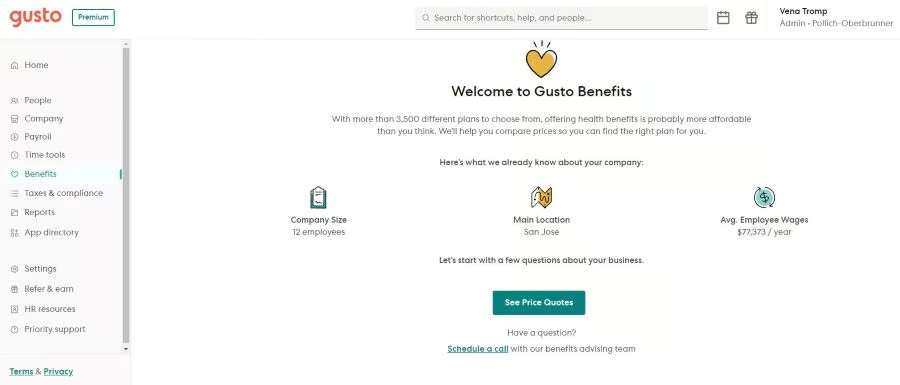
Gusto will use the information you already have loaded in the system to help with quotes, or you can contact a representative for more information. (Source: Gusto) 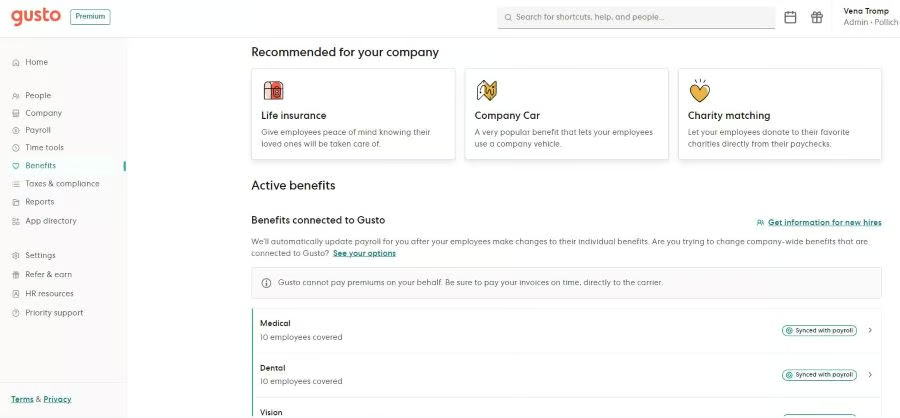
Even after your account is made, you can still add benefits. Gusto will recommend some to make you more competitive. (Source: Gusto)


6. Choose Your Apps
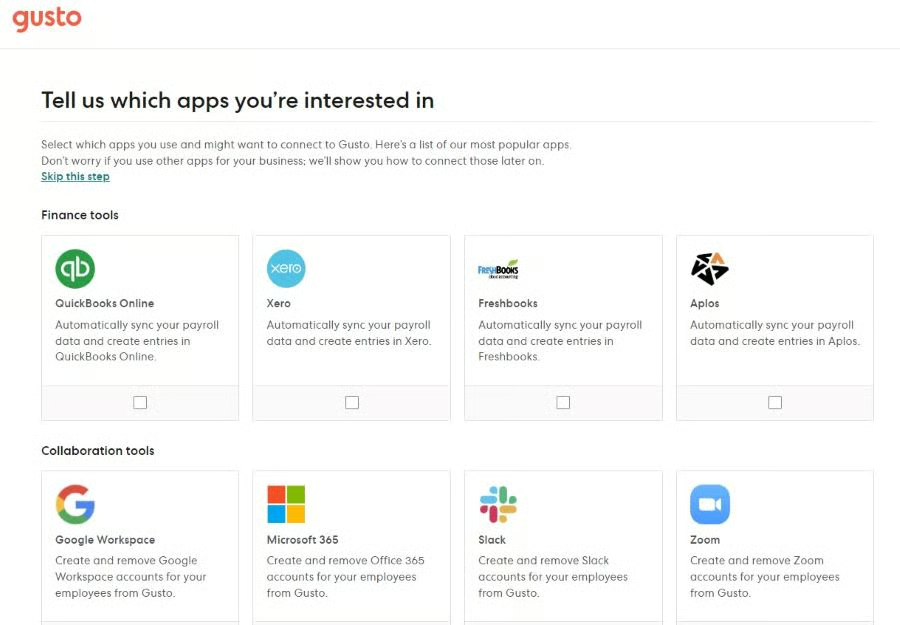
Next, Gusto will ask what third-party applications you want to connect with Gusto. It lists the most popular ones for them. You can also skip this step and add apps later.
7. Choose a Plan
If you’re using a trial to try out Gusto, you’ll be asked to choose a plan at this time. This won’t stop your trial or require you to make any early payments. It’ll just make the transition smoother if you opt to sign up for regular service.
Gusto has a three-screen questionnaire to help determine the best plan and add-ons for you. You can choose the plan or select a different one. Then it will lead you through some options, including how quickly you want direct deposit.
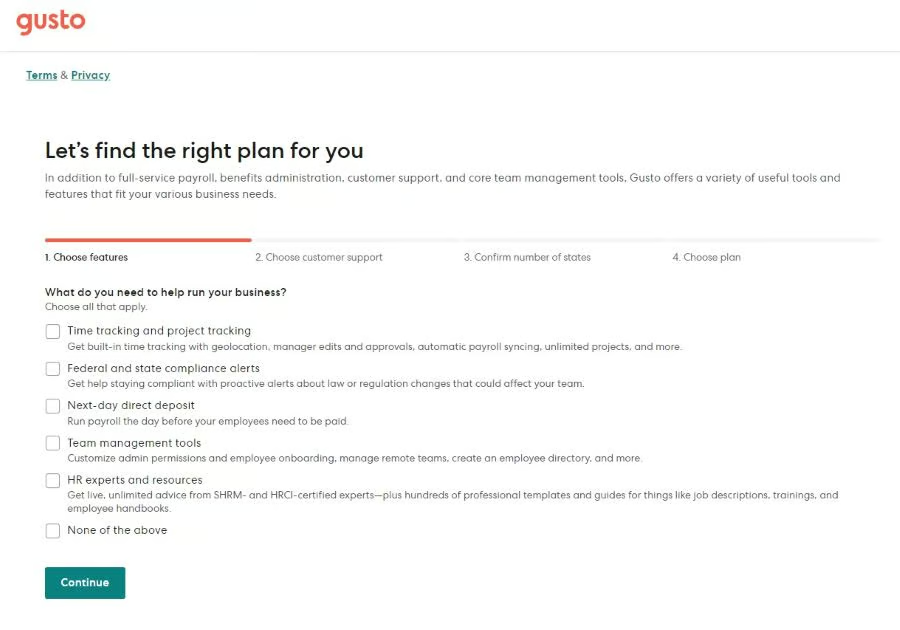
Gusto provides a questionnaire to help you choose a plan. (Source: Gusto) 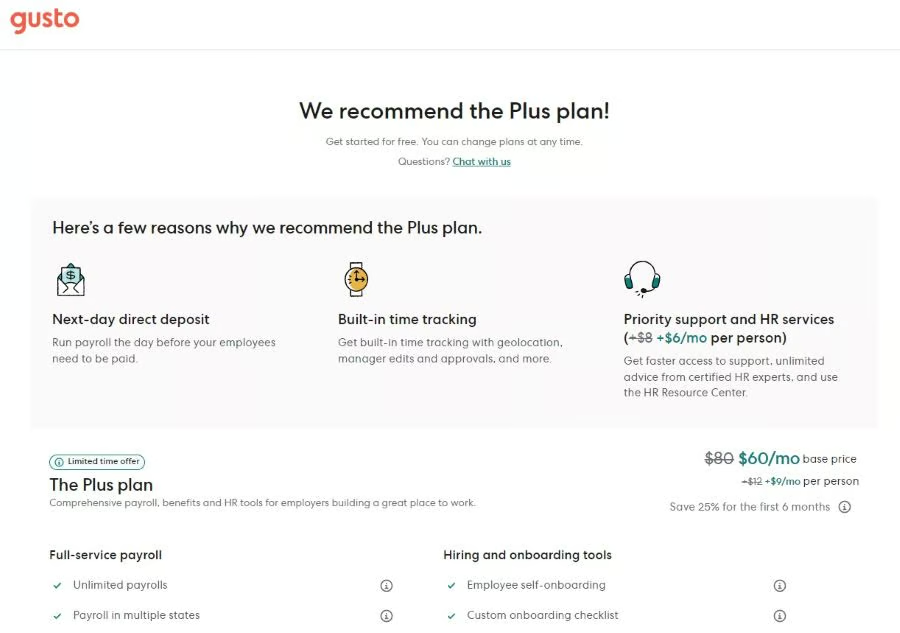
Once you’ve filled out the questions, it suggests a plan with pricing, reasoning, and features. (Source: Gusto) 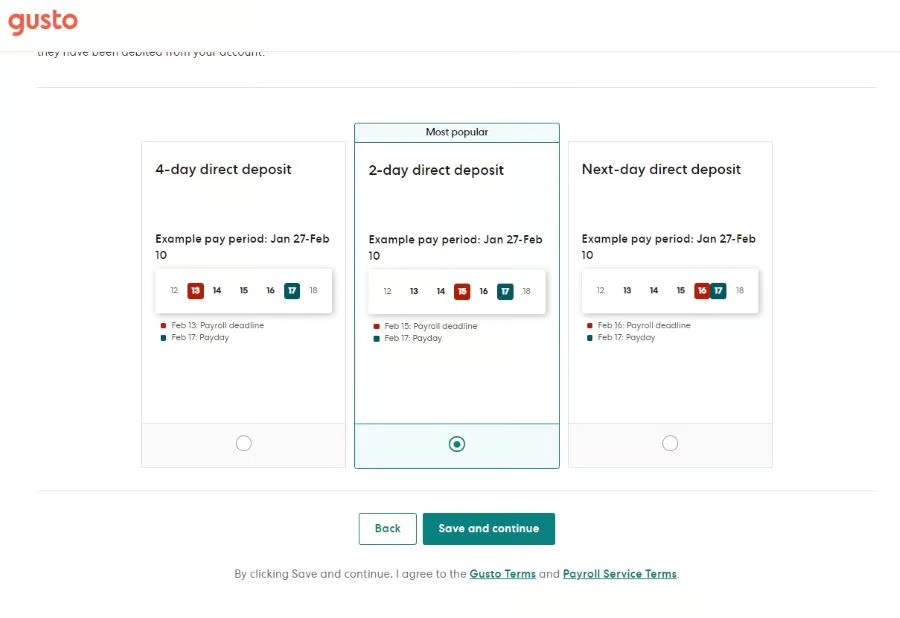
Gusto offers three speeds for direct deposit. You may have to pay for faster speeds. (Source: Gusto)


Setting Up Gusto Payroll
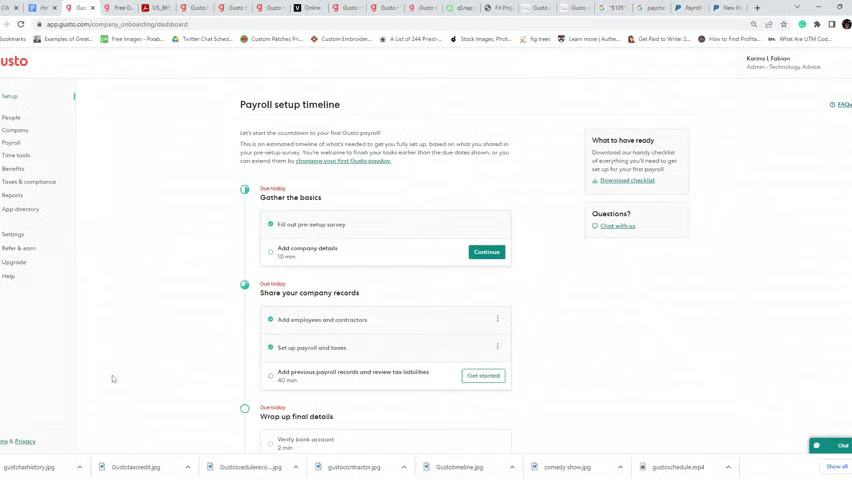
When you’re done with your account setup, you still need to take a few more steps before you can run payroll. You may be asked to do these as part of your setup; otherwise, once you have your account and are in, Gusto will take you through the steps, complete with the approximate time you’ll need and deadlines to make your next payroll.
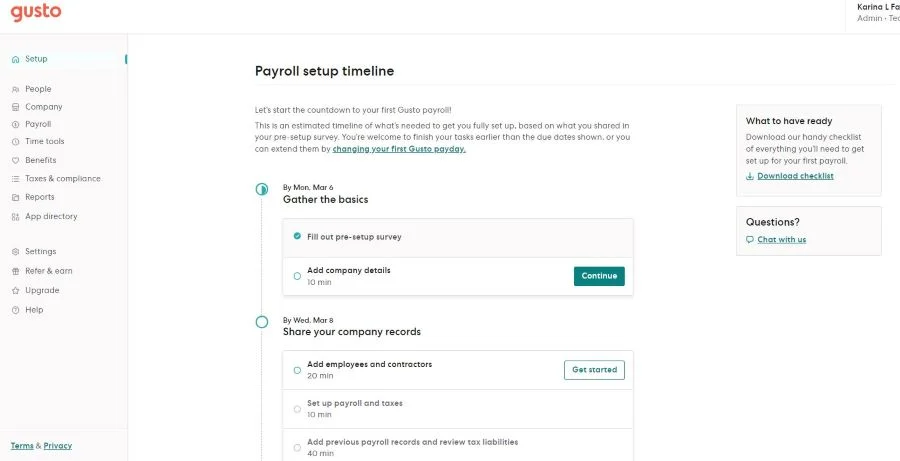
1. Add Employees
Similar to adding your business information above, you’ll gather the employee’s information and add them to the system. You’ll start with some basic information:
- Employee name: Enter the name they provide on their W-4 form, if possible. Gusto will use this information for all employees’ records, including year-end tax forms.
- Start date: Their first day of work at the company.
- Department: You can select from the drop-down menu, adding departments as you go.
- Manager: Add this if the manager is already registered. Otherwise, skip and come back later.
- Risk class code: Only needed if you have an integrated Worker’s Compensation plan
- Work address: This should be the physical address of the business location where the employee will be working. If you only have one location, you’ll use the same address for every employee you enter. If your employee works remotely, click Works from Home. Gusto has a remote guide to help you determine what location to select and how it impacts your business.
- Work state: If your employee works from home, use their home state here.
- Employee email address: Employees will use this email address to log in to their Gusto accounts; they’ll be able to retrieve check stubs, change their personal information, etc.
- Job title (optional): Enter the employee’s job title. If the employee performs the same job as another employee who’s already in your Gusto payroll account, you’ll be able to select it from a drop-down instead of entering it.
- Employee type: You’ll specify whether the employee is paid hourly or salary, how much they’re paid, and how often (weekly, monthly, annually).
- Amount: This is the rate at which your employee is paid. For example, if they are paid $15 per hour, you put in $15.
- Per: This is the pay rate, like per hour or month. You can select per year. Gusto will do the math.
- Default hours (hourly employees only): If your employee works a standard number of hours, you can note this here, so you don’t need to put it in every payroll.
- Special tax exemptions: Occasionally, an employee may have a special tax exemption, like non-resident aliens (visa holders), clergy, family employees, and others. You can mark that here.
- Time Off (optional): If your employees will be accruing paid time off (PTO), you can set up the policy within Gusto, so it’s automatically tracked and up-to-date for each worker. If you want to set up a time-off policy, Gusto gives you a link to do that first, so you can then apply it to the employee. Otherwise, you can come back to this.
There are other options you can add:
- Employment status: This is a drop-down menu offering the choices of full-time, part-time (20-29 hours), part-time (0-20 hours), variable, and seasonal.
- Compensation: Use this to note any special compensation types, like bonuses or tips. You can add a default amount.
- Garnishments and custom deductions: These can be one-time or recurring.
- Reimbursements: You select the type and non-taxable amount if needed.

How to add Contractors to Gusto Payroll
You can use Gusto payroll to pay contractors. You need less information, but you can still attach documents (like contracts) and invite them to enter their own details.
- Contractor type: Individual or business. For individuals, you will be asked if you have filed a new hire report or if Gusto needs to do it for you.
- Department: Like with employees, you can find the department in the drop-down menu and add as needed.
- Start date: This could be the day they sign their contract or the first day of work.
- Wage type: You can choose hourly or a fixed dollar amount.
- Contractor email: Use an email not associated with your company.
Gusto will invite your contractor to put in their information and send them a Form W-9.

Employee Onboarding Documents
When you first start with Gusto payroll, it sends your employee a Form W-4 and a direct deposit authorization form to complete, both common documents for new employees. It also sends a Form I-9 for new employees whose start date hasn’t passed yet. I-9s must be completed in person.
Once you have new hires in the system, Gusto emails them an invitation to set up their account and complete their onboarding tasks. If you offer benefits with Gusto, it automatically invites them to enroll in benefits once their new hire waiting period is complete.
If you have more employees to enter, click Add Another Employee. If not, click I’ve Added All Current Employees.
2. Add Pay Schedule
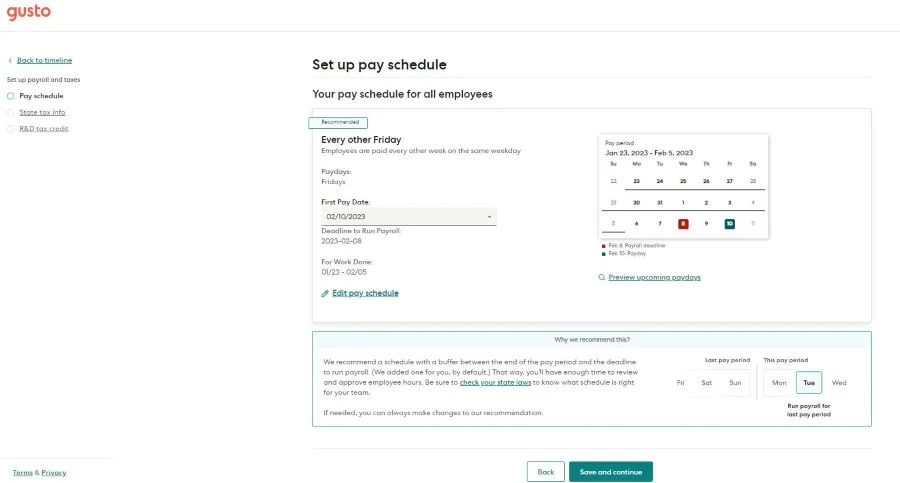
Gusto will next ask you to set up payroll and taxes, starting with a pay schedule. You can also add one later by clicking on Payroll Settings in the menu, then Add New Pay Schedule.
When first setting up, Gusto will suggest a schedule. If you decide to edit it, you’ll be asked the following:
- Pay frequency: Will employees be paid every week, every other week, twice a month, or monthly?
- Pay day: What day of the week or month will your business payday be (if weekly) or days, if twice monthly?
- First pay date: When will you run the first payroll? It must be after the current day (at least two days after, if your bank account is being verified manually).
- For work done during what time period: For what pay period will that first payroll cover? Some employers pay for the current week, while others pay a week or two behind (called paying in arrears).
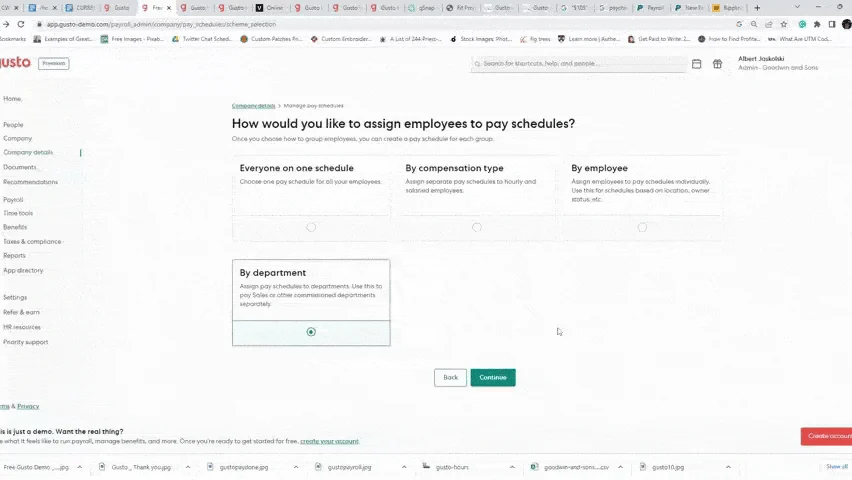
- Assign a schedule (when creating an additional pay schedule): You have the choice of assigning a new schedule by putting everyone on the same schedule, making schedules by compensation type, setting up schedules by employee (although this is done after onboarding is complete), or by department.
Example: Weekly Payroll Paid One Week in Arrears
If your pay period runs from Sunday night at midnight to the next Sunday, you may want to pay one week in arrears starting each Friday. You’ll collect hours for the prior week and pay employees Friday for the prior workweek.
3. Add State Tax Details
Even if you live in a state that doesn’t collect income tax (like Florida or Texas), you’ll still need to enter state tax information. Gusto will need your state unemployment insurance (SUI) rate and State Employer ID number. Some states, like Louisiana, also require a revenue account number. This page layout can vary depending on where your business is located.
You may need to add this tax information after you have set up the account. Go to Tax Setup under Taxes & Compliance in the menu section. Gusto can also register with your state for you if needed.
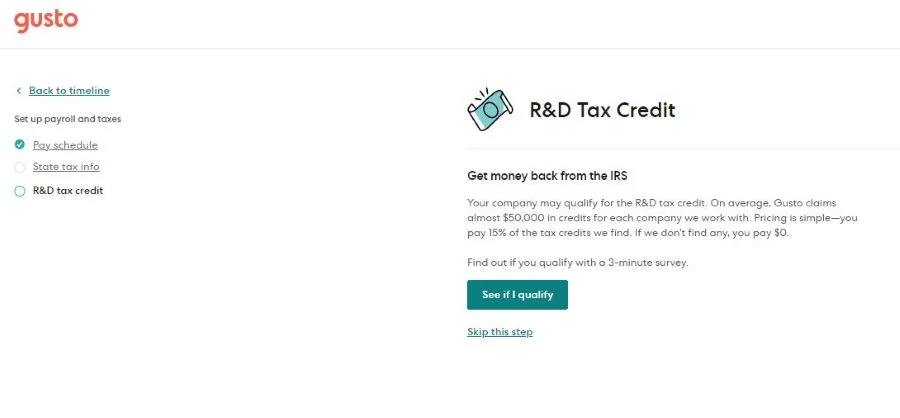
4. Check for R&D Tax Credits
Gusto searches for tax credits to help your business. It says it claims almost $50,000 in credits for each company it works with. As part of your payroll setup, they will ask if you want to see if you qualify for any tax credits. It’s a 3-minute survey that could save you thousands, but you can skip this step.
5. Enter Historical Payroll Information
If you have a contractor-only plan, you will skip this step.
If you are moving to Gusto mid-year, you need to enter all the payroll information for the previous quarters of the calendar year. You should have all the payroll stubs for employees for the current quarter and all the quarterly payroll summaries for each employee for the previous quarters in the current calendar year.
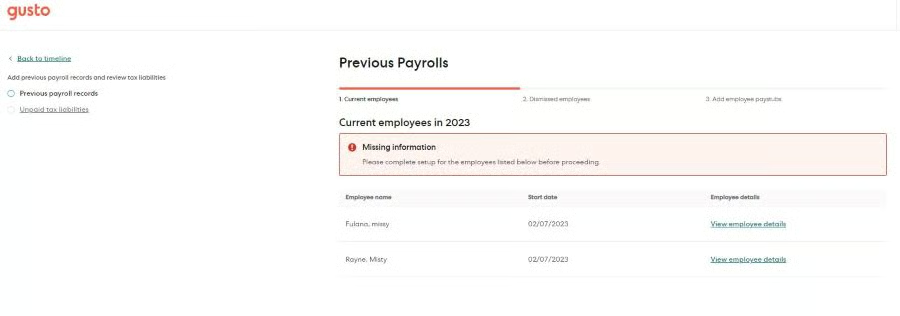
If not prompted in the timeline, click on Previous Payrolls, then Report Previous Payrolls. Make sure your employees are entered and confirm them. Do the same for dismissed employees. Now, you’ll need to add the pay stubs for each employee. Enter the check date—this is the date the employee was paid—ensure applicable taxes are correct, and enter the year-to-date earnings.
6. Enter Unpaid Tax Liabilities From the Current Quarter
If you have a contractor-only plan, you will skip this step.
If you are switching to Gusto payroll midyear, you may have outstanding tax liabilities to federal, state, or local authorities. Gusto can calculate these amounts based on payroll history and lets you determine what you’d like them to pay on your behalf.
Select Unpaid Tax Liabilities unless you are already sent there in the setup. Then choose whether you had a previous provider taking care of your taxes or if you were doing it on your own. Then select the amounts you’d like Gusto to pay from the drop-down menu.
Click Review Previous Tax Liabilities. If you’re not sure they are completely accurate, consult Gusto for guidance. If it looks good, then click on Pay Liabilities.
7. Assign a Company Signatory & Sign Documents
Select “Sign Documents.” With federal and state tax information entered and your pay schedule set up, you’re just about ready to do payroll. Before you can do so, however, you’ll need to provide your electronic signature, giving Gusto permission to run payroll on your behalf (which includes submitting payroll money and documents).
You’ll enter your full name, Social Security number, title, birth date, phone number, and home address. Select “Save and Continue.”
Officially Sign Company Documents
A company signatory is the person at your business who has the authority to approve official forms and future documents sent to the government (like payroll tax forms). This should be an officer, owner, general partner, LLC member, plan administrator, or fiduciary. It could be you as an authorized representative. Once entered, the person can sign the forms electronically.
Gusto will notify you via email of any forms that need signing. Likewise, you can add your e-signature with a single click.
At this point, you’ll need to electronically sign three documents:
- Direct deposit authorization: This gives Gusto permission to debit your bank account for payroll and tax payments. We recommend requiring a direct deposit for all employees to avoid the hassles of paper checks and reliance on snail mail, when possible.
- Authorization Agreement for ACH Debit and Credit Tax: This form gives Gusto permission to specifically debit your account for state taxes. You may or may not see this during your setup.
- Form 8655: Reporting Agent Authorization: The form 8655 authorizes Gusto to pay your federal taxes.
Select Sign Form for each of these documents, enter your name (which will show in cursive font to mimic a signature), check the box that states you agree to electronically sign this form, and select Sign.
8. Add Workers’ Compensation Insurance
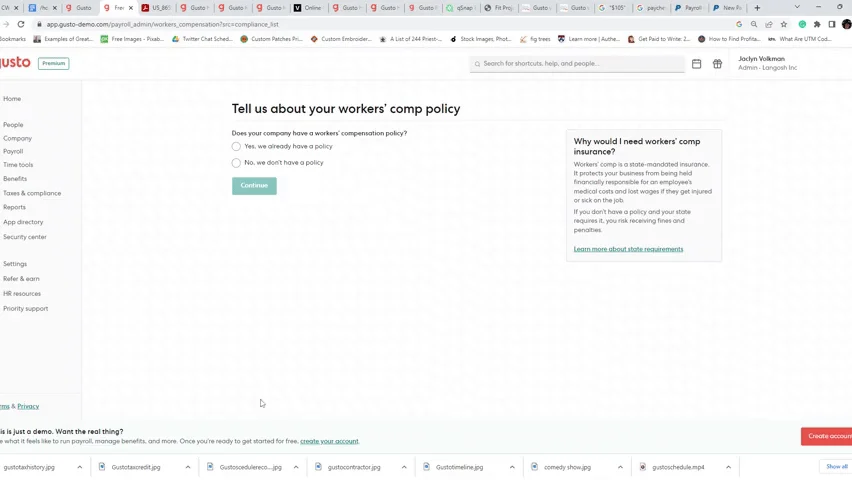
To add worker’s compensation, click on Stay Complaint in the menu under Taxes. Select Add Workers’ Compensation, and tell Gusto whether or not you’re already covered. Most states require it, but Gusto will let you know for sure so that you can comply.
If you have an existing workers’ comp policy, you can enter the details in this section, insurance carrier name, and renewal date. If you don’t have it but need it to comply, you can sign up for workers’ comp insurance directly through Gusto. Its partner, ERGO – NEXT Insurance, can find you several different offers in your area. There’s no additional cost (besides the cost of insurance), and premiums will automatically be calculated and deducted each month from your business bank account.
9. Take a Well-deserved Break
Gusto takes a day or so to review your account and ensure your information is correct. If there are problems, they will contact you to make corrections. Otherwise, in less than two business days, you’ll be ready to run your first payroll.
Running Payroll on Gusto
Once your Gusto payroll setup is complete, running payroll on Gusto only takes a few minutes. Gusto will handle the tax calculations and benefits, and pays via direct deposit, pay card, or check. We’ll show you how to use Gusto payroll for wage earners or contractors.
1. Click on Run Payroll
Gusto will put a reminder on your home page when it’s time to run payroll, or you can run it from the menu. There are separate options for wage vs contract workers.
2. Input the Hours the Employee Worked
You will have a few options to enter the hours the employee worked. You can either manually enter the hours of each pay period based on the employee’s time card, utilize Gusto’s simple timekeeping solution, or use a separate timekeeping system. Gusto has 21 time-tracking integrations, some of which are on our list of best time-tracking software. You will need to integrate the time-tracking app.
Entering by hand
You can edit anyone’s hours and add overtime, bonuses, cash tips, or other earnings by each individual’s name. Gusto will adjust the pay immediately so you can see how much their earnings are. There’s also a place for adding reimbursements. In addition, you can change how you pay.

Enter by CSV
You can enter hours in bulk using a CSV. There’s a CSV template you can download and add payroll information to.
.cls-1{fill:#155E85;fill-rule:evenodd;}
Tip: Gusto recommends adding the unique employee ID from the Gusto system to help ensure accuracy.
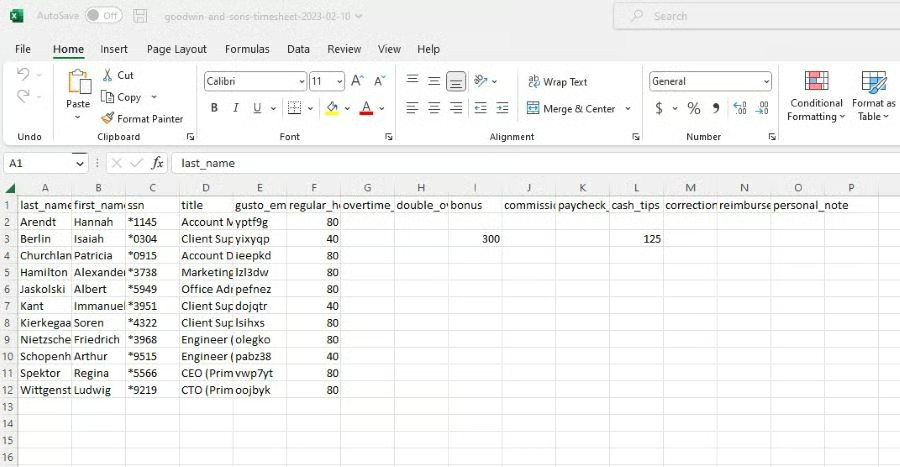
The Gusto CSV template makes it easy to upload payroll in bulk. (Source: Gusto)
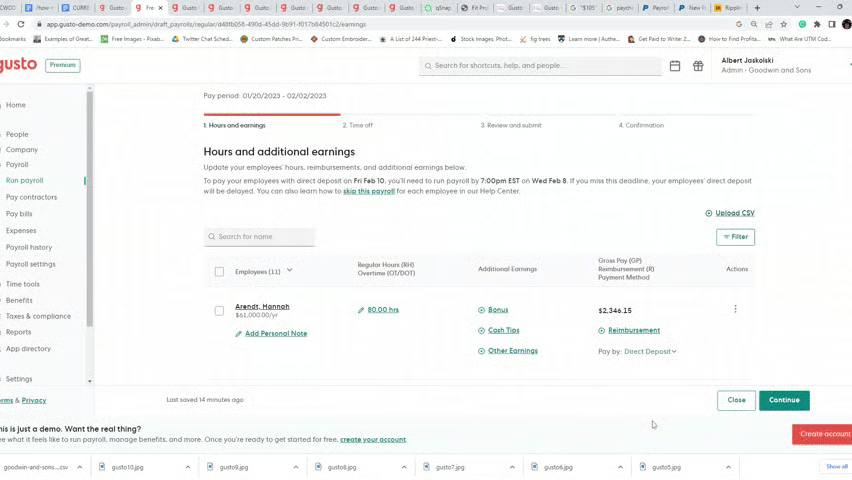
Once you have the spreadsheet ready, simply upload it into the system. (Source: Gusto)
3. Enter Time Off
If you created a time off policy, you can enter any paid time off (PTO) employees took during the pay period. This will ensure their PTO balance is always up-to-date and they get paid accordingly.

4. Review Payroll & Submit
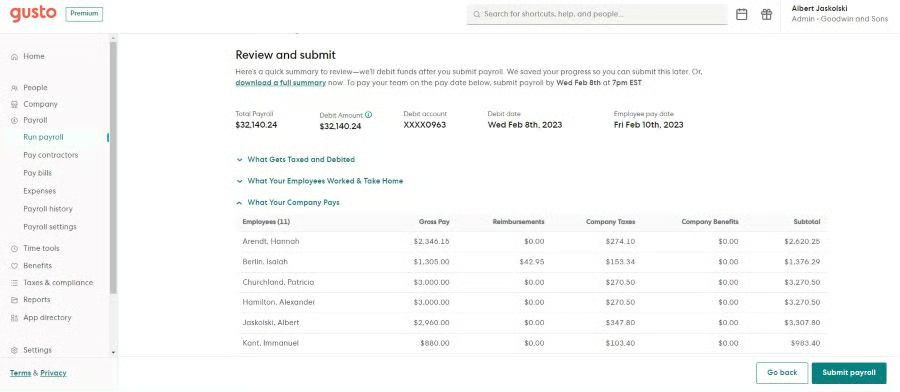
At this point, you’ll be able to do a final review of your payroll transactions. Double-check that your tax and net pay amounts look reasonable. Confirm that you haven’t forgotten anything (like bonuses, tips, or uniform cost deductions) or made any major mistakes (such as keying in an extra zero).
The more payrolls you process, the easier this will become. You can still make adjustments as needed. This also gives you time to see exactly how much money you’ll need in your payroll bank account to pay employees, giving you time to deposit money into that account.
Submit Payroll
When you’re sure payroll is accurate, select Submit Payroll. All employees who are set up for direct deposit will receive their paycheck in one to four business days, depending on how your business account is set up.
If you’re paying any employees by check, Gusto will prompt you to print them now. Be sure you have MICR toner in your printer and blank check stock. This will ensure your employees don’t have any trouble at the bank.
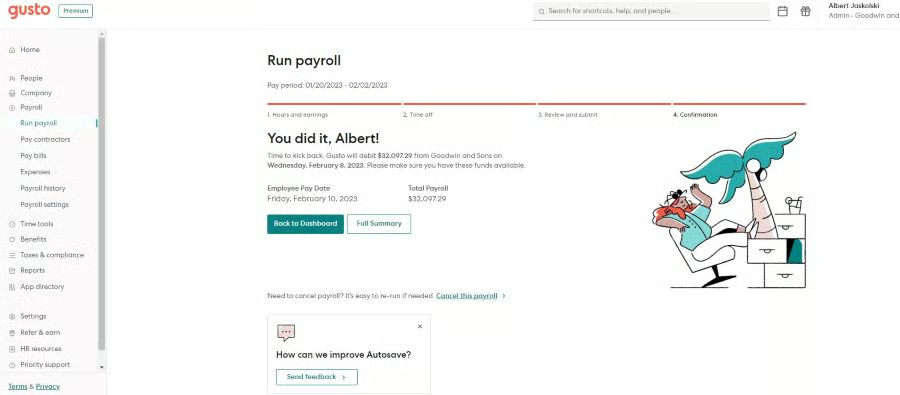
When you finish, Gusto gives you a summary and the date funds will be pulled. (Source: Gusto) 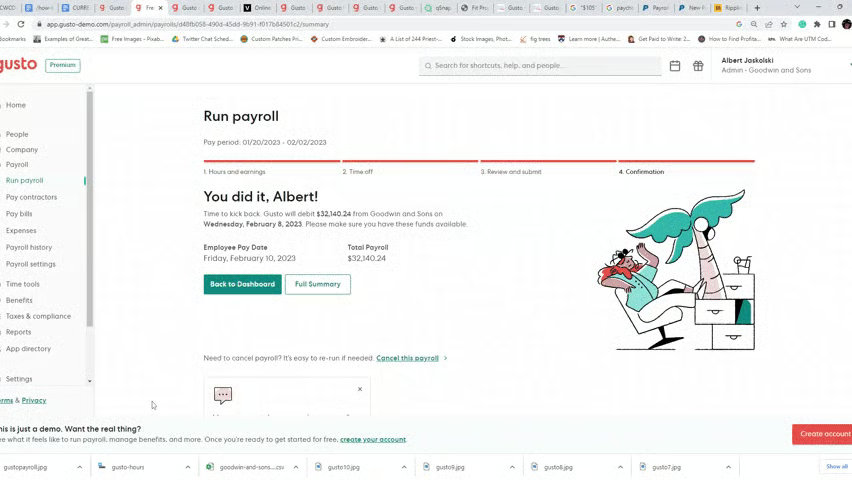
If you need to change payroll and are early, you may be able to cancel it and redo it. (Source: Gusto)


5. How to use Gusto Payroll for Paying Contractors
Gusto has a separate section for paying domestic and international contractors. In the menu, you’ll see the option under Payroll. Click on Pay Contractors to begin.
You have two ways to pay: Fixed Pay and Hourly. Either way, you will click on Enter Payment and fill in the needed information. You also have the option to reimburse expenses.
Congratulations! You just ran your first payroll with one of the best online payroll services in the market. If you’re ready for more, read our tips to get the best payroll training.
Bottom Line
Gusto is a leading payroll software for small businesses because it is quick and straightforward. By following the steps in our Gusto payroll tutorial, you can get your account set up and ready to go in an hour or so. If you have other questions on how Gusto payroll works, its help section provides in-depth answers and tips. If you haven’t already signed up for Gusto’s payroll service, sign up today and get one month free when you run your first payroll. Offer will be applied to your Gusto invoice(s) while all applicable terms and conditions are met or fulfilled.
