OnPay is a full-service payroll solution that lets you manage payroll, including tax filings for wage-earning employees and contractors. At $49 monthly plus $6 per employee monthly it also comes with basic HR functions such as paid time off (PTO) and benefits management. Its clear interface with large, colorful tabs makes it an easy-to-use solution for processing payroll.
In this article, we go over the basic steps of how to set up payroll with OnPay. It offers a free trial for 30 days with no credit card required.
If you want to set up your payroll account with more than just screenshots as support, follow along with our video on how to set up payroll with OnPay.
Please note: Depending on where you are in the process and how you initially access OnPay’s software, some of the screenshots we provide to help guide you may differ from what you actually see. Overall, the process should be the same and will ask for the same information.
- Step 1: Create Your Account
- Step 2: Add Company Information
- Step 3: Enter Bank Account Information
- Step 4: Create a Pay Schedule
- Step 5: Create Worksites
- Step 6: Verify Bank Account Information
- Step 7: Add Employees
- Step 8: Complete Federal & State Tax Details
- Step 9: Apply for Direct Deposit
- Step 10: Add Personnel Items
- Step 11: Add Other Payroll Items
- Bottom Line
Step 1: Create Your Account
Getting started is easy. Sign up for an account by completing OnPay’s “Get Started” form. There’s only one plan, and the first month is free. OnPay provides an account setup information sheet, which is a fillable PDF form, so you can gather all the information you need before starting and complete your account registration quickly.

New users can use OnPay free for one month. (Source: OnPay)
After you have submitted the form online, OnPay will send you a welcome email containing a link to verify your email address. You should expect to receive this message within two minutes after having signed up for an account. If you don’t see it in your inbox, check your spam folder. If it isn’t there, contact OnPay for assistance either through phone (877-328-6505) or via email (hello@onpay.com).
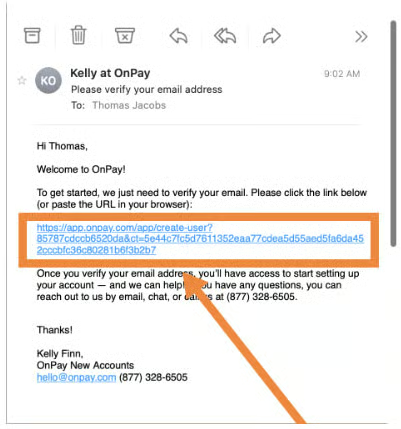
If you fail to click the email validation link within 48 hours of receiving OnPay’s welcome email, you have to sign up again. (Source: OnPay)
OnPay will also ask you to provide a password and a mobile phone number where it can send a one-time security code. For added security, you can choose to have its system forward security codes to your identified mobile phone number every time you log in to your OnPay account.
Step 2: Add Company Information
Once you’ve verified your email and added your password, you’ll be sent a link to Pending Enrollments. Click the “Complete Setup” button beside your company name. Then, it will lead you through the information you need to add, such as:
- Employer Identification Number (EIN)
- Type of business
- First check date (the trial begins as of the first check date)
- Name, Social Security number (SSN), and address of the owner or officer who can sign legal documents for the company
- Work locations (address of work site)
- Form 8655 to allow OnPay to report and file payroll taxes on your behalf
- Pay schedule or frequency (e.g., biweekly, weekly, semimonthly, or monthly)
- Estimated number of workers and payroll amount per pay period
- Bank account and routing numbers; OnPay will verify the account with token credit and debit transactions you’ll need to verify
To complete the owner information section and reporting agent authorization (Form 8655), here are some tips.
Add Owner or Officer Information
You’ll need to enter basic information about the owner or at least one officer who represents the company. OnPay requires you to provide an email address, Social Security number, and address. If you want to add more than one person, you can select the plus sign on the page to create another record. When you’re done adding owners and/or officers, select “Continue.”
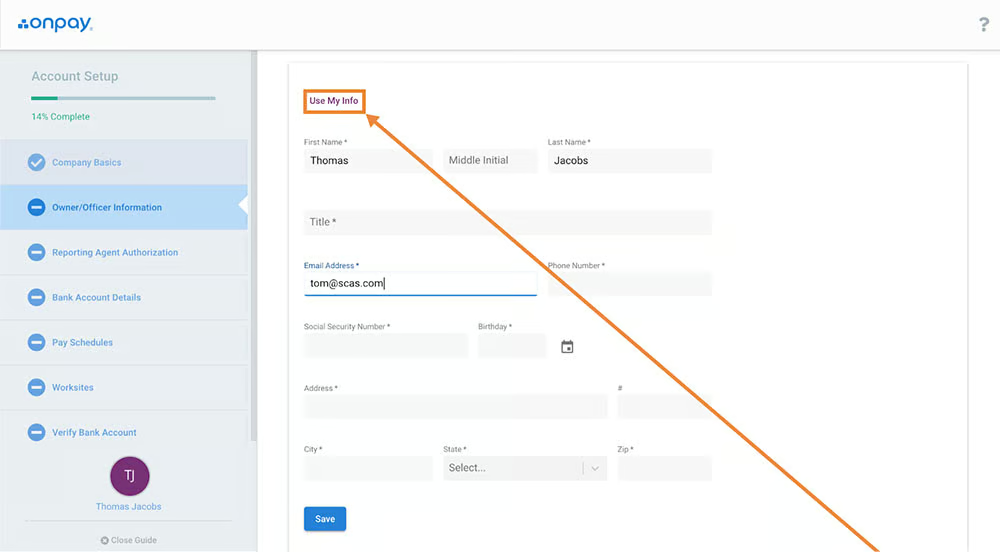
If you are the owner, click the “Use My Info” button at the top of OnPay’s Owner/Officer Information page so you don’t have to re-input your name and email. (Source: OnPay)
Reporting Agent Authorization
Now, you’re ready to review Form 8655, which essentially gives OnPay authorization to file and pay your payroll taxes. The system automatically fills the form with your company’s information, so all you have to do is select your title and click “Sign.” You also have the option to skip this section and save it for later.
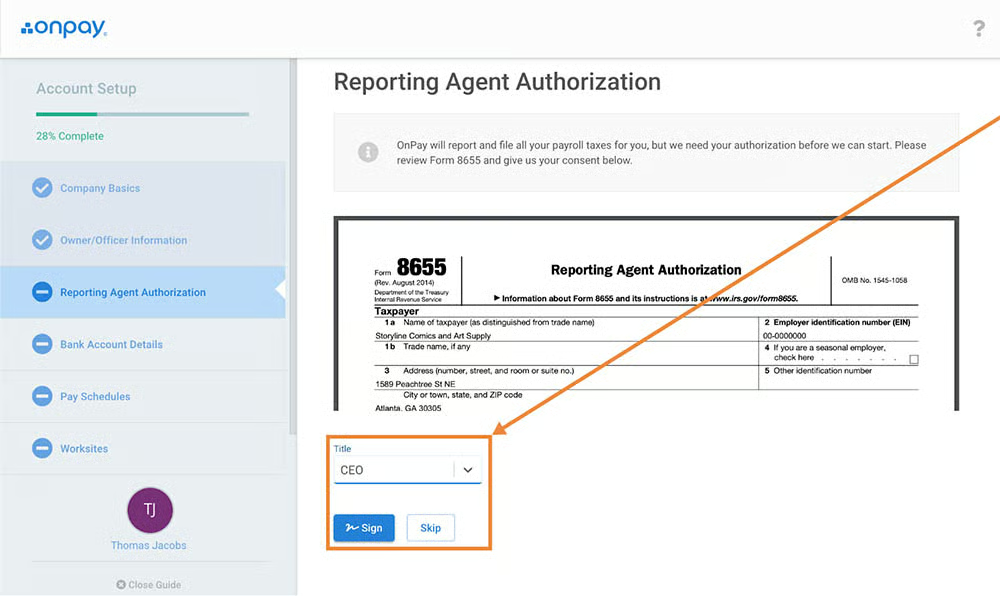
To electronically sign OnPay’s Form 8655, select your position title from the drop-down button at the end of the document preview and click the Sign button. (Source: OnPay)
Step 3: Enter Bank Account Information
OnPay needs your bank routing number and account number. When you enter your routing number, your bank name should populate. If it doesn’t, double-check that you entered it correctly. Click “Save and Continue” when you’re done, and you’ll see a message that states OnPay is provisioning your account. Once done, select “Continue.”
Step 4: Create a Pay Schedule
You can name each schedule, which comes in handy if you’re paying different groups of employees on contrasting pay cycles. There are four pay schedules to choose from—weekly, biweekly, semimonthly, and monthly. A specific number of pay period selections will populate, depending on which option you select. For bimonthly pay schedules, you’ll see two periods that need detail. You’ll enter the starting and ending dates of the period along with the pay date. Select “Create” when you’re done and then, “Continue.”

You can view the pay schedule created in OnPay’s Pay Period section, which shows upcoming pay periods, check creation dates, and pay run deadlines. (Source: OnPay)
Note that future pay periods and pay run deadlines will be based on the information inputted. You can choose to add only one pay period during account setup, and then go back to this section to create new ones. You can also edit existing pay schedules at any time. However, if you want to remove a pay schedule, you have to email OnPay at hello@onpay.com to delete it for you.
Step 5: Create Worksites
Although you’ve already entered the company address, OnPay wants detail on the physical location of your worksite. This may be the same address, but you can re-enter it. You’ll need to name the worksite, i.e., Main Office or Dallas Office. Select “Create” when you’re done. You’ll have the option to select “Add Another” or you can click “Continue” if you’re done.
Step 6: Verify Bank Account Information
OnPay uses a company called Plaid to verify your account. You’ll need to enter your bank name again (it doesn’t pull from the previous entry), and the bank’s online banking login page will populate. Once you enter your credentials (username and password) and select the account you’re planning to use for payroll, Plaid will be able to verify it. When you’re done on this page, you’ll be taken to OnPay’s dashboard where you can enter employee information.
You can also opt to verify your account manually—if, for instance, you don’t use online banking. Just close the Plaid verification window that will pop up on screen. Note that this process may take one to two business days to complete. Watch out for a credit transaction and two small offsetting debits in your enrolled bank account. Also, take note of the two debit amounts, log in to OnPay, go to “Company” and scroll down to the “Company Bank Account” section. Under “Verification Required,” input the debit amounts and click “Verify Amount.”

Your manual bank account verification is complete once OnPay (via Plaid) confirms the debit amounts. (Source: OnPay)
Step 7: Add Employees
OnPay allows you to add both employees and contractors to your account for payroll. To add an employee yourself, go to “Workers” and select “Employees.” Then, you’ll click “Hire Workers” and select “Add an employee.” You can also add a contractor on this page, if needed.
It will lead you through the steps of providing basic information, withholding details, banking data, and personal information. Here are some of the contractor or employee data that you’ll need.
- Legal name/business name
- Tax classification
- Social Security numbers (SSNs) or Employer ID numbers (EINs)
- Date of birth
- Contact information
- Home address
- Emergency contact (optional)
- Pay rates
- Bank information (for direct deposit)
Once you’re done inputting all the required details, click the “Continue” button. If you’re unable to complete the process, OnPay automatically captures workers with incomplete employee enrollment setups. Simply go back to the “Add an employee” option, and you’ll see a list of the affected workers under the “Continue an employee enrollment” section.
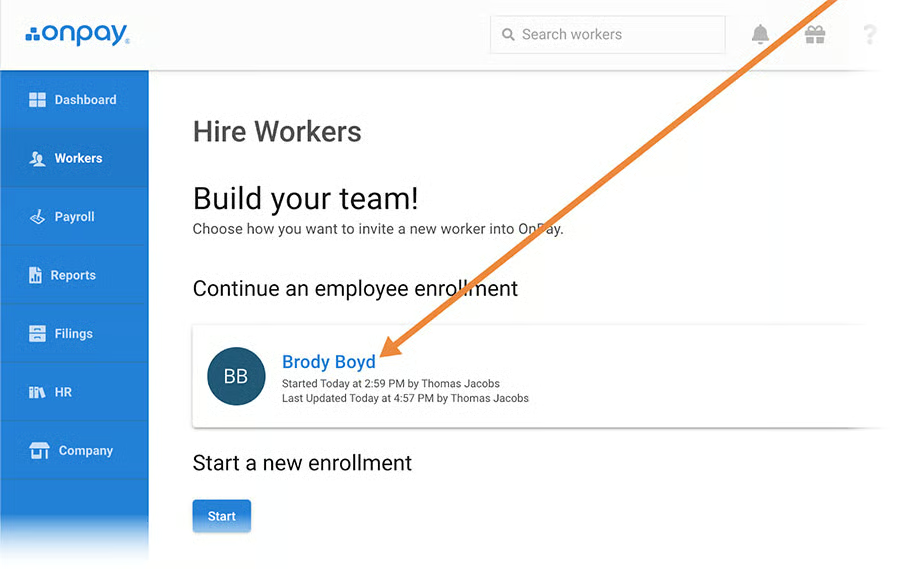
Click the worker’s name under OnPay’s “Continue an employee enrollment” section and complete the details. (Source: OnPay)
If you’d prefer to have the OnPay representative enter your employees for you, they absolutely can. You would simply need to provide them with this same information and they can add all of your employees to your OnPay account for you. You can also invite employees to load this information themselves by clicking “Invite Employee” after you’ve entered the basic information of name and job details.
Step 8: Complete Federal & State Tax Details
You need a federal employer identification number (FEIN) and a state tax ID (STI) for each state you file in. Enter these through the Settings tab in the left sidebar. Click “Company” and select “Payroll Taxes.” Then, input the required details and click “Continue” when you’re done entering tax information.
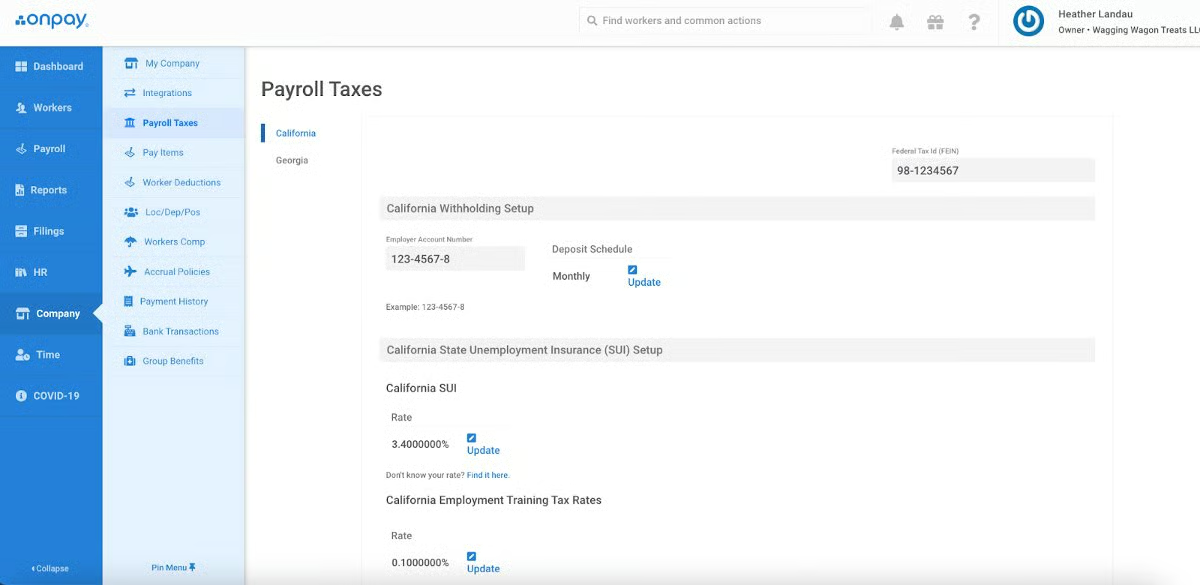
With OnPay, you can add your FEIN and STI on a single page. (Source: OnPay)
State tax laws vary. OnPay’s help section has a state map with links for registering with state agencies and getting the information it needs to file on your behalf.
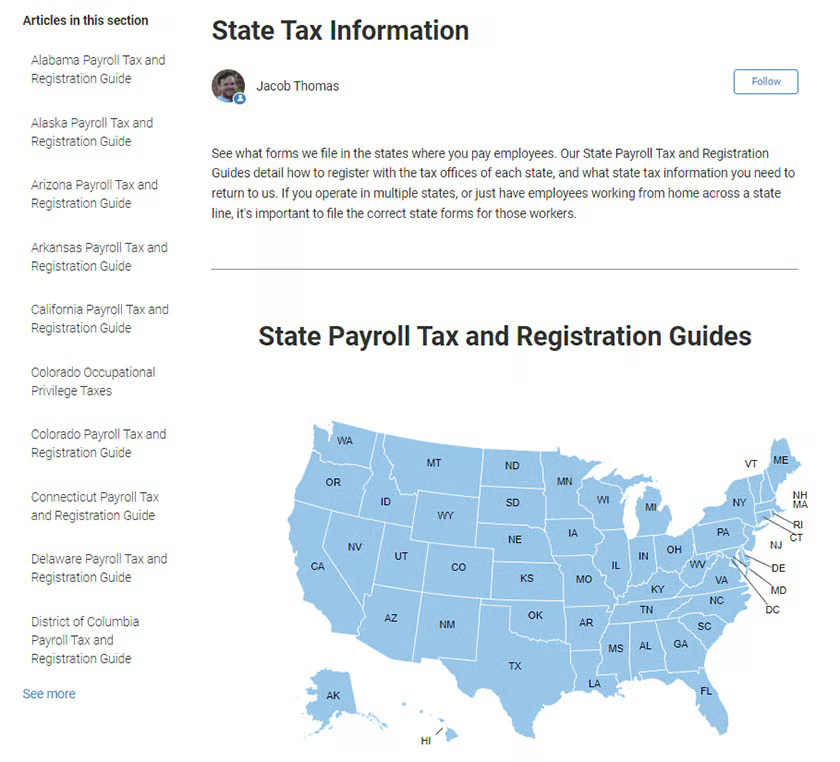
OnPay’s help section can lead you to information about state tax regulations. (Source: OnPay)
Step 9: Apply for Direct Deposit
You can apply for direct deposit when you put in your account information. Simply reply to the ACH verification email you receive during your enrollment. After that, the OnPay ACH team will run a risk assessment on the company to check the likelihood that you will have the liquid capital to cover the direct deposit withdrawals. OnPay’s risk assessment will also determine whether your company is eligible for two-day or four-day direct deposits.
To enable employees to use direct deposit, go to “Workers” in the left sidebar. Select the employee profile and click “Bank Accounts.” Under the “Enable Direct Deposit?” section, select “Enabled.” Then, manually input the routing and bank account numbers provided by the employee. Depending on the worker’s bank account type, toggle the “Savings Account?” option on or off. Select “Add Account” once done.
Note that you have to do this for all employees. If you lack time or don’t have a dedicated system administrator to handle this, you may invite your workers to enter the required information directly into their OnPay profiles. The system even allows employees to split checks between multiple accounts by percentage, dollar amount, or a mix of the two.
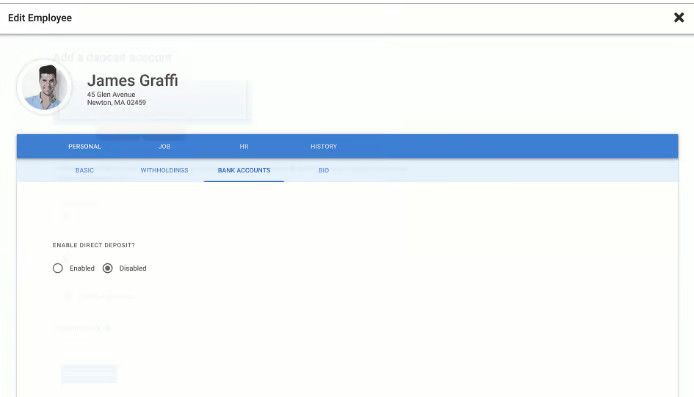
If you don’t see the option to enable direct deposit, contact OnPay, as your company account may not have been set up to use this service. (Source: OnPay)
Step 10: Add Personnel Items
OnPay’s “Personnel Items” option allows you to upload and store documents in its system, such as employee onboarding forms. While it has a default personnel items checklist, you can create your own.
Let’s say you are manually onboarding employees, click the “Workers” button from the left sidebar, and select the employee. Go to the Personal Items page and select “Checklist.” This folder can contain onboarding checklists, forms (like W-4 and I-9), handbook sign-off, and other acknowledgments. Upload these documents from your computer. Click “Add Task” if you need to send a request to the employee to sign the forms electronically.
Alternatively, you can create documents in the HR section of the program. This includes smart documents that can have signatures and acknowledgments.
Step 11: Add Other Payroll Items
Before running payroll with OnPay, you will need to set up items that will impact pay runs. This includes workers’ compensation, payroll deductions, and PTO accrual policies.
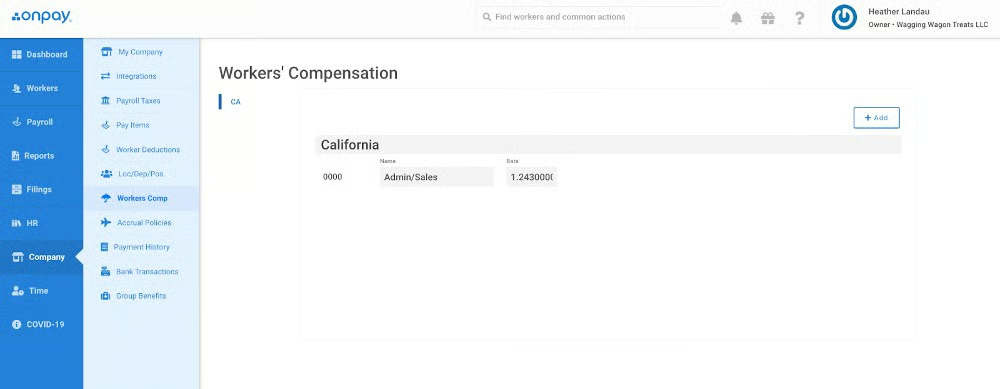
OnPay’s partnership with Next allows it to provide pay-as-you-go workers’ comp plans. (Source: OnPay)
The workers’ comp section under the “Company” tab in the left sidebar lets you add or modify workers’ comp codes for any state where you have employees. You can also give these a name for easier identification. To add a code, click the “Add” button and fill in the state, the name you choose to define the compensation, the class code, and rate. Then, go to the individual employee’s “Pay” section under “Workers” and add the state and class from the drop-down list.
Bottom Line
Setting up payroll in OnPay is simple and straightforward, and gets you ready to process payroll more easily. Also, these steps can be a good way to get payroll training for your team and help them understand how to navigate the OnPay system.
Consider partnering with OnPay for automated payroll processing and benefits in all 50 states. Sign up for a free trial today.