You should consider upgrading from QuickBooks Self-Employed to QuickBooks Online if you have transitioned from a freelancer or a contractor to a small business, or you just want the additional features of QuickBooks Online.
Today, we’ll show you how to upgrade from QuickBooks Self-Employed to QuickBooks Online using the automatic transfer wizard. After the conversion, you’ll use the same email and password for QuickBooks Online as for QuickBooks Self-Employed.
Tip:
You will no longer have access to your QuickBooks Self-Employed account after running the conversion wizard, so make sure to prepare all your items for the migration to QuickBooks Online. If you’re new to QuickBooks Online, learn more about it in our QuickBooks Online review.
Before you upgrade to QuickBooks Online, our overall best small business accounting software, take time to organize your QuickBooks Self-Employed account and prepare all your items and transactions for migration. Here are some tips and precautionary measures that you need to follow for a smooth transition:
Most of the items and transactions in Self-Employed will be transferred to QuickBooks Online, including customers, invoices, bank and credit card connections, and business and personal transactions. However, you may encounter issues migrating some items, including:
- Vendors: QuickBooks Self-Employed does not have a feature to assign a vendor to a transaction whereas, with QuickBooks Online, you must set up a vendor to assign to a transaction. During the transfer process, QuickBooks Online automatically creates the vendor list based on the expense descriptions in QuickBooks Self-Employed. As a result, imported vendor names in QuickBooks Online are mostly inaccurate.
- Product and service items: Based on our experience, product and service items don’t always successfully transfer to QuickBooks Online. You may need to compile a list of your products and services as you might need to recreate them in QuickBooks Online later. There’s no option to export products and services from QuickBooks Self-Employed.
When migrating from QuickBooks Self-Employed to QuickBooks Online, only reviewed transactions are transferred. If you have any unreviewed transactions, you should review them before the migration. One way to check if you have unreviewed transactions is to use the Unreviewed filter in the Transactions tab in QuickBooks Self-Employed.
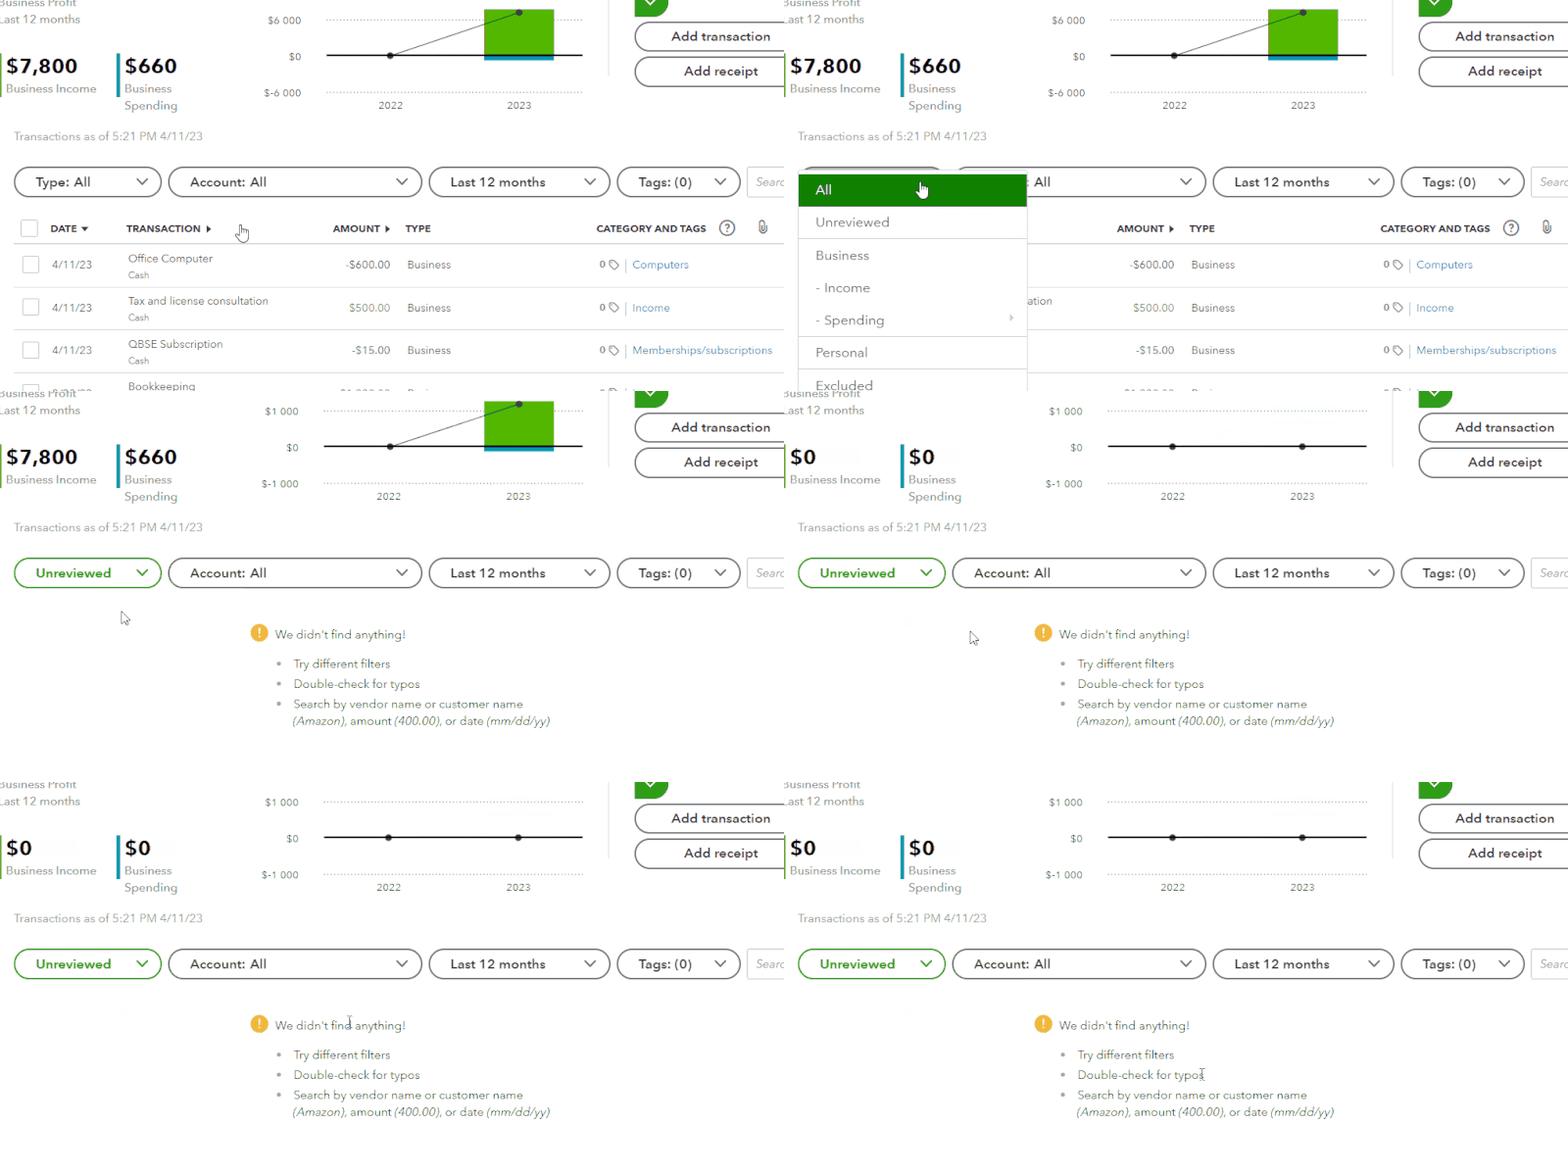
Filtering unreviewed transactions in QuickBooks Self-Employed
After the migration process, all your items and transactions in QuickBooks Self-Employed will disappear, including your reports. We recommend that you print all available reports for reference purposes and as a physical backup of your data in case something goes wrong during the migration process.
If the conversion wizard fails, you may lose access to your transactions forever. Therefore, we recommend exporting all your transactions in a comma-separated values (CSV) file as a backup copy, which will come in handy if you will later need to import transactions in QuickBooks Online manually.
To download your transactions, click on the download button in the upper right corner of the Transactions screen. Transactions will be downloaded in a CSV format. Make sure to remember where you save your file for easy access if needed.
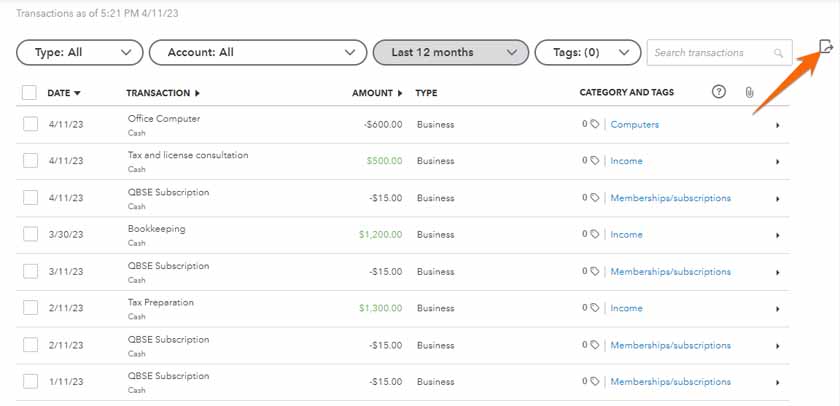
Export transactions from QuickBooks Self-Employed
To get started, click on the cogwheel in the upper right corner of your QuickBooks Self Employed dashboard, and select Upgrade under PROFILE, as shown below.
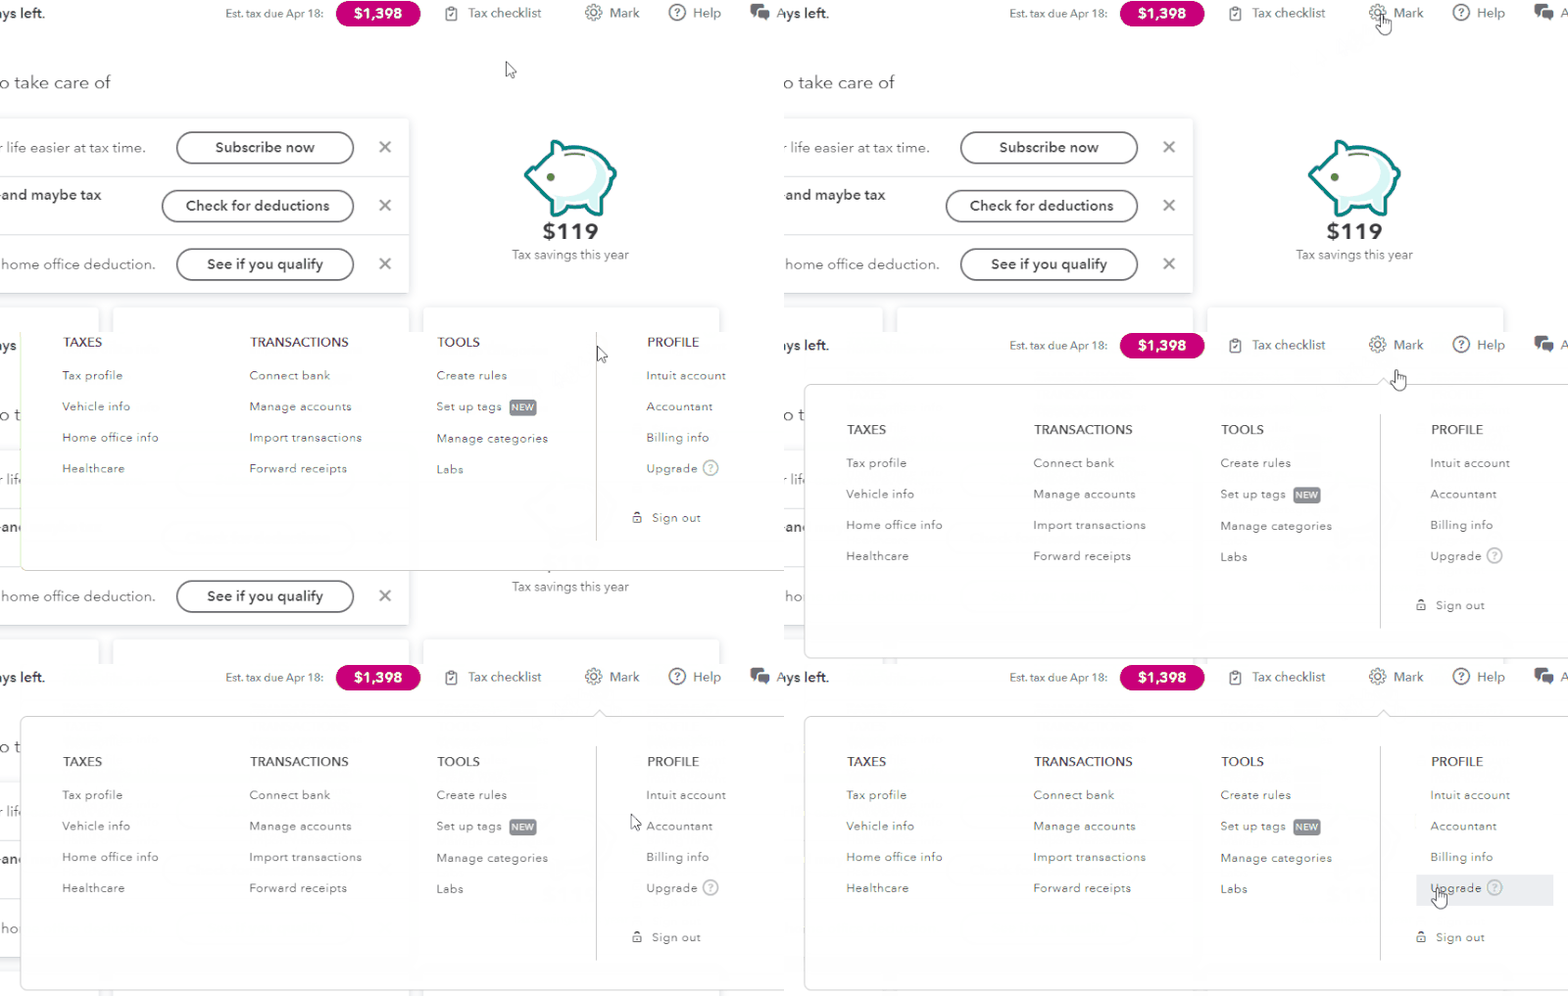
Click Upgrade to switch from QuickBooks Self-Employed to QuickBooks Online
Mark, a self-employed bookkeeper, wants to convert his QuickBooks Self-Employed account to QuickBooks Online, as he needs more advanced features to keep up with bookkeeping. He wishes to import several items and transactions in his QuickBooks Self-Employed, including the following:
- Transactions: Mark has set up three accounts in QuickBooks Self-Employed to organize his transactions: bank account, credit card account, and cash account. He wants to import these accounts and all transactions associated with each account to QuickBooks Online.
- Invoices: As shown in the screenshot below, Mark has two invoices, one for Jane Doe and one for John Buck.
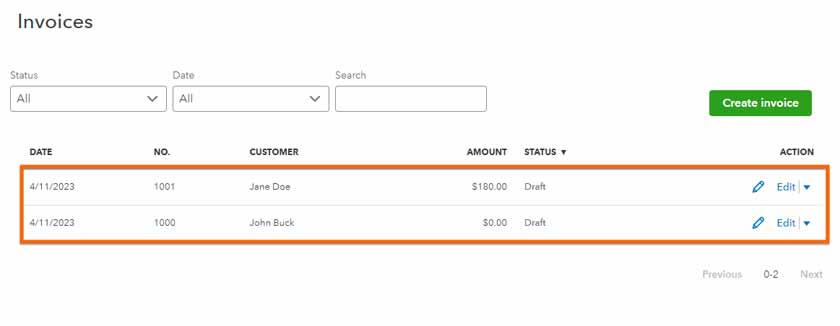
Invoices to be imported to QuickBooks Online
- Customers: Mark can’t directly see his customer list in QuickBooks Self-Employed, but whenever he creates an invoice and clicks on the customer field, QuickBooks will show him the list of customers he has. Based on the screenshot below, Mark has only two customers: John Buck and Jane Doe.
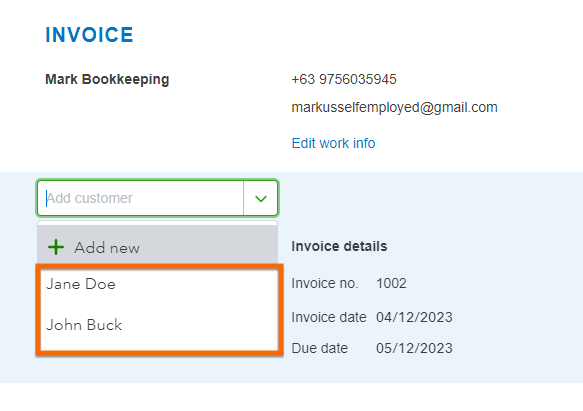
Customers to be imported to QuickBooks Online
- Product and service items: Just like customers, there’s no way to manage product and service items directly in QuickBooks Self-Employed. However, Mark can easily see what items he has added in QuickBooks Self-Employed in the invoice creation form by clicking on the Add Work field. In the example below, we can see that Mark has four service items: hours, services, bookkeeping, and tax Preparation.
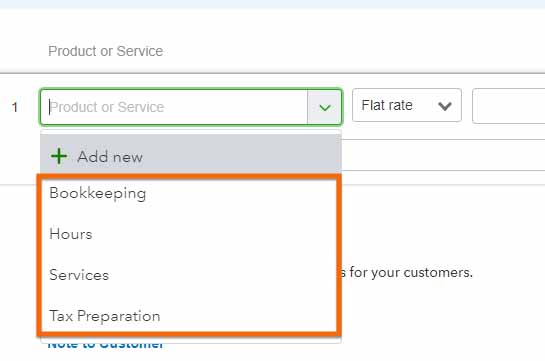
Service items to be imported to QuickBooks Online
Now, let’s upgrade to QuickBooks Online and see if we can transfer these items and transactions successfully.
After you click Upgrade on your QuickBooks Self Employed dashboard, QuickBooks will take you to a screen where you can select which plan to switch to, whether it’s Simple Start, Essentials, or Plus. If you’re unsure which plan to upgrade to, Simple Start, the entry-level plan, can be a good option. Later on, if you find that you need more advanced features or capabilities, you can upgrade to one of the other QuickBooks Online plans easily. Note that you can’t automatically upgrade QuickBooks Self-Employed to QuickBooks Online Advanced.
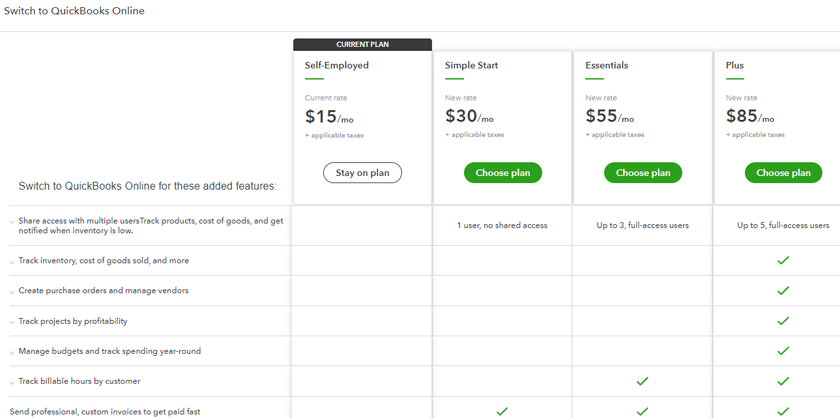
Select your QuickBooks Online plan
To help you decide which version of QuickBooks Online is right for you, check out our QuickBooks Online comparison guide.
QuickBooks Self-Employed will display a series of on-screen instructions to complete the migration process. On the first screen, QuickBooks Self-Employed will provide a quick overview of what is changing in your plan. Click Sounds Good to continue as shown below.
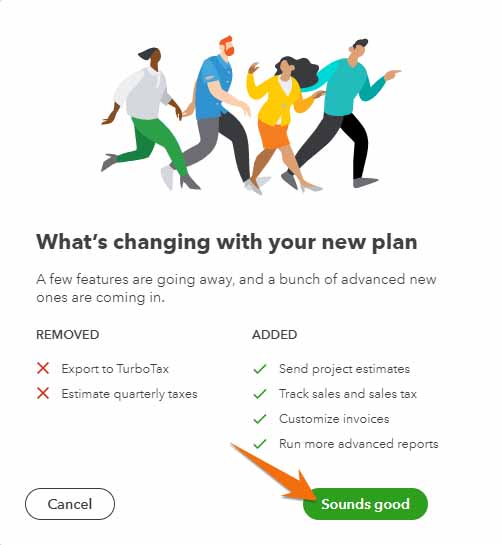
A brief overview of what will change in your plan
Follow the on-screen steps until you receive a confirmation indicating that you’re all set to move to QuickBooks Online. Click on To QuickBooks Online to proceed.
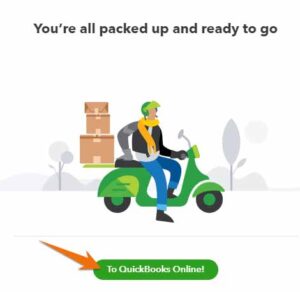
You’re ready to move to QuickBooks Online
After the conversion, you should be taken to QuickBooks Online automatically, where you’ll have to answer a series of questions to set up your company and customize the software to your specific business needs. This can save you time by making it easier to find the features and tools that are most relevant to your business. To help you learn the basics of QuickBooks, including how to set up your company, we compiled a series of free QuickBooks Online tutorials.
Tip:
We’ve experienced instances where the wizard will not take you to the new QuickBooks Online company automatically. If this occurs, log out and log back in, and you’ll be taken to QuickBooks Online.
Next, verify whether all your items and transactions in QuickBooks Self-Employed successfully transferred over to QuickBooks Online. Based on our sample scenario, let’s see if we are able to migrate successfully all of Mark’s items and transactions from QuickBooks Self-Employed to QuickBooks Online.
To check if transactions were successfully imported to QuickBooks Online, select Bookkeeping or Accounting on the left menu panel and click on Chart of Accounts. QuickBooks will then display a message saying, “Take a peek under the hood.” Click See your Chart of Accounts to continue.
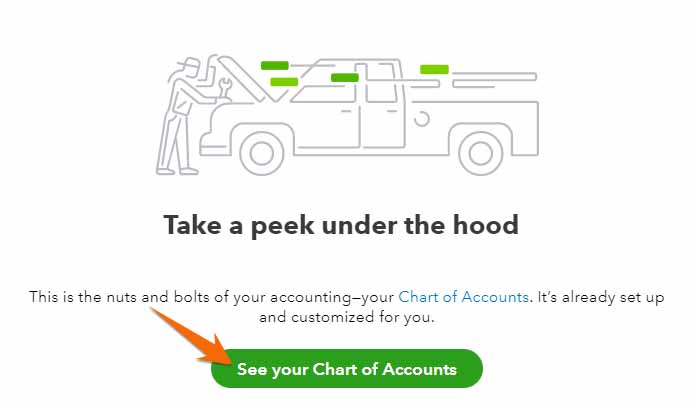
Click See your Chart of Accounts to view your transactions in QuickBooks Online
Tip:
While it’s safe to view your Chart of Accounts, we don’t recommend making any changes directly within it. Instead of editing transactions in the chart of accounts, it is recommended to make the necessary changes within the input screen for each transaction. For example, if an incorrect account was selected during an expense entry, the account should be changed within the expense entry form.
From the Chart of Accounts, locate the accounts imported from QuickBooks Self Employed and view the associated transactions by clicking on View register on the far right side under the Action column, as shown below.
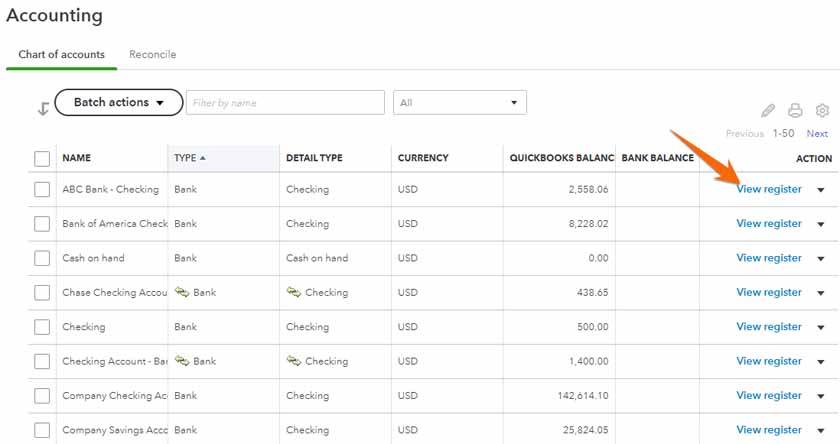
Click View register to view transactions associated with an account
Remember that we wanted to import three accounts into QuickBooks Online.
Bank account: Locate the bank account and select View register to open the transactions associated with it. We recommend taking time to go through your transactions and make sure that your personal and business transactions are classified appropriately.
In QuickBooks Online, it’s important that personal transactions in your checking account are categorized as “personal expenses” and recorded in the equity section of the balance sheet. In our experience, sometimes this occurs automatically in the transfer from QuickBooks Self Employed but, sometimes, it does not. You should review all personal transactions in your bank account to ensure they are assigned to “personal expenses” and not “unclassified.” Categorizing personal transactions as “unclassified” or leaving them in the business expense category can create inaccuracies in your financial statements and, ultimately, your tax return.
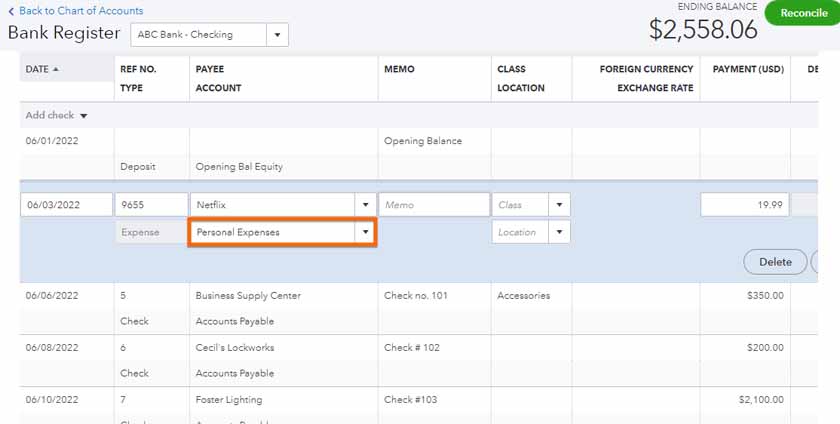
Categorize personal-related expenses as Personal expenses
Credit card statements: Locate the credit card account and Click view register. As with the checking account, personal expenses in credit card accounts must be assigned to “personal expenses” and not left as “uncategorized.” Therefore, take time to go through all your transactions and make sure any personal-related expenses are categorized as personal expenses under the equity section.
To do this, change the category under the Payee Account column to Personal Expenses, as shown below.
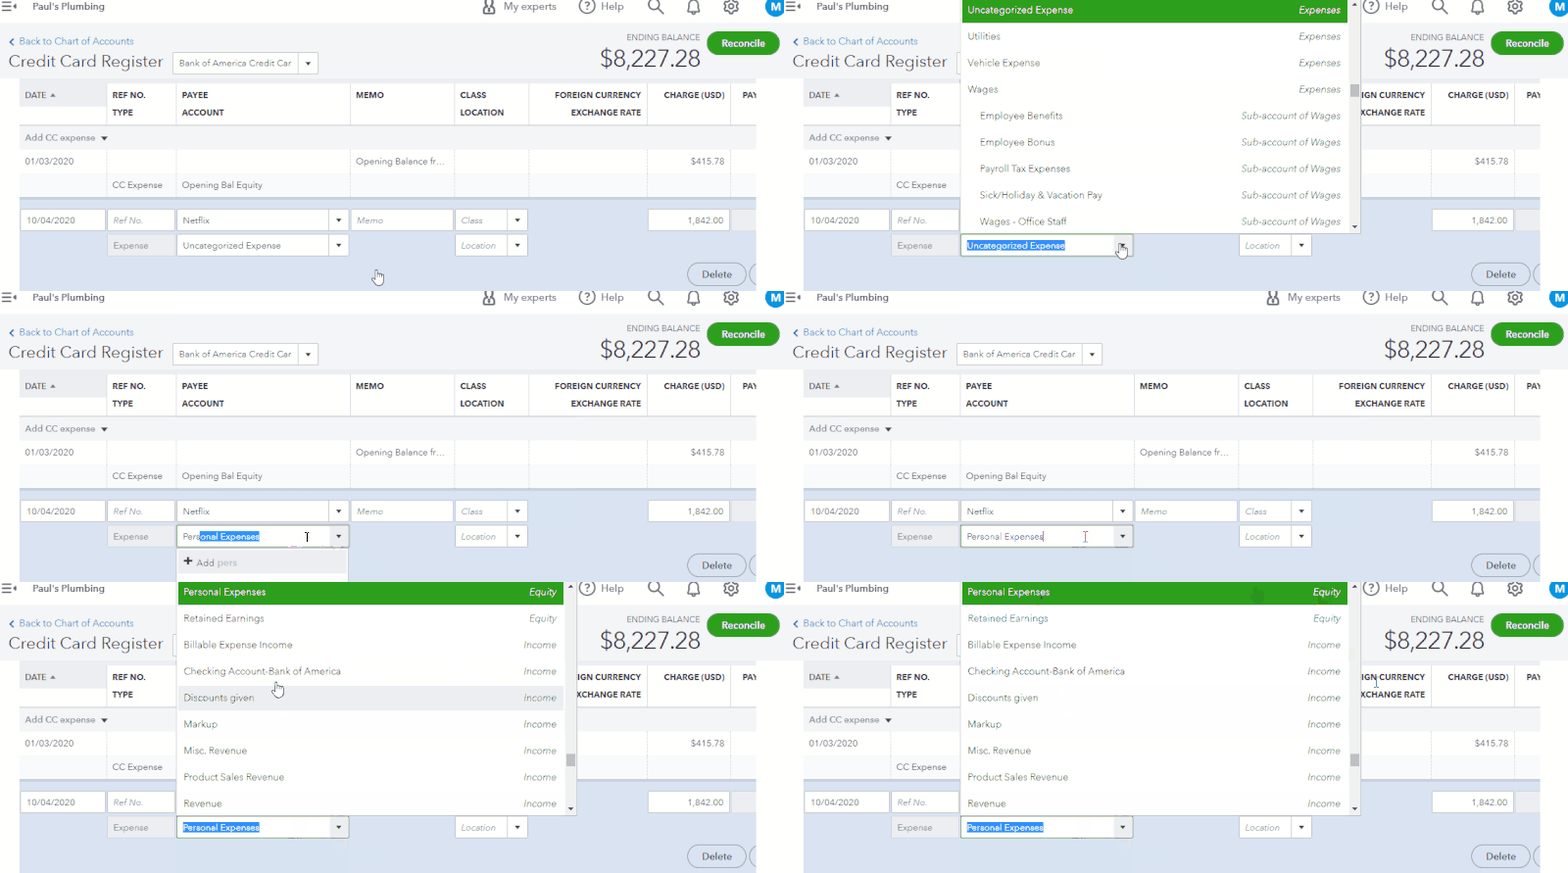
Categorizing personal-related expenses as personal expenses in QuickBooks Online
Cash account: View the register and see if all your transactions in your cash account transferred over to QuickBooks Online.
To see if your customers migrated to QuickBooks Online successfully, click on Customers & leads or Customers, and then select the Customer drop-down menu.
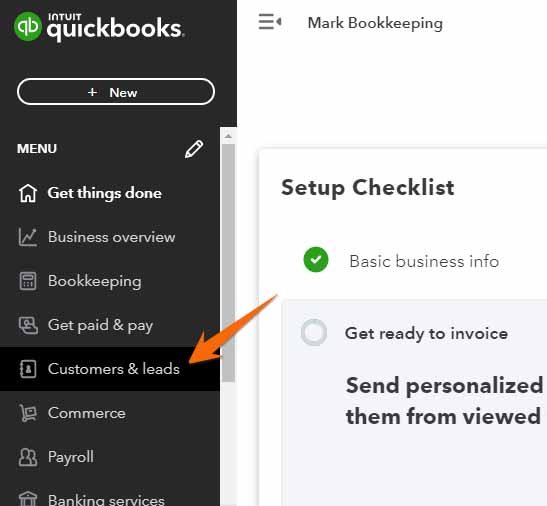
Navigate to customer list in QuickBooks Online
From the Customers tab, you’ll see whether you brought over your customers to QuickBooks Online successfully. Based on the screenshot below, Mark’s two customers, Jane Doe and John Buck, have successfully transferred to QuickBooks Online.
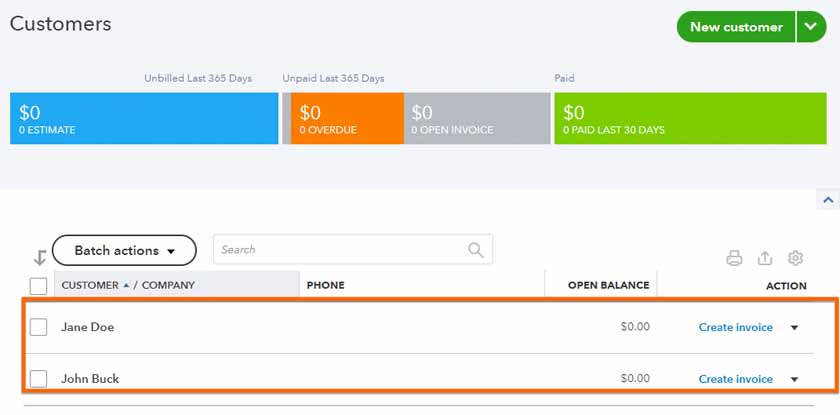
Customers imported to QuickBooks Online successfully
As mentioned earlier, QuickBooks Self Employed doesn’t have a vendor management feature, so the conversion wizard has to create vendors in QuickBooks Online. QuickBooks Online uses the descriptions of the bank or credit card charges to create a vendor name, so imported vendor names in QuickBooks Online are inaccurate most of the time.
You can see your vendor list in QuickBooks Online by clicking on Get paid & pay on the left menu bar.
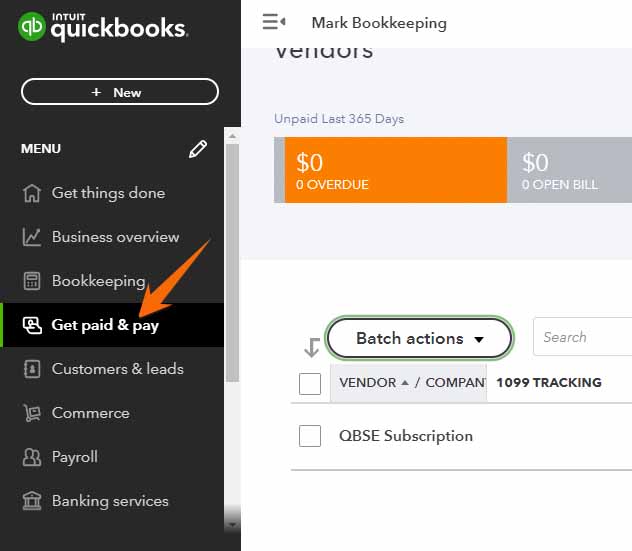
Navigate to the vendor list in QuickBooks Online
From the Vendors tab, you may see the list of vendors that QuickBooks Online created. You may see inaccurate vendor names, just like in the screenshot below.
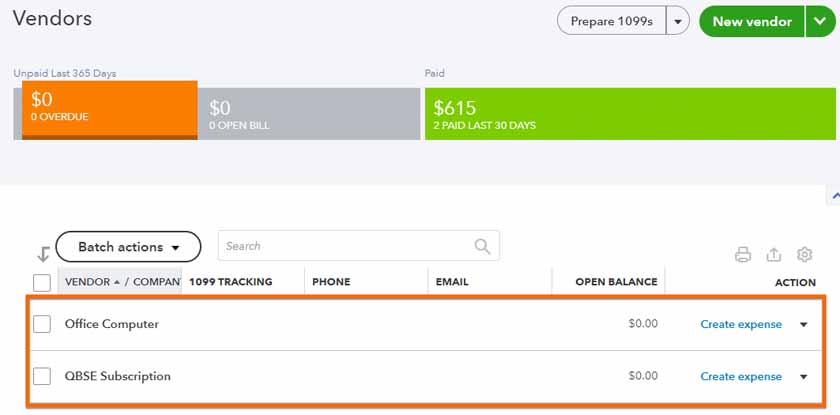
Vendor names created in QuickBooks Online using Self-Employed’s expense descriptions
Go through your vendor list and inactivate the vendor names that are not correct or that you don’t think you no longer need. To make a vendor inactive, tick the checkbox before the vendor name and click Make Inactive under the Batch actions button.
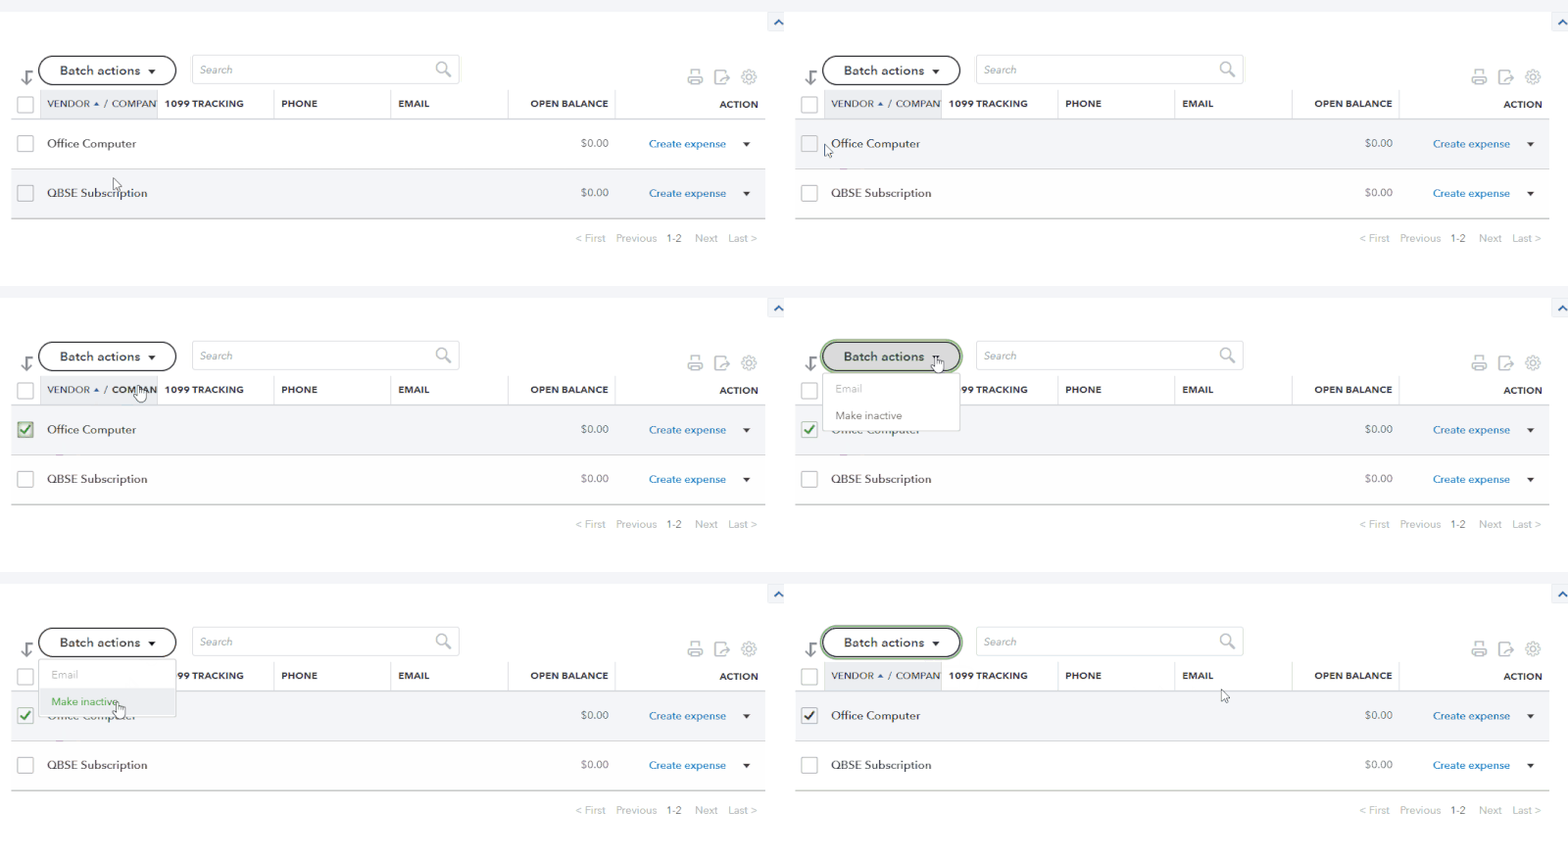
Make a vendor inactive in QuickBooks Online
To check if your products and services transfer to QuickBooks successfully, click on the cogwheel and select Products and services as shown below. As we’ve mentioned earlier, products and service items may not transfer over successfully. To check imported product and service items, click on the cogwheel and select Products and services under Lists.
In the GIF below, we can see that we have imported Mark’s four product and service items successfully.
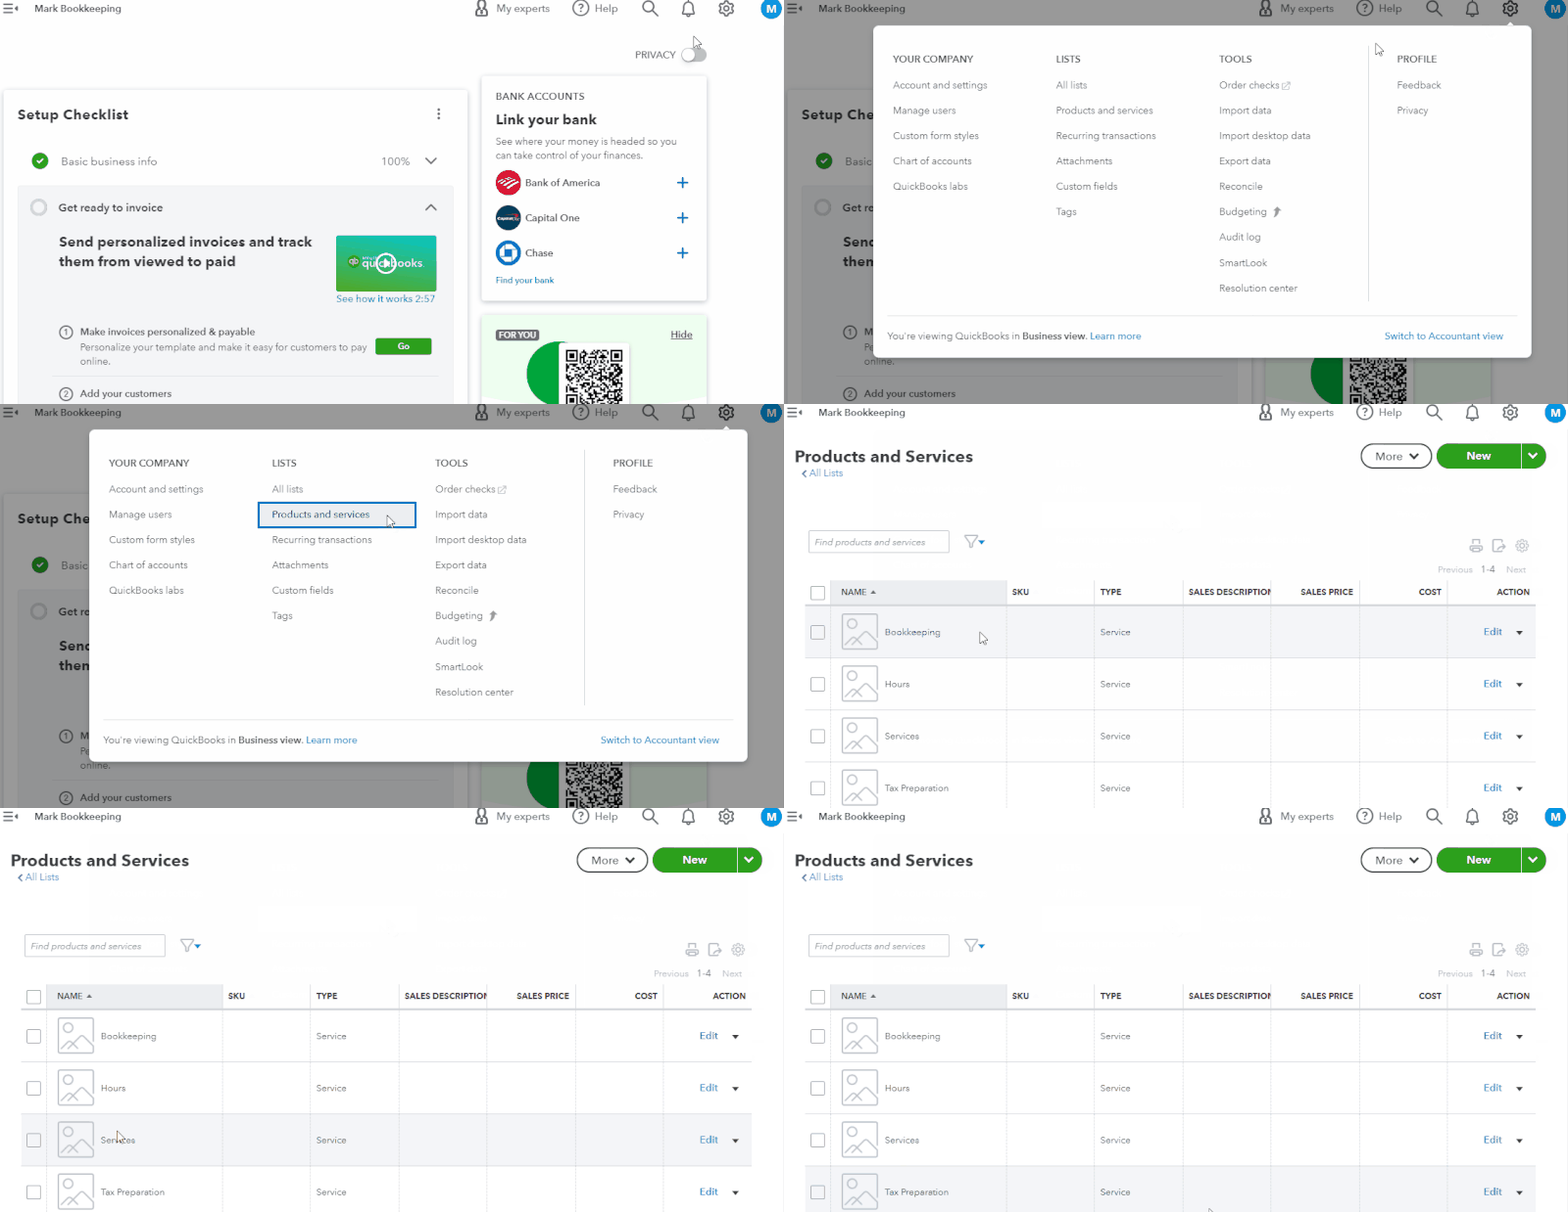
Product and service items imported to QuickBooks Online successfully
If it doesn’t work on your end, don’t fret, as you can build your product and services list easily in QuickBooks. You can add new items and make changes to them easily if needed. To add a new product or service item, click the green New button on the Products and Services screen and provide the required details. For detailed instructions, head to our tutorial on how to set up the products and services list in QuickBooks Online.
In addition to bank and credit card connections, bank feeds are also transferred over to QuickBooks Online. If you need to reestablish a bank or credit card connection, the process is essentially the same as in QuickBooks Self-Employed. You can see if your bank and credit card accounts successfully transferred to QuickBooks Online from the Business Overview tab.
When reestablishing bank feeds, make sure to adjust the starting date for the new feed to ensure that all transactions are captured but not duplicated accurately. The starting date should be the day after the last transaction date from the previous feed.
Key QuickBooks Online Features Not Available in QuickBooks Self-Employed
QuickBooks Online lets you access essential small business accounting features not available in QuickBooks Self-Employed, including:
- Balance sheets: While you can create profit and loss accounts in QuickBooks Self-Employed, there is no balance sheet to track assets and liabilities. QuickBooks Online includes a balance sheet report that gives you an organized view of your current assets and pending liabilities, helping you understand how your business is doing financially.
- Accounts payable (A/P) management: QuickBooks Online allows you to record a bill, add a vendor, and manage and track unpaid bills. You can also create recurring expenses, which is useful if you have bills to pay on a regular basis.
- Improved invoicing: QuickBooks Self-Employed lets you create and send invoices, but it doesn’t allow you to enter and manage customer, product, or service information. This means you have to manually enter the customer and sales information every time you create an invoice. QuickBooks Online has an improved invoicing feature that lets you automatically store this information, reducing manual data entry. Another notable feature is the ability to automatically calculate sales tax rates to apply to your invoice based on your customer’s location.
- Integrated payroll: As a new business owner, you may have to manage employees. QuickBooks Online integrates with QuickBooks Payroll which lets you pay your team by checks or cash deposit.
QuickBooks Self-Employed and QuickBooks Online are both cloud-based accounting software. If you are considering a locally installed program, you should check out QuickBooks Desktop. Learn the differences between QuickBooks Online and QuickBooks Desktop.
Frequently Asked Questions (FAQs)
Some of the items you can transfer include bank, credit card, and cash accounts and transactions, customers, invoices, and product and service items.
No, as your QuickBooks Self-Employed account will be converted to QuickBooks Online automatically. You’ll be able to log in to your new QuickBooks Online account using your login credentials in QuickBooks Self-Employed.
If you find yourself needing more advanced features, such as inventory tracking, purchase orders, and job costing, then you should consider switching to QuickBooks Online. Also, QuickBooks Online is more suitable if you have employees or contractors.
QuickBooks Online has four subscription plans ranging from $30 to $200 per month. Learn which plan is right for you in our detailed QuickBooks Online versions comparison.
Wrap Up
Congratulations on learning how to switch from QuickBooks Self-Employed to QuickBooks Online. Take our free QuickBooks Online courses to help you learn how to perform various tasks in QuickBooks Online, such as setting up QuickBooks, entering bills and expenses, and managing banking transactions.