


Shopify Payments is Shopify’s built-in payment processing service for online, in-person, and mobile sales. Each merchant account automatically goes through a verification process and, once approved, becomes eligible to accept all major payment methods. Learn how to use Shopify Payments, from setting it up to getting paid, with our step-by-step guide.
Shopify Payments is only available to stores in certain countries. Check Shopify Payments’ Terms of Service to find out if it’s available in your country and if your business type is supported. Once you find out that your business is eligible, you should also consider banking requirements. Banking requirements differ based on the country where your store operates.
Here is the list of countries where Shopify Payments is available and the usual banking requirements for most countries:
| Shopify Payments Countries | Usual Banking Requirements |
|---|---|
| Canada, US, France, UK, Australia, Ireland, New Zealand, Singapore, Hong Kong, Japan, Germany, Spain, Netherlands, Denmark, Italy, Sweden, Austria, Belgium, Finland, Czech Republic, Switzerland, Portugal, Romania |
|
If your business and region do not qualify for Shopify Payments, explore alternative payment methods based on your region.
Step 1: Select a Store Currency
You must set your store’s currency before setting up Shopify Payments. A store currency is the currency used in your dashboard settings and the currency your products are sold in.
Go to Settings in your Shopify account’s navigation menu to choose a currency. Under Store Details, go to Store Currency, and select the currency you want. Then, click Save.
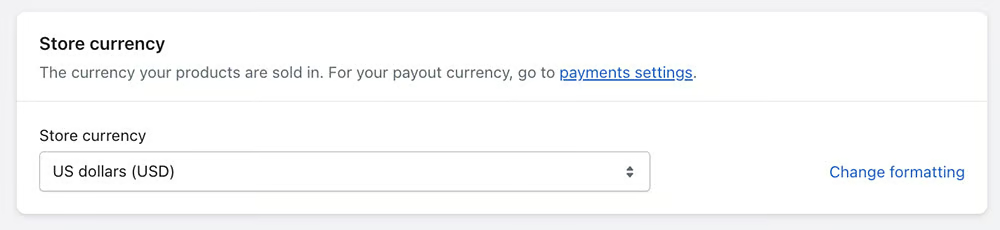
Your store currency can be different from the currency your bank account is in (otherwise known as your payout currency). For example, if your store is in Canada but most of your sales are in the US, you can set your store currency in US dollars but have your payouts in Canadian dollars.
Note that your store currency can be any of those listed in your store settings, but your payout currency is fixed based on your store’s location. This is because your bank account must be located in the same country as your store. If you need to change your currency after making your first sale, you will need to contact Shopify for assistance.
Once you’ve picked a currency, you can activate Shopify Payments.
Step 2: Activate Shopify Payments
You can create a Shopify account, set up a Shopify store, and start accepting payments without verifying your account. However, you only have 21 days (not business days) from your first transaction or sale to verify your account. Otherwise, all sales proceeds from your Shopify store will be refunded to your customers.
From your Shopify dashboard, go to Settings > Payments. There are two approaches to activate Shopify Payments:
If you do not have a payment provider yet:
Click on the Setup Guide from your Shopify dashboard home screen and Set Up Shopify Payments. Doing so takes you to the Payments section of your Settings where you can click Complete Account Set Up.
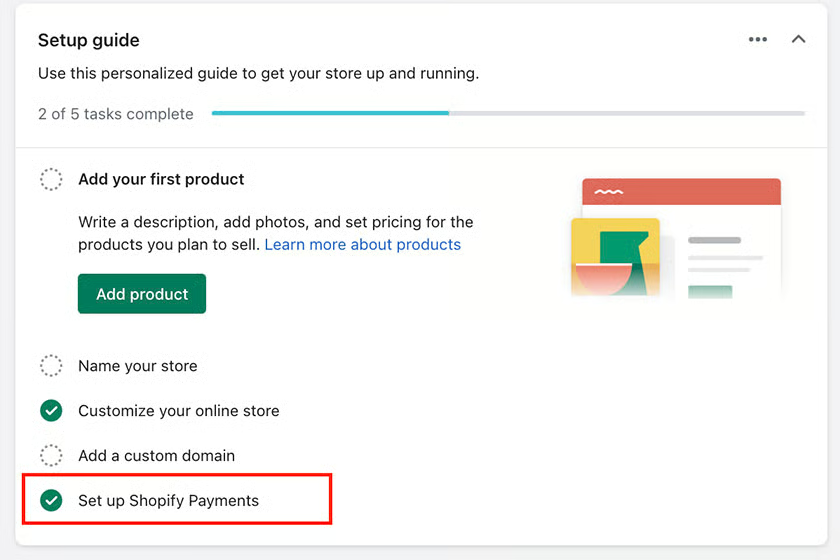
Set up Shopify Payments from the setup guide from the Shopify dashboard. 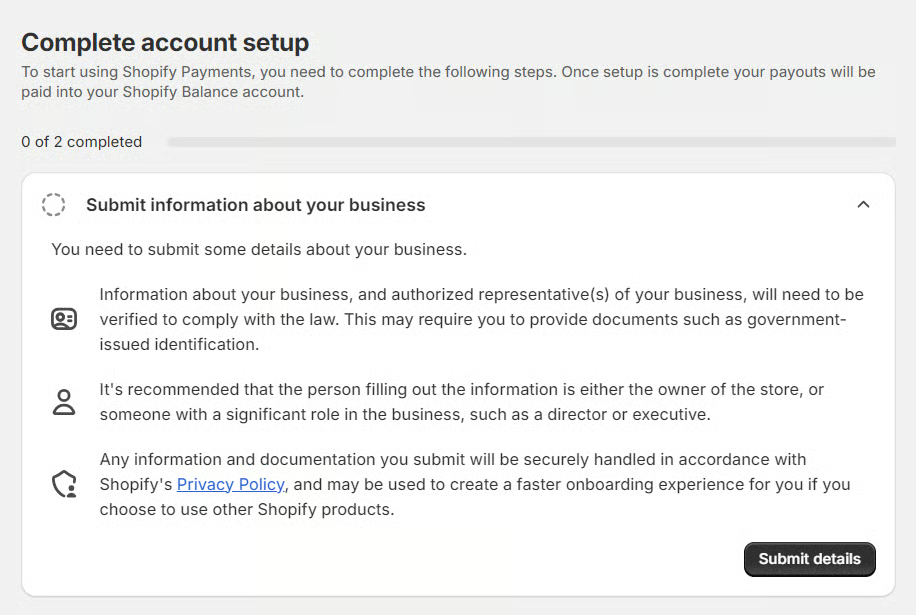
To complete account setup, you will need to submit your business and personal details.


If you already have a payment provider and want to switch to Shopify Payments:
Go to the top of the Payments section where you will see the primary provider. There is a link to Switch to Shopify Payments just below it.

If you would like to accept in-person payments, activate Shopify Payments in the point-of-sale (POS) app as well:
Download the Shopify POS app, then go to Settings > Payment types. Look for the Default payment types section and verify that the Credit/Debit option is set to Accepted.
Step 3: Verify Your Business
Once you have activated Shopify Payments, you need to fill in your business and address details and submit business documents for verification.
Under the Business Details section, choose the business type.
- If you are a corporation, you can provide your business number, EIN, or Taxpayer Identification Number for your business.
- If you’re a sole proprietor and don’t have any of these numbers, you can submit your Social Insurance Number or Social Security Number instead.
Suppose you set up Shopify Payments as a corporation or LLC. In that case, you still need to provide the name and date of birth of someone associated with the business for verification purposes.
.cls-1{fill:#155E85;fill-rule:evenodd;}
The name provided must match what’s shown on the submitted legal government-issued ID. If you enter the store name or an alias, Shopify won’t verify your account because they will be unable to verify your identity, as your submitted name doesn’t match the one listed in your ID.
Under the Address Details, ensure you provide the same address listed on your business documents.
All businesses are responsible for collecting and remitting tax on their sales to the appropriate government authority. It is recommended that you discuss any tax issues relating to your business with a local tax professional. Learn more about ecommerce sales tax if you are operating an online store.
After entering your business details, you may also be required to submit documents to verify your identity, business, and address. Make sure your submitted documents match the information you provided and are clear and large enough to read, valid and up-to-date, and complete with all details visible.
You cannot submit the same document to verify proof of identity or home address.
Here are some tips on uploading and submitting documents for verification:
| Proof of Identity |
|
|---|---|
| Proof of home address |
|
| Business verification |
|
Because of the nature of the documents you need to submit, you can only submit these through your Shopify dashboard—not through Shopify’s live chat or email. Reviews of your Shopify Payments account can take up to three business days to complete. During this time, your payouts may be on hold, but you can still accept customer payments.
Step 4: Configure Shopify Payments Settings
After activation, you can configure Shopify Payments while waiting for your account to get verified. This step lets you customize payment methods, payout notifications, fraud prevention, bank account information, and customer billing statement settings. You set this all up when you first create your store. Over time, however, you can still return to this procedure if you decide to change any of the settings.
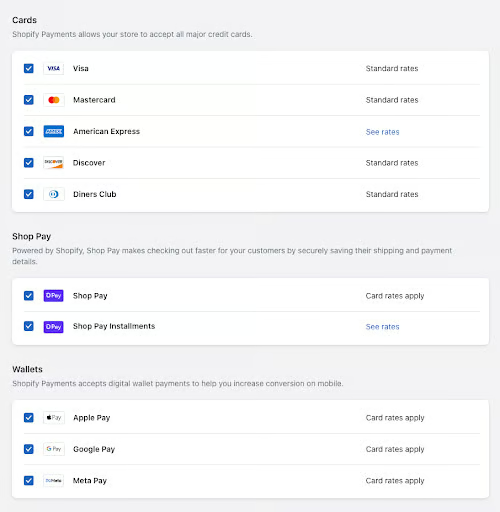
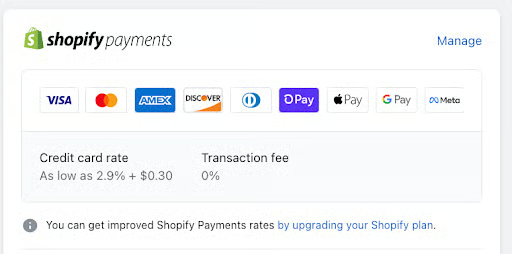
You may choose the payment methods you prefer to accept from customers, such as the types of cards and digital wallet payments. 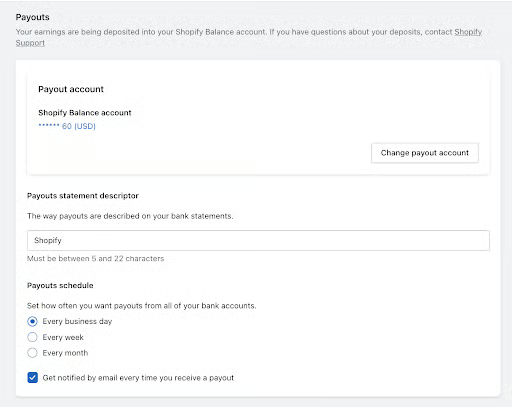
The Payouts section allows you to set how you prefer to get paid. 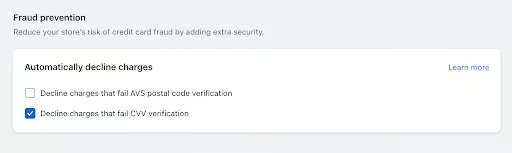
The fraud prevention section allows you to select your preferred fraud check filter. 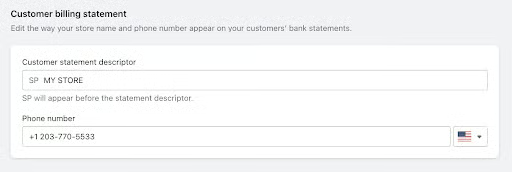
The customer billing statement section lets you customize how you want the charges against your customer to appear in their billing statement.


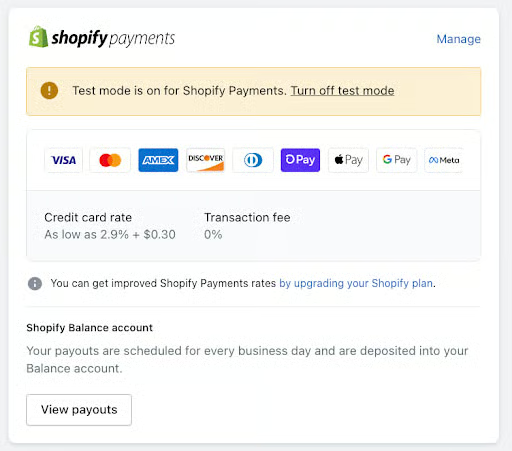
Step 5 (Optional): Test Shopify Payments
As a merchant, you may want to know how the system will perform based on the configurations you set in the previous step. The last section under the Manage settings of Shopify Payments allows you to run Shopify on test mode (note that Shopify provides instructions and mock credit card information to simulate successful and unsuccessful transactions). Here’s how:
Put Shopify in Test Mode
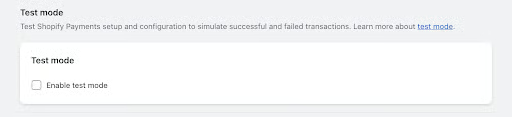
- Go to Settings > choose Payments > Shopify Payments section > click Manage
- Deselect Shop Pay and digital wallet payment options
- Scroll down to the very bottom. You’ll find the option to activate test mode
- Check the box that says Enable test mode, hit Save, and exit.
- Return to the Shopify Payments section; you will be notified by a banner that the system is in test mode.
Simulate Successful and Failed Transactions
- Add any product on your website to your cart.
- Check out the items, and make a card payment using the following options:
- Name on card: Enter any two words separated by a space
- Expiry date: Enter any future date
- Security code: Enter any three digits.
- Card number: Use any of the following numbers depending on the result you want to see
| Successful Transactions | Failed Transactions |
|---|---|
| Visa: 4242424242424242 | Card Declined: 4000000000000002 |
| Mastercard: 5555555555554444 | Incorrect Number: 4242424242424241 |
| AmEx: 378282246310005 | Disputed Transaction: 4000000000000259 |
| Discover: 6011111111111117 | Invalid Expiry Month: 0 or 13 |
| Diners: 30569309025904 | Invalid Expiry Year: Any previous year |
| JCB: 3530111333300000 | Invalid Security Code: Any 2-digit number |
Note that if you complete a successful purchase in test mode, you will find this transaction under your list of orders. If you want to see credit card error messages that might be displayed to a customer during checkout, use the details under the Failed Transactions column above. Remember to cancel and delete these orders before you deactivate the test mode.
Deactivate Test Mode
- Return to the Shopify Payments section in your Settings.
- Click Manage, scroll down to uncheck Enable Test mode, and hit Save.
Step 6: Get Paid with Shopify Payments
Not all options in the payment method section fall under Shopify Payments. Shop Pay Installments, PayPal, and Amazon Pay will not get paid through Shopify Payments, which means that these transactions will:
- Not appear in Shopify Payments’ payout report
- Not be transferred to your bank account at the same frequency
- Not have the same fraud security filters
- Be charged a Shopify commission fee of 0.5%–2% per transaction
Payout Fees
Using Shopify Payments waives the transaction fees Shopify charges when using a third-party payment provider. You only pay fees for credit card processing, which depend on your Shopify plan.
Payout Periods
Payouts depend on your set payout schedule, the timezone in which the customer places an order, and your store’s country location.
The day an order is placed in your store is determined by the time the order was placed in the UTC timezone. Orders from Friday through Sunday are grouped together. Once an order has been received, the payment will take a few days to be processed. The length of your pay period is determined by the country your store is located in. For US merchants, this typically takes about two business days.
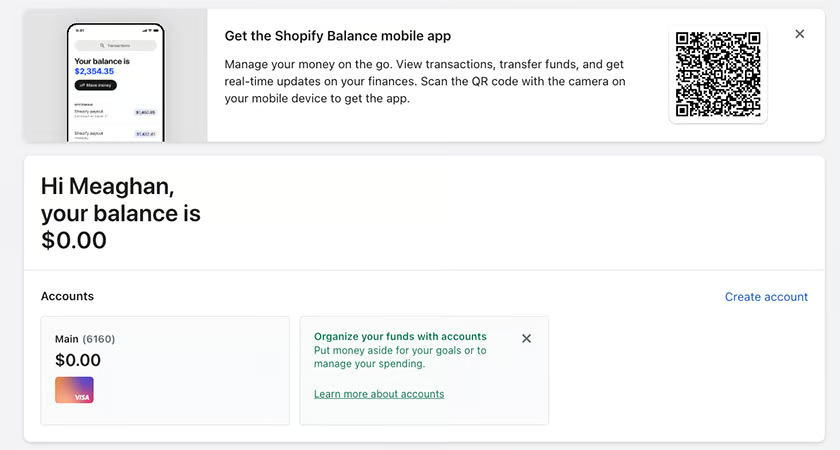
If you use Shopify Balance, you can receive your Shopify Payments earnings as fast as one business day.
Using Shopify Balance
Shopify Balance is Shopify’s solution to receiving faster payouts. It promises instant access to your funds by taking the bank out of the equation. It comes with a Shopify Balance card, physical and virtual cards you can use to access your money faster when spending in-store, mobile, or online, and withdraw from ATMs.
Shopify Balance isn’t available to all Shopify merchants at this time. To qualify, you must:
- Be based in the US
- Have a valid US Social Security Number
- Have a mobile phone that can receive listed text messages
- Have Shopify Payments enabled
You can activate Shopify Balance by going to Finances > Balance > Create account
Tracking Payouts
You may view your payouts by going to the transactions page under the Shopify Payments section.
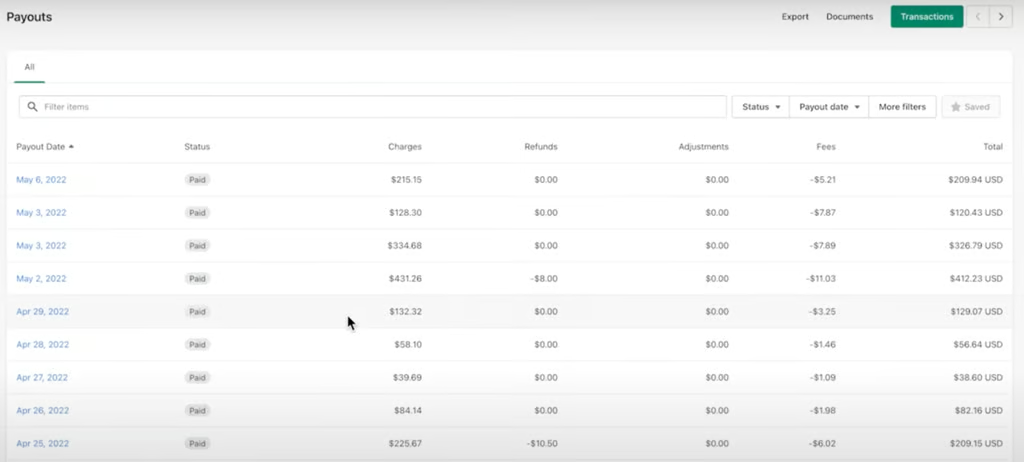
Your payouts screen will show the date of the payout, the status of the payout, the total charges, refunds, adjustments, total fees subtracted, and the final payout amount. (Source: Shopify) 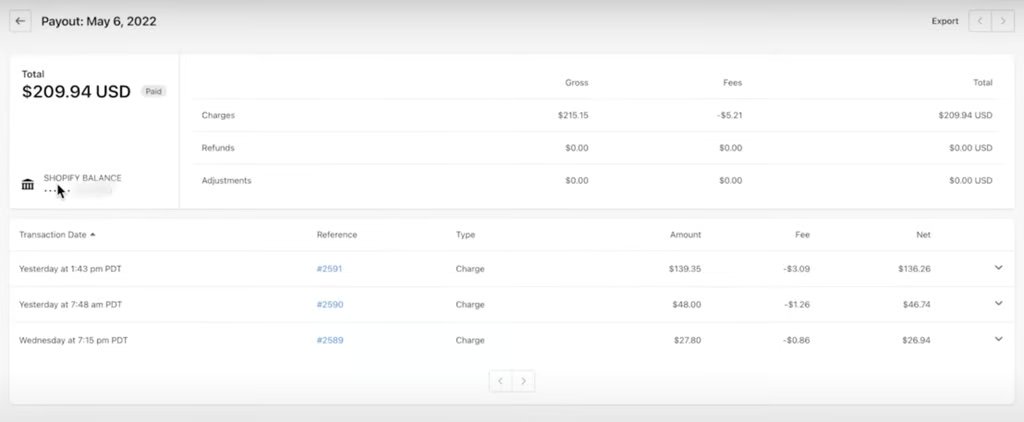
By clicking on the date of a payout, you will see the payout page—the details of the payout including the dates of all included orders, their corresponding order numbers, the type of transaction it was, the total order amount, fees, and the final amount you receive. (Source: Shopify)


Resolving Failed Shopify Payments Payouts
If a Shopify Payments payout fails, you will receive an email, a notification will be displayed in your Shopify dashboard, and the payout will be marked Failed on the payout page. A hold is placed on all your scheduled payouts until the issue with your bank account is resolved.
A Failed payout message explains why the payout failed and what needs to be done to resolve the issue. You can see this on your payout page.
The reasons for failed payouts and recommendations for their resolutions are:
- Incorrect bank account information: The bank rejected the payout because the linked account is closed or doesn’t exist. Update your bank account information.
- Account currency mismatch: Ensure your bank account is in a supported currency for your country. If the currency isn’t supported in your country, then update your bank account to an account in a supported currency.
- Invalid account type: If your bank account isn’t a supported type, then update to an account that is supported. Unsupported bank accounts include savings accounts and virtual bank accounts.
- Incorrect beneficiary or payee name: This is based on your Shopify Payments account information and registered business type. If the name on the payout doesn’t match the name on your bank account, then your bank might reject the payout. Update your bank account details for Shopify Payments.
- Insufficient funds to cover a negative payout: If there are insufficient funds in your bank account to cover a negative payout amount due to a refund or chargeback, then the negative payout fails. Shopify will reattempt to debit these funds in your next payout. The message will be cleared after there are enough funds to cover the negative balance.
Refunds Processed with Shopify Payments
- Transaction fees for the sale associated with the refunded order will not be returned to you.
- The refunded amount will be deducted from your next Shopify Payments payout. If your next payout amount is not enough to cover the refund, Shopify will deduct the balance from your linked bank account (for US merchants).
- Processing refunds through Shopify Payments takes anywhere from 5–10 business days.
- A list of refunds will be available from your payout reports. You can also filter the list to show only refunded transactions.
Managing Chargebacks
Shopify Payments users have tools to protect themselves from chargebacks. However, in the event that a chargeback claim goes through, Shopify Payments also provides merchants with features to manage chargebacks and inquiries.
- Choose Orders from the navigation menu on your Shopify dashboard.
- Click More Filters and choose Chargebacks to get a complete list of all chargebacks.
- Choose Chargeback and inquiry status from the Select a filter drop-down menu.
- Choose Open from the next drop-down menu to get a list of all open chargeback cases.
- Click on one of the open chargebacks to view the transaction details.
- Click Submit Response in the chargeback banner.
- Shopify Payments automatically populates the data you need to respond to the chargeback, but you can add additional supporting information and documents should you see fit.
- Shopify Payments sends the response for you on the due date (7–21 days after the chargeback is filed).
- Note that the bank automatically charges a $15 fee for chargebacks, which Shopify will reimburse if you win the dispute. However, if you do not wish to contest the chargeback, you can cancel any attempt to submit a response. The disputed amount will be returned to the customer, and the chargeback will be tagged as “Lost.”
How to Use Shopify Payments Frequently Asked Questions (FAQs)
Click through the sections below to read answers to common questions on Shopify Payments.
How does Shopify Payments work?
Shopify Payments is Shopify’s built-in payment processing system. It allows merchants to securely accept payments directly through their Shopify store without integrating any third-party payment processor. Merchants using Shopify Payments may accept debit/credit card and digital wallet payments.
How do I use the payment method on Shopify?
To use Shopify’s built-in payment processor Shopify Payments, go to your Shopify dashboard, navigate to Settings > Payments, and activate Shopify Payments by entering your business and banking details. Once set up, customers can pay using credit cards and other supported methods directly in your store.
What do you need to use Shopify Payments?
To use Shopify Payments, you need a Shopify account, a supported bank account, and business and personal information for verification. Additionally, your business must be located in a country where Shopify Payments is available.
How do I verify my Shopify account?
To get verified, you need to have a bank account and submit documents to prove your identity and the existence of a valid business.
Summary of requirements is as follows:
- A full checking account with a physical bank in USD currency and accepts electronic bank (ACH) transfers
- Valid proof of identity such as a passport, driver’s license, and state-issued ID
- Valid proof of home address such as utility bill (within 6 months) with matching address on your ID
- Valid proof of business such as IRS Letter 147C and IRS SS-4 confirmation letter
The verification process takes up to three business days after which, Shopify will notify you of its decision.
What’s the difference between AVS and CVV?
AVS (Address Verification System) and CVV (Card Verification Value) are both an enhanced method of fraud detection. As the name implies, the AVS compares the numeric part of the customer’s billing address and zip code or postal code to the information on file with the credit card issuer. Meanwhile, the CVV is a 3- or 4-digit number on the back of the customer’s credit card, which can be asked from the customer during checkout.
Which currencies are supported for accepting payments?
| AED | GTQ | PEN |
|---|---|---|
| AFN | GYD | PGK |
| ALL | HKD | PHP |
| AMD | HNL | PKR |
| ANG | HRK | PLN |
| AOA | HTG | PYG |
| ARS | HUF | QAR |
| AUD | IDR | RON |
| AWG | ILS | RSD |
| AZN | INR | RUB |
| BAM | ISK | RWF |
| BBD | JMD | SAR |
| BDT | JPY | SBD |
| BGN | KES | SCR |
| BIF | KGS | SEK |
| BMD | KHR | SGD |
|---|---|---|
| BND | KMF | SHP |
| BOB | KRW | SLL |
| BRL | KYD | SRD |
| BSD | KZT | STD |
| BWP | LAK | SZL |
| BZD | LBP | THB |
| CAD | LKR | TJS |
| CDF | LRD | TOP |
| CHF | LSL | TRY |
| CLP | MAD | TTD |
| CNY | MDL | TWD |
| COP | MGA | TZS |
| CRC | MKD | UAH |
| CVE | MMK | UGX |
| CZK | MNT | USD |
| DJF | MOP | UYU |
|---|---|---|
| DKK | MUR | UZS |
| DOP | MVR | VND |
| DZD | MWK | VUV |
| EGP | MXN | WST |
| ETB | MYR | XAF |
| EUR | MZN | XCD |
| FJD | NAD | XOF |
| FKP | NGN | XPF |
| GBP | NIO | YER |
| GEL | NOK | ZAR |
| GIP | NPR | ZMW |
| GMD | NZD | |
| GNF | PAB |
Bottom Line
There are many advantages to using Shopify Payments. Not only do merchants save by not having to pay Shopify a commission fee of 0.5%–2% per transaction, but they also get tools to offer accelerated and buy-now-pay-later checkouts, customize international payment processing, set up fraud protection, manage chargebacks, and more. These features alone make Shopify a cost-effective solution for online businesses of all sizes.