

In this guide, I show you exactly how to set up a Shopify store, from creating your account and adding products to designing your storefront, setting up payments, configuring shipping, and launching your marketing campaigns.
I built my own demo store using Shopify’s free trial so I can include tips and tools that help you get the most out of Shopify’s powerful platform — whether you sell handmade goods, dropship products, or want to have an online sales arm for your brick and mortar.
Don’t worry if you are not ready to commit to a paid subscription plan — you can sign up for the free Shopify trial. Simply create an account and follow our detailed guide below.
- Quick steps to building a Shopify store
- Step 1: Sign up for a Shopify free trial
- Step 2: Add products
- Step 3: Set payment methods
- Step 4: Design your store
- Step 5: Connect a domain
- Step 6: Configure back-office settings
- Step 7: Set up fulfillment processes
- Step 8: Launch your Shopify store
- Step 9: Market your Shopify store
- Step 10: Measure analytics
- How much it costs to set up a Shopify store for your small business
- Frequently asked questions (FAQs)
- Bottom line
Quick steps to building a Shopify store
Here’s a quick overview of what you’ll do in this guide. Click on any step to jump directly to that section:
- Sign up for a Shopify free trial
- Add your products
- Set up payment methods
- Design your store
- Connect a domain name
- Configure store settings (tax, billing, notifications)
- Set up fulfillment and policies
- Launch your Shopify store
- Market your store and grow sales
- Measure analytics
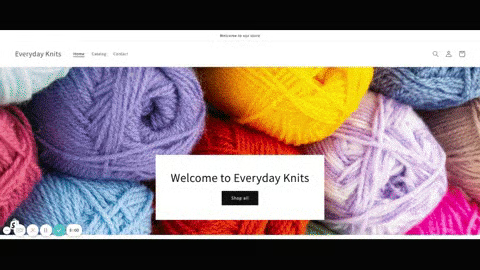
Everyday Knits is the demo store we created for this guide.
Step 1: Sign up for a Shopify free trial
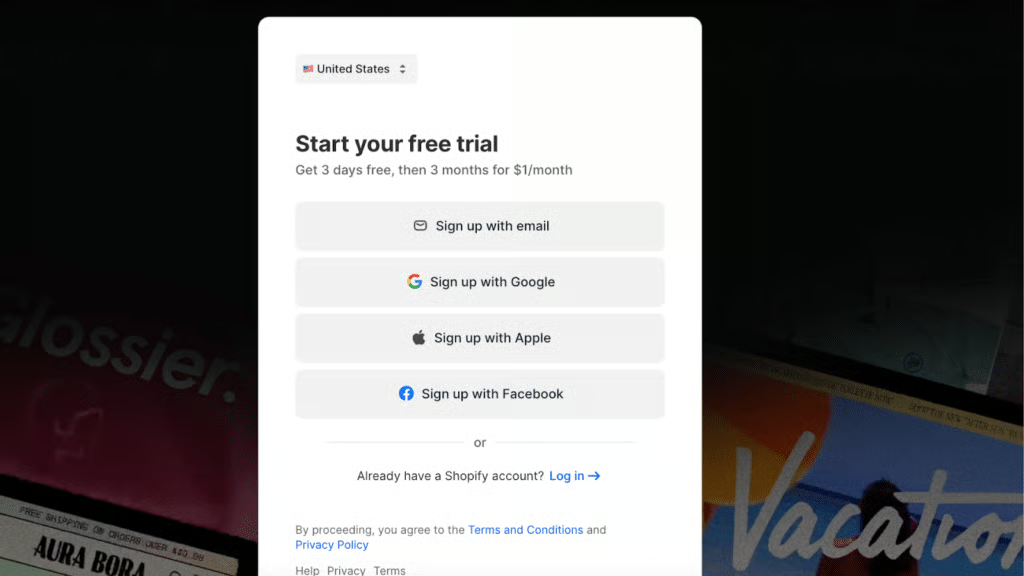
The first step in creating a Shopify store is to sign up for a free trial — this lets you try Shopify for three days, after which, you only pay $1 per month for the first three months of your chosen Shopify subscription.
Go to Shopify’s homepage and click the Start Free Trial button at the top of its navigation menu. It will ask you to set up your login by choosing your email and password.
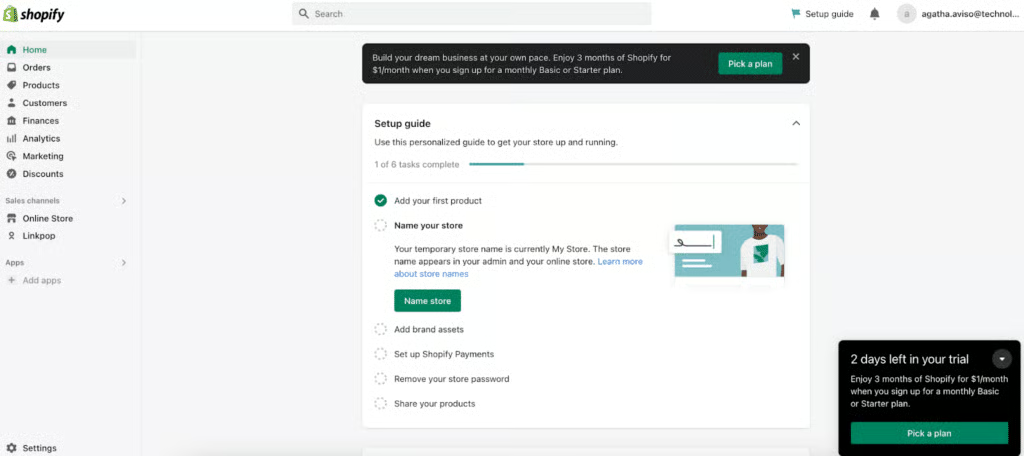
Next, it launches a setup wizard. You can answer the setup questions or skip through the end.

You don’t have to take too long answering each question in the startup wizard. Shopify uses your answers to get to know you and your store better. You also can skip this wizard by clicking I don’t want help setting up.
Still deciding if Shopify is right for you?
Read our in-depth
to learn more about its features. If you have decided to sell products through dropshipping, read our guide on
how to set up a Shopify dropshipping store
.
Step 2: Add products
Once you’ve created your Shopify account, the next step in setting up your Shopify store is to add products. Your products are the foundation of your online store, so take the time to set them up right from the start.
To add a product:
- From your Shopify dashboard, click Products in the left-hand menu.
- Select All products, then click Add product.
After logging in to your account, click Products in the left navigation bar and then choose All products. If it’s your first time, you will see the Add product button in the middle of your page since it is empty.
There are a lot of fields to fill in when you add a product to your store. I have a detailed description, along with images and tips, of each below. In the meantime, here’s a quick-reference guide that breaks down each Shopify product field, what it means, and what you need to know to set your store up for success.
| Product field | What it is | Tips |
|---|---|---|
| Title | The name of your product shown to customers | Keep it short but clear. |
| Description | Your product copy that explains and sells | Include benefits, uses, and unique value. |
| Media | Images, videos, or 3D models | Use PNG or JPEG for images, MP4 for videos. |
| Price | What you charge the customer | Can be updated easily for promos. |
| Compare at price | “Original” price shown when running a sale | Optional, triggers a sale badge. |
| Cost per item | What it costs you to source or make the product | Helps calculate profit margins. |
| SKU | Internal product code for tracking | Make it unique per variant. |
| Variants | Size, color, style options | Shopify allows 3 options max. |
| Shipping | Includes physical product check, weight, origin info | Required for accurate rates. |
| Collections | Category-style groups for browsing | e.g., "Spring Sale" or "For Kids." |
| Tags | Keywords to help filter, automate, or search | Use colors, materials, themes. |
Note: You are not required to provide each product detail. However, any detail you provide affects how the product is displayed to customers. It can make it easier for you to organize your products and help customers find the product.
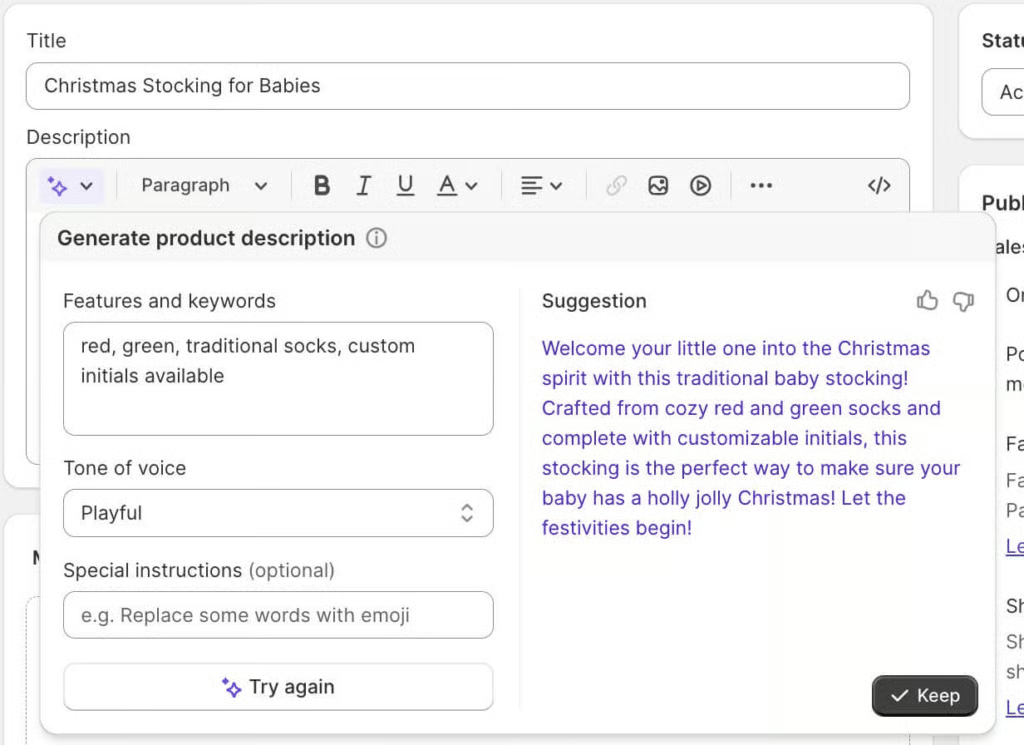
I entered a product title, “Christmas stocking for babies,” and typed in a few keywords. I wanted the tone to be playful and reflective of my brand, and it was able to generate the description.
Expand the sections below to view what it looks like in the Shopify dashboard, plus a few more tips on entering information for each section:
Put the name of your product that you want to display to your customers in the Title field.
Product descriptions describe (and sell) your product. They don’t have to be professionally written; you just need to keep your customer in mind when writing them. Think about what they need to know to feel confident in their decision to buy.
If you’re a reseller, don’t use the manufacturer’s exact description because your product descriptions need to be unique to search engines.
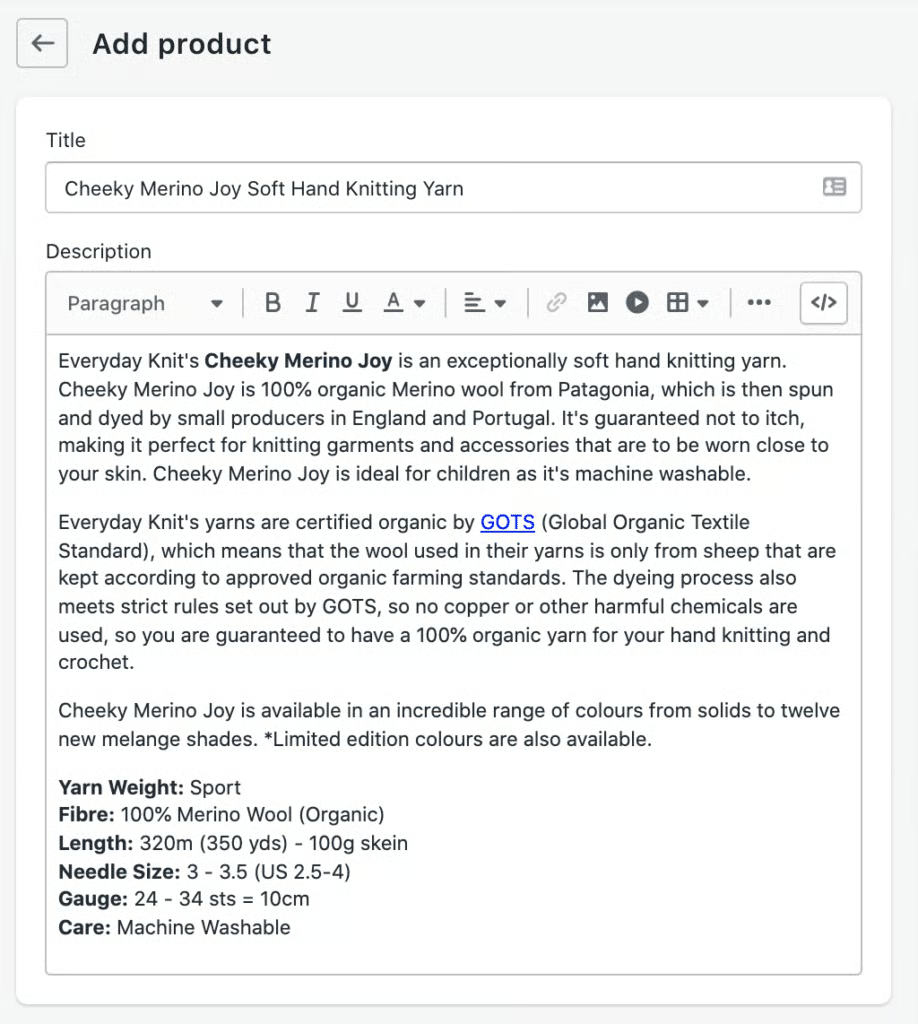
The area where you put your product description uses a rich text editor so you can format your text.
Related: How to Write a Product Description That Sells (Plus a Free Worksheet)
Under the media section, you can upload images, 3D models, and videos to show your product’s appearance.
Images: The most recommended file type of images is PNG, followed by JPEG, and GIF. However, PSD, TIFF, BMP, HEIC, and WebP are also accepted. Product and collection image sizes need to be 20MB or less to be added to Shopify.
Videos: You can upload a video file or embed a YouTube or Vimeo video link. For direct video uploads, the requirements are:
- Length: Up to 10 minutes
- Size: Up to 1 GB
- Resolution: Up to 4K (4096 x 2160 px)
- File type: .mp4 or .mov
3D Models: To display videos or 3D models on product pages, your online store needs to use a theme that supports the media that you want to add. It also has the following requirements:
- Size: Up to 500 MB
- File type: GLB, USDZ
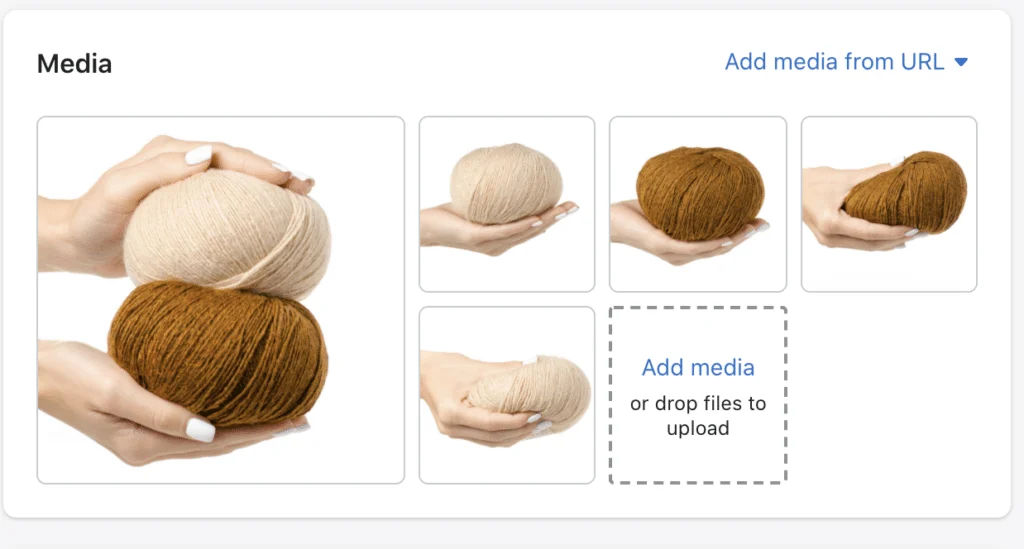
Product presentation in photos makes all the difference. Use high-quality photos. Starting out small? Most smartphones are capable of shooting photos, and you can use free photo editing tools to edit them.
Related:
Shopify limits you to three variants per product. For example, if you sell shirts, you can define size, color, and material options. These options can have multiple variants (e.g., Size: S, M, L; Color: Black, White, etc.). Our store sample has color as the variant and two options: caramel and cream.
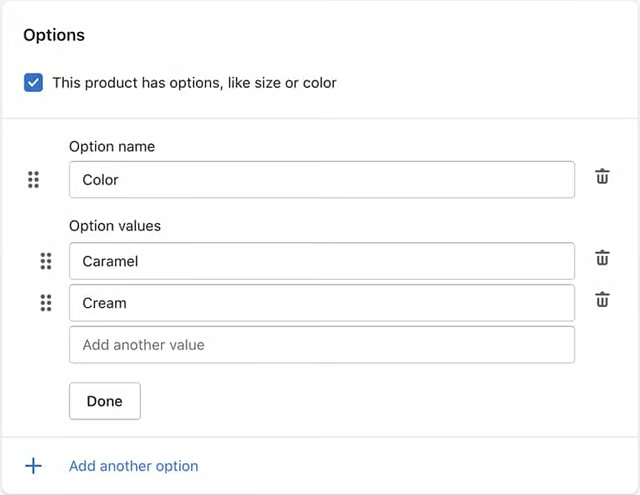
If your product has variants, check the box that says, “This product has options, like size or color.” You will then be able to set up product options. 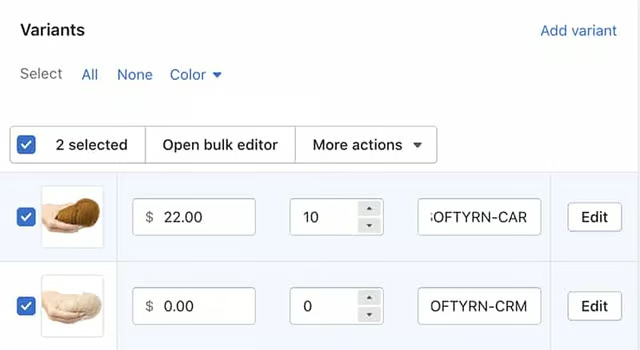
Once you set up variants, you can attach images, set up pricing, inventory quantities, and SKUs. If you have multiple variants, it is advisable to open the bulk editor so that you don’t have to scroll sideways to set up product details per variant. 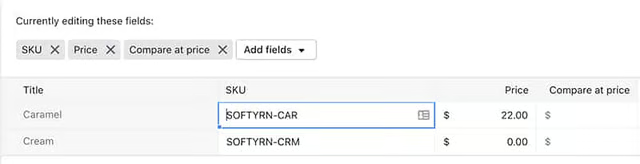
This is the bulk editor view for product variant setup.


For pricing, you can enter the following details:
- Price is the amount you are charging for the product. Click Charge taxes on this product if the product is taxable.
- Compare at price is the original price for a product on sale. When you enter a compare at price, the product displays a sale price.
- Cost per item is how much it costs to secure the product and is optional. If you resell a product, enter the manufacturer’s price, excluding taxes, shipping, or other costs. If you create the product yourself, enter a value that is based on your labor and material costs.
For inventory, you can enter the following information:
- SKU (stock keeping unit) is the code that identifies the product within your business and is optional. For effective tracking and sales reporting, each SKU needs to be unique.
- Barcodes (ISBN, UPC, GTIN, etc.) are typically used by resellers and are unique identifiers used internationally to store and locate product information.
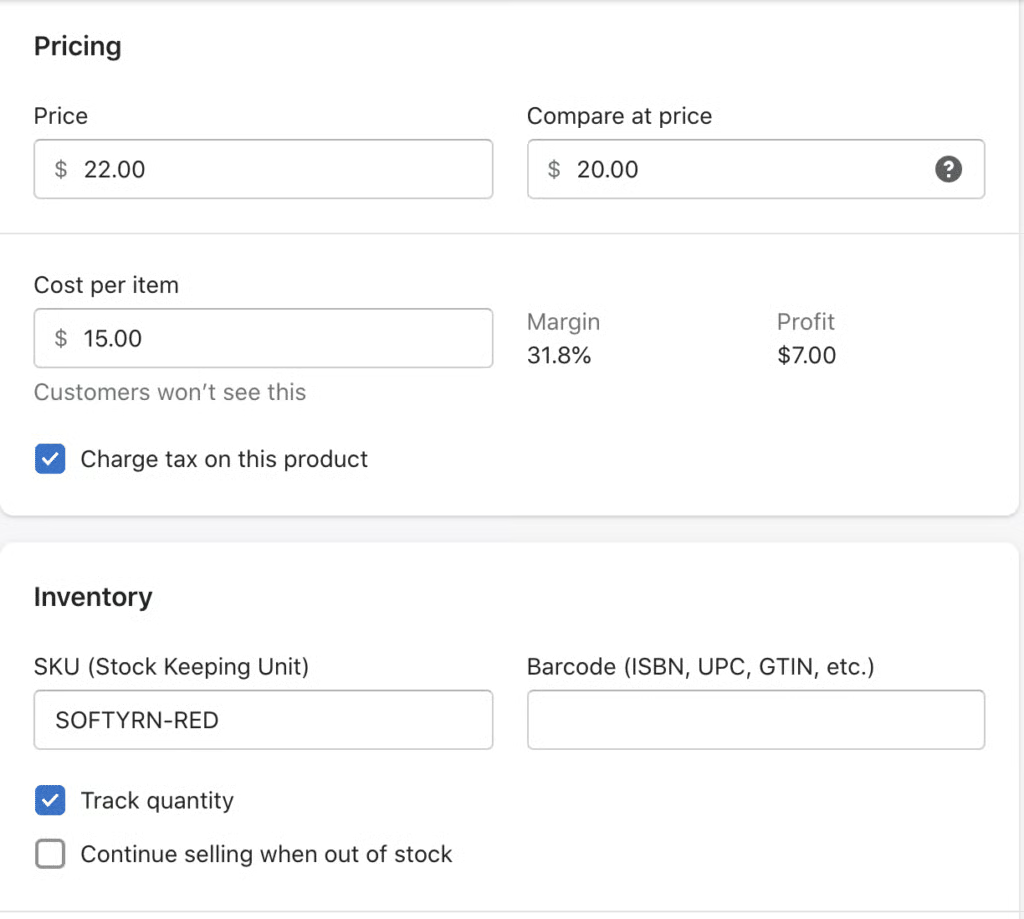
It is easier to set up pricing and inventory for products with no variants. Add your wholesale cost per item and your retail pricing to track your profits on each sale.
Related:
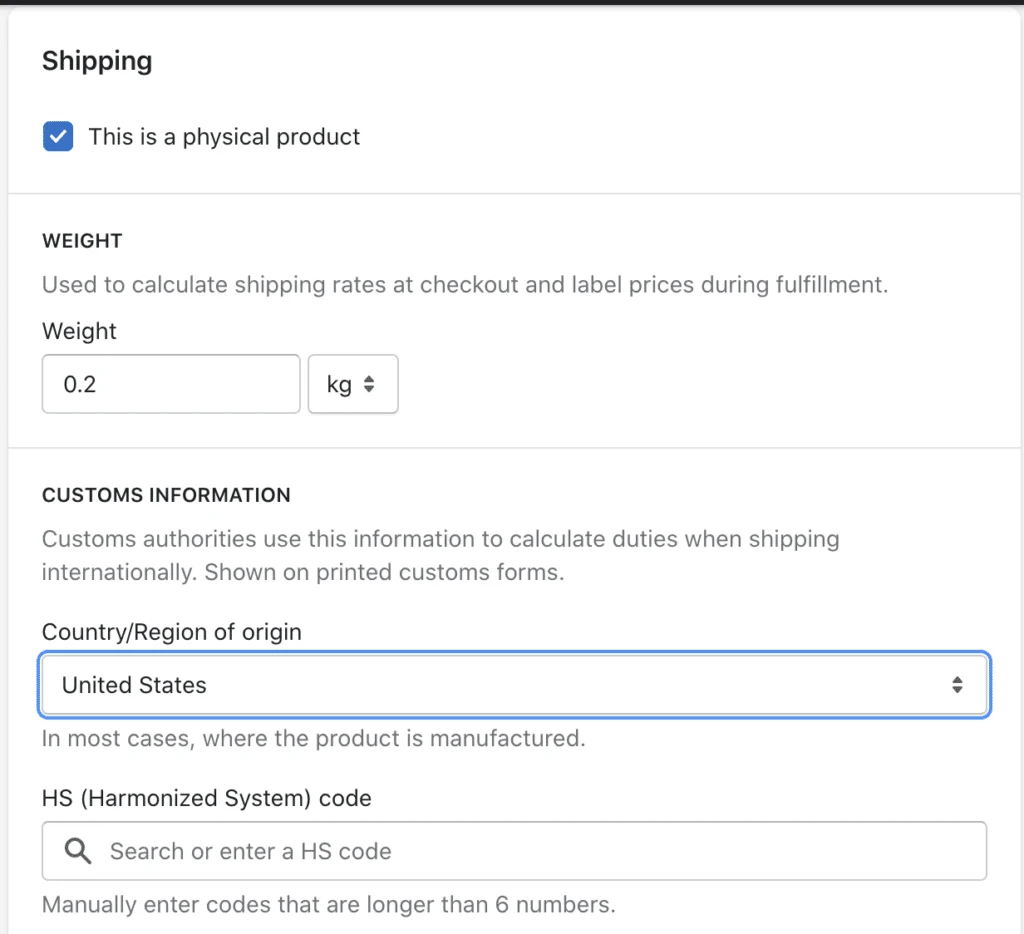
You need to set up shipping rules for physical products. Shipping rules (e.g., flat rate, free shipping, country or region-based rates) can be set up easily for individual products, collections, or your entire store. More of this will be discussed in later sections.
For shipping and fulfillment, you can enter the following information:
- Check whether the product needs to be shipped by checking This is a physical product.
- The Weight field only appears when This is a physical product is checked and needs to be exact because it is used to calculate shipping rates.
- The Country/Region of origin field is where the product was manufactured or assembled.
- If you want to ship the product internationally, enter the harmonized system (HS) tariff code because they provide customs with information so that correct tariffs can be applied to the order.
Related:
The search engine listing preview is a preview of how your product will appear in search engine results. The preview has the product title, the product slug, and part of the description. Edit the product details so that it’s easier to find on Google.
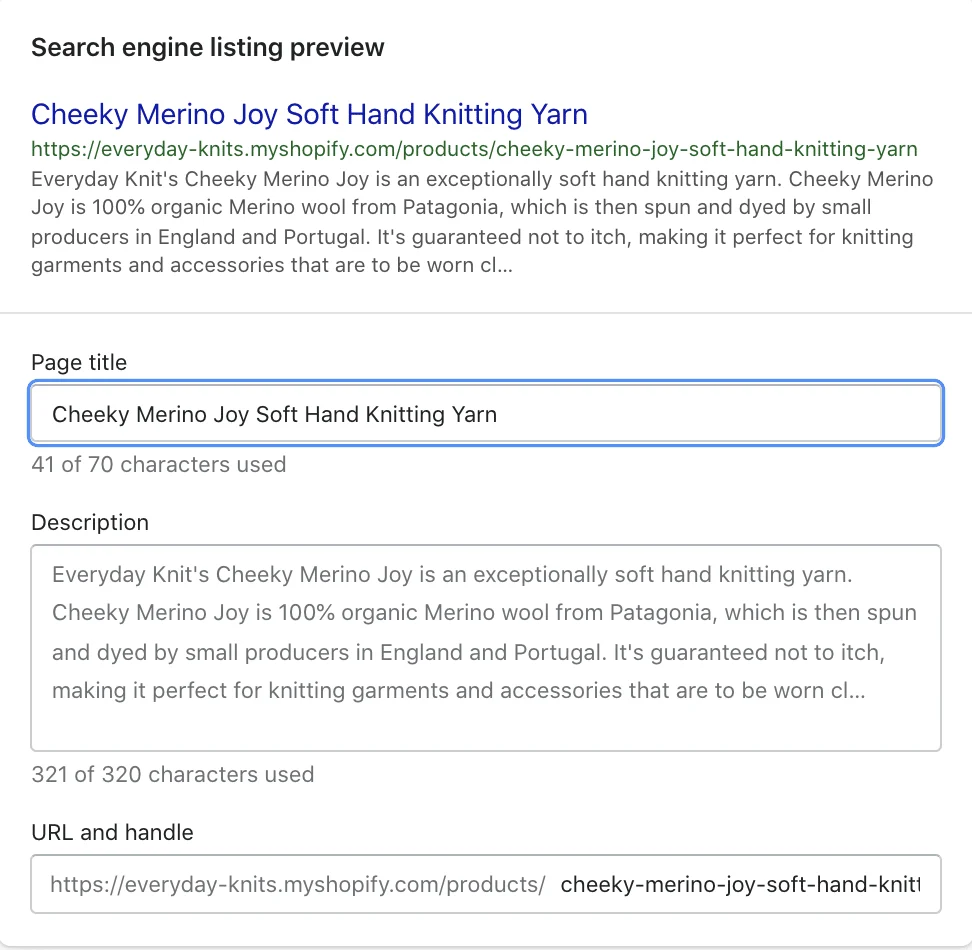
You can also manipulate the meta information that Google and other search engines display on results pages.
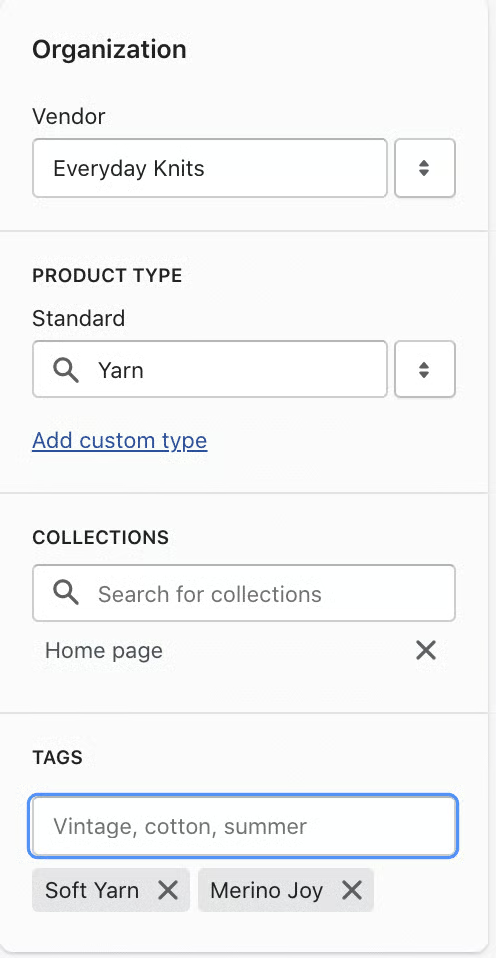
- Product type: You can create different product categories to organize your site and inventory tracking — for example, shirts, pants, jackets, etc.
- Vendor: Add the vendor or supplier information to reorder as items run out easily.
- Collection: Create collections, such as “Fall 2022” or “Back to School,” so that shoppers can browse by theme or event. They let you organize and curate your products for specific purposes and audiences. Display collections in your navigation or homepage, similar to having a catalog. When setting up collections, the same product can be part of multiple collections
- Tags: These are keywords you can add to products so that they are easy to search on your site. For example, if you sell pants, you can add tags based on color (navy, khaki), fabric (denim, cotton), and more. Tags can also help to automate actions in your store, like adding a product with a specific tag to a specific collection.
An example of how to organize products in a Shopify store.
Adding products individually might be best if you are just starting or have a limited inventory. However, if you’re bringing your brick-and-mortar store online or switching from another ecommerce platform, uploading your products in bulk can save a ton of time. Shopify has a sample CSV file you can download, add your product information, and then upload to the Product Manager. To import your CSV file, go to All Products > Import > Add File.
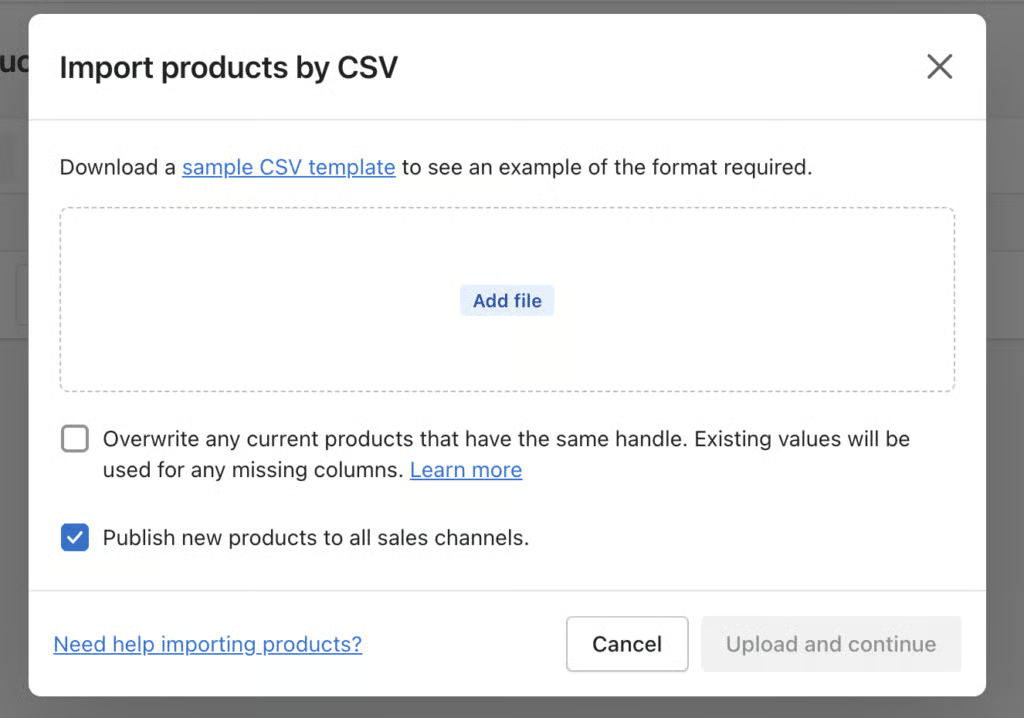
If you are already using a POS or inventory management system, downloading the CSV template and adding your products will likely be faster than adding products one by one.
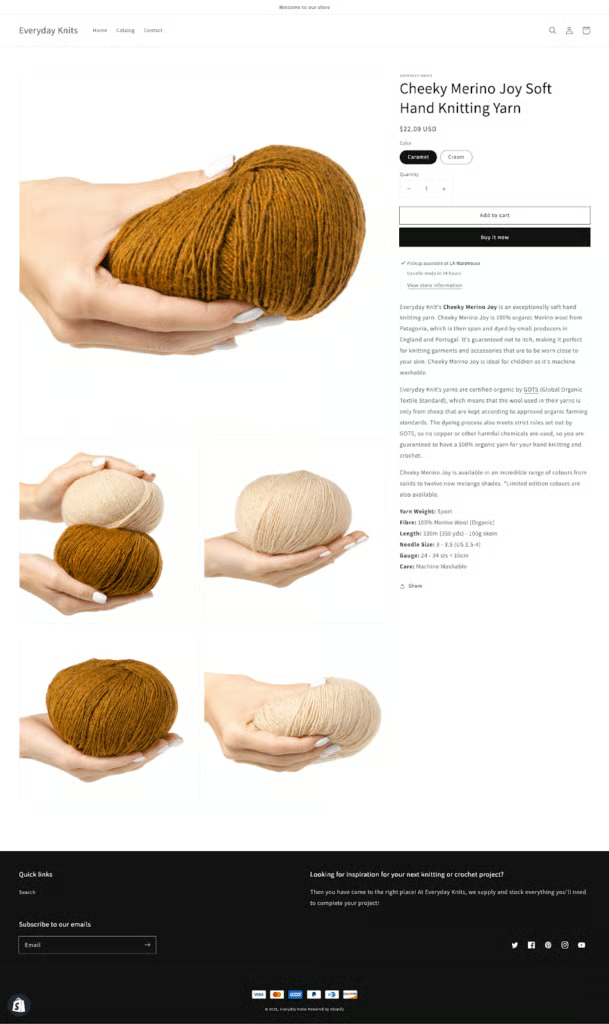
A sample product page
Step 3: Set payment methods
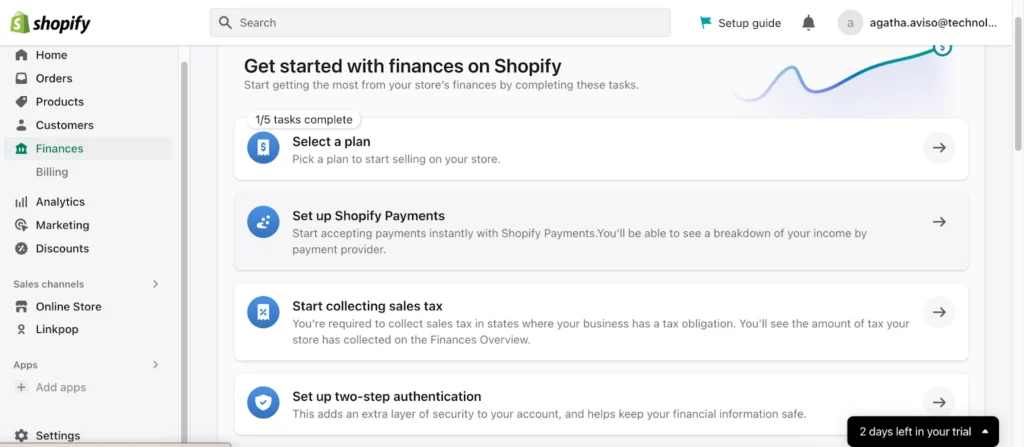
After you have added your products, the next step is to set up payment methods for your online store. To get started, click Finances from the navigation menu and then Set up Shopify Payments.
You can use Shopify’s built-in processor, Shopify Payments, or go with your preferred payment provider.
You can use Shopify Payments or a compatible third-party payment processor for your Shopify store. Shopify offers customers the following payment methods:
- Visa, Mastercard, American Express, Discover, JCB, Diners Club
- Shop Pay
- PayPal
- Apple Pay
- Amazon Pay
- Google Pay
If you want to use Shopify Payments, you’ll need to provide the following:
- Employer Identification Number (EIN)
- Banking information
- Average price of your orders
- Average shipping time for your orders
To set up Shopify Payments, navigate to Settings in the left navigation bar, and then choose Payments.
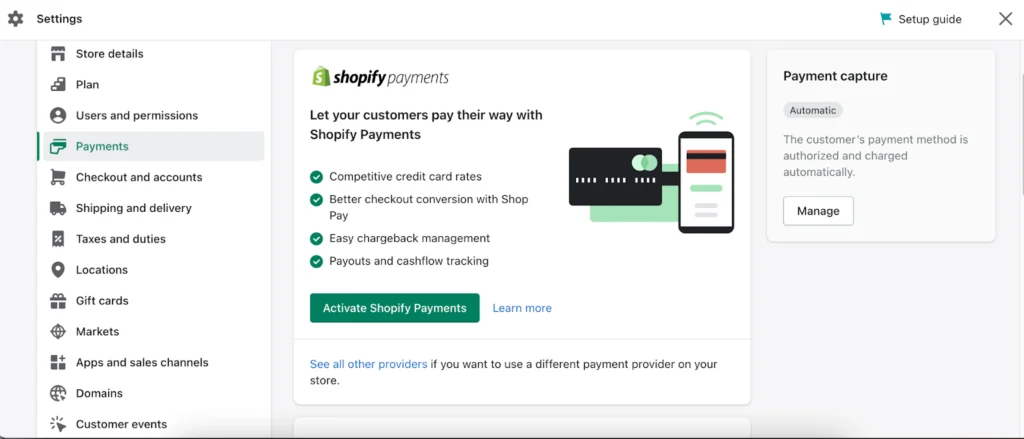
The easiest (and most cost-effective for new businesses) payment processing method for Shopify stores is Shopify Payments.
You’ll either see the option to Complete account setup (if you haven’t set up a credit card payment provider for your account) or to Activate Shopify Payments if you’ve enabled a different provider. The latter will remove any providers associated with your account and replace them with Shopify Payments.
You can also adjust payment settings, including
- Payout details: Shopify will automatically deposit earnings from sales into your bank account. The default description on the payment will be “Shopify,” but you can change the name of your store or business (if, for example, you have multiple Shopify stores).
- Payout schedule: Choose whether you are paid every business day, weekly, or monthly.
- Fraud prevention: You can choose to automatically decline charges that fail AVS postal verification (the zip code on the customer’s payment method does not match what they entered) or AVV verification (they enter the wrong 3- or 4-digit security code).
- Customer billing statement: Choose what name shows up on customers’ bank statements when they purchase from you and add a contact phone number.
- Multiple currencies: Accept dozens of currencies, including Canadian Dollars, British Pounds, and Euros.
After you set this up, it’s a good idea to conduct a test transaction on your store.
Related:
If you’re using Shopify Payments, you can still activate PayPal and Amazon Pay to offer shoppers more one-click or one-touch payment options. You can also activate alternative payment options — including buy now, pay later (BNPL) and installment payment plans from Affirm, Afterpay, Klarna, Sezzle, and others.
Learn more about how payment processing fees differ from each plan in our Shopify pricing guide.
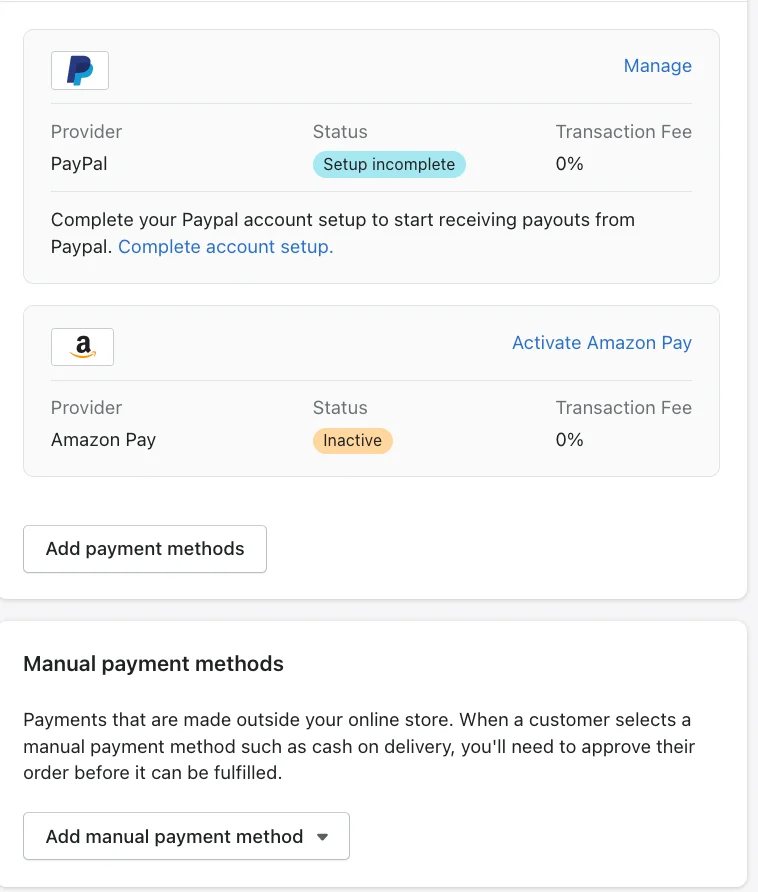
Shopify makes it easy to add PayPal payment options.
Step 4: Design your store
This is where the fun part begins! Now that the mundane tasks of adding products and setting up payment processing are over, it’s time to bring your vision to life with Shopify’s website design tools. You can opt to create your own designs or use one of Shopify’s many available designs.
Shopify’s website builder has an intuitive drag-and-drop interface.
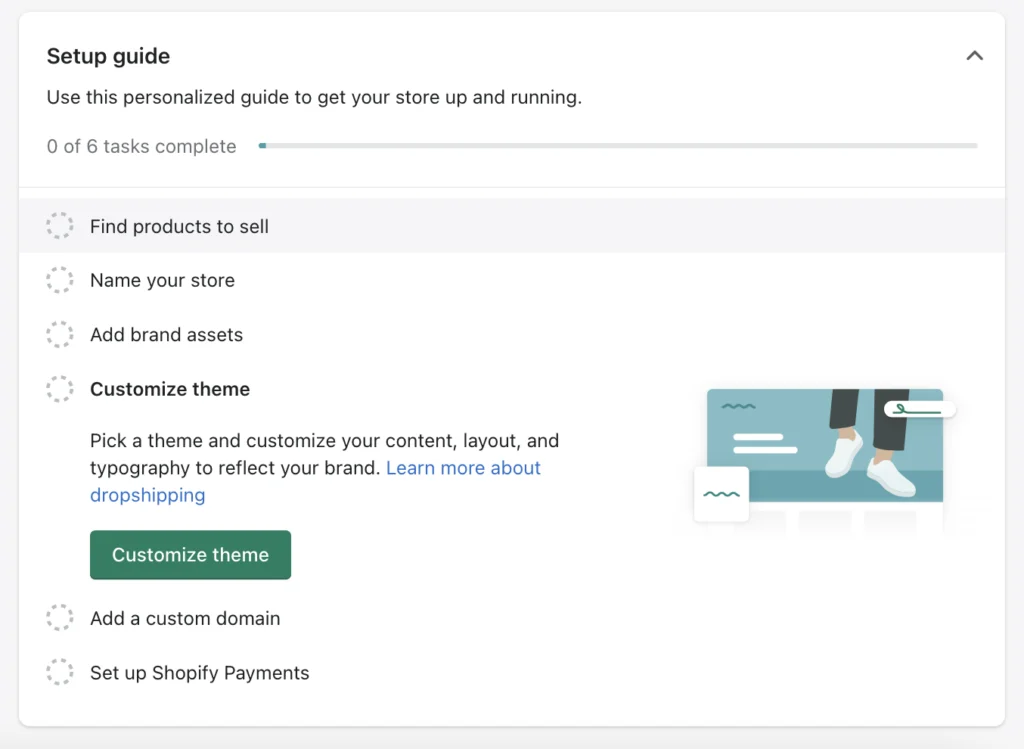
The first step in designing your store is to add your brand assets to Shopify — your logo, colors, and cover image. You can directly access this through the setup guide, but you can change this anytime by going to Settings from the navigation menu and scrolling down to click Brand.
Upload the following:
Common brand assets used across apps and channels:
- Default Logo: Used for most common logo applications (HEIC, PNG, or JPG; 512 pixels minimum recommended width)
- Square Logo: Used by some social media channels and may be cropped into a circle (HEIC, PNG, or JPG; 512×512 pixels minimum)
- Brand colors: Primary and secondary colors (HEX codes)
Additional brand assets that are usually used by some apps and social media channels:
- Cover Image: Shows off brand in profile pages and apps (HEIC, PNG, or JPG; 1920×1080 pixels minimum)
- Slogan: Brand statement or tagline often used along with your logo (80 characters)
- Short description: Business description often used in bios and listings (150 characters)
- Social links: Often used in the theme footer (Facebook, Twitter, Pinterest, Instagram, TikTok, YouTube, among others)
Related:
Next, you’ll choose a theme for your online store. You can use a templated theme or create your own. If you use a premade theme, you can customize it, so it’s unique for your online store. Browse free and paid themes in the Shopify Theme Store.
Click Customize theme from your Shopify dashboard to access free themes, purchase a theme, or upload a theme.
Once you find one you like, click Try theme to test it before purchasing and adding it to your site. Do note, though, that you need to be on a paid plan to be able to do so. If you like the theme, select Buy theme (Add theme if it’s free) to apply it to your Shopify store.
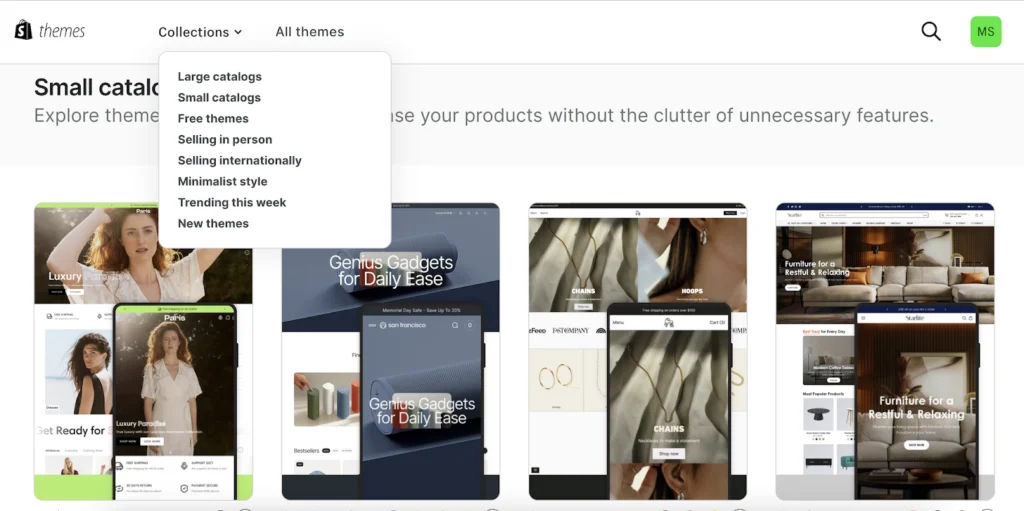
Shopify’s Theme Store offers 13 free and over 200 paid themes.
When choosing a theme, consider the following:
- Make sure the theme follows ecommerce website design principles.
- Check if the theme you like has the features you need built in, like a search bar that auto-completes queries or a section that displays press mentions.
- Don’t pick a theme based on colors or fonts. These are all things you can customize later.
- Try a paid theme before you purchase it for a one-time fee.

The default theme for Shopify is Dawn. You can click on the Customize button to add design elements and make the store your own. We will discuss how to do it in the upcoming sections.
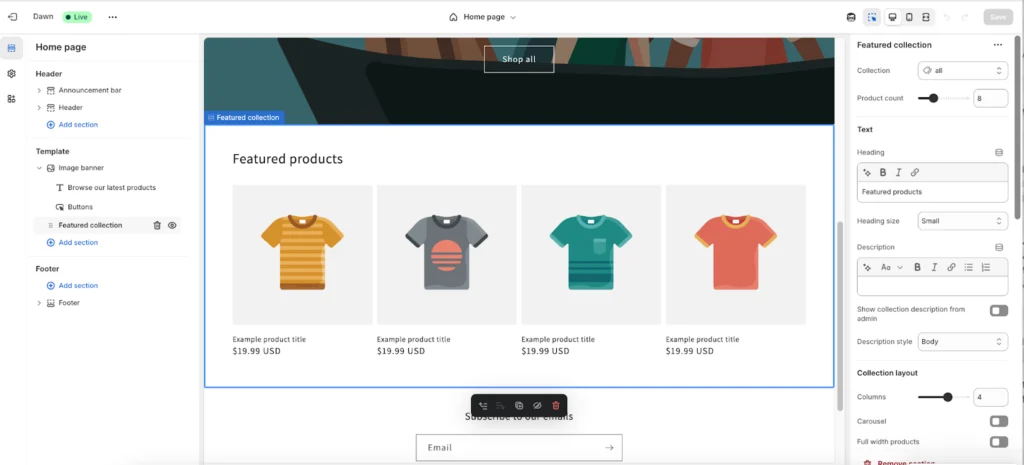
The final step in designing your store is customizing the look and feel. To make additional tweaks to the design of your Shopify site, you can go back to the Themes section of your Online Store from the navigation bar. Find the theme you want to edit and click Customize.
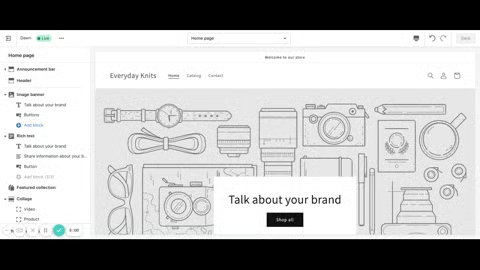
The theme editor is where you can customize your home page and set up what you’d like your product pages, site pages, blog pages, cart, checkout page, and more to look like.
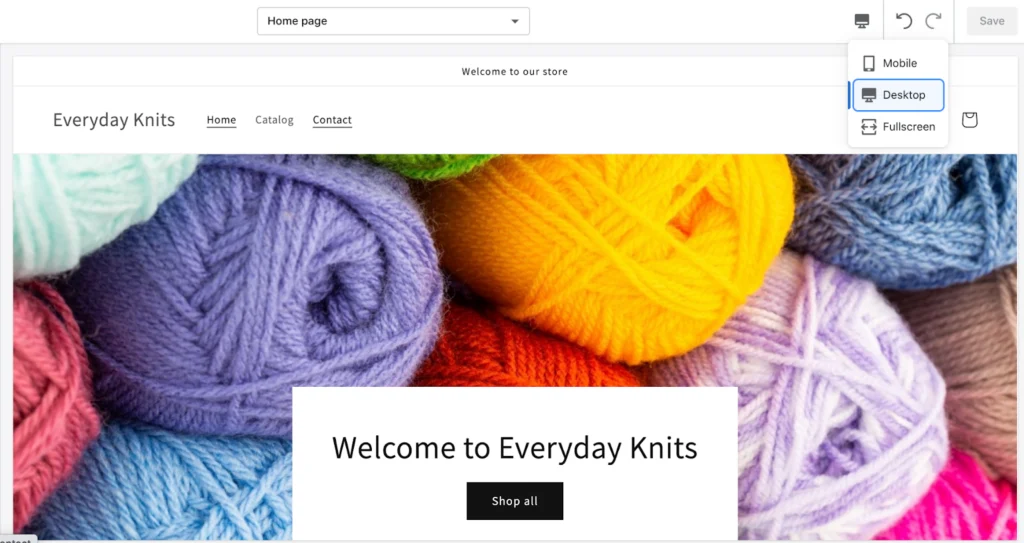
When designing your homepage, think about what goals you want your homepage to accomplish and determine how they can help with your business. For example:
- Prioritize first-time visitors. Help them quickly understand your business to encourage them to buy.
- Accommodate returning visitors, and make it easy for them to navigate and purchase items.
- Design your homepage with the intention that most will be viewing from their phones. Make it easy for them to scroll.
You can easily move, add, delete, or hide sections in your theme editor.
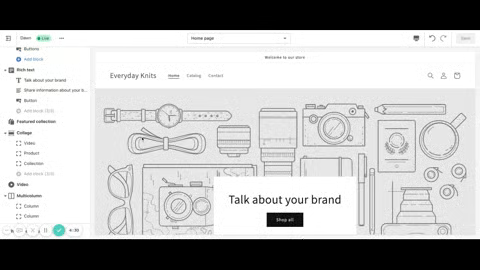
Make sure to preview your theme in mobile and desktop layouts when making any changes.
Shopify has previews for desktop and mobile.
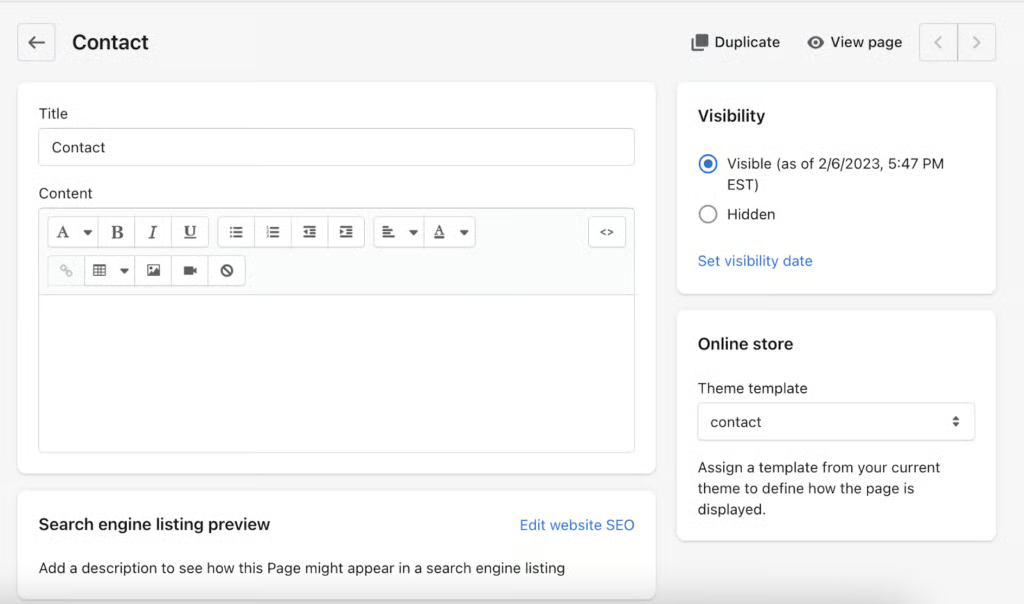
Your Shopify store should consist of more than just a homepage. You’ll need product pages, a contact page, and other pages to help users get to know your brand and products.
To add a new page, go to Pages under the Online Store menu in the navigation bar. Then click Add page.
To publish the page, choose a publish date under Visibility. If you’re not ready for the public to see it yet, you can always select Hidden or schedule it for a future date. When you’re done, click Save.
Your Shopify store pages use a WYSIWYG editor.
You don’t need to have all your pages ready for launch, but some of the most helpful pages to your shoppers are the following: About page, Contact page, FAQ page, Policy pages.
- About page: Some ideas to include on this page are 1) a video introducing yourself or the business; 2) links to awards and press mentions; and 3) images that explain your supply chain or display the faces behind your business operations.
- Contact page: Most Shopify themes let you create one easily. Give instructions to help customers get in touch or even link out to other pages, like an FAQ, to help customers troubleshoot their own problems first.
- FAQ page: A frequently asked questions page helps address some of the common customer support inquiries.
- Policy pages: Policy pages are standard practice for online businesses. Under Settings > Legal in Shopify, you can generate templates that you can customize according to your business and local laws. It is recommended you develop the following policies: return policy, privacy policy, terms of service, and shipping policy.
Step 5: Connect a domain
When you create a Shopify site, you can use your own domain or purchase a new one through Shopify.
Think of it as buying real estate for your business, but this time it’s on the internet. Learn
and explore
.
You can transfer your own domain name or buy one through Shopify.
- To use your own domain, you’ll need to log in to the portal of whatever you used to purchase and manage that domain. Unlock the domain you want to transfer to Shopify and get the transfer authorization code. In Shopify, go to Settings. Choose Domains in the left menu. Select Connect existing domain, and then transfer in your domain.
- Enter the domain name and then click Next. Select Verify domain. You’ll see either “domain unlocked” or “domain locked.” For the former, click Next. In the case of the latter, you might need to go back to your provider.
- Enter the authorization code and click Next. Select Buy and transfer. Your domain will typically be transferred in 20 days or less.
For a more seamless option, you can also purchase a brand-new domain name directly through Shopify.
- Go to Settings. Choose Domains in the left menu, then click Buy new domain. Enter the name of the domain you want and choose your extension.
- Once you find a URL you want, click Buy. Shopify will then take you through the domain purchase and registration process. It can take up to 48 hours for your domain to be active.
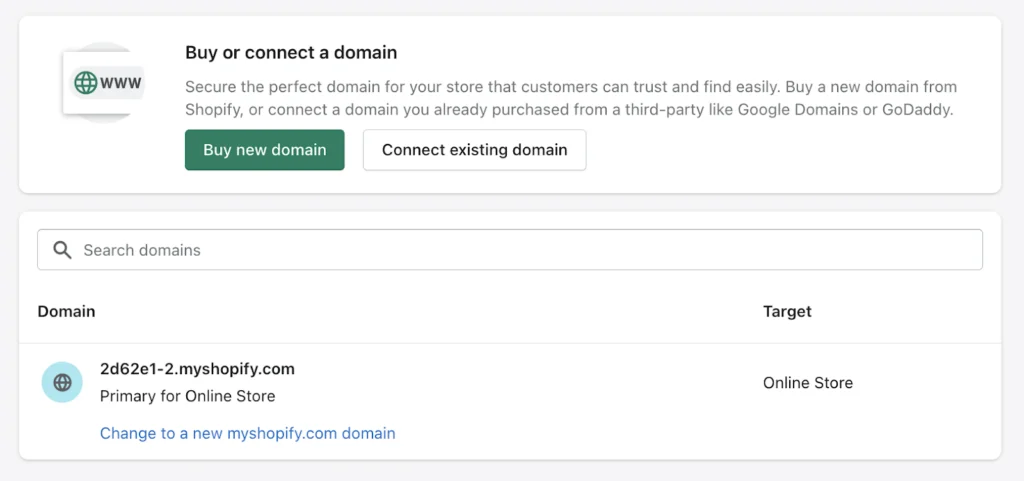
Every Shopify account comes with a Shopify domain, but you can purchase or transfer in a more custom domain name.
Step 6: Configure back-office settings
After you have connected a domain, the next step is to configure back-office settings for your store—taxes and duties, billing information, and notifications.
Depending on where your business and customers are located, you may need to adjust your Shopify store’s tax settings. Shopify automatically adjusts taxes for US-based sellers and sales, but you’ll need to add tax and enter your tax registrations if you’re in Canada or use default or custom rates for each location if you’re outside the US and Canada.
Related: The Ultimate Guide to Ecommerce Sales Tax
Navigate to Taxes and duties in the left menu (Under Settings) to review your default settings. You can also adjust taxes for shipping, specific products or collections, digital products, exempt customers, and more.
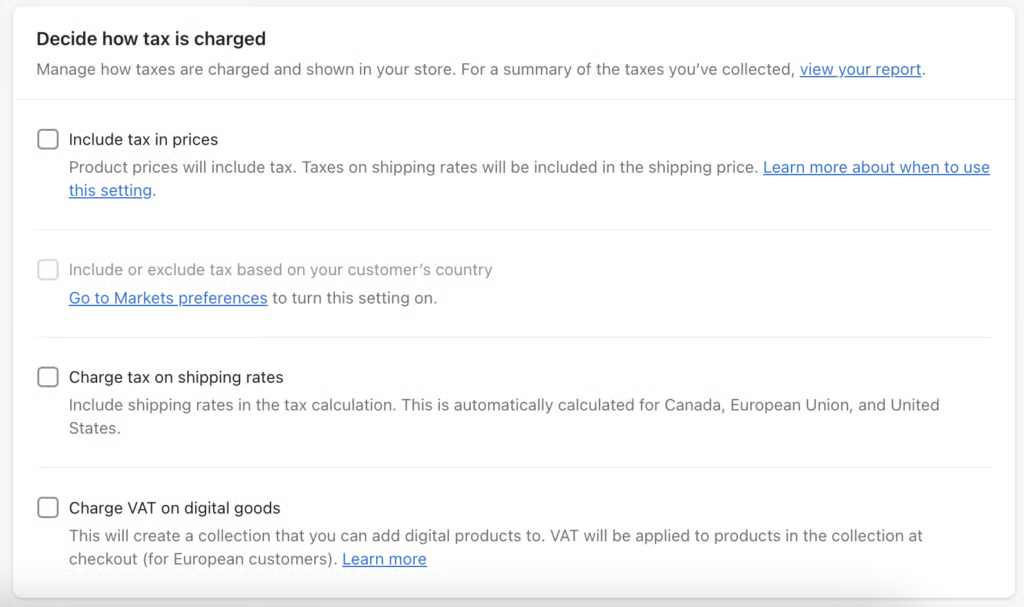
Shopify makes it easier for you to include or exclude taxes on your product pricing.
Step 7: Set up fulfillment processes
If you are starting a new business, you’ll likely handle order fulfillment in-house until your order volume starts to grow. You can connect third-party fulfillment partners to your Shopify store or use Shopify Fulfillment, which seamlessly integrates with your site and connects you to a full-service network of end-to-end shipping and fulfillment providers.
Look for Shipping and delivery in the Settings menu. Here, you can do the following:
- Add shipping locations
- Add, edit, and delete package types (look for Packages)
- Configure default package dimensions (in the Saved packages section)
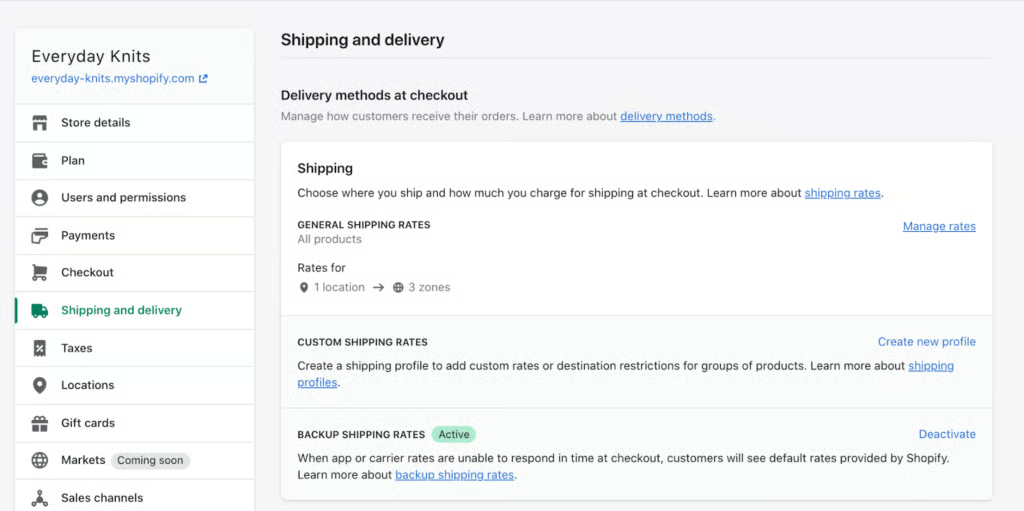
Configure custom shipping rates, local pickup and delivery, and save package sizes in this section of your Shopify store settings.
Now it’s time to design what the customer experience is like when shoppers check out. One of the best things about Shopify is that it allows you to create a fairly customized checkout experience without having to navigate any code. That also means there are a lot of settings you can wade through.
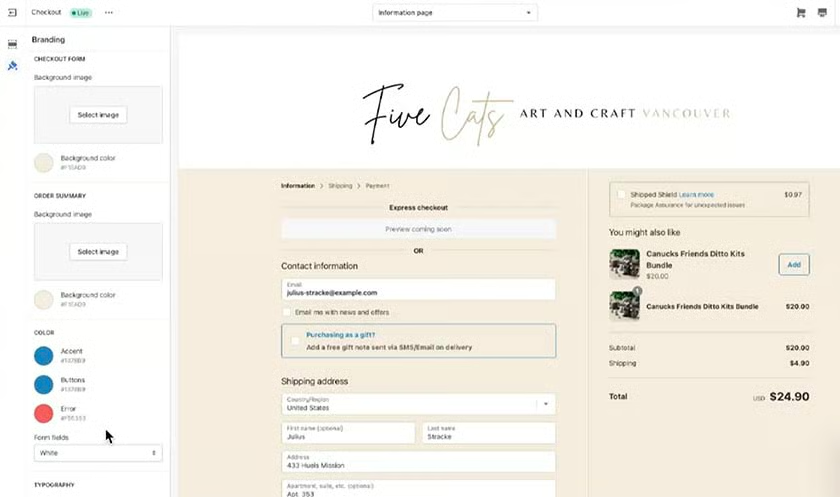
Shopify’s new drag-and-drop checkout editor lets you easily customize your checkout page with your branding colors, images, and fonts. (Source: Shopify) 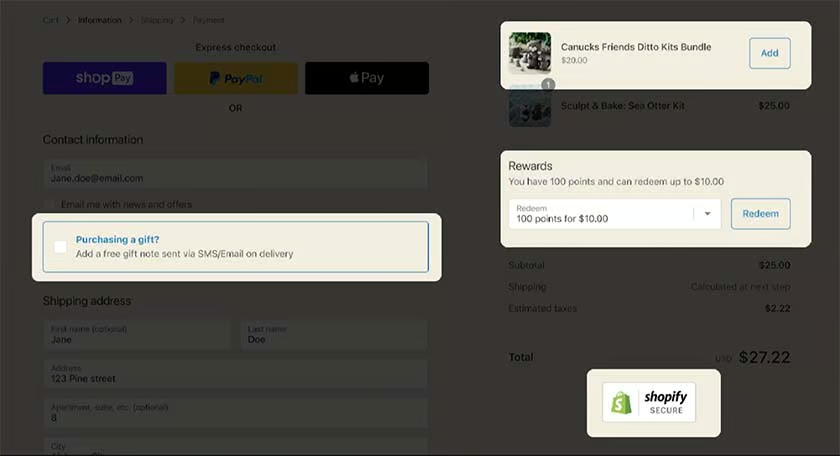
Shopify’s new checkout page also lets you install checkout apps that can be easily edited in the new checkout editor. (Source: Shopify)


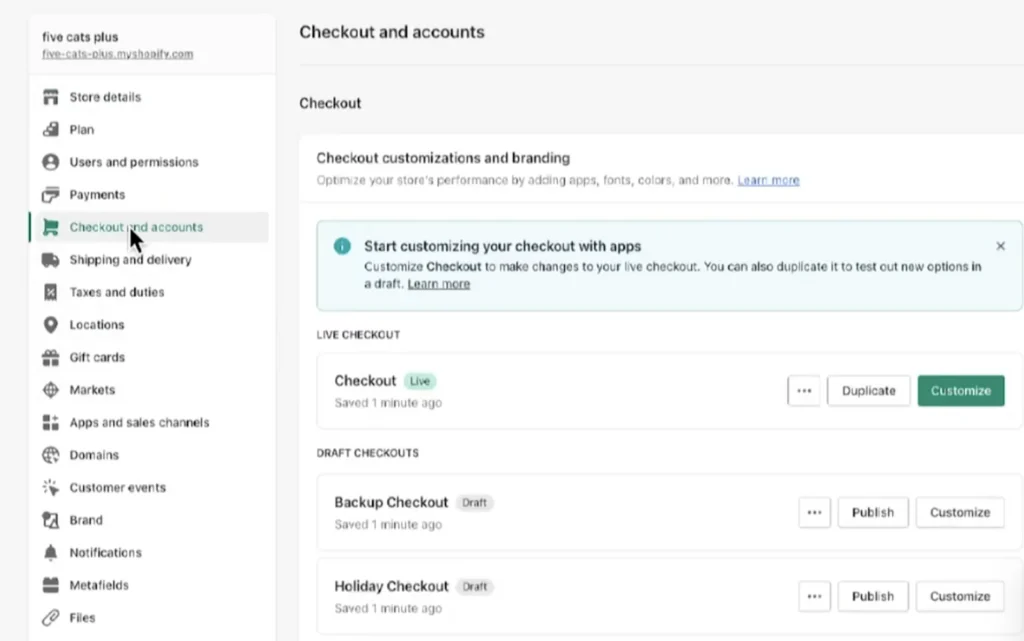
Navigate to Settings > Checkout and accounts to manage:
- Customer accounts: Choose whether user logins are disabled, optional, or required for purchases.
- Contact methods: Select whether shoppers can provide their email and/or phone number at checkout, or if their email is required. Also, choose whether or not shoppers are prompted to add notifications for shipping updates or download Shopify’s Shop app to track order status.
- Form options: Choose what fields are hidden, optional, or required for customers to fill in at checkout, including first and last name, company name, address, and phone number.
- Shipping: Choose whether or not to display tipping options.
- Order processing: Select whether or not to use a customer’s shipping address as the default billing address, whether electronic items such as gift cards should be automatically fulfilled, and when a customer order should be archived.
- Email marketing: Decide whether or not to show a sign-up option at checkout and if it should be pre-selected.
You can also use the theme editor to make adjustments like adding a background, logo, or image; changing the font and colors; adding bot prevention; and adjusting the form fields.
Step 8: Launch your Shopify store
After configuring back-office and fulfillment settings, it’s time to check everything before launching your Shopify store. We recommend running a test transaction first, removing the password to your Shopify store to publish, and measuring analytics for performance.
Here’s how to run a test transaction:
- Go to Payments in your settings menu on the left. Disable your payment gateway if needed. Click Manage.
- At the bottom of the page, click Switch to a third-party provider, and then click Switch to a third-party provider again to confirm.
- Select (for testing) Bogus Gateway from the list.
- Click Activate (for testing) Bogus Gateway. Hit Save..
Shopify recommends testing more than just placing an order, including other things like running successful and failed transactions, refunds, canceled orders, archiving orders, and doing partial vs completed fulfillments.
After successfully running a test transaction, it’s time to publish your store by removing its password. To do this, go to Online Store > Preferences from the navigation menu and click Remove Password.
Step 9: Market your Shopify store
Once your Shopify store is live, the real work begins: attracting customers and generating sales. No matter how great your products are, you need a marketing plan to get your store in front of the right people.
In this step, I’ll walk you through practical, beginner-friendly ways to start marketing your Shopify store — from using Shopify’s built-in marketing features to setting up email campaigns and SEO. Whether you’re just starting out or scaling up, these strategies will help you build traffic, grow your brand, and turn visitors into loyal customers.
- Leverage built-in campaign features available in your dashboard: Marketing on Shopify comes with a range of marketing tools to help you build and promote campaigns including blogging tools, SEO features, automation tools, targeting Facebook ads, Google advertising, and more. Shopify’s automation apps and add-ons include options for abandoned cart recovery, SMS messaging for promotions, and email list segmentation. Alternatively, you can also enhance your Shopify store by using apps from the Shopify App Store.
- Optimize for SEO: Customize your page titles, meta descriptions, and product listings. SEO helps your store appear in Google search results without paying for ads. Read more about ecommerce SEO in our guide.
- Set up email marketing: Use Shopify Email to send newsletters, promotions, and abandoned cart reminders. Email marketing remains one of the highest-ROI tools for ecommerce stores. See our tips on email marketing for retailers.
Step 10: Measure analytics
The final step in setting up your store is to track customers and measure analytics. This helps you see how your store is performing and zone in on areas for improvement.
Shopify has built-in analytics tracking and reporting, and works with third-party providers like Google Analytics. Its native data reporting tools will automatically kick on. You’ll have three separate tools right out of the gate: Dashboards, Reports, and Live View.
The dashboard allows you to see daily or date range-specific statistics like total sales, returning customer rate, conversion rate, average order value, traffic source, and more. Reports offer detailed breakdowns in eight categories: sales, acquisition, profit margin, customers, behavior, finances, marketing, and inventory. Live view allows you to see your current site visitors.
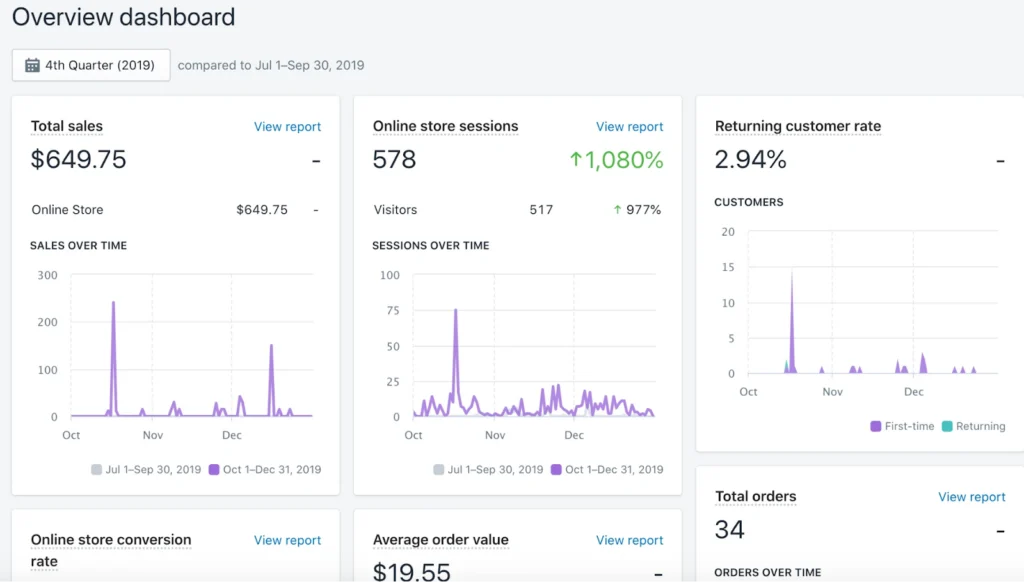
This is an example of what your reports look like from your dashboard. You can customize date ranges for comparison.
To learn more about your customers, go to Analytics in the left navigation and select Reports. Look for the Customers section. Here, you can find the following insights as well as customize your own reports:
- Customers over time
- First-time vs returning customer sales
- Customers by location
- Returning customers
- One-time customers
- At-risk customers
- Loyal customers
Learn how to use retail metrics to drive more sales for your business.
How much it costs to set up a Shopify store for your small business
When building your Shopify store, it’s also important to understand the potential startup costs. While Shopify makes it easy to launch an online store on a small budget, there are a few basic expenses to plan for, including your subscription, domain name, and optional tools to help you market and grow your business.
Here’s a quick look at the typical costs involved when creating a Shopify store for a small business:
| Expense | Estimated Cost | Details |
|---|---|---|
| Shopify subscription | $39-$399/month | Free trial for three days; $1/month for three months after 3-day free trial; starts at $39/month after promo. |
| Domain name | $14-$25/year | Purchase through Shopify or use your own. |
| Paid theme (optional) | $100-$490 (one-time) | Free themes available; premium themes add design/functionality. |
| Essential apps | $0-$50/month | Email, SEO, reviews, product bundling, upselling, etc. |
| Product photography/tools | $0-$100 | Use smartphone + free editing apps like Canva or Snapseed. |
| Marketing (ads, email, etc.) | Varies | Facebook/Google ads, Shopify Email campaigns. |
Frequently asked questions (FAQs)
To set up a store on Shopify, start by signing up for a free trial. Then, add your products, choose a theme, set up payment and shipping options, and launch your site. You don’t need any technical experience—Shopify guides you through each step.
Yes, Shopify is ideal for small businesses. It’s easy to use, affordable, and packed with built-in tools for marketing, inventory, and sales. Whether you’re a one-person operation or scaling up, Shopify adapts to your needs.
Not at all. You can build a Shopify store using drag-and-drop tools and prebuilt themes. No coding required. You can customize your site using settings, apps, and visual editors.
You can start with Shopify’s 3-day free trial, followed by a $1/month plan for the first 3 months. Expect to spend $300-$600 in total startup costs if you include a domain, optional paid theme, and apps.
Yes, Shopify is one of the best ecommerce platforms for beginners. It offers an intuitive drag-and-drop builder, step-by-step setup guides, and built-in features for selling online or in person. You don’t need any coding or technical skills to create a Shopify store — everything from product setup to payment processing can be done through an easy-to-use dashboard. Plus, Shopify provides 24/7 customer support, a large app marketplace, and free resources to help you launch and grow your store.
Before creating a Shopify store, you should decide where you’ll sell (online, in-store, or both), whether you need POS hardware, and what your initial budget looks like. A clear product offering and brand name are helpful too.
Bottom line
Setting up a Shopify store is one of the fastest and most effective ways to launch an online business — whether you’re starting a side hustle, expanding a brick-and-mortar store, or building a brand from scratch. With its user-friendly platform, powerful built-in tools, and endless customization options, Shopify makes it easy for small businesses to start selling online without needing technical experience.
By following the steps in this guide, you’ll be well on your way to creating a professional, high-converting online store. From adding products and designing your site to setting up payments and launching marketing campaigns, everything you need to succeed is right at your fingertips.
Ready to build your store and start selling? Sign up for Shopify’s free trial today and take the first step toward growing your business online.