

Learning how to start a retail business is a challenging yet highly rewarding endeavor. To open a successful brick-and-mortar store, you need a business plan (including market research) and legal structure, an ideal storefront location, startup funding, inventory, and a team of employees ready to start selling. Plus, in today’s market, you’ll also want to launch an accompanying online store and start marketing your business.
Learn how to start a retail business in 13 simple steps:
- Step 1: Create a Retail Store Business Plan
- Step 2: Determine Your Niche & Select Products
- Step 3: Develop Your Brand
- Step 4: Choose a Legal Structure for Your Retail Business
- Step 5: Organize Your Finances
- Step 6: Launch Your Online Store
- Step 7: Secure Funding for Your Retail Store
- Step 8: Choose a Storefront Location to Open Your Retail Store
- Step 9: Design Your Retail Store Interior
- Step 10: Choose & Install a Retail POS System
- Step 11: Hire & Train Retail Staff
- Step 12: Build Your Marketing Plan
- Step 13: Ensure You’re Compliant
- Frequently Asked Questions (FAQs)
- Bottom Line
Step 1: Create a Retail Store Business Plan
A business plan is a written document containing a business’s goals, methods for attaining those goals, and a time frame for achieving them. It’s a crucial first step in starting any business.
Writing a business plan gives you a definitive path to follow and set you up for success. It’s also what you present to potential investors.
The Small Business Administration (SBA) outlines two types of business plans: traditional and lean startup.
- Traditional business plans are more thorough and ideal if you’re requesting funding from banks or other traditional loan sources.
- Lean startup business plans are more informal and designed for fluid businesses that will change significantly as they grow.
You can also create a shorter, one-page business plan. Learn how with our one-page business plan guide.
When opening a retail store, we recommend following a traditional business plan as it’s more detailed—it can never hurt to be too prepared. Plus, it will provide a more concrete outline for you and your business partners or possible investors.
The nine elements of a traditional business plan are:
- Executive summary: High-level paragraph outlining your company’s purpose, mission, and why it will be successful.
- Company description: Be specific about your company’s details, including what problem you are aiming to solve, how you will solve it, what consumers you plan to serve, and the talent on your team.
- Market analysis: Include retail industry outlook and trends, what successful competitors are doing, and what your strengths will be.
- Organization and management: Outline who will be running your business and the experience your team members have in retail or startup environments.
- Product line: Outline what kinds of products you will sell, why they are needed, and include any research and development on private labels or proprietary custom products.
- Marketing and sales: Describe the tactics you will use to obtain and retain customers.
- Funding requests: Opening a retail store costs money. If you need outside funding, outline your needs and specify exactly how you will use the funds.
- Financial projections: Detail how your business will become stable and profitable, including a projected financial timeline of at least five years.
- Appendix: Use this space for any supplemental documents, such as product prototypes and pictures, credit histories, licenses, and permits.
This may seem like a lot of information, but it’s best to keep each section succinct so readers can easily get through the entire document and absorb all of the information.
When it comes to actually writing and formatting your business plan, there are a few different options to choose from. You can type it out in traditional word processing software like Microsoft Word or Google Docs. Or, build your business plan as a slideshow in PowerPoint, which is a great option if you need to present your plan to an audience.
There are also business plan software tools available, such as LivePlan, that have industry-specific templates. You can also use this business plan template and checklist or enlist the help of business plan writing services.
Step 2: Determine Your Niche & Select Products
Next in how to start a retail store business is choosing a niche.
A niche is the subset of the market to whom your business and products seek to appeal. This subset can be defined by its own unique needs, preferences, or identity that makes it different from the market at large. Your niche will define the products you sell, your price range, product quality, and marketing initiatives.
The narrower your niche market, the easier it is to become the go-to retail destination for that market. For example, there may be a dozen stores in town that sell pet products. But, you may be the only retailer that specializes in dog costumes or organic food options.
Carving out a niche for your retail store helps differentiate your business from the competition. With retail giants like Amazon and Walmart, the competition is fiercer than ever. And truthfully, many large retailers, like department and box stores, carry very similar products. Aside from the feel-good nature of shopping small, having something unique to offer will help you beat out big box retailers.
Choosing a Niche
You can find your niche market by:
- Listing your hobbies and interests: As a store owner, you will spend a lot of time engulfed in your chosen niche, so your own interests are a good place to start. Plus, choosing something you’re interested in will make your store more authentic.
- Researching the potential for each niche: Make sure you choose a topic with good money-making potential by researching Google Trends and checking out competitors on social media.
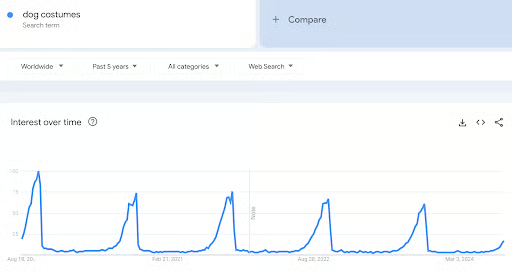
The phrase “dog costumes” appears to be trending downward in search, indicating a different niche may present a more long-term opportunity.
- Evaluating potential profits: Determine each niche’s potential profitability by looking at industry statistics and Amazon Best Seller lists. You can also research wholesale prices for products on sites like Alibaba and compare them to typical retail prices to get a sense of potential profit margins.
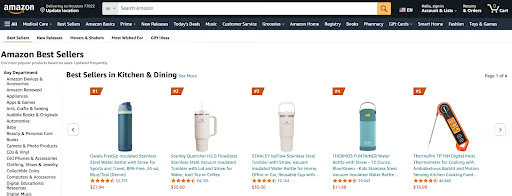
Amazon Best Sellers lists highlight popular products by category.
Sourcing Products From Suppliers
Once you’ve honed in on your niche products, it’s time to find a reliable supplier for those products. When figuring out how to source products for your retail business, you’ll first need to understand the different options.
- Manufacturer: You develop the product concept and outsource the creation. This option allows for the most control over the product but also takes comparatively long.
- Wholesaler: Wholesalers develop products and sell them in bulk to retailers for a discounted price. Retailers then resell those items for a profit. This is the quickest route for product sourcing, but it also allows for the least control over the product.
- Dropship: Dropshipping is when you sell products directly to customers and then outsource the manufacturing and fulfillment for each order. It is the most hands-off option, but also yields the lowest profit margins.
When choosing your supplier, research a few different options and order samples from two to five suppliers. Undergo quality assurance testing to narrow down which items you want to source. From there, nurture vendor relationships with effective communication and efficient payment—eventually, you can negotiate discounts, especially for high-volume orders.
As a retailer, you can plan for external supply chain issues by padding timelines, vetting suppliers, having multiple sources for your most popular products, and choosing local suppliers when possible.
Retail Market Research
Instead of starting with niche products and then researching to find their market, you can also start by doing primary market research. This is a type of market research where you go straight to your target consumers and ask them questions to figure out their interests.
In other words, you are starting with your consumer and their needs rather than starting with a product and then finding the right audience. Then you don’t have to spend so much time validating your retail business ideas—you already know there’s anticipated demand.
When you’re opening a physical brick-and-mortar storefront, you can study your local consumer behavior to determine their needs. It’s possible, and likely, that there are some specific needs locals have that your store can fill.
Effective primary market research tactics include:
Surveys are an easy and effective way to gather a lot of useful data. Established businesses typically use their customer database to send out emails. But, because you don’t yet have a customer database, you can promote your survey through local Facebook groups and targeted Facebook ads.
Your first surveys can be very broad and simply ask local consumers why they like their current favorite stores and interests. As you get closer to choosing specific products, you can send out surveys to measure customer interest and reaction to specific items.
Essentially, surveys give you quantitative data.
Step 3: Develop Your Brand
Your products are just one part of your retail business. Your brand is equally as important.
Developing a branding strategy for your business’s identity is also important because it attracts new customers and builds strong relationships with existing ones. Your brand identity is the essence of who you are as a store—it creates the feel that customers associate with your business and maintains cohesiveness between your products and aesthetic.
When defining your brand, ask yourself what feelings you want your business to evoke. Tap into your market research—look at your biggest competitors and think about what their branding looks like and how you can differentiate your store from theirs. All of this information helps build the foundation of your brand.
Document everything in your brand style guide to hold yourself accountable and onboard new team members or contractors.
Elements of your brand include:
Visual branding
Visual branding includes your logo, storefront, fonts, signage, and colors. It’s important to have a strong visual brand because it can communicate your message before someone even has a chance to read anything. You can use a tool and logo generator like Canva, or you can hire a brand designer to take you through the process.
Store Name
Your store name and slogan should be completely unique to you. Come up with something that’s easy to remember and representative of your brand. If you’re feeling stuck, do a Google search for business name generators and plug in some ideas to see what you get back. You can also use an AI tool like ChatGPT to help you brainstorm.
Don’t forget to use your store name as your domain name—having a website is a good idea even if you won’t sell online. You might even consider trademarking your name.
Mission and Vision Statements
Your mission statement and vision statement outline how you want to serve your community and customers. The main difference is your mission outlines more of what you’re actually doing, while your vision statement may be more aspirational and describe what you hope to achieve for the community around you.
Positioning
Brand positioning describes where your business fits in relative to your niche, market, community—and what sets you apart from the competition. Develop a unique selling proposition to document this positioning. This will concretely outline what sets you apart and can be helpful for yourself, your staff, lenders, investors, and even customers.
Step 4: Choose a Legal Structure for Your Retail Business
Choosing a legal structure when starting a retail shop is important because it determines how to collect and report taxes, how you’ll get paid from your business, and your level of personal liability. There are many types of legal structures, but the three most commonly found in retail are sole proprietorships, limited liability companies (LLCs), and corporations.
If you don’t set up a legal structure for your business, sole proprietorship is the default. It essentially means you’re doing business as an individual and therefore not separated from your business in any way.
| PROS | CONS |
|---|---|
| Easy setup and low cost | Unlimited liability |
| No corporate business taxes | No ongoing business lift |
| No annual reports/filings | Difficult to raise money |
| Not restricted by formal business structure | Inability to take on business debt |
| Easy recordkeeping | Can be seen as unprofessional |
Read more about the pros and cons of sole proprietorships.
Step 5: Organize Your Finances
Regardless of which legal structure you choose, it’s critical to separate your business finances from your personal accounts from the start. Having a dedicated business account will make it much easier to track expenses and income, which will help you stay on track financially.
Plus, you’ll have an easier time filing your taxes. Not to mention, if your personal and business finances are combined, that could “pierce the corporate veil” of your LLC if things go wrong.
When it comes to choosing a small business checking account, the options are virtually unlimited. Look for a bank that’s small business-friendly with few fees. Make sure there are branches close to your store or home. As a retailer, you’ll likely be making many cash deposits and making change, so getting to the bank should be convenient.
Consider other features that will make your life easier, such as mobile banking and online check deposit. Also, consider whether or not the bank has features that will help as your business grows, such as business credit accounts, loans, and overall branch location accessibility.
To get help choosing the best small business banking solutions for your business, check out the following guides:
In addition to a small business checking account, you’ll also want to have an accounting software program. There are a lot of expenses associated with running a retail store, such as products and shipping, employee wages, and advertising costs. Accurately tracking your income and expenses will help you see exactly how much revenue you’re making, understand where your expenses are high, determine your product purchasing budget, and make filing taxes a million times easier.
QuickBooks is one of our favorite accounting programs for small businesses because it is affordable, user-friendly, and integrates with many popular retail point-of-sale (POS) systems (we’ll cover POS systems below). It’s particularly good for retailers because it has retail-specific report bundles available—including reports like gross margin by inventory volume—and integrates with ecommerce solutions. QuickBooks plans start at just $10 per month, plus they offer a free 30-day trial.
Step 6: Launch Your Online Store
While you might be opening a physical retail store, in today’s market, you will also want to launch an accompanying digital storefront. Your bottom line has a lot to gain from launching an online store—in tandem with your retail store, it can help you reach a larger audience, geographically speaking, and it also gives you another channel where you can nurture existing customer relationships.
To start launching your online store, first choose an ecommerce platform that integrates with your POS system and accounting software. Most modern ecommerce platforms have templates and tools to help you design your store, or you can hire a professional to help.
We recommend Shopify as the top, user-friendly, high-value ecommerce platform. Not only that, every Shopify ecommerce subscription includes Shopify’s basic POS.
From there, you will want to figure out your order fulfillment and shipping so that you can get customers their orders. You might also consider offering click-and-collect services for your local customers.
Not sure where to start with your ecommerce site? We put together an entire guide to take you through how to start an online store. You can also check out these resources:
Step 7: Secure Funding for Your Retail Store
Opening a retail store requires a lot of upfront investment. You need to sign a lease on a physical space, invest in renovating that space, purchase products, set up your POS system and payment processing hardware, advertise like crazy, invest in a grand opening, and pay staff. It sounds expensive because it is expensive. Altogether, opening a retail store can cost up to $100,000.
To fund your retail store, ideally, you have a decent chunk of your upfront costs saved that you can invest personally. But, there are also plenty of small business funding options where you can secure capital from external sources.
Some of those options include:
- Small business loans: You find these loans from banks, credit unions, the SBA, and even your existing network of connections. This is where your formal business plan will come into play—it shows investors your path to success (and getting a return on their investment).
- Credit cards: If you’re starting and have no business income history or a lower credit score, choosing a business credit card may be the better option. A credit card will also give you more flexibility to account for unexpected expenses. Visit our guide on the best small business credit cards to see which one may be right for you.
- Crowdfunding: Crowdfunding is a great way to build buzz for your store and get people financially and personally invested. Plus, you don’t need to pay this money back.
The biggest factors to consider when taking out a loan are the interest rates (AIRs), upfront fees, and application requirements. Typical AIRs vary based on your loan type but should look something like this:
| Business Loan Interest Rates | Average Annual Interest Rate (AIR) | Minimum AIR | Medium AIR | Maximum AIR | Average Loan Amount |
|---|---|---|---|---|---|
| New Fixed-rate Loans | 2.54% | 0.47% | 2.73% | 7.65% | $59,046 |
| New Variable-rate Loans | 3.90% | 1.09% | 4.25% | 6.25% | $319,117 |
| Outstanding Fixed-rate Loans | 2.69% | 1.00% | 2.89% | 8.02% | $59,716 |
| Outstanding Variable-rate Loans | 4.19% | 1.84% | 4.68% | 7.50% | $159,243 |
| Source: ValuePenguin | |||||
Alternative Funding Options
An alternative option for funding your business is using your IRA or 401(k) retirement account. Your initial reaction to this idea may be, “Whoa, absolutely not.” But, using your retirement account to fund your business doesn’t necessarily mean you’re cashing out or borrowing against your account.
Instead, there’s an option called Rollover for Business Startups (ROBS), which lets you invest retirement funds into your new business without paying taxes or early withdrawal penalties. This process can be complicated. So, if you’re interested in using your retirement account to fund your business, we recommend working with an experienced provider like Guidant.
Step 8: Choose a Storefront Location to Open Your Retail Store
Choosing a location for your business can seem overwhelming: Where do you start? How do you know if you’re choosing a profitable area? Will people even want to come to your location?
When choosing a location for your business, first narrow down your options based on practicality and convenience. Consider how far you’re realistically willing to commute every day for the foreseeable future. Choose areas that are easily accessible from your residence. Spend time in each area to familiarize yourself with specific neighborhood demographics and preferences and to scope out other local businesses.
From there, look at listings in your desired area and find a space that will suit your needs. Contacting listings directly can offer the best deal—but working with a real estate agent can give you peace of mind in the contract negotiations and help you find the best space for your business.
Below are some ways that you can get to know a neighborhood and narrow down your perfect location:
For many retailers, foot traffic can account for most, if not all, of sales. This is especially true for convenience stores, for example, where almost all sales are walk-in impulse buys. But, if you’re operating a dog costume specialty shop, you might have more customers drive specifically to your store.
Our guide to determining foot traffic outlines how to calculate whether it’s worth splurging on a prime storefront location. It’s also important to consider the different types of foot traffic and what time of day it occurs. It may not always be what you expect.
For example, there’s a cafe and bakery in my hometown, both located in a central business district. It’s a few minutes out of the way for most commuters, so they do decent business during the morning rush hour. But, the cafe is only a block away from the town’s middle school. Its business is slammed on weekdays around 2 p.m. with all of the teenagers who walk over when school gets out.
This is one example of a foot traffic pattern you wouldn’t be able to predict if you weren’t familiar with the area, which is why it’s important to spend lots of time casing out prospective store locations.
In addition to staking out your prospective storefront, inquire about the traffic, shopper demographic, and neighborhood. Ask your listing agent as many questions as you can while viewing the space. But, keep in mind their motive of getting a lease signed. You can also visit neighboring businesses, introduce yourself, and ask business owners or managers if you can take them out for coffee to get some feedback on the location.
Important questions to ask about the property include:
- Who is the landlord and how is the property managed? Other businesses and employees in the space you are interested in will give you honest feedback about the landlord’s maintenance style and how they handle things like snow removal and general property upkeep.
- Why did the previous tenants leave? Look into tenant turnover in the complex, and talk to tenants who left, if possible, to discuss their experience in the space.
- What’s the busiest time of day and days of the week? Get other tenants’ opinions on traffic to the area.
- How long do tenants stay in the space? If you’re in an area surrounded by other storefronts, it’s best if they are established stores with regular customers that can help drive traffic to your new shop.
In addition to foot traffic and tenant feedback, it’s also important to consider other storefront factors that can majorly impact your retail business. For example, does the space have a dedicated parking lot? If there isn’t a dedicated lot with ample spaces, and street parking is difficult, potential shoppers might not make the effort to visit your store.
Also, consider what signage and street-facing display options are available. To draw in all of that foot traffic you monitored, shoppers need to know your business is there. Ideally, your storefront will be facing a busy street. If the location is set further back, is there a large sign by the driveway where passersby can easily see what businesses are inside? Ask the listing agent and neighboring tenant about what signage options are available and who pays for them.
Additionally, make sure you’re aware of any town or city policies that could affect your storefront marketing. For example, some towns place restrictions on how big the sign on the front of your store can be. Other towns forbid temporary signage like A-frames.
As we mentioned earlier, splurging on a prime location can be a savvy move if you’re opening the type of retail store that relies heavily on impulse purchases, such as a corner convenience store or a souvenir shop in a tourist town. But, most boutiques need to stick within their budgets, which means spending less than 10% of your monthly gross sales on rent.
Learn more about how to create a budget and budgeting best practices with our article How To Budget a Retail Business (+ Free Templates).
Step 9: Design Your Retail Store Interior
After securing a retail storefront, it’s time to start planning the interior. Strategically planning your store layout is so important because it greatly impacts in-store sales. A well-designed layout will welcome shoppers, make them feel comfortable, and direct them toward specific products.
The first thing you need to decide is what type of floor plan you want. This will largely depend on the type of store you’re opening. Most retail stores fit into one of these basic layout categories:
| Retail Floor Plan | Best For | Example Store Design |
|---|---|---|
| Grid Floor Plans Used in grocery, big box, and convenience stores | Shelf-stocked goods such as books, toys, specialty foods, hardware, and homewares | 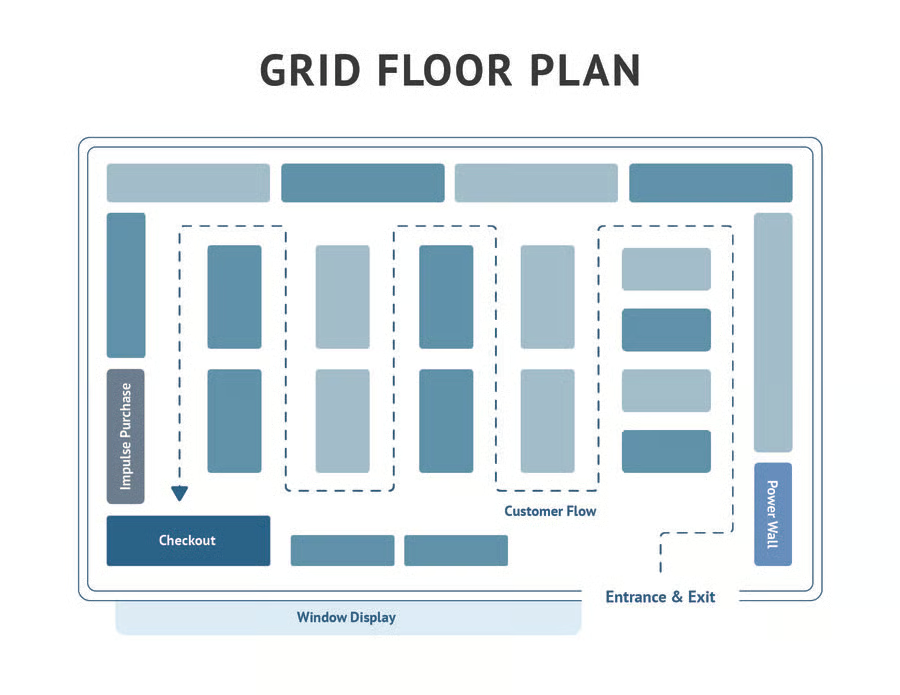 |
| Loop Floor Plans Maximize wall space and lead shoppers along a set pathway | Apparel, accessory, toy, homeware, kitchenware, personal care, and specialty retail | 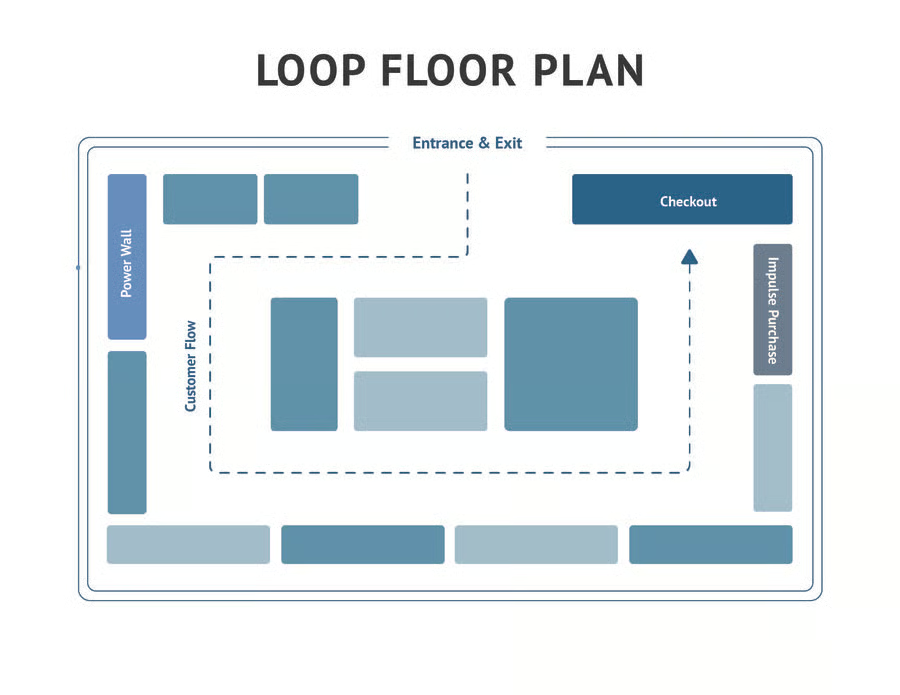 |
| Diagonal Floor Plans Maximize employee visibility in retail stores with lots of product testing | Self-service kiosks, tech and electronic stores, beauty and cosmetic retailers | 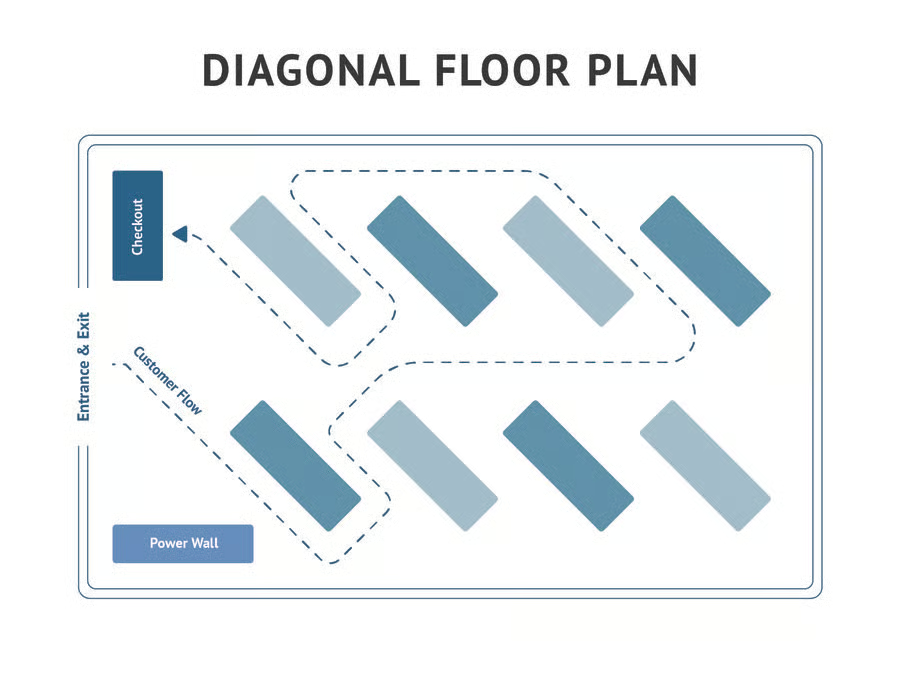 |
| Forced-path Floor Plans Customers are guided through a predetermined path and exposed to every product | Furniture, home decor, experiential retail stores, showrooms | 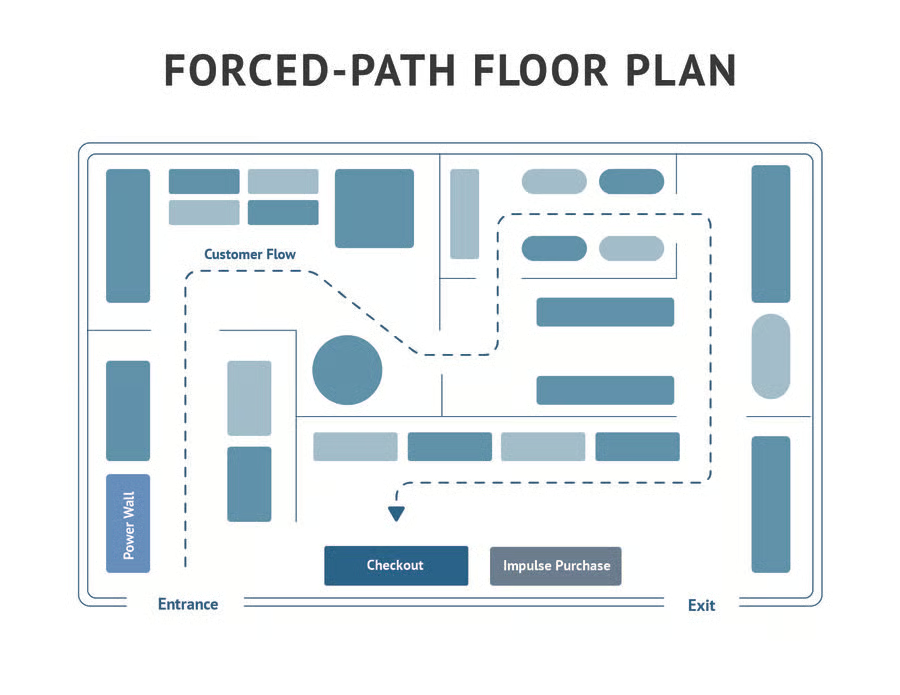 |
| Angular Floor Plans Showcase curated or edited inventories in designer or specialty shops | Designers, artisans, high-end apparel and accessories retailers, and curated or limited collections | 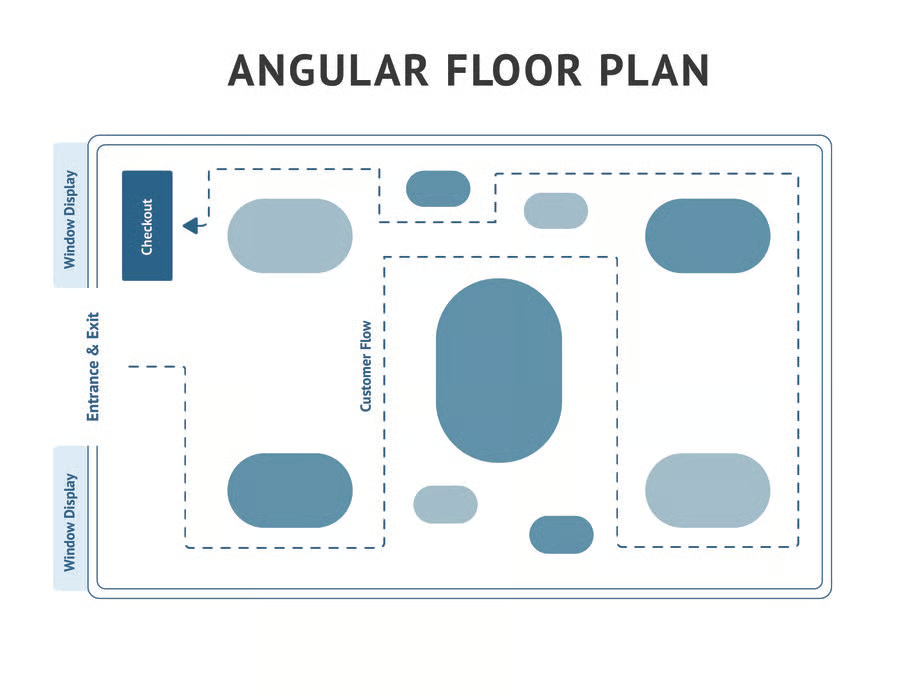 |
| Spine Floor Plans Easy to navigate and organize product categories with one big, center aisle | Small grocers, department stores, markets and marketplaces | 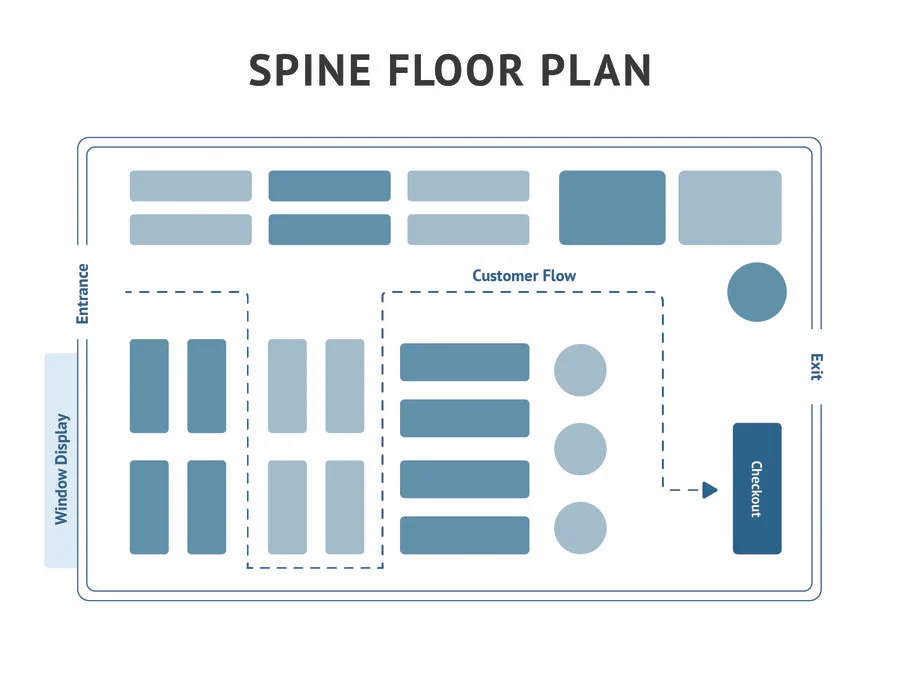 |
| Herringbone Floor Plans A type of grid floor plan with a big center aisle | Small footprint stores and/or stores needing to fit in lots of product | 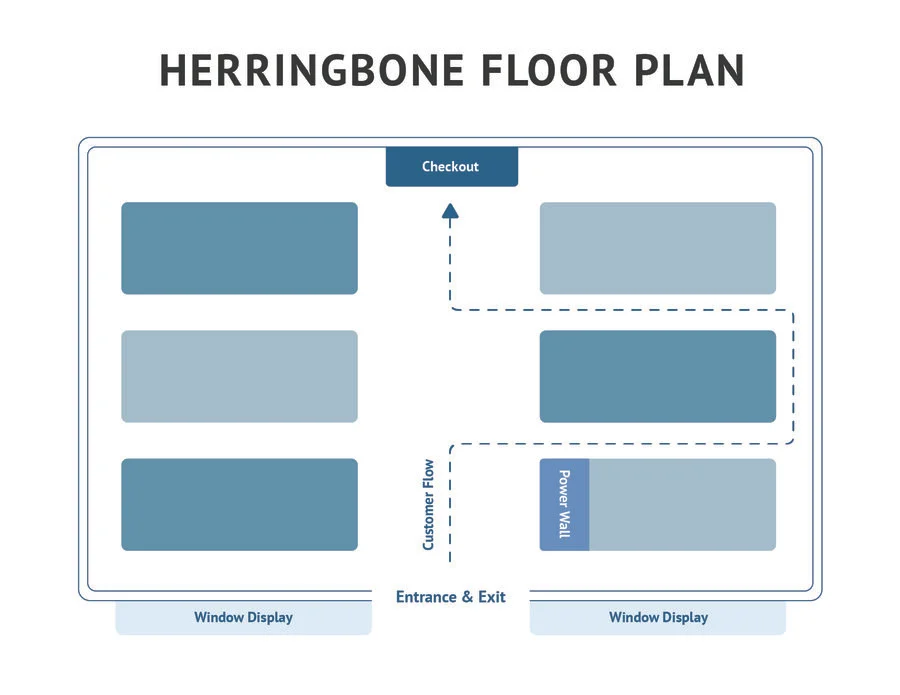 |
| Boutique Floor Plans A type of free-flow plan that prioritizes visibility and open space, often highlighting “pop-in” shops | Boutiques and specialty retailers use this floorplan to highlight brand collaborations, guest or “pop-in” retailers, or new product categories | 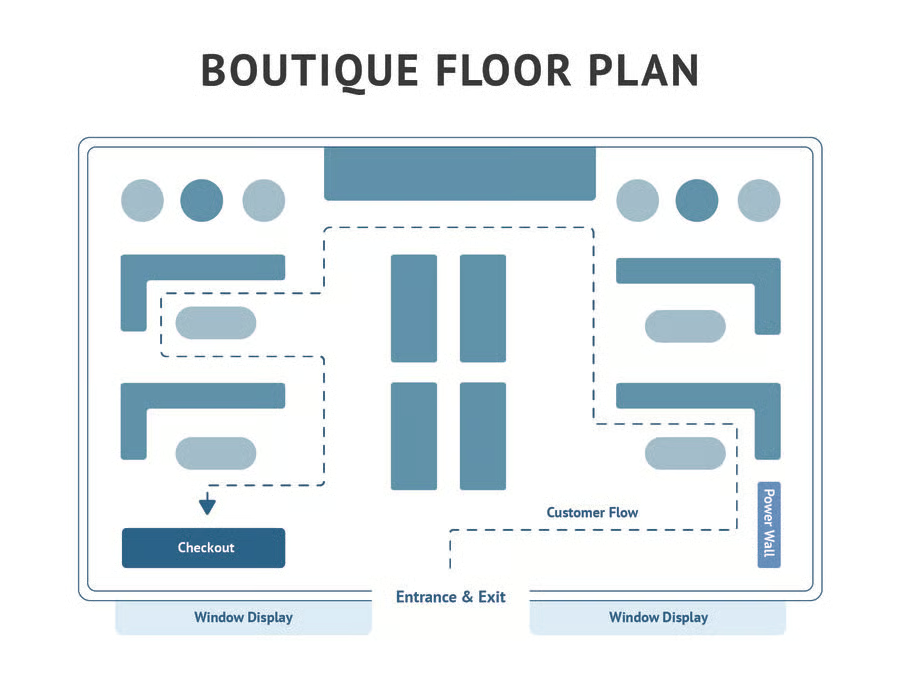 |
| Free-flow Floor Plans Used in specialty and boutique settings | Apparel, accessory, personal care, specialty, and mixed-use stores like bakeries that display packaged goods
| 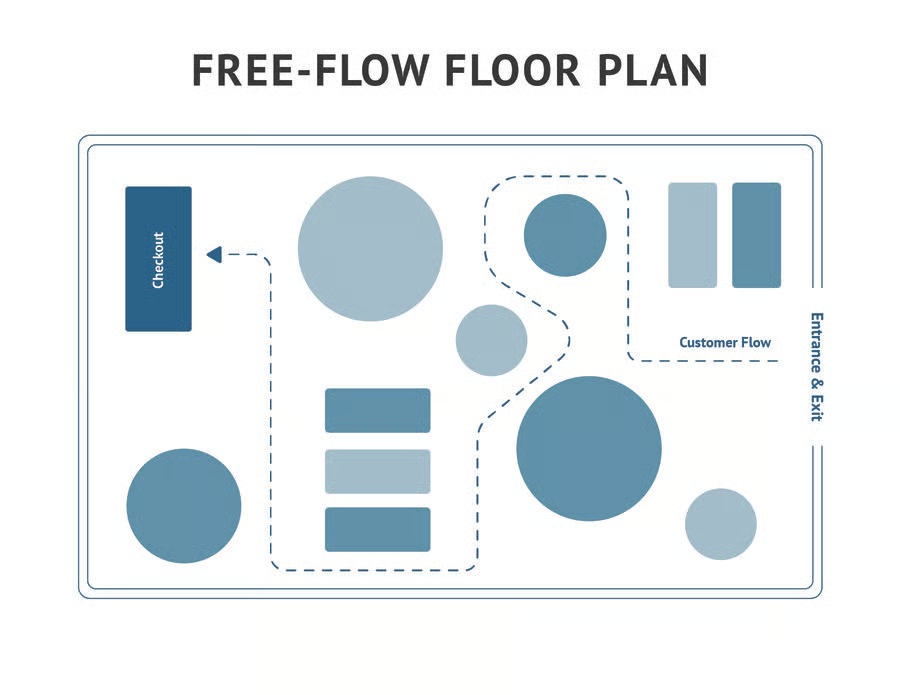 |
A well-positioned checkout will open up prime retail space for displaying products and encourage shoppers to move through more of your store. Instinct might tell you to place your checkout at the front of the store so that it’s most visible or on the right-hand side of your store where traffic tends to flow. But, the best place to position a retail checkout counter is often on the left side of a store.
Shoppers naturally veer toward the right side of a store when they walk inside. So, that’s where you want to display money-making products and new products. Some department stores and larger mall retailers place their checkout counters at the back of the store. However, for smaller retailers, placing your checkout toward the front makes it easier for staff to attend the register and keep an eye on the entrance.
This small-footprint retail store layout features a checkout counter on the left side of the store, with featured products displayed on the right side.
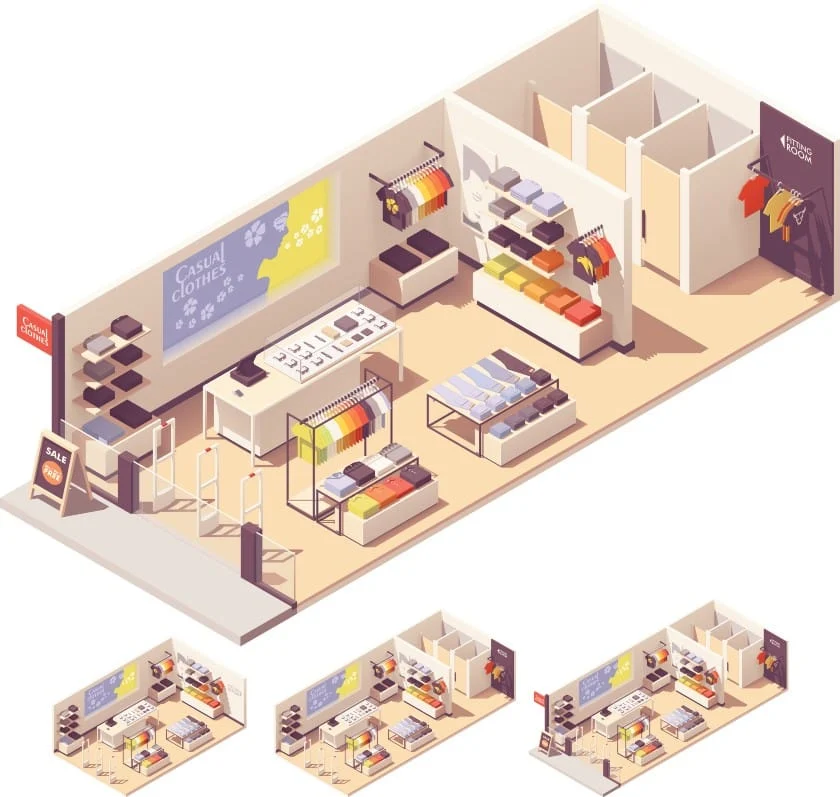
This small-footprint retail store layout features a checkout counter on the left side of the store, with featured products displayed on the right side.
Learn more about how to set up your checkout to drive sales.
Once you have the bones of your store layout and checkout counter placed, you’ll also need to invest in display fixtures, signage, and lighting. Start with parts of the store that will be mostly permanent: counters, lighting installations, dressing rooms, and any fixed shelving.
Because these pieces will be permanent, invest in high-quality items that will form a cohesive look and won’t fall out of trend. From there, you can outfit the rest of your store with more affordable, temporary merchandise displays and decorations that are easier to swap out with the seasons or trends.
Read our guides below for step-by-step instructions on setting different fixtures and displays:
- How to select and design retail lighting
- How to design the best storefront sign for your business
- Tips for great fitting room design
- Store design ideas for increasing sales
Exactly how you merchandise your products will depend on what type of store you have and the layout you choose. But there are a few simple tricks you can use to boost sales in any store environment.
- Eye level is buy level: Products placed at eye level instead of above or below are more likely to be seen and purchased.
- Place seasonal products and new arrivals front and center: Many retailers utilize a table display five to 15 feet inside the entrance that’s updated almost daily to show off new and limited products or holiday promotions.
- Drive impulse sales at the point of purchase: Think candy at the grocery checkout; placing small, low-cost but useful or appealing items like phone chargers, Chapstick, and lottery tickets near the checkout counter is an effective way to drive add-on sales.
- Keep it comfortable: Shoppers who spend more time in your store also spend more money; encourage shoppers to stay awhile with Wi-Fi, product demos, and comfortable seating.
For more tips on how to merchandise your store, download our store layout e-book for step-by-step instructions.
Download Free Store Layout Checklist
Step 10: Choose & Install a Retail POS System
Another major step in opening a retail store is selecting a point-of-sale (POS) system. Your POS system is the software that processes transactions and completes in-person sales. However, modern POS systems do much more than that, acting as the heart of all store management, including CRM, inventory, payment processing, ecommerce, reporting, vendor management, and more.
Some of the criteria we use to evaluate the best retail POS systems include:
- Price: Most POS software systems charge a monthly fee. Some also charge extra for features like advanced inventory management.
- Setup and installation process: Some POS systems allow DIY installation, while others charge a hefty professional installation fee. You should also note the integration capabilities and process.
- Ease of use: Test the POS to ensure the interface is comfortable to navigate. Also, read user and expert reviews to identify any glitches or common problems.
- Inventory management: Make sure the retail inventory management solution you use has features to bulk upload orders, set stock alerts, and create purchase orders directly from the system to save you time.
- Customer management tools: Almost all POS systems have a customer directory feature, but otherwise, they vary greatly in what loyalty, marketing, and customer feedback features are included.
- Ecommerce functions: If you have plans to also sell online, make sure the POS you choose also has an online store feature so all of your inventory, customer, and order information syncs between online and offline sales.
- Payment processing: Some POS providers have built-in, in-house payment processors, and others let you integrate with third-party options for no fee.
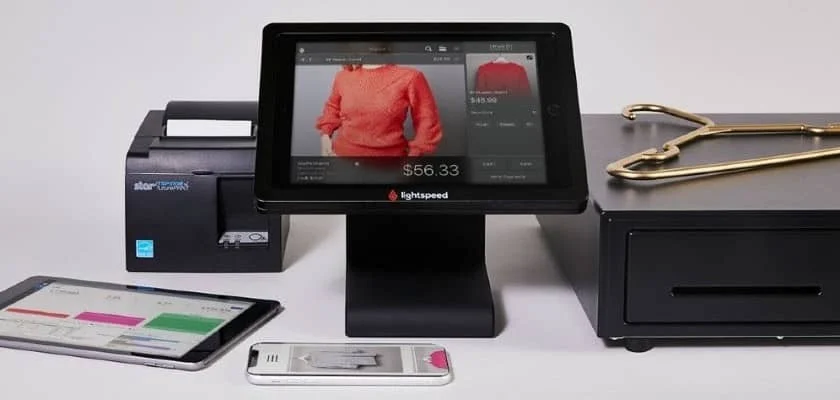
Lightspeed Retail POS (Source: Lightspeed)
Choose a Credit Card & Payment Processor
Once you have selected a POS system, you need to choose a credit card processing company or merchant services provider. Some POS systems include their own in-house payment processing, while others require you to use a third party. The two most important things to consider when choosing a retail credit card processing company are price and compatibility with your POS.
Some card processing companies charge monthly fees, and some have lengthier application processes than others. Many traditional merchant accounts also require contracts or have early termination fees. Be careful to read the fine print before signing with a card processing company.
The other thing to consider is whether or not the payment processor integrates with your POS system. Choosing an integrated processor is ideal because as you ring up sales, they will automatically sync with your POS system. If you don’t have a payment processor that integrates with your POS, you have to input sales manually, and your data becomes susceptible to human error.
Step 11: Hire & Train Retail Staff
Last but certainly not least, you need to bring on a stellar group of employees to serve as the front lines of your business. If you haven’t hired an employee before, navigating the process can be really intimidating. Our new hire checklist outlines all of the gritty steps you need to take, such as obtaining an employer identification number (EIN), registering for state and local taxes, and so on.
As a small business retailer, it’s likely you won’t have a dedicated HR team member. And, hiring retail workers right now is especially challenging.
With this knowledge, it’s more important than ever to take your hiring seriously. Take a look at our tips below and read more with our guide to retail recruiting to learn how you can overcome hiring challenges for your retail business.
The first step in writing an accurate and compelling job post is to create the job description for the position you are hiring, whether store associate or shift manager. Then, consider what qualities would be a best fit for the position. Finally, add in at the beginning of the post what your company is and why your future employees will love working there – including an attractive pay and commission structure.
In addition to using an all-in-one HR management tool, also consider using an applicant tracking system (ATS) to manage your search for the perfect candidates. An ATS is a software program that streamlines the hiring process and tracks candidates from initial job posting to hire. Here are a couple resources to help you find the right ATS tool for your new business:
Practice makes perfect with any skill, and customer service and store operations are no exception. You want your staff ready to deliver A+ service to your guests and shoppers from the minute your store opens, giving you peace of mind that they can handle store operations when you aren’t around. That’s where new hire training comes in.
Hold a paid training “boot camp” where you practice customer service skills, review store policies, outline expectations, and teach staff about the products in your store. Find ways to incorporate games and contests to keep the training engaging.
Step 12: Build Your Marketing Plan
Now that your brand and store are ready, it’s time to build a retail marketing strategy. Your marketing strategy should outline everything from your pre-launch initiatives to your store’s grand opening and the first few weekends post-launch. This will ensure that people know about your store upon opening and that you are able to continue to attract a healthy mix of new and repeat customers.
You’ve put in months, if not years, of hard work conceptualizing your store and building it from the ground up—a grand opening is a perfect opportunity to introduce your business to the community with a bang.
Some ideas you can consider to boost your grand opening are:
- Hand out unique promotional gifts
- Provide product or service discounts
- Host games and live music
- Invite the local news and influencers
- Partner with a local group or charity
Planning a party only to have no one show up is really disheartening and definitely not the tone you want to set for your new business. Make sure your event is well attended by recruiting friends and family, but also by starting your advertising efforts as soon as you have a date planned. Draft a press release to send to local media outlets and neighboring businesses. Create an event on Facebook. Take an ad out in the local paper. Go all out.
Working with similar but non-competitive businesses, such as spas, fitness centers, and other types of retailers, is a great way to tap into a pre-existing customer base. By involving other businesses, you’ll spread the word about your store to their customers, too. Tap into your local chamber of commerce, networking groups, schools, and even youth sports organizations. Invite members from those groups to attend your grand opening festivities.
Step 13: Ensure You’re Compliant
Our final and possibly most important tip for starting a retail business is to ensure you’re fully compliant and legal. Be sure to comply with all local laws and regulations when opening a retail store, including but not limited to:
- Federal tax ID or EIN: Used to identify businesses for tax-paying purposes; this is a nine-digit number issued by the IRS that all employers need to apply for.
- Sales permit: Issued by the state and allows businesses to sell products and collect sales tax.
- Certificate of occupancy: Local government issues a certificate stating the building your business is inhabiting is up to code.
- Sign permits: Some local governments require permits for certain kinds of signage, like the one you may want to display on your storefront.
- Safety and health information bulletins: You may be required to put up labor law posters. These are often provided to you, but it never hurts to check with your local government.
If you’re unsure where to start or want to be sure you’re not missing any compliance aspects, check with your local town hall or municipal center and your local chamber of commerce.
Frequently Asked Questions (FAQs)
It can cost anywhere from $10,000 to a few hundred thousand dollars to start a small retail business. The cost of opening a retail store varies greatly—it mostly depends on where you’re located and what your vision is.
Some profitable retail business ideas include:
- Permanent jewelry
- Secondhand shop
- Children’s store
- Gift shop
- Beverages
- Cosmetics
- Specialty foods
- Furnishings
- Create a retail store business plan
- Determine your niche and select products
- Develop your brand
- Choose a legal structure
- Organize your finances
- Launch your online store
- Secure funding for your retail store
- Choose a storefront location
- Design your store interior
- Choose and install a retail POS system
- Hire and train staff
- Build your marketing plan
- Ensure you’re compliant
To start selling in retail, first explore your niche and find a product to suit that niche. Secure suppliers and then determine how you’ll sell in retail—you can open your own store or sell your products wholesale to existing retail stores, or both.
The profitability of retail varies greatly from store to store. The industry as a whole has an average net profit margin of less than 5%.
Bottom Line
Learning how to start a retail business involves many steps and requires years of planning. However, putting in the time to make andexecute a detailed plan will set you on a path to success once your business is operational.