


I’ll show you how to integrate QuickBooks with HubSpot, which allows you to synchronize your accounting and CRM data between the two software. I’ll walk you through each step—from connecting the platforms to selecting what data to sync and how to configure the data before bringing them over to QuickBooks Online or HubSpot. I’ll also explain when you should consider the HubSpot and QuickBooks integration.
- Step 1: Log Into QuickBooks & HubSpot
- Step 2: Go to the HubSpot App Marketplace
- Step 3: Connect QuickBooks Online
- Step 4: Select the Data You Want to Sync
- Step 5: Customize & Organize Your Data
- Step 6: Sync Your Data
- Step 7: Confirm the Sync Is Successful
- When to Integrate QuickBooks Online With HubSpot
- Frequently Asked Questions (FAQs)
- Bottom Line
Step 1: Log Into QuickBooks & HubSpot
Before starting, I recommend logging in to both QuickBooks Online and HubSpot. I keep them open in the same window so that I don’t have to log in anymore later during the integration.
Step 2: Go to the HubSpot App Marketplace
Note that you can only set up the integration from your HubSpot account—not from QuickBooks. You can find HubSpot in the QuickBooks App Store, but it doesn’t directly lead you to the integration process.
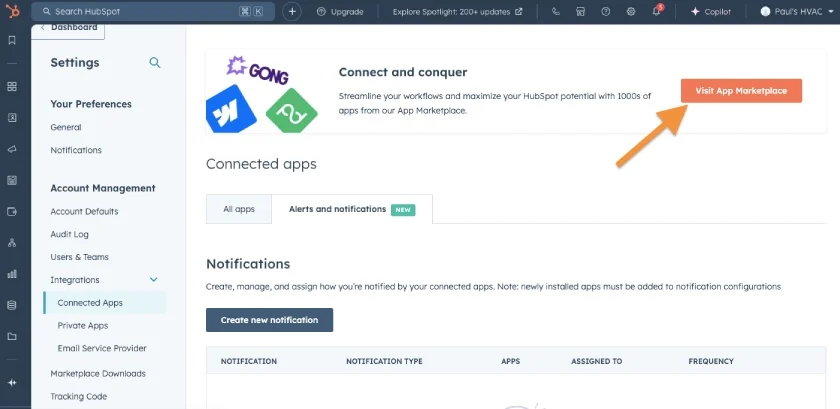
From my HubSpot dashboard, I navigated to the Integrations menu in the left menu bar and then selected the Connected Apps drop-down. From here, I clicked on the Visit App Marketplace button in the upper right corner of my screen, as shown below.
Step 3: Connect QuickBooks Online
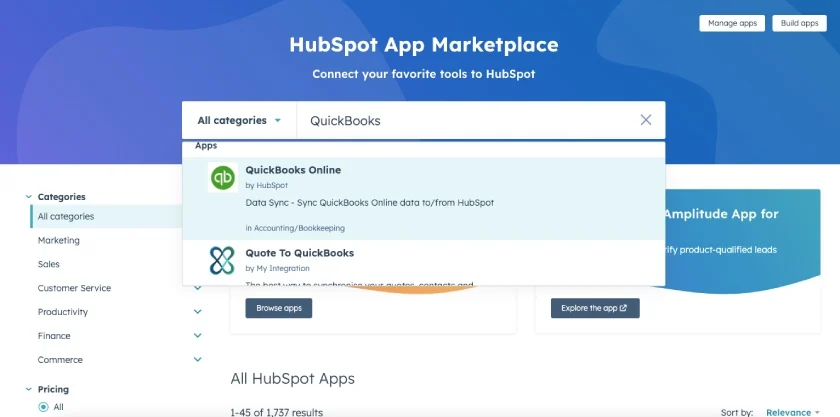
In the HubSpot App Marketplace, I used the search bar to find QuickBooks Online and then selected it to access the QuickBooks integration page.
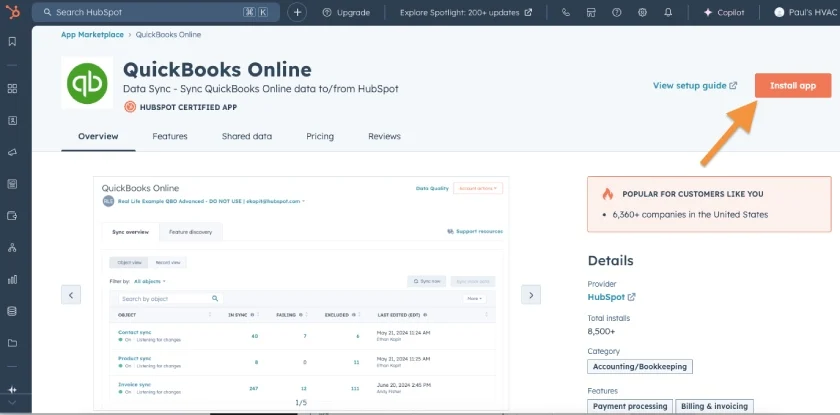
Then, I clicked the Install app button in the upper right-hand corner, as shown below.
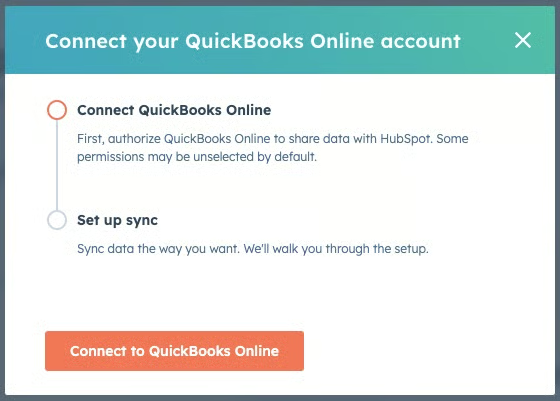
HubSpot displayed a confirmation box to connect my QuickBooks Online account. I clicked on Connect to QuickBooks Online to continue with the integration.
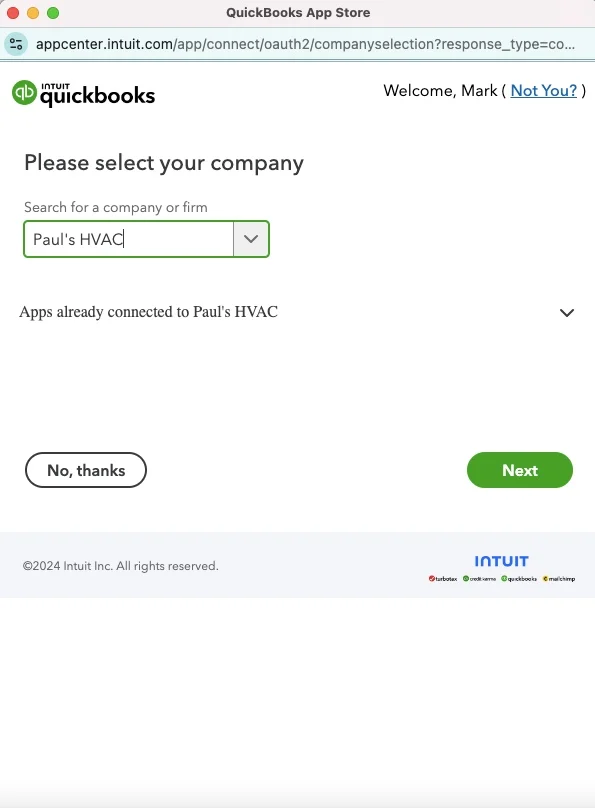
A separate window appeared where I could select my company from my QuickBooks Online account—and this is why I recommend logging in earlier. Since I was already logged in, I proceeded directly to the integration; otherwise, I would have needed to log in to QuickBooks first, adding an extra step to the process.
In the screenshot below, I selected Paul’s HVAC as the company to connect to HubSpot for integration.
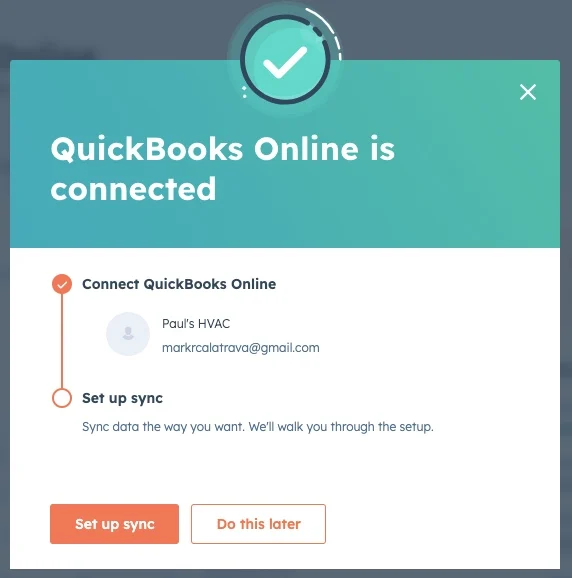
QuickBooks Online confirmed that my account was connected. From here, I proceeded to synchronize my data between the two platforms (something you can choose to do at a later time). I clicked on Set up sync.
Step 4: Select the Data You Want to Sync
At this stage, I needed to select which types of objects or data I wanted to sync between QuickBooks Online and HubSpot. I also needed to specify the direction of the sync—whether I want the data to flow one way or both ways between the two systems.
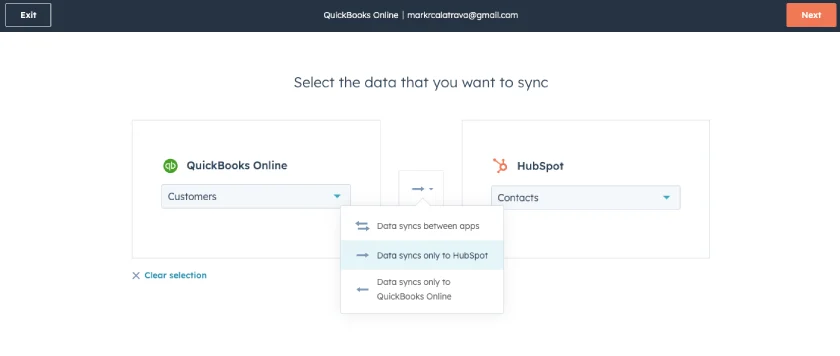
When you select an object to sync from one platform, the corresponding data on the other platform will automatically align. For example, in the screenshot above, I selected Customers in QuickBooks, and the integration tool automatically matches it with Contacts in HubSpot.
After selecting the data to sync, I clicked Next in the upper right corner of the screen (shown in the screenshot above).
Step 5: Customize & Organize Your Data
QuickBooks Online provides four tabs to customize your data before syncing between QuickBooks Online and HubSpot:
- Configure
- Limit
- Organize
- Review
1. Configure
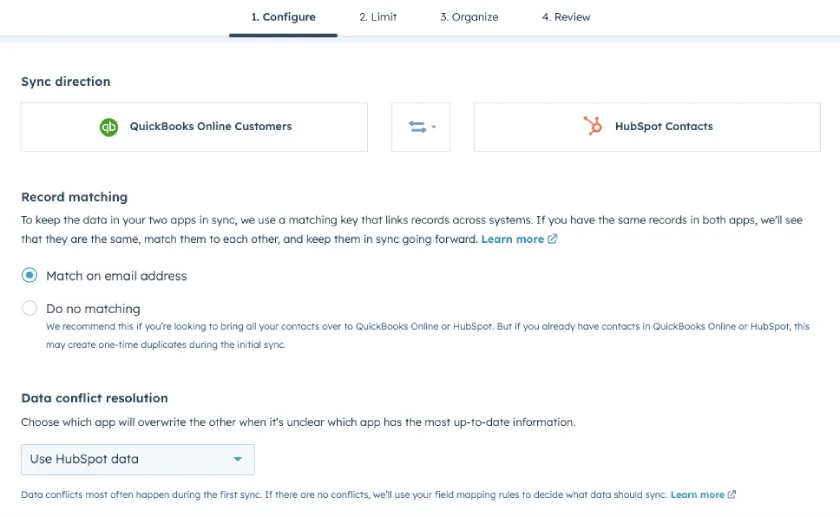
This tab is where you can resolve potential conflicts before syncing your data. Some of the major configuration options include record matching, data conflict resolution, and mapped fields.
Record matching
This section includes two options:
- Match on email address: When selected, HubSpot will look for contacts in its database with the same email address as the customers in QuickBooks. If it finds a match, the two records will sync, preventing duplicates.
- Do no matching: You can prefer not to match any fields, but I only recommend this if you need to bring all your customers to QuickBooks or HubSpot. However, this option may create duplicates if you already have customer information in both systems.
Data Conflict Resolution
Sometimes, data may differ between QuickBooks and HubSpot, so HubSpot provides an option where you can decide which one will overwrite the other when it’s unclear which platform has the most up-to-date information.
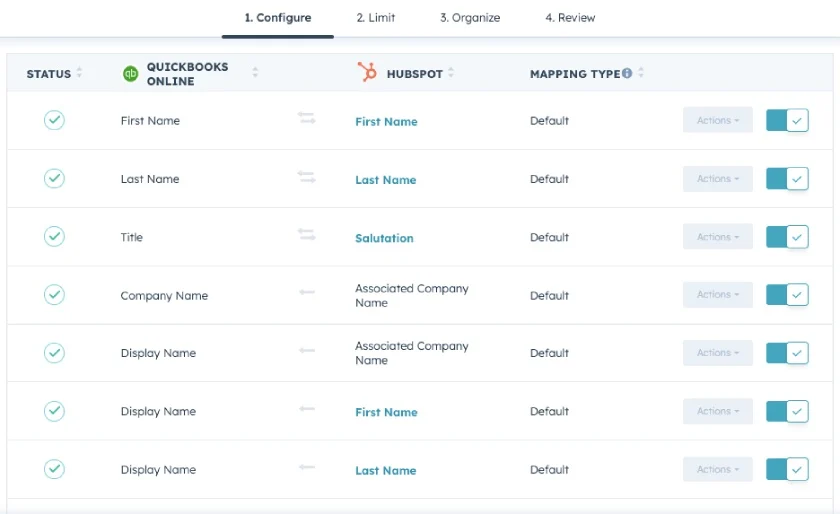
Mapped Fields
This section shows the default field mappings that connect common fields between the two platforms. You can’t edit default mappings, but you can turn it off and create custom mapping if needed by clicking the Try out custom mappings button (not shown in the screenshot below). Once done, click the Next button in the upper right corner.
2. Limit
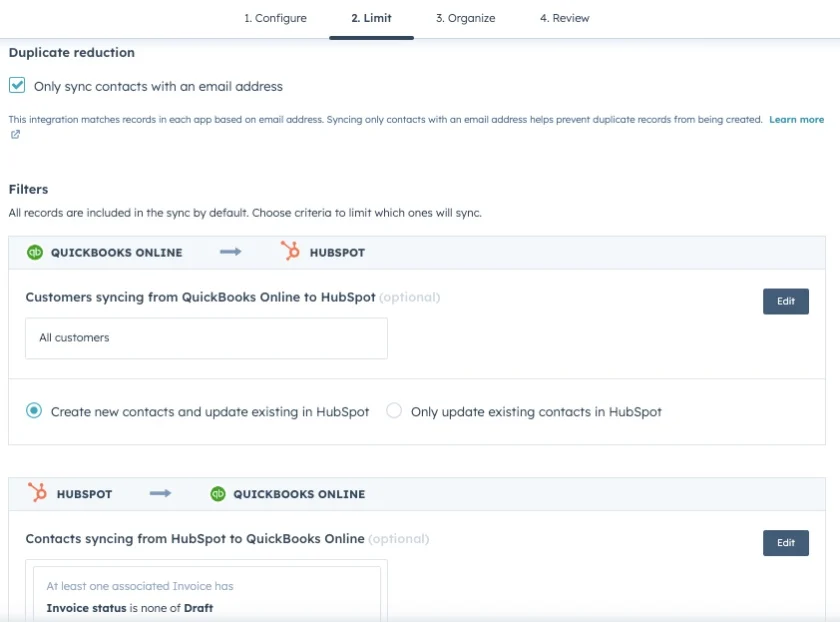
This is where you can limit the records you want to sync between QuickBooks Online and HubSpot. For example, you can select whether the integration will create new contacts and update existing ones in HubSpot—or only update them.
You can also decide whether all items will transfer (which is the default setting) or limit what to bring over by using filters. For instance, when syncing customers, you can bring over only customers with a balance of $1,000 or less. Then, click on Next to proceed.
3. Organize
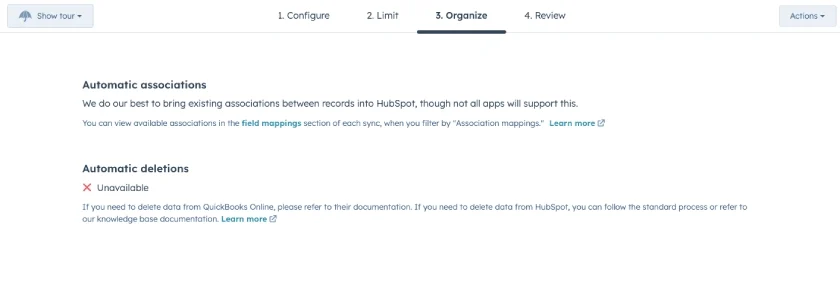
There’s not much to be done here, but you can review the associations between records that HubSpot has brought over from QuickBooks (e.g., contacts linked to invoices). You can view these in the field mappings section by filtering for “association mappings” or by manually doing it in QuickBooks. If you need to delete data, you can do so manually in QuickBooks or HubSpot by following their respective standard processes. style=”border-radius: 15px; box-shadow: 0 0 25px #e5e5e5; max-width:90%”
4. Review
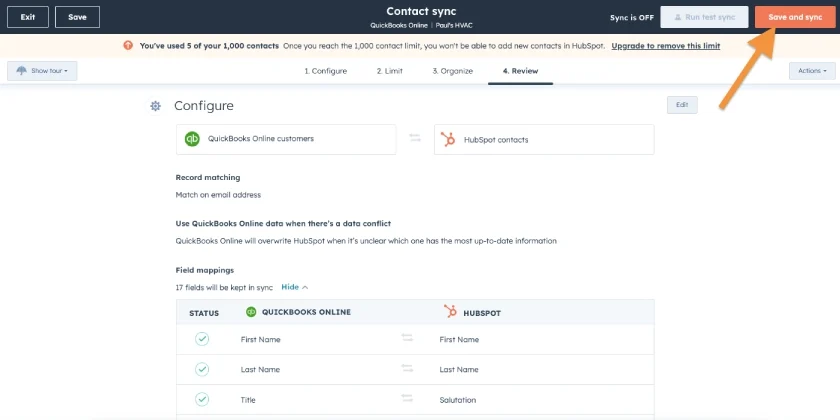
HubSpot will give you a final opportunity to review and adjust the settings you configured in the previous steps. Here, you can double-check everything to ensure it’s properly set up. You can always make changes by clicking the Edit button in the respective sections.
Step 6: Sync Your Data
Once you’re satisfied with your settings, click the Save and sync button to synchronize your data between QuickBooks Online and HubSpot. Depending on the amount of data being synced, this may take a few seconds or minutes.
Step 7: Confirm the Sync Is Successful
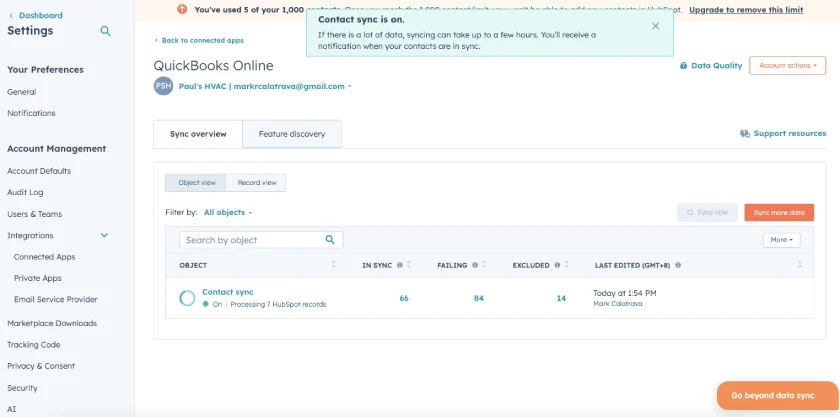
Once the sync is complete, you’ll see the synced data directly within your HubSpot account. In the screenshot below, you can see that I successfully synchronized my contacts between the two platforms.
When to Integrate QuickBooks Online With HubSpot
If you’re using QuickBooks Online for accounting and HubSpot for managing sales and customer engagement, then it makes sense to connect the two platforms.
By doing so, you can synchronize important data, such as customer information, invoices, and product details. This means you don’t have to update each platform separately just to ensure that the information managed by your QuickBooks accounting team and HubSpot sales team is the same and up-to-date.
Frequently Asked Questions (FAQs)
Do I need a third-party connector to integrate QuickBooks Online with HubSpot?
No, as you can set it up directly from the HubSpot App Marketplace.
Does the integration work both ways between QuickBooks Online and HubSpot?
Yes, there’s an option to sync your data two-way, meaning your data flows from QuickBooks Online to HubSpot and vice versa.
What are the types of data I can sync between QuickBooks Online and HubSpot?
You can sync various data types, including customer information, invoices, and product details.
What HubSpot data is incompatible with any QuickBooks Online object?
Several—including calls, carts, meetings, and tickets.
Bottom Line
You just learned how to integrate QuickBooks with HubSpot. With the integration, you can seamlessly sync your customer data, invoices, and other important records between the two platforms. To learn more about using the other features of QuickBooks Online, explore our free QuickBooks Online tutorials.
