

Prior to reconciliation, it’s essential to classify imported expense transactions in FreshBooks—which involves navigating to the Expense page, locating the transaction, and reviewing and properly classifying that transaction. You’ll then need to match the imported transactions with the entries in your FreshBooks; and when you’re ready to reconcile, head to the Accounting page, set your opening balance, and start with the reconciliation process.
Learn all the feature of FreshBooks in our FreshBooks Review.
How to Classify Imported Bank Transactions in FreshBooks
Step 1: Navigate to the Expenses Page
Click on Expenses in the left navigation bar to access the Expenses page, as shown below.
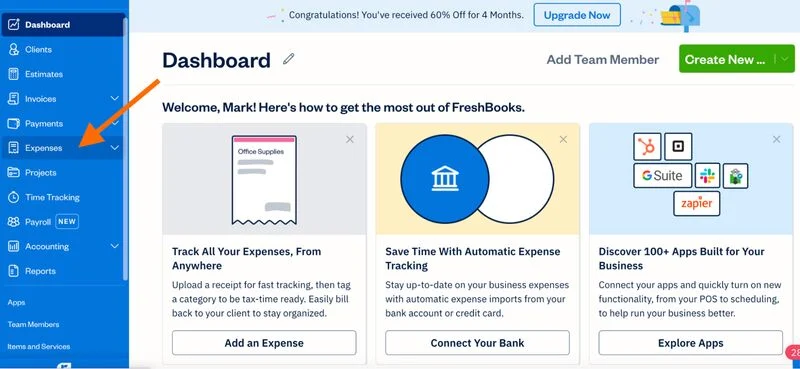
Navigate to the Expenses page in FreshBooks
Step 2: Locate the Transaction
Under All Expenses on the Expenses page, select the transaction you wish to categorize. Click anywhere on the transaction entry line to view and adjust details.
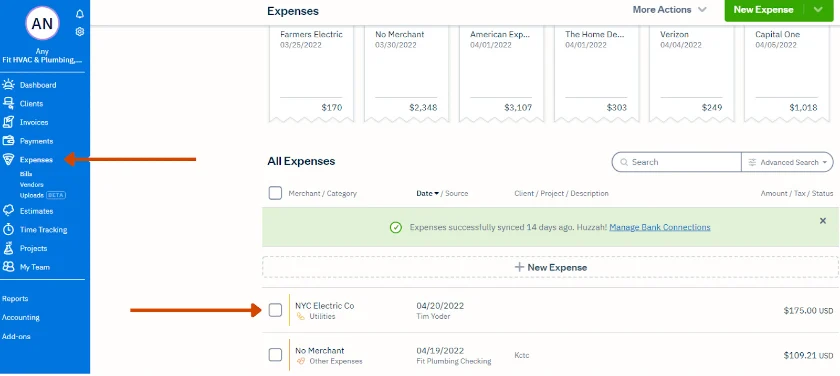
Viewing and classifying expenses in FreshBooks
Step 3: Review & Classify the Transaction
From the transaction screen, you can easily edit and adjust details as needed by simply clicking on the respective fields. You can edit transaction details, including:
- Merchant: You can edit or add the vendor associated with the expense. This isn’t required, but it can help you track payments made to a particular merchant.
- Category: FreshBooks, by default, categorizes imported transactions as “Other Expenses,” so you have to review and change the category for more efficient tracking. For instance, if it’s a payment for electricity, then use the “Utilities” category.
- Date: If needed, you can adjust the date to match the actual date the expense was incurred.
- Amount: Double-check that the expense amount is correct, and adjust if needed.
- Tax amount: If applicable, you can add taxes to the transaction.
- Client/project: You can assign a transaction to a specific client or project.
- Attach receipts: To verify the expense, you can attach relevant receipts or documents.
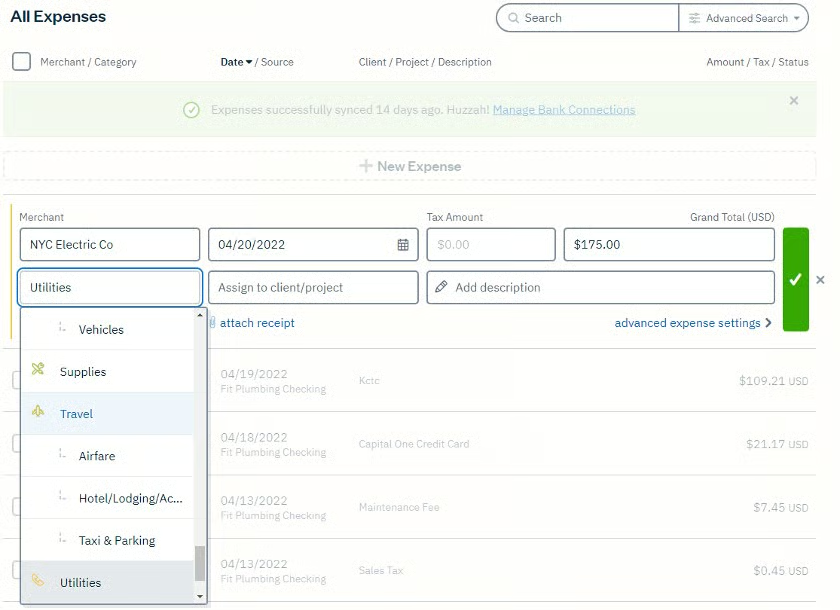
Changing the details of an expense in FreshBooks
Step 4: Save the Transaction
To record the categorized transaction, click the small arrow in green in the upper right corner of the transaction screen (shown in the screenshot under Step 3). Go through all the expense transactions, and make sure to categorize them accordingly.
Matching Imported Transactions With Existing FreshBooks Transactions
Before you reconcile your bank accounts, you must see to it that the imported transactions match the entries in FreshBooks. This will also ensure that your bank account balance matches your FreshBooks balance. To do this, follow the steps below.
Step 1: Navigate to the Accounting Page
Click on Accounting in the left menu bar to access the Accounting page.
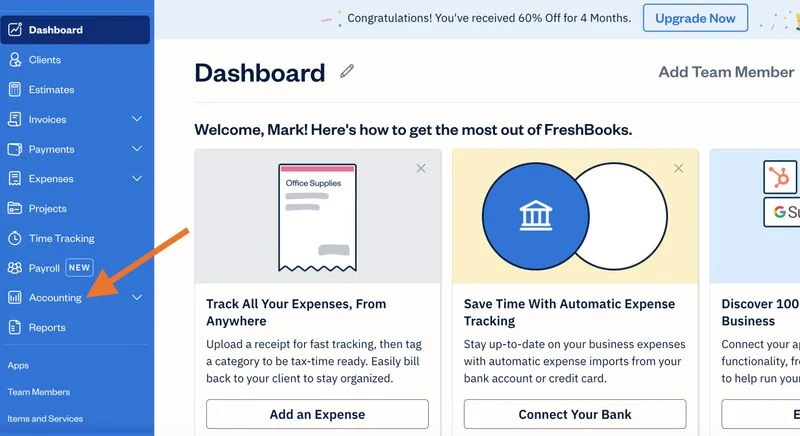
Navigate to the Accounting page in FreshBooks
Step 2: Review Unmatched Transactions
Under the Bank Reconciliation section of the Accounting page, you’ll see a list of unmatched transactions that need to be reviewed and matched with existing FreshBooks transactions. FreshBooks will indicate how many transactions you need to match. Click on the X left match link to review the transactions.
FreshBooks will then display a pop-up with a list of transactions organized in two columns. The column on the left shows your bank transactions, while the column on your right displays suggested FreshBooks matches.
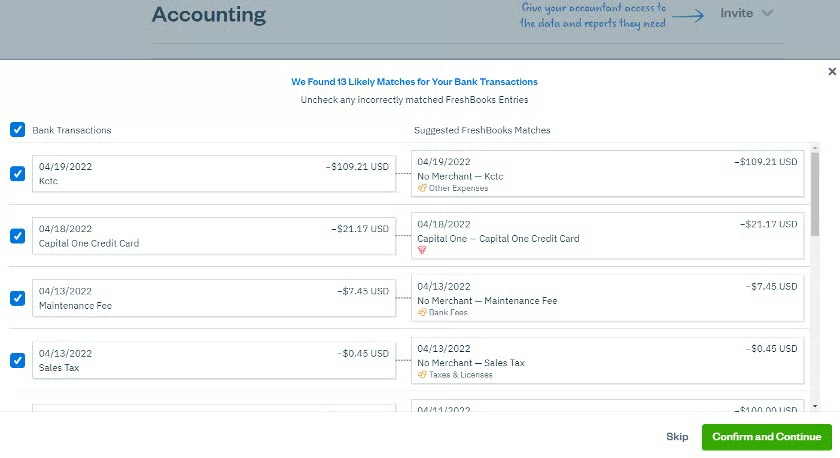
Suggested matches for bank transactions in FreshBooks
There are three ways to manage imported transactions:
- Match transactions
- Mark transactions as a transfer, owner’s equity, or an expense refund
- Create a new transaction if the transaction doesn’t exist in FreshBooks
1. Match Transactions
If you have an unreconciled bank transaction and see the corresponding entry or multiple entries in the FreshBooks entries section, follow these steps to match them:
- In the Bank Account Transactions section on the left, check a transaction.
- In the FreshBooks Entries section on the right, check one or several entries that sum up the bank transaction. Use the search bar if you need help finding your entries. The amount selected from bank transactions must match the amount selected in FreshBooks matches.
- Click on the Match button.
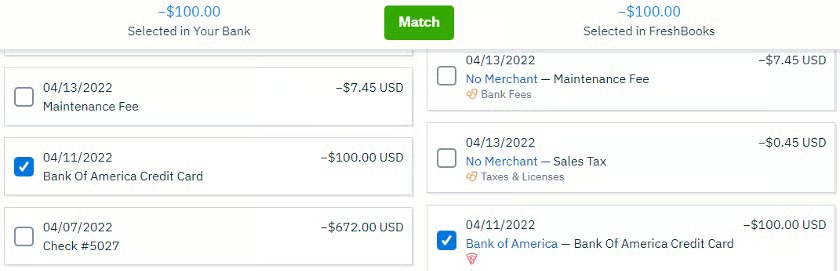
Matching bank transactions in FreshBooks
2. Mark Transactions
If your unreconciled bank transaction doesn’t require an accompanying FreshBooks entry to match it because it’s a transfer, owner’s equity, or expense refund, follow the steps below:
- Check the box next to the bank account transaction.
- Click on the Mark As button at the top.
- Choose from the appropriate category—Transfer, Owner’s Equity, or Expense Refund.
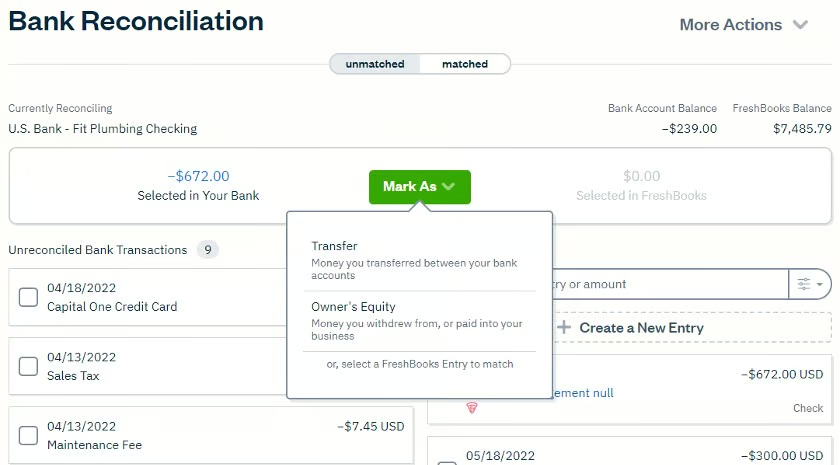
Marking transactions in FreshBooks
3. Create a New Entry
If a FreshBooks entry doesn’t yet exist, you can create it with the following steps:
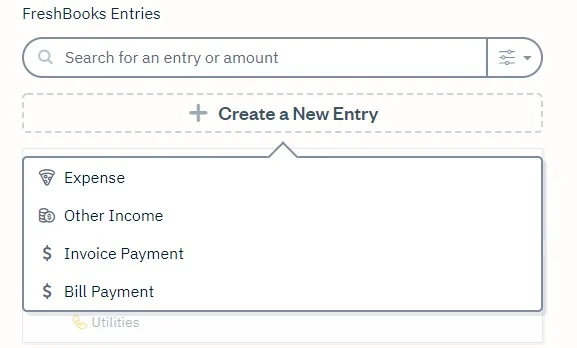
- Under FreshBooks Entries, click on the Create a New Entry button. Depending on the kind of matching entry you need to create, choose from Expense, Other Income, Invoice Payment, and Bill Payment. Once saved, this entry will appear in the list of FreshBooks entries.
- Check off the entry or entries that you have created.
- Click on the Match button.
Creating a new entry in FreshBooks
How to Reconcile Bank Accounts in FreshBooks
Follow the process below to reconcile bank accounts in FreshBooks.
Step 1: Set Your Opening Balance
Click on Accounting in the left menu bar and then select Set your opening balance, as shown below.
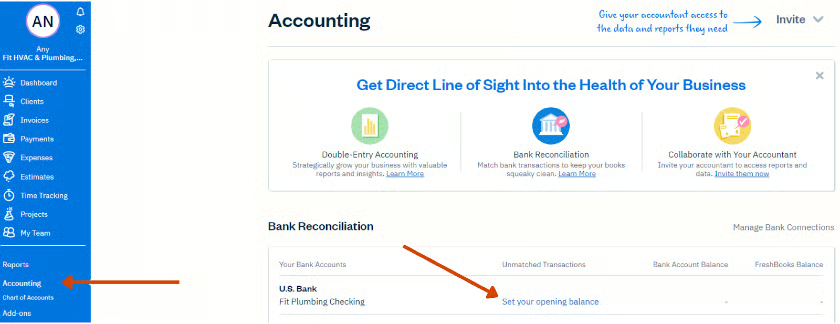
Setting the opening balance in FreshBooks
In the field provided, enter a date to start reconciling from. This could be the first date from your recent bank statement or the start of a period on your credit card statement. Note that you can’t select a reconciliation start date before the date of your first imported bank transaction. Once you have entered this date, click Continue.
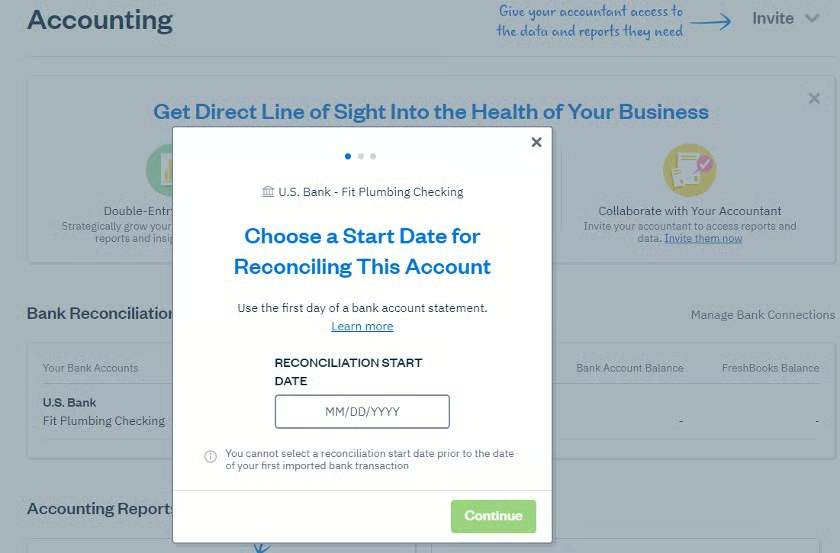
Setting the reconciliation start date in FreshBooks
In the next field, enter the opening balance from the date you chose to start reconciling. Then, click Continue. You’re now ready to start reconciling this account, and you’ll only need to set the opening balance the first time you reconcile an account. Click Get Started to begin the reconciliation.
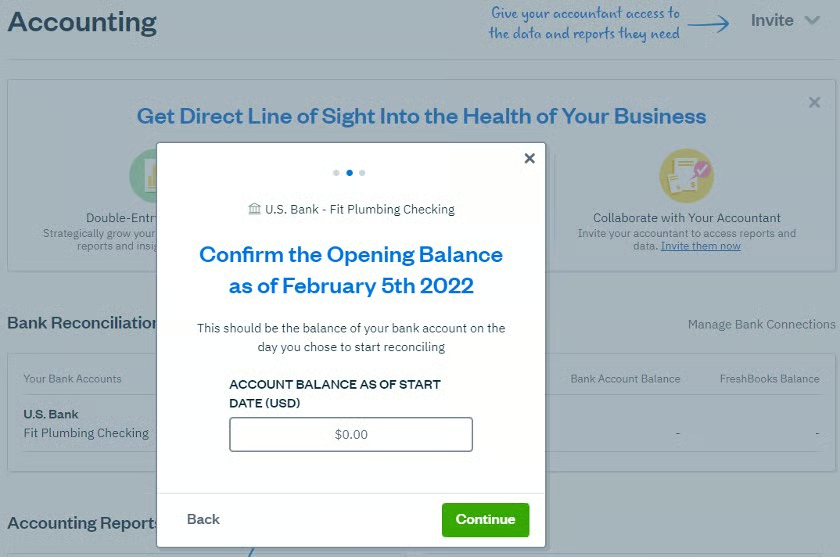
Entering the opening balance in FreshBooks
Step 2: Perform the Reconciliation Process
At the top right of the bank reconciliation screen, you’ll see two balances:
- Bank Account Balance: This includes the opening balance entered for this account and all imported transactions in real time (as of the most recent sync).
- FreshBooks Balance: This is your opening balance entered for this account, the transactions you have matched in Bank Reconciliation, and any journal entries that have been posted to this account.
Match All Unreconciled Bank Transactions to FreshBooks Entries
The left half of the bank reconciliation screen lists all your imported bank transactions that haven’t been matched to FreshBooks entries. For a reconciliation to be complete, you must assign each bank transaction to a FreshBooks entry.
To do so, click on an unreconciled bank transaction on the left side and then one or more FreshBooks entries that comprise that bank transaction on the right side. In the box above the list of entries, the amount “Selected in Your Bank” should equal “Selected in FreshBooks.” If they’re equal, click the green Match button to reconcile the entries.
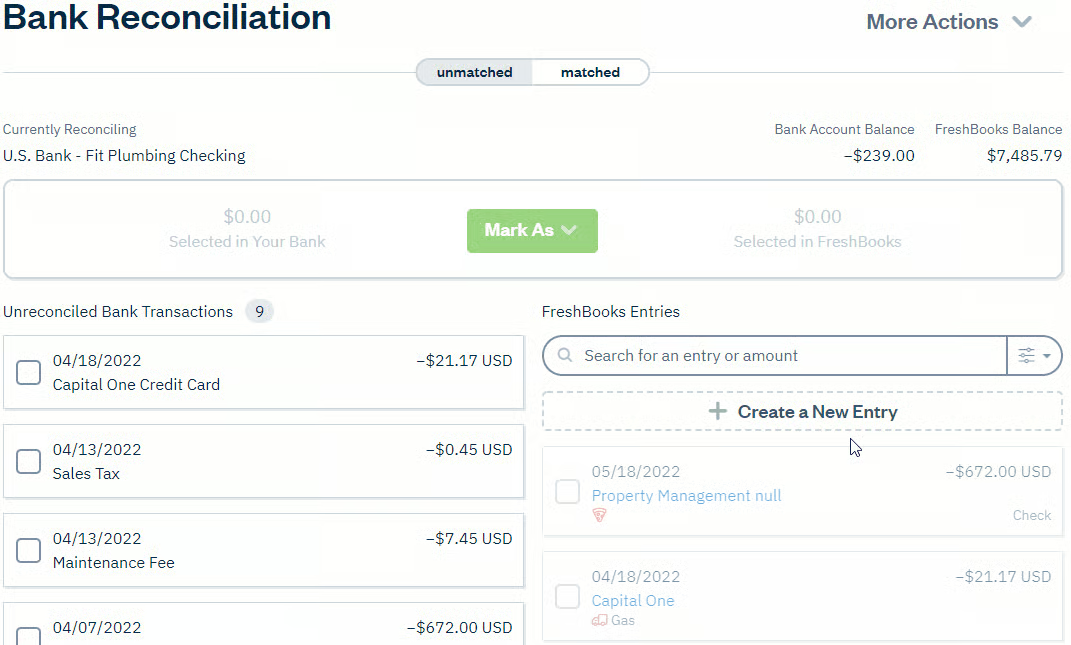
The process of matching transactions in FreshBooks
If the bank transaction hasn’t been recorded in FreshBooks yet, you can click on Create a New Entry at the top of the FreshBooks entries column to create and assign a new transaction. Once all of your unreconciled bank transactions have been assigned, the bank account balance and FreshBooks balance at the top of the reconciliation screen should be equal.
Review Unmatched FreshBooks Transactions
After all of your bank transactions have been matched to FreshBooks entries and your left column is blank, you must review the FreshBooks entries in the right column that haven’t been assigned to bank transactions. Each FreshBooks entry should fall into one of the following categories:
- Transactions from different bank accounts: These will be matched to bank transactions when the other bank account is reconciled.
- Outstanding transactions from this account: Transactions such as checks written from this bank account that haven’t yet cleared the bank are called outstanding transactions and it’s proper for them to remain in the Unmatched FreshBooks Transaction column until the next period when they clear the bank.
- Petty cash transactions: If you keep cash on hand, any cash transactions will remain unmatched forever.
- Incorrect transactions: If an Unmatched FreshBooks Transaction doesn’t fall into any of the three categories above, then it’s likely a bookkeeping mistake. You must investigate these mistakes and correct them.
Step 3 (Optional): Print Bank Reconciliation Summary Report
The Bank Reconciliation Summary is a report that allows you to see if there are any remaining transactions to be matched in your bank reconciliation. It also shows a summary of all unmatched transactions across all bank accounts, as well as any payments and expenses logged in your FreshBooks that have yet to be matched.
You can generate a Bank Reconciliation Summary report by following these steps:
- Go to the Reports section.
- Select Bank Reconciliation Summary under Accounting Reports.
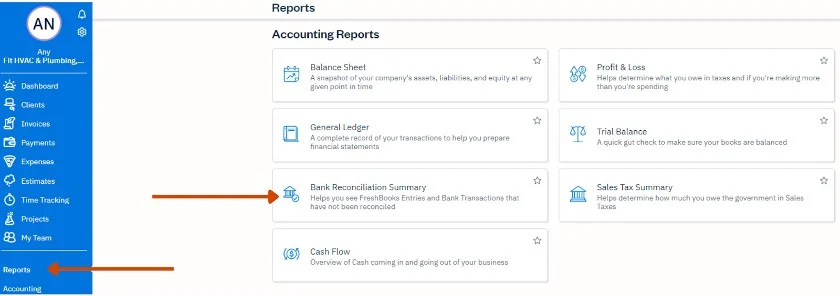
Accessing the Bank Reconciliation Summary in FreshBooks
The report (sample seen below) displays the following transactions:
- Unmatched FreshBooks Entries: These transactions are displayed first and show all of your payments and other income that haven’t been matched to transactions in your bank account. These are the transactions we reviewed in the prior section.
- Unmatched Bank Transactions: These are transactions from your connected bank account that have yet to be matched to entries from FreshBooks. Notice the reconciliation report includes all transactions across all connected bank accounts, not only the bank account you just reconciled.
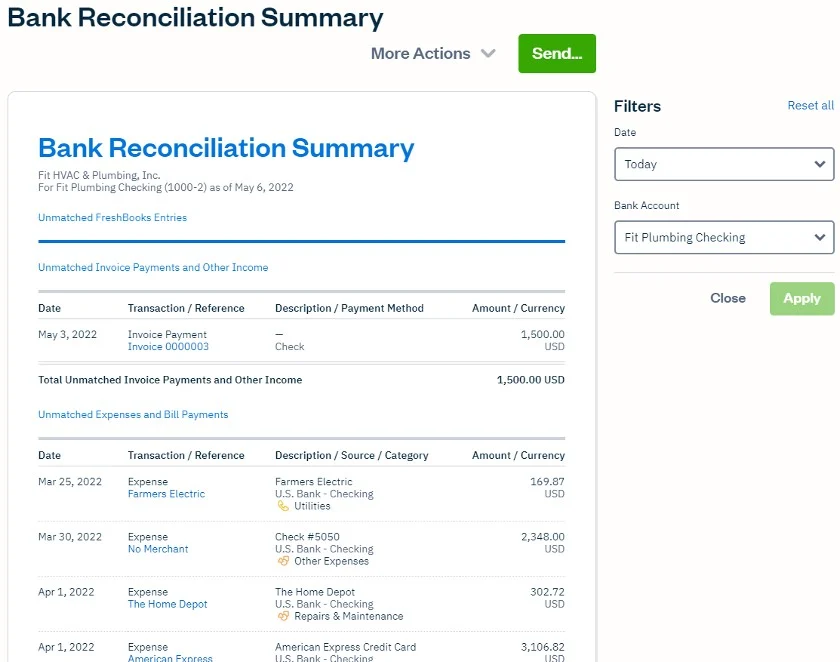
Sample Bank Reconciliation Summary in FreshBooks
Frequently Asked Questions (FAQs)
To classify bank transactions in FreshBooks, click on the appropriate page (e.g., Expenses), locate the transaction you wish to classify, open the transaction screen, and adjust the details as needed.
No, you can’t. FreshBooks requires a bank connection to import bank transactions.
Bottom Line
You have now learned how to reconcile bank accounts in FreshBooks. The next and final tutorial in our FreshBooks course is “How to Print Reports.” That will also cover how to navigate to reports, what reports are available, and how to set basic options.