

You can enter, track, and pay bills in FreshBooks from the Bills page under the Expenses menu. Use the New Bill form when entering a new bill, and track unpaid bills either from the Bills page or by running an A/P aging report. When it’s time to pay the bill, simply locate that bill on the Bills page and then select the Add a Payment button.
Read our FreshBooks Review to learn everything you can do with this powerful program.
How to Enter a New Bill in FreshBooks
Step 1: Go to the Bills Page
Select Expenses in the left menu bar and then click on the Bills dropdown, as shown below.
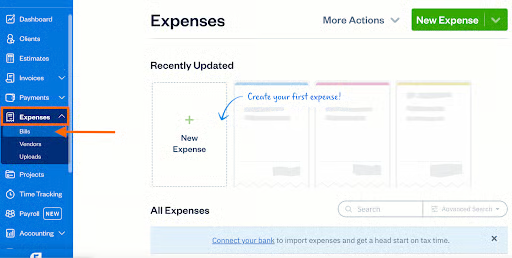
Navigate to the Bills page in FreshBooks
Step 2: Navigate to the Bill Creation Form
From the Bills page, select the green New Bill button in the upper right corner and then select Manually Create, as shown below.
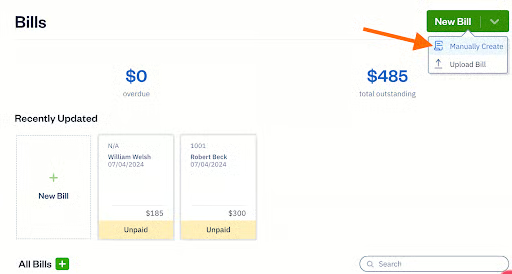
Navigate to the bill creation form in FreshBooks
Step 3: Create the Bill
Complete the New Bill form by providing the necessary information, including the following:
- Vendor: Click on the Add Vendor text and type in a new vendor, or choose from a list of vendors that you have used before.
- Issue date: FreshBooks defaults to the current date automatically, but you can click to change it to another date instead.
- Due date: Specify when the bill is due for payment (the default is one month from the issue date).
- Bill number: If needed, add a number in the Bill Number field.
- Bill details: Click on the Add a Line button and then the Description field, where you can enter details about the bill. You can also add a category and specify the rate and quantity.
- Totals: Specify the subtotal and grand total. You may also add tax rates if applicable.
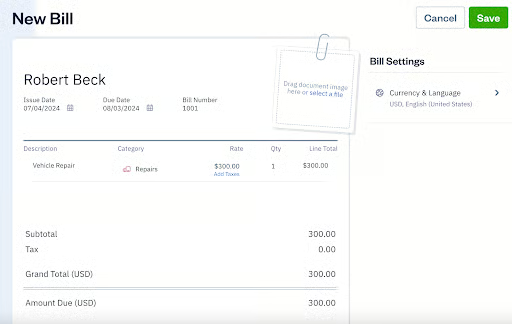
Creating a new bill in FreshBooks
On the right side of the New Bill form, you’ll find the Bill settings section where you can adjust the language and currency to be used for the bill, which can be useful if you have international vendors.
Step 4: Save the Bill
Once you provide all the required information, click the green Save button in the upper right corner (shown in the screenshot under Step 3).
How to Track Unpaid Bills in FreshBooks
There are two ways to view or track unpaid bills in FreshBooks:
- View unpaid bills on the Bills page. When you go to the Bills page (illustrated in Step 1 of how to create a bill), you’ll see a list of bills and their statuses. From the All Bills section, you’ll be able to easily see which bills aren’t paid yet and when they are due.
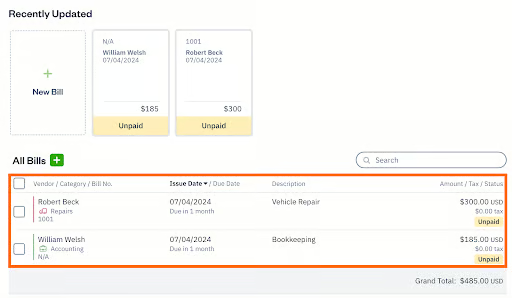
Viewing unpaid bills on the Bills page in FreshBooks
- View an A/P aging report. The A/P aging report shows which vendors have outstanding bills that need to be paid. You can access this report by clicking on Reports in the left menu bar and then Accounts Payable Aging under Payments Reports.
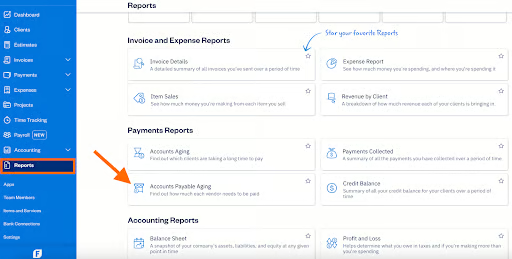
Running an A/P aging report in FreshBooks
On your A/P Aging report, bills are grouped by Outstanding or Overdue into intervals of 0-30 days, 31-60 days, 61-90 days, and more than 90 days. You can click on either the Vendor or Total headers at the top of the report to sort the data in ascending or descending order by that particular header.
Selecting More Actions at the top right will give you the option to export the report to Excel or to print your report.
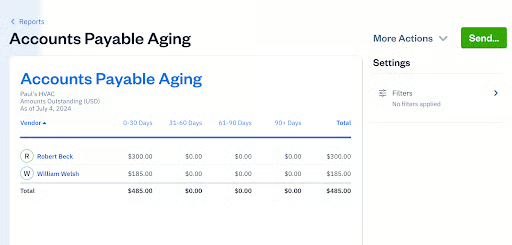
Sample A/P Aging report in FreshBooks
How to Record the Payment of a Bill in FreshBooks
Step 1: Locate the Bill
Navigate to the Bills page and locate the bill that you need to pay. Click anywhere on the bill entry line, tap More Actions in the upper right corner, and then select Add a Payment, as shown below.
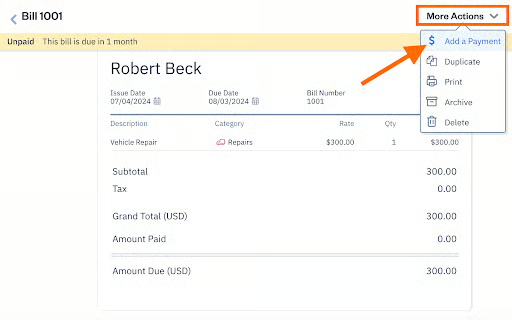
Preparing to pay a bill in FreshBooks
Step 2: Pay the Bill
FreshBooks then displays an Add a Payment pop-up window where you can specify the bill payments, including the amount, payment method used, the date it was paid, and notes, if applicable.
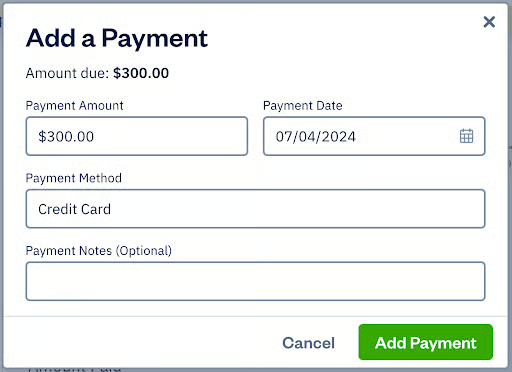
Entering bill payment info in FreshBooks
There is no need to specify a payment source when paying a bill. The payment will later be matched to the transaction from the bank feed for whichever credit card or bank account was used to pay the bill.
Frequently Asked Questions (FAQs)
To enter a new bill, navigate to the Bills page, select Manually Create under New Bill, complete the bill creation form, and then save the bill.
You can view and track unpaid bills by either going to the Bills page or running an A/P aging report.
No, you can record the payment of bills in FreshBooks, but you can’t actually initiate a bill payment. QuickBooks Online does offer the ability with its built-in QuickBooks Bill Pay feature.
Bottom Line
You’ve just learned how to enter and pay bills in FreshBooks. The next tutorial in our FreshBooks course is “How to Reconcile Accounts and Classify Transactions.” That tutorial will cover how to classify imported bank transactions, how to match imported transactions with existing FreshBooks transactions, how to reconcile bank accounts, and how to print a reconciliation report.