

We’ll discuss how to add and manage customers in FreshBooks by accessing the Clients page, creating a new client profile, and managing client information (e.g., editing and deleting them). Also, we’ll cover how to create and send a new invoice by navigating to the invoicing screen and providing the necessary invoice information. Furthermore, we’ll look at how to adjust additional invoice settings, apply customer payments to invoices, and view open invoices.
Learn all the features of FreshBooks in our detailed FreshBooks Review.
You can watch the video below or read the step-by-step instructions that follow.
How to Add & Manage Clients in FreshBooks
Step 1: Navigate to the Client Center
Click on Clients in the left menu bar, and then tap on the New Client button in the upper right corner of the page.
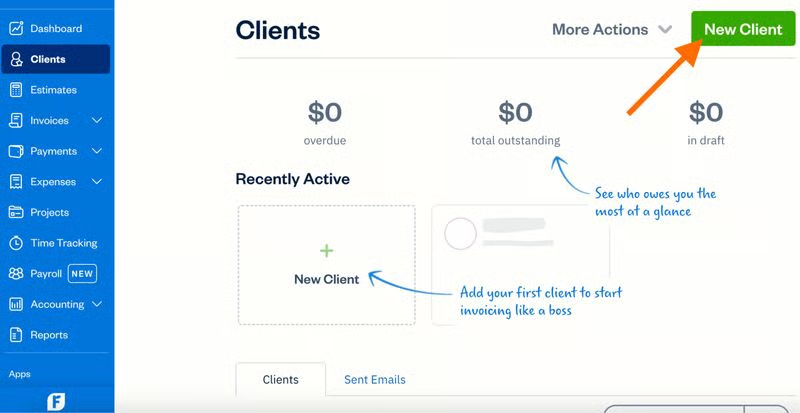
FreshBooks’ Clients page.
Step 2: Provide Basic Client Profile Information
Once you’re in the New Client form, you can add basic client information, including the client name, their company name, email address, and phone number. Simply click on the respective fields and enter the information requested.
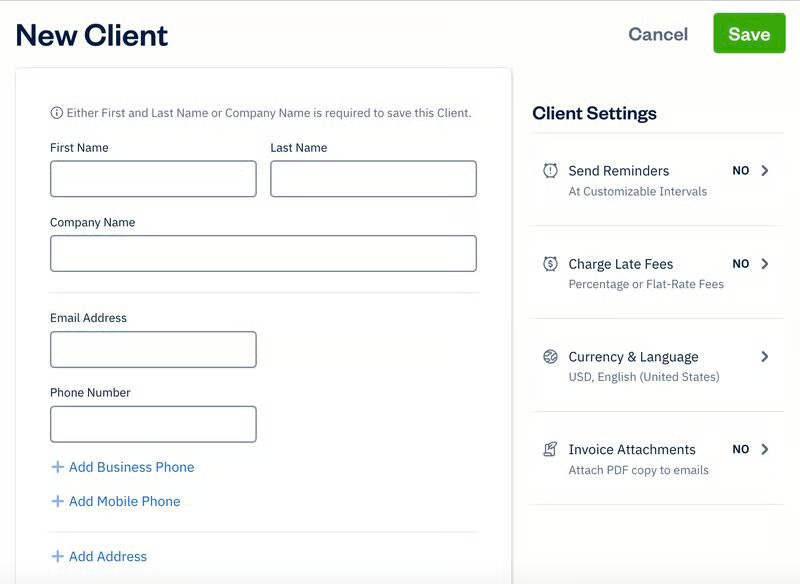
FreshBooks’ New Client form
Step 3: Adjust Client Settings
Set up additional settings for the client from the Client Settings section in the right sidebar (shown in the screenshot under step 2). From here, you can set up the following settings:
- Send Reminders: When you turn this on, FreshBooks will automatically send payment reminders for the client’s invoices based on the interval you specified.
- Charge Late Fees: This will automatically add late fees to your client’s overdue invoices.
- Currency & Language: This allows you to select the language used in the invoice as well as the currency.
- Invoice Attachments: When turned on, you’ll be able to include the option to attach PDF documents when emailing invoices to your clients.
Step 4: Click ‘Save’
Once the necessary information is provided and the settings are properly adjusted, click on the Save button to confirm your new client.
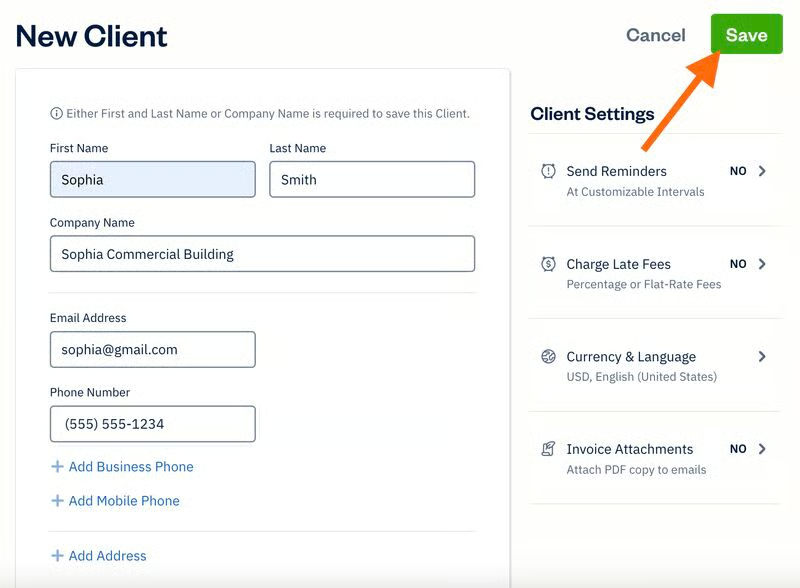
Saving a new client in FreshBooks
Once a client is successfully entered, it will appear on the Clients page, and you can view their profile by clicking anywhere on the entry line. From here, you can see information related to that customer, including outstanding invoices, time entries, expenses, and projects.
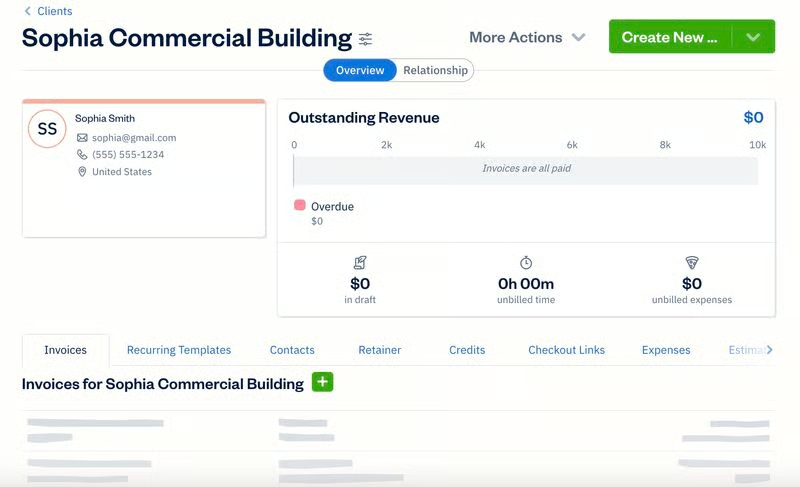
Sample client profile in FreshBooks
Managing Clients
If you need to make changes to the client’s information, click on the arrow next to More Actions and then select Edit Client, as shown below.
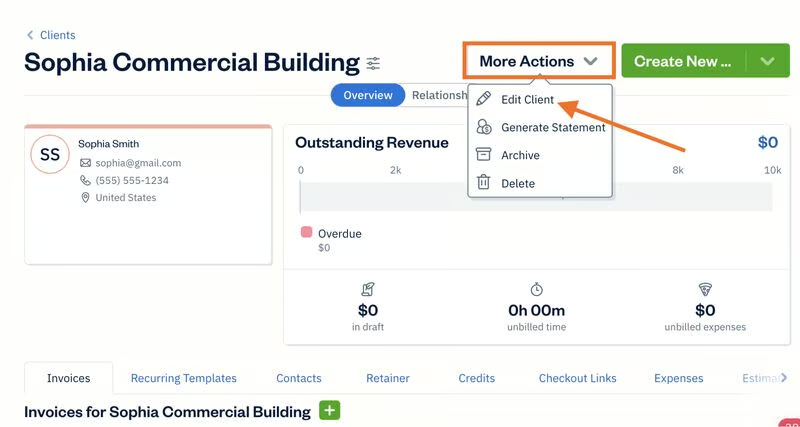
Editing client information in FreshBooks
Similarly, if you need to delete a client, then you can do so by clicking Delete under the More Actions button.
How to Create a New Invoice in FreshBooks
Step 1: Navigate to the ‘Invoices’ Screen
Click on Invoices in the left navigation bar to access the Invoices screen. To proceed with creating a new invoice, click on the New Invoice button in the upper right-hand corner.
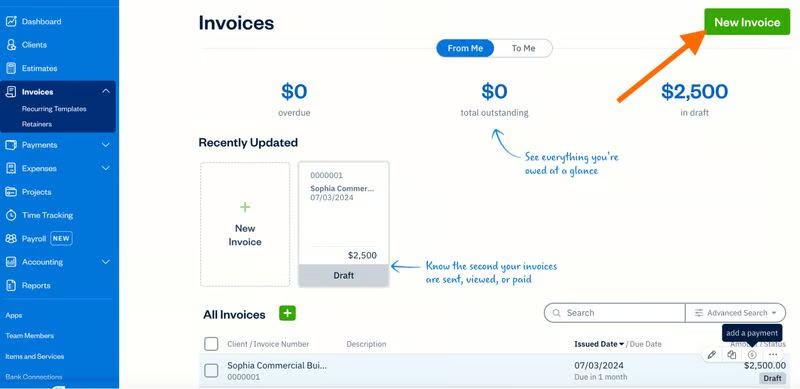
Navigating to the New Invoice screen in FreshBooks
Step 2: Complete the ‘New Invoice’ Form
To complete the New Invoice form, you need to provide the necessary information, including your company logo, the total amount due, and a description of the product or service performed.
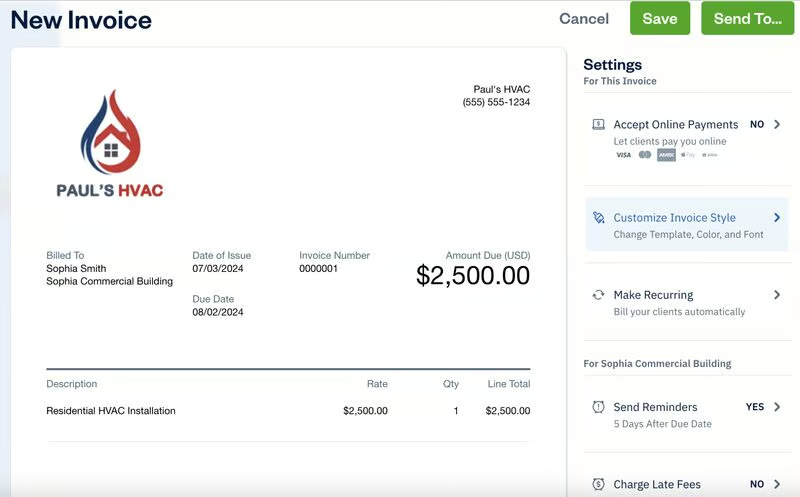
Creating a new invoice in FreshBooks
Step 3: Adjust Additional Settings for the Invoice & the Customer
On the right side of the New Invoice form, FreshBooks provides options for setting up additional preferences for the invoice and the customer (shown in the screenshot above).
For the Invoice
- Accept Online Payments: This allows you to set up online payments so that customers can pay you via credit or debit cards and ACH bank transfers.
- Customize Invoice Style: This is where you can adjust the design of your invoice. You can change the theme color and choose between classic and modern font.
For the Customer
FreshBooks will use the same preferences you specified when setting up the client profile, as discussed in Step 3 of our tutorial on how to add and manage clients.
Step 4: Save the Invoice or Send It Right Away
If you want to save your invoice as a draft, click on the green Save button (shown in the screenshot under Step 2). If you need to send the invoice to your customer right away, click on the Send to button next to Save.
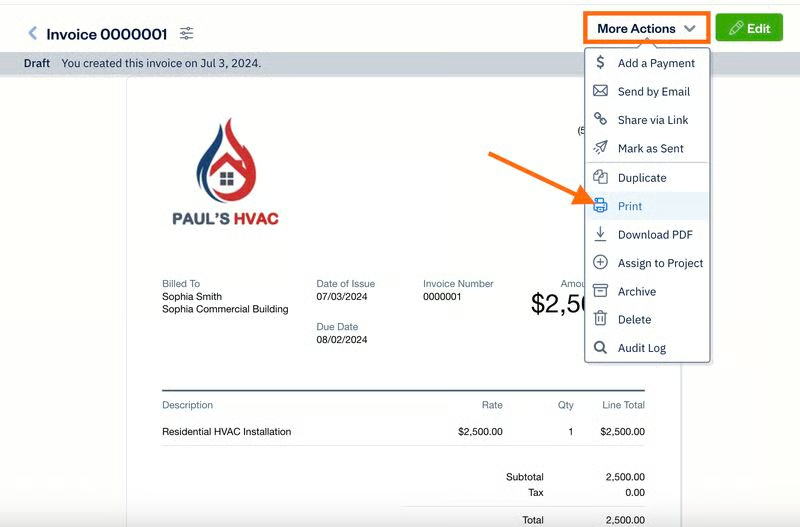
How to Print Invoice
To print an invoice, click on the More Actions drop-down menu in the upper right corner of the Invoice screen, and then click Print. You can also use this drop-down menu to share the invoice via a link or download a PDF of the invoice.
Print an invoice in FreshBooks
How to Apply Customer Payments to Invoices in FreshBooks
If you have received a payment outside of FreshBooks, you’ll want to add that payment to the invoice in your account so FreshBooks recognizes that you have received that money. You also have the option to send your clients a payment notification to let them know that you have received your payment. To indicate a received payment in FreshBooks, follow these steps:
- Step 1: Click on Payments in the left navigation bar.
- Step 2: Click on the green + button and then type in the invoice number or look for the invoice in the drop-down list under the Invoice field.
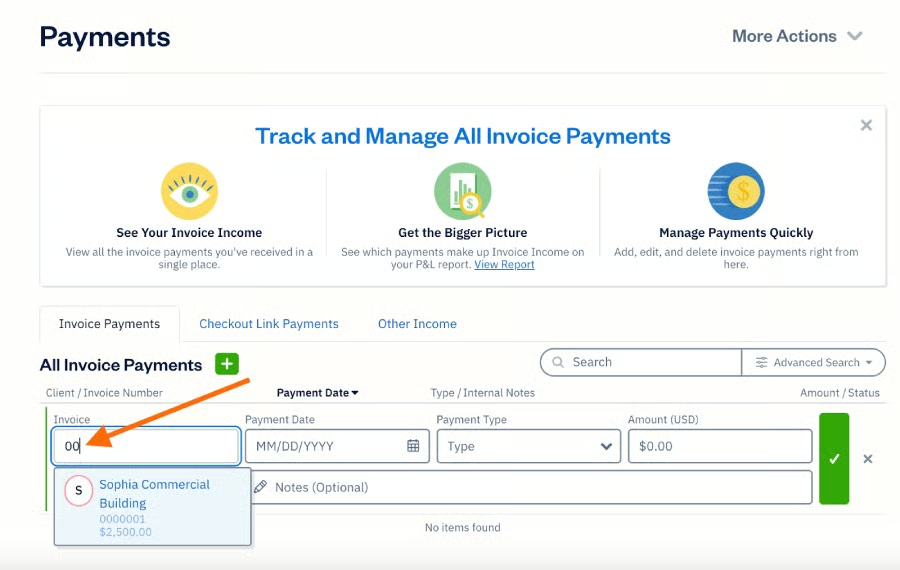
- Step 3: Specify the payment date. The payment date will default to the current date, but you can click on it to change it to a different date if needed.
- Step 4: Enter the amount paid, which will be in the same currency as the invoice.
- Step 5: Click the checkmark highlighted in green at the far right side of the invoice transaction to save the payment.
How to View Open Invoices in FreshBooks
There are two ways to view open invoices in FreshBooks:
- Check the client’s profile. Navigate to the Clients page and then go to the client’s profile. It will show you a list of open invoices associated with that client.
- Print an Accounts Aging Report. For a more comprehensive summary of outstanding invoices that are sorted by dates due, you’ll want to generate an Accounts Aging report. You can access this report by first clicking on Reports on the left menu and then selecting Accounts Aging. This report will show you which clients are taking a long time to pay their invoices by pulling all outstanding and overdue invoices into one place for your review.
Frequently Asked Questions (FAQs)
Navigate to the Clients page, complete the New Client form, and then click Save.
Go to the Invoice page, complete the required fields in the New Invoice form, and then click Save or Send.
Yes, and you can do so by adding your company logo, changing the invoice theme color and font, and adding a personalized message for your client.
Bottom Line
You have now learned how to manage clients and send invoices in FreshBooks. Also, you’ve discovered how to accept payments in FreshBooks as well as how to view open invoices.
The next tutorial in our FreshBooks course is “How to Track Bills and Pay Expenses.” That will cover how to enter and view unpaid bills, how to record the payment of a bill, and how to add and view vendors.
Previous Tutorial
5 Free FreshBooks Tutorials
Next Tutorial