

Finding ways to print payroll checks online for free is a good option if you have employees who prefer checks over direct deposits. All you need is a printer, check stock, and magnetic ink, and you can usually print within minutes. However, free services are generally limited—some only allow one check per day and don’t allow you to pay your employees via direct deposit or pay cards.
If you have a limited software budget, check out the below options to help you print payroll checks free of charge.
Option 1: Use Free Payroll Software
No-cost payroll software can be a great way to print payroll checks online for free. Here are two options you can use:
Payroll4Free
Payroll4Free is an online payroll software you can use at no cost if you’re paying the same 10 (or fewer) workers in one month. It can print checks, run payroll, compute tax calculations and deductions, track vacation and sick leaves, and provide access to tax forms and payroll reports. You can also give employees the option of receiving their paycheck through direct deposit if you use your bank to set it up.
For printing checks online using Payroll4Free, follow these steps.
Sign Up for & Install Payroll Application
The first step is to visit the website and enter your business name and email address on the “Get Started Today” box located on the right side of the page. You’ll receive an email that details the features included with the free service, available add-ons, and a link to verify your email address.
Clicking on the link will take you to Payroll4Free’s sign-up page where you need to input your basic information like company address, contact details, and number of workers.

The system will send you another email with a link to download the app. You’ll need to respond to a couple of prompts, like giving your computer permission to run the program, so just follow the installation steps on the screen.
Once you log in to the app, you’ll enter information to finish setting up your company, payroll, employees, taxes, and payment details. This includes your bank’s routing and account numbers, your pay frequency (i.e., biweekly, weekly), and employee W-4 data. After entering all of the required information, you can submit and wait to be notified via email that your account setup is complete.
Process Payroll
Select the “Payroll” menu option located on the left side of the screen. It’ll bring up a dashboard that shows processing, reports, and maintenance options. Click the PR Explorer button to start the payroll process.
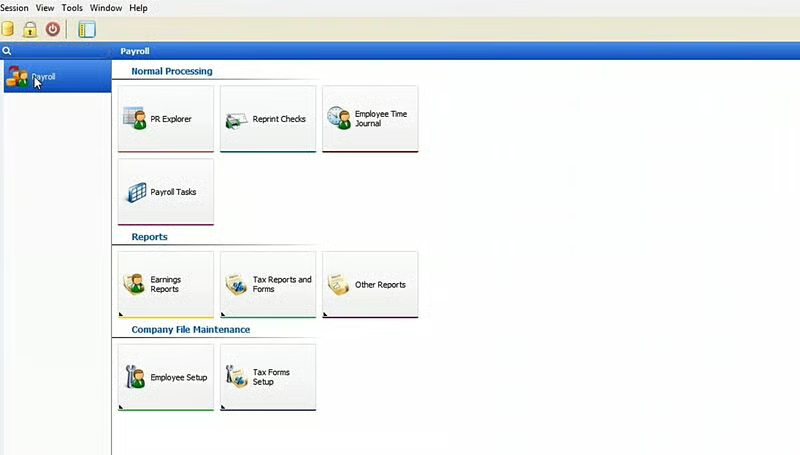
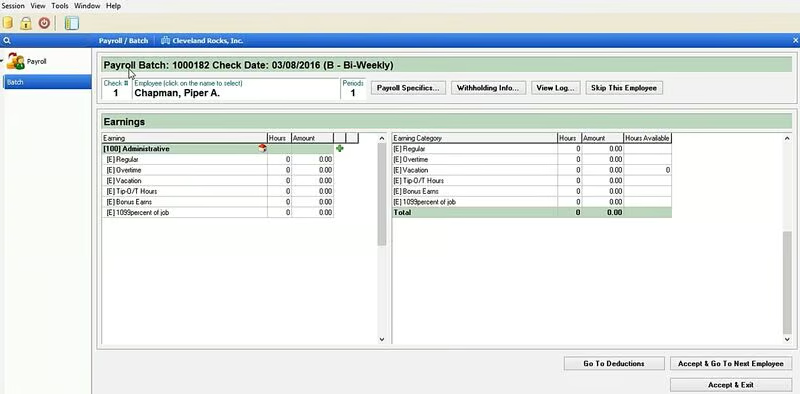
Start a new payroll batch and input your employees’ hours or salary. You also need to enter and verify the check date, payroll period, and payment types (checks and/or direct deposits). The system will automatically calculate deductions, employer taxes, wages, and salaries payable based on information entered during setup and the hours you submit.
Once all of your employees’ information is entered, view your preposting report before printing the paychecks. This will help ensure your checks are accurate, so you won’t have to void the transaction in the system and reprint later.
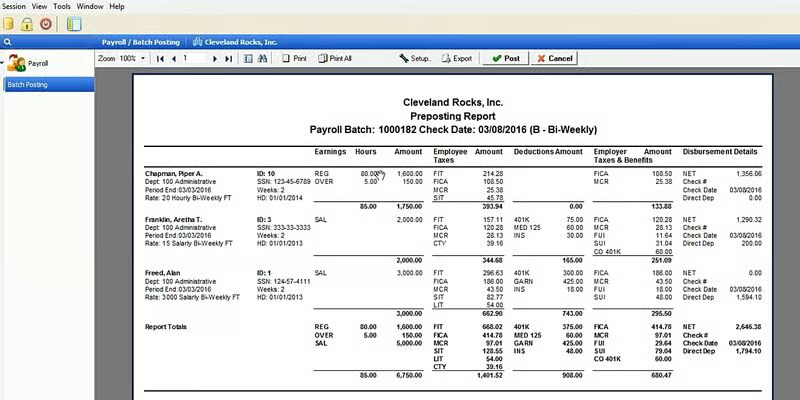
The preposting report contains all of the information about your current payroll. It has several pages showing detailed breakdowns of employee earnings, taxes, and deductions, including summaries of the journal entry and check register. To toggle through these, click the left or right ticker (arrow) at the top, under your company name.
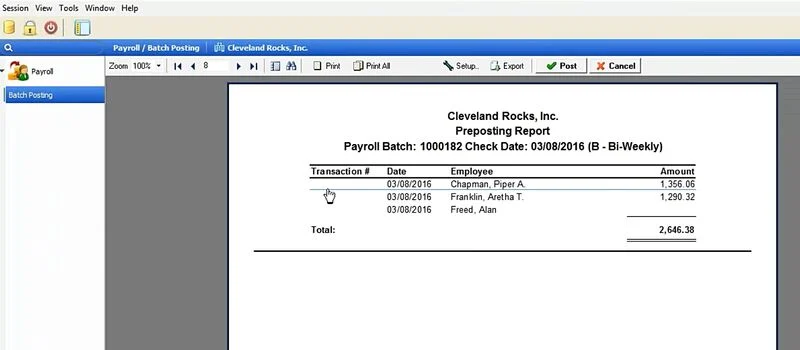
The last page of the report is the check register, which features a list of employees and their net pay for the pay period. If you want to see the online paycheck, double-click the name of the employee.
Once you have reviewed and approved the applicable reports, click the “Post” button on the menu bar just above the report. This function will update the payroll and send you to the check printing screen.
Load & Prepare Printer
Ensure that your printer is loaded with the payroll check stock, and then verify that the printer listed on Payroll4Free is where your checks should be printed. If not, open the drop-down box and select the correct printer. Also, confirm that the checks listed below are the payments you’re expecting.
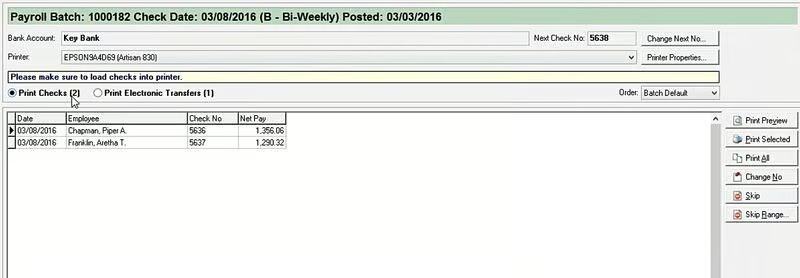
Print Payroll Checks
When you’re ready, click the “Print All” button on the right menu bar to print the checks. There will be a prompt asking if you want to see the posting reports. Click “Yes,” and you will see reports that look similar to the preposting reports but with check numbers. You can export the report as a PDF, CSV, or TXT file.
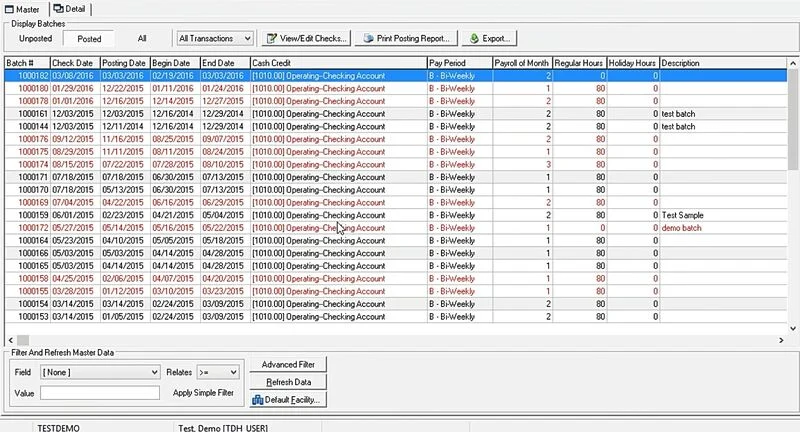
If you view your posted payroll batches and some are in black-colored font, then this means that the checks for those batches have been printed. If it’s in red, you’ve updated the pay run but haven’t physically printed the checks. If the batch is shaded in gray, there’s a void check in the batch.
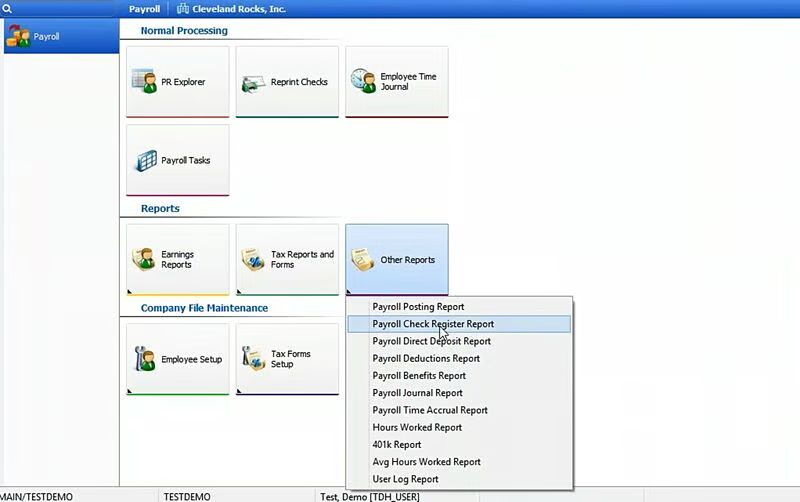
If you ever need to reprint checks, just click “Other Reports” under Reports to see a drop-down list. You will need to select “Payroll Check Register Report.” Enter a time frame, i.e., 06/05/2024 to 06/19/2024, and click “Generate.” The system will then show you a check register report that’s similar to the one that displays when you print an original batch.
Follow the same process as described above by hovering over the transaction you want to see, double-click, and the check will display. Since it’s already been posted, simply select “Print” so you can print payroll checks online free of charge again.
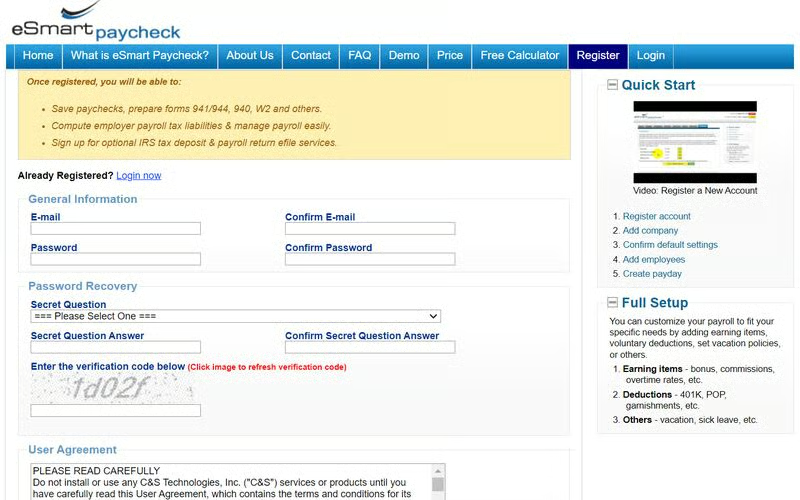
eSmart Paycheck
eSmart Paycheck is an online payroll software that can handle very basic payroll needs, like calculating payroll and taxes, printing tax forms, and printing paychecks. In addition to the free plan (which is free only for the first three months), it offers annual packages (yearly fees start at $75) that allow customizations and save payroll data.
Follow these simple steps to print payroll checks online free of charge using eSmart Paycheck:
Register for a Free Account & Input Company Information
This step is actually optional. If you only have a single check you need to print in a pinch, you can go to the free paycheck calculator and put in the information. However, if you want to save paychecks, compute taxes, and manage payroll, then register first.
eSmart will mail you a verification code, and once you enter it, you can set up your company, payroll, employees, taxes, and accounting. The system will need information like your bank’s routing and account numbers and pay periods (i.e., biweekly, weekly). You are also invited to add company-specific policies like vacation and sick pay.
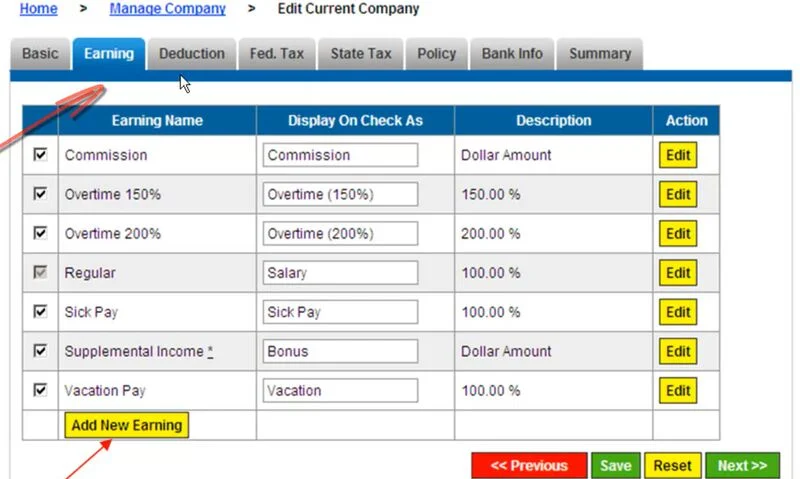
You’ll want to check the “Earnings” tab, where it lists the most common earning types, from commissions to overtime. You can make changes or add new types of earnings to be used in payroll calculations. You can do the same for deductions.
Adding employee information is optional in the registration process, but you will need it for running payroll. This is also true for adding paydays. After entering all of the required information, you can submit and wait to be notified via email that your account setup is complete.
Process Payroll
When you are ready to run payroll, click on “Create Payday” in the top left-hand menu. Then you will then enter basic information, like paycheck date, check starting period, pay period, and pay cycle (monthly, weekly, etc.)
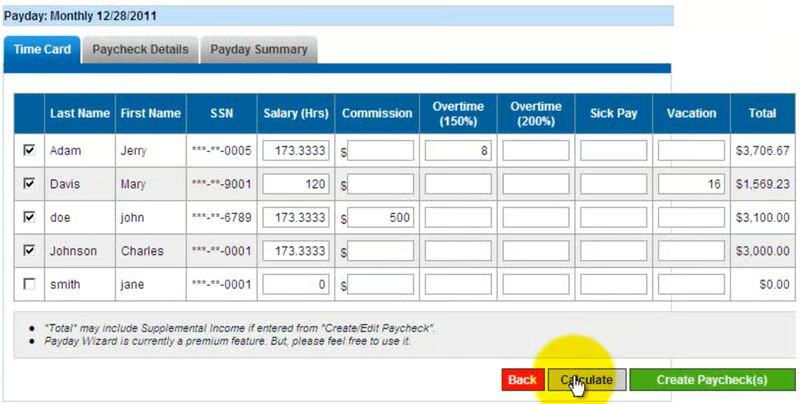
After that, you have two choices: you can create paychecks one at a time or run the entire payroll for the pay period by clicking “Payday Wizard,” which is the blue button at the bottom of the list of employees.

From “Payday Wizard,” you can also select employees you don’t want to create a check for, add other payments like commissions or sick pay, and adjust hours if needed. Then, click “Calculate” to see how much the checks will be and “Create Paycheck” to create the checks.
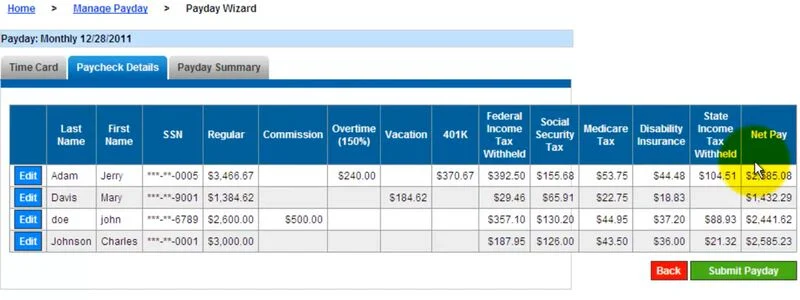
Before creating the checks, it will show you the details so that you can make any corrections as needed. After that, click on “Submit Payday” to get a summary report with wages and taxes. Select “Save” to save the payroll.
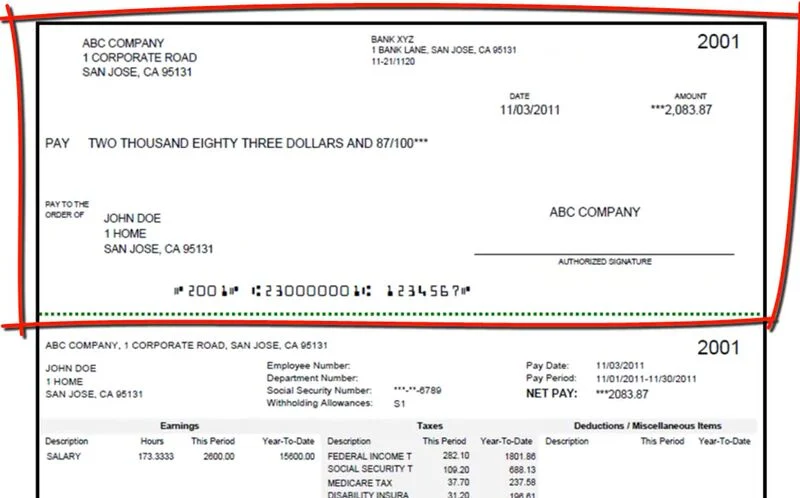
Print Paychecks to PDF
Once you save the payday, you can either view the summary report or select “Print All Paychecks.” This will download the paychecks as a PDF. Then, you can print payroll checks free of charge—provided you use standard 3-part blank check stock. This stock is available commercially or from eSmart for a service fee.
Option 2: Use a Mobile App
If you don’t have a computer or laptop, printing from a mobile app is a good option. This allows you to use smartphones or tablets to create employee paychecks from anywhere, provided there’s an available internet connection for Wi-Fi printing and that you have the required materials (such as check paper, printer, and magnetic ink
Check Writer
For iOS and Android users who want to write and print checks at home, consider Check Writer. All you need is a US bank account, a phone or tablet, a printer, magnetic ink, and blank check stock (personal or business size). After printing the check, you can sign it and give it to your employees to endorse and cash. You can also keep a digital copy on your smartphone or tablet.
One concern you might have is security since printing from the app requires entering your bank account numbers. The application states that your bank information will never be uploaded to the cloud or stored on a server or any other place.
Follow these simple steps to print payroll checks online for free via the Check Writer mobile app:
Download the App on Your Phone
Search for and install the app. After you open the app, you’ll be prompted to agree or disagree with the privacy policy and terms of use.

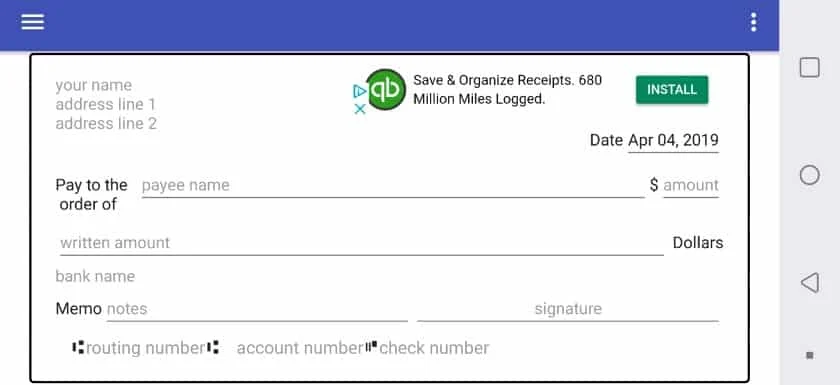
Enter the Check Information
Fill the checkout by entering your name and address at the top, the payee’s name beside “Pay to the order of,” and the amount in numeric form. Write out a memo and include your signature (which is just your name in print).
When you’re ready to add your routing and account numbers at the bottom, click in the area they should be entered, and a prompt to add a bank account will display. You’ll see the image of a check at the top of the page with arrows showing you where to find your routing and bank account numbers on checks issued to you by your bank. Scroll down and enter the following:
- Your full name
- Address
- Bank name
- Routing number
- Account number
- Starting check number
After you enter all of the information, click “Save Bank Account.” The app will display a message reminding you to verify that the data you entered is correct and it’s not responsible for any errors. Click “OK,” and you’ll be sent back to the page displaying your check.
Now, you can add the bank account you just created in the system. Click in the bottom area where your routing and accounting number will show, and a prompt will display the accounts you entered. Select the bank account from which you want to pay, and the routing account and check numbers will automatically populate on the check.
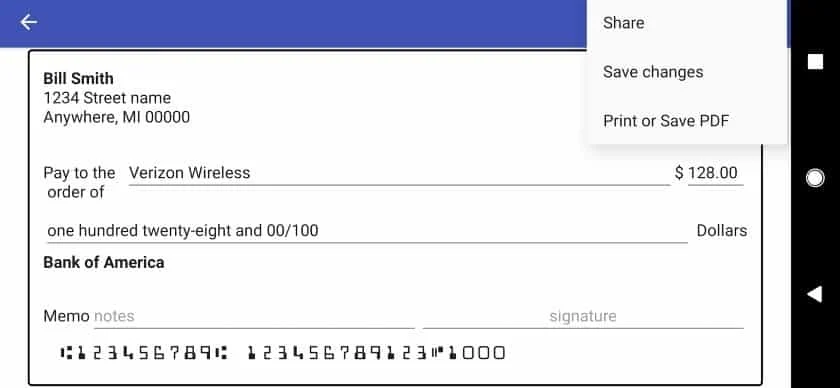
Preview Your Check
In the top right-hand corner, you’ll see a series of white dots aligned vertically. Click on them, and a drop-down will appear. Select the last option, “Print or Save PDF.” A box with information about print settings will appear. Be sure to read that, because you may need to change your check alignment, border, or size when you’re finished reviewing the check preview.
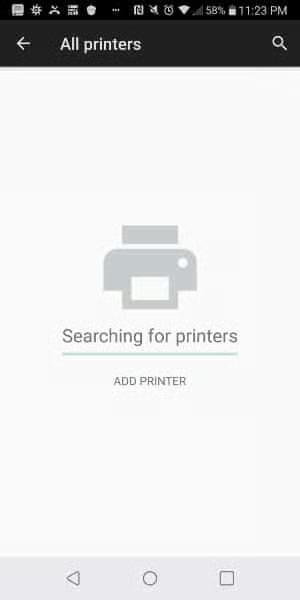
Prepare Printer, Adjust Settings, Load, and Print
Now, you’re ready to select a printer. Select “All Printers” in the top left-hand corner (you’ll see the alternative option to save as a PDF), and your device will begin searching for printers. You can add a wireless printer from your phone settings; the exact steps can vary depending on the type of phone you have.
You’ll see this message Check Writer connects to your local printer. (Source: Check Writer)
Be sure your printer and your phone are connected to the same Wi-Fi network. This will make it easy for your phone to find and connect to the printer. If you don’t find the option to add a printer in your phone settings, check your manual or Google.
Add check stock to your printer. Check Writer can only print using personal- or business-sized check stock. It also only supports printing on blank check paper that doesn’t have preprinted symbols or symbol placeholders in the magnetic ink character recognition (MICR) line at the bottom of the check. You can order any blank check paper from shops and online vendors (like Amazon) or check out this list of blank check paper products that have passed Check Writer’s testing.
Check Writer doesn’t have specific printer settings to follow, but if you find that fields are overlapping on the check when you print, go to “Settings” then “Customize checks.” Next, try to decrease the font size or change its type. If you have alignment issues, go to “Settings” then “Print Settings” and adjust until you find a fit.
If your printer doesn’t support wireless printing, just save the check as a PDF file. Send it to yourself via an online email account, and print it from a computer or laptop. Also note that if you’d prefer to print blank checks and handwrite them later, the app supports that. Disable the “Today’s date” option in the app settings. Then, follow all the steps above but leave the check information blank.
Looking for a more robust payroll service that works great on mobile?
Check out our top recommended payroll apps.
Option 3. Use Free Online Check Printing Services
A free online check printing service is useful if you need to print a small number of checks without having to download or install payroll software. Here’s a provider you can use to print payroll checks online free of charge.
CheckRobot
CheckRobot is a free check printing service you can use from anywhere. All you need is blank check stock and a home printer. If your bank supports optical check scanning, which requires a special MICR, print a sample check first and let your bank confirm they will not have problems recognizing it. Its free plan lets you print up to three checks monthly, while its paid Pro Monthly plan (costs $6.50 per month) comes with unlimited check printing.
Follow these simple steps to print payroll checks using CheckRobot:
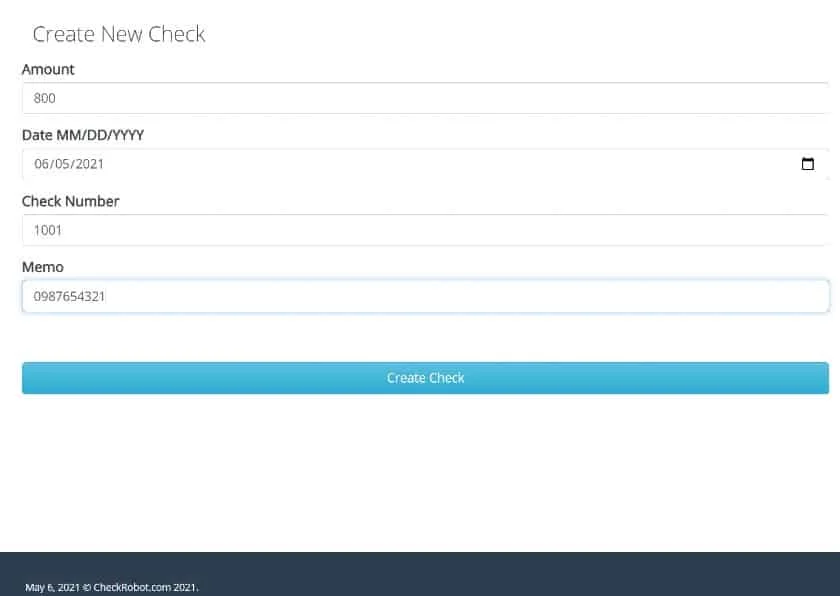
Sign Up for a Free CheckRobot Account
The first step is to visit the website and enter your name and email address. You’ll immediately be directed to CheckRobot’s dashboard once you log in.
Add Bank Account Details
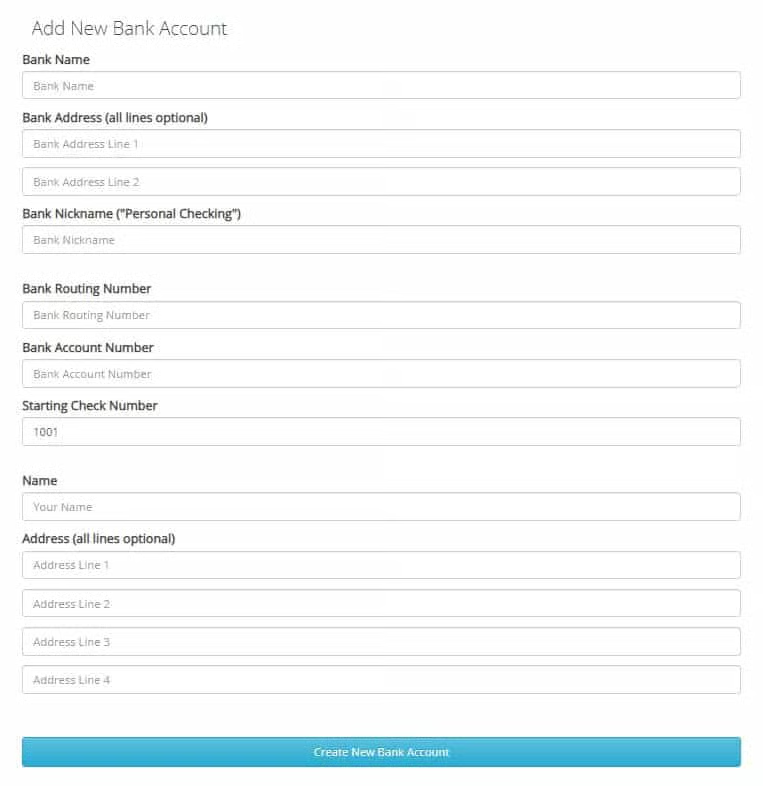
Click the “Add Bank Account” button in the upper left corner of the dashboard and provide your bank account details, including your bank’s name, address, nickname, routing number, account number, and starting check number. Then, click the “Create a New Account” button at the bottom of the page.
Add Payee Details
After creating your bank account, you can proceed with adding your payee’s name, address, and bank account, and click the “Create New Payee” button. After creating a new payee, you will be directed to another page that will allow you to create a check. You can also add another payee, delete, or add another bank using the buttons at the upper left of the page.
Create a Check for Your Payee
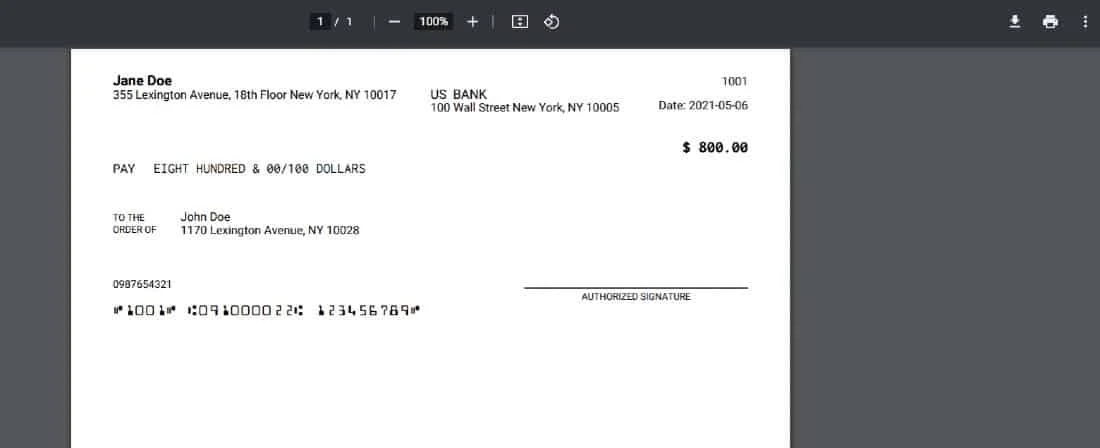
When you click the button to create a check, you will be directed once more to a page that will need the amount you will provide the payee. The date, check number, and memo (payee’s account number) are automatically filled out, but you can still edit the information. Once you click “Create a Check,” you will then see a listing below the page of all the checks that you will issue. It also has a feature to convert it to PDF format or delete the check entry.
Save PDF, Load Your Check Stock, and Print Checks
Be sure you have your magnetic ink cartridge or toner in the printer. After you load your check stock, click “Get PDF” to view the PDF with the check information. Double-check your entries, and then save the PDF. Adjust your printer settings and print your personal check.
Option 4: Use a Free Trial With Online Payroll Provider
You can find plenty of payroll providers that will offer a limited free trial, so you can print payroll checks online free of charge—but to continue doing so, you’ll have to sign up and pay after your trial is over. Some will require you to enter payment information, such as a debit card, before activating your trial, but others will allow you to start using the system without it.
Gusto
Gusto is a great example of a payroll provider that offers new clients one month of free access to its payroll tool
Follow these simple steps to print checks online Gusto:
Sign Up for a Trial & Set Up Your Account
First, you’ll enter information about yourself and your company—name, address, number of employees, etc. You’ll set your password and declare whether or not you’ve run payroll in the current year. You’ll also tell the system if you offer health benefits and how you heard about Gusto.
Then, you’ll create your account. Gusto will send you an email to confirm your email address. Once you click on the link, you can complete the setup and run your first payroll.
After you sign in, you will have to enter a bit of information to get started. Remember, with payroll software, you have to process payroll before printing checks. You’ll enter information regarding the following:
- Accounting software integrations
- Company addresses
- Employees
- Federal tax information
- State taxes
- Bank account information
- Pay schedule
- Previous payrolls, if applicable
- Unpaid tax liabilities
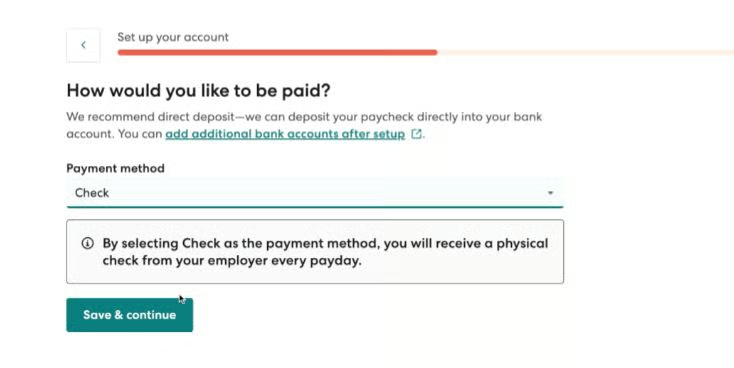
To pay your employees with payroll checks, you will need to specify this within the employee setup menu. However, you can change this or input additional payment options after the setup process.
Run Payroll
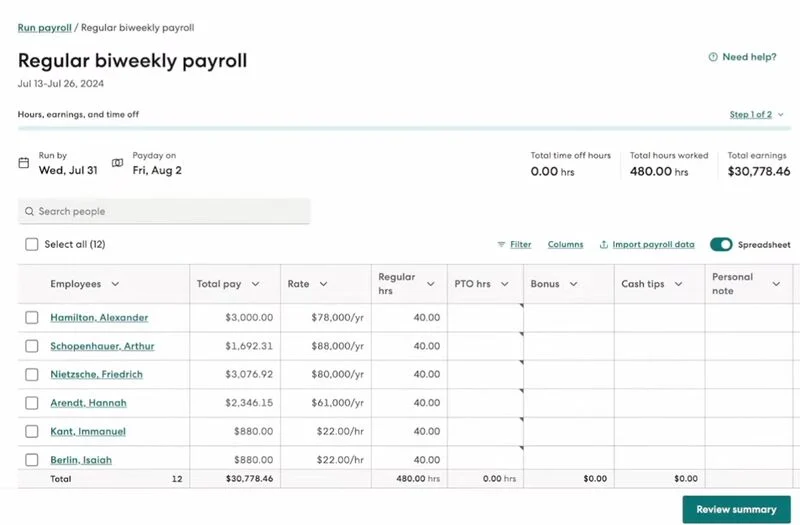
After you enter the employees’ basic information into the system, workers will receive their own login and can enter their work hours each pay period. However, Gusto also has a time tracking tool you can use—provided you upgrade to its higher tiers—which lets you capture, monitor, and approve employees’ work hours. This helps prevent errors from manual data entries and ensures accurate payments of actual attendance data for each payroll period.
Once you approve time for all employees, Gusto will calculate gross pay and deductions. You’ll need to verify that everything looks correct before proceeding to print your payroll checks.
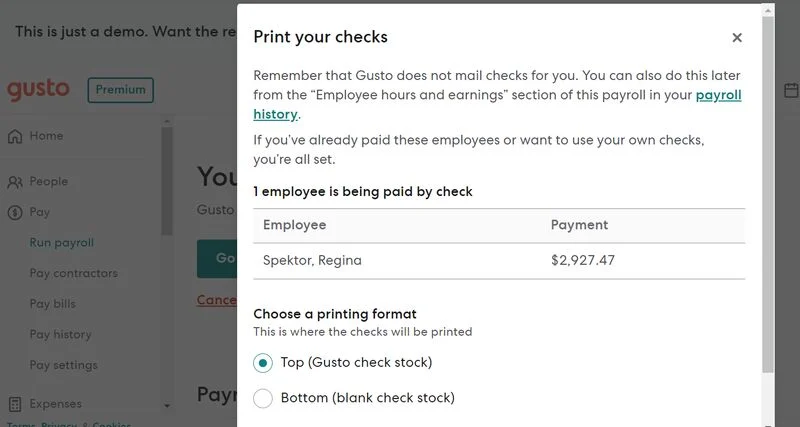
Select Print Settings & Load Printer
After running payroll, click “Print Checks” on the Write Checks screen. You’ll need to choose your check type. You can print personalized checks on top paper or blank checks on bottom paper. Gusto recommends specific personalized check stock and blank check stock to ensure compatibility with the system.
If you choose the personalized top check option, you will need to select “Layout t10196,” and when you’re choosing the check style, toggle the tab from “by Software” to “by Layout.”
If you have blank check stock and need Gusto to populate your company and bank information, choose the blank bottom check option.
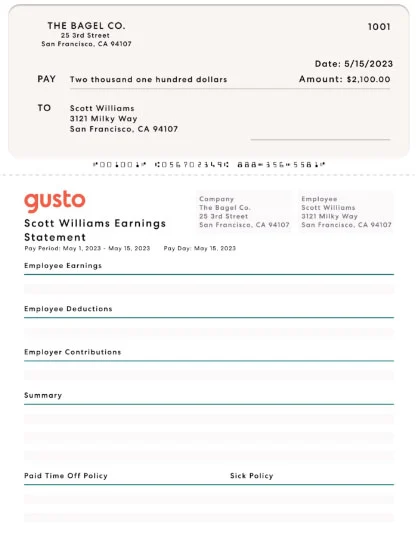
Load Your Check Stock, Preview & Print Checks
Be sure you have your magnetic ink cartridge or toner in the printer. After you load your check stock, click “Prepare Checks” to view the PDF with the check information and earnings statement. Save the PDF if you’re using the “Blank with Check on Bottom” option, because check numbers will change if you have to regenerate the batch at a later time for reprinting. To avoid printing issues, deselect the option for Fit to Page or Scale to Page.
Then, all you have to do is print, sign, and deliver the checks to your employees. Pay stubs are included, so you don’t have to manually prepare.
Other Considerations When Printing Payroll Checks for Free
Before you can print payroll checks online free of charge, take stock of the resources you have. Whether you use a check printing website or a payroll system, you must have the materials and equipment needed, including a payroll staff to handle paycheck printing every pay period.
To learn more about what it takes to do payroll from start to finish, check out our guides on how to do payroll and the various methods of paying workers. Generally, it’s best to have multiple ways to pay your employees to help limit the number of checks you need to print. However, when you are preparing to print payroll checks, you must keep the following in mind:
You can use any printer to print as long as you also use magnetic ink or toner. If you don’t, your bank can opt not to process the payroll checks, require a longer processing timeline, or charge you an additional fee. The bank’s check readers are designed to detect checks printed in magnetic ink. If you print in regular ink, it may not recognize your routing and account numbers, which means the bank teller will have to manually process.
Your printer settings will need to be checked per the application’s instructions to ensure your check information is aligned properly when printed. Some software services will allow you to perform a test print before printing the actual check. If that option is available, we recommend it.
You’ll also need payroll check stock to print your checks. If the service you use recommends a particular check stock, it’s a good idea to use it so you don’t have compatibility issues. Services that aren’t payroll-specific, like check printing mobile apps, will print checks as personal checks. This means the check stock you use must be personal check stock, which doesn’t have a paycheck stub listing earnings, deductions, and taxes. Depending on your state’s pay stub regulations, you may need to provide this information to employees.
Don’t know what to look for when buying check stocks? Read our ultimate guide to payroll checks as it contains tips on where to buy check supplies and the features to consider.
Once you understand what you’ll need, you can use free online check printing solutions or a payroll software like Gusto to prepare paychecks. You can also download our free pay stub template that complies with state-by-state laws.
Frequently Asked Questions (FAQs)
How can I print my own payroll checks?
You can follow the directions we outlined in this guide. Essentially, you need a printer that supports blank check stock and magnetic ink (or MICR ink). For easy check preparation, we recommend using an online check printing software or a payroll system that has check printing capabilities.
Can I use a regular printer to print payroll checks?
Almost all printers can handle payroll check printing. However, you need to check if it can use magnetic ink (or MICR ink) and if the settings can be adjusted to support printing on blank check stock.
Do I have to use magnetic or MICR ink for printing payroll checks?
It is highly recommended to use MICR ink, as it comes with security features. A payroll check printed with MICR ink will easily pass the bank’s magnetic reader and won’t require additional manual steps to process it. On the other hand, a check printed with regular ink is generally accepted, but the bank may charge a fee and/or take longer to process it.