Patriot Payroll offers a relatively inexpensive and easy-to-use software for processing payroll for any number of employees. You can choose the Full Service payroll plan, which costs $37 plus $4 per employee monthly, or its Basic option, which is priced at $17 plus $4 per employee monthly and requires you to handle tax filings. The provider offers free setup for new users, but if you want to set up Patriot Payroll yourself, the process isn’t difficult. The interface is also intuitive, and there are multiple help features if you get stuck anytime you run payroll with Patriot.
In this guide, we go over the basic steps to set up an account and run payroll with Patriot. You can follow along by signing up for a free demo on Patriot or taking advantage of the free 60-day trial.
If you want to set up Patriot Payroll with more than just screenshots as support, follow along with our video on how to set up and run payroll with Patriot.
Please note: Depending on where you are in the process and how you initially access Patriot Payroll’s software, some of the screenshots in our guide may differ from what you actually see. Overall, the process should be the same and will ask for the same information.
Payroll Setup Checklist: Info to Have on Hand
Before you dive into your payroll setup, take a look at the items Patriot recommends you have ready beforehand. This will make your setup process quicker and easier.
Step 1: Create Your Account
To create an account on Patriot, simply sign up for the free trial from the homepage. The system will then prompt you to create your username and password and enter basic company information, like your tax filing name, business name, number of employees, phone number, and mailing address. You will have at least 60 days to try out the software for free before having to select a plan.

Patriot Payroll runs special promotions at times and you can input the applicable code to enjoy the promo, which can be a discount or a longer free trial. (Source: Patriot)
Alternatively, you can jump straight in and choose either the Basic payroll plan or the Full Service payroll plan. With the Full Service plan, Patriot files and pays the payroll taxes for you. In contrast, the Basic plan requires you to manage and file tax forms on your own. Both plans also come with free payroll setup, wherein you provide Patriot with all the required employer and employee information, and it will handle the setup for you. Depending on your needs, this may make it worth forgoing the free trial, which requires you to input everything yourself.
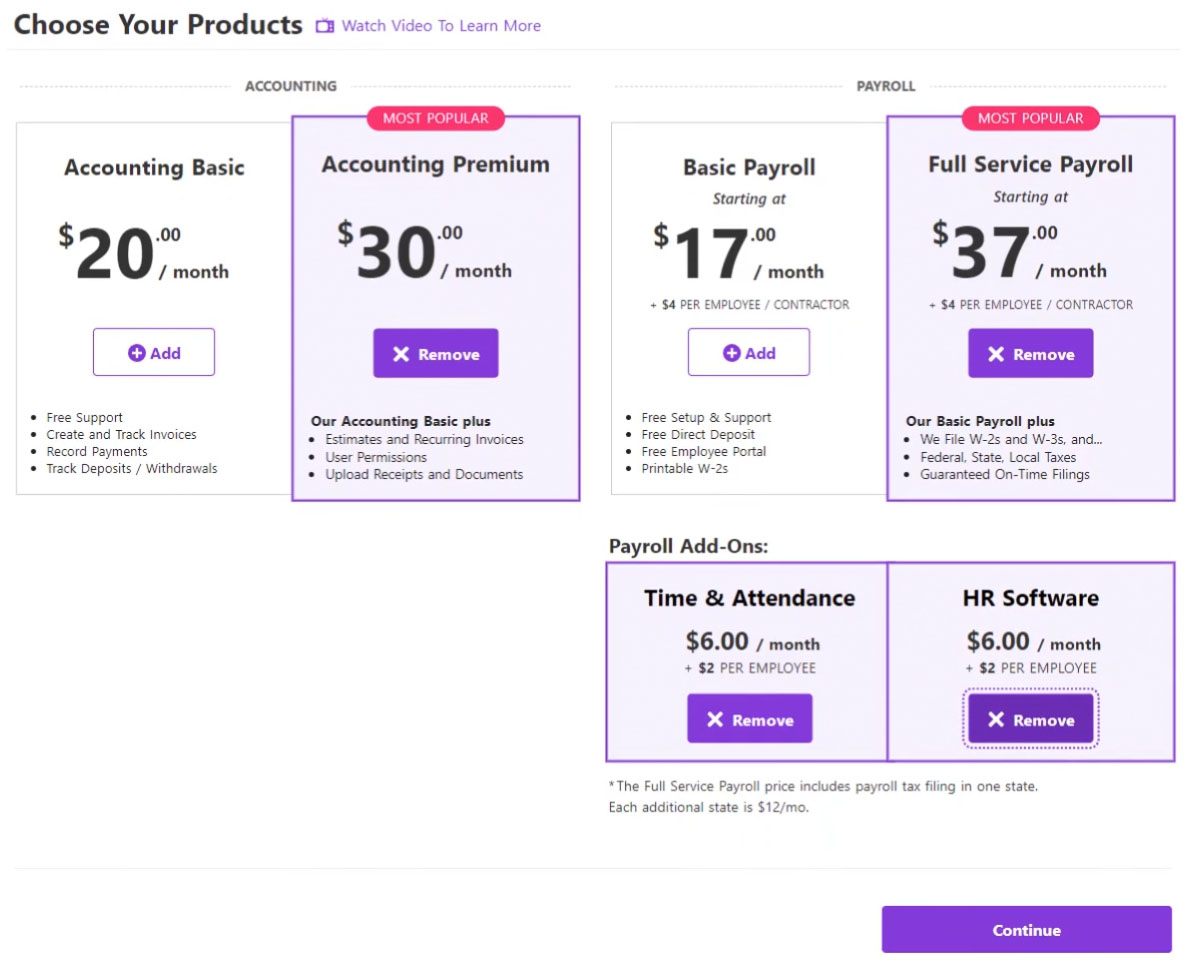
Patriot’s account setup process will ask you to choose the products and add-ons you want.
(Source: Patriot)
If you decide to set up Patriot Payroll on your own, you’ll find most of the functions you need in “Settings” and can use Patriot’s setup wizard to simplify the process. If, at any point, you want to complete the steps in a different order than the wizard suggests, then you can skip steps and come back as needed.
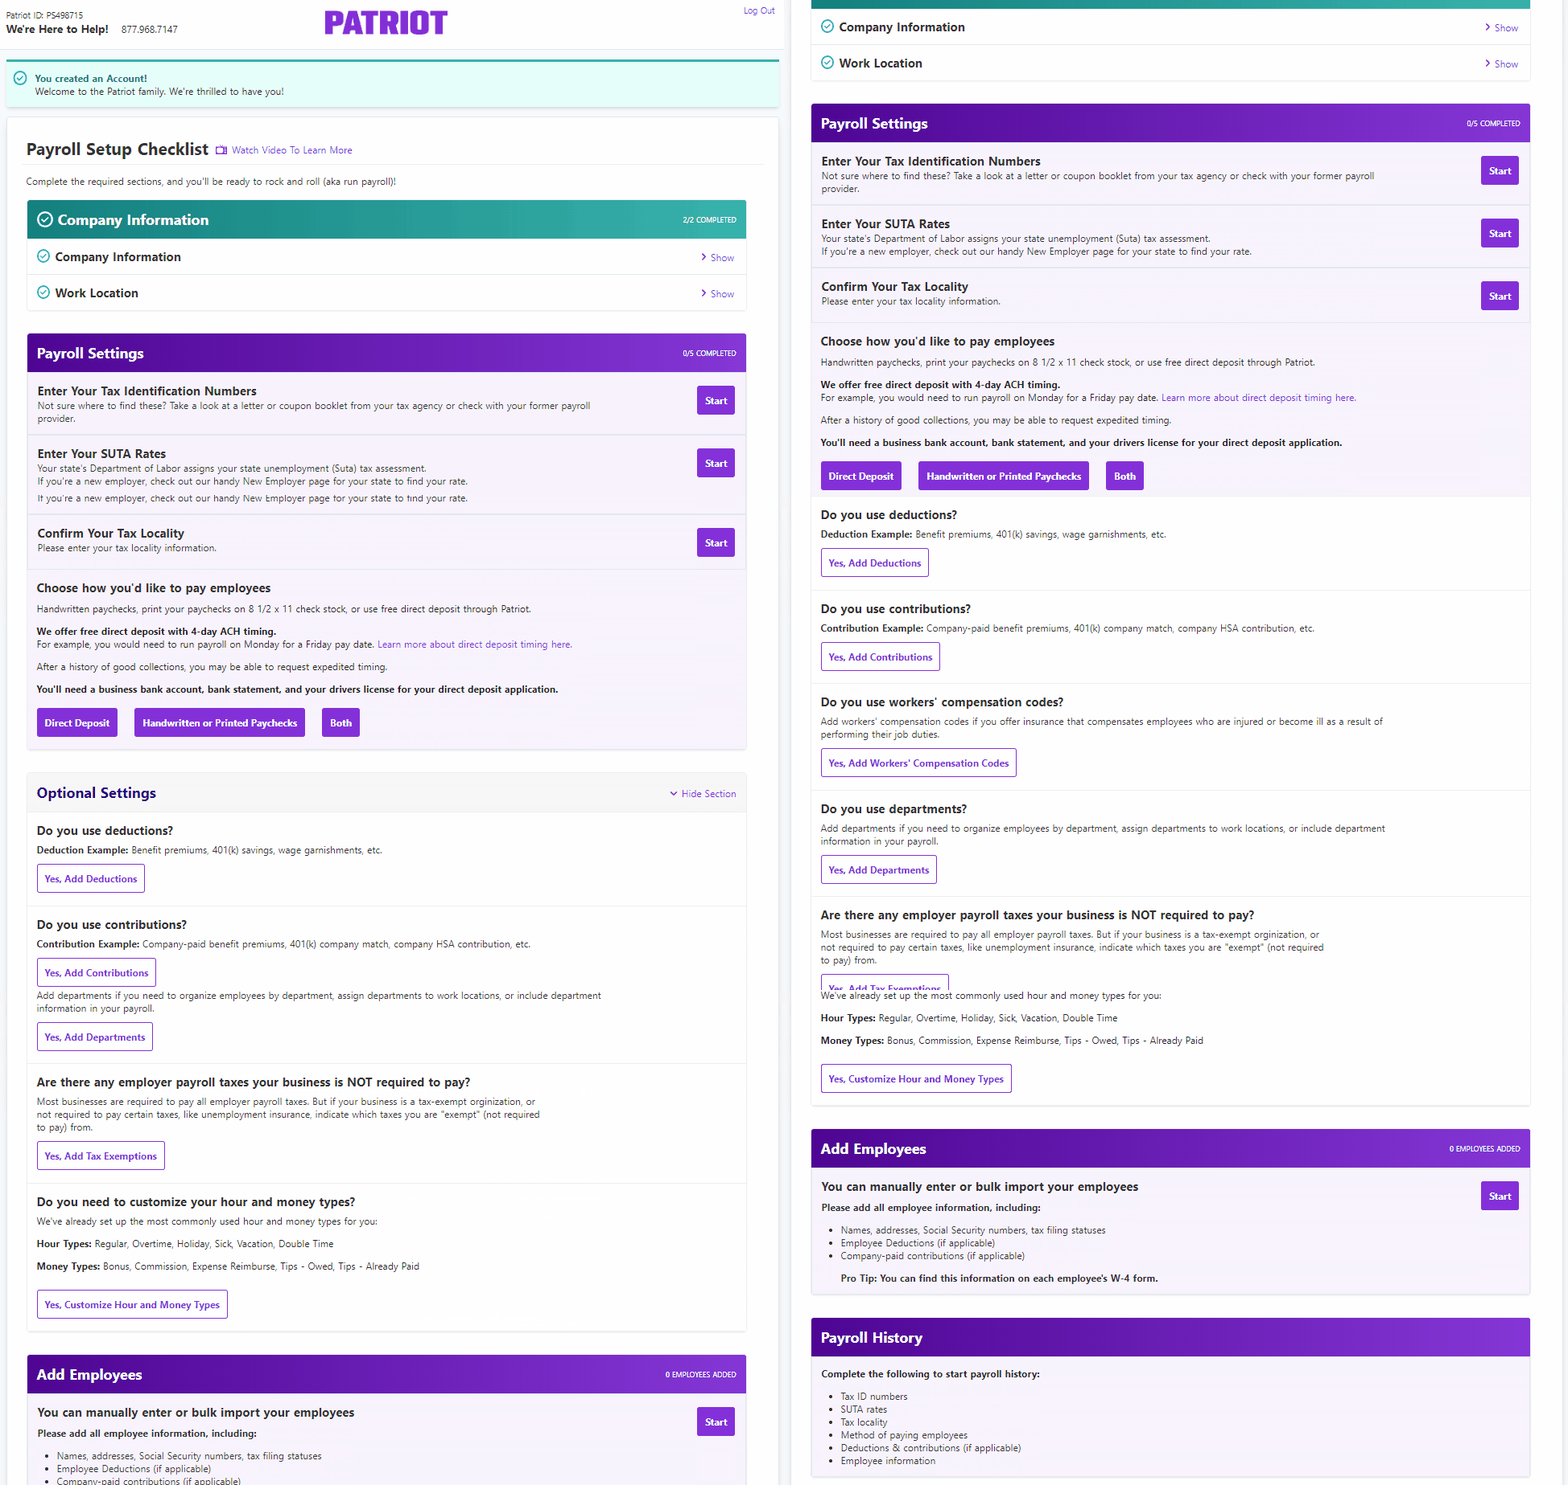
Patriot’s payroll setup checklist contains the basic requirements you need to complete the setup process. (Source: Patriot)
Step 2. Add Payroll Settings
To complete Patriot’s payroll settings, you’ll be asked to provide your tax identification number, SUTA (state unemployment tax) rates, and employee payment methods. It also has an “optional” section that lets you add workers’ compensation, benefits contributions, deductions, and other money types to its system.
The “Enter Your Tax Identification Numbers” section is where you input your federal tax identification number, while “Show Advanced Tax Settings” is where you choose your default payroll frequency (i.e., weekly or biweekly pay period). You’ll also need to identify your federal filer type, Form 941 or Form 944 (small employers that usually owe less than $1,000 a year typically file Form 944). When you’re done, select “Save.”
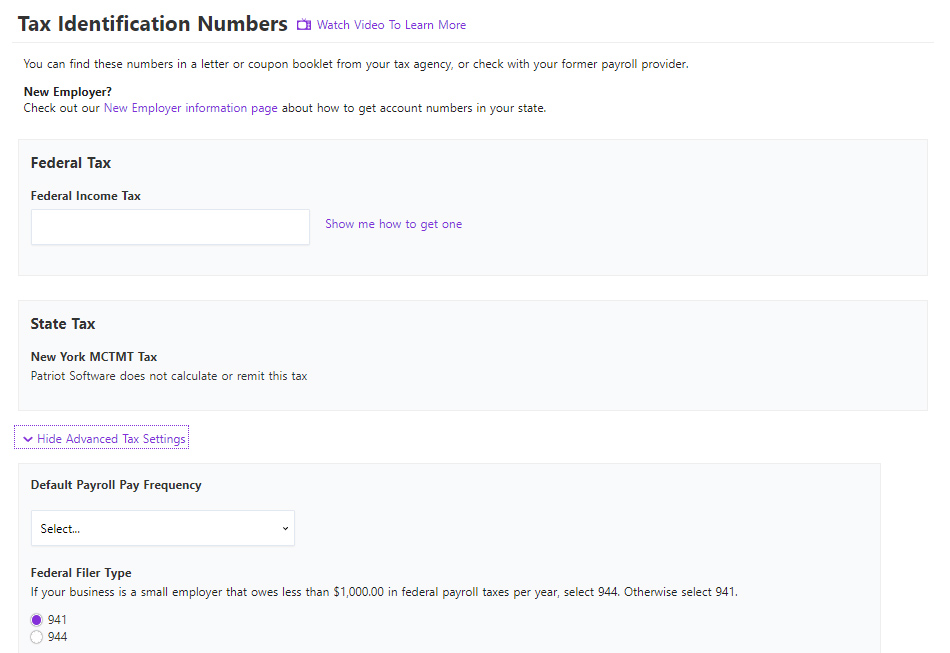
If you don’t have a federal tax identification number, Patriot has a link that will send you to an article explaining how to get one in your state. (Source: Patriot)
Similar to how the federal tax section works, the state settings let you set up account numbers. It’ll ask for your state income tax number if you live in a state that charges income tax. There’s also space for you to enter your state unemployment tax rate and the date the rate is effective. When you’re done, select “Continue.”
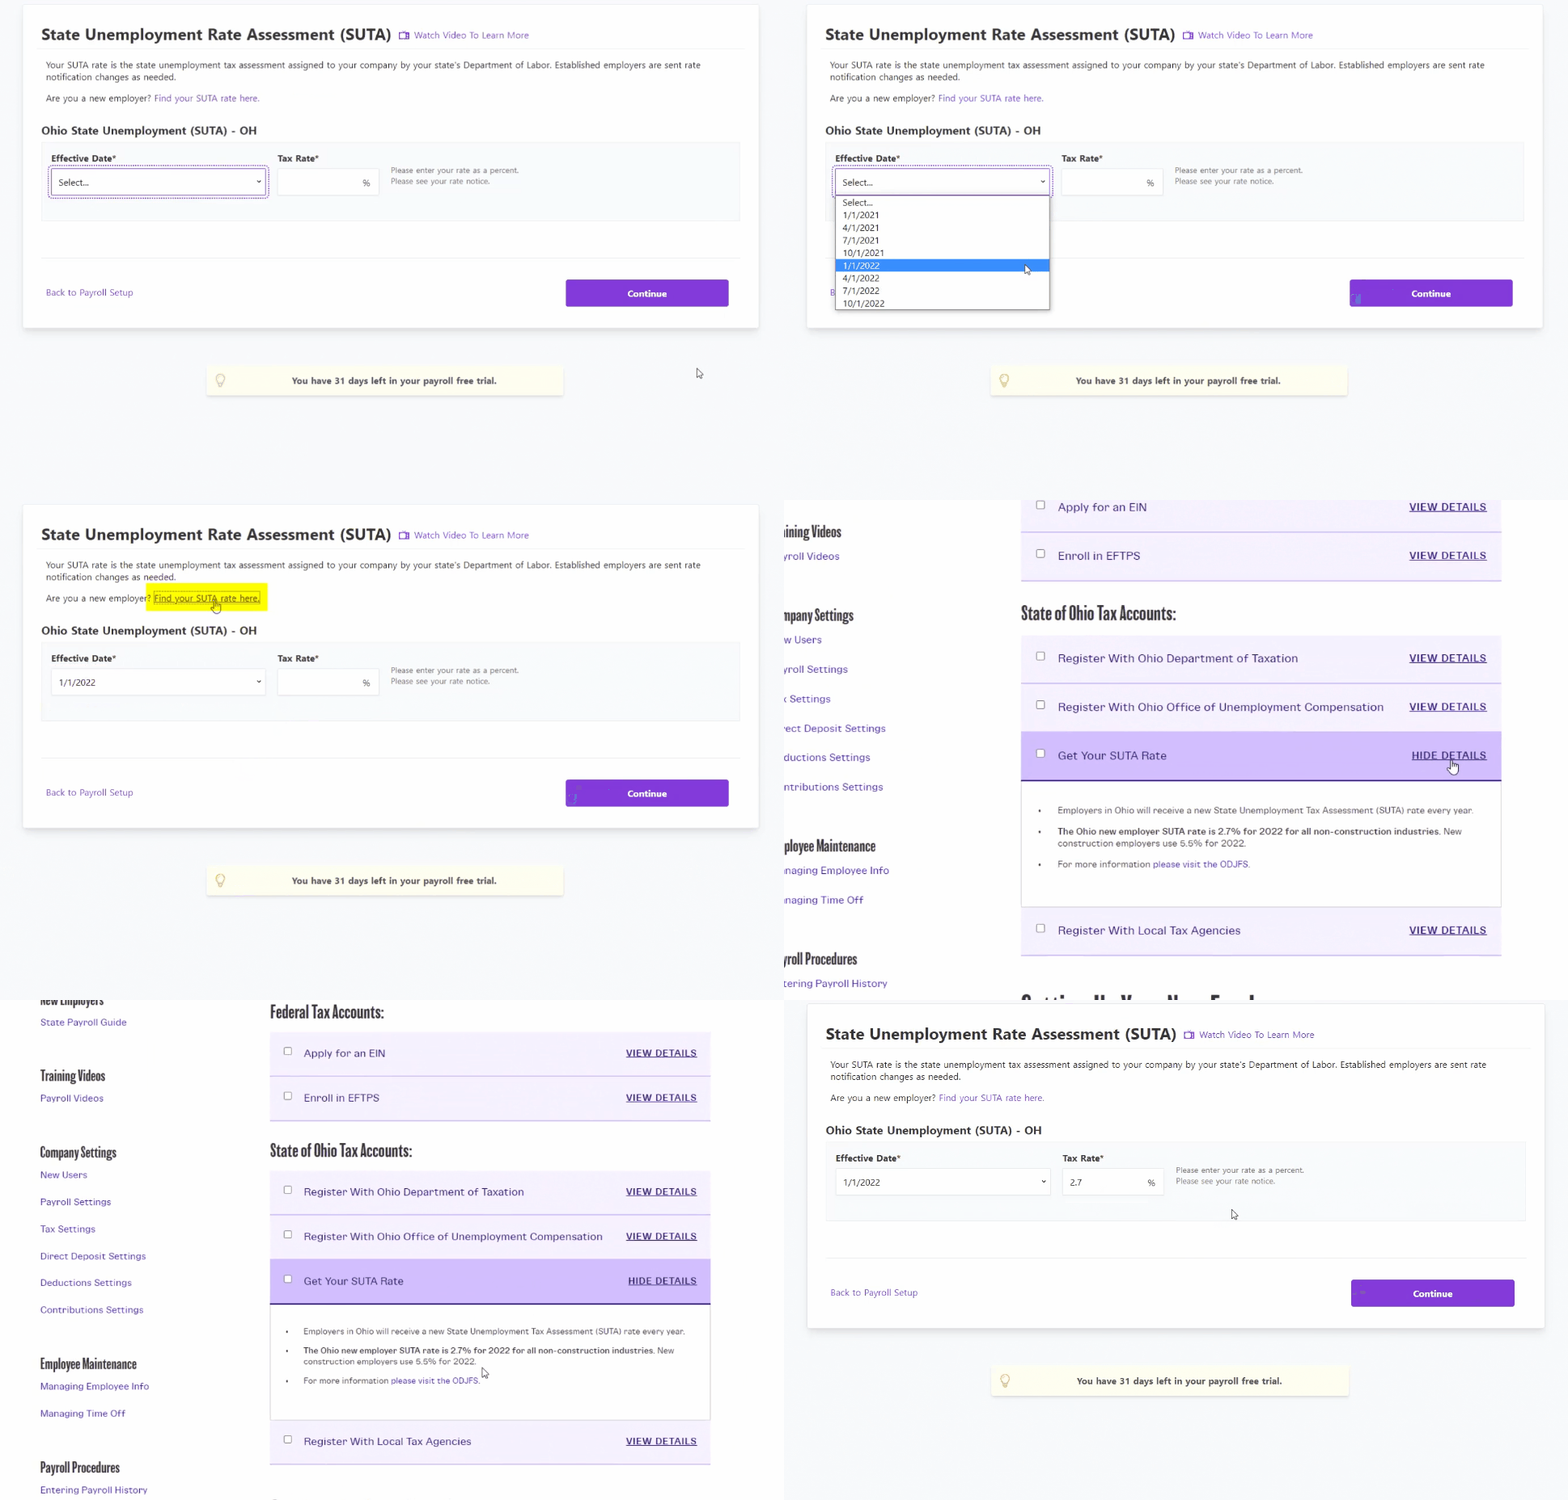
If you’re unsure about your SUTA rate, click Patriot’s “find your SUTA rate” guide to get the correct details for your state. (Source: Patriot)
Note that the system automatically populates the tax locality section based on the mailing address provided when you created your account. However, you can change this information and select a different local tax area based on the actual location of your business.
Step 3: Set Up Payment Details
Patriot Payroll supports employee payments done via direct deposits and paychecks you print or handwrite yourself. You can choose either one for your employees or a combination of both payment types. Note that for direct deposits, Patriot’s standard processing timeline is four days. While it also offers a two-day option, this is available only for qualified customers.
If you choose to pay via direct deposit, you need to complete and submit an online direct deposit application form. Patriot will also need to confirm your identity using a third-party service. If you’re only paying by check, you won’t need to complete this step.
You can complete the required form by clicking the “Start Application” button located in the “Direct Deposit Application” section. You’ll be asked to enter basic information, like your name, address, Social Security number, birth date, and business bank account details. Keep in mind, however, that you only get three chances to enter the correct information before Patriot will deny your identity verification.
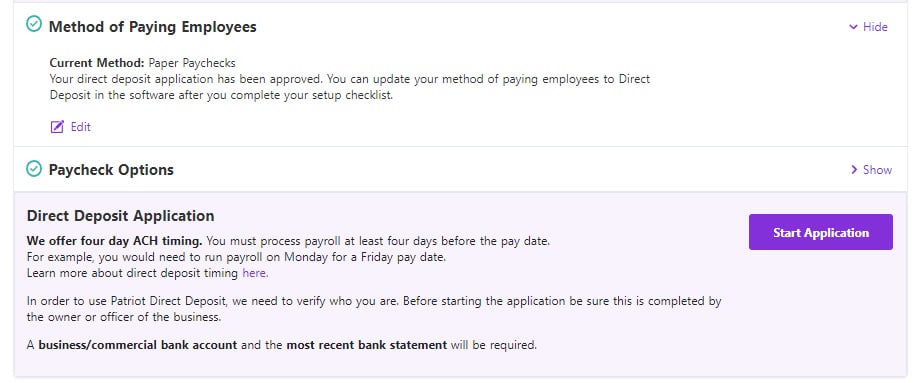
A snapshot of Patriot Payroll’s “Direct Deposit Application” section (Source: Patriot)
Patriot will need your bank account information to ensure it pulls funds from the correct place. Setting up your bank account is straightforward, as this is part of the direct deposit application process. Just add your routing number; if you don’t know it, check the bottom of one of your paper checks. Patriot will then verify it through Plaid or by sending a test transaction. You can also upload a copy of your business bank account statement; personal bank accounts aren’t accepted.
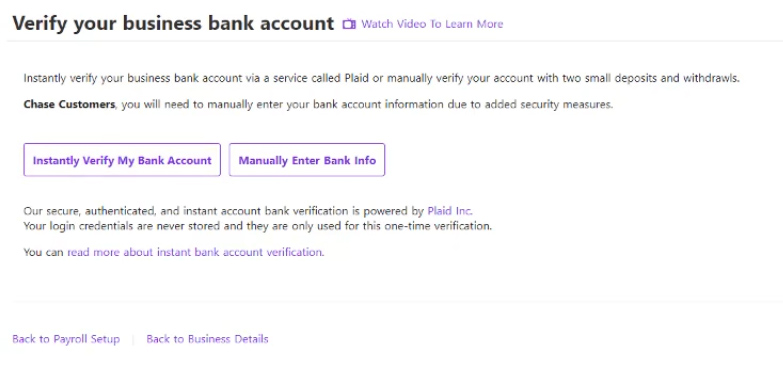
Selecting the “Instantly Verify My Bank Account” option allows Patriot to conduct instant business bank account verifications through Plaid. (Source: Patriot)
If you pay employees via paychecks and are planning to print the checks using Patriot, the provider offers three layout options (check on top, check on bottom, and check stub only). You can even select whether your checking account number is preprinted on your checks. If you opt not to add your checking account details on the checks, Patriot will require you to enter the account number so that it prints accordingly.
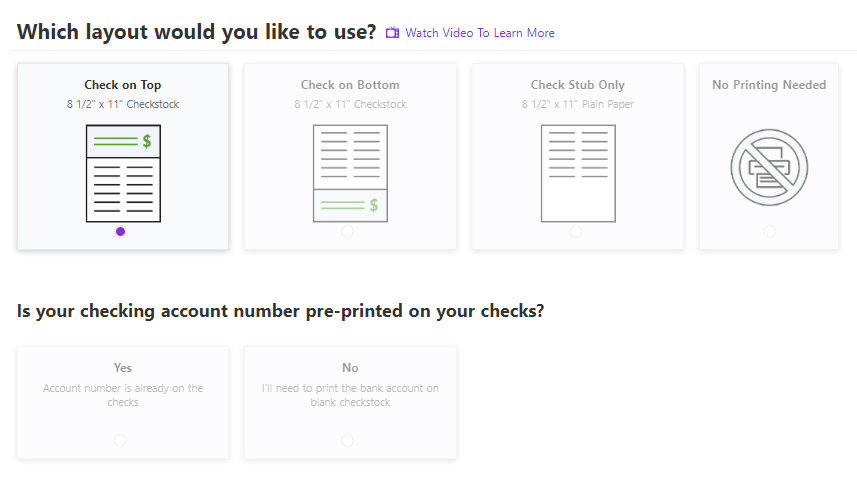
Apart from three layout choices, Patriot has a “no printing needed” option if you prefer to handwrite checks yourself. (Source: Patriot)
Step 4: Set Up Other Payroll Details
In addition to setting up tax and payment details, Patriot has an “Optional Settings” section where you can input other payroll information, such as deductions, contributions, and money types. To help you set up additional payment details for your employees, Patriot will ask you the below questions. If your answer is no, simply skip the questions. If your answer is yes, then click the “Yes” button and provide the required information.
- Do you use deductions? You’ll need to add specifics about each deduction type you need set up, including benefit premiums, 401(k) contributions, and garnishments.
- Do you use contributions? If you match retirement contributions or pay a portion of employee benefit premiums, add a description of each and how the contribution will be calculated.
- Do you use workers’ compensation codes? If you use codes to report workers’ compensation for each employee, enter them here along with the applicable state.
- Do you use departments? If you want to organize employees by department, you can include department information in your payroll. Patriot even allows you to assign departments to specific work locations, which is great for tracking the per-department payroll data of multi-location businesses.
- Are there any employer payroll taxes your business is NOT required to pay? Tax-exempt organizations, like nonprofits, can add their tax exemptions here (such as unemployment insurance).
- Do you need to customize your hour and money types? Hour types can be used to label your employees’ work hours (such as regular and overtime hours), while money types are payments made to employees on top of their regular wages (like bonuses and commissions). Patriot has a list of commonly used hour and money types in its system. You can customize these or add your own, such as PTOs and allowances.
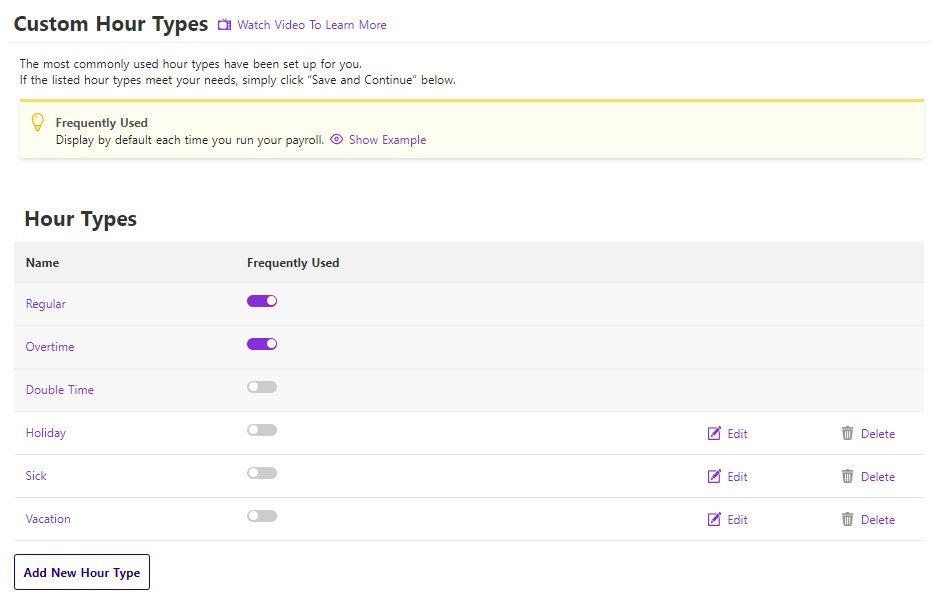
The hour and money types that you select as “Frequently Used” in Patriot will always appear when you process payroll. (Source: Patriot)
Step 5: Add Employees
After entering the basic payment details, you’re ready to add each employee to the software. You can choose to manually input each employee’s details directly into Patriot Payroll or do a bulk import of your staff information via a single file upload.

We recommend gathering all the employee information that Patriot needs before clicking the “Start” button in the “Add Employees” section. (Source: Patriot)
Start by entering basic information for each of your employees, including name, Social Security number, and address. You also have the option of entering their email addresses so Patriot can send them a link they can use to access the employee portal. Once you upload all your onboarding documents, your employees can see and sign them through the portal.
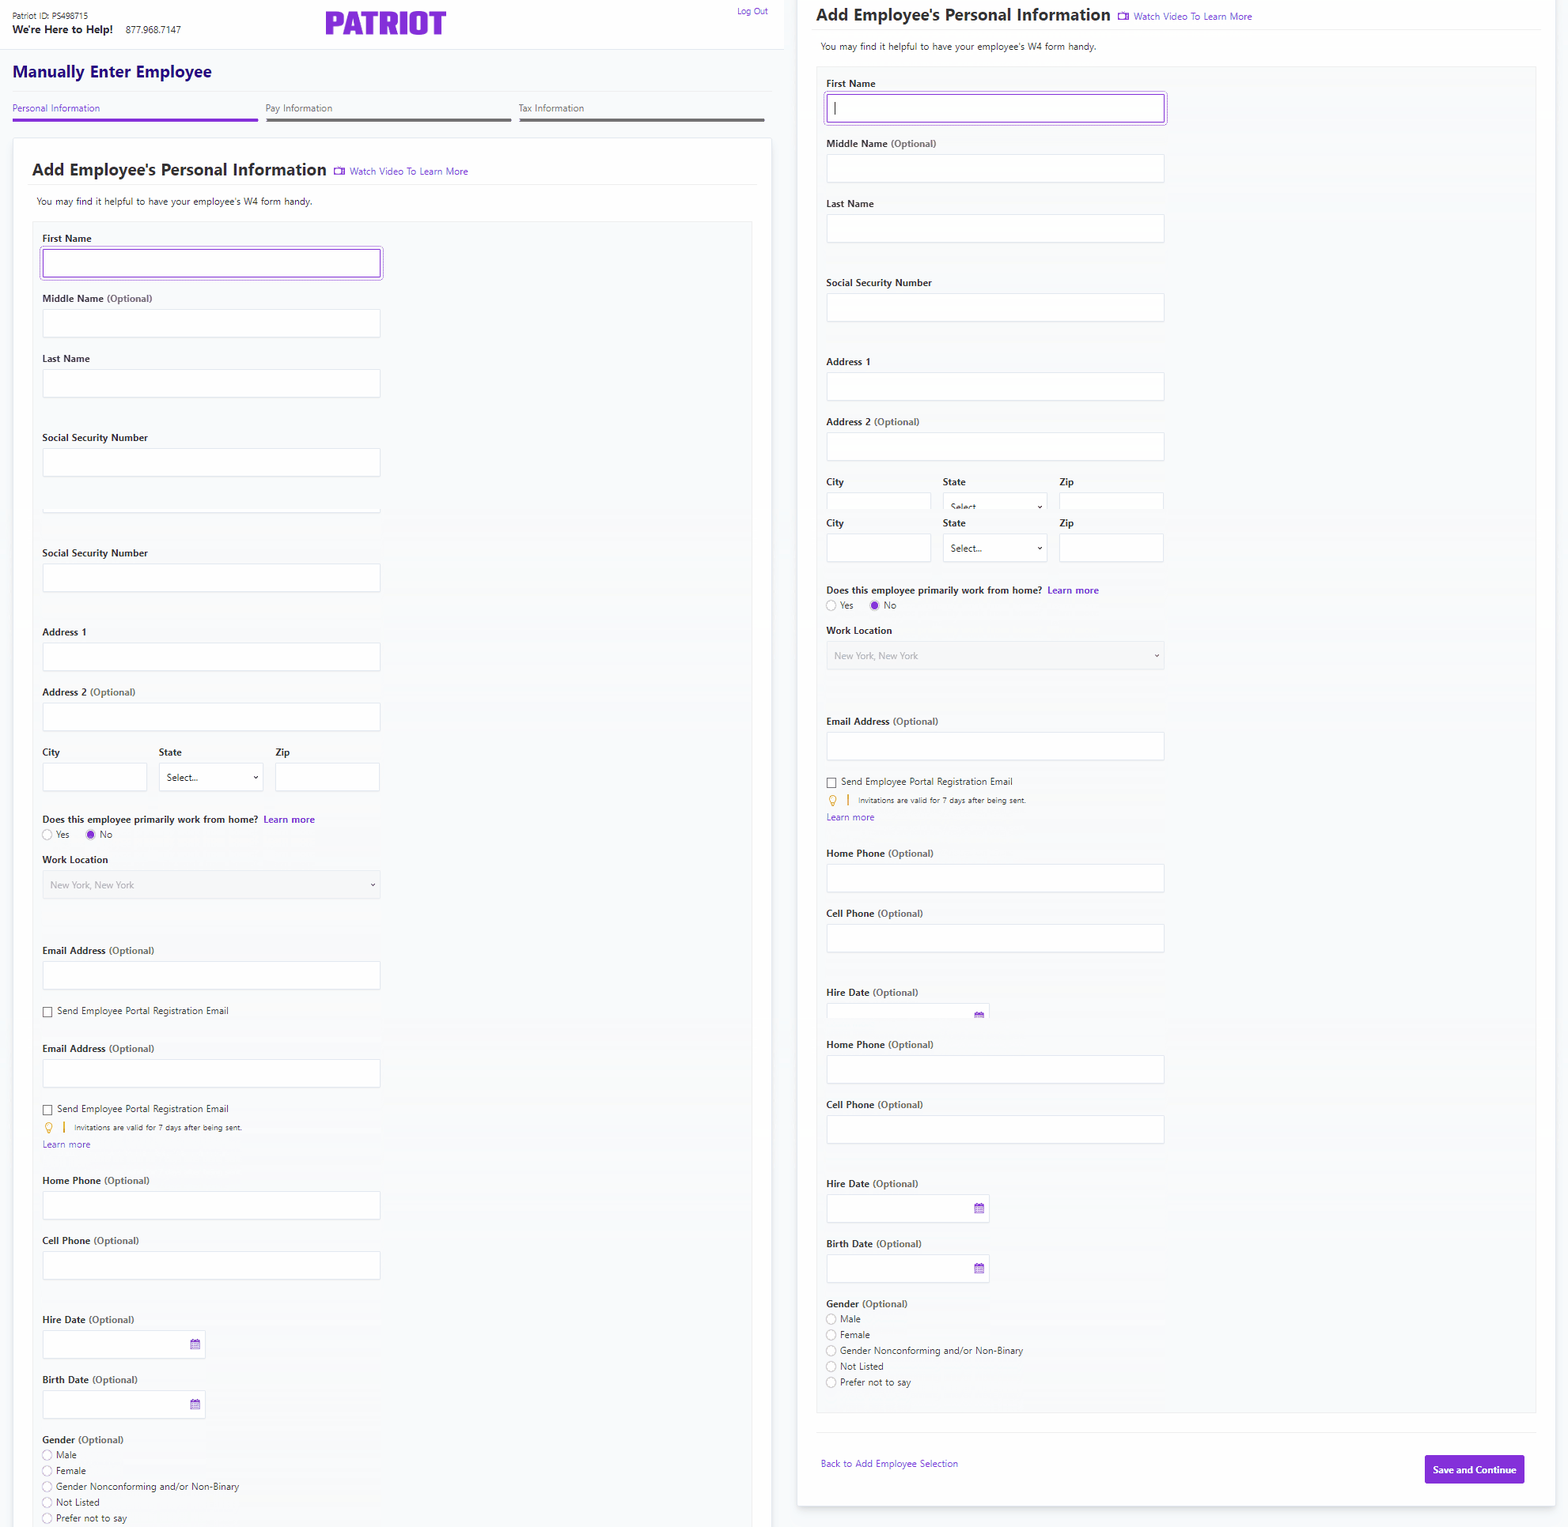
When manually adding employee data into Patriot, it is helpful to have your workers’ W4 forms on hand so you can check their legal names and other important details. (Source: Patriot)
Patriot needs to know how often each employee will be paid and on what basis, be it hourly or salary. In addition, you’ll need to enter a pay rate and add repeating money types (such as housing allowance and commission payments).
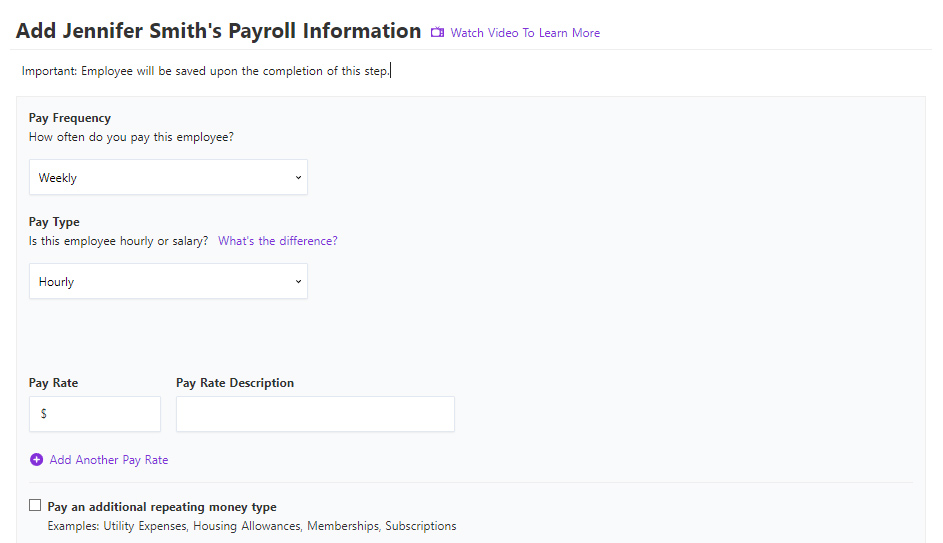
Patriot has an “add another pay rate” option if the employees have multiple pay rates. (Source: Patriot)
You should have a W-4 form for each employee, and you’ll need it to complete this section. Enter their filing status (single, married, or head of household), withholding exemption status, dependents, and other information required by the form. If you’re in a state that has income tax, you may need to enter information from each employee’s state W-4 form. Select “Continue” when you’re done.
At this point, you’ll have the chance to specify whether each individual employee will have deductions or contributions included in their paychecks. You already set these up on a company level, so all you’ll need to do is select the appropriate one(s) applicable to each employee.
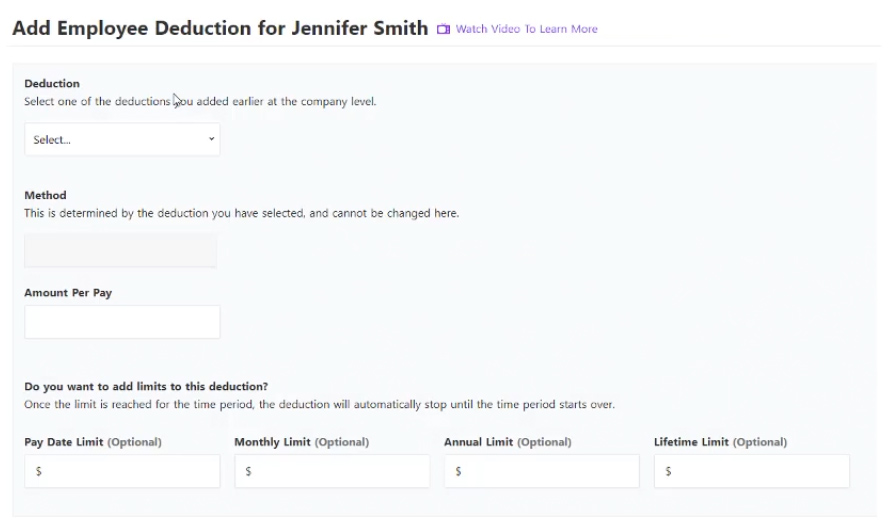
With Patriot Payroll, you have the option to add limits to employee deductions. (Source: Patriot)
When you’re done adding your first employee, you’ll see a prompt asking if you need to add another employee. Repeat the process we just covered until all employees are in.
Step 6: Review Patriot Payroll Setup
Patriot provides a summary of information for each employee added to its system. This allows you to see and review all of the information you entered for your company, taxes, payment settings, and employees. If you spot errors or have missing data, click the “Edit” button to make the necessary changes.
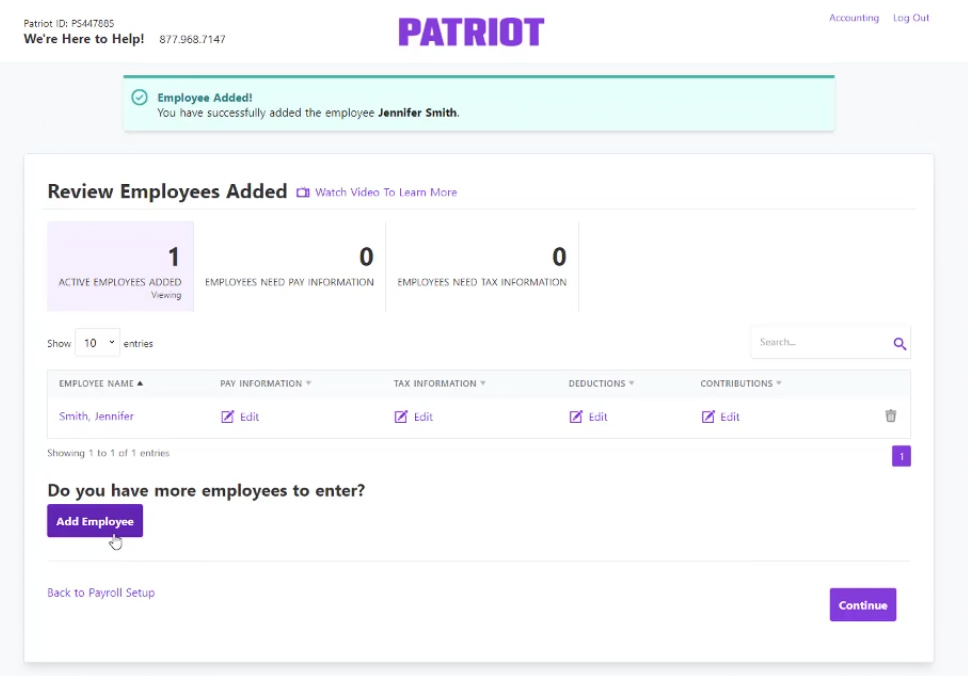
If you’re sure that everything is correct and complete, select “Continue” to proceed to the next step. (Source: Patriot)
Step 7: Enter Payroll History
Patriot needs to know your payroll history for the current year to ensure your tax payments are up-to-date and any year-to-date information it provides is accurate on pay stubs and year-end tax forms. To do this, answer the following questions:
- Has your company paid any employees during the current year? You’ll have to verify that you understand that providing all payroll and tax history for the current year could lead to additional fees if Patriot has to do corrections in the future.
- What payroll provider did you previously use to run payroll? It’ll list common providers for you to choose from, like Gusto and QuickBooks Payroll.
Now you’re ready to enter your payroll history. This can be time-consuming because you can’t enter lump sum totals. Instead, you’ll have to enter payroll information by pay period and for each individual employee. When you’re done, you’ll be able to review and approve a summary of the payroll history you entered.
Patriot will then compare the historical tax payments you entered to its own calculations of what it expects your tax payments should have been. This is to help catch any errors you may have made. If you approve, then it will automatically adjust the figures for you so that they are correct in the system.
Step 8: Give Tax Authorization
To finalize your payroll setup, you have to officially authorize Patriot to act as your Reporting Agent. This means it will deposit and file federal, state, and local taxes on your behalf. Note that this is only applicable to those who subscribe to Patriot’s Full Service payroll plan.
Select “Preview Unsigned form 8655” to download a PDF of the form you need to sign. It should pre-populate with basic information like your name and title. Review it to ensure you understand what you’ll be electronically signing, and then check the box on the page to verify you have the authority to sign Form 8655. Select “Submit” when you’re ready.
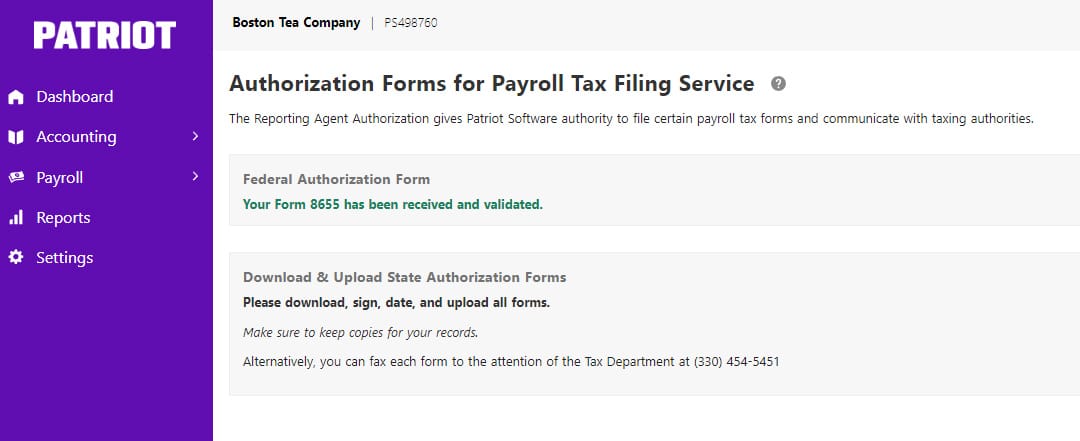
You can also access the payroll tax authorization form by clicking “Settings” and selecting the “Federal/State Forms” option. (Source: Patriot)
Choose the date you want Patriot to begin withholding, depositing, and filing your payroll taxes. If you choose a prior month, Patriot will charge you an extra monthly fee to cover tax withholding for all months before the current one.
You’ll see a summary of your tax responsibility and Patriot’s tax responsibility. Select “Authorize Tax Collection” at the bottom of the page to verify that you give permission for Patriot to deduct tax payments from your bank account.
You should now see a message stating that your payroll setup is complete.
Step 9: Start Running Payroll With Patriot
Once you enter all of the necessary employee, payroll, and tax information, it’s time to start using Patriot to manage your payroll. Follow these steps for running payroll with Patriot:
Click the “Run Payroll” button on Patriot’s “Payroll Overview” dashboard. In the next window, select the correct pay period and pay date. You can manually input the employees’ actual work hours (both regular and overtime hours) into Patriot.
If you are integrating time-tracking software, the hours should populate automatically. Patriot even offers a time and attendance solution (priced at $6 plus $2 per employee monthly) that lets employees clock in and out from the employee portal.
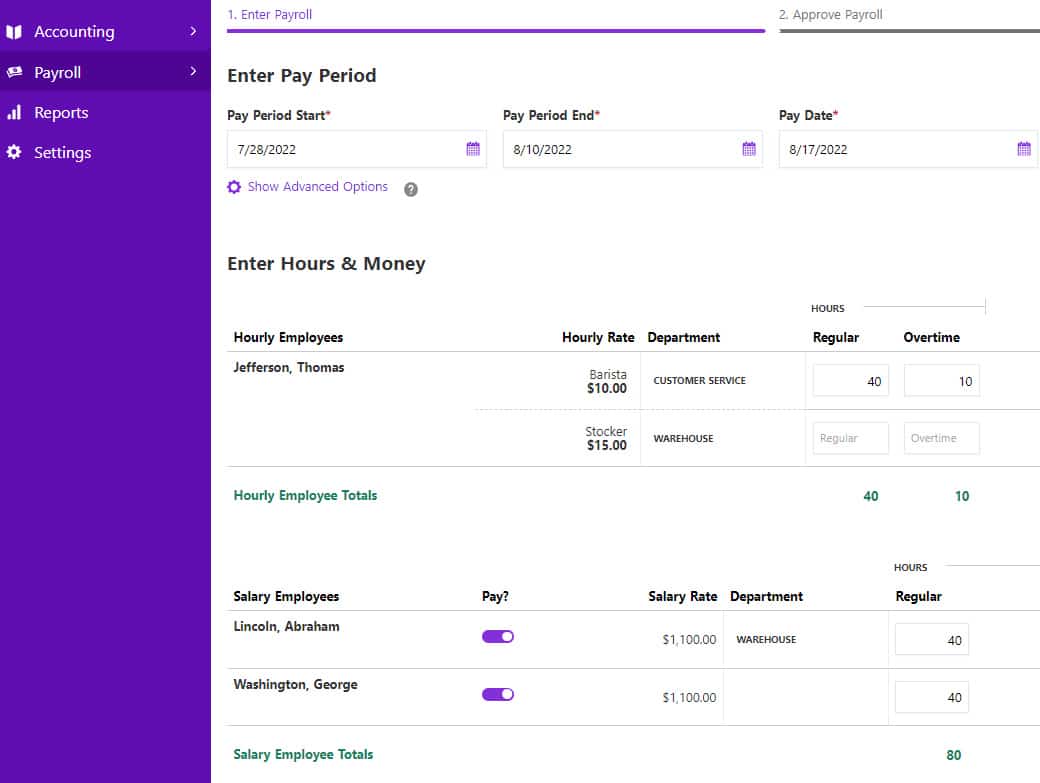
Patriot Payroll has separate sections for hourly and salaried employees so that you can easily account for overtime hours. (Source: Patriot)
Similar to work hours, you can input employees’ PTO details and additional payments (like tips and bonus amounts) directly into the system while running payroll. Note that the options you see are based on the hour and money types that you tagged as “Frequently Used” when you first set up Patriot.

If you only see data fields for regular and overtime hours, click the “Show All Hours and Money Types” button located on the right side of Patriot’s payroll window to view other options. (Source: Patriot)
After you have recorded hours worked and hours taken off, including additional payment details, click “Continue.” A summary will appear, and the software will flag potential errors. Select “Back to Employees” to make the necessary corrections. However, If everything is good, click the “Approve Payroll” button.
If you select paycheck payments as your default payment method, the last step in Patriot’s pay run provides you the option to print the checks yourself. In addition to printing checks, it also lets you view the payroll register report, payroll tax bill information, and paycheck summary details.

With Patriot, you can choose to print the checks after each pay run or at a later date (before the pay period’s payout date). (Source: Patriot)
Congratulations! You just ran your first payroll with Patriot Payroll. After this, you can print the payroll, review the pay register, or run other reports.
If you’re wondering how to run payroll in Patriot for contractors, the process is similar to paying employees. You can either run a separate payroll for contractors or include them in your employee payroll runs. You’ll find that paying different worker types with payroll software is much easier than doing it without—using payroll services and solutions makes the process much smoother.
Although having payroll software makes paying your employees the right way much easier, you still need to know the basics. Check out our tips on how to get the best payroll training to help.
Patriot Payroll Frequently Asked Questions (FAQs)
What size organizations can use Patriot Payroll?
Patriot Payroll is designed to handle the pay processing needs of new or seasoned businesses with up to 500 employees.
Can Patriot Payroll handle international payroll?
No, it can’t handle international payroll. Patriot’s payroll software is only available to businesses with US-based employees.
What will happen if I don’t run payroll in a month?
Patriot Payroll will only charge you its base fee for the months you don’t run payroll. This can be $17 per month if you’re on its Basic Payroll plan or $37 per month if you signed up for its Full Service Payroll package.
What do I need to use Patriot Payroll for my business?
Given that Patriot Payroll is cloud-based, you only need internet access and a web browser to use its system to run payroll.
Bottom Line
By following these nine simple steps, you can create an account online and set up Patriot Payroll in just a few minutes—provided you only have a few employees and have all the required information on hand. While it has an online wizard to guide you through the process, Patriot provides free payroll setup to all its new customers if you don’t want to handle this yourself.
What’s also great about Patriot is that it offers a full-service payroll package that includes payroll tax filing services. However, if you prefer to simply run payroll with Patriot and file tax forms yourself, its Basic plan has all the essential tools you need to accurately calculate salaries, taxes, and deductions.
Sign up for a Patriot Payroll plan today.