







To learn how to add a signature in Outlook, first check if you have Outlook’s new or classic version because the process differs slightly for each. The new Outlook was just released in 2024 and runs on Windows 11. Meanwhile, any version before that is Outlook classic.
Adding a signature in Outlook’s new version involves the following steps:
Adding a signature in Outlook’s new version involves the following steps:
- Open your settings.
- Under Account, choose Signatures.
- Add and save your signature.
- Adjust your signature’s conditions.
Meanwhile, here’s how to add a signature in Outlook’s classic version:
- Open the new email window.
- Choose Signature under the Message tab.
- Add your email signature.
- Set your signature’s conditions.
- Save and use your signature.
Keep reading for a more detailed step-by-step guide on how to add a signature in Outlook for both versions.
How to add a signature in Outlook’s new version
If you only started using Outlook in 2024, you’ll probably have its new version, which has a cleaner and easier-to-navigate interface. To start adding a signature on Outlook, open your inbox.
Step 1: Open your settings
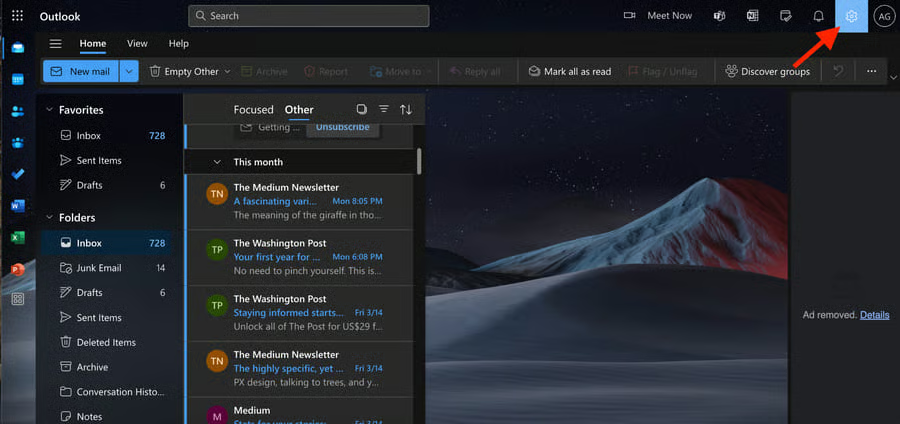
Inside your inbox, navigate to the gear icon in the top-right corner of your screen, next to your profile. This will open your settings menu.
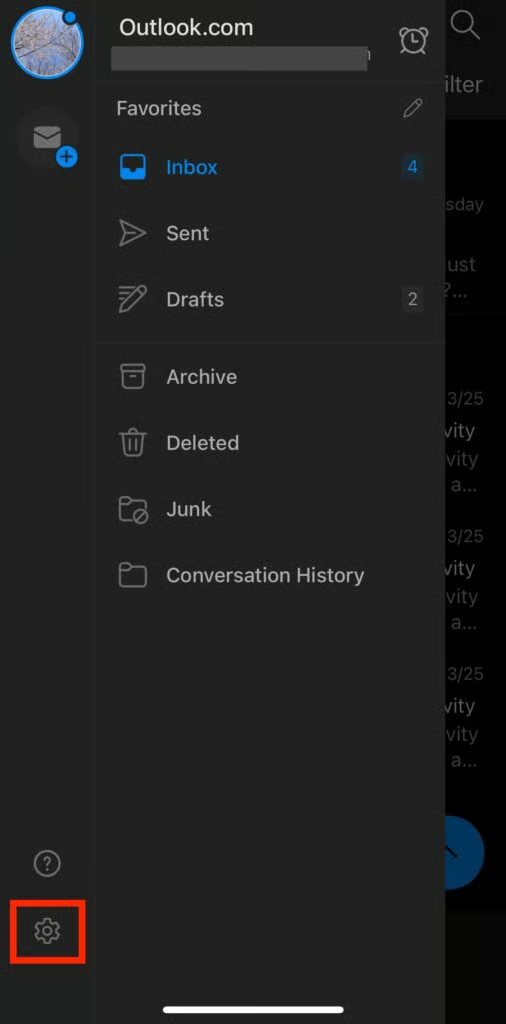
If you’re on the app, open the left-hand menu bar, then click on the gear icon.
Step 2: Under Account, choose Signatures
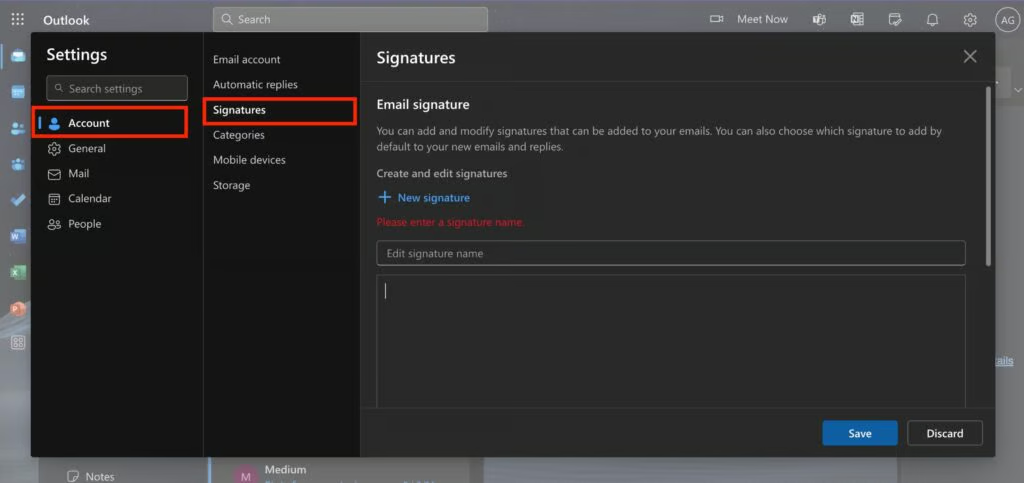
Inside your settings, open the Account tab, then choose Signatures. This is where you’ll add, manage, and delete all your email signatures in Outlook.
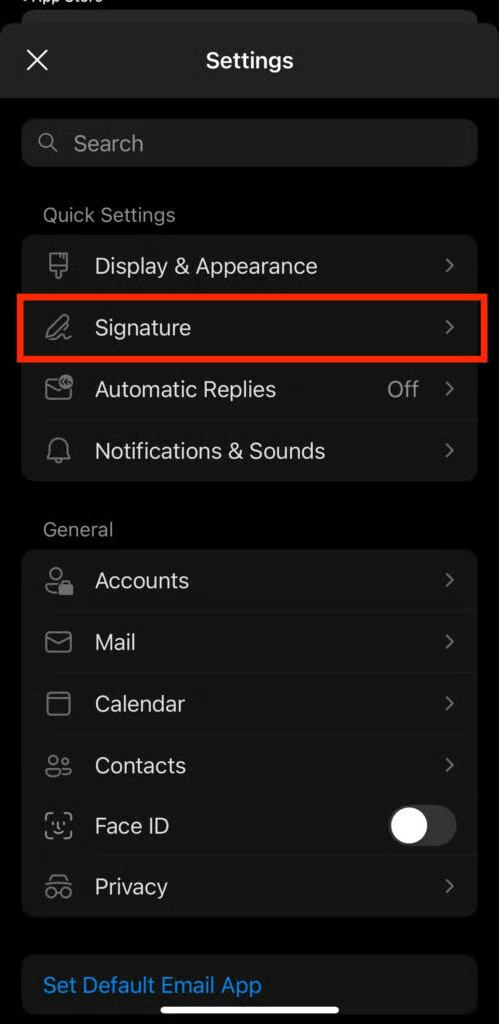
On the app, you’ll immediately see the Signatures tab inside your settings.
Step 3: Add and save your signature
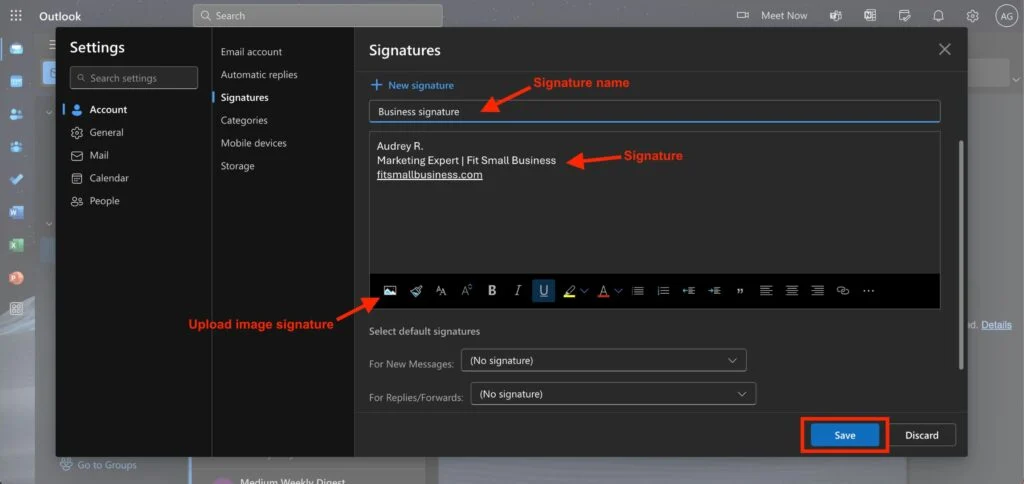
Under the Signatures tab, add your email signature in the box and give it a name.
- If your signature is text-only, you can manually type or paste it in. You can also change its font, color, and size and add links.
- If you have an image signature, click on the image icon on the bottom left of the box and upload the JPG or PNG image file of your email signature.
After adding your signature, click Save on the bottom right corner to save your signature.
On mobile, simply add your signature to the box, and it’ll immediately be saved. Unfortunately, the mobile app can only accommodate text-only signatures, and you can’t adjust its conditions. To do both, you’ll need to use the desktop version of Outlook.

Step 4: Adjust your signature’s conditions
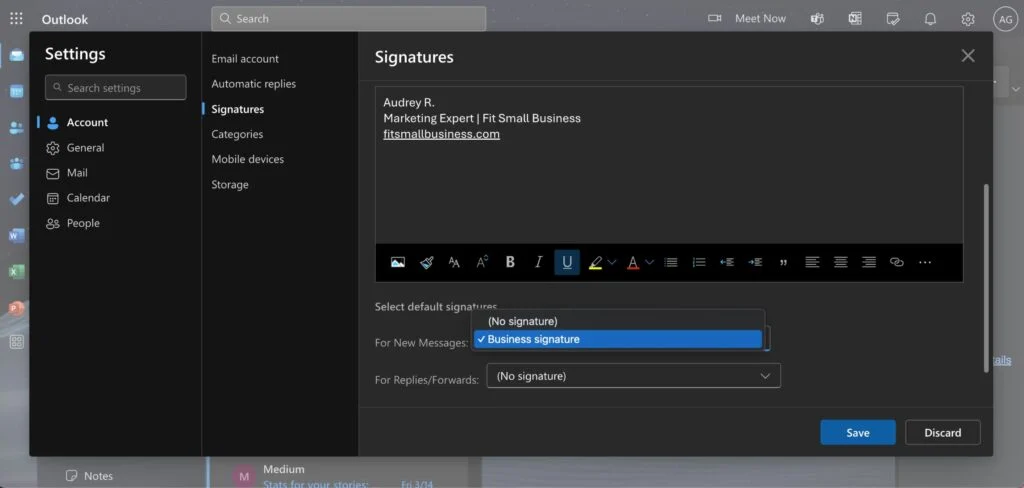
You can also adjust your signature to appear on new emails or replies and forwards. You can also add different signatures for each.
To do that, scroll to the bottom of the Signature window and toggle the dropdowns to add your signature for new emails, replies, and forwards. Click Save when you’re done.
How to add a signature in Outlook’s classic version
The process for how to add a signature in Microsoft Outlook’s classic version differs slightly because of its older and more complicated interface. However, the commands are generally the same, only in different locations. You’ll first need to compose a new email, choose the Message tab > Signature, and then type in our upload your signature.
Step 1: Open the new email window
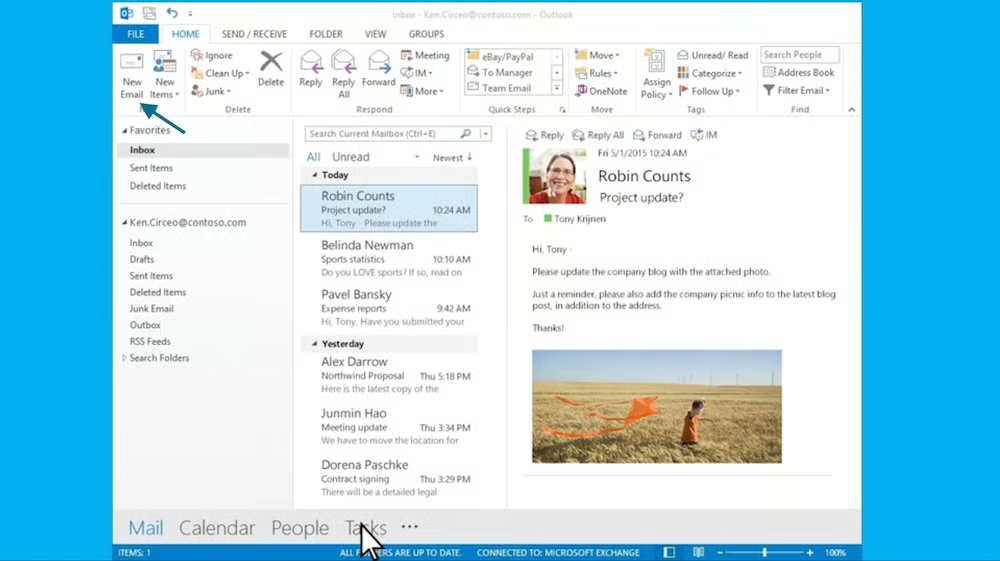
The first thing you’ll need to do to add a signature in Outlook is to compose a new email. You won’t need to actually send an email — just access the Message tab that appears in the “New Email” window. Open Outlook, then click New Email in the upper-right corner.
Step 2: Choose Signature under the Message tab
In the new email window, click on the Message tab in the upper-left corner (next to the File tab), and then choose Signature > Signatures. This will open the Signatures and Stationery window, where you’ll add your email signature.
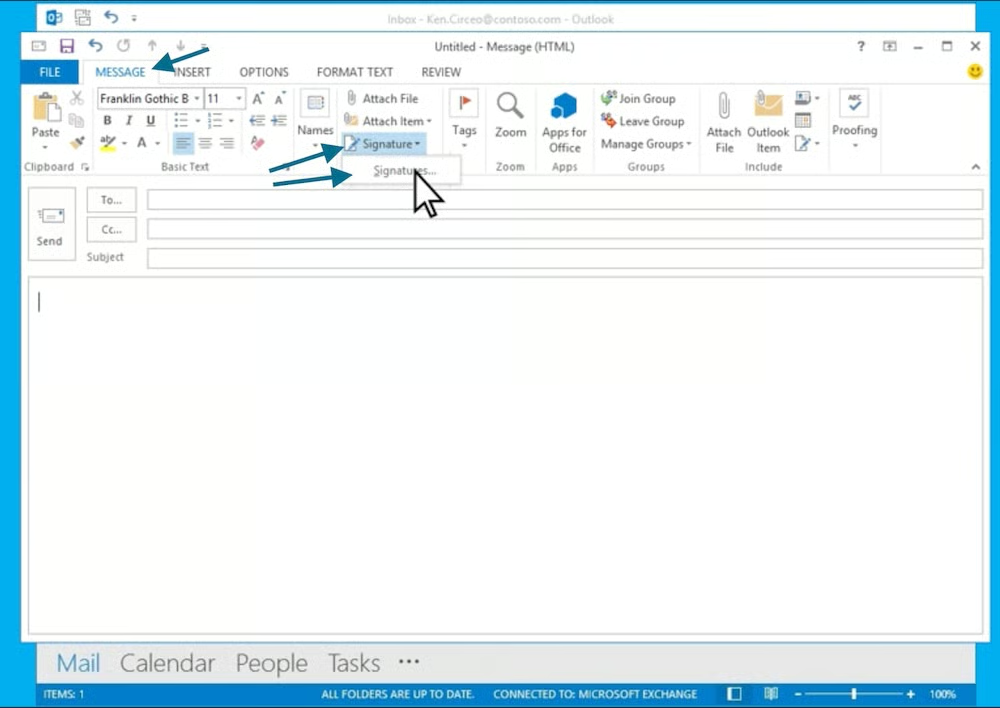
Open the Message tab > Signature > Signatures. (Source: Microsoft) 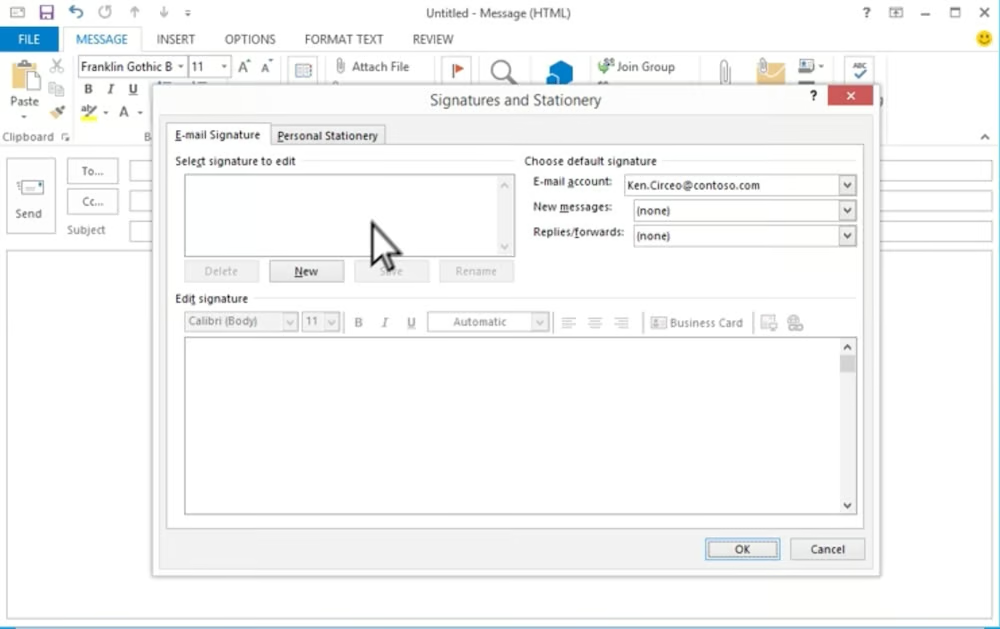
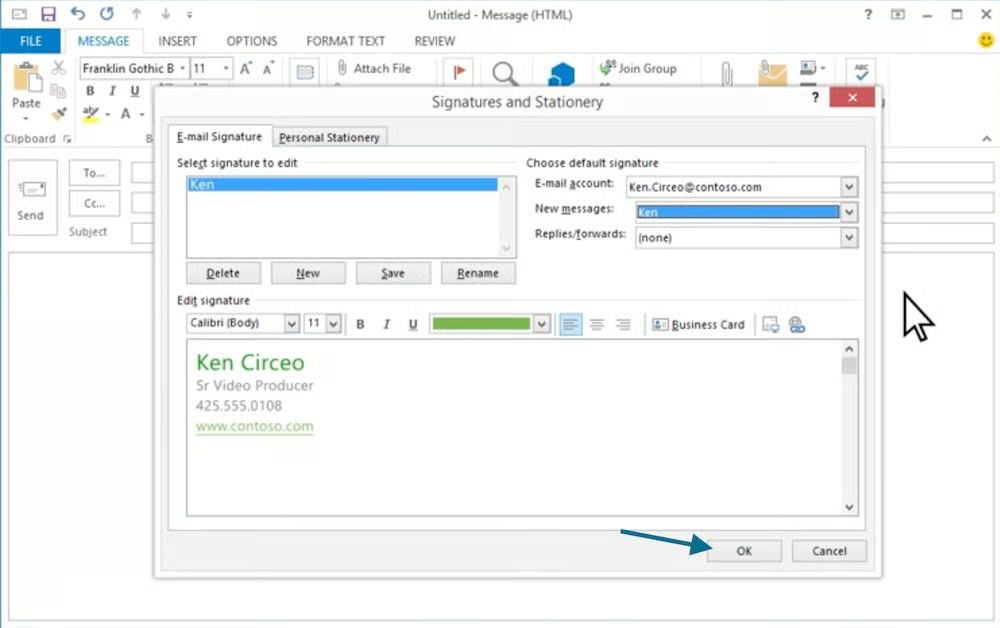
This will open up the Signatures and Stationery window. (Source: Microsoft)


Step 3: Add your email signature
Inside the Signatures and Stationery window, you can directly add your signature. Outlook’s classic version also allows for text or image-based signatures or a combination of both.
First, you’ll need to create a name for your signature. Click New, then type in a name for your signature in the pop-up window. Click OK once you’re done.
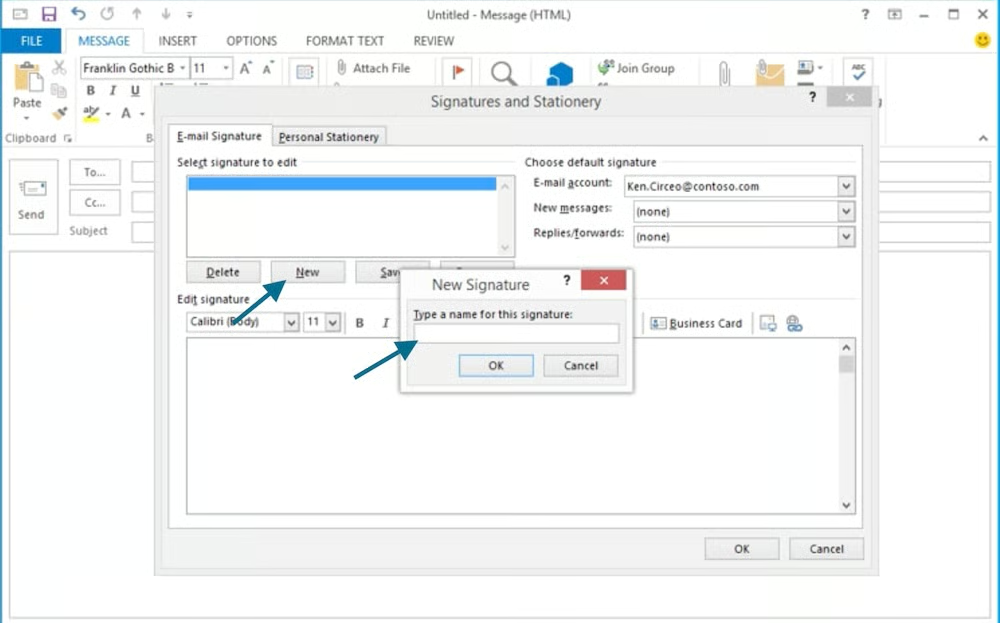
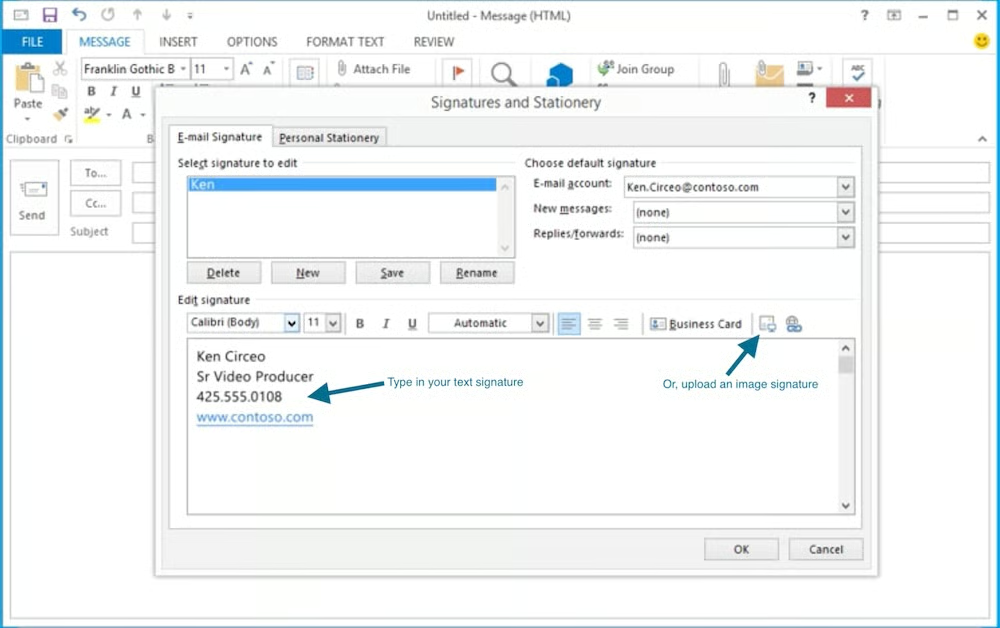
Once you’ve saved your signature’s name, it’ll appear in the window. You can then type your signature in the box or upload an image file.
- If you have a text-only signature, manually type in your signature in the space provided. You can also change its formatting and add links.
- If you have an image signature, click on the image icon and upload a JPG or PNG image file of your signature.
Then, click OK on the lower-right corner when you’re done, and your signature will save automatically.
Step 4: Set your signature’s conditions
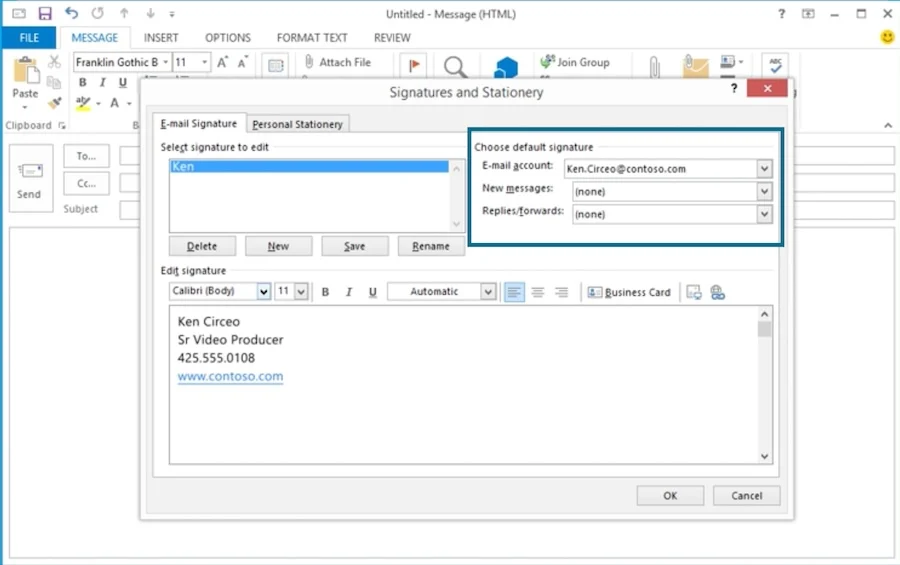
Before saving and finishing your signature, you can also set its specific conditions, such as from which email account you want your signature to appear and whether it’ll appear on all messages and replies, emails you forward, or only in new emails you send. You can set these options in the dropdown arrows on the upper-right portion of the window.
Step 5: Save & use your signature
After setting your signature’s conditions, your email signature is ready to go. Click the OK button on the bottom right of the window, and Outlook will save your signature. The next time you compose a new email, your signature will automatically show up according to your set conditions.
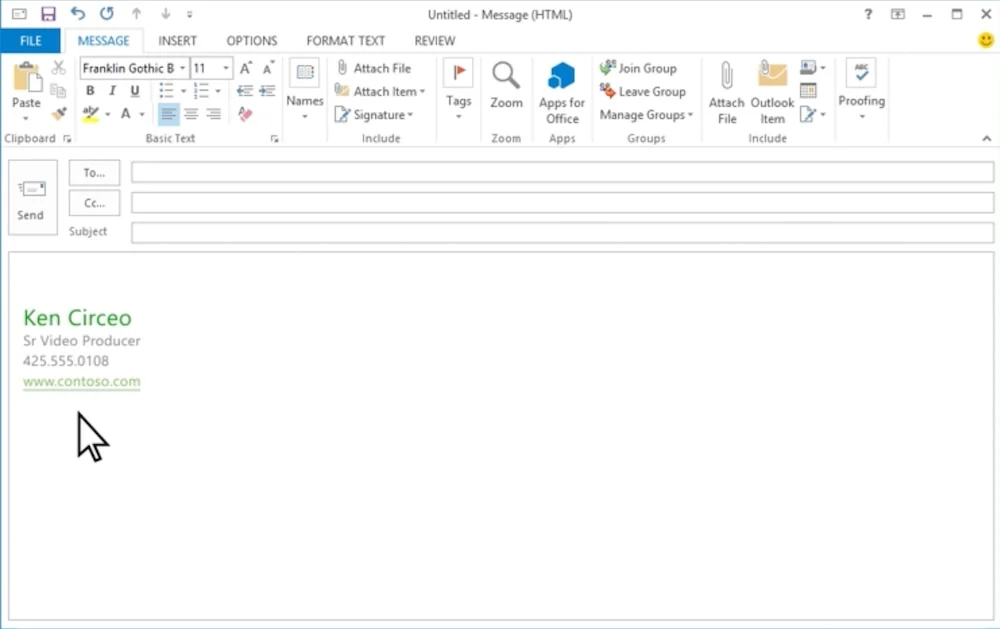
Anytime you need to edit your signature or add any new ones, you only need to visit the same Signatures and Stationery window from your Message tab. You can also easily switch between signatures or delete unnecessary ones from the same tab.
Why add an Outlook email signature?
Adding an email signature to your Outlook account is a small but powerful way to boost your credibility and promote your brand. Think of the impression you want to make to your industry: You want your brand to seem credible, trustworthy, and professional. Each email you send is an opportunity to build that reputation with the help of your signature.
Here are some of the foremost reasons to create a professional email signature for your business emails:
- It boosts your credibility. A professional signature at the end of your emails presents you as a credible figure to others, from partners to investors, clients, and customers. A shared email signature also presents a united front if you have team members.
- It builds your brand. There’s a stark difference between a simple email sign-off and a fully custom and branded email signature. The former won’t leave much impression, while the latter can leave recipients informed and curious about your business.
- It can lead to traffic to your site. And not just your business website — any landing page that needs extra traffic could benefit from your email signature. Custom email signatures let you add links, calls to action, portfolios, and social media pages.
- It distinguishes you from others. Finally, an email signature makes your email stand out from the thousands of others people receive every day, making you more memorable.
The great news is that creating a custom and professional email signature is super easy. All it takes is a few clicks from one of the best email signature generators. Or check out 25 professional email signature examples for more inspiration.
Best alternatives to Outlook email
Outlook has always been noteworthy for its many email features, but if I’m honest, it’s not the easiest to navigate. If you want an easier platform or a less expensive alternative for your business email, consider the platforms below. All these platforms let you set up a custom email address with your own domain (i.e., “@yourbusiness.com”).
 |  |  |
|---|---|---|
| Best for a beginner-friendly email interface with real-time team collaboration | Best for an all-in-one business email platform and a website builder | Best for super-secure email protections for multiple email domains |
| Free or from $7 a month | From $1 a month | Free or from $6.99 a month |
| Visit Google Workspace | Visit IONOS | Visit Proton Mail |
Frequently Asked Questions (FAQs)
How do I add a signature in Outlook?
To add a signature in Outlook’s new version (2024 and onward), open your settings, then under Account, choose Signature. Add your email signature, then click Save. You can also adjust your signature to appear on new messages, replies, and forwards. On Outlook’s classic version, compose a new email, then choose Signature under the Message tab. Add your signature, adjust its conditions, and then click Save.
How do I make my signature automatic in Outlook?
You can make your signature automatic in Outlook by adjusting its conditions under Signatures in your settings window. Select the signature you want to make automatic, then scroll down to the Select default signatures section. Open the dropdowns under For New Messages and For Replies/Forwards, and select your signature, then click Save. It’ll automatically appear in all your emails.
How do I add a handwritten signature in Outlook?
To add a handwritten signature in Outlook, you’ll need to upload it as an image file. Create your signature separately and save it as a PNG or JPG file. Then, upload it under the Signature tab in your settings by clicking on the image icon in the bottom-left corner and choosing your signature.
Bottom Line
The process of how to add a signature in Outlook depends on whether you have the new or classic version, but both will be under your Signature settings. In the new Outlook, navigate to your Settings tab, then choose Account > Signature. In the classic Outlook, compose a new email, then choose Signature under the Message tab. Add your signature, then click Save.
