





.jpg?w=288)



Microsoft Outlook is an information manager software for business email that allows companies of all sizes to manage emails, tasks, calendars, and contacts—all in one place. There are also thousands of business app integrations to extend functionality, including seamless use of Microsoft 365’s Office suite software and collaboration tools. Find out why it’s the best for teams prioritizing security, advanced features, and automations, and get details on how much it costs and how to get started.
- Who Outlook Business Email Is Best For (Top Features)
- Who Outlook Is Not a Good Fit For
- Best Alternatives to Outlook Email for Business Use
- How Much Outlook Business Email Costs
- How to Set Up & Use Outlook for Business Email
- Microsoft 365 & Outlook Market Share Statistics
- Frequently Asked Questions (FAQs)
- Bottom Line
Who Outlook Business Email Is Best For (Top Features)
Among the top reasons Microsoft 365’s Outlook is preferred vs other email clients and direct competitors are security, integrations, automations, and the seamlessness of the Microsoft ecosystem. Outlook business email is best for those who want:
Advanced Security
Microsoft prioritizes users’ security and privacy. It promises to respect its users’ privacy by not scanning emails or attachments for advertising purposes. Furthermore, Outlook uses Domain-based Message Authentication, Reporting, and Conformance (DMARC), an email authentication protocol that allows owners to protect their domain from unauthorized access.
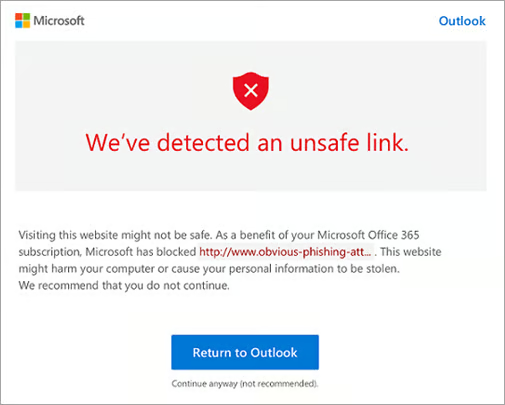
Microsoft Outlook also boasts a feature that automatically deactivates unsafe links containing phishing scams, viruses, or malware. Personal and business email users benefit from spam and malware filtering as long as they access their email in Outlook mailboxes.
Seamless Integrations With Microsoft 365 & Third-party Apps
Outlook integrates seamlessly with other Microsoft 365 office software, like Microsoft Word, Excel, and PowerPoint. Plus, you can set files on your device to automatically sync to cloud storage on OneDrive, giving you access from anywhere and enabling you to collaborate on projects with your team.
Outlook also integrates with hundreds of popular business tools, simplifying workflows for increased productivity. For instance, you can send an Excel spreadsheet or Word document directly from the productivity apps. You can also integrate third-party apps and sync your contacts to various platforms, such as LinkedIn, to help you expand your network online.
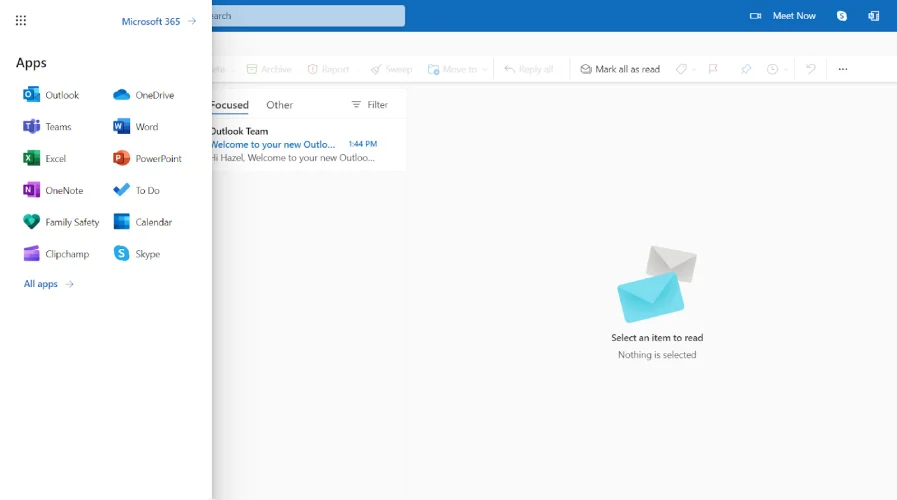
Microsoft 365’s suite of applications can be accessed directly from the Outlook inbox. (Source: Outlook) 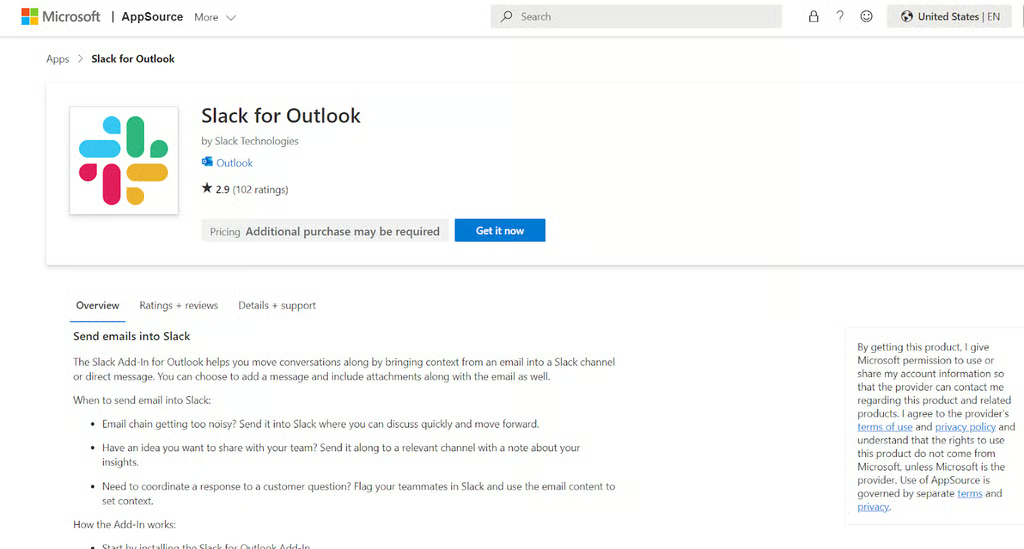
Get Microsoft Outlook add-ins and integrations from AppSource. (Source: Microsoft AppSource) 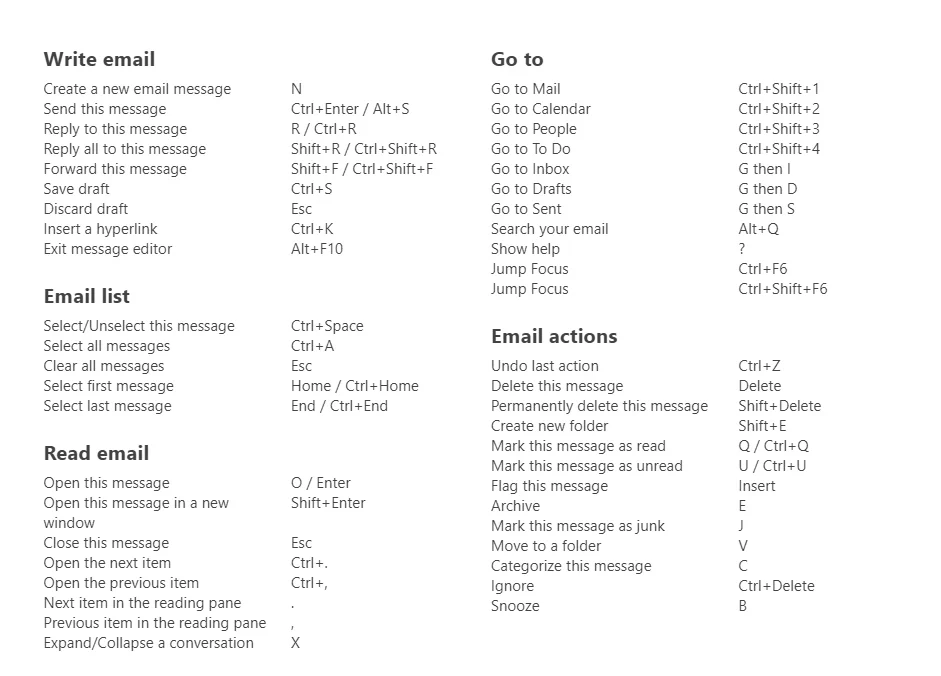
Built-in Outlook shortcuts for users with disabilities (Source: Outlook)


Lastly, Outlook integrates easily with apps like Slack, Zoom, Skype, and other team collaboration and meeting software. It also connects with email tools for project management like Asana, email signatures via WiseStamp, Grammarly for advanced editing tools, email tracking software, and more. Plus, there are almost 50 keyboard shortcuts for users with visual impairment, blindness, and disabilities.
Email Scheduling & Customization
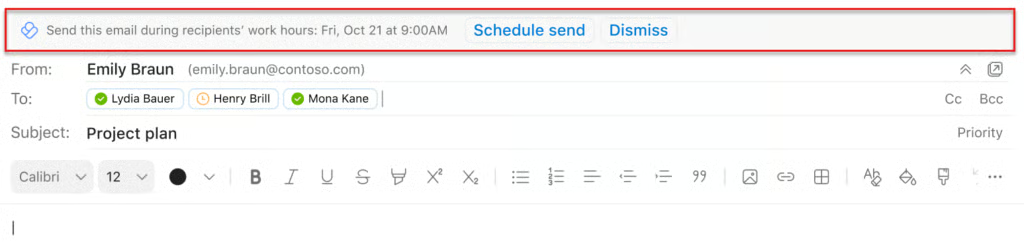
Users can schedule Outlook business emails to be sent at specific times. This can be helpful when sending a set of prospecting emails to coincide with a special offer or newly published piece of content, for example. Marketers can use this feature to send a press release at specified times to the journalists and media outlets they want to approach individually.
Another important feature is the ability to create multiple custom professional email signatures. Sales agents can create email signatures with different calls to action based on contact type (e.g., networking partner vs prospect or customer) so that it’s easy to get the recipient to take the next step.
Likewise, among the advanced Outlook features, you will have the ability to create templates and quick parts. These allow you to quickly create personalized emails with content that you send frequently, like cold call sales or lead nurturing emails.
Calendar Visibility & Sharing
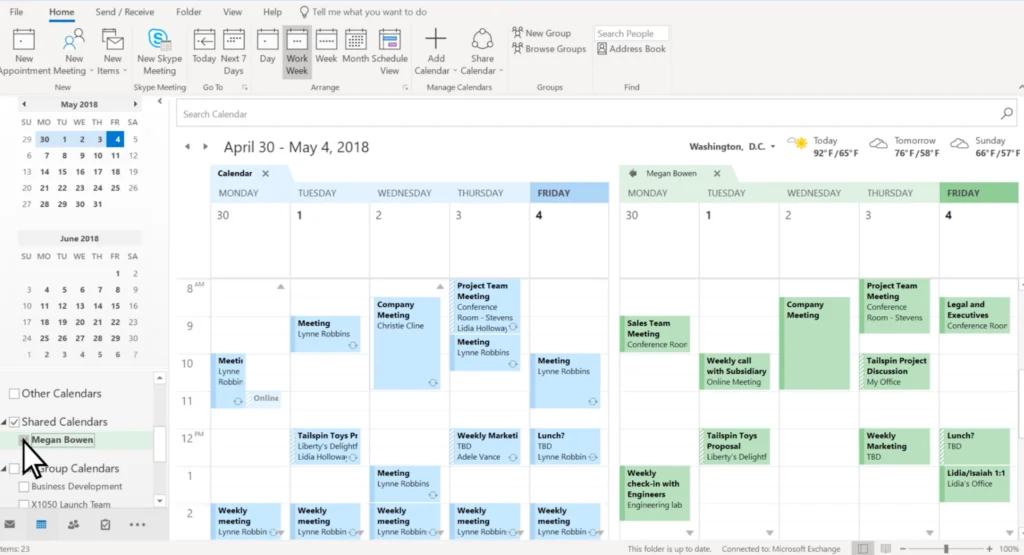
Sales agents and busy business owners will also appreciate being able to share and delegate management of their Outlook calendars. This makes it easy for an assistant to set up meetings and presentation times that will be convenient for all parties involved.
You can even use calendars to manage meeting rooms. For example, give a conference room its own unique email address and calendar for scheduling and sharing calendars to the team. See why it made our list of the best shared calendar apps for small businesses.
Task & Workflow Automations
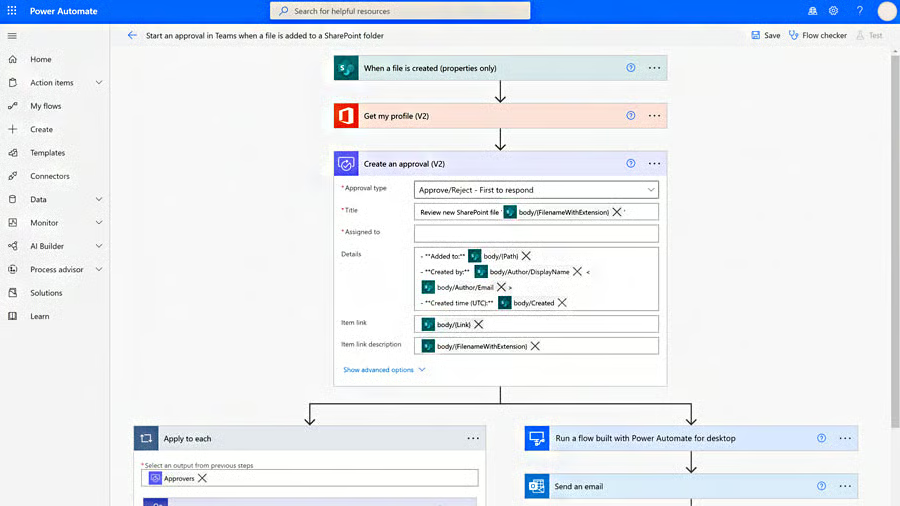
For business email, Outlook has the most advanced features by far. Among these are tools that automatically create, read, sync, update, and delete tasks. For example, you can automatically create new tasks for high-priority emails, and copy Salesforce tasks over to Outlook. Plus, you can send emails showing all your completed tasks every day, and even create tasks in Outlook when you get new emails in Gmail.
Build multi-layered workflow automations using Outlook’s AI Builder. There are hundreds of ways to save time, streamline workflows, and increase productivity with Outlook’s Power Automate tools. Check out this list of Outlook Tasks to get a better understanding of all the ways you can use Outlook for business efficiency.
Even inbox management can be automated when using Outlook for business email. You can create multi-layered rules that automatically forward emails, flag them for follow-up, send them to junk mail, delete them, or send them to a folder to be stored or addressed at a later time.
Who Outlook Is Not a Good Fit For
Outlook’s feature-rich nature makes it less beginner-friendly than top rival Gmail (and Google Workspace). It doesn’t have multi-user plans or a free version, unlike Zoho Mail. And while it has strong security features in higher tiers, it still doesn’t offer the ultimate security of an app like ProtonMail. If Outlook isn’t what you’re looking for, consider these alternatives:
- Professional email beginners: Gmail is more beginner-friendly, so if your team doesn’t need the advanced features noted above, it could be a better choice. And while Gmail lacks a lot of features that come standard with Microsoft Outlook, some can be manually installed through Gmail extensions. Read our comprehensive Gmail vs Outlook comparison to learn more.
- Companies with an international clientele: Businesses using email to correspond internationally may also prefer Gmail and its automatic language translation features. Learn what else you can do in our list of Gmail tips and tricks.
- Businesses needing high security: Outlook has business-class security, but the most advanced security requires a top-tier subscription. ProtonMail (on our list of the best email apps) offers the highest business email security of all, and it starts in the free plan. ProtonMail also offers end-to-end encryption, which is necessary for healthcare and other organizations that need to comply with HIPAA (Health Insurance Portability and Accountability Act) regulations governing protection of data.
- Cost-conscious businesses looking for a free option: Outlook comes with a free trial, but not a free plan. Zoho Mail allows up to five users in its free plan for startups, freelancers, and small businesses on a tight budget. Find out how to get Zoho free business email accounts.
- Organizations that don’t need a productivity suite: If you don’t need an office productivity suite, both Microsoft 365 and Google Workspace might be overkill. Outlook also isn’t the cheapest option—IONOS business email plans start at $1 per month.
- Companies with lots of employees: If you need multiple email accounts in an affordable plan, you can get unlimited email accounts through DreamHost Shared Unlimited WordPress or web hosting services at $2.95 per month for the first year.
Best Alternatives to Outlook Email for Business Use
Microsoft Outlook is a great tool for many small businesses, but it’s not ideal for everyone. Here are four alternatives to Outlook, including Google Workspace, DreamHost, IONOS, and Zoho. These platforms also offer professional email functionality plus additional features that might be better for your business. Consider reviewing them as well.
 |  |  |  |
|---|---|---|---|
| Visit Google Workspace | Visit DreamHost | Visit IONOS | Visit Zoho |
| Most comparable provider vs Outlook (and Microsoft 365) | 25GB storage per mailbox + mobile syncing | Free domain + cheap email hosting | Up to 5 free email accounts on a domain you own |
| Cost: From $6 per month | Cost: From $1.67 per month | Cost: From $1 per month | Cost: Free; paid plans from $1-$6/month |
| How to Set Up Gmail | Set Up Free Emails on Zoho |
If you’re still undecided, learn more about these and other alternatives in our article on the best business email providers.
How Much Outlook Business Email Costs
To use Outlook business email software, you’ll need a paid business plan for Microsoft 365 (formerly Office 365). In addition to Outlook, this gives you access to essentials like Microsoft Word, Excel, PowerPoint, Forms, Bookings, and more, including team chat, webinars, and video conferencing with Microsoft Teams.
Microsoft 365 Pricing & Plan Features for Outlook
All Microsoft 365 business plans include access to the web and mobile versions of Outlook, including the ability to work offline and sync changes later. However, some advanced features require the use of desktop software, and for this, you need to subscribe to the Standard Plan to download office software apps.
| Microsoft 365 Business Basic | Microsoft 365 Business Standard | Microsoft 365 Business Premium | Microsoft 365 Apps for Business | |
|---|---|---|---|---|
| Price per Month | $6 | $12.50 | $22 | $8.25 |
| Apps Included | Web and mobile versions of Word, Excel, PowerPoint, Teams, Outlook, Exchange, SharePoint, and OneDrive | Everything in Business Basic plus desktop versions of each and desktop-only versions of Access and Publisher | Everything in Business Standard plus Intune and Azure Information Protection | Desktop, web, and mobile versions of Word, Excel, PowerPoint, Outlook, and OneDrive, and desktop-only Access and Publisher |
| Security | Standard | Standard | Advanced | Standard |
| 30-day Free Trial | ✓ | ✓ | ✓ | ✓ |
| Business Class Email | ✓ | ✓ | ✓ | ✕ |
| 1TB of Cloud Storage | ✓ | ✓ | ✓ | ✓ |
| Chat, Call & Meet With Up to 300 Attendees | ✓ | ✓ | ✓ | ✕ |
| 24/7 Phone & Web Support | ✓ | ✓ | ✓ | ✓ |
| Desktop Apps | ✕ | ✓ | ✓ | ✓ |
| Webinars | ✕ | ✓ | ✓ | ✕ |
| Appointments | ✕ | ✓ | ✓ | ✕ |
| Cyberthreat Protection | ✕ | ✕ | ✓ | ✕ |
Plans also include apps like Microsoft Publisher, Teams, Exchange, and SharePoint, and more apps and security comes standard as you upgrade to higher tiers. If you don’t need Teams, Apps for Business is a lower-cost option. However, note that it also doesn’t come with the business-class email and security enabled through Exchange.
How to Set Up & Use Outlook for Business Email
Microsoft Outlook email is easy to use, particularly if you have prior experience with other Microsoft Office apps. All you need to do to send and receive emails is to set up Outlook by adding your account credentials.
Step 1. Open Outlook & Add Your Email Credentials
If you’re using a Windows computer, Outlook may already be installed among your apps. Open the app through the Start menu or the web-based or mobile version of Outlook. If the app isn’t on your device, add it through your device’s App Store. To add your account credentials, get your IMAP (or POP/POP3) and SMTP settings from the email account you set up with your web hosting provider.
For more support or specific instructions about how to add your email account on PC, Apple, or mobile devices, check out detailed instructions for how to set up Microsoft business email on Outlook. Alternatively, your email host or web hosting provider will likely also have detailed instructions for setting up your business email on Outlook, Gmail, and mobile apps.
Step 2. Send Business Emails Through Microsoft Outlook
To send an email, click on New Email in the top bar’s Home menu, fill in the “To” box with the recipient’s email address, and type out your message. Unless your device is offline, Outlook will automatically check for new messages and sync your folders (when using Outlook on multiple devices, such as mobile and PC).
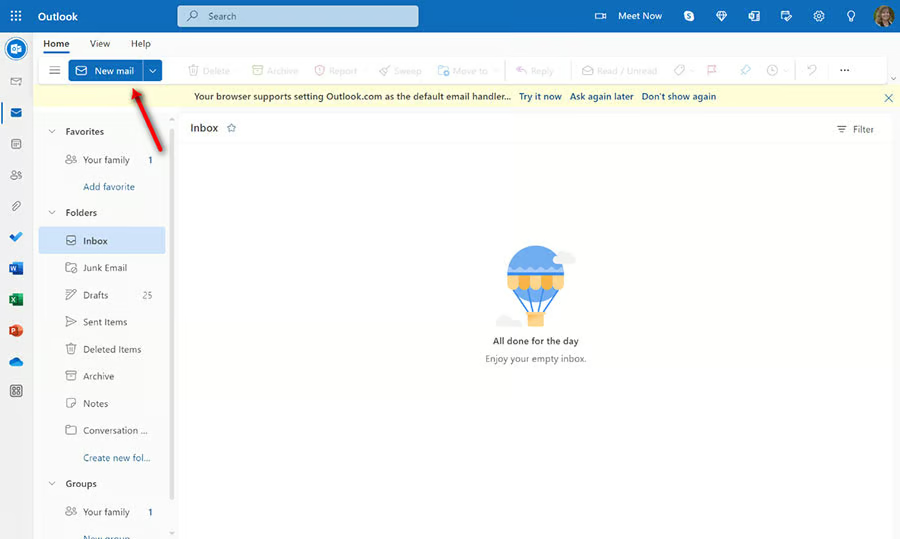
Click on “New Email” in the top left corner to start a new Outlook business email. 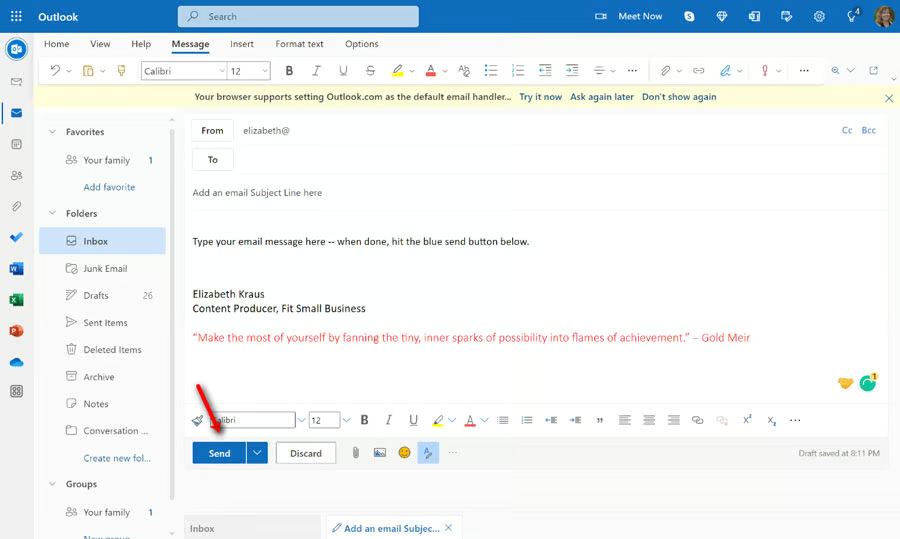
Type a subject line and the body of your email, then hit Send.


Step 3. Organize Emails & Outlook’s Interface
To organize your emails, delete unnecessary messages, flag important emails, and organize emails in specific folders. You can also customize the view of your inbox, such as adding a reading pane to quickly see the content of an email or a To-Do Bar showing your upcoming meetings and tasks.
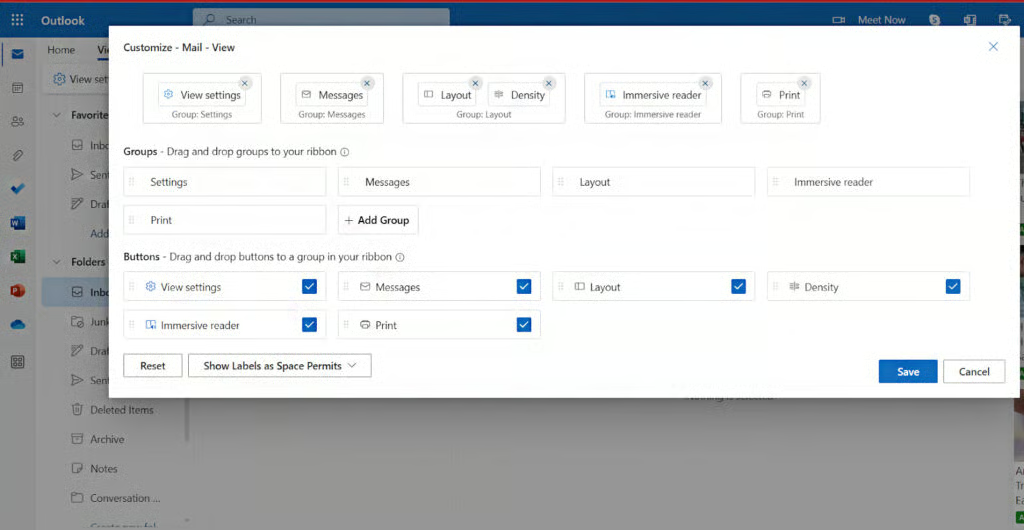
- Manage multiple email addresses: You can manage multiple email accounts in Outlook, including importing items from other email management software. Simply add an account and input the credentials of the email addresses you want to create inboxes for. This way, you can see and manage all your emails in one place to save time.
- Delete emails: To delete emails, click on the Trash icon located on the upper left side of the menu. To flag messages for follow-up, click on View, then click on Flag Status for the email you want to flag.
- Categorize for follow-up: Add a “From” element to flag every email from a specific sender—this can be very helpful for small customer service teams that may need to escalate a customer’s issue. Alternatively, you can view messages in “conversations” and see all emails exchanged in a given thread.
- Add folders: When using Microsoft Office for business email, it’s easy to add folders to organize emails you want to keep, such as for projects or from important senders. Simply right-click on Inbox, and then click on “New Folder.” Type in the name for the new folder, and when there’s an email you want to move to that folder, simply right-click the email, select Move, then choose the folder you want to move the email to. You can also simply drag-and-drop emails from your main inbox into folders.
- Set up rules: For business or personal emails, there is a Rules feature where you can create rules based on either the sender or recipient of messages. This will dictate the email to be automatically moved to specific folders you set.
For more guidance on how to use Microsoft Outlook for business email, read our tip list of the best Outlook features for business users.
Microsoft 365 & Outlook Market Share Statistics
No matter the industry, companies need a holistic tool for their email and calendar, making Microsoft Outlook great for small businesses. As of February 2023, Microsoft 365 software trailed Google Workplace worldwide, with a market share of 45% vs 50% for Google in office productivity software. Over a million companies worldwide use Microsoft 365 as their main productivity software. In the U.S. alone, more than 1.3 million companies use Microsoft 365 and Outlook as their email software solution.
Microsoft Outlook is available in 106 languages for U.S. and international businesses alike. Here are 10 main business types Microsoft Outlook is being used by:
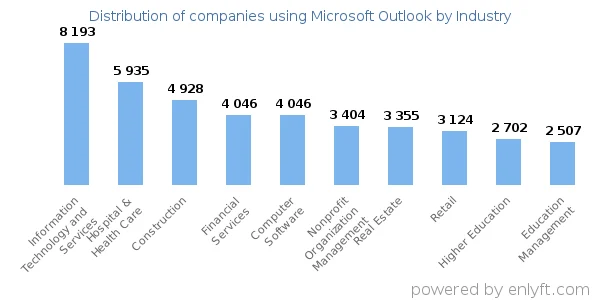
- Technology services
- Hospital and healthcare
- Construction
- Computer software
- Financial services
- Real estate
- Nonprofits
- Retail
- Education management
- Higher education
If your industry or category isn’t listed above, you can search through the list of companies that are using Microsoft Outlook email for business. Another interesting statistic is to compare how many businesses use Microsoft Outlook by company size. It clearly demonstrates that Outlook business email is appropriate for companies of all sizes and types.
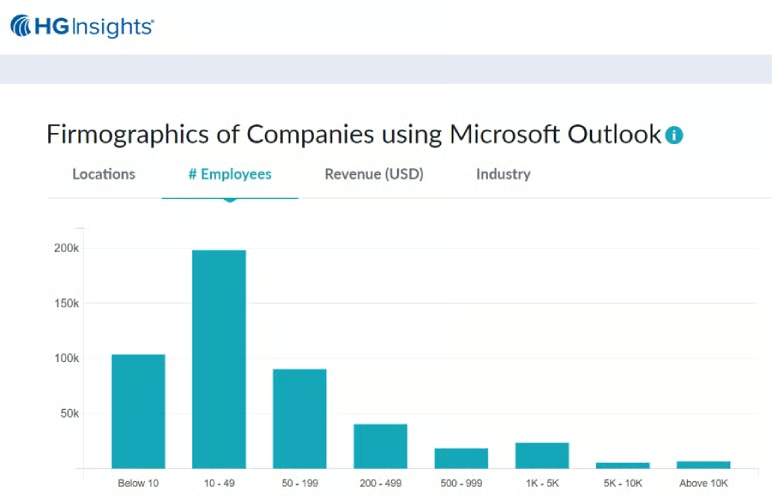
Microsoft Outlook users by company size:
- Fewer than 10 employees: 106,732
- 10 to 49 employees: 203,667
- 50 to 199 employees: 92,98
- 200 to 499 employees: 41,923
- 500 to 999 employees: 19,399
- 1,000-plus employees: 36,696
Source: HGData.com
Frequently Asked Questions (FAQs)
How much is Outlook for business?
The Outlook app itself is free—you can create an Outlook.com email account (e.g., yourname@outlook.com) and use the app for personal email. However, this lacks the professional credibility that having an email on your own domain offers. The cost of Outlook for businesses starts at $6 per user, per month, and includes not only business class email but web and mobile versions of the Microsoft 365 office suite as well.
How do I get Outlook for my business?
Getting Outlook for your business is easy, and it also comes with other software most companies need, like Microsoft Word, Excel, and PowerPoint. Simply visit Microsoft and click the tab for business plans, choose the plan that’s right for your company, connect (or set up) your business email address, and start using web-based and mobile apps to manage your professional emails.
Is Outlook better than Gmail for business emails?
The choice between Gmail vs Outlook depends on a few factors. Gmail is great for ease of use and better for collaborative teams (as is Google Workspace). Outlook has more advanced business email features and offers the ability to manage other users’ inboxes and calendars. Microsoft Outlook is also better for businesses using Microsoft 365 Office products like Word, Excel, and PowerPoint.
Bottom Line
Microsoft 365 business plans with Outlook include extensive business email features that can only be replicated in competitors’ apps through extensions (if at all). Outlook is the best choice for business email for those who need advanced security, robust email features, and the sheer number of business email, scheduling, and task management tools that come with Outlook.
