


I’ll walk you through how to set up advanced settings in QuickBooks Online. I’ll show you how to navigate to the Advanced tab, where you can set up and adjust various preferences, including the fiscal year and accounting method, company type, chart of accounts, and categories for detailed reporting. I’ll also share why it’s important to customize advanced settings in QuickBooks Online.
Step 1: Navigate to Account and Settings
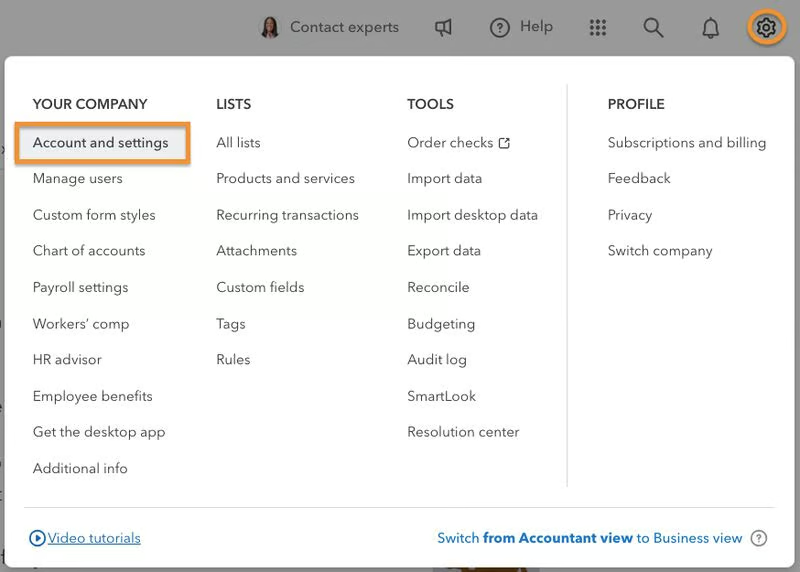
First, click on the gear icon (⚙︎) in the upper right corner of the QuickBooks Online screen and then select Account and settings, as shown below.
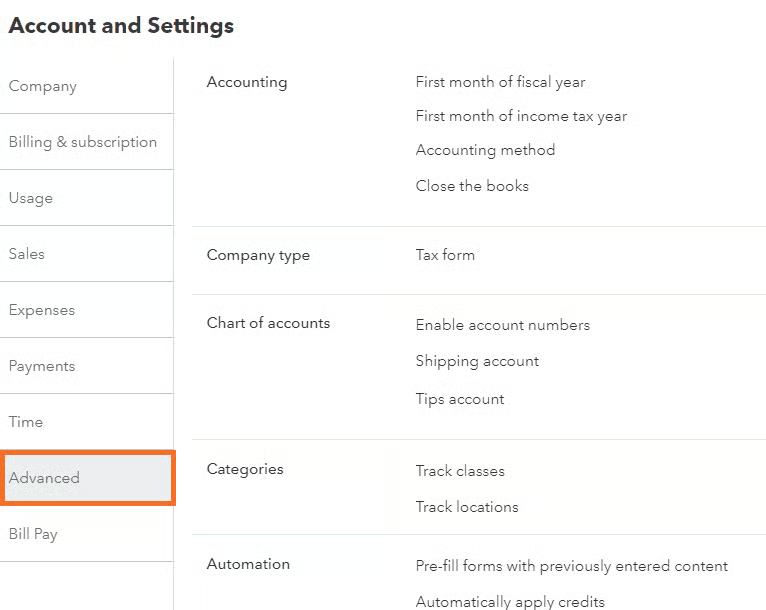
Step 2: Select the Advanced Tab
On the Account and settings page, navigate to the Advanced tab in the left menu bar. As seen in my GIF below, the tab provides nine sections where you can customize various settings in QuickBooks.
Step 3: Customize Advanced Settings
Now, proceed to set up and adjust the advanced settings by clicking anywhere on each section. I’ll guide you step-by-step on how to adjust each area, and I’ve included screenshots with labels for the fields to make it easier for you to follow and understand. As I completed each section, I clicked the green Save button to apply the changes.
This section allowed me to adjust information related to my accounting method, fiscal year, and closing the books to lock transactions in prior periods.
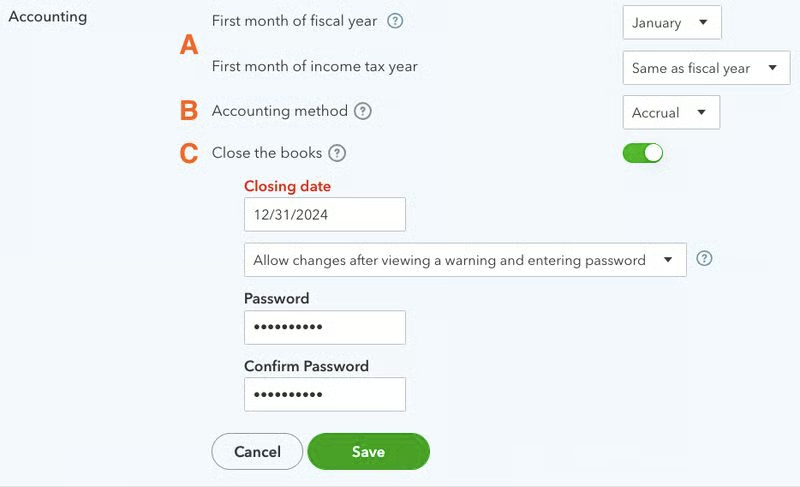
A. Fiscal and income tax year: Select the fiscal year and tax year for your business. Most businesses use the calendar year, January 1 through December 31, for both their fiscal and tax years. If you’re a new business, I suggest consulting a tax professional before choosing a tax year other than the calendar year.
B. Accounting method: Set the default accounting method―cash or accrual―but you’ll still be able to select either method when printing reports. This is a powerful feature of QuickBooks since many small businesses use the cash method of accounting for their tax returns and the accrual method of accounting for their internal reports.
C. Close the books: Closing the books is an important control feature for any bookkeeping system. It prevents inadvertent changes to prior accounting periods, which will cause an error in your beginning balance sheet for the current period.
I recommend turning this feature on by entering the ending date of your prior fiscal year. Select to either view a warning before making a prior-period change or require a password to make such a change. To learn more about this, I have a separate tutorial on how to close books in QuickBooks Online.
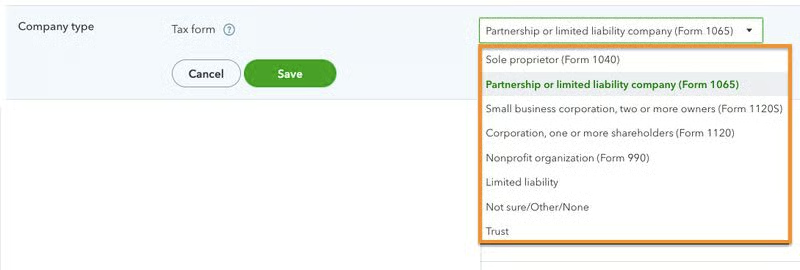
In this section, select how the company is organized for income tax purposes. Choose one of the following types of entities from the drop-down box.
- Sole proprietorship: A business with one owner that hasn’t filed with a state to be a corporation is a sole proprietorship.
- Business partnership: A business with two or more owners that hasn’t filed with a state to be a corporation is a partnership. Partnerships report their business income on Form 1065.
- S Corporation (S-corp): A corporation or LLC that has made an election with the IRS to be treated as a small business corporation.
- C Corporation (C-corp): A corporation not electing to be treated as a small business corporation.
- Nonprofit organization: A nonprofit is a corporation that has received tax-exempt status from the IRS.
- Limited liability company (LLC): A business structure that offers limited liability protection and pass-through taxation is an LLC.
If you don’t know how your business is organized, choose Not sure/Other/None.
QuickBooks provided me with a standard chart of accounts list based on the industry I selected when I created my company. I’ll cover how to add and remove accounts in a later tutorial on how to set up the chart of accounts in QuickBooks Online, but for now, there are a few advanced settings you can adjust.
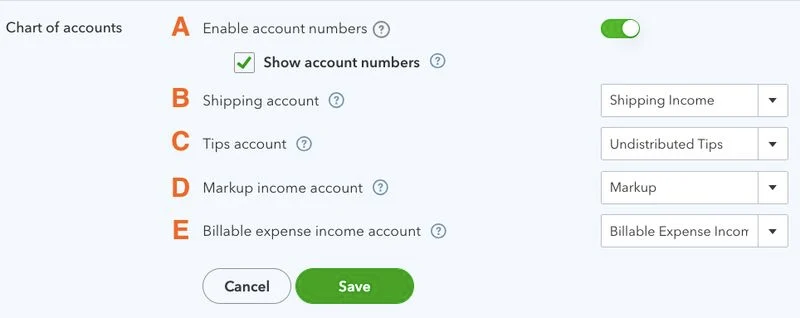
A. Enable account numbers: Accountants often use account numbers to help organize their chart of accounts. For instance, my revenue accounts might start at 1000 and my expense accounts may begin at 2000.
B. Shipping account: Specify which of the income accounts you would like to use to track your shipping income.
C. Tips account: Tips collected are a current liability until you distribute them to employees. You can specify which account to use to track unpaid tips. I ensured that the account I selected is a current liability.
D. Markup income account: If you’ve chosen to markup expenses that are billed to customers, as shown in our guide on how to customize expenses in QuickBooks Online, you can choose which income account to use to track the markups.
E. Billable expense income account: You have the option to treat customer expense reimbursements as income or a reduction of expense. If you choose to treat them as income, this is where you specify an income account.
QuickBooks Online Plus and Advanced let you track profit and loss by both classes and locations. I highly recommend class and location tracking for more detailed information on your profitability, but if it doesn’t suit your business, then you can turn them off to keep your input screens less cluttered.
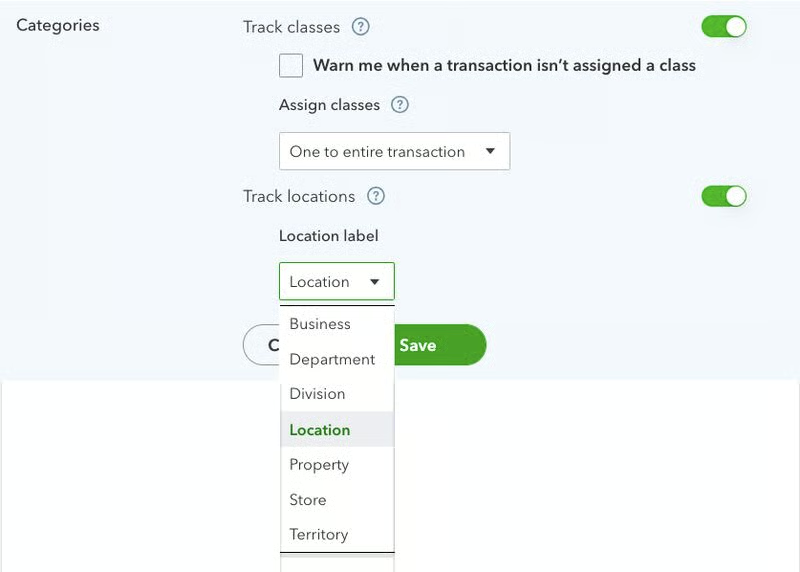
- Track classes: This feature adds a class field to all sales and expense forms to enable the reporting of income and expenses by department or product line. I recommend enabling the warning if a transaction isn’t assigned a class and suggest assigning classes to each row of a transaction rather than one class for the entire transaction since some transactions will likely involve multiple classes.
- Track locations: This option adds a location field to all sales and expense forms. The definition of what constitutes a location is very flexible. You can change the label on the location field to business, department, division, property, store, or territory.
QuickBooks Online can make bookkeeping faster by applying certain rules automatically.
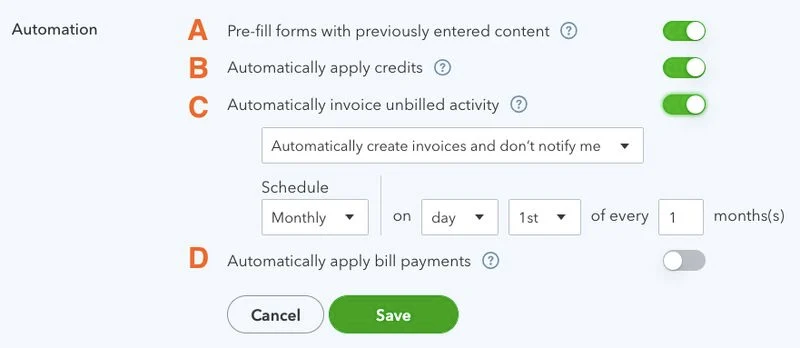
A. Prefill forms: This automation will prefill information based on the last form saved for that employee, vendor, or customer.
B. Automatically apply credits: QuickBooks will apply customer credits automatically to a newly created invoice.
C. Automatically invoice unbilled activity: I recommend setting this option to “Remind me to create invoices” vs allowing QuickBooks to generate an invoice automatically. Once you’re proficient in QuickBooks and confident that unbilled activity should always be invoiced, you can change the setting to allow automatic invoices.
D. Automatically apply bill payments: As you’ll learn later, most expenses are first inputted as bills and then paid for with a special check, referred to as a bill payment. This option will apply a bill payment to the oldest outstanding bill automatically.
I recommend turning on each of the automation options to evaluate whether it’s helpful. You can return to this screen and disable any automation you dislike. These automations prefill a transaction, but any of the prefilled information can be changed before saving.
QuickBooks Plus and Advanced users can track all income and expense items by project. This is especially helpful for contractors or other businesses that have multiple jobs for the same customer and want to track each job separately.

I highly recommend turning projects on to at least evaluate the feature. By doing so, there will be a “Projects” item in the left menu of my dashboard that you can explore.
This section enabled me to select my home currency or the default currency used for my business. There’s also an option to enable multicurrency, but I suggest turning this on only if you have customers or vendors that you deal with in a currency other than your home currency. Once turned on, multicurrency cannot be turned off, so I recommend that you learn more about multicurrency before making a decision.
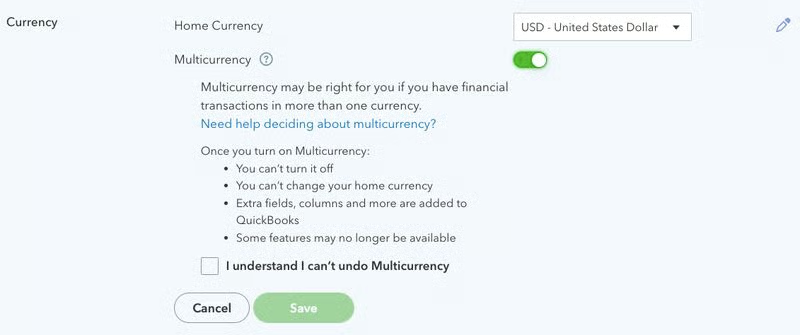
If you decide you need the option, click the box next to Multicurrency and the box that confirms you understand that it cannot be turned off. You can check out QuickBooks’ guide on how to set up and use multicurrency.
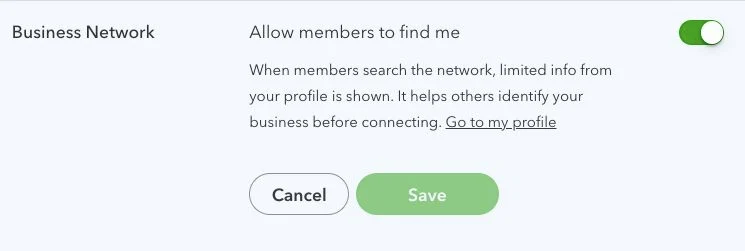
When this setting is turned on, your business will be searchable in the QuickBooks Business Network. You’ll also be able to search the network for customers and vendors, send invitations to connect, and use the Accounts Payable (A/P) automation feature. When a customer or vendor accepts your invitation, you can send them invoices or receive bills through the network.
Here, I accessed additional settings to customize my QuickBooks Online account:
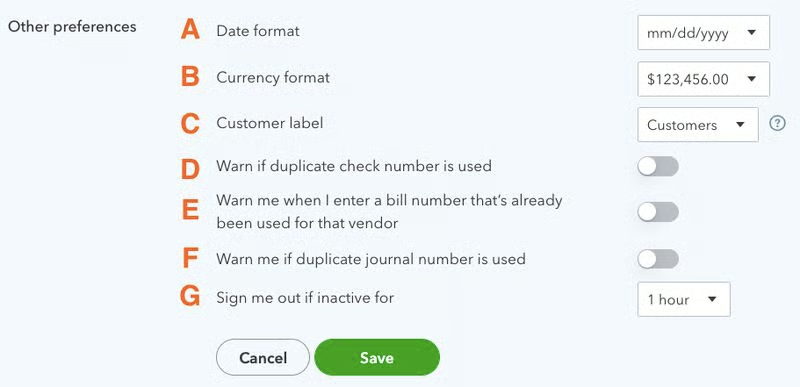
A. Date format: This allows you to select how dates appear in QuickBooks Online.
B: Currency format: This lets you adjust how currency values are displayed in QuickBooks. For instance, I can adjust whether commas are used to separate thousands and how decimal points appear.
C. Customer label: Select how you would like customers referred to on your forms. For instance, professional service firms usually refer to customers as clients and hotels refer to customers as guests.
D, E, and F: Warn if a duplicate number is used: I recommend turning the warnings for whenever a check, bill, or journal entry number has already been used on. A good accounting system should have a unique number for each transaction, and these warnings will alert you to potential problems. There may be circumstances where you want to use a number twice, which you’ll be allowed to do after acknowledging the warning.
G. Sign me out: You can choose to be signed out after one, two, or three hours of inactivity. I recommend choosing one hour unless your computer is in a secure area where nobody else has access.
Why Advanced Company Settings in QuickBooks Are Important
QuickBooks Online is awarded our best small business accounting software because users can customize it to their unique business needs. These advanced company settings play a crucial role in customizing QuickBooks because they let you enable time-saving tools and turn off those that you don’t need to keep your input screens simple and uncluttered.
Also, the advanced settings let you choose what shows up in your financial reports, including your profit and loss statement, balance sheet, and cash flow statement. If you don’t set up this area, reports will use the default settings for your fiscal year, accounting method (like cash or accrual), and chart of accounts. If these default settings don’t match your actual business information, it could result in incorrect financial reports and tax returns.
Frequently Asked Questions (FAQs)
What are advanced settings in QuickBooks Online?
The advanced settings in QuickBooks Online are essential tools and preferences that you can turn on or off depending on your unique business needs. These settings can help you properly set up your chart of accounts, better categorize your transactions, and automate actions like transaction entries.
What happens if I don’t customize my advanced settings in QuickBooks Online?
The features and reports in QuickBooks Online will run using the default settings, which can cause a problem entering transactions and understanding your business. For instance, when you don’t customize the chart of accounts, you might begin putting your transactions in the wrong categories because you haven’t created customized account names based on the specific needs of your business.
Wrap Up
I just showed you how to customize advanced settings in QuickBooks Online. Our next tutorial is how to import bank transactions in QuickBooks Online, which will cover both how to connect a bank account to update transactions automatically and how to import transactions from a comma-separated values (CSV) file.