


I’ll guide you on how to import credit card transactions into QuickBooks Online. You’ll want to navigate to the Banking Center, where you can import transactions automatically by connecting your credit card account to QuickBooks. I’ll also explain how to manually import your credit card transactions If your credit card isn’t supported by QuickBooks or if you prefer not to connect it.
If you’ve completed my tutorial on how to import bank transactions, then this lesson will be a breeze. The process is very similar, except you’re importing credit card transactions instead of bank account transactions.
- Step 1: Go to the Banking Center
- Step 2: Connect Your Credit Card Account
- Step 3: Set Up the Account in the Chart of Accounts
- Step 4: Select the Date Range
- Step 5: Review Downloaded Transactions in the Banking Center
- How to Import Credit Card Transactions Manually Into QuickBooks Online With a CSV or Similar File
- The Importance of Connecting Your Credit Card to QuickBooks
- Frequently Asked Questions (FAQs)
- Wrap Up
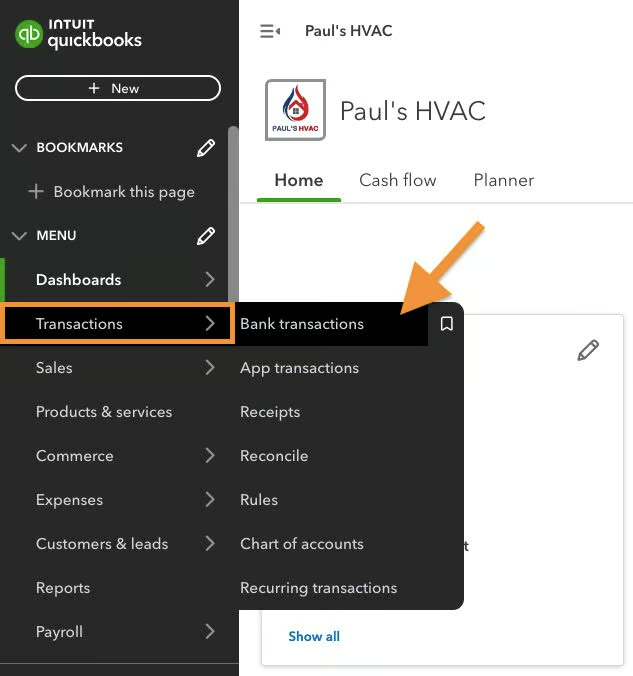
Step 1: Go to the Banking Center
From my QuickBooks Online dashboard, I clicked on Transactions in the left menu bar and then selected the Bank transactions drop-down menu, as shown below.
Step 2: Connect Your Credit Card Account
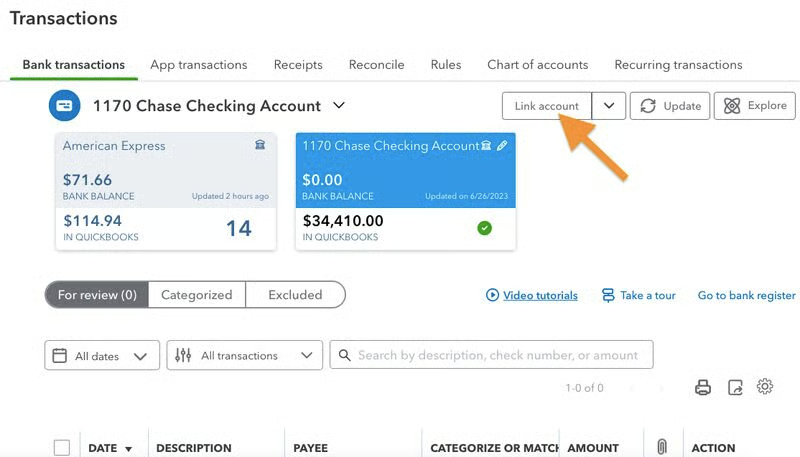
If this is the first bank or credit card account you’re connecting to QuickBooks, you’ll see a screen allowing you to connect your account to QuickBooks Online. Since I’ve already connected another bank or credit card account, I’m taken directly to the Banking Center.
From the Banking Center, I clicked the Link account button, as I need to add a new credit card account.
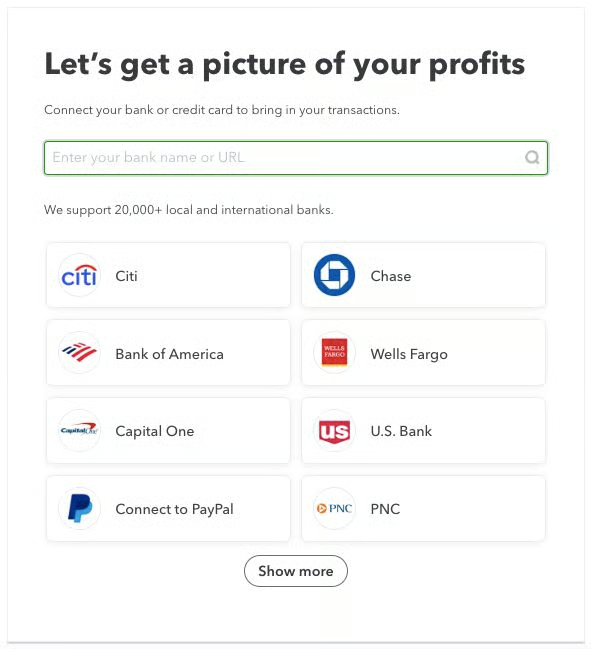
You’ll want to select your credit card from the displayed options or type the name of your credit card provider in the search box. QuickBooks supports over 20,000 financial institutions worldwide, so it is likely that your credit card provider is supported for automatic import into QuickBooks. However, if you can’t locate your bank, import your transactions manually—which I’ll discuss later.
After selecting my bank or credit card provider, Capital One, QuickBooks displayed a new screen. It asked me to sign in to my bank account, as shown below.
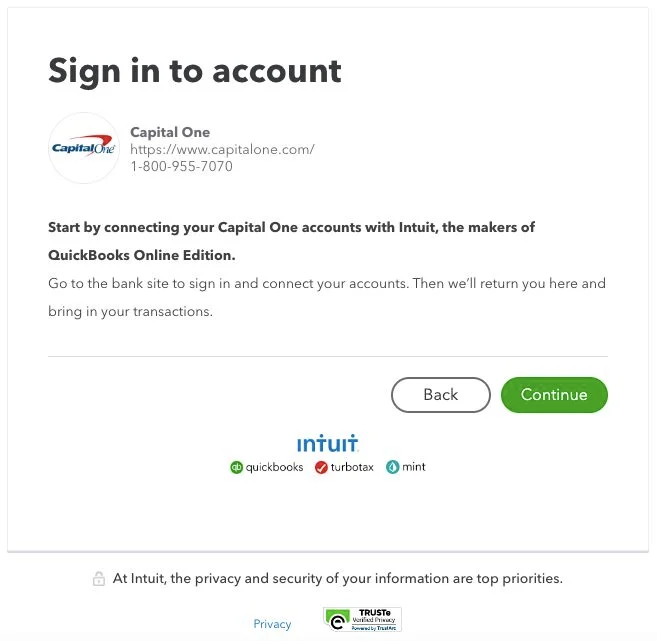
QuickBooks then opened a new browser where I could sign into my credit card account. After I signed in, my credit card provider asked me to confirm that I wanted to share my banking information with Intuit and provide a summary of the information to be shared. I clicked the appropriate button on my bank’s confirmation page, and I was taken back to QuickBooks.
Step 3: Set Up the Account in the Chart of Accounts
Next, I selected the appropriate credit card account from my chart of accounts; I could also add a new one if it hadn’t already been created. This account is where the imported transactions will automatically be recorded. QuickBooks displayed a list of available accounts associated with my bank. This list included various types of accounts, such as credit card, checking, and savings.
If you have a new account, then click Add new (shown below) at the top of the drop-down box to open the new account setup form.
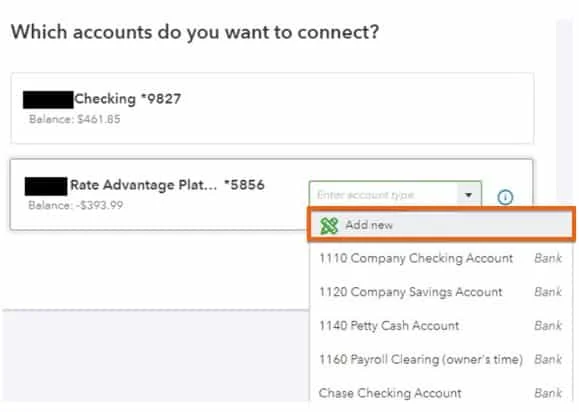
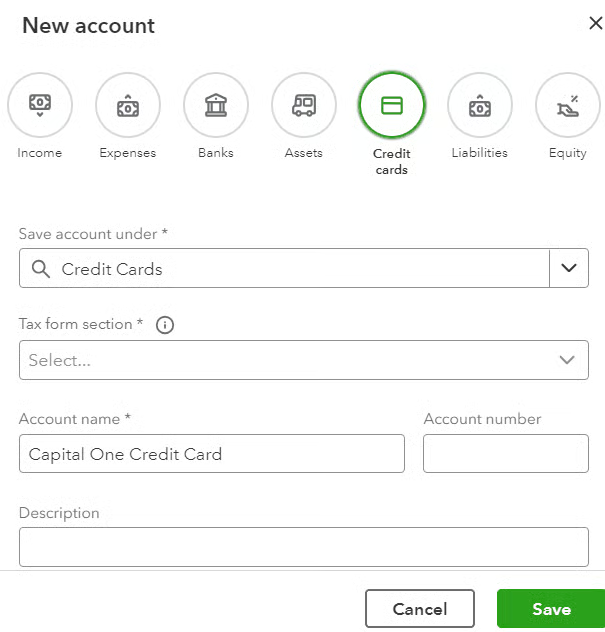
To create a new account, you need to provide essential information. I prepared a tutorial on setting up a chart of accounts in QuickBooks Online if you want to learn more—but for now, you can provide a few details, such as the appropriate account and the account name. You also need to select the starting date or the date when you want to begin tracking transactions for that account in QuickBooks and the opening balance. Once done, click the green Save button.
Step 4: Select the Date Range
After linking the credit card to an account from your chart of accounts, you must decide when QuickBooks should begin importing transactions. Click the green Connect button when you’re done.

Step 5: Review Downloaded Transactions in the Banking Center
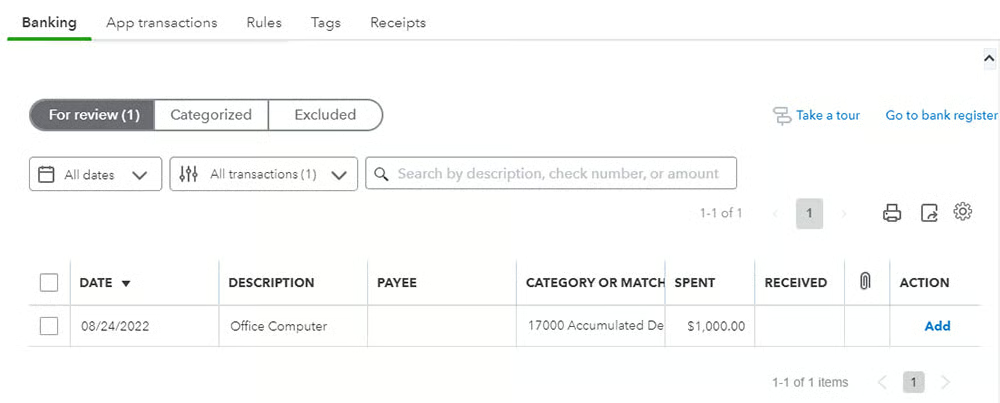
After connecting my bank account, QuickBooks Online took me to the Banking Center. I found the downloaded transactions ready for review in the For review tab.
Now that my credit card account is connected, new transactions will be imported automatically into QuickBooks Online daily. You can also click Update in the upper right corner to import any new transactions immediately.
How to Import Credit Card Transactions Manually Into QuickBooks Online With a CSV or Similar File
Step 1: Download a Transfer File From Your Credit Card Company
To obtain a transfer file, I logged into my credit card account and located the option to download my account transactions. I was given the option to download transactions in multiple formats.
- CSV: These files are commonly used to export data for a multitude of purposes and can be opened and edited with Excel.
- QBO: QBO files are QuickBooks WebConnect files specifically designed for exporting information from bank or credit card accounts to QuickBooks.
- QFX: QFX files are financial exchange files created for exporting information to Quicken, but they’ll also work with QuickBooks Online.
- OFX: An OFX file is a text file specifically designed for exporting financial data.
- TXT: Text files can be imported but might require some editing first. You might want to open the TXT file with Excel and convert it to a CSV file for a smoother transfer.
I then saved the transfer file to a location on my computer that I could easily remember when I need to import the file.
Step 2: Select the Transfer File to Upload in QuickBooks
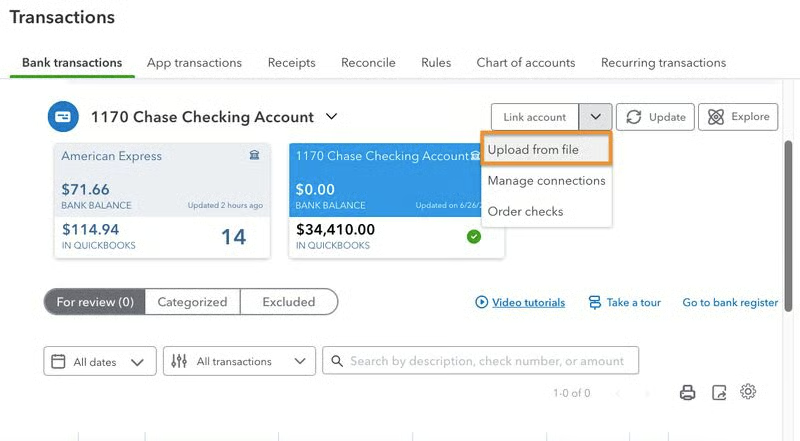
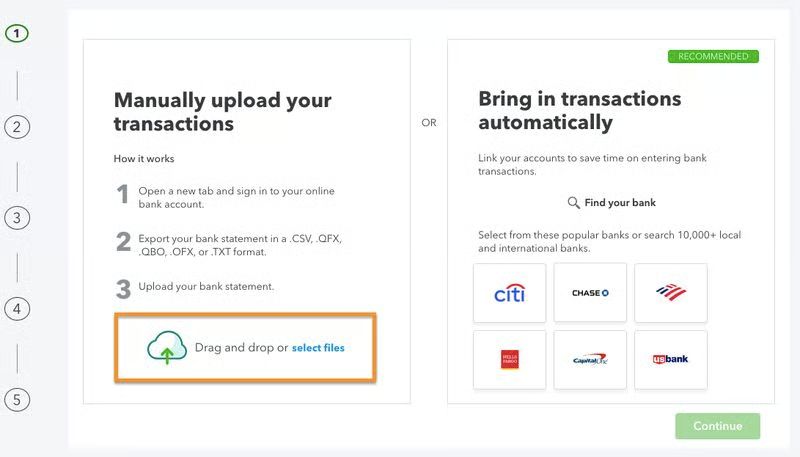
To select the file I wanted to import into QuickBooks, I clicked the drop-down arrow next to Link account in the upper right corner and then selected Upload from file.
I dragged and dropped my file of transactions, but I could have also clicked the select files link to browse my file on my computer, as shown below. I then hit the green Continue button to proceed.
Step 3: Select a QuickBooks Account
Next, I chose an account from my chart of accounts to record the imported bank transactions. I selected a Capital One credit card, as shown below.

If needed, I could also have clicked on Add new to set up a new credit card account, as demonstrated earlier.
Step 4: Map Columns to QuickBooks Fields (for CSV & TXT Files)
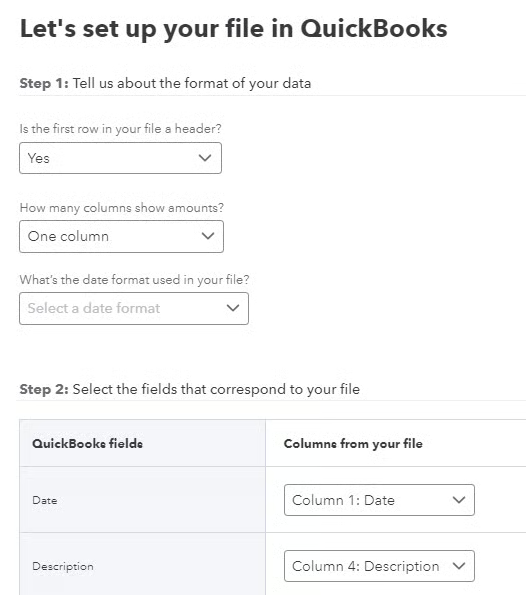
After having clicked Continue, QuickBooks took me to a screen where I could set up my file and map the fields in QuickBooks to the columns on my file. However, before you complete this step, open your CSV or TXT file in Excel to determine what information your bank exported and how it’s formatted.
Below is a sample CSV file with columns for important information, such as date, description, and amount.
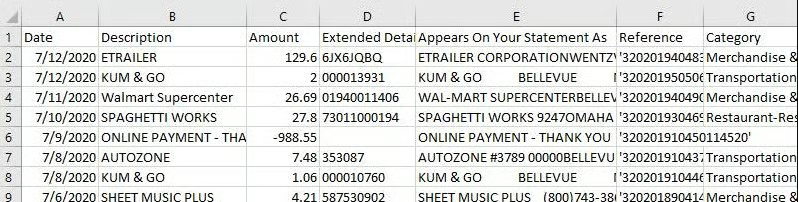
Notice that transaction amounts are shown in column C, with credit card charges shown as positive numbers and payments to reduce the credit card balance as negative numbers. Some credit card companies might include charges in one column and payments in another. Either way is fine, but you’ll need to know how the amounts are organized in the next step.
After I reviewed the information exported from my bank, I was ready to set up my file and map the fields. Below, I specified the format of my data (i.e., whether the first row in my file is a header and how many columns show amounts). I scrolled down to the file setup screen to complete the mapping. I did this by matching each column in the bank file to the appropriate fields in QuickBooks. For example, I matched the “date” field in QuickBooks to the “date” column from my file.
Once I was satisfied with the mapping, I clicked the green Continue button (not shown in the image) in the bottom right corner of the screen.
Step 5: Select Which Transactions to Import (CSV & TXT Files)
QuickBooks Online then provided a list of transactions associated with my selected account. I chose the transactions I wished to import by clicking the checkbox next to the transaction.
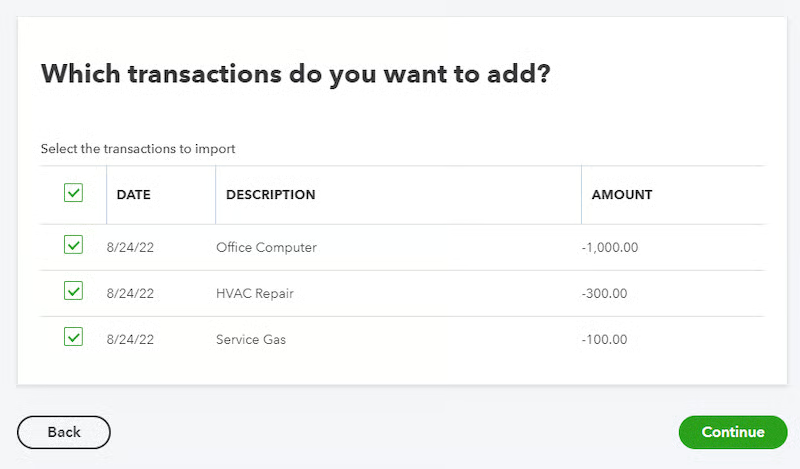
Once done, I clicked the green Continue button in the bottom right corner of the screen to complete the import of your transactions. I then received a confirmation from QuickBooks that the import was successful.
Now that I have successfully imported my transactions, I can return to the Banking Center to review them. If you need a guide on how to review the transactions, such as accepting, excluding, or matching them to an existing transaction, check out my tutorial on how to manage QuickBooks Online bank feeds.
The Importance of Connecting Your Credit Card to QuickBooks
The ability to connect a credit card to QuickBooks is one of the many reasons we hailed QuickBooks Online as the overall best small business accounting software. Once connected, all you need to do is sign in to QuickBooks and classify the transactions that will transfer daily automatically.
Most credit card companies allow you to connect to QuickBooks using your online sign-in credentials. If your credit card doesn’t allow a connection to QuickBooks, you can still import your credit card transactions using a QBO or CSV file with the help of Excel.
Frequently Asked Questions (FAQs)
How can I import credit card transactions into QuickBooks Online?
You can import your transactions automatically by connecting your credit card account to QuickBooks. If your credit card is not supported by QuickBooks, import your credit card transactions manually using the Upload from file button in the Banking Center.
What file formats can be imported into QuickBooks Online?
QuickBooks Online supports the following file formats: CSV, QBO, QFX, OFX, and TXT.
Can I import credit card transactions from multiple credit cards into QuickBooks?
Yes, you can. QuickBooks allows you to connect and import transactions from multiple credit card accounts.
Wrap Up
I just showed you how to connect your credit card to QuickBooks Online and import credit card transactions manually when necessary. My next guide is on QuickBooks Online multiple users setup, where you’ll learn how to allow your external accountant and other employees full access to your QuickBooks Online account.