An employee database doesn’t have to mean using complicated HR software. At its core, it’s a place to organize the details you need about your team. When set up correctly, even an employee database in Excel gives you quick answers about employee headcount and basic pay information — all in one file.
Featured Partner


In this guide, I’ll walk you through how to create an employee database in Excel, step by step. I’ll also share a few tips I recommend if you want your spreadsheet to work more like a lightweight HR system. You can also download our free template to help you get started.
Thank you for downloading!
What employee information to include
Before you open Excel, think about the information your business needs most often. The basics usually include.
- Employee Name
- Birth Date
- Address
- Contact Details
- Job Role
- Supervisor/ Department Details
- Pay Rate (optional)
- Start Date
- End Date (for terminated employees)
Contact details like phone numbers, email, and home addresses are also useful. From there, customize based on the information you require. I recommend asking yourself: “What employee details do I wish I had at my fingertips?”
For example, a restaurant business might need to track food handler certifications, while a landscaping company may want equipment training or driver’s license numbers. You should also consider keeping data that can be used in the future, such as clothing size (for team T-shirts or company apparel gifts) and food allergies (for conference meal planning).
Defining these fields first makes it easier to design your spreadsheet in a way that works for your team. Once you’ve chosen what to track, follow the steps below to turn your Excel spreadsheet into a powerful employee database.
Step 1: Create a new spreadsheet
Your first step is to create the employee database spreadsheet.
- Open Excel and click on the Blank workbook box. This opens a new blank spreadsheet. Or, make a copy of our employee database template. It is already created for you and ready for your data.
- Create a title for your employee database, such as “Employee Database – Template.” In Excel, click File and then Save As. Name your spreadsheet and select where on your computer you wish to save it. At the top center, you’ll now see your file has a name.
Even if you are only tracking a few employees, name and organize the file carefully. Taking the time to do this makes your Excel employee database template easier to manage as your team grows.
How you create your spreadsheet will vary depending on which platform you use — Excel or Google Sheets. While both are versions of Microsoft Excel, how you navigate them is a bit different. Click the tabs below for a visual of how to create each.
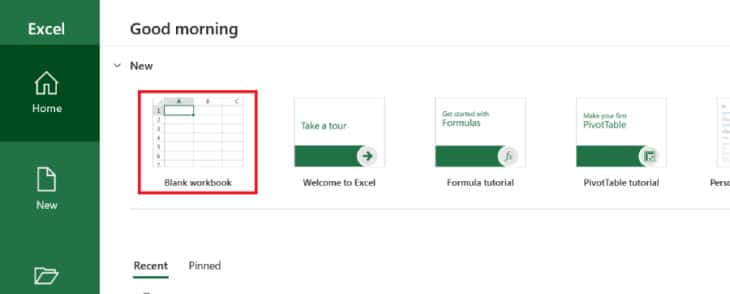
Upon opening Excel, you will be directed to create a blank workbook or open an existing template or spreadsheet.
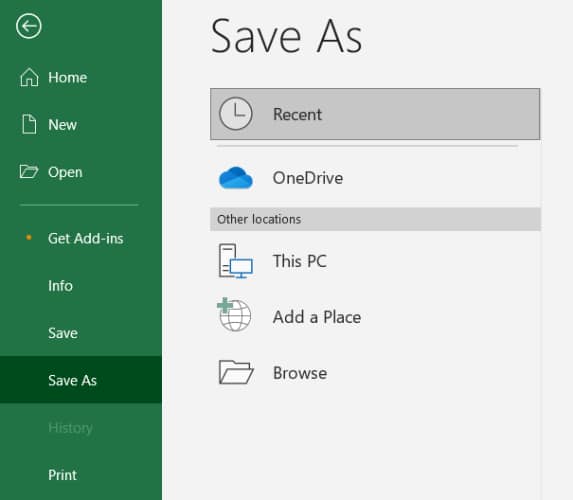
Once you save your file in Excel, the title will show at the top center of your spreadsheet.
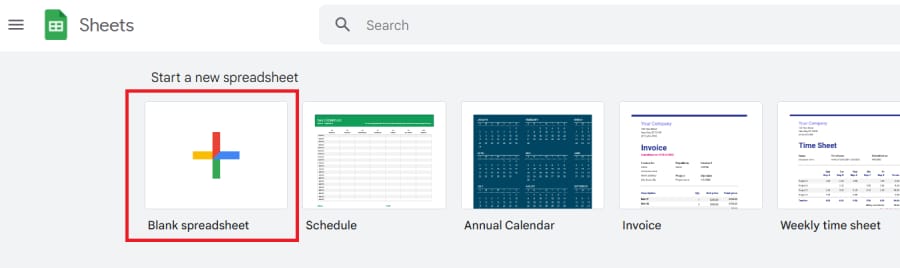
Click the Plus sign to create a blank spreadsheet in Google Sheets.
Type directly in the box at the top left to change the title in Google Sheets.
If you’d rather not start from scratch, I suggest using our sample employee database in Excel. It includes pre-built fields and three tabs: one for the instructions, another for current employees, and a third sheet for past employees. That third tab is especially helpful if you want to archive former staff without losing their history. Keeping their details in a separate tab allows you to quickly verify job history when asked for references.
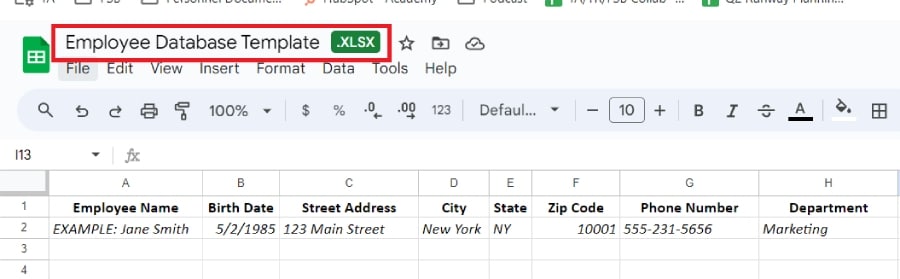
Step 2: Add columns
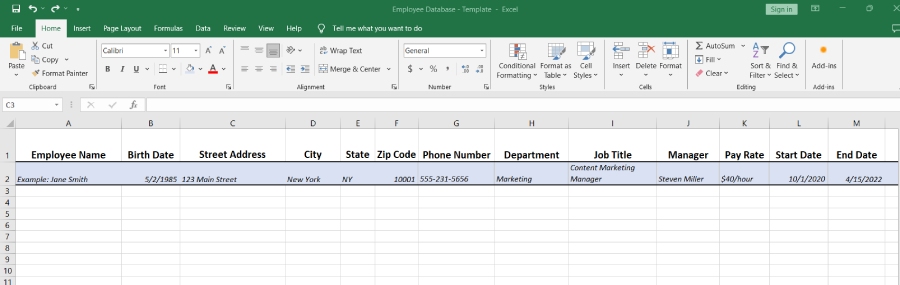
The columns you add to your employee database will depend on the information you want to track for each employee. To enter these fields, type each one in the top row (this may be row 1 or row 2, depending on whether you include a header at the top). I recommend bolding, increasing the font size, centering them, and freezing the row for easy viewing.
Our Excel employee database spreadsheet has templated columns, but you can customize them to fit your company’s needs. For example, you may want to include columns for job costing to help with reporting and budget analysis per employee.
You can add a column by right-clicking at the top of the column to the right of where you want to add a new column, then clicking Insert. This will add a new column to the left of the column you have highlighted. You can also right-click anywhere in the spreadsheet and select Insert. You then have the option to add a single cell (shifted right or down), add an entire row, or add an entire column.
How you add columns also varies depending on the spreadsheet you use — Excel or Google Sheets. Scroll through the images below to learn how to add columns with each.
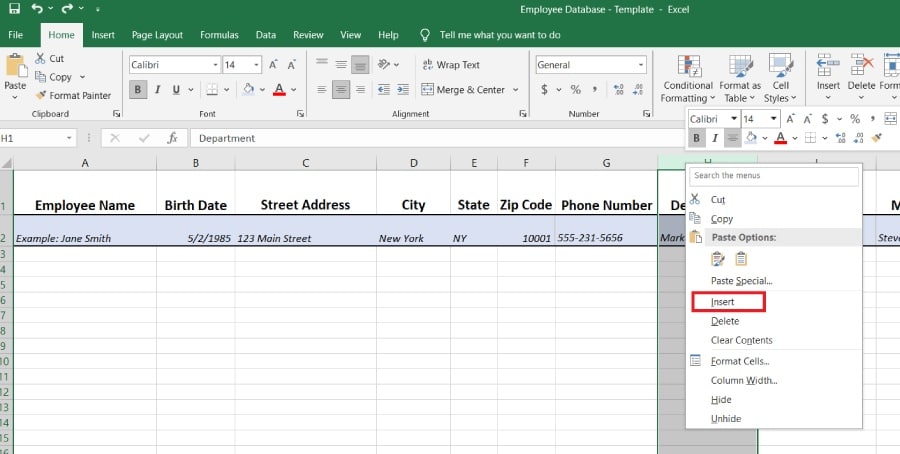
Click the Insert tab to automatically add a column to the left of the highlighted column.
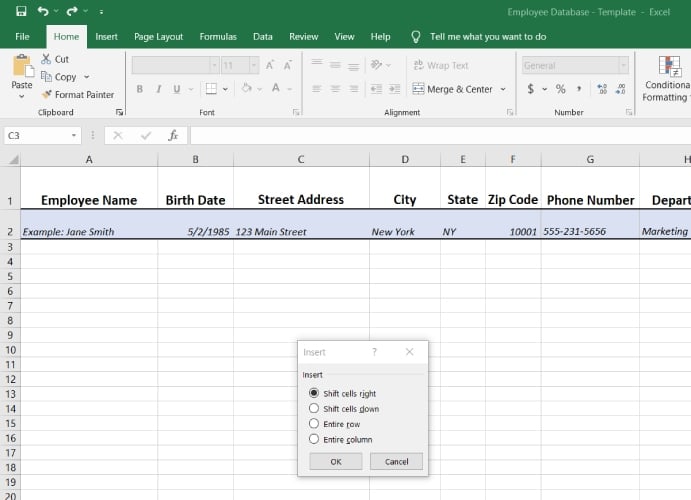
Right-click anywhere on the worksheet and select Insert to add cells, rows, or new columns.
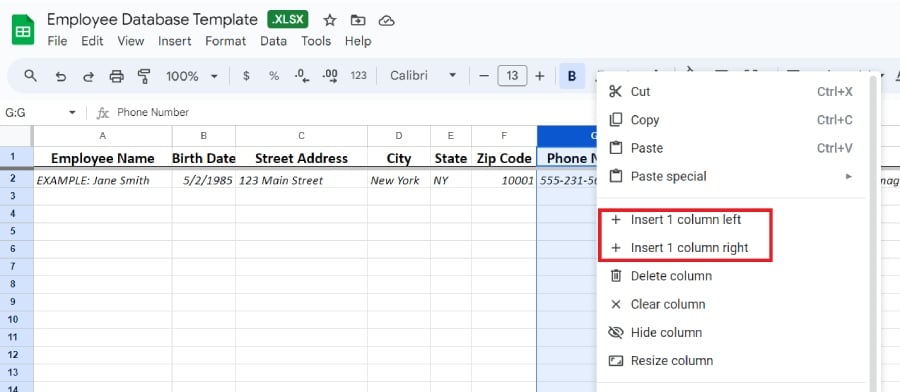
In Google Sheets, you have the option to insert your column to the left or right. Simply right-click on the column next to where you want to add the new column.
Step 3: Collect and enter employee information
With the structure in place, begin collecting employee details. Once you’ve collected all pertinent information, input that data into your spreadsheet. Simply fill in each column with the employee’s information. Each row should represent a new employee, allowing the data to be easily sorted.
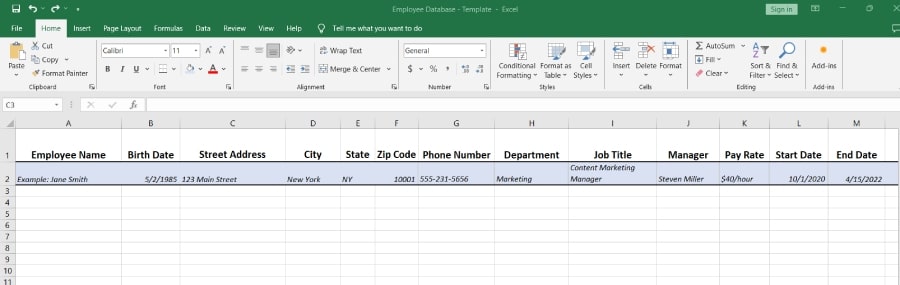
Above is an example (listed in blue) of data to add to your employee database.
Sorting your data
Once you’ve entered your employee data, you may need to sort it so you can easily find the information you are seeking. To do this in Excel, simply click the drop-down arrow on the column you wish to sort. You can then sort alphabetically or by numerical data.
If you want to sort the entire spreadsheet, highlight the entire sheet by clicking the small box to the left of Column A. Then, from the Home screen, click Sort & Filter. A drop-down box will appear, allowing you to arrange the data alphabetically or create a custom sort.
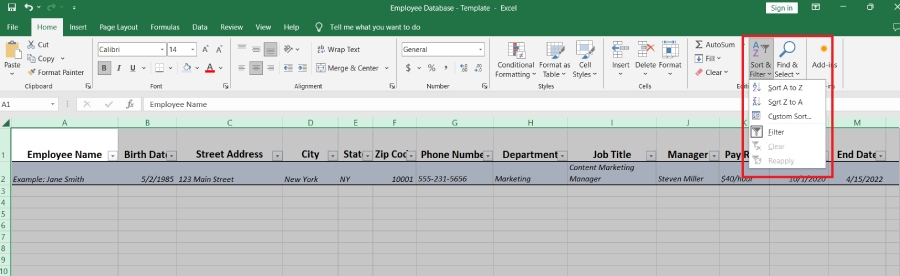
You can easily sort and filter your data in an Excel employee database.
Step 4: Set permissions & access
Even if you are not storing highly sensitive data, you are still handling personal information about your workers. You’ll want to restrict access to this sheet, giving permission only to specific employees who need to reference this information.
Make sure you share the sheet only with authorized users. Click File then Share. From there, you can share with people by uploading your document to the cloud, or share it via email.
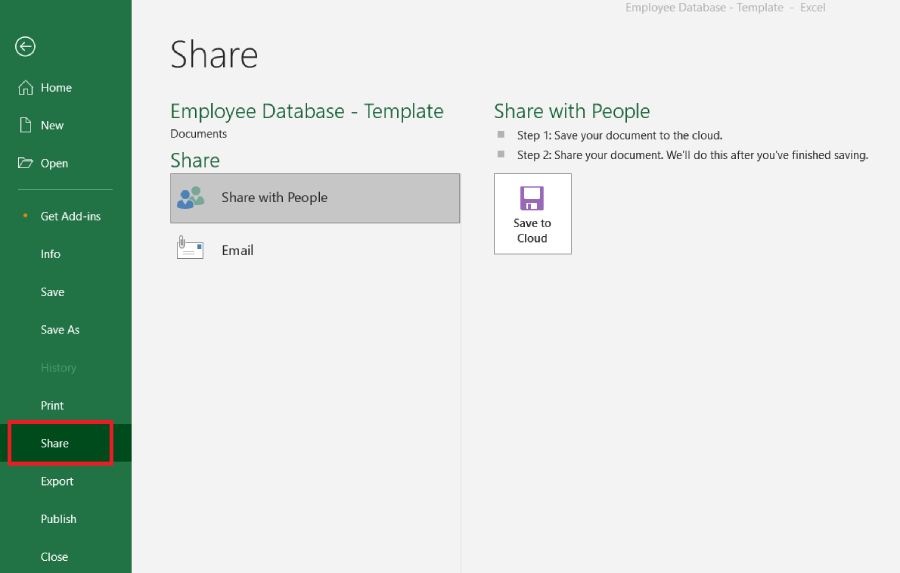
Easily share your documents with other team members for collaboration.
Then, you can protect the sheet further by restricting what data users can edit by clicking Review and Protect Sheet or Protect Workbook. This will set a password that prevents the data in your spreadsheet from being changed. Additionally, you can click Allow Edit Ranges, which will allow users to edit specific cells, columns, and rows.
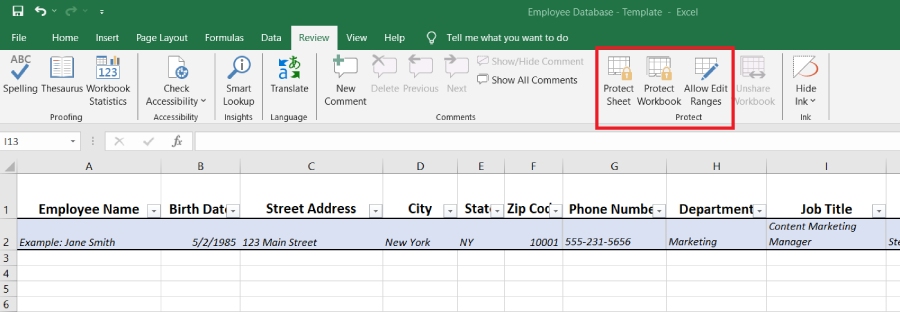
Protecting your workbook will prevent anyone without a password from changing the data.
Step 5: Keep your employee database updated
For an employee database to be effective, it must be kept up-to-date. Regular updates are crucial, particularly when there are changes in personnel such as new hires, promotions, or departures. I recommend updating the database and doing an audit at least once every year.
As you grow, consider creating a fillable data entry form to enable new employees to enter their information, which will then auto-populate in your spreadsheet. This would also be useful to have your existing employees update annually or as their personal situation changes.
Why it’s important to have an employee database
As part of an overall employee management strategy, having a centralized employee database puts all necessary information at your fingertips. You can use this information in a number of ways, depending on the fields you include in the spreadsheet.
- Quick reference for employee contact information
- Salary budgeting and reporting
- Career growth decisions
- Policy creation and updates
- Onboarding new employees
- Recruitment analysis
- Generation of HR reports
The reporting possibilities are endless with a well-structured employee database. The more comprehensive and intentionally managed it is, the more value your database will provide.
Tips for creating an employee database
Setting up your database is only part of the work. The way you manage it day-to-day will determine how useful it is. These tips will help keep it accurate, up-to-date, and relevant.
- Involve managers early: If you’re creating an employee database in Excel for the first time, ask managers what information or data fields they need for staff metrics or to develop their people management skills. That way, you build something they can rely on instead of a sheet that only HR can use.
- Backup your data: You may already be backing up the information you keep on your computers. If not, you definitely should start — especially when it comes to important employee information.
- Update often: We’ve already covered that you should update your spreadsheet regularly. Failure to do this could result in misinformation and incorrect financial or payroll reports.
- Include demographic information: Having demographic information in one employee database can help you make informed diversity and inclusion decisions.
- Stay compliant: Be sure to stay compliant with document and confidential information collection and storage. Every employer must adhere to EEOC privacy laws.
Common mistakes to avoid in Excel databases
Building an employee database in Excel is straightforward, but maintaining it can get messy if you’re not careful. When updating or creating an employee database in Excel template form, even minor mistakes can lead to inaccurate reports or compliance issues.
Here are a few of the most common pitfalls:
- Inconsistent data entry: If one column header uses “Sales” and another says “Sales Team,” your data filters and reports won’t work properly. The same goes for dates. Mixing formats like MM/DD/YYYY and DD/MM/YYYY can throw off results. Set up dropdowns or data validation rules at the outset to maintain consistency.
- No backups or version control: Excel does not automatically track changes. If someone saves over the file or two people create different versions, important data can be lost. A simple system of dated backups or a shared master copy avoids that risk.
- Hardcoding numbers in formulas: It’s tempting to use Excel formulas like “=AI*1.05” when creating a database that calculates pay raises. However, the moment your percentage changes, every formula must be updated. Referencing a separate cell for those values makes it easier to adjust the values across the entire sheet.
- Tip (2025 update): Modern Excel functions can make your sheet more powerful and easier to maintain. Use XLOOKUP instead of VLOOKUP, parse text cleanly with TEXTSPLIT, and simplify long formulas with LET or LAMBDA. For larger datasets, turn to Power Query (Get & Transform) to clean and load data efficiently. Just note that functions like TEXTSPLIT and LAMBDA are only available in Microsoft 365—not older perpetual versions.
- Weak security practices: An employee database in Excel often contains personal information. Storing it on a shared desktop or giving everyone edit access can create problems. Implementing password protection, restricting edit ranges, and limiting access to authorized staff should be part of your process from the start.
Excel vs HR software: Which one to choose?
Excel works well as a starter solution, especially for very small businesses. Meanwhile, HR software offers tools that spreadsheets cannot match once your team grows. Here’s a quick comparison:
Feature | Employee Database in Excel | HR Software Database |
|---|---|---|
Cost | Free if you already have Excel or a Google Workspace subscription | Monthly subscription, often with a base rate and per-employee fees |
Ease of Setup | Quick to build with a template | Requires client onboarding and configuration |
Data entry | Manual updates, risk of errors | Automated syncing with payroll/benefits |
Security | Password or file protection | Role-based access, stronger compliance |
Scalability | Best for fewer than 15 employees | Designed for growing teams of 15 to over 500 |
Reporting | Limited to spreadsheet tools, requires knowledge of Excel formulas | Pre-built HR and compliance reports |
Integrations | None | Connects to payroll, time tracking, and accounting systems |
When to move beyond Excel
If you’re a very small business or just starting out, an employee database in Excel may be perfect for your team. It’s inexpensive and easy to set up with a template. However, as your workforce grows, its limitations begin to show.
The warning signs usually look like this:
- Updating employee information takes too much time
- Different versions of the spreadsheet are floating around
- You need reports for compliance or payroll that Excel can’t generate automatically
- Data security is a concern because sensitive details are stored in a file that’s too easy to share
Alternatives to an Excel employee database
If updating spreadsheets is starting to feel like a chore, HR software or an HR information system (HRIS) can take over the work. These tools are designed to collect and manage employee data for you.
Below are a few options to consider.
Free Plan | Monthly Starting Price | Standout Features* | |
|---|---|---|---|
✕ | $8 per user + $40 base fee |
| |
✕ | $6 per user + $49 base fee |
| |
For one-location businesses with up to 10 employees | $30 per location |
| |
For up to 10 employees | $35 for the first 30 users + 60¢ for each additional user |
| |
* Not all features are included at the lowest price point. | |||
Employee database frequently asked questions (FAQs)
A staffing database is similar to an employee database, except that it saves information on candidates instead of employees. You can record the same type of information, plus include links to resumes and interview notes.
Your HR department should have full access to the information contained in your employee database, including being able to edit and update that information. Should you decide to share the information with others in your company, we recommend concealing sensitive or confidential information (such as salary) by hiding and protecting columns.
An Excel employee directory template is a listing of employee names, addresses, and phone numbers. While you can certainly add columns, the template is not as advanced as the free version offered here.
Yes. Google Sheets works almost the same way and is easier to share. However, some of Excel’s features are stronger, such as richer conditional formatting controls, richer chart options, and advanced formulas.