

There are five main steps to create a Facebook business page: Log in to your personal Facebook account and choose Create > Page, then add your page’s profile and cover photo, and fill in the “About” section. Add other details like your call to action and page sections, add other people as page admins, and voila! You’re ready to start posting and promoting your page.
It’s super easy and free, and often the first path to building an online presence for countless small businesses. As the former social media manager for a startup, marketing via our Facebook page was one of my main responsibilities, and I’ll share some of the lessons and tips I’ve learned from that below as well.
- 1. Log in to Facebook and choose Create > Page from the menu
- 2. Add your page name and basic info
- 3. Add a profile picture & cover photo
- 4. Add a call to action and organize your page sections for better page navigation
- 5. Add other admins to help manage your page
- How to start promoting your brand-new Facebook page: My tips as a former B2C social media marketer
- Further things to explore on your Facebook page
- Frequently asked questions (FAQs)
- Bottom line
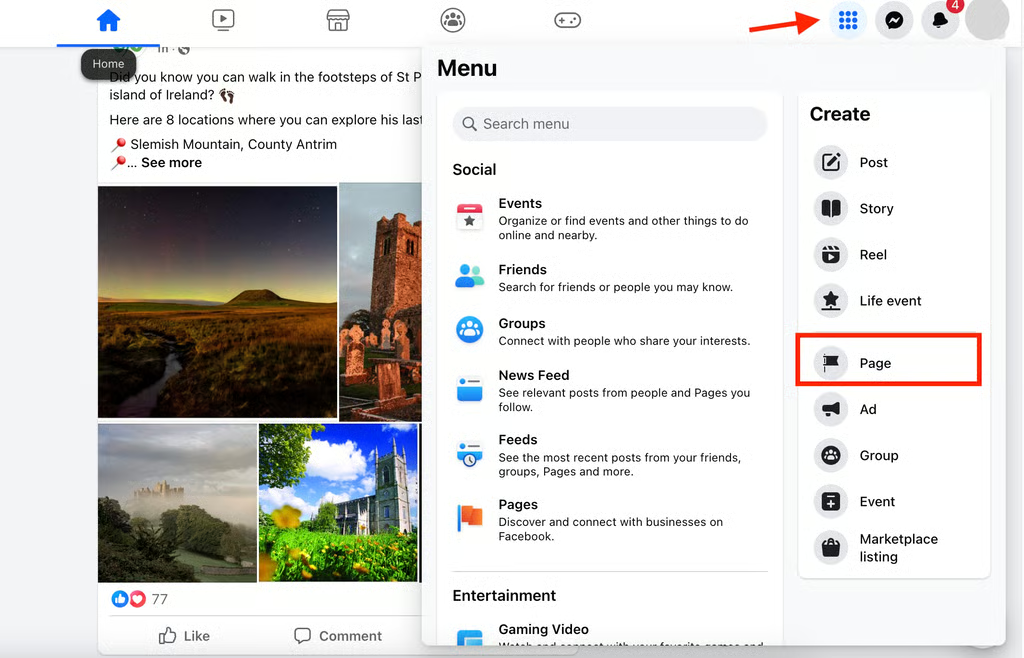
1. Log in to Facebook and choose Create > Page from the menu
The first step to learn how to create a Facebook business page is to log in to your personal Facebook account (or the Facebook account of whoever will be the main admin of the page).
- If you’re on a desktop, select the grid icon in the upper left corner of your feed, then under Create, click Page.
- If you’re on mobile, select your profile picture on the bottom-right corner of your Facebook app, then tap “See more” to see the Pages tab, and then select Create.
Open the menu, then choose Page to create a new Facebook business page. (Source: Facebook) 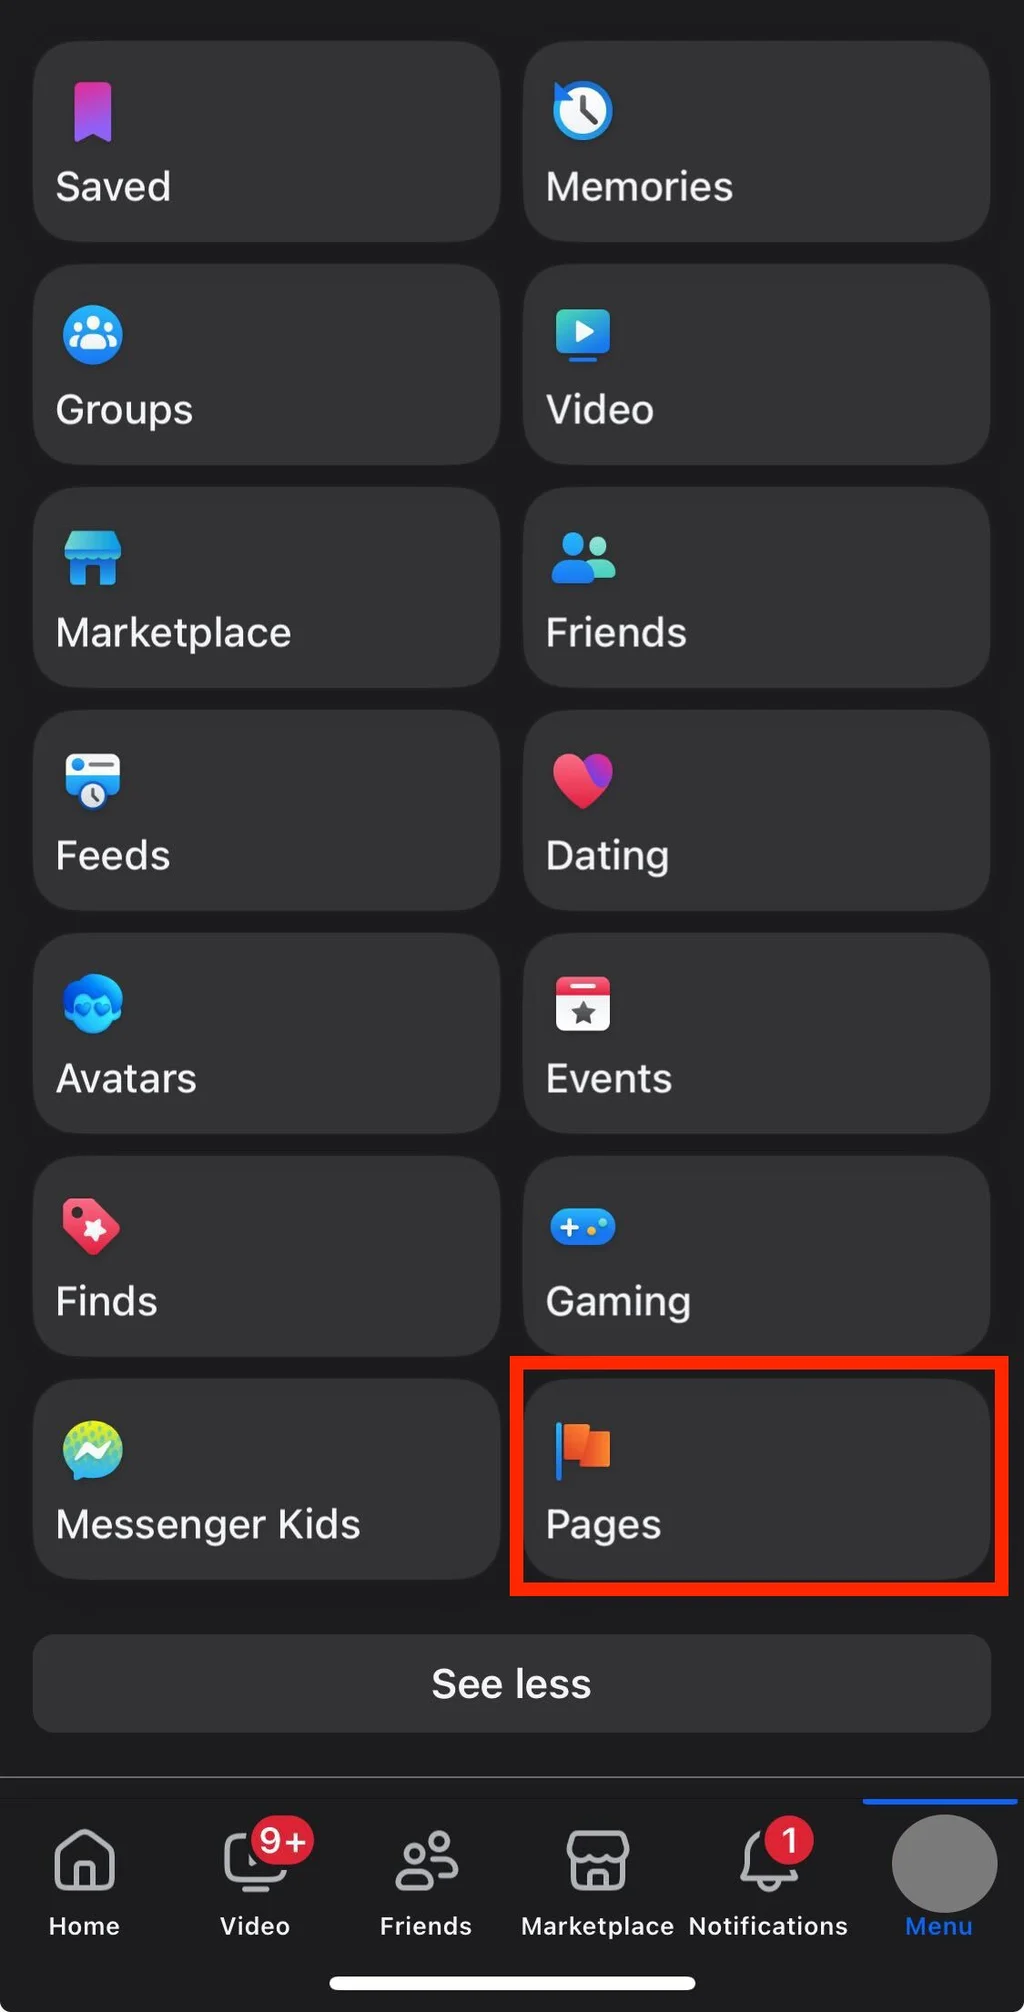
On mobile, tap on your profile, then choose Pages > Create. (Source: Facebook)


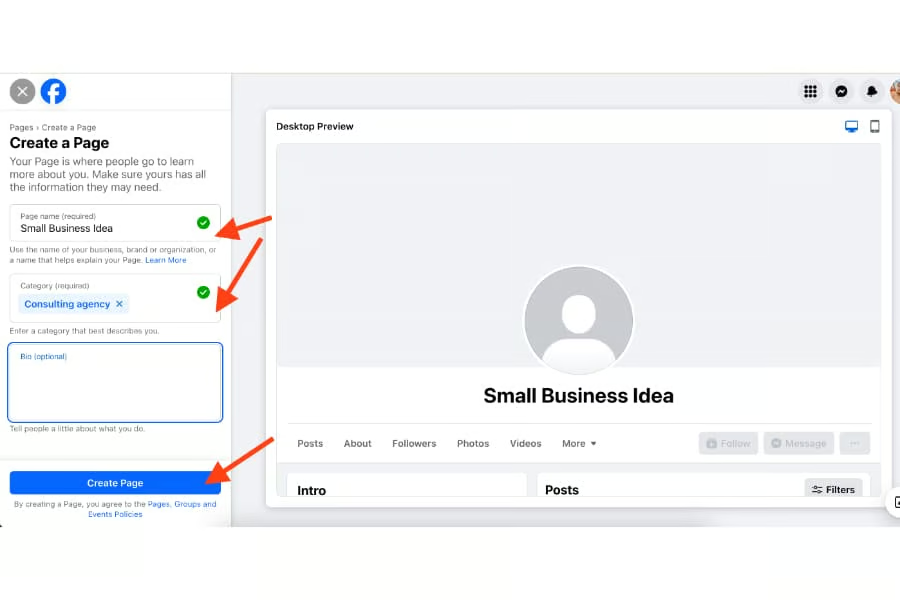
2. Add your page name and basic info
After clicking Create, you’ll be led into your Facebook page’s setup. Before anything else, add your page’s name, category (i.e., “pet shop,” “flower store,” etc.), and a short description to help build your brand presence. This can be a few sentences about the products or services you offer, your motto or slogan, and where people can find you. It can also be edited later on.
After adding this information, click Create Page at the bottom of the screen to save your progress. The process is the same for both desktop and mobile.
In the next screen, add your location, website, business hours, and contact details like your email address and phone number. Click Next when you’re done. This finalizes your page’s basic setup.
Make sure you fill in active contact details so people who visit your page can reach you — it often makes the difference between a good Facebook page and an ineffective one.

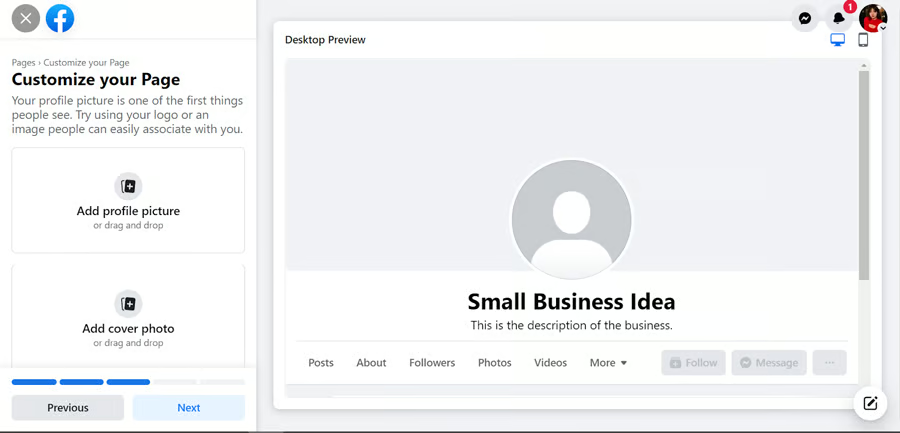
3. Add a profile picture & cover photo
After setting up your page details, add your page’s profile picture and cover photo to make your page more recognizable. Click on Add profile picture and add a square profile pic (360 px by 360 px) to your page. Then, click Add cover photo and upload a rectangular (820 px by 312 px) cover photo.
As you upload your photos, you’ll also see a preview of how they’ll look on your page.
Use your business logo as your profile picture, and add a cover photo that gives insight into your business. For example, if you run a cafe or restaurant, upload a good photo of your most popular menu items. A photo of your team would work well if you run a consulting agency.
Take a look at sample Facebook page templates for a better idea. And don’t place essential elements or text on the bottom center of your cover photo so they’re not obscured by your profile picture.
Add a profile picture and a cover photo to your Facebook Business Page. (Source: Facebook) 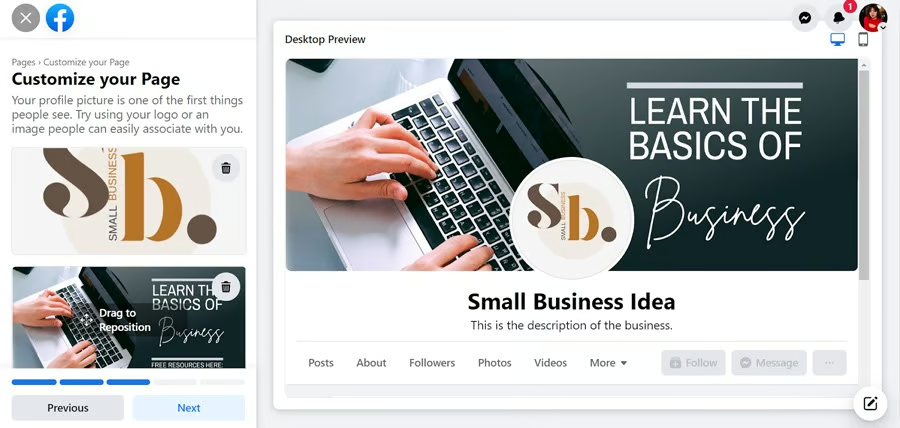
You’ll also see a preview of how your photos look on your page. (Source: Facebook)


On the following screens, you’ll also have the option to invite your Facebook friends to like your page and to receive notifications. However, these aren’t required, and you can set them up later. When you’re finished, click Done to finish your page setup. This publishes your page.
4. Add a call to action and organize your page sections for better page navigation
While your page is technically already published, it’ll still need some work. Anytime I’m making a Facebook business page for any business, I always make it as actionable as possible.
Customers should know what they need to do after visiting your page, whether it’s to visit your website or send you a message. You can do that by adding a call-to-action button to your page and organizing your page sections.
Adding a call to action button
Your call to action button is the main button that appears beneath your profile when people visit your Facebook page, usually “Message” or “Book now.” To add one, click on the ellipsis (…) button on the right side of your page. Choose Add Action Button, and then select a call to action button in the pop-up that follows.
The following are the call-to-action buttons you can choose from:
- Book now
- Sign up
- Start order
- View shop
- Get tickets
- Send message
- Send WhatsApp message
- Call now
- Send email
- Contact us
Your call-to-action button should be the main thing you want people to do after visiting your page. For instance, for restaurants, “Book now” is a popular option to set reservations. “Send message” is also a good option to prompt conversations in your page’s DMs.
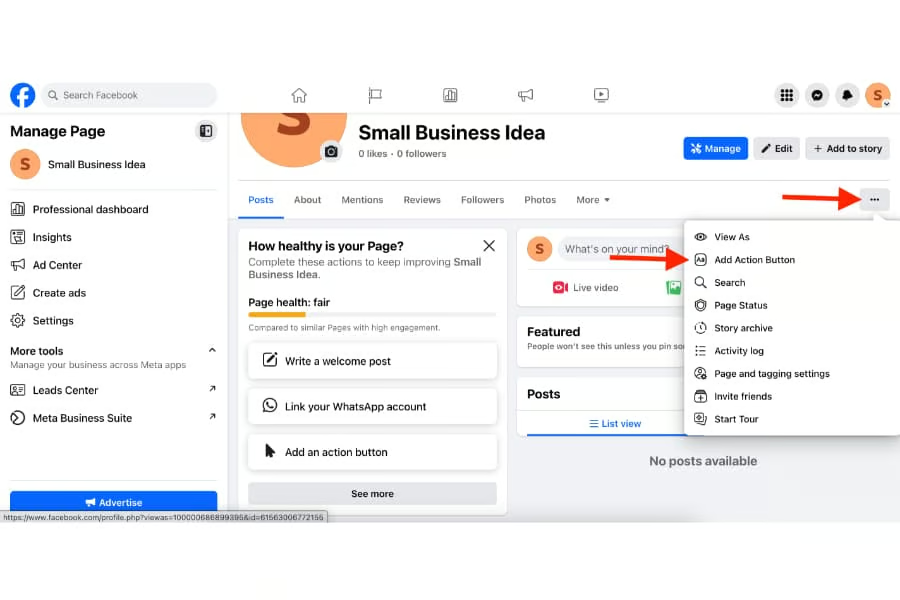
Click on the ellipsis > Add Action Button to add a call to action to your page. (Source: Facebook) 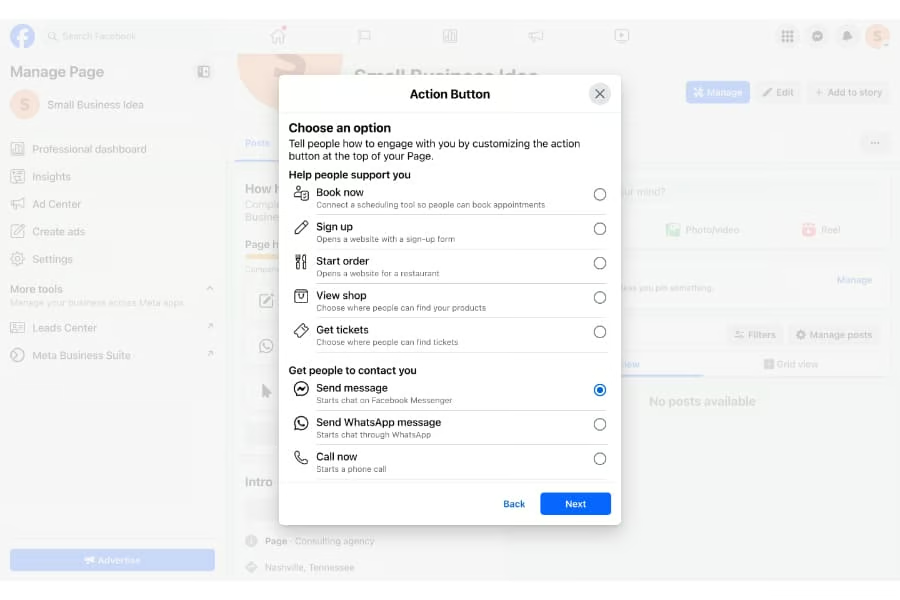
Choose the best call to action for your business. (Source: Facebook)


Organize your page sections
Your page sections are the tabs that appear when people visit your page, like your reviews, photos, and check-ins, and you can organize and remove them from your page as you wish.
To do this, click on the More tab on your page, then scroll to the very bottom and choose Manage Sections. In the following pop-up window, check the sections you want to display on your page.
If I were running a cafe or restaurant, for instance, I would display the Reviews Given and Check-ins tabs so that people would see customers’ reviews and check-ins first. It’s a small adjustment that makes your page much easier to navigate.
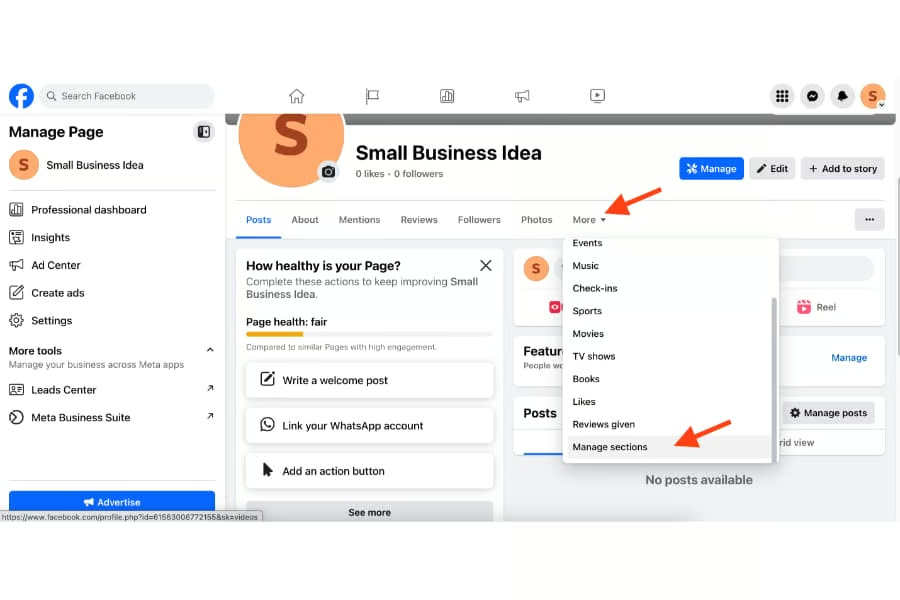
Click More to manage your page’s sections. (Source: Facebook) 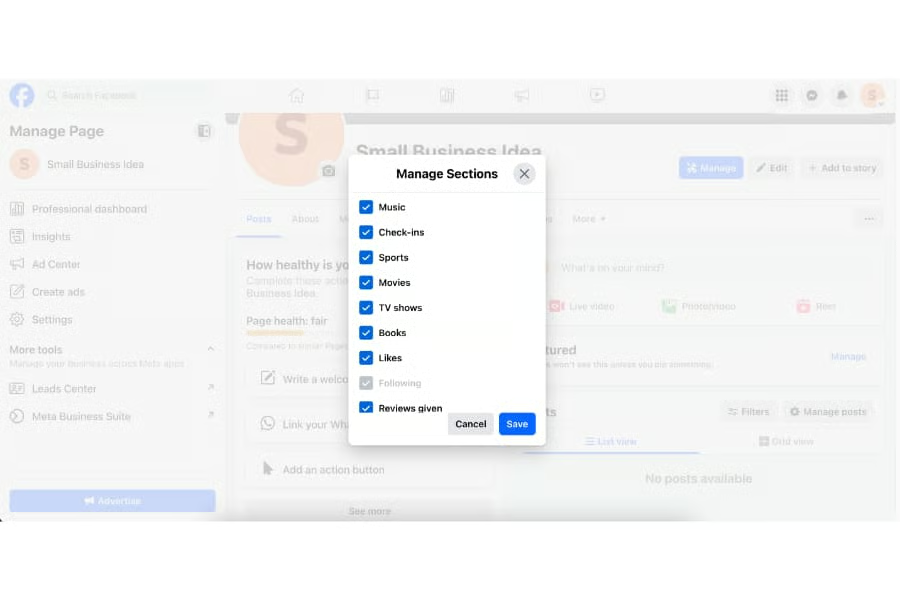
Check on the sections you want to display on your page. (Source: Facebook)


5. Add other admins to help manage your page
If you have other people to help manage your Facebook page, you’ll need to add them as admins. It’s a better option than sharing your account password because it lets you share management of your Facebook page without giving up your access. It also keeps your personal account secure.
Click Settings from the left-hand menu on your page, then choose Page Setup > Page Access in the following screens. From there, you can add or remove people to manage your page and their level of access by searching their name on Facebook.
Click Add New, then search your admins’ Facebook names and add them to your page and their page management role. There are three Facebook page management levels: Business tools only, partial access to Facebook and business tools, and full Facebook access.
- Business tools only: Allows users to post content, manage comments, and set up ads via the Meta Business Suite and Ads Manager exclusively.
- Partial access to the business tools and Facebook page: Allows full access to the business tools and to switch into the Page persona on Facebook.
- Full Facebook access: Allows full access to the page, including its business tools, Page persona, and settings.
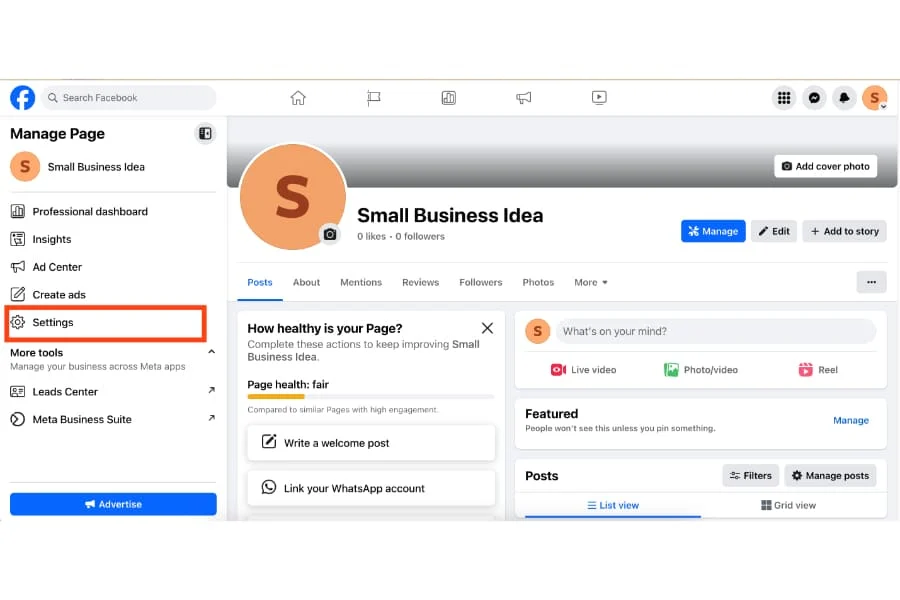
Click Settings to add people who can manage your page. (Source: Facebook) 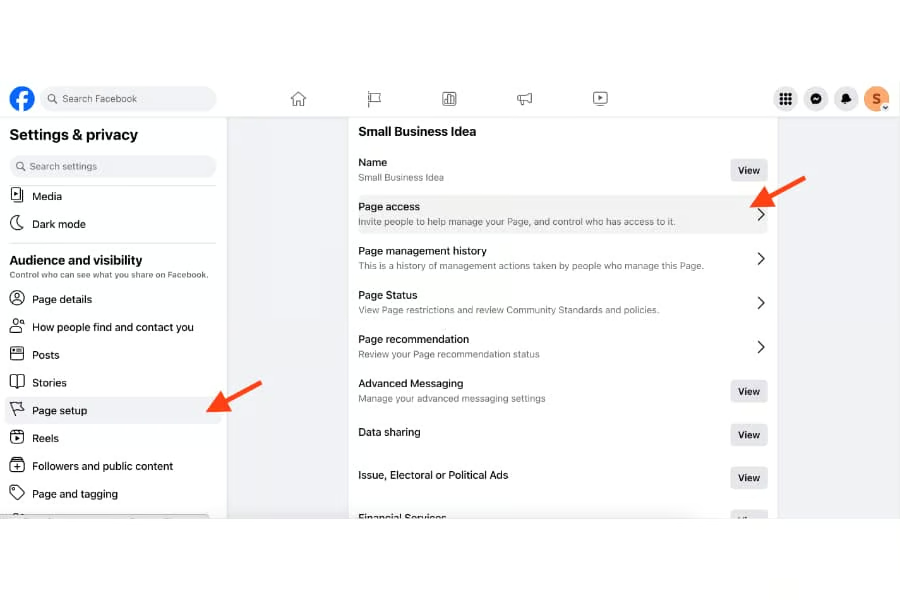
Inside your Settings, click Page Setup > Page Access. (Source: Facebook)


How to start promoting your brand-new Facebook page: My tips as a former B2C social media marketer
Learning how to set up a Facebook business account or page is just half the journey. With so much competition on social media (and Facebook in particular), you’ll need to actively promote your Facebook page to reach more people — specifically, the right people for your business.
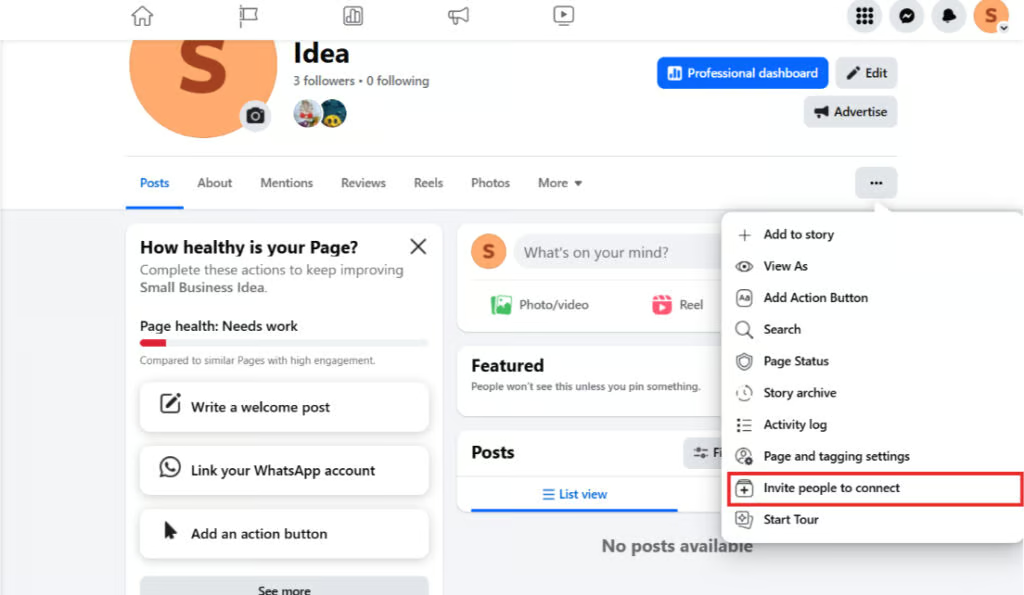
How do you start? Some easy initial steps are inviting people to like your page, joining relevant Facebook groups, and interacting with other relevant pages to start getting some visibility. Inside the ellipsis menu on your page, there’s an option to Invite people to connect, which sends an invite to people on your Friends list.
Even if not everyone “likes” your page, that’s okay. You’ll still get some visibility by popping up in their notifications.
Then, the fun part: posting content and building a community! Facebook is still the biggest social media platform in the world, which means both more opportunities and more competition. But more than anything, Facebook is all about creating community, no matter your industry.
People go on Facebook as a pastime, not with the express intent of purchasing from a brand. So, to get them interested in your business, you have to really connect with them as people, not customers.
That’s why making a business Facebook page isn’t just a one-time thing — it’s an ongoing process.
- Post content that interests your audience: Content drives social media, but good content drives authentic engagement and gets people interested in your business. Your content should address your audience’s interests, questions, pain points, and concerns.
- Find your people — and keep them engaged. Don’t try to be everything to everybody and end up being relevant to nobody. Know your core group of people you want to engage with your brand, and focus your efforts on them.
- Be genuine, not promotional: Good social media marketing is all about being genuine, not promotional. People won’t connect with a brand that constantly talks about itself. Talk to your audience and focus on their interests.
- Talk with users, not at them: One of the best lessons I’ve learned about social media is to talk with users like you’re one of them instead of a faceless brand talking at them. Follow their language, tone of voice, and online behaviors.
- Relatability and authenticity keep people interested. In an age of digital fatigue, being relatable, human, and honest can make you memorable. Always speak honestly, from campaign promotions to customer service messages.
- Comments and live videos are great for engagement. Posting isn’t everything! Getting engagement on social media also means being active in your comment sections. I’ve also found Facebook Live videos good for real-time audience engagement.
- Focus on one goal a month (or quarter). This way, you don’t exhaust yourself trying to reach too many goals but have strategic, sustainable growth.
- Set up Messenger chatbots to keep visitors engaged. But only for the initial conversation or answering FAQs. Make sure to follow up on messages with a human voice. Visitors don’t want to talk to robots on DMs — they want real human conversations.
- Post a few times a week, and find your posting cadence. Posting content on your page consistently keeps you on people’s radars. Best practices say to post once or twice a day, but I recommend monitoring your Insights tab to find the cadence and posting times that work best for your business.
- Ultimately, quality wins over quantity. More than finding your best posting frequency, prioritize posting high-quality, relevant content. Make sure every content you post either helps fulfill your business goals, offers value to your audience, or makes you relatable to your audience.
Further things to explore on your Facebook page
Now that you know the fundamentals of how to create a Facebook business page, there are dozens of other tools on Facebook that help you manage and grow your page further. These are things like a comments manager and content monetization, all of which you’ll find under your Professional Dashboard.
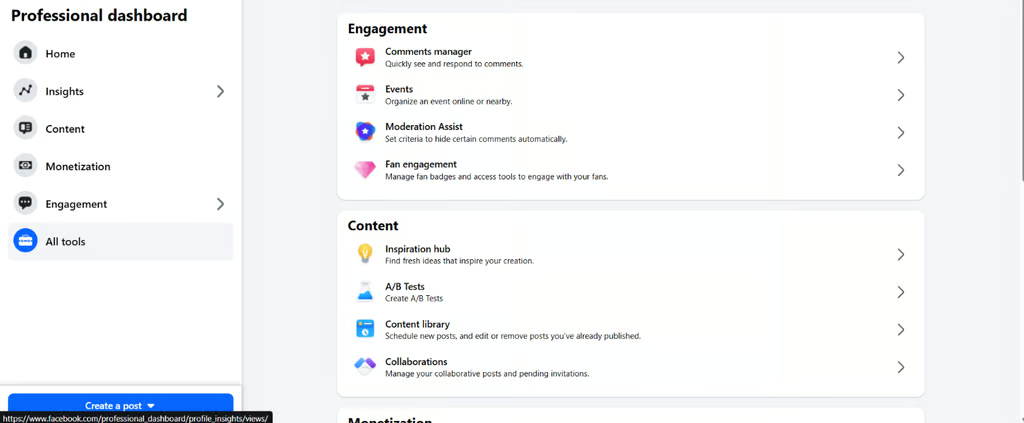
Your Facebook page’s professional dashboard is full of helpful tools to promote your page. (Source: Facebook) 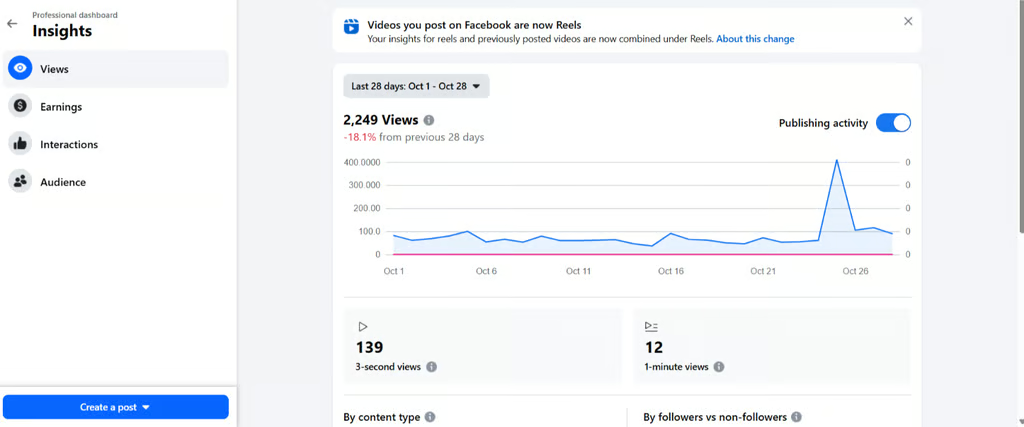
One of the most helpful is the Insights tab, which shows analytics like page views, engagement, and top-performing content. (Source: Facebook)


- Insights tab: By far my most important and used tool in any Facebook page. The Insights tab shows your post analytics, including engagement, shares, and views over time, and your best-performing content format. It’s a data goldmine — use it to guide your future strategies.
- Comments and mentions management: Aside from Insights, the comments and mentions management tool is also super helpful for seeing the kinds of comments you’re receiving and replying to them, or deleting as necessary.
- Content: This is Facebook’s native content scheduling platform. Use it to schedule posts and to see an at-a-glance view of how your content is performing across reach, views, interactions, and comments (however, if you run multiple social media platforms, I recommend using one of the best social media schedulers instead.)
- Affiliate partnerships and monetization: If you sell directly on Facebook and have a wide enough audience, Facebook lets you run affiliate programs with your followers where you earn a commission on every sale from your affiliates. If you have at least 500 followers, you can sign up for Facebook’s “Stars” program, which lets you earn money when people give “stars” to your content.
- A/B testing: Facebook also lets you run A/B tests for video content and publish the version that works best. It can be helpful for figuring out what type of video ad would work best for your audience (i.e., product demos vs testimonials).
- Events: This lets you set events on your Facebook page and invite people to them. Events can be anything from grand openings and launches to webinars, workshops, or special sales and holiday campaigns.
Frequently asked questions (FAQs)
How do I set up a business page on Facebook?
To create a business Facebook page, first log in to your personal account, then open the menu in the upper-right corner and choose Create > Page. On mobile, tap your profile picture in the bottom-right corner to find the same menu.
Then, follow the instructions to set up your Facebook page: Add your name, description, and contact information, add a profile and cover photo, then finalize your page by adding a call to action and organizing your page sections.
Does a Facebook business page have to be connected to a personal account?
Yes. You’ll need to have a personal Facebook account first before you can set up a Facebook page. The personal account that creates the page will be the main admin. However, you can also add other accounts to manage and moderate your page under Settings > Page Setup > Page Access.
Is creating a Facebook business page free?
Yes, creating a business Facebook page is 100% free. All you need is a personal Facebook account, and you can immediately create a Facebook page for a business or personal brand. There are no permits or certifications required.
Bottom line
Learning how to create a Facebook business account is one of the easiest ways to build an online presence and community, no matter the size of your business. It’s also free. Log in to your personal Facebook account, create a new page from the menu, then set up your page details.
Customize your page with more information about your business, then promote it by posting relevant content and interacting with other Facebook users.