Square’s inventory management features let you create and import items, edit variants, and adjust quantities—all from a single dashboard. Square inventory software is hosted within the larger Square point-of-sale (POS) system, which is free to use with any Square account. The POS can be accessed both through your browser and via the free Square POS iOS and Android apps.
Learn how to manage inventory with Square tools—from creating your account to enabling tracking to using your reports—and get the most out of your account with our step-by-step guide. Also, view our brief video guide:
Since we recorded this video in April 2022, there have been a few small changes to Square:
- The current Square POS interface looks slightly different on some pages, though the functions are ultimately still the same.
- You can now indicate the vendor when creating an item, though this needs an upgrade to the Plus plan.
- Inventory Reports now include one more type of report: Inventory sell-through. We detail this further down in the article.
Step 1: Create a Square Account
Before you can start using Square’s inventory management tools, you will need to sign up for a free Square account. Square offers several different point-of-sale (POS) plans for different kinds of businesses, including Square for Retail, Square for Restaurants, Square Appointments (a scheduling app that includes a POS system), and a general-purpose POS. For this guide, we will be looking at the general-purpose Square POS. However, every Square POS product has free inventory tools.
Learn more about Square and Square fees and pricing, or explore our guides to find which POS product is right for you:
If you happen to already have a Square account, all you will need to do is sign into your account on either your mobile app or desktop.
Step 2: Click on the ‘Items’ Tab on Your Main Dashboard
Before you can start managing inventory, there has to be inventory to manage. This means adding all the products you plan to sell to your inventory catalog. The Square inventory management platform makes this process extremely easy and allows you to add detailed information about each of your products.
All you will need to do is select “Items” from your home screen menu to be taken to your inventory catalog, where all your products will be listed, and you can add additional items.
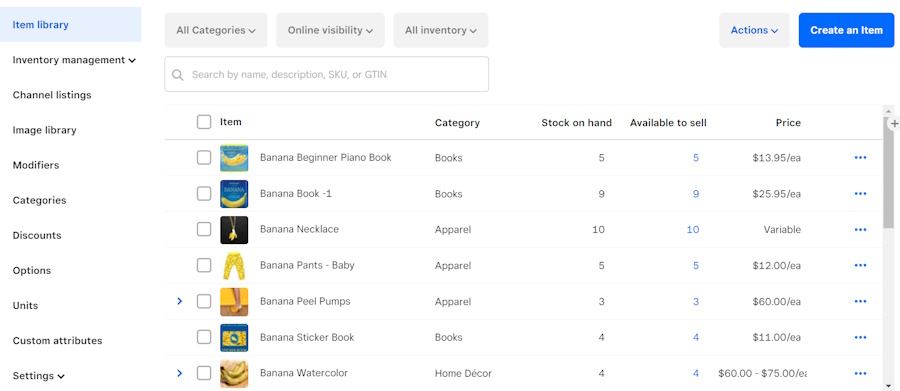
The item library lists all your existing products on one page and lets you create new items.
Step 3: Hit the ‘Create Item’ Button; Set Name & Type
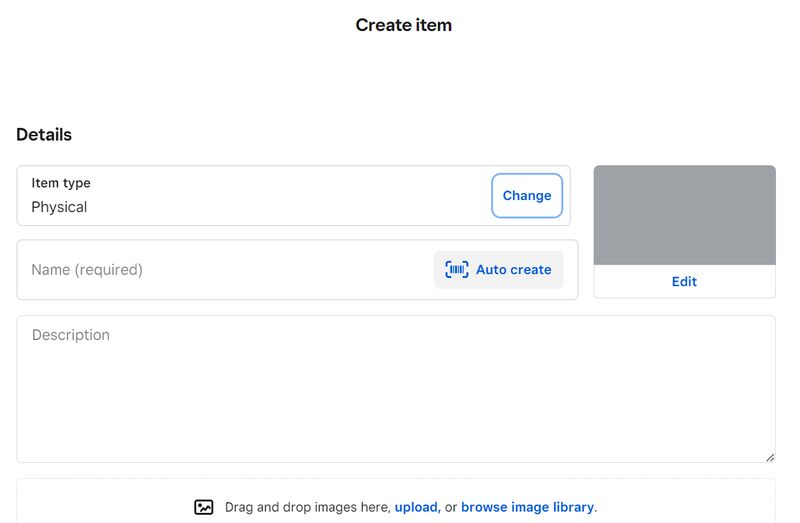
Once you are in your inventory catalog, select the “Create an Item” button. This will allow you to add new inventory items to your catalog. You will be taken to a product form where you should first add your product’s image, name, item type, description, and location(s) where sold. Proper categorization helps Square run category reports, something we will look at later in this article.
From this form, you can also decide whether you’d like this product to be a non-taxable item and whether the sale of it should be age-restricted. When it comes to adding and editing the product image, you can download Square’s free Photo Studio app. The app includes AI tools, backgrounds, and stabilizers to make your product image as sharp and appealing as possible.
Adding Items in Bulk With a CSV or XLS File
If you have an existing inventory, you can take advantage of the Square bulk inventory intake feature. Select “Actions” and then “Import Library” from your Item Library; this allows you to download a Square-compatible spreadsheet where you can fill out product information in bulk and add all your existing inventory in a single upload.
Or, if you don’t want to use the downloadable sheet, you can upload your own existing inventory list by simply dragging and dropping, then clicking “Upload.” You’ll be asked whether you intend to simply modify the stored inventory list (if there is one in the system), or overwrite it entirely.
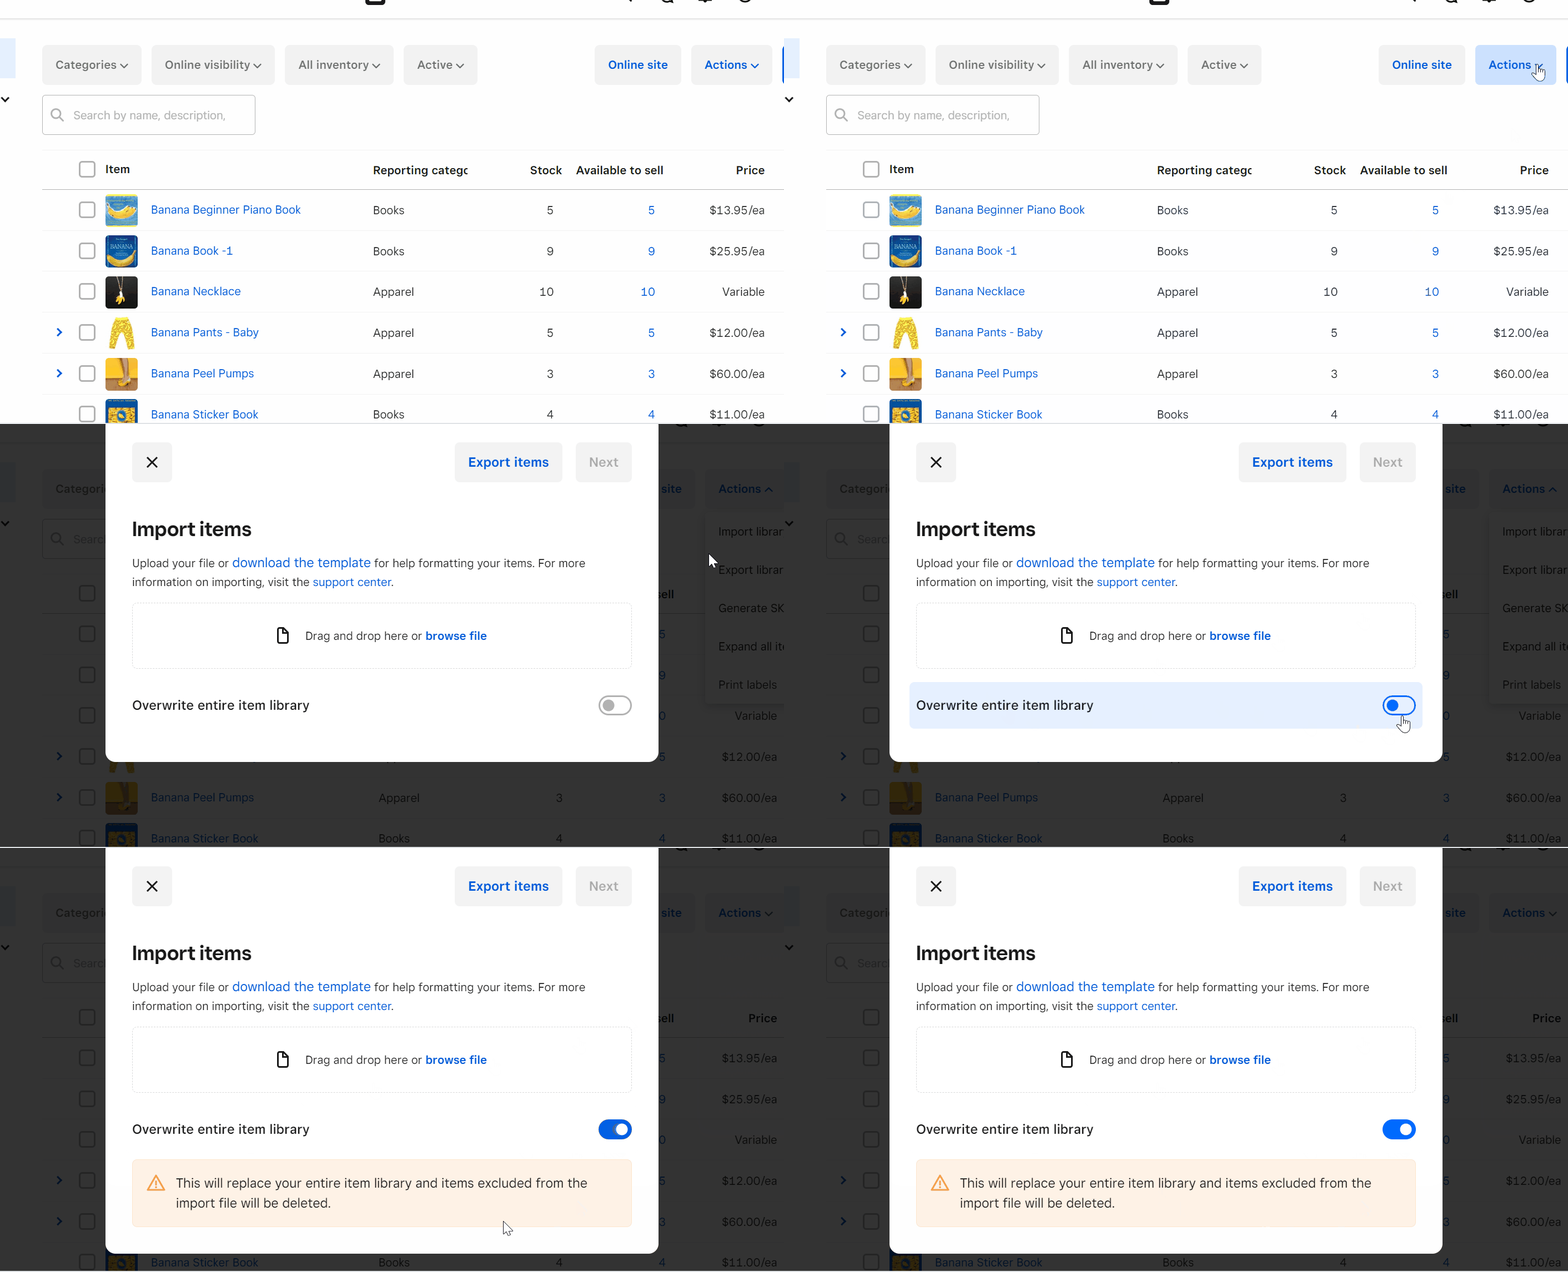
Once you’ve uploaded your inventory list using either method, click “Next.” At this point, Square might prompt you to confirm that item attributes are matched to the correct columns in your import file.
Square will take you through steps to review, edit, and approve the information. If everything looks good, click “Confirm” in the upper right. If not, fix it, and then click “Confirm.”
At this stage, your items should appear in your inventory catalog.
Step 4: Edit Image & Category
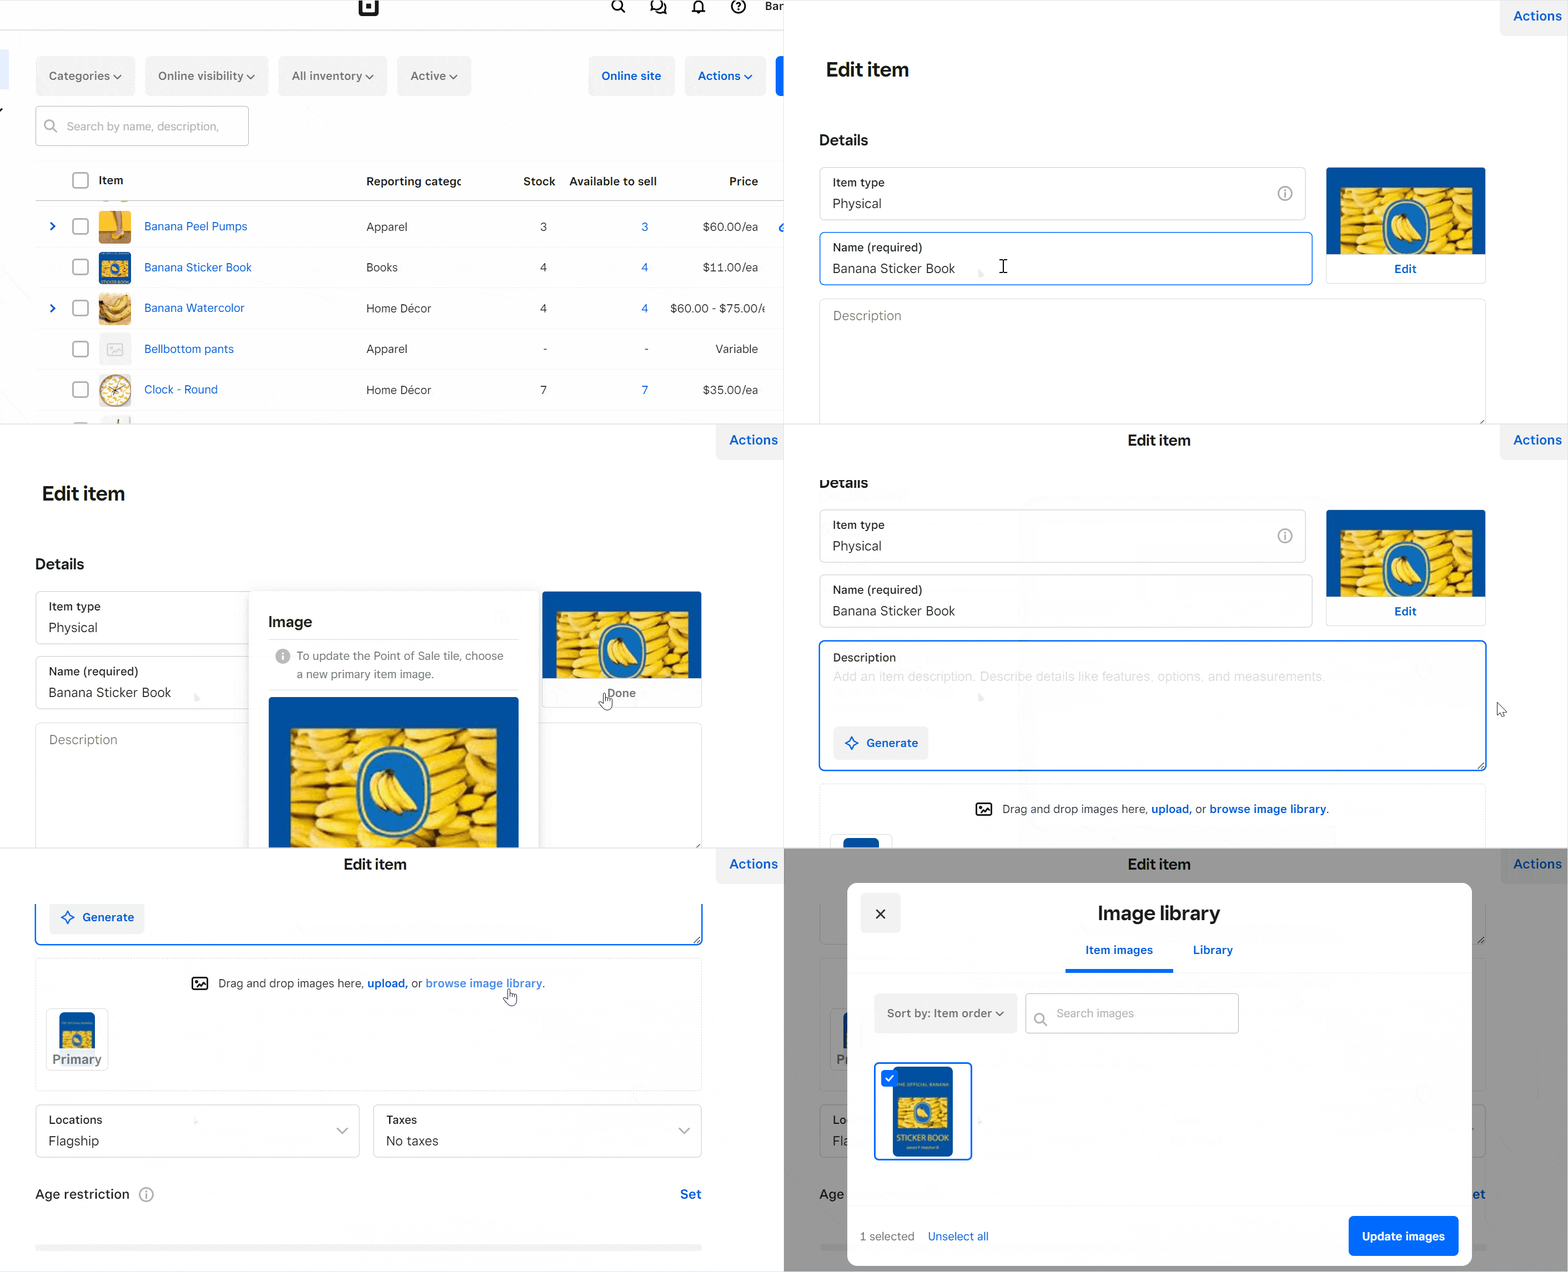
To edit your inventory item image, simply hit “Edit” under the image box of a particular item. You’ll be prompted to select a new primary item image, which will then become the tile image for that product.
You can also set each item’s categorization. Look for the “Categorization” section while editing a product, and then hit “Edit” under “Categories.” Start typing in the category under which you want this item to be filed; Square will autofill the field based on any categories you have specified previously.
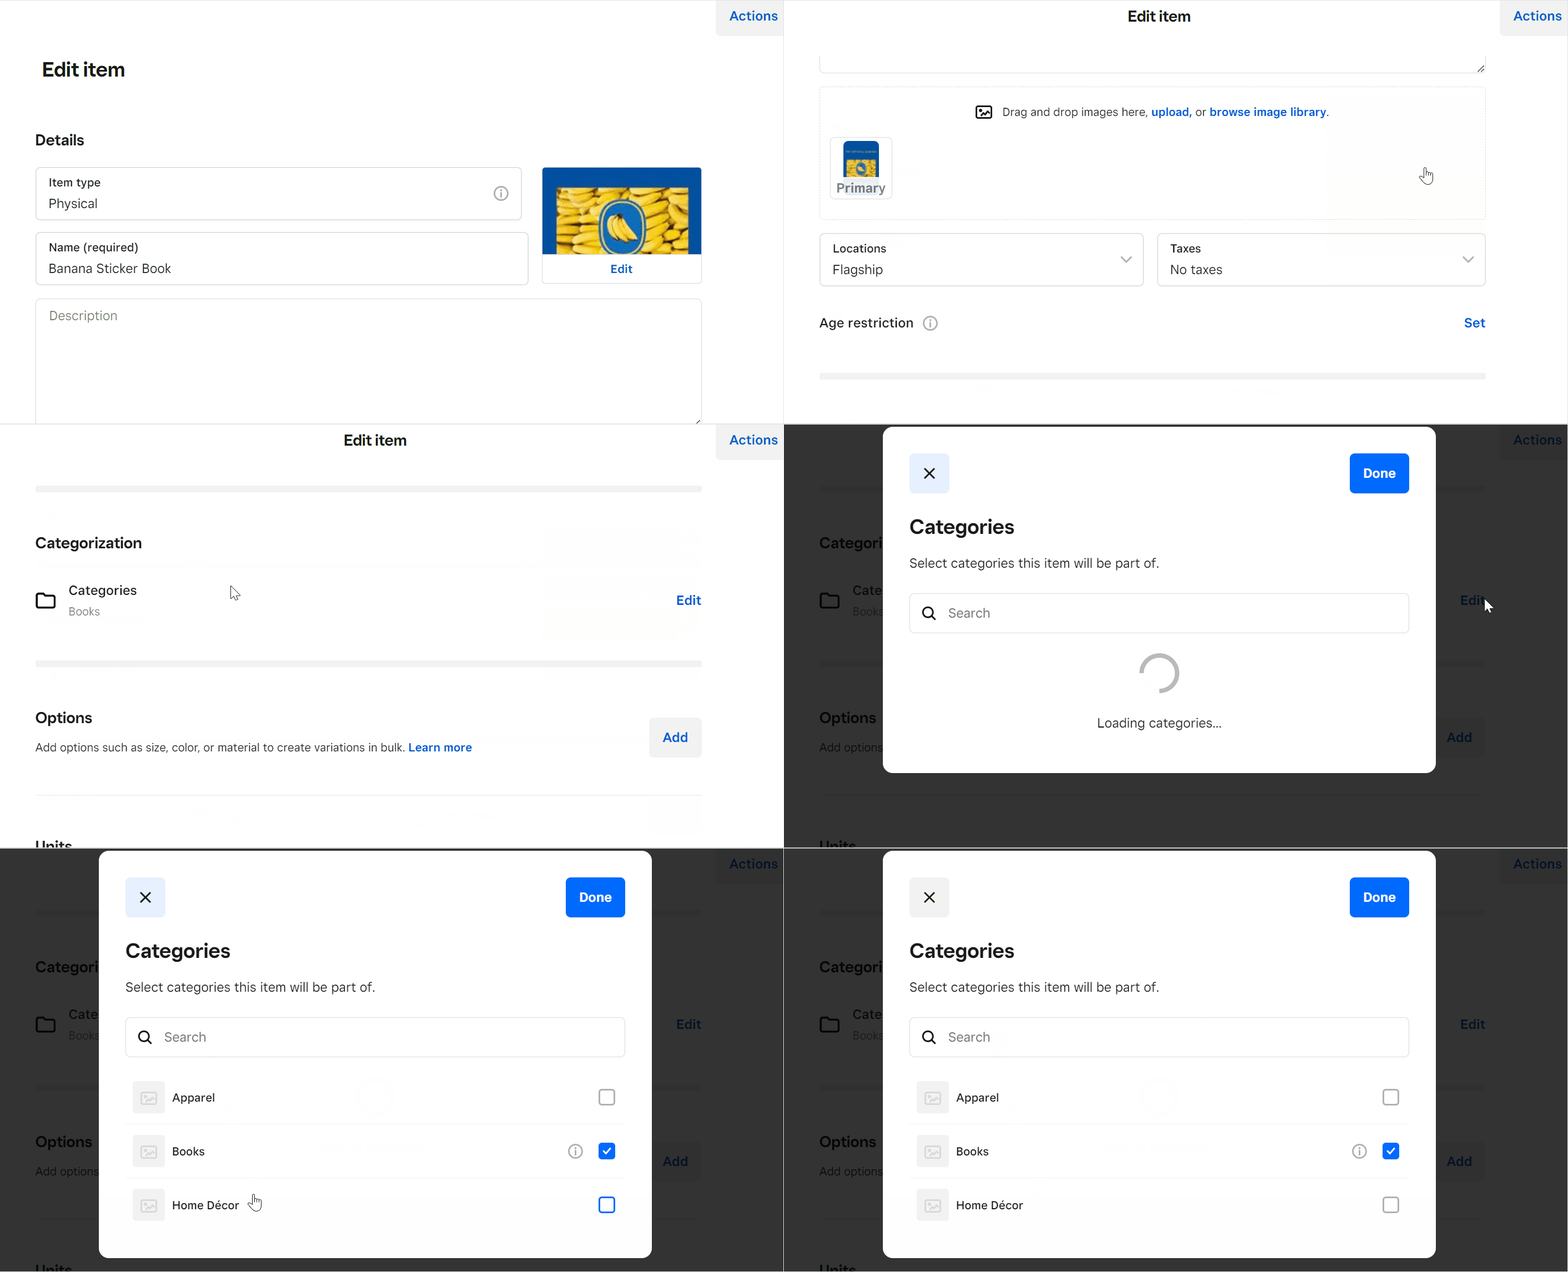
At this time, you can also fill in the product description and select which locations sell those products or services.
Step 5: Set Product Options
Scrolling down slightly on the product form, you will come to the Options section. With this tool, you can categorize item variations into “Option Sets” like size, flavor, or color, and then add specific variations under each option category. The variations will then be added to your product page under Variations as well as to your inventory list.
So, for example, a size option set would likely have variations within it for small, medium, and large. Another great feature of this tool is if you add a second option set for the same product—say color with red, yellow, and green variants—Square will create variants for each of the products automatically. For the size and color option set example, there would be small red, small yellow, and small green variants automatically, and so on for all the sizes and colors.
To begin adding options for your product, all you will need to do is select “Add Options,” and an option form will appear.
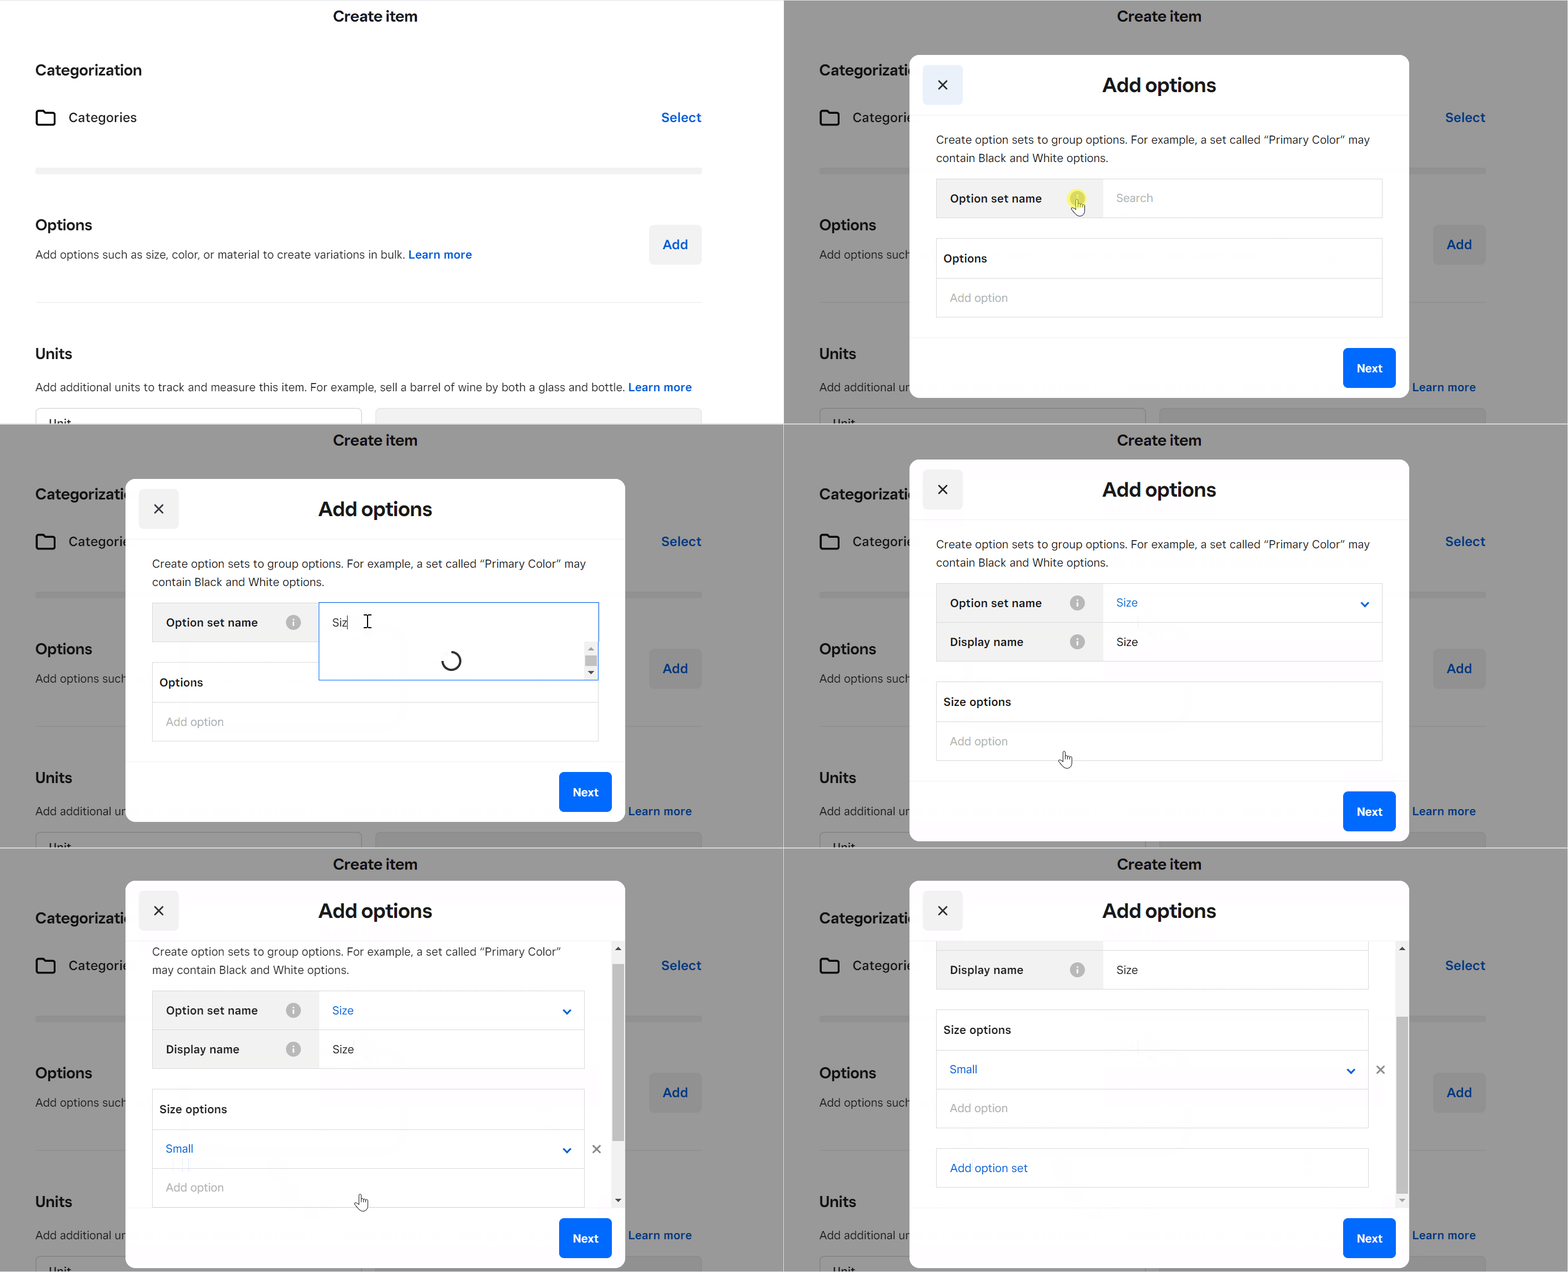
Here, you simply fill out the option set name and the individual options within the set, click next, review the variants your option set creates, and then hit “Create Variants.”
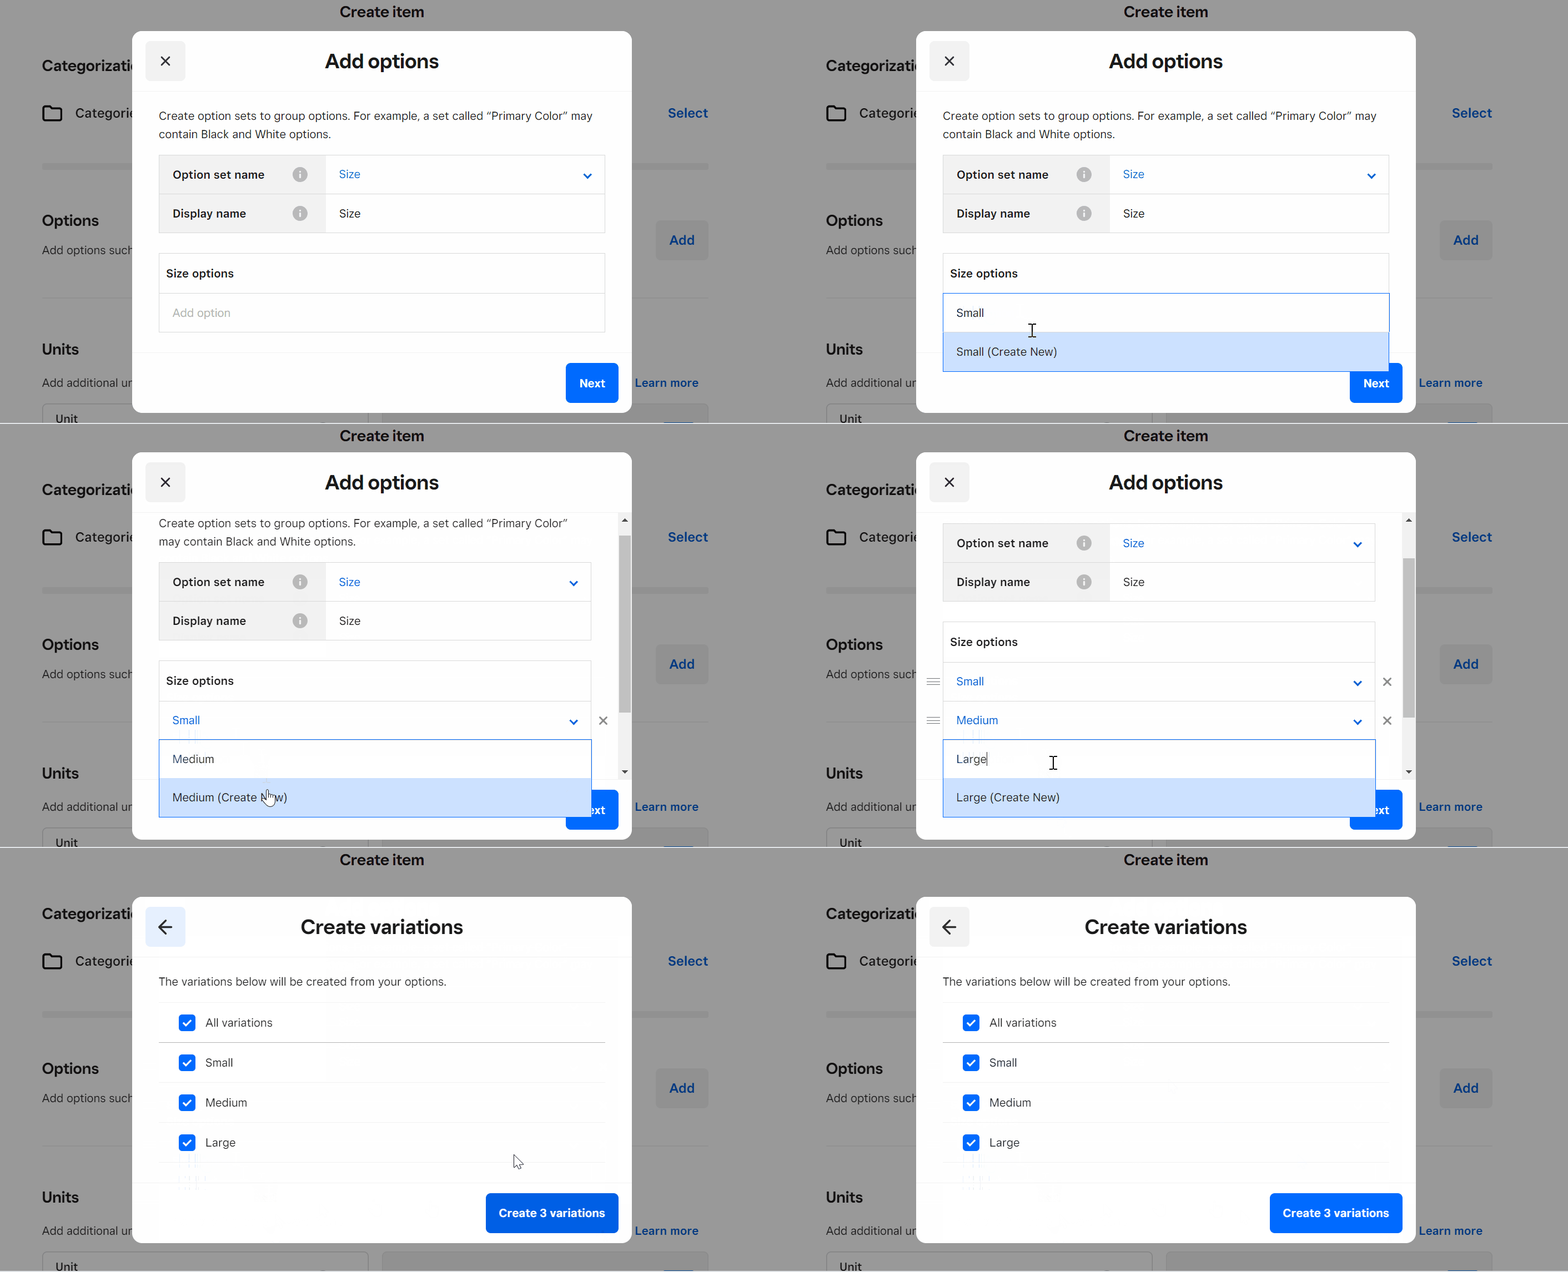
Step 6: Edit Your Variants
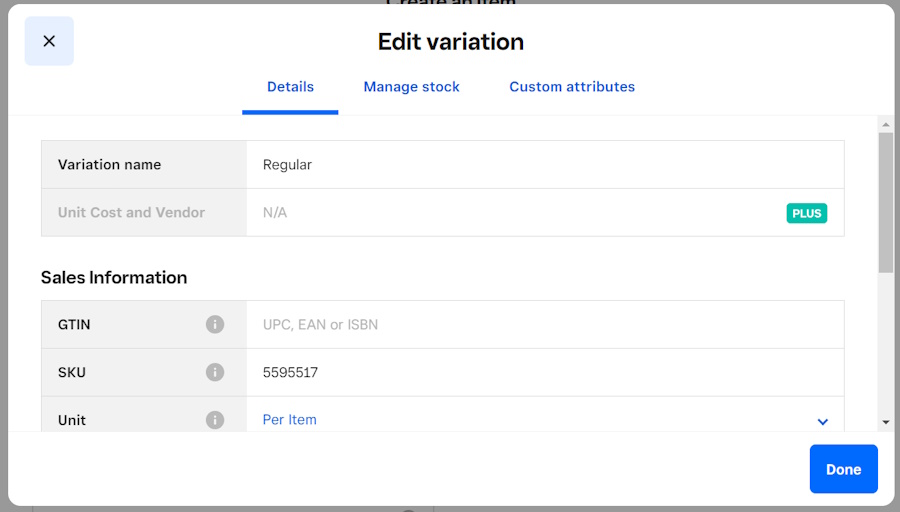
Below the Options section, you will find another similar section: “Variations.” Here is where all of your individual options will appear for you to edit. In this section, you will click on an individual product name, and a form will appear where you can input the product’s stock-keeping unit (SKU) number and pricing.
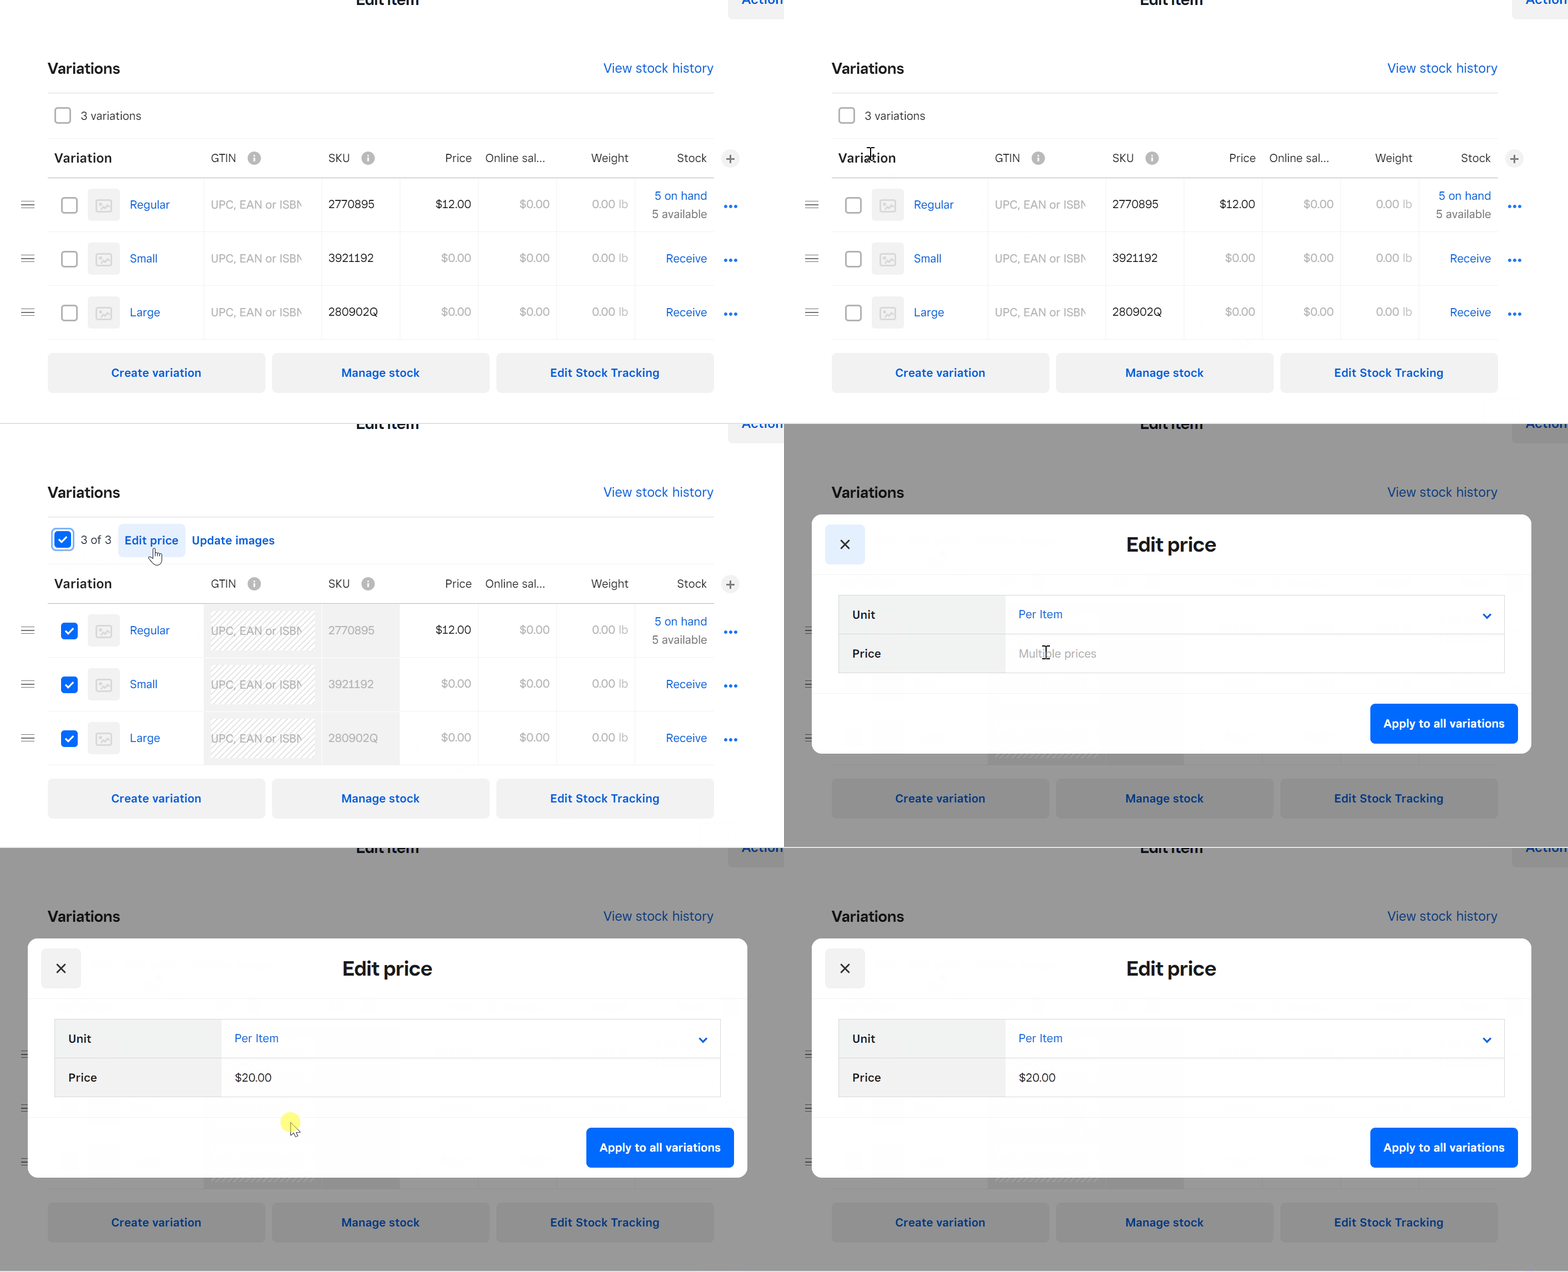
You can also set the price for multiple variants at once by selecting the variants you want to edit from your variants list and clicking “Edit Price.” Then, set your price for all variants and hit “Apply to all variations”.
Step 7: Add Quantities on Hand
Once you have filled out your product details and told Square what products you have, there is still an important piece of information that you need to add―how much of each product you have. This information is vital for Square to be able to accurately track your inventory levels and help you stay on top of your products. Choosing the appropriate stock action is important for accurate reporting and having a clear understanding of your inventory’s performance.
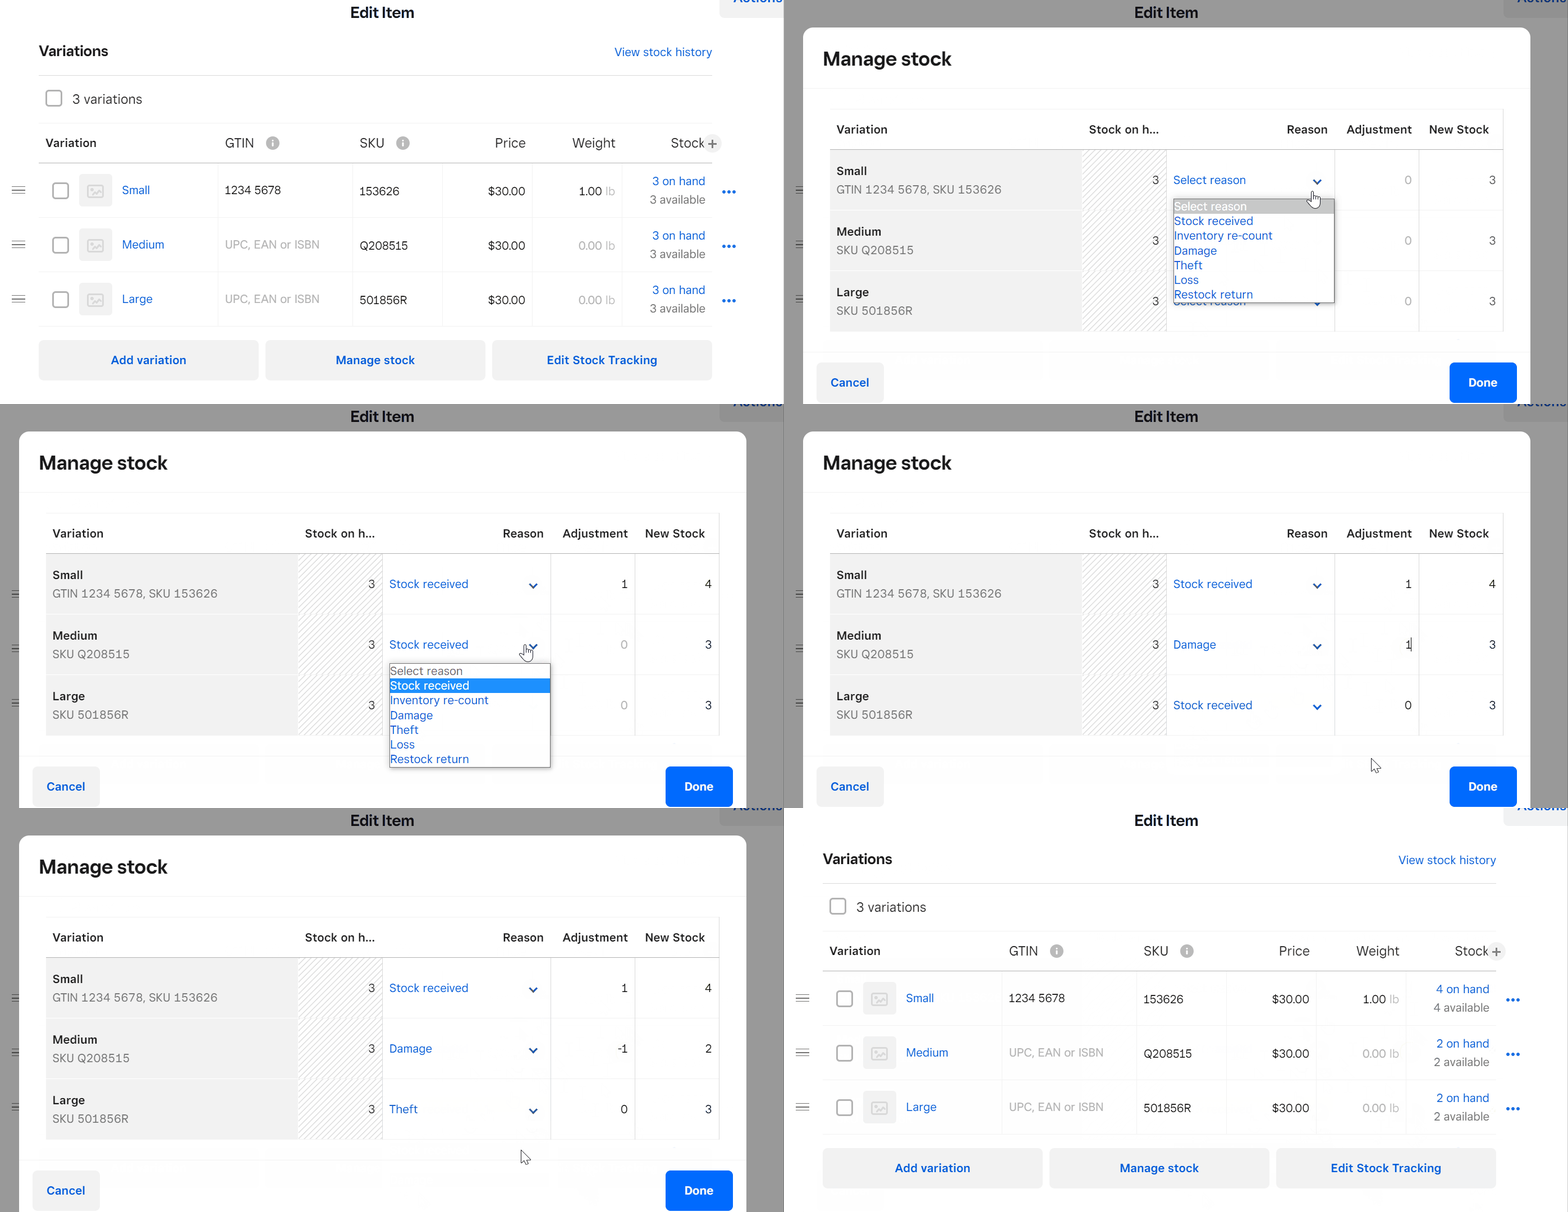
After specifying each variation’s name, SKU, and unit price, you can proceed to add quantities to each variant. Go to the “Manage stock” button under the variants list. From here, you can immediately view the stock quantities on hand and select a reason for your stock adjustment. You will have the following options:
- Stock Received: Indicates that additional stock was received from suppliers
- Inventory Recount: Used to adjust the number of products after physical count
- Damage/Theft/Loss: Indicates when products were lost for reasons other than sales
- Restock Return: Indicates that you are adding back products returned by customers
If you select “Stock Received” or “Restock Return,” the amount you specify will be added to the current stock amount. If you select “Damage,” “Theft,” or “Loss,” on the other hand, any quantity adjustment will be deducted from the current stock amount of the particular variant. Selecting “Inventory Recount” will allow you to manually update by specifying the correct stock count.
Once you have indicated the reason for your stock level adjustment, you can then input the amount by which you are adjusting your stock quantities in the “Adjustment” column. From there, you click “Done,” and your updated quantities will be added to your inventory catalog.
Step 8: Enable Inventory Tracking & Low Stock Alerts
With your quantities set and ready to go, the next thing you will want to do is allow Square to track your inventory levels and send low stock alerts. These tracking permissions allow Square to automatically deduct from your product levels as you sell items, and low stock alerts let you set a custom quantity for when you want to receive a restock alert in your inbox, telling you it’s time to order another set of the product in question.
So, for example, say that I set my low stock alert at 10 pieces for a red blouse. When there are only 10 red blouses left in stock, I will receive an alert from Square telling me that it is time to reorder. This tool is optional; however, it is extremely helpful for staying on top of your products and ensuring you never face a stockout.
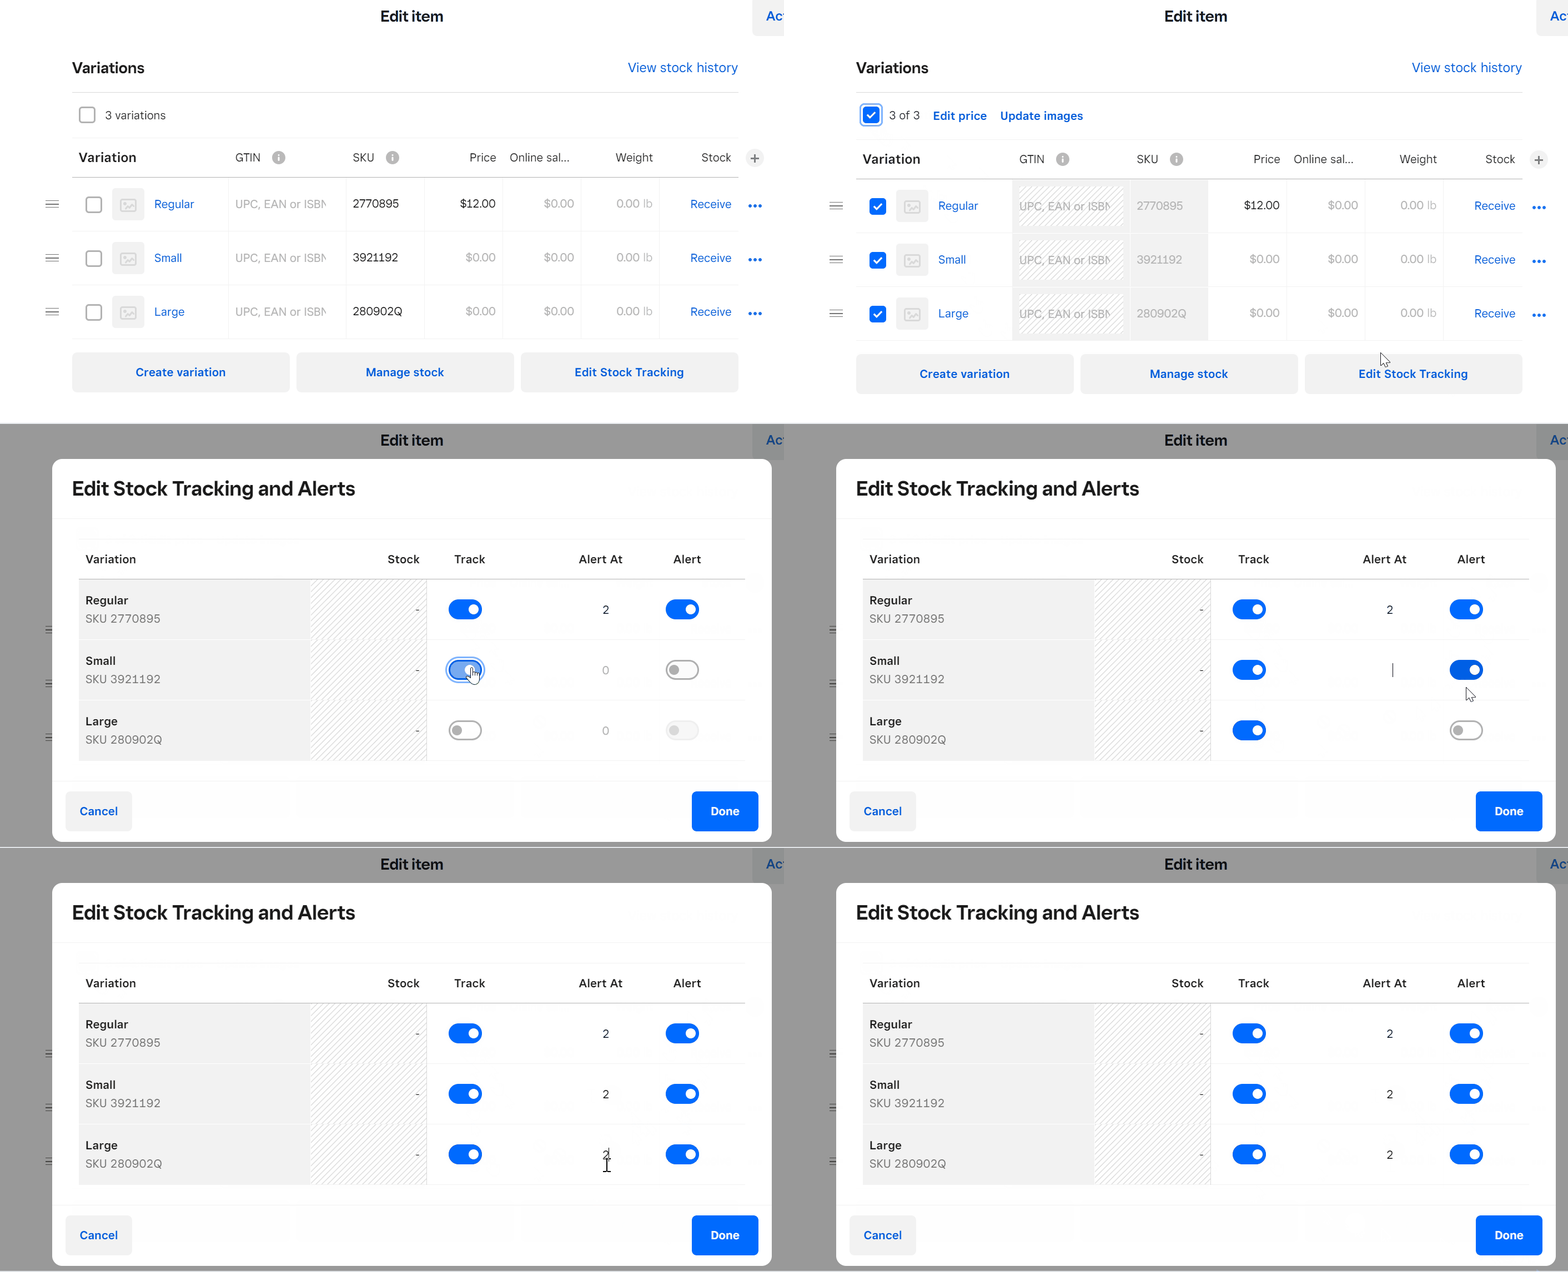
Allowing for tracking and low stock alerts is easy. From the Variations section on the “Edit item” page, hit the “Edit Stock Tracking” button. Then, click the track option to “On” for any variants you want to track and look to the right to do the same for the Alert option. There is a field where you can input the quantity at which you want a low stock alert. At this point, all that is left to do is hit “Done.”
The same tool works in the same way if you’re using Square to manage a restaurant; low stock alerts will let you know when you’re low or out of a specific dish. Square will periodically send you these alerts as long as the stock remains below the level you have set, until either the stock is replenished or you turn off the alerts.
Step 9: Review & Save
Once you have filled everything out, all that’s left to do is a final review. If your inventory item is good to go, just hit the “Save” button at the top right corner of your screen, and your changes will be saved.
In case of errors, you can always edit your product list at any time simply by selecting the item from your inventory catalog. The Square inventory management platform will take you right back to its product page, where you can edit any field you need.
Step 10: Manage Inventory With Inventory Reporting Tools
With your items logged into your Square POS inventory system and your tracking permission on, the software will take the lead. Square will track, analyze, and report on your inventory so that you can make better decisions and stay on top of your business.
Users with a Square for Retail Plus subscription ($89 per location, per month) can access advanced inventory reports. All you need to do is select the “Reports” option on your home screen sidebar and then scroll down to “Inventory Reports.” Here you will have access to several reports that are detailed below.
Cost of Goods Sold
It costs money to manufacture and sell each product. The cost of goods sold (COGS) report tells you how much it costs you to make an item. This helps inform your pricing strategy and gives you an idea of what kind of total revenue and profit margin you can expect. When you calculate COGS, you include direct expenses for any materials used in production and labor, excluding indirect costs like fulfillment or marketing.
Vendor Sales
The Vendor Sales report tells you which vendors supplied products sold during a specified period. This report helps you see which vendors have products that are most and least popular with your customers. You may want to reassess vendors with consistently low-performing products while exploring the product catalogs of vendors with high-performing items.
Projected Profit
The Projected Profit report uses data from previous store performance to estimate the potential profitability of your store in the future. You can break down projections based on store location, product, and inventory category, among other parameters.
Inventory by Category
Inventory by Category is a reporting tool that shows you the value of your inventory divided by category. The reports include your cumulative inventory value, potential profit, and profit margin by item category. This tool is a great way to better understand how certain types of products are performing so that you can better understand your target market and make better buying decisions in the future.
Inventory Sell-through
With this tool, you can monitor your items’ sell-through rate and check it against your quantity on hand. You’ll also have access to related reports and actions such as sales forecasting, purchase ordering, discount setup, and marketing campaign creation. These data points can help you make decisions for when and how much stock to order, plus what pricing to set for each item.
Frequently Asked Questions (FAQs)
Click through the following sections to learn more about Square Inventory’s functions, setup, and pricing.
Square Inventory is a software tool used for managing inventory. It is part of the larger Square point-of-sale system. You can perform inventory management with Square regardless of the POS type you are using (Retail, Restaurants, Appointments), and it is accessible via browser and Android or iOS apps.
To summarize the process very briefly: create items; assign categories and images; set options and variants; set quantities; set tracking and alert preferences.
Some inventory features are free, but not all. You’ll need to upgrade your Square for Retail POS subscription to access features like inventory counts, bulk intake, product bundles, smart forecasts, and vendor management.
Go to your Square dashboard’s Item Library, select “Actions” and then “Import Library.” You can then download and fill out an inventory spreadsheet. You can also upload a spreadsheet containing your own existing inventory list.
Bottom Line
Square inventory management tools will help you run your business more effectively and efficiently. As you sell through your stock, Square will adjust your inventory reports automatically and help you understand how products are performing so that you can make wiser business decisions and drive your bottom line. With the tools in this article, you are ready to start taking advantage of all the tools for managing inventory with Square and to watch your business flourish.
