

Setting up Square POS is relatively simple, but the right setup depends on your business type, sales channels, and hardware needs. This Square tutorial walks you through how to create your account, link deposits, download the Square POS app, choose hardware, add products or services, customize checkout settings, and run your first test sale.
Square setup usually takes less than an hour if you have your business details, bank account, product list, tax settings, and device ready. Retailers with large catalogs, restaurants with menus and modifiers, or businesses setting up multiple locations may need more time.
Create a free Square account and follow along my step-by-step guide below.
- Square tutorial at a glance
- Step 0: Before you set up Square
- Step 1: Sign up for a free Square account
- Step 2: Link your bank account and set up deposits
- Step 3: Download the Square POS app and choose your hardware
- Step 4: Add your products or services
- Step 5: Customize your checkout settings
- Step 6: Run a test sale and go live
- Post-setup: Explore optional Square tools
- Common Square setup mistakes to avoid
- Square setup troubleshooting
- Frequently asked questions (FAQs)
- Bottom line
Square tutorial at a glance
| Step | What you’ll do | Time estimate |
|---|---|---|
| 0 | Gather business, banking, tax, item, staff, and hardware details | 10–20 minutes |
| 1 | Create a free Square account | 5–10 minutes |
| 2 | Link your bank account and choose deposit settings | 5–10 minutes |
| 3 | Download the Square POS app and choose hardware | 10–20 minutes |
| 4 | Add products or services | 15–60 minutes |
| 5 | Customize checkout settings | 10–30 minutes |
| 6 | Run a test sale and go live | 5–10 minutes |
This Square POS setup guide is for:
- New small businesses setting up Square POS for the first time
- Retailers adding items, taxes, receipts, and checkout settings
- Restaurants, cafes, food trucks, and service businesses choosing a Square setup path
- Mobile sellers using Tap to Pay, Square Reader, Square Terminal, or Square Handheld
- Businesses switching from cash-only sales or another POS system
- Sellers that want to start with Square Free and add more tools later
Step 0: Before you set up Square
Before you start creating your Square account, take a few minutes to gather the information and tools you’ll need. Doing this upfront can make setup faster and help you avoid having to go back and change important settings later.
Gather what you need before you start
Use this checklist before beginning your Square POS setup:
☐ Business email address: Use an email you can access easily since Square will use it for account verification and notifications.
☐ Legal business information: Have your business name, business type, address, and tax information ready.
☐ Personal identification details: Square may ask you to verify your identity during setup.
☐ Bank account information: You’ll need your routing and account numbers to link a bank account for deposits.
☐ Phone, tablet, or computer: Square can work on mobile devices, tablets, and desktop browsers, depending on how you plan to sell.
☐ Product or service list: Prepare your inventory, service menu, or pricing list so you can add items faster.
☐ Sales tax settings: Know the tax rates you need to charge based on your location and business type.
☐ Receipt and refund policy: Decide what you want customers to see on receipts and what your return rules are.
☐ Staff details: If employees will use the system, have their names and roles ready so you can set permissions later.
☐ Hardware plan: Decide whether you’ll use Tap to Pay, a mobile card reader, or a full countertop setup.
Choose your Square setup path
Your Square setup should match how you sell. A mobile seller does not need the same workflow as a restaurant, and a service business will likely need different tools than a retail store.
| If you are a… | You need.. | My Square software recommendation |
|---|---|---|
| Restaurant or cafe | Menu, modifiers, taxes, and tips | Square for Restaurants |
| Service business | Services, booking, staff, and deposits | Square Appointments |
| Online seller | Website, checkout, pickup, delivery, or shipping | Square Online |
Choose the right Square Plan first
Before you build out your account, decide which Square plan makes the most sense for your business. Square’s pricing is centered on three main software tiers: Square Free, Square Plus, and Square Premium.
For many small businesses, Square Free is enough to get started. But if you need more advanced retail, restaurant, or appointment features, it is worth reviewing the paid tiers before you begin, so you do not have to rework your setup later.
| Square plan | Best for | Monthly fee | Inclusions |
|---|---|---|---|
| Square Free | New and small businesses that want to start taking payments quickly | $0 | Free POS, online site, item library, invoicing, booking, checking and savings accounts |
| Square Plus | Growing businesses that need more advanced tools | $49 | Everything in Free + industry-specific POS features, lower processing fees, loyalty rewards program, email and text message marketing, staff management |
| Square Premium | Larger or more complex businesses | $149 | Everything in Plus + 24/7 priority support, advanced reporting, lowest processing fees, more text message marketing, no gift card load fees |
If you are not sure where to begin, Square Free is usually the easiest starting point. But if your business depends on more specialized workflows, such as restaurant operations, more advanced retail inventory tools, or appointment-based scheduling, reviewing Square Plus upfront can save time later.
Decide how you’ll accept payments
You do not need to choose your exact Square hardware yet. For now, just think about the type of payment setup that makes the most sense for your business, since that will affect your setup process, costs, and how you plan to use Square.
For example, some businesses can start with Tap to Pay on a compatible phone and begin accepting in-person payments without buying extra hardware right away. Others may prefer a mobile card reader for selling on the go, while businesses with a permanent checkout counter may eventually want a Square Terminal, Square Register, or a full POS station with accessories like a receipt printer, cash drawer, or barcode scanner.
At this stage, you only need a general idea of how you want to take payments. You can compare specific Square hardware options later, once your account is set up and you have a better sense of your workflow.
| If you are a… | You need.. | My Square software recommendation |
|---|---|---|
| Mobile seller | Phone-based checkout | Tap to Pay or Square Reader |
| Pop-up shop | Simple mobile POS | Square Reader or Square Terminal |
| Retail store | Item library and inventory setup | Square Stand, Square Terminal, or Square Register |
Step 1: Sign up for a free Square account
The first step in learning how to set up Square POS is creating your free Square account. Unlike some point-of-sale systems that require a separate merchant account, professional installation, or a longer approval process, Square combines payment processing,merchant services, and POS software in one system, so you can get started faster.
To begin, visit Square’s website and click Get Started. Enter your email address, create a password, and select your country. From there, Square will guide you through the signup flow and collect the information needed to start setting up your account.
At this point, focus on creating your account and entering your details accurately. You can adjust many of your settings later as you continue building out your Square POS system.
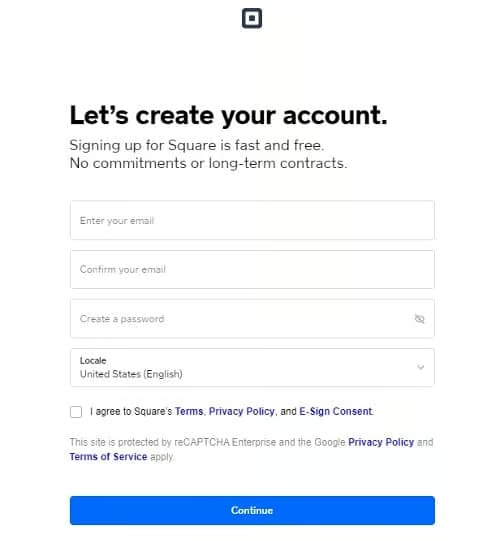
Step 1 in creating a free Square account is entering your email address and creating a password. (Source: Square) 
Square prompts you to add additional services before you continue with your account creation. 
Square recommends setting up 2-step verification, which you can do in the accounts and settings dashboard later. (Source: Square)


Related: How to Set Up a POS System
1.1 Enter your business information
As part of the sign-up, Square will ask you to enter basic information about your business. This includes your business or personal name, along with other details needed to create your account and personalize your setup.
Square will also ask you to choose your merchant type:
- Individual: Best for sole proprietors and people accepting payments from casual or occasional sales
- Business: Best for registered business entities, including partnerships, LLCs, corporations, nonprofits, and religious organizations
It is important to classify your business correctly. Choosing the wrong merchant type can lead to avoidable issues later, including verification delays or fund holds. For example, if your business is registered as an LLC or corporation, you should sign up as a business rather than as an individual.
You will also enter the name that customers will see when they pay you. This can usually be updated later in your Square Dashboard if needed.
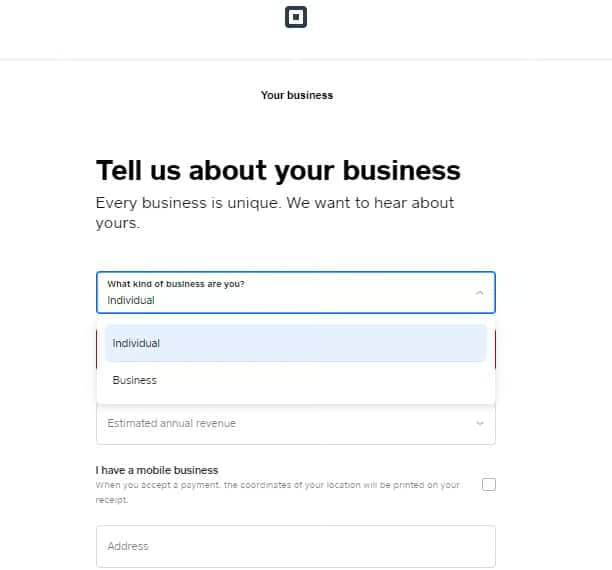
Specify your merchant type and business name. After setup, you can always go back and change your business name in the Square Dashboard under “Accounts & Settings.” (Source: Square) 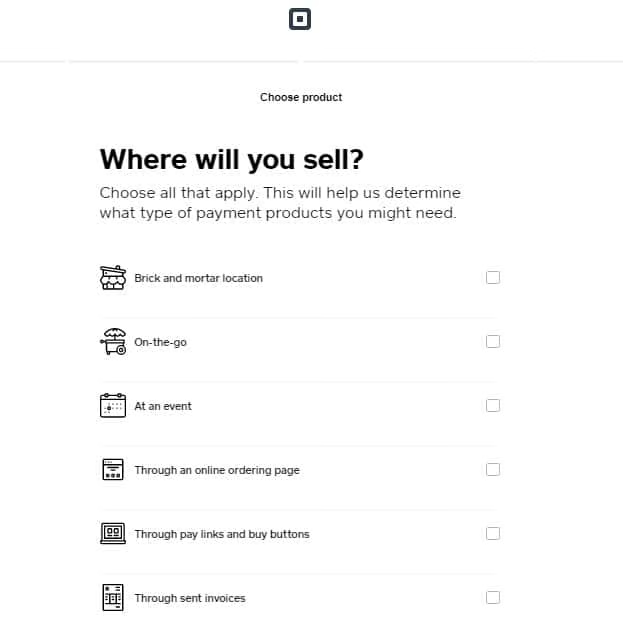
If you don’t see an option that describes your business, select “I Don’t See My Business Type.” You’ll then be able to choose a more general option from a drop-down menu. (Source: Square)


1.2 Tell Square how you plan to sell
Next, Square will ask how you plan to use the platform. This helps tailor your account setup and surface the tools most relevant to your business. Depending on the setup flow, you may be asked whether you plan to sell:
- In person
- Online
- By invoice
- Through appointments
- Through a combination of sales channels
Choose the options that best reflect how you currently sell. If your business expands later, you can usually add more sales channels and tools from your Square Dashboard.
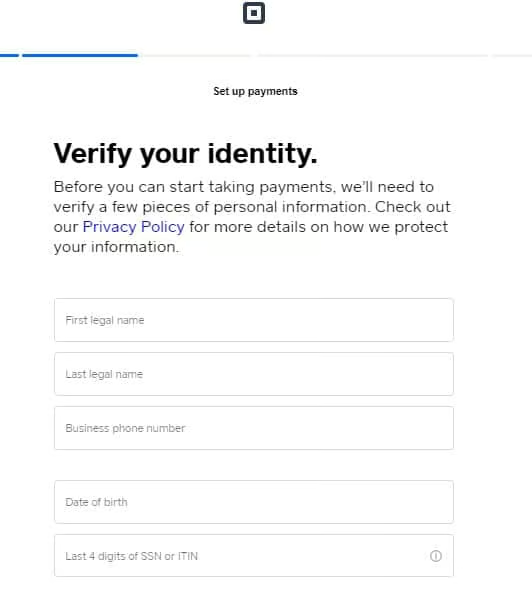
1.3 Verify your identity
Square may also ask for personal and business details to verify your identity and confirm that your account can process payments. This is a normal part of the setup process and helps Square meet financial compliance requirements.
Be prepared to provide identifying information for yourself and, if applicable, your business. Enter everything carefully and make sure the details match your official records to reduce the chance of delays.
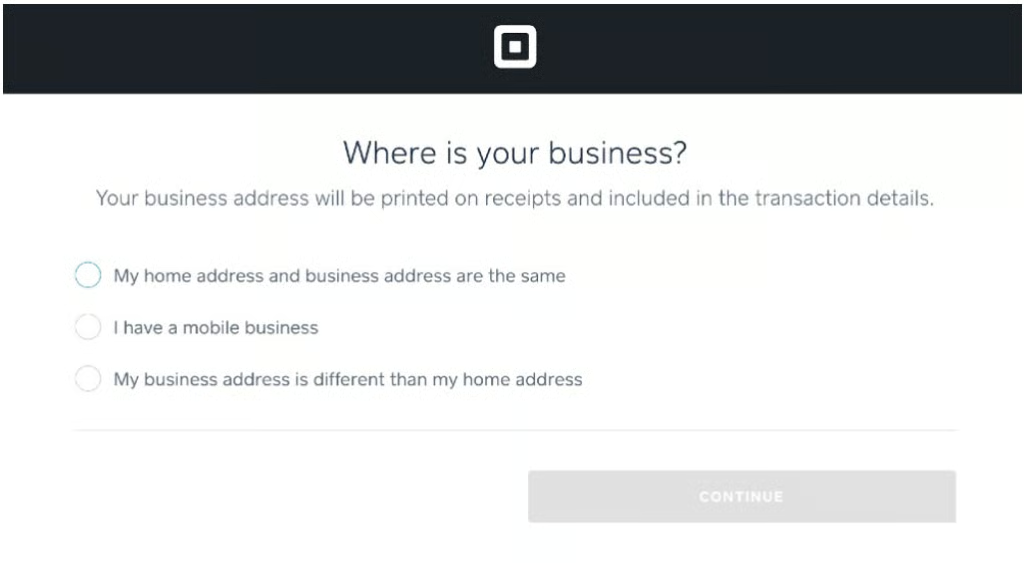
1.4 Add your primary business location
As you continue through signup, Square will ask for your main business location. This step helps Square apply the right settings for taxes, receipts, reporting, and other account functions.
If you operate in more than one place, start with your primary location. You can add additional business locations later once your account is active and your main setup is complete.
Step 2: Link your bank account and set up deposits
After creating your Square account, the next step is deciding where you want your sales revenue sent and how quickly you want to receive it. Setting up deposits early is important because it affects your cash flow from day one.
Square will prompt you to choose a deposit option and connect a bank account during setup. For most businesses, linking a bank account and using the standard deposit schedule is the simplest option. If you need quicker access to funds, you can also review faster transfer options based on your business’s cash flow needs.
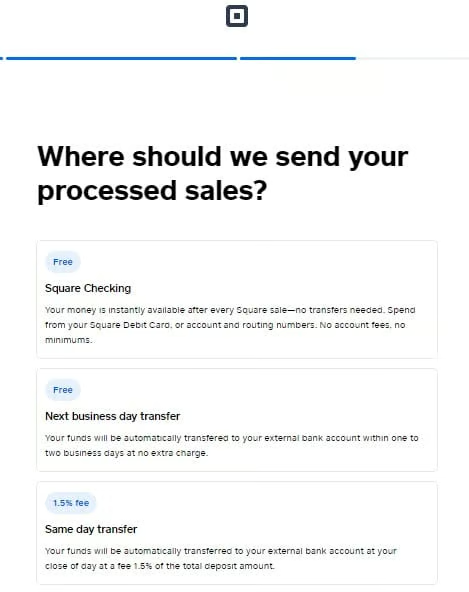
2.1 Choose how you want to receive deposits
Before linking your account, think about how often you want to receive your funds and how quickly you need access to them. In general, your deposit options may include:
- Standard deposits: Best for businesses that are comfortable receiving funds on Square’s regular transfer schedule
- Faster transfers: Best for businesses that want quicker access to daily sales
- Square Checking: Best for sellers who want to keep funds within Square’s ecosystem and access money faster
If you are not sure which option to choose, the standard deposit schedule is usually the easiest place to start. You can adjust your transfer settings later if your needs change.
2.2 Link your bank account
Once you choose a deposit method, follow the prompts to connect your bank account. You will typically need your bank routing number and account number to complete this step.
Before you submit your information, double-check that everything is entered correctly. Even a small mistake can delay deposits and create extra verification steps later. Have these details ready before starting:
- Bank routing number
- Bank account number
- Debit card details, if applicable
- A general idea of how often you want to receive deposits
If you do not have your banking details ready, you can usually come back and finish this step later. However, your account will need a verified deposit method before Square can transfer your funds. If you operate multiple locations, you must also designate a bank account for each location.
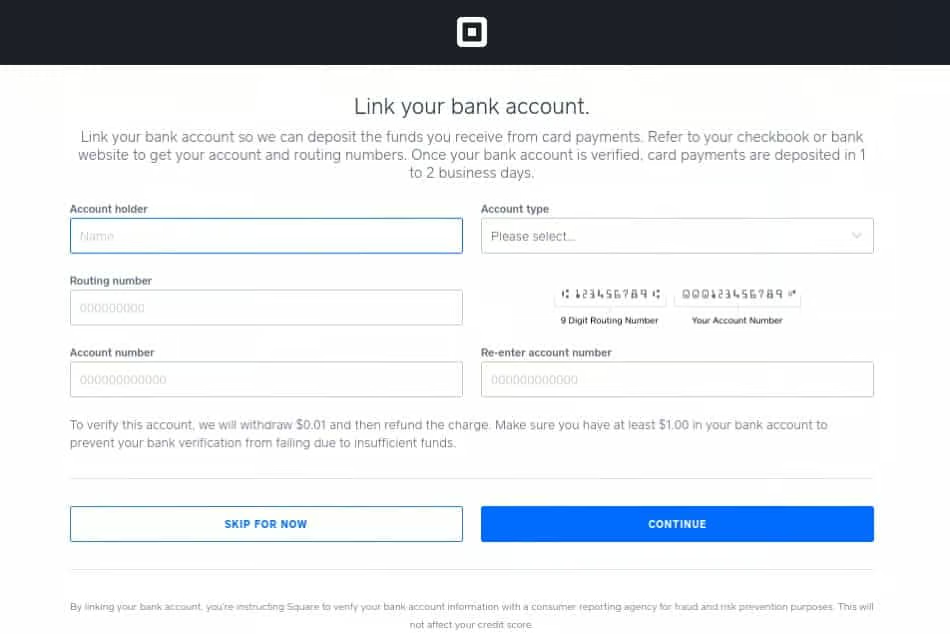
It’s important to link your business bank account with Square so that you can deposit the money you make from sales. (Source: Square) 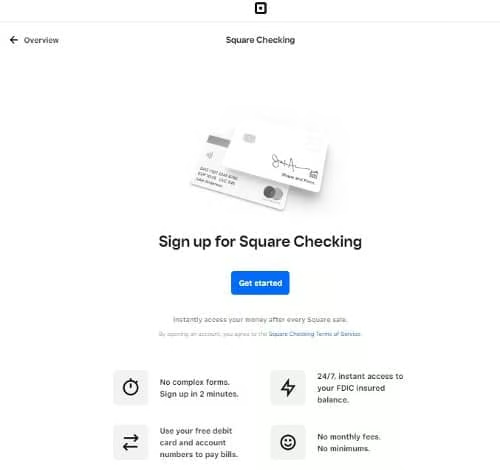
You also have the option to sign up for Square Checking to receive your funds instantly. (Source: Square)


Square’s own banking service, called Square Checking, provides a traditional bank account. Opening a Square Checking account allows you to automatically transfer sales into your account and instantly access them via debit card, digitally or in person.
2.3 Confirm your deposit settings
Before moving on, review your deposit preferences to make sure they match how you want to manage incoming payments. If you run multiple locations, be sure each one is connected to the correct account if needed.
Once your bank account and deposit settings are in place, you are ready to move on to downloading the Square app and setting up how you want to accept payments.
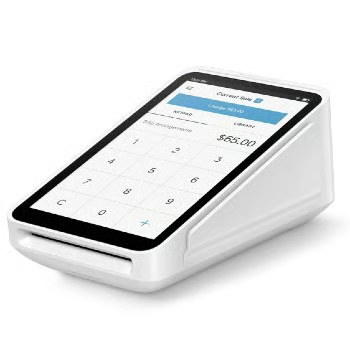
Step 3: Download the Square POS app and choose your hardware
Once your account and deposit settings are in place, the next step is setting up the device you will use to run Square. The Square Point of Sale app works on phones and tablets, and Square also offers dedicated hardware for businesses that want a more complete checkout setup.
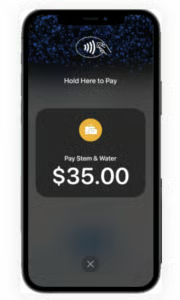
If you are still waiting on hardware, you can begin accepting in-person contactless payments with Tap to Pay on iPhone or Tap to Pay on Android on supported devices. If you set up Square Online, you can also set up QR codes and online payments.
Start by downloading the Square Point of Sale app on the phone or tablet you plan to use for checkout. Then, sign in with the same email address and password you used when creating your account. Before buying accessories or dedicated devices, it is worth checking whether your phone or tablet is compatible with the setup you want to use.
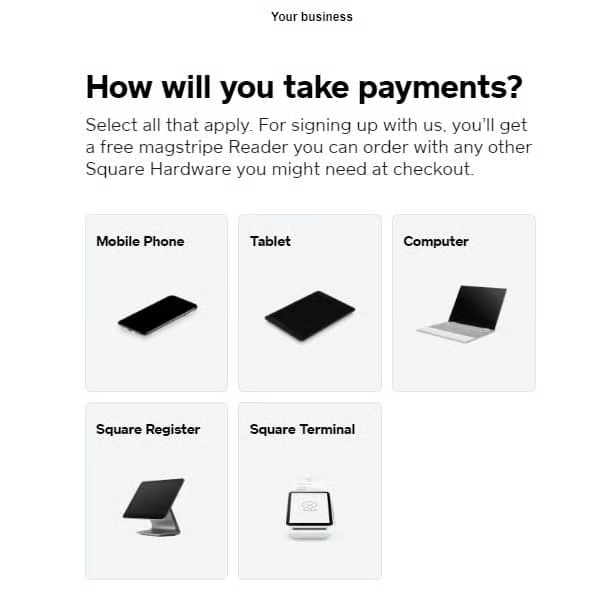
3.1 Choose the right hardware for your business
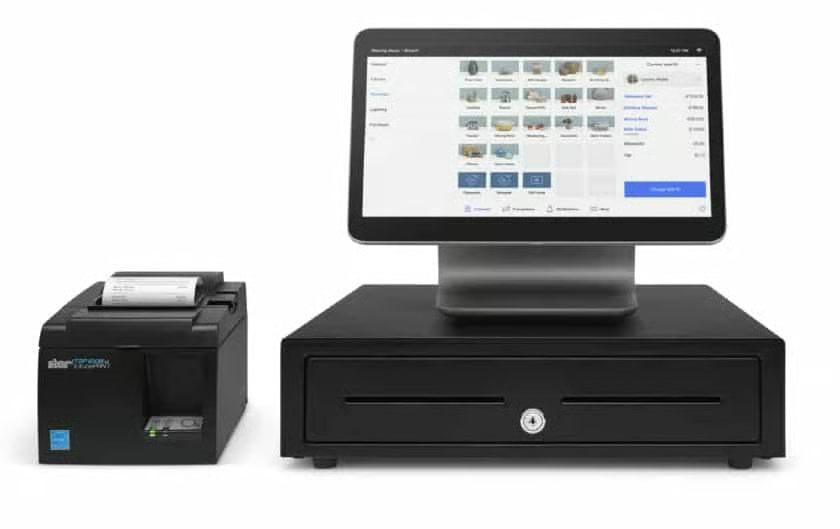
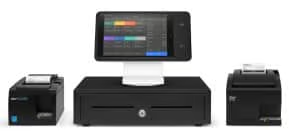
Not every business needs the same setup. Some can start with only a phone and Tap to Pay, while others will want a reader, a dedicated terminal, or a full countertop register. Current Square hardware options include Tap to Pay, Square Reader, Square Stand, Square Terminal, Square Register, Square Handheld, and Square Kiosk.
| Hardware | Best For |
|---|---|
 | Magstripe Reader Best for: Accepting swipe payments on the go Cost: First free, additional $10 |
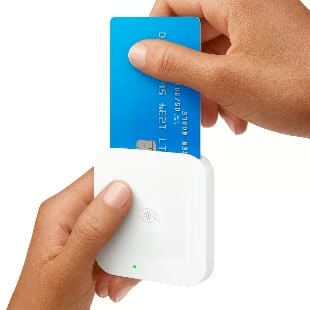 | Contactless and Chip Reader Best for: Accepting card, EMV, and contactless payments on-the-go Cost: $49 (1st generation), $59 (2nd generation) |
 | Square Terminal Best for: In-store mobility and curbside sales Cost: $299 or $27 per month for 12 months Read our Square Terminal review |
 | Square Handheld Best for: Mobile order-taking, tableside checkout, and line-busting in busy service environments Cost: $399 or $37 per month for 12 months |
 | Square Stand/ Square Mount Best for: Affordable countertop setup using an iPad and mobile card reader Cost: $149 or $14 per month for 12 months Read our Square Stand review |
 | Square Register Best for: Full POS countertop plus customer display with built-in card reader Cost: $799 or $39 per month for 24 monthsRead our Square Register review |
 | Square Stand Kit Best for: iPad users with frequent cash transactions Cost: $579 or $53 per month for 12 months |
 | Square Stand Restaurant Station Best for: Restaurant setup needing tableside POS option Cost: $1,389 or $68 per month for 24 months |
3.2 Start with the simplest setup that fits
If you are not sure which option to choose, start with the setup that matches how you sell most often. A phone-based setup may be enough if you mainly sell at markets, appointments, or on the go. A countertop business may be better off with Square Stand, Square Terminal, or Square Register, especially if you want faster checkout, printed receipts, or a more polished in-store experience.
You also do not need to buy hardware to begin taking payments if you plan to use tools such as invoicing, payment links, virtual terminal, or Tap to Pay.
3.3 Connect your hardware
If you are using Square hardware, follow the prompts in the app or dashboard to pair and connect your device. The Square Reader for contactless and chip connects by Bluetooth to compatible iPhone, iPad, and Android devices, while dedicated devices such as Terminal and Register are built as more self-contained checkout tools. If you plan to use accessories like barcode scanners, cash drawers, receipt printers, or scales, confirm compatibility before you buy so your setup works smoothly from day one.
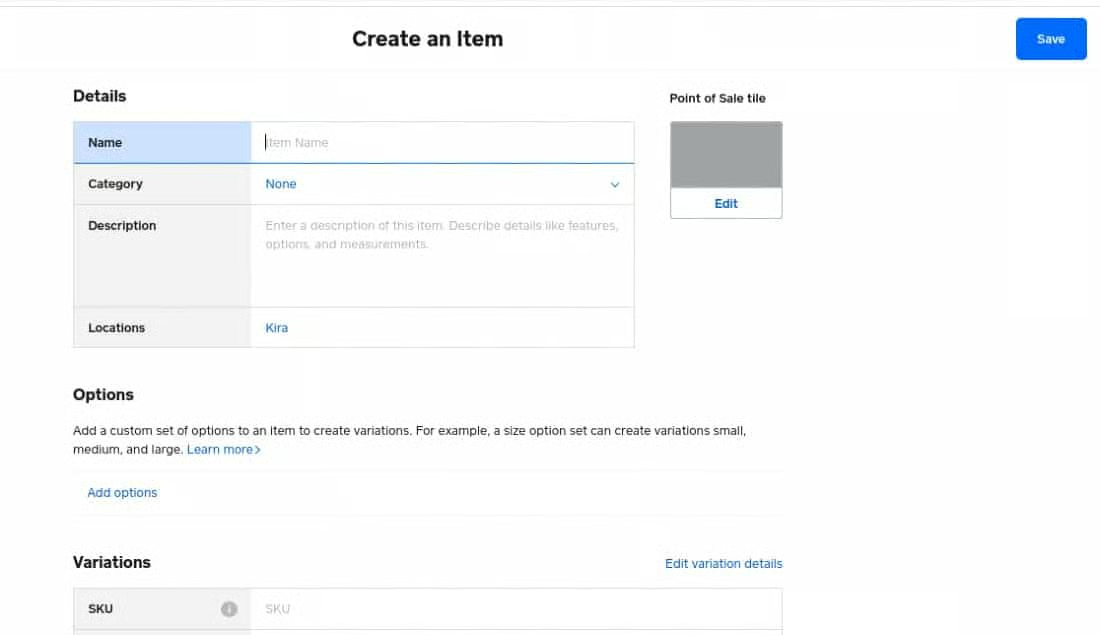
Step 4: Add your products or services
Once your account and hardware are set up, the next step is building your item library. Square’s inventory management tools come free with your Square account. This is the part of Square setup that shapes how quickly you can check out customers, track sales, and review reports later. The more organized your catalog is from the start, the easier it will be to manage day-to-day operations.
4.1 Import your catalog if you already have one
If you are switching from another POS or already track products in a spreadsheet, importing your catalog may be faster than entering everything manually. This is usually the better option for retailers or businesses with a large number of SKUs.
Before importing, clean up your file first. Make sure item names, prices, SKUs, categories, and variants are consistent, so you do not create duplicate items or messy product data.
4.2 Start with your basic products and services
Begin by adding the core products or services you sell most often. You do not need to build out your entire catalog at once, but you should enter enough items to start selling and test your checkout flow properly.
For each item, Square lets you add details such as:
| Item detail | Why it matters |
|---|---|
| Item name | Helps staff find items quickly at checkout |
| Price | Ensures sales ring up correctly |
| Category | Keeps your catalog organized and improves reporting |
| Description | Useful for online sales, service menus, and staff reference |
| SKU | Helps with inventory tracking and product identification |
| Image | Makes checkout more visual and easier to navigate |
| Tax setting | Applies the correct tax rate automatically |
If you sell services instead of physical products, the same setup still applies. You can organize your services by type, price, or appointment category so they are easier to manage.
4.3 Add variants and modifiers where needed
If your products come in different sizes, colors, flavors, or configurations, set those up now instead of creating separate items for every small variation. This keeps your catalog cleaner and makes reporting more accurate. This step is especially important for retail, food, and service businesses because it affects both checkout speed and inventory accuracy. For example:
- A T-shirt can have size and color variants
- A coffee drink can have modifier options like oat milk or extra espresso
- A salon service can include different lengths or upgrade add-ons
4.4 Organize for how you actually sell
Do not just organize your catalog by what looks neat on the back end. Set it up based on how you and your staff will use it during checkout. A practical way to do this is to group items by department, product type, service category, menu section, or top-selling items
If certain items are used constantly, place them where they are easy to find. A well-organized catalog can shave time off every transaction and reduce ringing errors during busy periods.
4.5 Avoid overbuilding your catalog at the start
One of the easiest ways to slow down your Square setup is trying to perfect every item before you are ready to sell. In most cases, it is better to add your core products or services first, test how they appear at checkout, and then expand or refine your catalog afterward. At minimum, make sure you have:
- Your main items or services entered
- Correct prices
- Categories for organization
- Variants or modifiers for customizable items
- Taxes applied where needed
Once your item library is ready, the next step is customizing your checkout settings, including taxes, receipts, and other account preferences.
Step 5: Customize your checkout settings
Before you start taking payments, take a few minutes to review the settings that shape how Square works during checkout. This is where you fine-tune the customer experience and confirm how sales will be processed.
You do not need to configure every setting right away. Focus on the settings that affect live transactions first, then come back later to adjust anything more advanced.
5.1 Review your tax settings
Start by making sure your tax settings are correct. This is one of the most important parts of your Square setup because it affects both the customer checkout experience and your reporting later.
If you sell taxable goods or services, confirm that the correct tax rates are applied to the right items. Businesses that sell a mix of taxable and non-taxable products should double-check each item type before going live.
5.2 Customize receipts and checkout preferences
Receipt settings are one of the easiest ways to make your checkout flow look more polished. Square lets you customize receipt settings by adding your business information and choosing what details appear on customer receipts. Depending on your setup, you may also want to adjust options such as digital or printed receipts, signature collection, and other checkout prompts.
This is also a good time to add details customers may expect to see, such as:
- Your business name and contact information
- A return or refund policy
- Itemized receipt details
- Branding elements like a logo or colors, if applicable
Related:
5.3 Confirm which payment methods you want to accept
Not every business needs the same payment setup. A retail store may need card, cash, and contactless payments ready from day one, while a service business may rely more on invoicing, manually entered cards, or payment links.
Review the payment types you want to accept and make sure they match both your hardware setup and your customers’ habits. In many cases, enabling too many options too early just adds clutter, so keep it practical and start with the methods you expect to use most often.
Step 6: Run a test sale and go live
Before you start using Square with customers, run a test transaction to make sure everything works the way you expect. This is the best way to catch issues with item pricing, taxes, receipts, payment methods, or hardware before they affect a real sale.
Start by ringing up one of your products or services in the Square app. Then, go through the same checkout flow you expect to use during normal business operations. If you are using a card reader, terminal, or register, make sure it connects properly and processes payments smoothly. If you plan to email or print receipts, test that too.
6.1 Check your core checkout flow
As you run your test sale, confirm that:
- The correct item names and prices appear at checkout
- Taxes are applied properly
- Variants, modifiers, or discounts work as expected
- Your payment device connects and processes smoothly
- The receipt shows the right business information
- The transaction is recorded correctly in your Square Dashboard
If anything looks off, fix it now. It is much easier to adjust your setup before launch than during a busy sales period.
6.2 Test the sale like a real customer
Your test transaction should reflect the way you expect customers to buy from you. Instead of running a generic sale, walk through one or two realistic checkout scenarios based on your business type. The closer your test is to a real sale, the easier it will be to catch issues in your checkout flow before customers encounter them. For example, you might test:
- Retail store: Scan items, apply sales tax, take a card payment, and print or email a receipt
- Coffee shop or quick-service business: Ring up a customized order, apply modifiers, add a tip, and complete a fast checkout
- Service business: Enter a custom amount, manually key in a card if needed, and send a digital receipt
6.3 Complete your first sale in Square
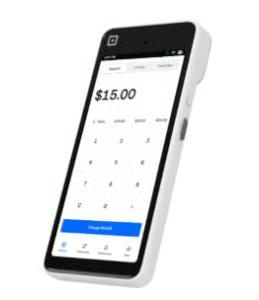
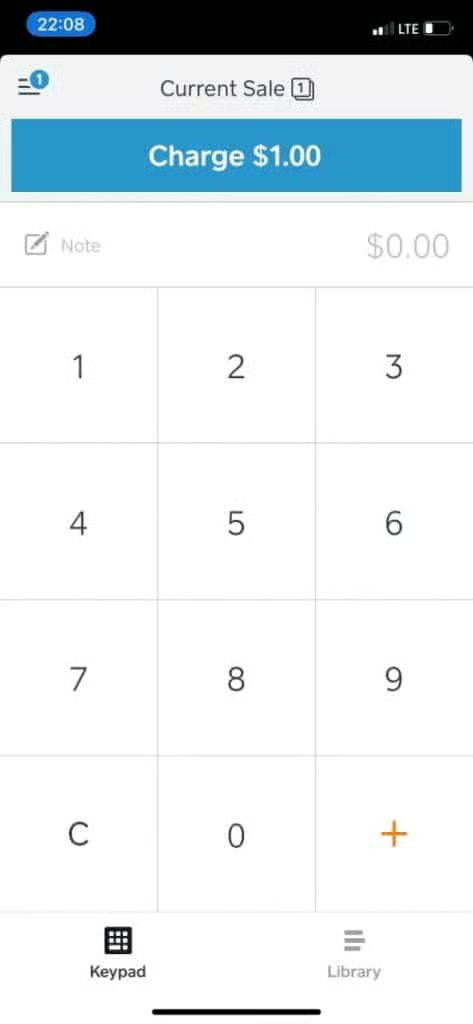
When you are ready to process a sale, go to Checkout in the left-hand menu. From there, you can either enter a dollar amount manually or select one of the inventory items you already created. If you sell physical products and want to track inventory accurately, selecting the preset item is usually the better option.
Once you have entered the sale amount or added the correct product, click Charge to move to the payment screen. At that point, you can also apply discounts or loyalty rewards if needed.
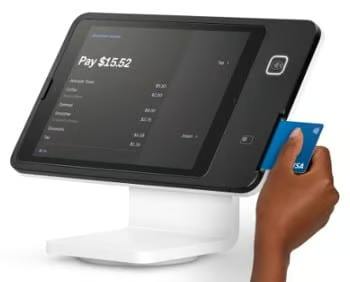
Next, choose the payment method. Depending on your setup, you may be able to:
- Swipe, dip, or tap a card with a connected reader
- Manually enter a credit card number
- Accept cash or check
- Charge a card on file
- Send an invoice
- Accept a gift card
After the payment is completed, Square will prompt you to select a receipt option. Customers can usually choose a text receipt, email receipt, printed receipt, or no receipt. Once that is done, the transaction is complete and recorded in your system.
To process a transaction, go to “Checkout” and then enter a dollar amount or select an inventory item. (Source: Square) 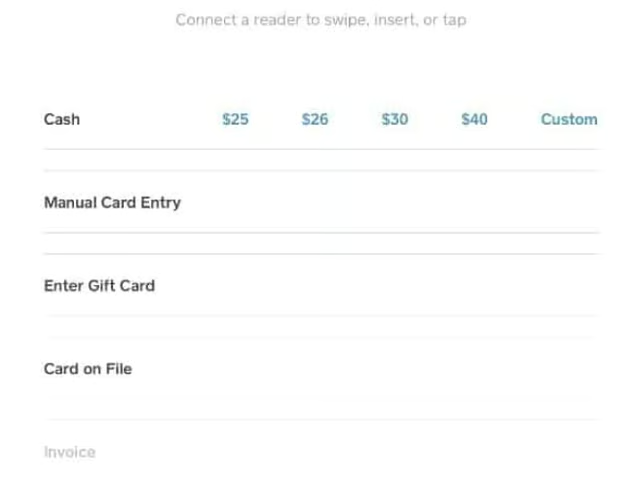
Square offers multiple payment methods. (Source: Square) 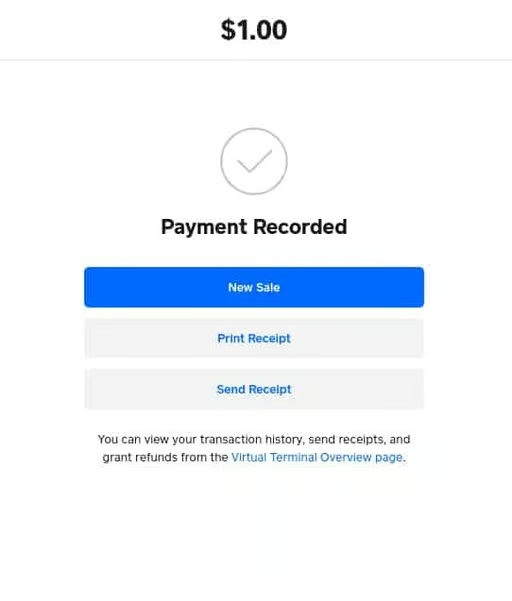
Aside from printed forms, Square also offers digital, text, and email receipts. (Source: Square)


6.4 Start selling once the essentials work
You do not need to perfect every Square feature before going live. Once your core products, payment methods, tax settings, receipts, and deposit setup are working properly, you are ready to start selling.
From there, you can continue improving your setup over time by adding more inventory, connecting additional hardware, refining receipts, or exploring more Square tools.
Post-setup: Explore optional Square tools
Once your core Square POS setup is live, you can start building out the extra tools that fit your business. This is the best time to expand because your checkout flow is already working.
Instead of adding features just because they are available, choose the ones that match how you actually sell and operate.
What to do after setting up Square
- Add Square Online if you sell online
- Set up Square Invoices if you bill customers
- Consider Square Appointments for service bookings
- Review Square Marketing, Loyalty, Payroll, or Banking if needed
Additional Square Free tools
Even on Square Free, you still have access to a few useful tools beyond basic in-person checkout. These can help you expand how you sell and improve the customer experience without upgrading right away.
Square Online (online store)
Selecting Square’s “Sell online” feature gives you more than simple ecommerce sales. With Square Online, you can start selling online through a basic website or store and expand later if you need more advanced ecommerce features. If you do not need a full online store yet, Square also offers payment links that you can share through email, text, or social media. We recommend that most businesses choose the sell online add-on because:
- It’s free (Square Online is free with every Square POS account)
- Pickup orders reduce in-store crowding
- More options allow customers to shop according to comfort levels and preferences
Customer feedback
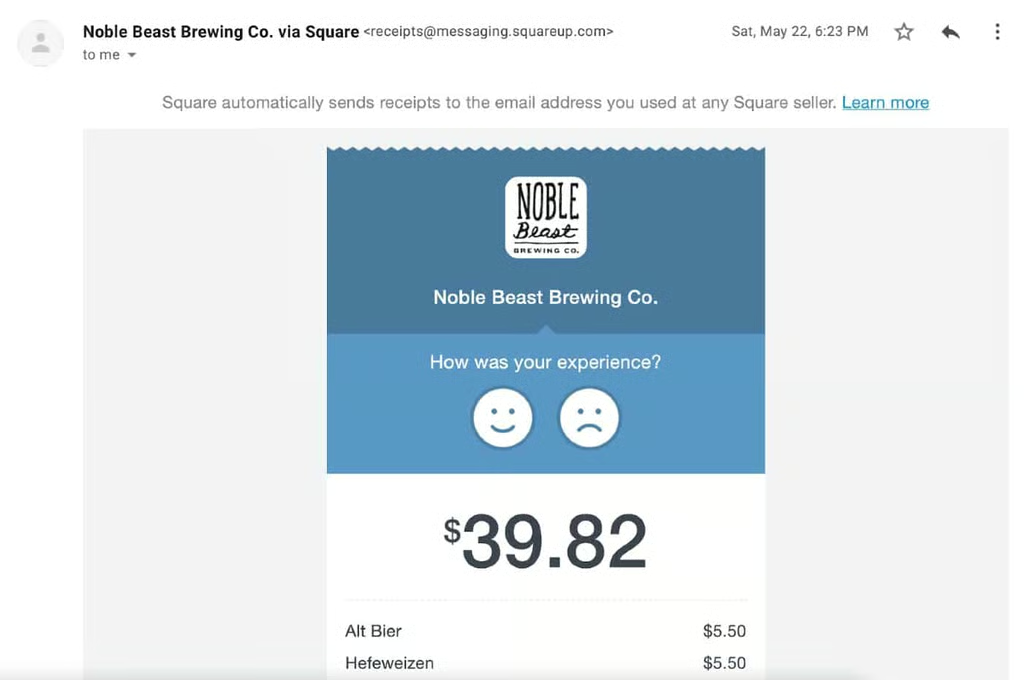
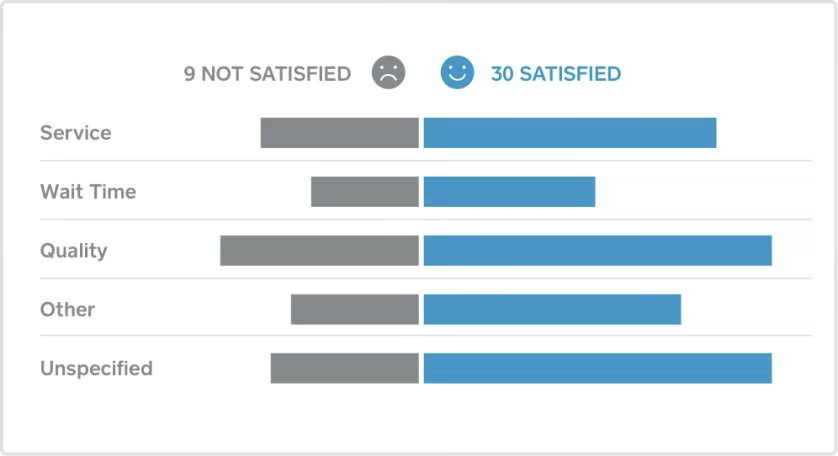
After your first sales start coming in, you can choose to collect customer feedback through Square’s digital receipts. When feedback collection is enabled, customers can share comments about their experience through their email or SMS receipt, giving you a private way to spot issues and respond before they turn into public reviews.
You can view feedback threads in your Square Dashboard, filter results, reply to customers who allow responses, and, in some cases, send a promotional reward or refund directly from the thread. Feedback is connected to transaction information, which makes it easier to understand what happened and respond appropriately.
This is a useful post-setup feature because it helps you identify service or checkout issues early, especially while you are still getting used to your Square POS workflow.


Integrations
Square has an App Marketplace with a variety of popular third-party business apps that you can integrate to streamline operations. Browse through categories like accounting, invoicing, ecommerce, team management, and inventory. You can also check out its suggested app bundle tailored to your specific needs. There are collections for restaurants, retail, beauty/personal care, live video, Square Online, and more. Some of these apps are free, others require paid plans.
Advanced tools with paid Square plans
If your business starts to outgrow the free plan, Square Plus and Square Premium bundle in more advanced tools instead of relying as heavily on separate add-ons. Square’s pricing page positions these paid plans as the path to more robust business management features.
Staff management
If you have employees, this is the stage to decide whether you need Square’s staff tools. Staff management is not included with Square Free; it is listed under Square Plus and Square Premium. Staff management tools included with Square Plus and Premium are Shifts, Advanced access, and Team communication.
For many small businesses, that means you can launch first with a simple owner-operated setup, then add employees and staff controls later if needed. This is a better approach than paying for team features before you know how much staff management your business actually requires.
If you do need payroll, Square Payroll is a separate add-on. Square’s payroll pricing page lists full-service payroll at $35 per month plus $6 per person paid per month, while contractor-only payroll costs $6 per person paid per month.
Email and text marketing
If you want to stay in touch with customers after the sale, Square’s paid plans include email and text marketing tools that can help you drive repeat business. These tools can be useful for sending promotions, announcements, reminders, and other customer updates without relying on a separate marketing platform. For businesses that already collect customer contact information through Square, built-in email and text marketing can be a practical next step once you are ready to focus on retention and repeat sales.
Loyalty rewards and promotions
If bringing customers back more often is a priority, Square’s paid plans also include tools for loyalty and promotions. This can be especially useful for retail stores, coffee shops, restaurants, and service businesses that depend on repeat visits. Once your basic POS setup is working smoothly, loyalty and promotional tools can help you encourage return purchases without adding another separate platform to manage.
Advanced reporting tools
As your business grows, you may want more than basic sales summaries. Square’s paid plans expand reporting as you move up tiers, with Reporting included in Square Plus and Advanced reporting included in Square Premium.
For many businesses, that means Square Plus may be enough if you want stronger day-to-day reporting, while Square Premium makes more sense if you need deeper reporting and analytics. Square also offers a Custom Report Builder in Square Dashboard, which lets you create more flexible reports using your own metrics, filters, and groupings.
If your business is starting to make decisions based on sales patterns, product performance, taxes, payments, or team data, upgrading for better reporting can be a worthwhile next step.
Common Square setup mistakes to avoid
Square is relatively easy to set up, but a few common missteps can slow down your launch or create avoidable problems once you start taking payments. Before you go live, review these common Square setup mistakes so you can catch issues early and get your POS running smoothly.
- Choosing the wrong Square plan upfront: Square Free works for many businesses, but if you already know you need staff management, stronger reporting, or other advanced tools, it may be worth reviewing Square Plus or Square Premium before you build everything out.
- Waiting too long to set up deposits: If your bank account or transfer method is not verified, your payouts can be delayed once you start taking payments.
- Setting up taxes incorrectly: Double-check that the right tax rates are applied to the right products or services, especially if you sell a mix of taxable and non-taxable items.
- Overbuilding your catalog before testing checkout: Add your core items first, make sure they ring up correctly, and then refine your catalog later instead of trying to perfect everything before launch.
- Buying hardware before checking compatibility: Make sure your phone, tablet, reader, printer, or other accessories work together before you commit to a specific setup.
- Skipping receipt and checkout preferences: Review receipts, signature settings, and checkout prompts before going live so the customer experience matches how you want to sell.
- Forgetting location-specific setup: If you operate in more than one location, confirm that the right bank account, business details, and settings are assigned where needed.
- Trying to perfect everything before your first sale: You do not need every feature fully built out before launch. Once your core products, payment methods, taxes, and deposits are working, you are ready to start selling.
Square setup troubleshooting
| Problem | What to check |
|---|---|
| Account verification is delayed | Confirm your legal name, business type, address, and identity details match official records |
| Bank deposits are not active | Check routing and account numbers, then confirm your bank account is verified |
| Reader will not connect | Check Bluetooth, battery, device compatibility, and Square app updates |
| Tap to Pay is not showing | Confirm your device and region support Tap to Pay |
| Items are missing at checkout | Check item visibility, location assignment, and category settings |
| Taxes are not calculating correctly | Review tax rates, item tax settings, and location rules |
| Receipt information is wrong | Update business name, address, return policy, and receipt settings |
| Staff cannot access POS | Review team permissions, passcodes, and location access |
| Deposits are going to the wrong account | Check location-specific bank account assignments |
| Reports look incomplete | Confirm items are being selected at checkout instead of using only custom amounts |
Frequently asked questions (FAQs)
Click through the sections below for common Square tutorial-related questions we encounter.
How long does it take to set up Square?
Most small businesses can set up the basics of Square in less than an hour if they have their business details, bank account, product list, tax settings, and device ready. Adding a full inventory catalog, staff permissions, hardware, and an online store can take longer.
Is Square free to set up?
Yes, you can create a Square account and use Square Free without a monthly POS fee. You still pay payment processing fees when you accept card payments, and you may need to buy hardware depending on how you sell.
What do I need to set up Square?
You need a business email, legal business details, identity information, bank account information, product or service list, tax settings, and a device for checkout. You may also need Square hardware if you want to accept dipped, tapped, or swiped card payments.
Can I use Square without hardware?
Yes, you can use Square without hardware if you accept payments through Tap to Pay, invoices, payment links, virtual terminal, QR codes, or online checkout. Hardware is only needed for certain in-person payment setups.
Can I set up Square on my phone?
Yes, you can download the Square POS app on a compatible phone and use it to take payments, manage items, and view sales. You can also use Tap to Pay on supported devices or connect a Square Reader.
What is the first thing to do after creating a Square account?
After creating a Square account, link your bank account and confirm your deposit settings. Then download the Square POS app, add your items or services, set taxes, customize checkout, and run a test sale.
Should I start with Square Free, Square Plus, or Square Premium?
Most new small businesses should start with Square Free. Consider Square Plus if you need more advanced retail, restaurant, appointment, staff, loyalty, or marketing tools. Square Premium is better for larger or more complex businesses that need advanced reporting, priority support, and lower processing fees.
Bottom line
Square is a free mobile POS and payment processing app that works on smartphones and tablets. Square makes money by charging flat-rate payment processing fees. In return, businesses receive a suite of free management features, a mobile POS, and competitive credit card processing rates.
It’s easy to set up a free Square account, and it’s even easier to process mobile sales. Best of all, Square is free to use and requires no commitment. Visit Square to set up your own account and test out the app for yourself.