


This tutorial covers how to pay bills in Xero, including how to enter and approve new bills and view unpaid transactions. You can enter bills in Xero by completing the New Bill form, and you can view unpaid bills from the Awaiting Payment tab on the Bill page or by running an Accounts Payable Aging Summary report.
When it’s time to pay the bill, you can record the payment through the Make a Payment section within the bill itself, or use the Make payment button on the Bill page if you wish to pay by check or process a batch payment.
How to Enter a Bill in Xero
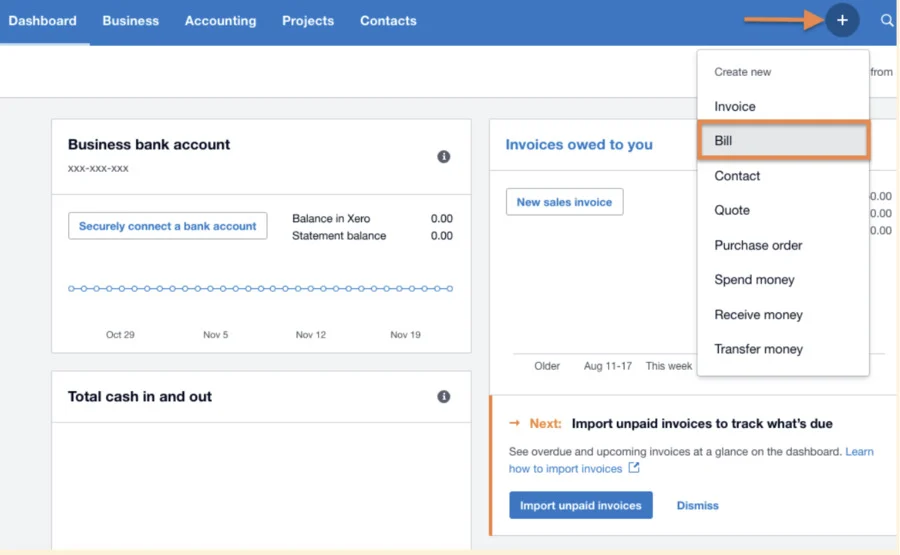
Step 1: Navigate to the ‘New Bill’ Form
Click on the + button in the upper right corner of your Xero dashboard and then click the Bill dropdown option, as shown below.
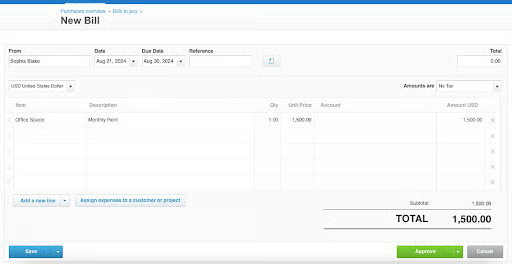
Step 2: Create the Bill
Complete the New Bill form by providing the necessary details, including:
- From: Enter the name of the supplier you received the bill from. For help setting up new suppliers, visit our first tutorial on setting up your company in Xero.
- Date: Enter the date displayed on the bill you received.
- Due date: The date the bill is due for payment, which is set by your supplier.
- Reference: Enter the invoice number from the bill. This will allow you to find the invoice number easily if you need it for communicating with your vendor.
- File attachments: Click the file icon to attach any relevant files to your bill, such as an image of the bill itself.
- Total: The overall amount that you owe. It includes all of the line items and tax depending on your selected setting.
- Amounts are: Select the tax setting to apply to the bill total. If the item has sales tax, select either Tax Exclusive to add tax to the total or Tax Inclusive if the item price always includes the sales tax.
- Item: Select an existing inventory item or add a new item. The account field should populate automatically based on the item you select.
- Description: Enter a description of the item you’ve purchased. This should auto-populate if you’ve selected an Item.
- Quantity: This is the quantity of the items you’ve purchased.
- Unit Price: The price of the item.
- Account: Xero populates the Account field based on how you have created bills in the past or the Item you selected, but you can edit this suggestion.
- Tax Rate: This is the tax on the transaction, which is required only if you have selected Amounts are Tax Exclusive or Tax Inclusive in the upper-right corner of the bill.
- Assign expenses to a customer or project: You can assign expenses to the customer to recover expenses from a job or to a project to record it as a project expense.
Step 3: Approve or Save the Bill
Once you complete all the essential information and have access to approve the bill, you need to go ahead and approve it (by clicking the green Approve button) before you can record a payment against it. This is useful for situations where a bookkeeper enters the bills and submits them to the business owner or manager to approve before payment can be issued.
For those recording a bill with no access to approve it, simply click the blue Save button in the lower left of the screen.
How to Track Unpaid Bills in Xero
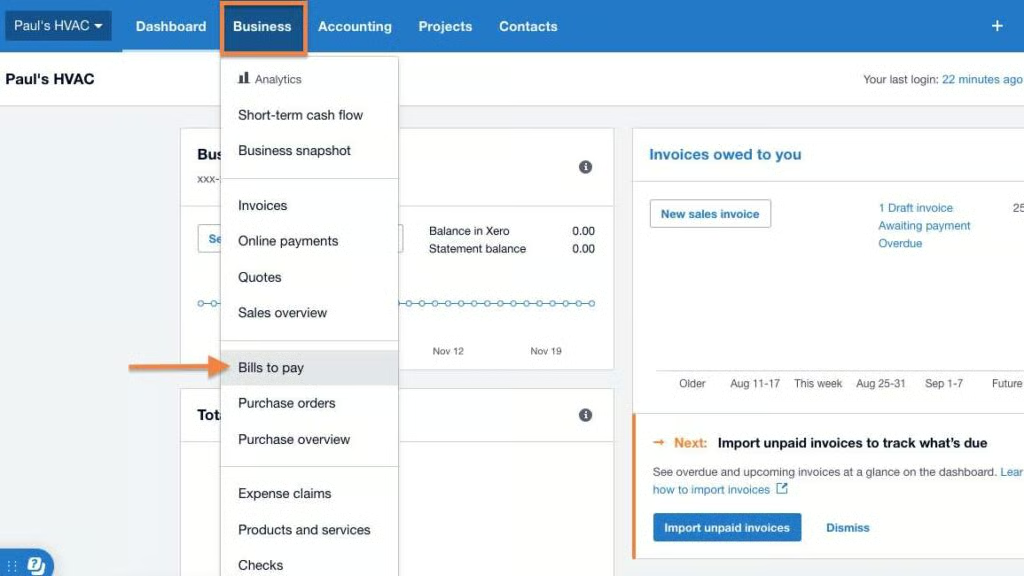
Step 1: Navigate to ‘Bills to Pay’
Click on the Business menu at the top of the screen, and then select Bills to pay from the dropdown list.
Step 2: View Unpaid Bills
You can view unpaid bills from the Awaiting payment tab on the Bill page or by running an Accounts Payable Aging Summary report.
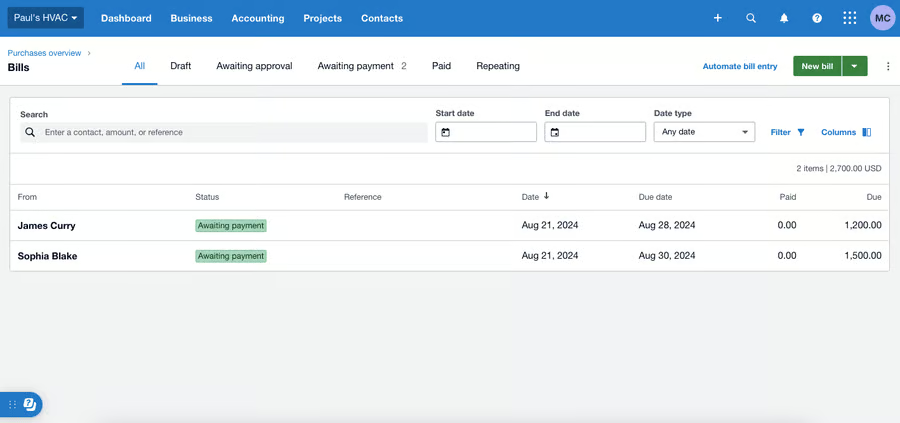
View Unpaid BIlls from the Bill Page
On the Bill page, you’ll see a list of bills that are categorized based on their statuses. Bills that are ready for payment have a status of “Awaiting payment” and are also filtered under the Awaiting payment tab.
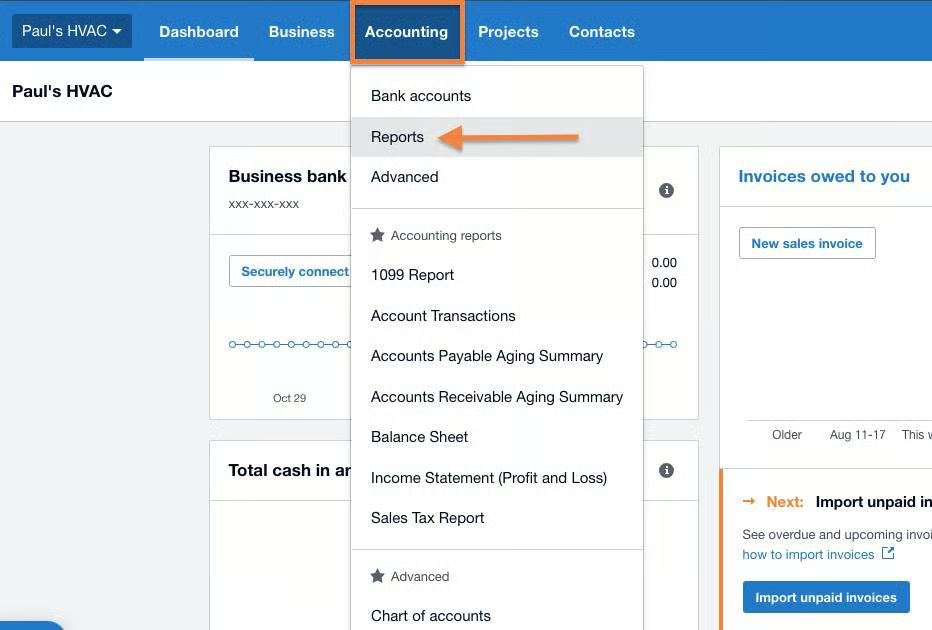
Run an Accounts Payable Aging Summary Report
Click on the Accounting menu and then select Reports. Locate the Accounts Payable Aging Summary report from the report list and then click on it.
Xero will run an Accounts Payable Aging Summary report, just like the sample below. The report displays the amounts you owe based on the age of the transactions, helping you easily see which bills aren’t paid and how long they are overdue, if at all.

You can customize your reports by selecting the reporting period, the number of periods to display, and whether you want to view aged payables based on their due dates or invoice dates. You can also select the information that you want to include or exclude from the report.
How to Pay Bills in Xero
Step 1: Select the Bill
On the Bill page, select the bill you wish to pay and click anywhere on the transaction line to open the details. This will open the View Bill form (shown in the next step) where you can see the transaction details, including the total amount to pay.
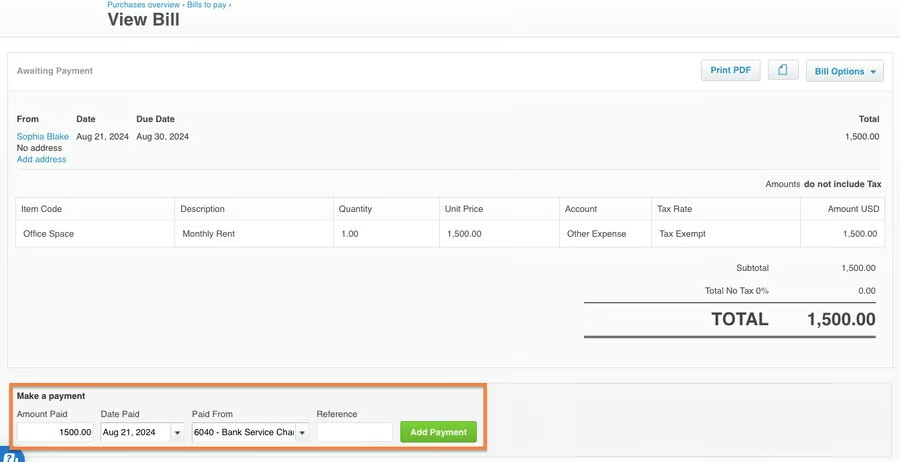
Step 2: Pay the Bill
On the lower left corner of the View Bill screen, you’ll find the Make a payment section. Enter the amount you’re paying and the date when it’s paid, and select the account the payment will come from. To record the payment, simply click on the green Add Payment button.
Note that the step above is for recording payments that have already been made, such as cash, bank transfer, or credit card payments. You may also choose to pay by check or process batch payments using the steps below.
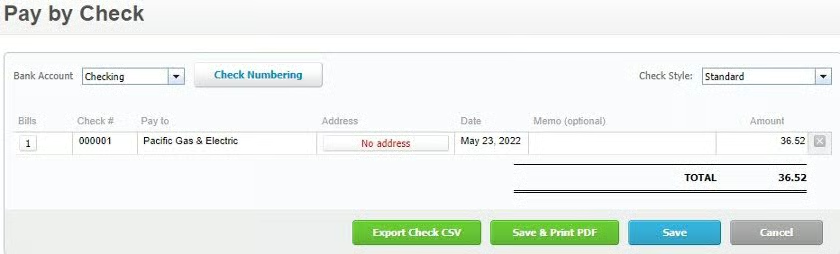
Pay by Check
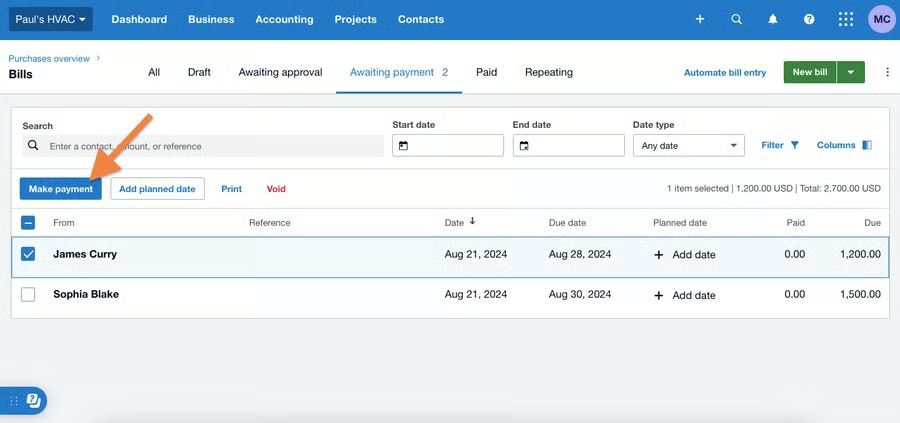
On the Bill page, mark the bill you wish to pay and then click the blue Make payment button, as shown below.
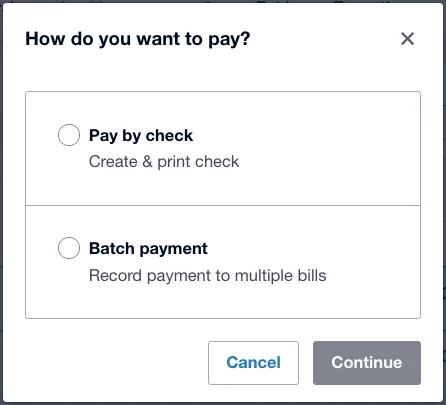
Then, Xero will ask whether you want to pay by check or process batch payments. Select Pay by check to continue.
On the Pay by check form, provide the required information, including the bank account, check numbering, check style, payee, and amount. Then, select from the following options to record a bill payment by check:
- Export Checks CSV: Export the check information to a CSV file so that you can import it and print it.
- Save & Print PDF: Save the check details and then print it as a PDF file. Before printing the checks, you’ll need to change the page scaling to none to print the preprinted check vouchers.
- Save: Save the check details without creating a PDF file. Print the checks from Xero later, or record them in your checkbook or other check printing software.
- Cancel: Cancel the transaction.
Process Batch Payments
From the Bill page, mark all the bills you wish to pay at the same time, click the Make payment button, and then select Batch payment. The New Batch Payment form will then display all the selected bills, and from here, you can enter the date and select the bank account that the bills will be paid from. Verify that the bills to be paid are correct and select Make Payments to enter a batch payment in Xero.

Frequently Asked Questions (FAQs)
Can I pay multiple bills at once in Xero?
Yes, and you can do so by using the Batch payment option after clicking the Make payment button on the Bill page.
Who can approve bills in Xero?
It depends on the assigned user role. Standard and Adviser users can approve bills, while Invoice-only users require admin approval for access. Read-only users can’t approve bills.
Bottom Line
You have now learned how to pay bills in Xero, including how to enter and view unpaid bills. The next tutorial in our Xero course is how to add, reconcile, and delete your bank accounts. It will look at connecting your bank account, reconciling your account with and without a bank feed, viewing your bank reconciliation summary report, and deleting a bank feed that’s no longer needed.