



.jpg?w=288)
.jpg?w=288)


Welcome to the Fit Small Business free Xero tutorials. Whether you are new to Xero or are looking to deepen your understanding of the software, we have five tutorials that will help you. Each Xero tutorial includes detailed step-by-step guides, complete with text and images.
Check out our five free Xero training lessons below:
TUTORIAL 01 How to Set Up Your Company in Xero
TUTORIAL 02 How to Manage Customers & Create Invoices in Xero
TUTORIAL 03 How to Track and Pay Bills in Xero
TUTORIAL 04 How to Add, Reconcile & Delete Your Bank Accounts in Xero
TUTORIAL 05 How to Create and Print Custom Reports in Xero
Tutorial 1: How to Set Up Your Company in Xero
In this guide, we’re going to cover how to set up your company in Xero, which includes adjusting settings, adding users, managing currencies, viewing and modifying your chart of accounts, and adding contacts.
Step 1: Edit Basic Company Information
Step 1.1: Navigate to Settings
Click on the small dropdown arrow next to your company name in the upper left corner of the dashboard, and then select Settings from the dropdown list, as shown below.
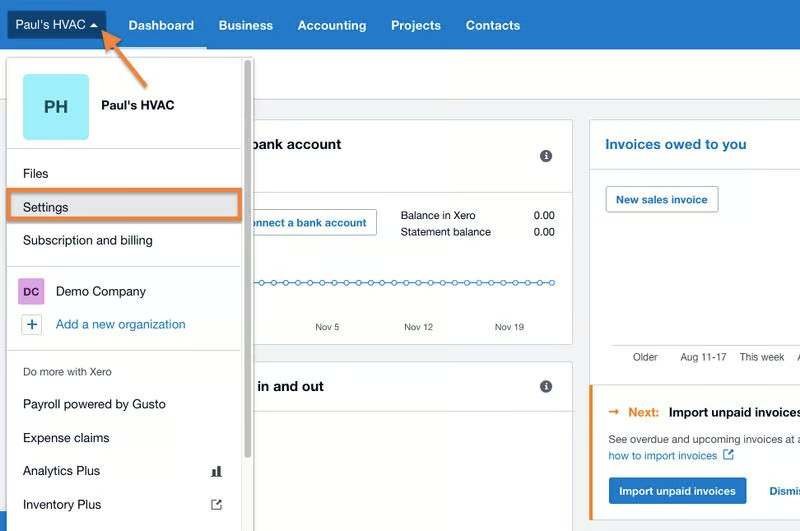
Step 1.2: Add or Edit Basic Company Information
On the Organization settings page, you’ll find several options to customize your company. For general company settings, let’s focus on the first three options, starting with organization details.
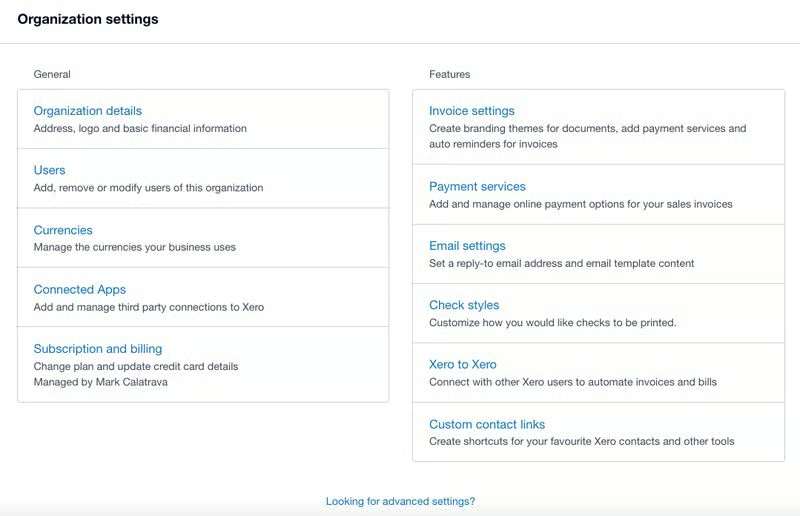
Click on the Organization details section to add or edit your basic company information, such as the company display name, organization type, and industry. Also, you can upload your company logo, which will appear in your sales and purchase forms. When you scroll down, you’ll also find a section to update contact information, including your company address, email, and phone number.
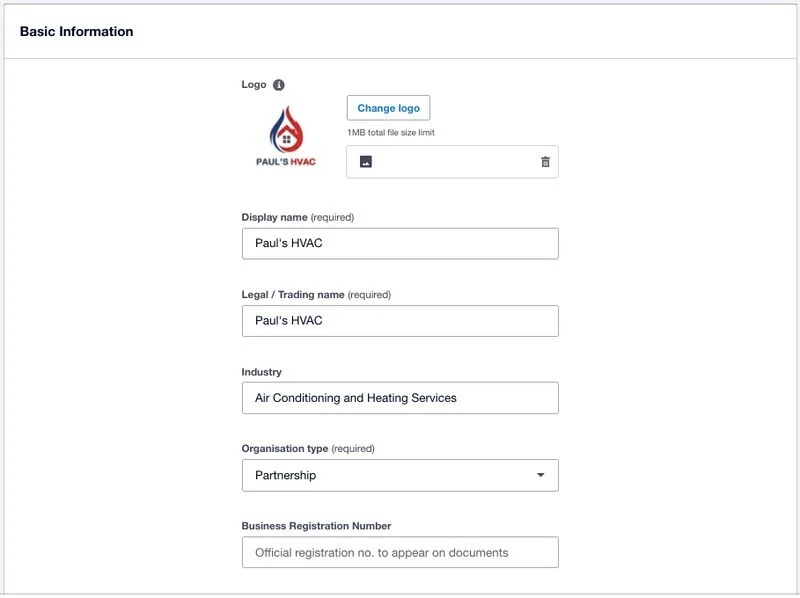
Once done, click on the blue Save button in the lower right corner of the screen (not shown in the image above).
Step 2: Invite Users
Step 2.1: Select “Users”
Select the Users section from the Organization settings page. Then, click on the blue Invite a user button in the upper right corner of the screen, as shown below.
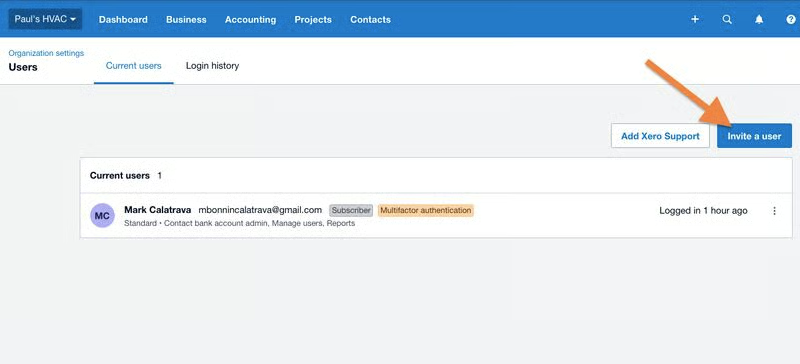
Step 2.2: Add a New User
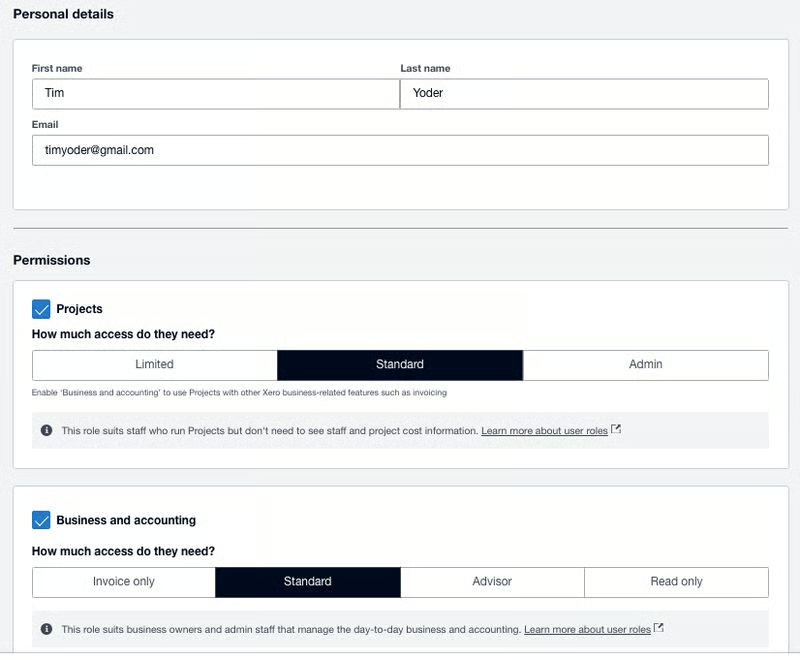
Then, enter the name of the user and their email address. The email address you send the invite to will be the user’s login email address.
Step 2.3: Select User Permission Level
After providing the user’s personal details, Xero will ask you to select the level of permission you want to grant to the user in two areas: (1) projects and (2) business and accounting.
For Projects users, you can choose from three permission levels:
- Limited: The user can view their projects and tasks but is unable to make changes to them. Also, the user can view, enter, and change their own time entries.
- Standard: In addition to all access by a project limited user, a standard user can view expenses, billable amounts, and which staff spent time on a task. However, they can’t view certain expenses within projects, including staff cost rates, staff cost on tasks, and the Profitability dashboard.
- Admin: A project admin user has complete access to Xero Projects features, including the ability to add and manage projects and time entries. They can also view financial information, like project estimates and total amounts invoiced, task charge rates and totals, and staff cost rates. Moreover, they can view, generate, and export project reports, as well as view the Profitability dashboard.
For Business and accounting users, Xero provides four levels of access:
- Invoice Only: This limited role suits users who create quotes and invoices or enter bills, but don’t need access to bank accounts or reports.
- Standard: The standard user has almost full access to Xero, with optional access to cash coding and reports.
- Advisor: Advisors have full access to all areas of Xero. These are the permissions that you will give your accountant. If the advisor is not the subscriber, they will not be able to change the pricing plan or payment details.
- Read Only: These users can view most areas of Xero but are unable to create or edit transactions or run new reports.
Once you have specified the user role and permissions, you can add a personal message if you like, and then click the blue Send Invite button at the bottom right of the screen. The user will receive an email with the invitation to join your organization and set up their access based on the role and permissions you’ve granted them.
Step 3: Set Up and Manage Currencies
Note that this setting doesn’t determine your base currency. You selected the base currency during the subscription stage, where you provided key information about your business as part of the onboarding process.
However, while you can’t change the base currency at this stage, you can add and manage additional currencies, which comes in handy if you deal with transactions in different currencies.
Simply click Currencies on the Organization settings page, and then click the Add Currency button, as highlighted below.
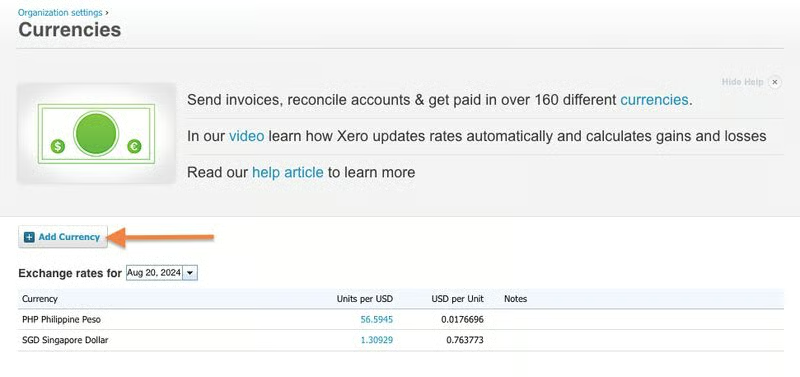
The currencies added can be used for transactions with vendors or clients operating in those currencies, and Xero will automatically manage the conversion for you.
Step 4: View and Modify Your Chart of Accounts
To view your chart of accounts, click on the Accounting drop-down menu at the top of the screen and then select Chart of accounts.
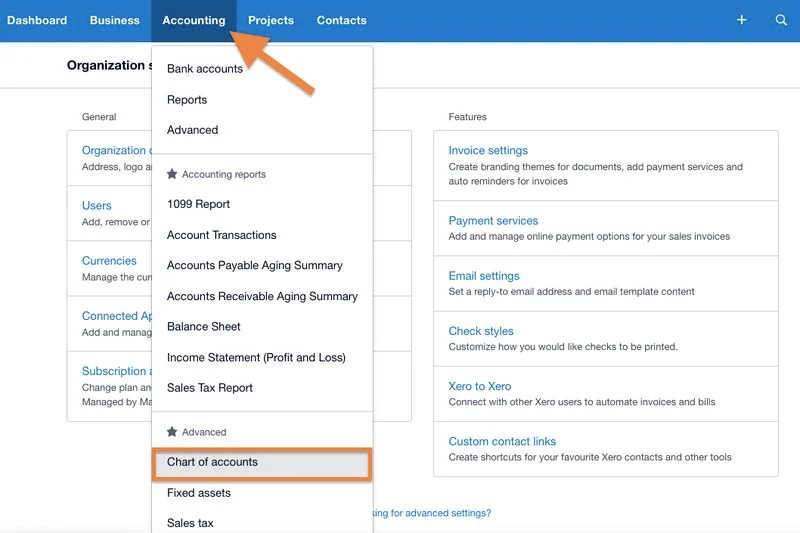
You can opt to use Xero’s default chart of accounts, but if you prefer, you can create a new account, edit existing ones, or import your own chart of accounts.
Adding a New Account
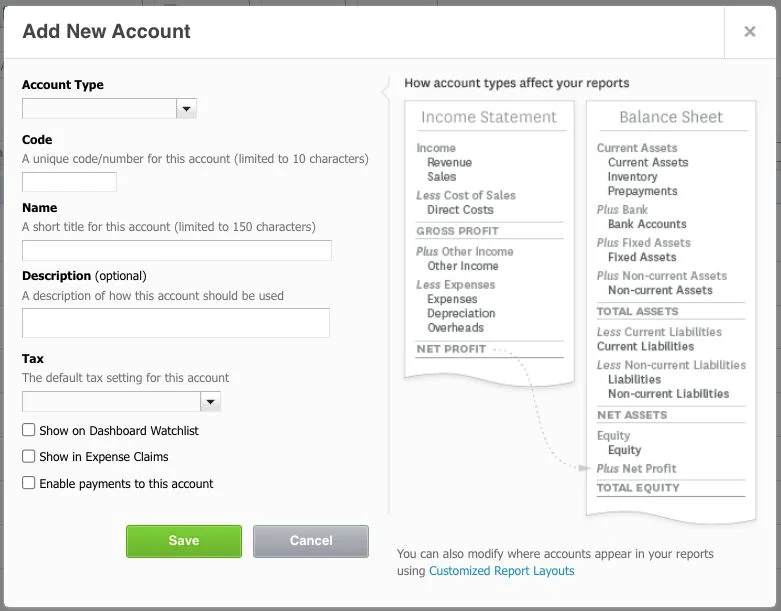
On the Chart of accounts page, click on the Add Account button to access the account creation form.
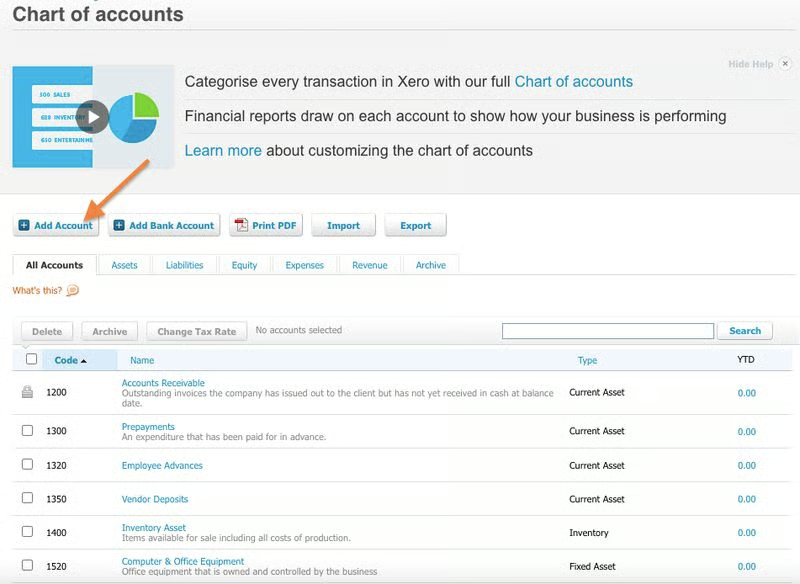
Then, proceed to complete the required information, including the following:
- Account type: Each account has an account type, which Xero uses to determine where the account appears in your financial reports. You can change the account type at any time by editing the account.
- Code: Each account has an account code of up to 10 characters. The code is used to group similar or frequently used accounts together in your chart of accounts. You can use any code for any account as long as it’s unique.
- Name and description: Every account in Xero must have a name of up to 150 characters. The account description is optional for all accounts except for bank accounts. Use letters, numbers, or symbols for this account, up to 1,000 characters. You can edit the account name and description if needed.
- Tax: Each account has a default tax rate. When you add an account, you can choose the tax rate for the account. You can change the tax rate on the account at any time by editing the account.
Editing an Existing Account
From the Chart of accounts page, click on the account that you wish to edit. Then, update the information as needed, and click the Save button to apply the changes.
Importing a Chart of Account
On the Chart of accounts page, click on Import, and indicate whether your file includes balances. If yes, enter your conversion date. Also, since you’re using a Xero accounts template, leave Xero as the system you’re importing from.
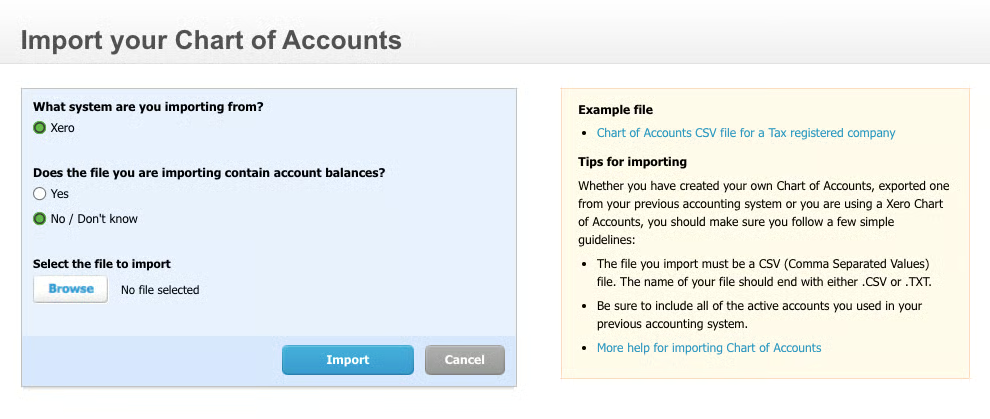
Click Browse (shown in the image above) to locate the saved file on your computer. Select Import, then a summary will appear that displays all of the new accounts.
Step 5: Add Contacts
You can add new contacts either by adding them manually or importing them into the system.
Note that in Xero, you’ll use the same contact form to add customers and vendors. You can later designate whether that contact is a customer or vendor based on the transactions you create. In contrast, other accounting software, like QuickBooks, use separate forms for creating new customers and vendors.
Add Manually
The easiest way to add a new contact manually in Xero is to click the + button at the upper right corner of your dashboard and then select New Contact, as shown below.
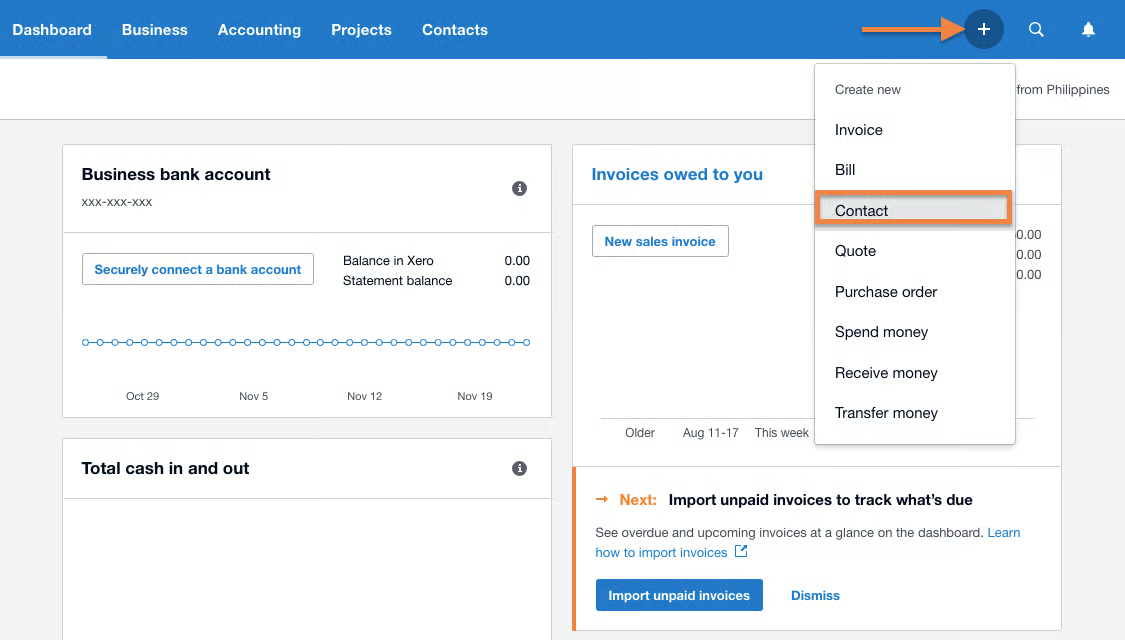
Next, proceed to enter the essential information, such as contact details and address. You can also enter financial details related to W-9 business classification and a credit limit amount. At the very least, you need to provide the contact name to be able to create a new contact in Xero.
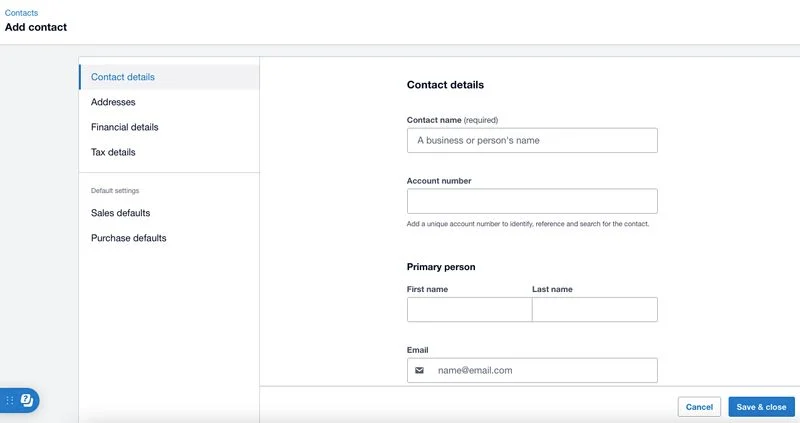
Click the blue Save & close button when you’re finished.
Import Contacts
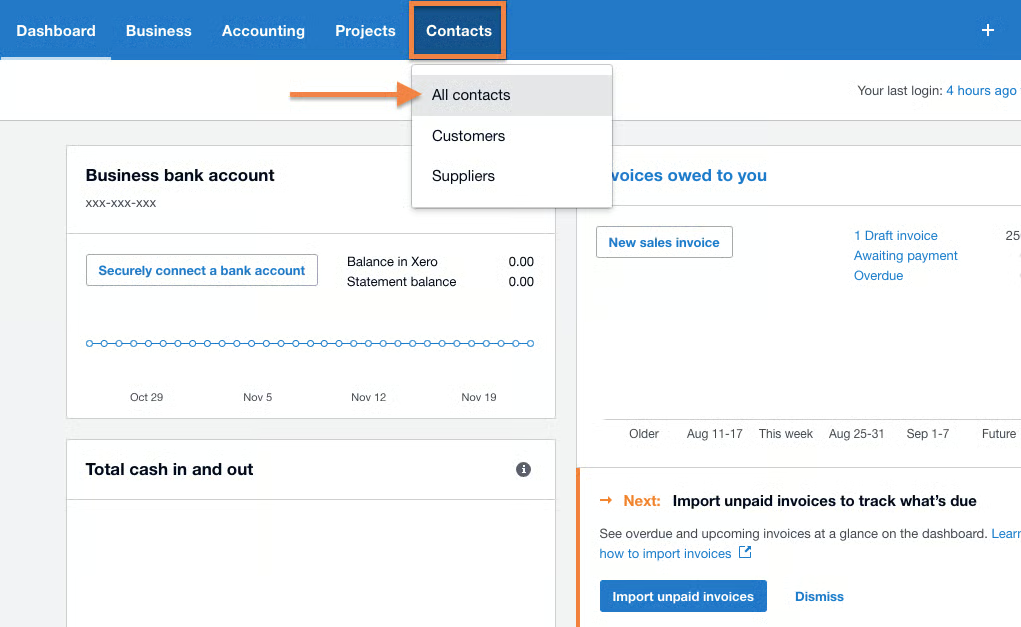
Click on the Contacts menu at the top of the screen, and then select All contacts, as shown below.
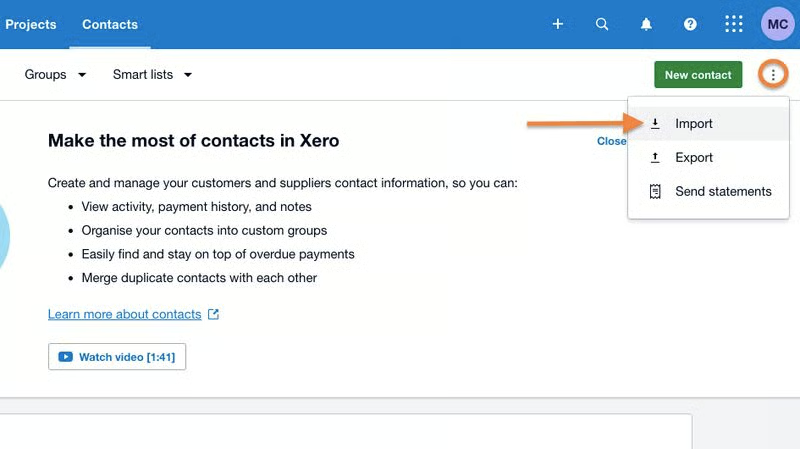
Then on the Contacts page, click the three dots next to the green New contact button, and then select Import.
Next, Xero will ask you to upload your contacts by clicking the Select file button and uploading your file. You may download Xero’s basic template for importing contacts to make the process easier.
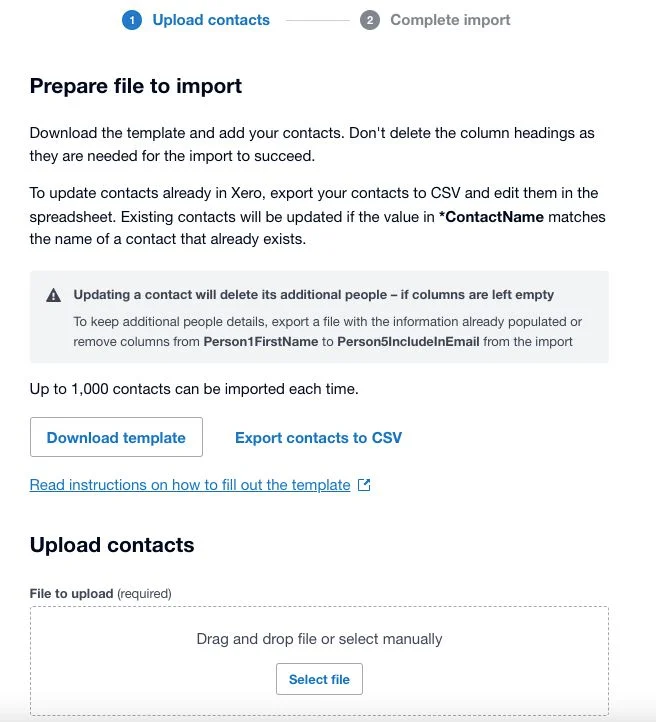
Then, under On importing an existing contact (not shown in the image), select Be ignored so that empty fields will be ignored. Click Next, review the information you’re importing, and then click Complete Import.
Frequently Asked Questions (FAQs)
Can I add multiple users in Xero?
Yes, you can, and the good thing is that you can add as many users as needed without paying any additional fees.
Does Xero provide a default chart of accounts?
Yes, it does, and you can opt to use these accounts for your transactions. However, you may also create a new account manually, edit existing accounts, or import one into the system.
Bottom Line
You have now set up your company in Xero. Be sure to check out our other four free Xero tutorials. Our next guide is on how to manage customers and send invoices in Xero, which will cover how to adjust settings for your customers and preferences for sending invoices. Read our detailed Xero review to learn more about the software’s pricing and features.
