A good applicant tracking spreadsheet can help organize your hiring process, allowing you to track candidate applications, multiple interviews, and even test results.
Applicant Tracking Spreadsheet: Free Excel Templates
This article is part of a larger series on Hiring.
Key Takeaway:
Using a candidate tracking spreadsheet is best if you:
- Need to compare candidates’ resumes, skills, and experience in one place
- Have more than one open position
- Can’t afford an applicant tracking software (ATS) system
Featured Partner
Free Recruitment Tracker Excel Templates
The following free applicant tracking spreadsheet templates include a job-specific recruitment template for individual hiring teams and an HR applicant master tracking sheet of all applicants across all roles for HR or the hiring manager.
Download the templates using either Excel or Google Sheets and customize them for your specific needs. They are easy to use and help optimize the hiring process.
For an instructional walkthrough of each recruitment tracker Excel template, check out our video or continue reading below.
When to Use Each
Click the tabs below to learn which recruitment tracker template is best for you.
How to Use the Recruitment Template
Let’s look at each element and how to best use the recruitment template.
Screenshot of the Position Template tab for the recruitment template showing options after right clicking on the tab footer.
Position: This spreadsheet was created to be job-specific. At the bottom of the file, you will see tabs marked Position 1, Position TEMPLATE, and Sample. Position 1 is ready for you to fill in with your first job. Save Position TEMPLATE for future jobs. You can modify the cells to fit your applicant tracking procedures.
When starting a new hiring process, right-click on the Position TEMPLATE tab and select Move or Copy. Select the sheet you wish to place the copy and check the box next to Create a Copy. This will create another tab that you can rename. The Sample tab shows you how you might use the template.

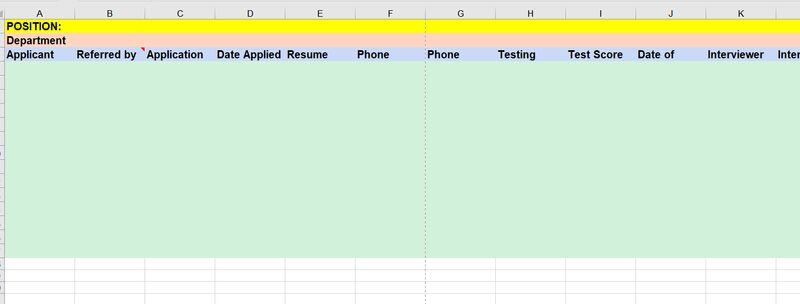
The Position Template tab has multiple colors to help guide your personalization of the template.
Row 1 (Yellow): Put the job title and description at the top of the page. This is for the edification of your hiring team only. You can copy and paste this from the official job posting or put a summary of what interviewers should be considering.
Row 2 (Peach): Put the department you are hiring for or the responsible hiring party—whatever information is most important for the team to keep in mind.
Row 3 (Blue): This row is the header row (auto-filled) that lists the description for each column. You can modify this row to fit your needs.
Row 4-104 (Green): The current template is set up for 100 candidates. If you need more, highlight and copy an entire row, then paste it. That will let you keep the drop-down menu choices.
Clicking on the dropdowns shows you options of common applicant statuses to help in your applicant tracking.
Column A: Put the applicant’s last name first so that it’s easy to sort alphabetically.
Column B: Knowing the reference can help give insight into the candidate. For example, if an employee refers another person for a position, you can ask them about the candidate. You can modify this column by making a menu of choices, but we chose to leave it fillable so you can get more precise (like referral names).
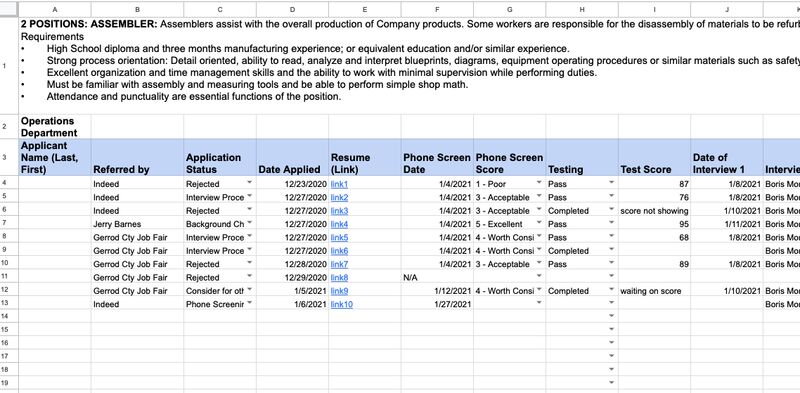
Column C: The application status lets you know where a particular candidate is in the process. You can also use color-coding to make it easier to spot active vs. rejected candidates. If you like a candidate but not for that job, the “Consider for another job” option is useful. This column has a pre-filled drop-down menu (as shown above).
Column D: Place the date the applicant applied in Column D.
Column E: Resumes can be referred to with links or notes as to where they are stored, such as a Google Doc or a job board like ZipRecruiter.
Our template also has a dropdown for Phone Screen Score, which gives you a quick view of how well they did in that segment of the recruitment process.
Column F: If your company has a policy of phone screenings (quick interviews to weed out unqualified candidates), then record that date in this column.
Column G: This column offers drop-down menu choices for scoring. It offers a pass/fail option and a scale of 1 to 5. The menus are easy to change if you prefer something more specific, such as PASS/FAIL, UNQUALIFIED/FAIL, UNINTERESTED/FAIL, POOR COMMUNICATION, etc.
The Interview score dropdowns give a quick glance at whether the candidate passed the first interview stage.
Column H: Some companies ask potential candidates to take online or in-person tests, such as for analytical skills, word processing, or trade skills. Here, you can track if the candidate is scheduled or has taken the test, and whether they have passed or failed using the drop-down.
Column I: This column is used for testing scores. We left the score as fillable to accommodate the many ways that one can be graded.
Columns J-R: Use these columns to record the date, interviewer, and score of each interview conducted. We allowed for three interviews, but of course, you can either delete some columns or leave them blank. The drop-down for the Interview Score uses the same pass/fail or 1 to 5 criteria as the Phone Screen Score.

Our template also has columns for background and reference check statuses and progress. We also have a column for general notes.
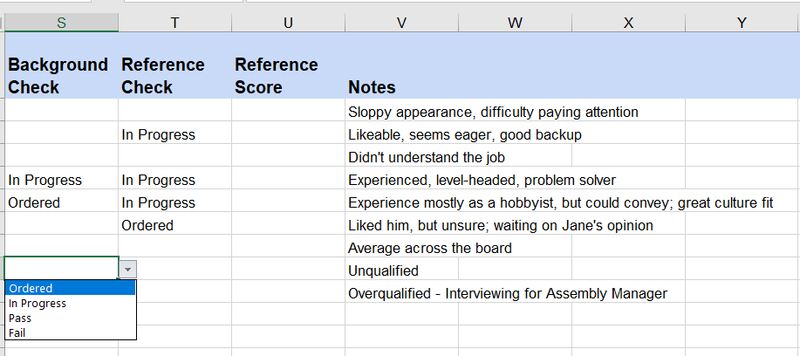
Column S: At any point in the process, you may want to conduct a background or reference check to verify qualifications (Drug testing is in the HR Applicant Tracker). The background check menu offers a simple pass/fail in addition to ordered and in progress.
Columns T-U: These columns are to notate reference checks. Column T has a drop-down that shows if the reference check is ordered, in progress, or complete. Column U offers a place for a score. The drop-down score shows pass/fail or a score of 1 to 5.
Column V: This column is used to make any notes regarding the candidate.
How to Use the HR Applicant Master Tracker Spreadsheet
Let’s look at each element and how to best use the HR applicant master tracker spreadsheet template.
The HR Applicant Master Tracker also has an overall applicant status dropdown, giving viewers a quick look at what status an applicant is in the recruitment pipeline.
Column A: This column is where you can put your own unique applicant ID code, whether an identifier from another system, a Social Security number, or an in-house identification method.
Column B: Put the position title of the job for that specific candidate in this column.
Column C: Put a link to the job description for this candidate.
Column D: Enter the department that is associated with this job position.
Column E: This column uses a drop-down to indicate the status of the applicant—whether it be a rejected candidate or one that is currently in the interview process (see options above). We also included a “Consider for other position” option in case you find a candidate that you’d like to hire for a different job or at a later time. You can easily sort your spreadsheet by this column to view all candidates in each stage of the hiring process.

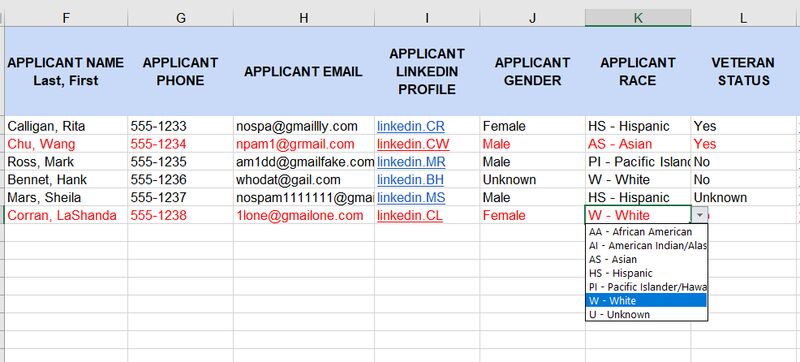
Our free master tracker also has columns that note demographic information for DEI tracking.
Columns F-L: This is the applicant’s contact and demographic information. Demographics are important for HR considerations for equal opportunity employment, which not only impact the diversity of the company but can also result in tax credits. Nonetheless, this should be considered sensitive information that does not impact hiring itself. Drop-down options are available for Gender, Applicant Race, and Veteran status.
We added some columns for noting the previous employers/job history of a candidate to make quick references.
Column M-O: This tracks the applicant’s past and current work history. Column M includes a place to link to the applicant’s resume or application. From their resume or application, you can easily fill in Columns N & O with their current employer and position.
Column P: By noting where the applicant heard about the job, you can get insight into what venues get the most results and which generate the most qualified candidates. This can help you with future recruiting planning and knowing where to post job ads. One modification would be to create a menu of items.
Columns Q and R: These columns indicate the date the applicant applied and the date of their last interview with your company (if applicable).
Apart from columns for noting down background, reference, and drug test check statuses, we also added a column for the reason a job offer was rejected (if it was).
Column S-U: These columns are used to track each applicant’s background check, reference check, and drug tests. You can make notes or simply place the status—Ordered, Scheduled, Completed, Fail, Pass, etc.
Columns V and W: Use these columns to record the date you made an offer to the candidate. Should the candidate not accept your offer, you can include the reason in Column W.
Column X: Interviewers can record notes in Column X. This is for high-level notes or additional comments.
Quick Reference for Customizing the Templates
Our templates may be modified to suit your business or industry needs. Below are simple instructions for modifying our templates in Excel:
- Delete a column: Go to the top of the page in the row with the letters. Right-click on the column letter you don’t need, then select Delete Column.
- Add a column: Do you have a step or piece of information you want to track? Go to the top of the page to the row with letters. Right-click on a nearby column where you want the information, and select Insert. Excel defaults to inserting a column on the left.
- Add or modify drop-down menu choices: Start by highlighting the cells whose menu you want to change. Then go to Data in the menu. Find Data Validation. You’ll see the menu options under Source. Delete the ones you don’t need and add those you want. Separate items with a comma, then click OK. You can use the same process to create a menu of choices, such as for referral sources.
You can go to the Data Validation option to edit the drop-down menu choices.
Alternative Recruitment Tracker Templates
Numerous applications use Excel templates for applicant tracking. We have highlighted several that may be of interest.
Why Use a Free Applicant Tracking Spreadsheet?
If you are only hiring a single worker or a handful of workers, then you may not need a full applicant tracking system. However, if you are hiring a new employee with a team of managers or experiencing high turnover, seasonal hiring surges, or a growth cycle, then a free applicant tracking template can keep you organized and on top of the information. In addition, it can help with:
- Team communication: Anyone on the hiring team can see at a glance where an applicant is in the process, what other people’s impressions were (as long as notes are recorded), and how a candidate fared in each part of the process.
- Organization: By recording dates and tracking steps, you can ensure a qualified candidate does not fall through the cracks.
- Analysis: By having the tracker in Excel, you can manipulate the data to gain insights. What referral process brings the most candidates and the best applicants? Where are most job seekers falling short in the process?
- Process improvement: For example, if candidates are doing well in phone screening then failing the first interview, you may need a more stringent phone screening process to weed out the weaker applicants. Or maybe you’re not seeing a correlation between online test results and the best candidates—and in this case, you might be able to drop that program and save some money.
- Diversity analysis: While no one should be judged by race or gender, more businesses are focusing on ensuring they are reaching out to a diverse hiring pool. An applicant tracker can help you determine if you are reaching a wide range of demographics.
Frequently Asked Questions (FAQs)
Excel is not categorized specifically as an applicant tracking system. However, you can create spreadsheets that automate workflows and candidate sourcing, and provide detailed reporting to manage your entire recruitment process.
An applicant tracking sheet is a spreadsheet (e.g., Excel or Google Sheets) that helps you manage applicant information, such as resumes, interview details, scoring, and personal information.
To make a live Excel tracker, use its real-time data (RTD) feature. It will allow you to access data from an external source. To create your spreadsheet, create a new table and then add column headers that correspond with the data you wish to pull over. Select the cells that you want to add data in and click the Data tab. Add a column to receive the data and use the RTD feature to pull your data in.


