

Product videos demonstrate an item’s features, benefits, and uses in action—helping to inform, persuade, and bridge the gap between online and in-store experiences.
Adding video to your ecommerce product pages can increase conversions, reduce return rates, improve buyer confidence, strengthen brand image, and even boost search engine rankings. Plus, many types of video content can also be used to avail marketing strategies on other channels.
Follow our comprehensive guide on how to create a product video at home. You’ll need:
- A smartphone or camera
- A quiet indoor or outdoor space
- Time to research and plan your video
- Some basic equipment you may already have around the house
- Step 1: Consider What Type of Product Video You Need
- Step 2: Know Your Target Audience
- Step 3: Create Your Video Script or Storyboard
- Step 4: Set Up Your Studio
- Step 5: Shoot Your Product Video
- Step 6: Edit Your Video
- Tips on How to Create a Product Video
- Product Video Frequently Asked Questions (FAQs)
- Bottom Line
Step 1: Consider What Type of Product Video You Need
Product videos can be made in different styles and formats to serve different purposes—such as educating, informing, and/or persuading. These may differ for uses in ecommerce, marketing, and other applications, too. Knowing the types of product videos and when to use them will help give your video shoot a direction.
Consider these five types of product videos and examples to figure out which is best for your product, customers, and intended channels.
These videos are typically simple and short—around 15 to 60 seconds generally. The objective of a product demo is to provide a high-level overview of the product, its capabilities, and what it looks like in action. They’re perfect for use in the gallery of a product page.
The style and content of these clips can vary based on the product, brand, and intended usage, but they often include full views and close-ups of the item. Audio and text may or may not be used.
Short demo videos are typically the easiest to make and most likely to be watched in full. They can even be turned into a looping GIF.

This looped product demo video is a brief compilation of simple clips that effectively demonstrate how the product is used, how it looks, and how it makes the user feel. (Source: Target)
Step 2: Know Your Target Audience
A successful product video is well-crafted and well-researched. It needs to appeal to the customer base you’re targeting, so it’s crucial to understand how to reach them.
Start by creating a customer profile to establish key details about your ideal buyer types. This involves making a list of details, such as:
- Shared demographics
- Pain points
- Priorities
- Typical buying journey
- Which devices they’ll be watching on
- What kinds of language they respond to
- What types of media they prefer to consume
Even if you don’t plan to use your videos for social media marketing, it’s important to know which social channels your customers are on. Trends on TikTok posts, Instagram reels, live streams, and various types of YouTube videos can help you plan for and create a product video that engages your audience.
Step 3: Create Your Video Script or Storyboard
Creating a script and/or storyboard is essentially the process of finalizing a detailed plan for your product video. It should map out every element of your video—including scene composition, setting, camera angles, transitions, flow, gestures, and dialogue.
Follow these steps to write a powerful product video script:
As you plan how to create a product video, consider some important questions that your final production should answer:
- Who is the target audience?
- What is the product for?
- Where and how can they use it?
- Why is it worth using/buying?
Not all of these topics need to be blatantly addressed in the video’s dialogue or overlaid text—especially if you’re shooting a short, simple video without audio. But the answers to those questions should be conveyed to the audience through your choices in subjects/actors, settings, themes, and the ways that you showcase the product’s features.
Reference your customer research to understand how to approach these objectives in a way that resonates with your audience.
This product video stresses its value as a solution for consumer pain points. It identifies a target audience by mentioning a number of specific use cases, and includes simple, engaging demonstrations.
Tone is the “personality” of your business or brand and how it comes across to your target audience. It’s conveyed through your product descriptions, marketing copy, social media posts, site design, and product videos.
The tone of your video’s narration, dialogue, music, setting, and production as a whole should align with what speaks to your customers. To zero-in on the right tone to use when writing your script, consider a hypothetical meeting with your ideal customer profile in your mind: How, where, and why would you talk to your target buyer in person?
This will guide you toward an appropriate and compelling tone. Any exchange will naturally take on a tone of its own—business, technical, casual, cheeky, sassy, supportive, instructive, etc. By adapting that sentiment to your script, you’re more likely to engage qualified shoppers.
The product video uses a bright, caring tone that resonates with parents. The background music, visuals, and narration are reminiscent of moments that kids and parents share together.
This product video uses a humorous tone. The visuals, highlighted features, narration, and dialogue are energetic and absurd—which mirrors the product and brand itself. It’s informative while conveying the comedic (and giftable) nature of the item.
Keeping your objectives and tone in mind, start envisioning your video and jot down notes, ideas, and diagrams. Then proceed with writing a script.
While it doesn’t need to follow any specific type of format, ensure that your script is detailed and clear to everyone involved in shooting. You can reference similar businesses’ product videos for inspiration and guidance if you feel stuck.
As you finalize and edit your script, create and stick to a consistent formatting. The best approach is to separate audio and video by using clear indicators before each cue or direction. You can also distinguish the elements of your script (such as narration, on-screen dialogue, transitions, and sound-effects) by color-coding, italicizing, formatting in bold, or bracketing them.
Storyboarding
A storyboard is a graphic organizer consisting of visual cells that represent each scene or part of your video.
An illustration of the background, product, user, and any other subjects can be drawn in each cell, and notes pertaining to camera angle, camera movement, music, and more can be added underneath.
Storyboarding can be a useful supplement to a written script. But for product videos that don’t feature narration, dialogue, or multiple sets, a solid storyboard may replace a script altogether.
Use a storyboard template like this one to get started:
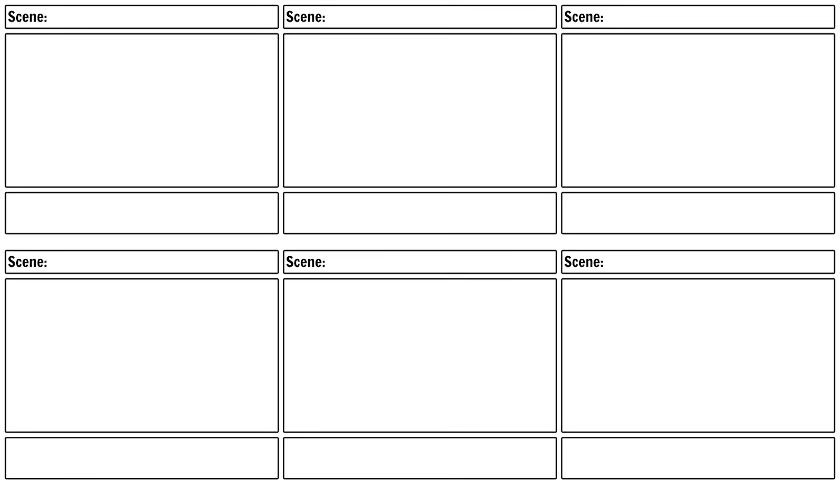
(Source: StoryboardThat)
Script-writing Do’s & Don’ts
Here are some tips to plan a product video that sells:
| Do’s | Don’ts |
|---|---|
| Include at least one ‘Hero Shot’ that showcases your product in action | Over-explain the product or provide irrelevant details/specs |
| Show your product from multiple angles and levels of detail | Talk down to your viewers or use commanding language |
| Address your viewers directly | Use overly complicated wording |
| Use active verbs and strong imperatives | Incorporate jarring visuals (like strobe lighting, dizzying graphics, or disturbing images) |
| Emphasize how your product will improve the shopper’s life | Add inappropriate music for your product and brand image (remember, what you like may not match up with what your customers like) |
| Explain how your product solves pain points | |
| Demonstrate dimensions and/or relevant specs. Give the viewer context for how large or small the product is and how heavy or feather-light it feels | |
| Include your logo and a call to action | |
| Say the product name multiple times (aim for 3+) | |
Step 4: Set Up Your Studio
Creating a product video doesn’t require a high-budget setup with fancy equipment, but you’ll need some things other than your camera or phone. However, every part of a home video studio can be DIYed or purchased affordably.
The tools you’ll need are listed below, along with links to buy budget-friendly supplies from Amazon if you don’t have them on hand.
This videographer created an at-home studio using household furniture, reclaimed wood, a smartphone, tripods, and a translucent curtain over a large window. (Source: Stephen Mills)
While it helps to have a dedicated video camera, it’s probably not necessary to invest in a new device for your product video. Many modern smartphones are built with advanced cameras that can capture beautiful photos and video alike. DSLRs and compact digital cameras can achieve great results as well.
That being said, an old iPhone 4 isn’t going to provide the video quality your customers are looking for. If you need to borrow a device from a friend or upgrade to a more sophisticated model, here are the specs to look for:
- Megapixel Count: Megapixels—or MP—is the number of pixels in an image (the prefix “mega” denotes a million). In camera specs, it refers to the resolution of the photos the device can create. Aim to shoot with a camera that has 12 MP or greater.
- Sensor Size: The size of a camera’s internal sensor impacts image quality. It’s measured in inches or fractions of an inch, and smartphones typically have smaller sensors than dedicated cameras. In any case, choose a device with a sensor measuring as close to 1” as possible (or larger).
- Aperture: Aperture is a measurement of the size of the opening through which light enters the camera. This opening (or diaphragm) on dedicated cameras can be adjusted, whereas most phones contain a fixed aperture. To allow for the most versatility and brightness on a camera phone, find one with a relatively large aperture (f/1.8 or wider). For this setting, the smaller the value, the bigger the lens’ opening will be— which allows for more light to be captured
Stabilizing your camera or phone is crucial for getting smooth, professional-looking footage.
It’s possible to set up your device by setting it on an object of the appropriate height—like a stack of books or a piece of furniture. But keep in mind that smartphone cameras use digital zoom that reduces the image quality—so zooming to get a close look at your product will likely result in a grainy video.
Your best bet is to buy a dedicated tripod that can adjust to the proper height for your setup. Here are some useful options that cost $30 or less:
If you’re filming a small or moderately sized product with props or hands, you’ll need a flat platform large enough to easily display the subjects. You can use a dining table, desk, or similar platform as your shooting table.
You can also purchase a dedicated studio table with a built-in sweep (covered in the next tab) for $50–$125, like this economical option—but DIY versions work just as well.
Try covering the surface of your shooting table with colored paper, cloth, or another material that matches or complements your background. To create a flattering reflection beneath your product, lay a flat piece of glass on top of a dark-colored surface.
When shooting larger subjects (like actors), forgo the table altogether and position them in front of a sweep or backdrop.
It’s one option to shoot in an environment that contributes to your product video, such as a classroom, gym, or hair salon. But in most cases, you’ll want to create an elegant, distraction-free background for the subjects of your video.
There are a couple of tools you can use to achieve this:
- A sweep or infinity curve: A sweep is a seamless backdrop that smoothly transitions from the horizontal to vertical surfaces in your shot. Sweeps can be made at home using clamps or tape and paper, foam core, or cloth. Professional sweeps are available for small or large settings.

A DIY sweep constructed from tape and a large sheet of paper can create a clean, simple background for your video. (Source: Pixc)
- Backdrop: A backdrop covers only the vertical surface of your setup. It’s typically used if the horizontal surfaces won’t be visible in your shot, or if your shooting table has an attractive background of its own.
Similar to making a sweep, you can make a backdrop by suspending paper, cloth, foam, or another material behind your shooting area. Or you can buy a backdrop that consists of paper or cloth loaded onto a large frame.
Alternative materials can make for an interesting and on-brand background, like in the example shown below.

Colorful paper chains arranged on a backdrop stand create a whimsical video background. (Source: Pretty Life Girls)
Audio quality makes a huge impact on your video. To get crisp, professional-level audio, you need some type of microphone other than the one built into your primary phone or camera.
Here are some economical microphone options to record great sound:
- Secondary Smartphone: In a pinch, the built-in microphone on a friend’s or coworker’s phone can be used to capture your audio (which can be synced with your video in post). Try setting it up on a separate tripod near the audio source.
- Clip-on Microphone: These mics are best for capturing spoken dialogue. Most cost-effective options, like this set of wireless clip-on mics, connect directly to your device.
- Shotgun Microphone: Smaller versions of these professional mics are available with a 35mm headphone jack that plugs into a phone or camera, such as this affordable option that comes with a tripod.
Lighting is one of the most important aspects of your product video. Poor lighting instantly makes a video look dull, which can affect the perceived quality of your item.
Always avoid shooting with a bright light source (like a window) behind the subject. This can cause problems with the auto-exposure on your camera and create a washed-out foreground.
There are multiple ways to approach lighting for your product video:
Natural Lighting
Working with natural light is typically the best for DIY product videos. It’s easier, cheaper, and more forgiving than using studio lighting. Plus, a wash of soft, natural light provides the best color balance.
Try these methods for getting the right natural light in your studio:
- Shoot near a large window, glass door, or open door. The closer you can get your subjects to the natural light source, the better.
- Shoot outdoors on an overcast day for naturally diffused, even light.
- Diffuse bright, direct sunlight with translucent curtains or by draping thin fabric.
- Turn off domestic lights, unless they’re 5000K bulbs or have a temperature that’s similar to the natural light coming in. Mixing color temperatures can throw off your camera’s automatic white balance, which results in poor, unflattering video.
- Use reflector boards to manipulate light for even coverage in your shot and to reduce shadows. Professional reflectors are available for as little as $15, but a simple white foam board can be used instead.

Position your reflector on the opposite side of your subject from the light source to bounce the light back into the scene.
Artificial Lighting
Artificial lighting is an alternative that provides flexibility and convenience. This option may be particularly helpful for those without the right weather, windows, or daily schedule to capture any sun.
If you plan to use artificial lighting, opt for 5000K daylight/cool white LED bulbs or adjustable LED lights that have cool-toned settings. This color temperature provides a glow that’s very close to natural light and tends to look best on camera.
Here are some studio lighting options and equipment you may need:
- Ring Lights: LED ring lights are the simplest type of studio light to use, and they typically are made with light-diffusing plastic covers. Pricier ring lights like this model feature an adjustable telescoping stand, phone holder, 36W output, colored gels, and remote shutter release control. Cheaper options, such as this ring light, are typically smaller and less powerful.
- Clamp lamps: These fixtures house a bulb in an aluminum reflector that disperses light nicely, and can be attached to any household object to get lighting at the right height for your product. Note that most clamp lamps (like this set of two) are sold without bulbs included.
- LED bulbs: Most studio light housing fits an E26 base, and the pros recommend having a total of 200-300 watts for a small studio—so a pack of bulbs like this one would be plenty.
- Reflectors: As explained above, reflectors can be used to evenly disperse light and eliminate shadows on your subjects.
- Diffusers: If your artificial lights are too bright and harsh, you can soften and disperse their output by using professional diffusers like this one or homemade tools, as shown below.

A paper towel wrapped around an empty picture frame can make for an effective DIY diffuser. Other professionals recommend clipping parchment paper or even bedsheets to your lights. (Source: B&H Photo Video)
You can never be over-prepared for a shoot, so plan for the additional tools and accessories you may need. Some miscellaneous items to keep on hand include the basics, like pens, paper, tape, extra batteries or a charger, and a lens cloth.
Other useful items you may want to procure before you shoot include:
- Teleprompter: If you’re working with actors in your video (or filming yourself), a teleprompter can be used to give a visual reminder of lines and physical cues. Many free apps are available to turn a smartphone into a teleprompter—like these five recommendations.
- Cleaning Supplies: Bright lighting and close-up shots can put dust, fingerprints, and grime at center stage. Make sure your product looks appealing by keeping it clean and polished before each shot.
- Props: Try incorporating props and special touches to add visual interest to your scenes. Gather items that align with your video’s tone, that tell the product’s story, appeal to your audience, and fit in with the scale of your subjects. Avoid heat- and time-sensitive props (like ice cubes) and opt for stable acrylic replicas instead.
- Turntable: Create dynamic movement in your video that provides a 360° view of the product by using a rotating turntable or lazy Susan on set. Mechanical turntables are the best for consistent speed, but the traditional household version can also work.

Blend the turntable into your set by creating a platform of like-colored materials. Adding a piece of glass on top creates flattering reflections, as shown in the video example below. (Source: MrCheesyCam)
A rotated product video like this one is shot with a turntable. It provides lots of visual information about the product, and would be good for the image gallery on a product page.
Step 5: Shoot Your Product Video
With your script written and your studio set up, it’s time to record a beautiful product video.
Here are some tips to get professional-quality footage from your shoot:
The auto settings on your camera or smartphone may be all you need to capture high-quality video. But if your test shots aren’t looking quite right, try refining these settings manually:
Frame Rate & Resolution
Frame rate is the frequency at which images are captured by your camera. Shooting with more frames per second (or fps) yields more fluid video.
Resolution refers to the number of pixels that can be displayed in any given frame. A higher resolution records information on a greater number of pixels, yielding better video quality.
These attributes are typically adjusted together on modern smartphones. The most commonly used settings are:
- 1080p at 30 fps: For the most life-like video
- 1080p at 24 fps: For a pleasing, cinematic look
- 1080p at 60 fps: For ultra-fluid video that can be turned into slow motion footage
- 4K at 24 fps: For high video quality even when cropped or displayed on large screens
White Balance
This setting adjusts the color temperature of the scene you’re shooting. Color temperature is measured in K or Kelvins, and ranges from warmer, orangey tones at 1,000 K to bluer, cooler tones at 10,000 K.
Your camera’s white balance features add the opposite color to the image to neutralize the scene’s color temperature.
Aim for a white balance that gives your video a neutral, true-to-life hue. Adjusting your lighting and settings is the best way to achieve this, but color temperature can also be reworked during editing.
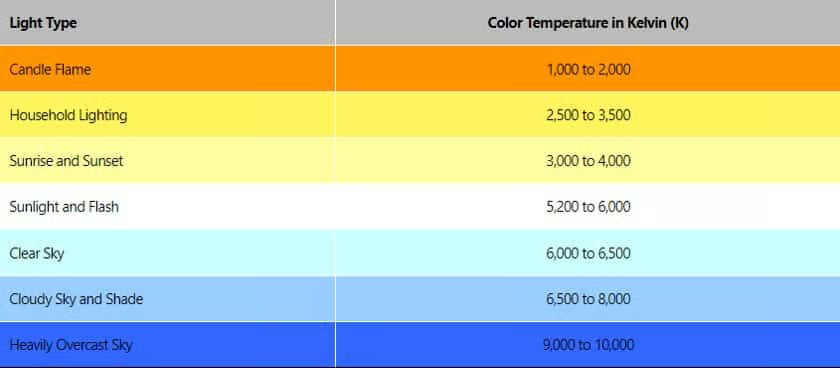
A chart of the color temperature-value of common lighting conditions (Source: Photography Life)
Step 6: Edit Your Video
Once your product footage is captured, the final step is editing. In this stage, you can review everything you shot, stitch together the best scenes, add text and/or music, and adjust the look of the video.
Editing your video also allows you to optimize it to load quickly, look better on browsers, and increase page visibility.
Here’s what you need to know to turn your footage into a polished representation of your product and brand:
Use the Right Software
The best app or program depends on the tools you need to bring your plan to life. Here are the top choices for video editing programs:
- Free
- For Windows, Mac, and Linux
- See the user guide and tutorials
Lightworks is famous for its approachability (thanks to its large collection of in-depth tutorials) and intuitive interface. Its free features include everything you’ll need to produce clean, attractive videos that sell your product, but a paid “pro” version is available starting from $9.99 to those who want to take their videos further.
- $20.99/month after 7-day free trial
- For Windows and Max
- See the user guide and tutorials
Adobe’s editing products are widely considered to be the gold standard, and Adobe Premiere Pro is used by professionals, enthusiasts, and beginners alike. The software comes with 100G of storage and social media tools, among other useful features.
- Free
- For Windows and Mac
- See the user guide and tutorials
VideoPad is a great entry point to product video editing, complete with customizable transitions to weave product clips together nicely and exportable presets to optimize files.
- Free
- For iOS and Android
- See the user guide and tutorials
The Quik by GoPro mobile app is best for quickly touching up clips and/or photos and stitching them together into a video. It allows you to use convenient filters, change video speed, sync audio, and more.
Meet Platform Requirements
Including product videos in your online store is typically as simple as uploading them to the listing’s media field on your ecommerce platform.
Similarly, adding videos to social media platforms and other marketing channels is very straightforward—but it’s important to adjust your video to meet the platform’s compatibility requirements.
The exact requirements and limits for these specs can usually be found on the provider’s Help Center page. The most common requirements pertain to:
- Length
- File Size
- Resolution
- File Type
- Aspect Ratio
These requirements can be met by making adjustments and conversions on your video editing software.
Add Music
Adding a background track is an easy way to enhance your video during editing. Music can help convey the emotional attributes of your product and make your video more engaging.
Avoid using copyrighted music illegally in your video, as it’s considered copyright infringement with serious repercussions. Instead, consider using Creative Commons (or CC)-licensed music, which authors have specifically licensed for others to use. Ensure to check each track’s license terms as they may vary, with some restricting modifications or commercial use.
Many sources for CC music offer a free license, requiring only credit in your project. Some provide commercial subscriptions or ‘Pro Licenses’ for uncredited use. Alternatively, purchase a license for commercial use of stock or royalty-free music, generally allowing use in your product video without ongoing fees.
Alternatively, you can purchase a license for commercial use of stock music or royalty-free music. Generally, this option allows you to use a copyrighted song in your product video without the need to pay ongoing royalties or other fees.
Try using these sources for safe and legal tracks:
This product video relies heavily on music to show viewers how the product will make them feel. The track is cleverly synced with the visuals, creating a compelling effect.
Tips on How to Create a Product Video
Use these tips to guide you through the product video process, ensuring clarity, emotional engagement, and a clear path to purchase—helping you achieve product video success.
Showcase Real-world Applications
Don’t just display your product; aim to show how it fits into the bigger picture of your customers’ lives. Illustrate scenarios where your product solves real-world problems or enhances user experiences. This approach helps to position your product as a valuable addition to the customer’s lifestyle.
Maintain Clarity Over Creativity
While it’s tempting to get artistic or abstract, it’s crucial that customers fully understand the product’s features and benefits. Unlike vague perfume or pharmaceutical ads, your video should provide clear, direct information about the product. Ensure that your creative elements don’t obscure the essential message you want to convey.
Share Your Product’s Story
Give your viewers some backstory or context to connect with: share the narrative of how your product came to be, introduce the team behind it, show how it’s made, or include stories from satisfied customers. This narrative style helps to humanize your brand and build a stronger emotional connection with your audience.
Direct Viewers to the Next Step
At the end of your video, include a clear Call to Action (CTA) guiding viewers on how and where to purchase your product. Whether it’s directing them to your website, a retail partner, or a sales representative, ensure the purchasing process is straightforward and easily accessible. This step is critical in converting viewer engagement into actual sales.
Product Video Frequently Asked Questions (FAQs)
What Is a Product Video?
A product video is a visual marketing tool that showcases your product’s features and functionality, illustrating how it solves problems or improves the user’s life. With the right approach, a compelling product video can significantly boost your marketing efforts, product pages, and more by creating an informative and persuasive depiction.
Why Do I Need Product Videos?
Creating a product video is an effective strategy for promoting products, services, or SaaS offerings, allowing potential customers to see the value and benefits firsthand.
By bringing your product to life through video, you’re providing a more interactive and engaging shopping experience, which can enhance understanding and foster a stronger connection between your brand and your audience. It can also increase sales by clearly showing the practical applications and advantages of your product.
Can I Use AI to Make My Product Videos?
Yes, there are many low-cost tools for creating videos with AI. However, product videos you shoot yourself will likely come across as more genuine, portray your products more accurately, and do a better job of building trust with customers.
Bottom Line
Product videos work with your product descriptions and product photos to inform, qualify, and persuade shoppers. It’s widely reported that using product video on your store or landing page can increase conversions by up to 80%. Plus, adding video to your existing content is a great way to boost rankings through SEO (or Search Engine Optimization).
Search engines like Google reward videos for their ability to capture clicks, inform viewers, and keep customers on the page. So the more informative and engaging your product videos are, the better your SEO results will be.
Once you know how to create a product video at home, it’s easy to create engaging and informative content using just your smartphone and basic equipment.