

Product descriptions are key to building customer trust and successfully selling your products. To be effective, product descriptions need to go beyond simply describing the product. They should also inform your customers, convey your brand, and get your store visited by searchers—bringing in sales and boosting other key performance indicators (KPIs).
Continue reading for our seven-step guide on how to write a product description that sells, along with effective examples from online stores. You can also use our free product description template below to get started now.
- Step 1: Set Objectives for Your Product Description
- Step 2: Identify Your Target Audience
- Step 3: Establish Your Listing’s Tone
- Step 4: Turn Item Features Into Must-buy Benefits
- Step 5: Focus on Format & Length
- Step 6: Write Your First Draft
- Step 7: Revise & Optimize
- Do’s & Don’ts of Writing Product Descriptions
- Product Description Frequently Asked Questions (FAQs)
- Bottom Line
Step 1: Set Objectives for Your Product Description
Before getting started, it is important to understand the elements of a good product description so you can have a clear vision of what you are trying to accomplish. By knowing where to focus your attention and how to measure your listings’ success, you have the foundation for a profitable product description.
An effective product description will:
- Qualify: Demonstrate to the customer that they’re a perfect fit for your brand and product
- Persuade: Supply compelling reasons that the customer will benefit from making the purchase
- Inform: Provide relevant and factual information that increases buyer confidence and decreases return rate
- Boost: Optimize search engine results to get your listing seen
Though the bullets above outline the main goals your product descriptions should address, you might look at a few other key retail metrics to identify if there are any additional objectives you want to address. Consider the following:
Return Rate
Return rate can be significantly impacted by honing in on your listings’ specificity and accuracy. Delivered items not matching their product representations is among the top reasons for returns. According to a 2020 survey from SalesCycle, 64.2% of shoppers have returned purchases due to listing discrepancies. So, the more informed your customers are, the less likely they are to return their orders.
Bounce Rate
Bounce rate, or the percentage of page visitors that leave without taking desired actions, can be mitigated by crafting functional descriptions as well. Whether customers are comparison shopping or checking out an ad, they ultimately navigate away from a page if they feel they’re in the wrong place. By using tone and content thoughtfully tailored to your target demographic, your writing can retain on-page interest by qualifying and demonstrating the customer’s compatibility.
Shopping Cart Abandonment
Shopping cart abandonment is usually caused by friction in the checkout process, so product listings are your first line of defense against it. By clearly disclosing influential details in the product description—like price, shipping cost, delivery date, and handling time—shoppers are less likely to abandon their orders when met with this info later on.
If any of these factors are less than ideal, the product description is the perfect place to justify them in alluring ways. For example, a package arriving three weeks after the purchase date is much easier to swallow knowing that the goods are handmade to order by a skilled artisan. Similarly, buyers are less likely to seek the same product for a cheaper price elsewhere if proprietary materials and superior construction give it an edge.
Store Traffic
Maybe you’re not getting enough visitors to your store in the first place. Poorly written or nonexistent product descriptions have a huge impact on search engine rankings, so structuring your listings with SEO in mind is a surefire way to drive traffic.
Step 2: Identify Your Target Audience
The next step is defining your buyer; this will help you understand who to write product descriptions for and to whom they should appeal.
Whenever I define a target market, I start by choosing key characteristics like gender, age, socio-economic position, and location. Once I have a picture of who my target audience is and I can describe them, I research their behaviors and preferences, like where they like to shop, how much they spend, how often they shop, what makes them want to buy, and more.
If you have a clear picture of your target audience and understand what makes them tick, you will be able to turn product-centric copy into vibrant, customer-centered conversations that appeal to your market’s sensibilities and help convert browsers to buyers.
For example, at my store, our target market was young women ages 15 to 40 with medium levels of expendable income living in Denver and the surrounding suburbs. In general, via personal experience and outside research, I found that this group preferred high-quality fabrics, liked receiving styling help, and preferred modern, trend-forward pieces.
To appeal to our target audience in product descriptions, we included information about fabric and care, as well as sourcing and fabric features. We also mentioned what trends the pieces spoke to or could complement, and we left pairing suggestions to help turn single pieces into complete looks.
Here is another example of two versions of a product description—the first written with zero focus on the customer profile and the second written with the customer profile in mind:
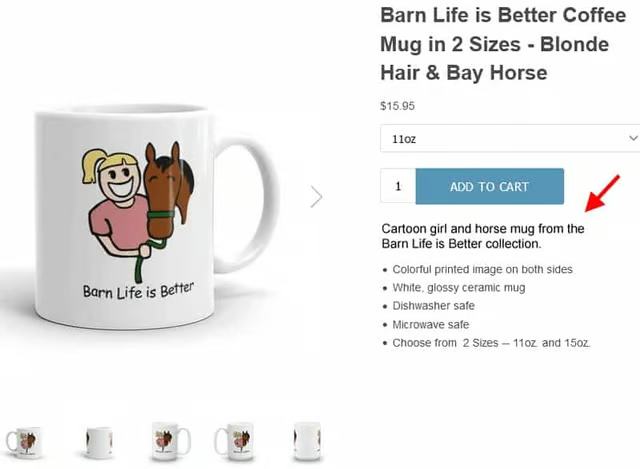
The information is detailed and accurate, but there’s no chance to make a connection with the reader and qualify their fit for the product. (Source: The Horse Junkie) 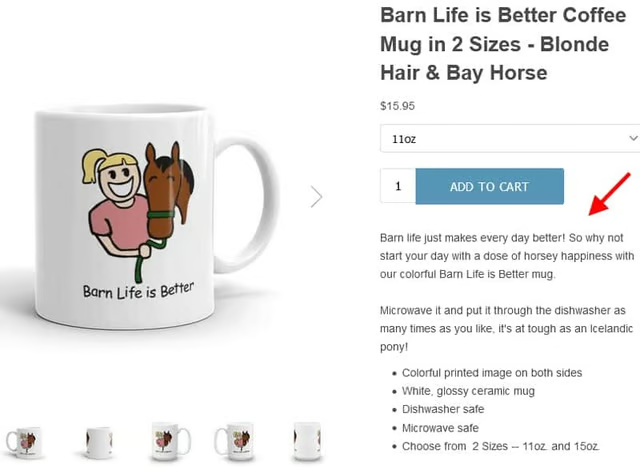
By rewriting the product description with the target audience (horse lovers) in mind, the listing relates to the customer and draws them in. (Source: The Horse Junkie)


Step 3: Establish Your Listing’s Tone
The tone of a product description is the “personality” of your store or brand as conveyed through your writing. Having a consistent and clear tone is a large part of successful branding, and incorporating brand tone into your product descriptions can have a big impact.
To begin, you have to have a clear picture of your brand. Is it professional? Formal? Girly and fun? Technical? In the case of my store, my brand was feminine and youthful with an outdoorsy, Western bent. I found that the best way to hone in on a tone that fit my brand’s image in my product descriptions was to imagine my store as a person, and then describe the product as that person would.
You can see in the example below that I used a more conversational voice and playful language, as well as helpful styling details to set a tone that matches my brand image, “feminine and youthful with an outdoorsy, Western bent.”
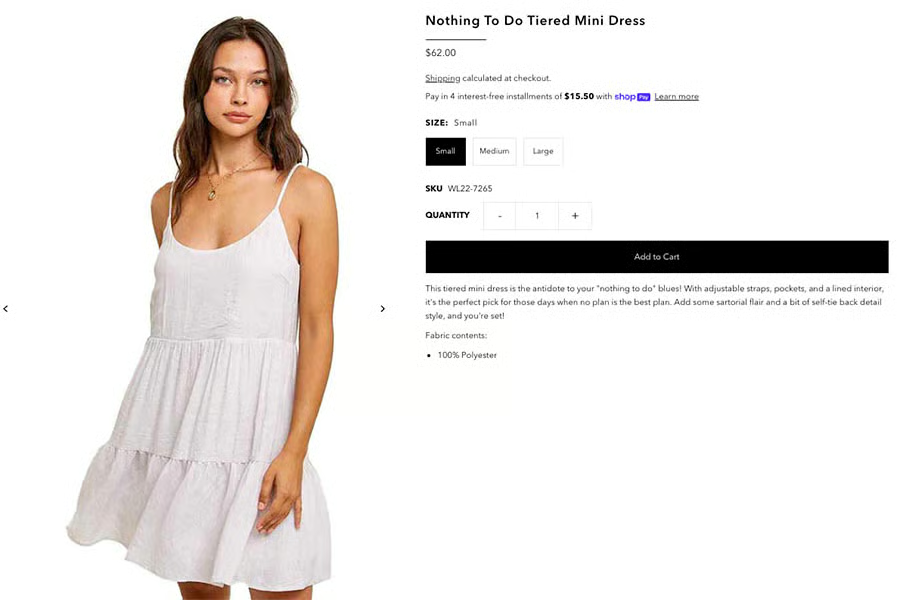
The tone of a product description should reflect your brand image.
Step 4: Turn Item Features Into Must-buy Benefits
When I started, I focused solely on hard features, specs, and key details in my product descriptions. While all this information is highly important, I was missing a key aspect of an effective product listing: conveying how and why my product will make my buyer’s life better. Sure, you want to make your product’s high points shine, but your real focus should be creating the perfect excuse for the buyer to snap it up.
To do this, you’ll need to convert facts about your product (like construction details, intended use, special features, material, and specs) into user benefits. Here’s a powerful example:
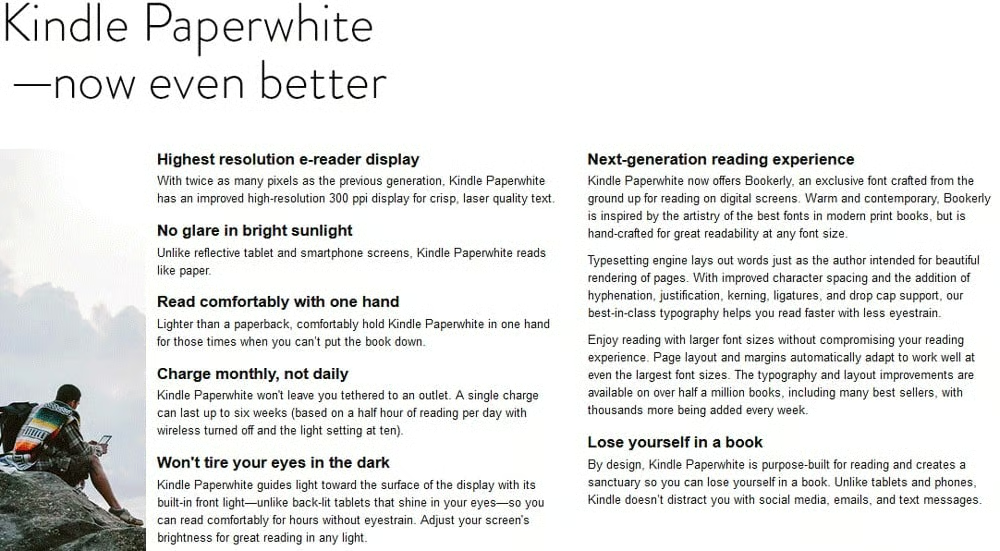
(Source: Amazon)
By considering the target audience and using a decisive tone, the description of this Kindle translates hard facts into purpose-driven, relatable benefits.
The writer could have mentioned that the device has a high-capacity 1600 mAh lithium-polymer battery, but converting that raw feature into the benefit it provides allows shoppers to envision the experience of minimal charge time. Similarly, the product is described as being “lighter than a paperback” to “read comfortably with one hand,” which is far more compelling than simply stating that the device weighs 6.4 oz.
A successful product description will turn impersonal details into personal advantages. To do this effectively, you’ll need to focus your attention on what your target buyer values.
Step 5: Focus on Format & Length
According to Chartbeat’s analysis of page views and engagement, you only have 15 seconds to win your customer’s interest before they’re closing out of your store’s tab and moving on. That’s a small window of opportunity, so it’s crucial to make your listings as eye-catching and scannable as possible.
Product descriptions are not the place to write a mountain of prose—it’s practically guaranteed that your viewers won’t read it. Instead, create a quick-scan layout that puts your product’s benefits front-and-center, like this:
| Product Description Element | Format |
|---|---|
| Intro | Brief lead-in of 1–2 sentences |
| Benefits | Bulleted list or collection of headers with short explanations |
| Body | Complete description in 1–3 paragraphs |
| Close | Purchase call to action |
Sticking to a template maximizes efficiency and consistency. In fact, it’s how I was able to crank out product descriptions in volume.
Step 6: Write Your First Draft
With the groundwork laid out, you are ready to start writing your product descriptions.
Keep these considerations in mind as you dive in:
- What are the goals you have set for your listing(s)?
- Who is the target buyer you’re trying to reach?
- What kind of tone would an in-person conversation with them have?
- Which features of the product should be highlighted, and how do they translate into consumer benefits?
- How will the format of your product description take shape?
When I wrote product descriptions, I also liked to incorporate proven copywriting techniques into my work. While readers respond negatively to product descriptions that come across as over-engineered or packed with marketing-speak catchphrases, skillfully adopting a few copywriting techniques can improve your descriptions’ impact.
Create a Sense of Urgency
To persuade customers to buy now rather than later (which often turns into never), you need to reasonably convey that it’s in their best interest to do so.
Mention stock scarcity to compel viewers to act quickly with additions like, “Only three left in stock!” or “Only 2 size SM available!”
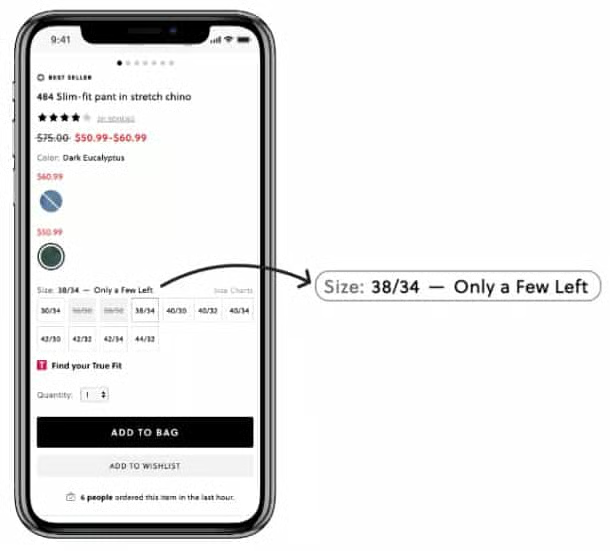
This online store compels visitors to buy with limited stock notices. (Source: TheGood)
Limited-time offers are also highly effective sales drivers. Explaining the time-sensitive nature of the purchase with copy such as, “Sale ends tomorrow, don’t miss out!” is a great way to boost conversions.
Building time-dependent deals into your checkout process is another way to impart a sense of urgency. By letting the customer know to “Order in the next five minutes to score free shipping!” on the product page, you’re increasing the likelihood of a sale.
Ask “Yes” Questions
A tried-and-true principle used in sales and copywriting alike is that answering “yes” to a question makes a customer more likely to answer “yes” to following questions—including the question of whether or not to buy.
Think about how your product’s benefits relate to your target buyer, and you’re sure to find some queries with obvious “yes” answers. For example, “Does your cat’s litter box make the room smell not-so-fresh?” or “Are you dreaming of a seaside getaway?”
Appeal to the Senses
An effective product description should encourage your reader to connect with the item you’re offering. A powerful way to accomplish this is to infuse your writing with sensory words.
Reading a listing that vividly describes how the product feels, tastes, smells, and looks actually activates sensory parts of the brain, making a real and lasting impact on the customer. Think of words like these that apply to your item:
→ Juicy
→ Crisp
→ Baby-soft
→ Earthy
→ Dazzling
→ Mellow
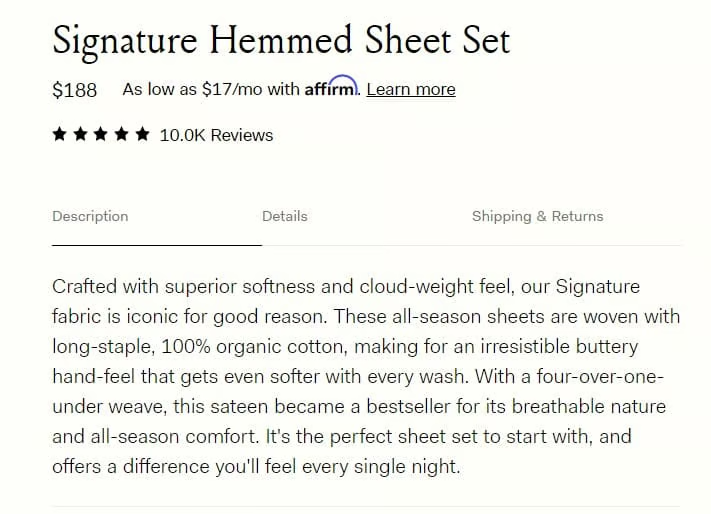
This product description uses terms like “cloud-weight” and “buttery hand-feel” to appeal to the reader’s sense of touch. (Source: Boll & Branch)
Above all, your copy to be customer-focused rather than brand-focused. Counterintuitively, what matters and speaks to the customer is almost certainly different from what matters to the retailer. So always consider how your writing will be perceived by your audience and do the most to make it personal.
Once you have a first draft written, read it aloud to yourself. Does it sound conversational and appropriate? Does it flow nicely and naturally, without any clunky sentences or unnecessarily big words?
If you can confidently answer “yes” to those questions, it’s time to bring your product description into the final stage.
Step 7: Revise & Optimize
The next step is to edit your work. First, go back over each word carefully to check for spelling and grammar errors. You can either paste your work into a Google or Word document and use their editing tools or you might consider a grammar-check plug-in, like Grammarly, for a more advanced option.
Once through the initial editing stage, you will want to optimize your description for Google, also known as search engine optimization (SEO).
When I first learned about SEO practices, optimizing for the search engine was my biggest focus when writing. I soon learned, however, that modern search engine algorithms are highly sophisticated and can tell when you are prioritizing SEO considerations over customers.
As a general rule, stay customer-focused and use the elements we have already discussed. Including information that is most relevant to your customers is what will get you ranked, and antiquated SEO practices, like keyword-stuffing and shooting for hyper-specific word counts, can actually work against you in the modern age of ecommerce.
In addition to staying customer-focused in your descriptions, you should also be sure that you are targeting the right keyword. Your keyword is the term that customers use to search for your product in a search engine. Your keyword is typically just the name of the product, but for items that can have multiple names, you will need to target the one that is most relevant based on search volume and the other search page results.
For example, if I am selling custom playing cards, I will need to determine how people who are looking for this product search for it. Are they searching “custom playing cards” or are they using different language like “customizable deck of cards” instead? This comes down to the volume of searches associated with each search term as well as the search page results for both of those terms. The phrasing with the higher search volume and similar results is going to be your best bet for a keyword.
Once you know your keyword, you should include it in your title and/or description, so that Google can recognize the product and display it on relevant searches.
Overall, search engines reward clarity and user-friendliness. The top-ranking products on Google will almost certainly have descriptions that clearly inform the reader and stay firmly on brand. Use them as guidance and inspiration, but keep in mind that uniqueness is a hefty contributor to SEO as well—so make sure your copy is 100% original.
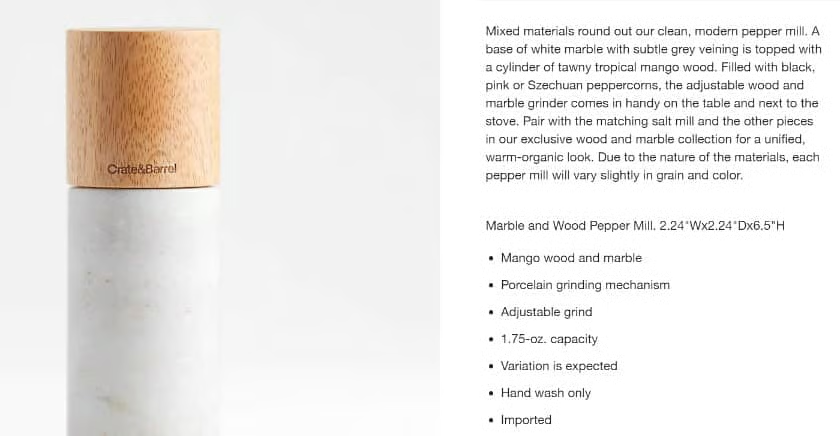
This product description targets the primary keyword “pepper mill” as well as some additional, more refined keywords—like “wood pepper mill” and “marble grinder.” It also provides clear and concise information that appeals to readers and Google’s search rankings.
(Source: Crate & Barrel)
Do’s & Don’ts of Writing Product Descriptions
A good product description can make or break a sale. Here are some final tips for crafting yours:
Do:
- Be personal. Use the word “you” to speak directly to your buyer. Ask questions, incorporate product-centric stories, and make it feel conversational.
- Use justified superlatives like “top-rated on Trustpilot” or “brightest flashlight in the world with a 100,000-lumen output.” Did your product win an award, receive notable mention, surpass a standard through testing, or earn an impressive number of 5-star reviews? Those are substantial recognitions that carry meaning for your customers.
- Check for readability. Go beyond your writing’s format to make sure your product description looks good and legible on the page. Font color, typeface, background, and placement should all work together to be on brand and, most importantly, readable.
Don’t:
- Use unjustified superlatives like “best in class” or “top-ranking brand.” If there isn’t any real class or ranking that you’re referring to, nix it.
- Use hollow verbiage like “excellent quality” or “cutting-edge.” Opt for descriptive specifics instead of meaningless filler.
- Use excessive jargon. Your tone will dictate whether or not it’s appropriate to sell your target buyer using specialized, highly technical language—but in most cases, it is confusing and off-putting.
- Use copied content. As mentioned above, duplicate text from elsewhere on the web hurts your search engine rankings; it’s not a good look for your brand in general.
Product Description Frequently Asked Questions (FAQs)
Click through the questions below to get answers to some of your most frequently asked product description questions.
A product description is the part of an online listing that explains what an item is and why it’s worth buying. A well-written product description can transform your online store by qualifying, persuading, and informing the reader, as well as boosting your listings’ visibility.
When writing descriptions for products, first, consider who your target customers are, your brand image (tone), and the objectives of your description. Then you will want to highlight the features of the service and format the information in a scannable way. Finally, optimize for SEO.
You should include a description of the product, a list of features and their benefits, and a call to action.
Different products require different amounts of information, but your product description should always include all the information that a customer needs to make a confident purchase, and no additional, extraneous text.
First, describe the garment, then list its fabric and care information, then include a sizing chart, model information, and additional features/benefits.
Bottom Line
There’s a lot that goes into writing product descriptions. With the guide above, however, anyone can do it—and the results are worth it. Spending a little time honing in on your customer profile, tone, format, and SEO will lead to increased conversions, along with boosts to other important KPIs.