


Product photos might be the most important piece of any ecommerce listing. They convey everything from physical specs to emotional attributes. Plus, photo quality directly correlates to perceived value.
High-quality product photography can be done on a budget using your iPhone or camera with equipment and materials you may already have around the house. Here’s how to take product photos that sell in seven easy steps.
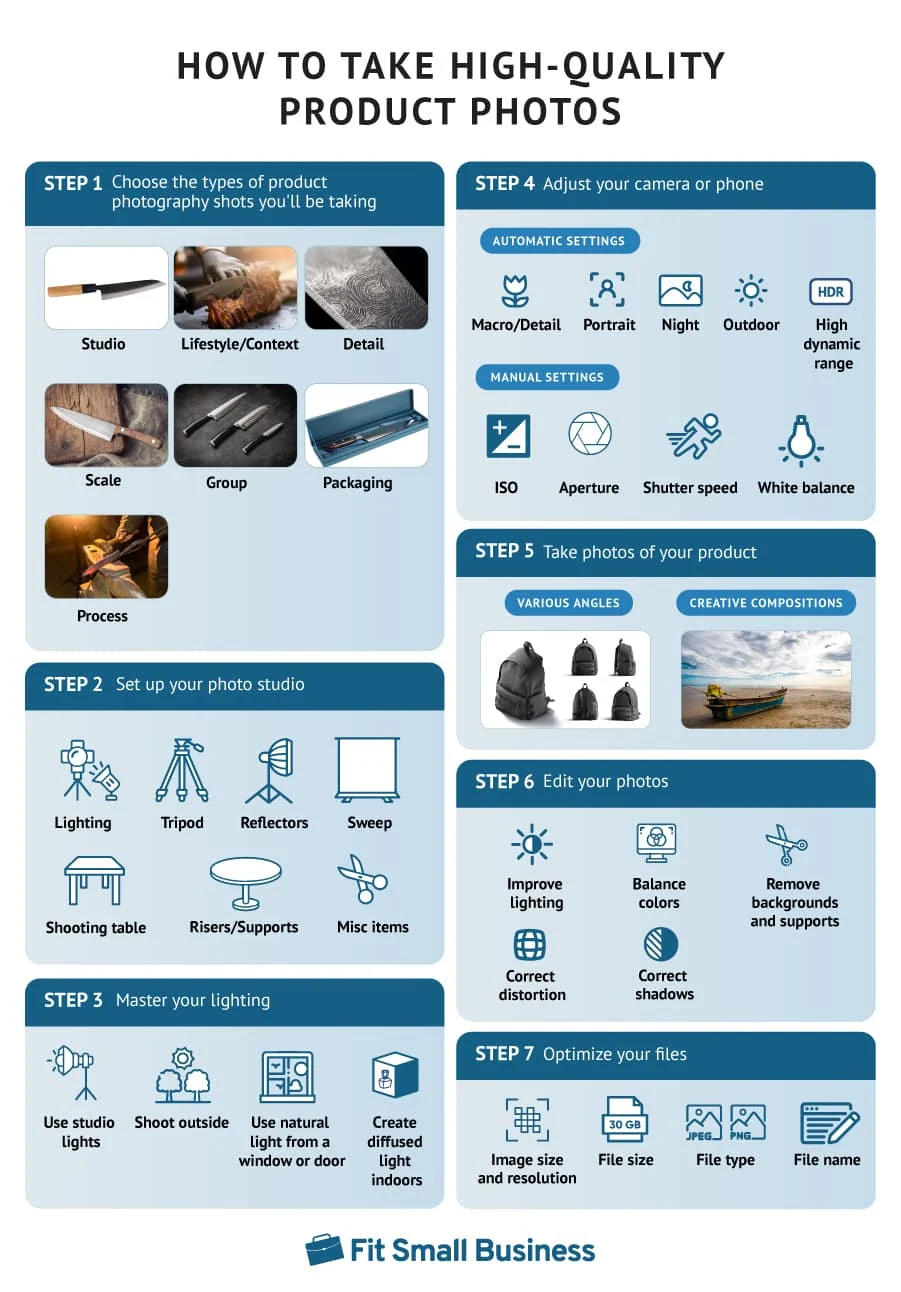
Step 1: Choose the Type of Product Photo
Online shoppers rely on product photos for crucial information since they can’t interact with the item firsthand. A simple photo against a white backdrop does a lot, but it might leave them wondering about the size, how to use it, or the experience it offers.
It’s a good idea to share a range of four to 10 photos to cover your product’s key features. Mostly, keep them clear and informative with a plain background, but include some dynamic shots to showcase real-world use.
Here are some product photography ideas based on the main styles of product shots, as well as how to use them:

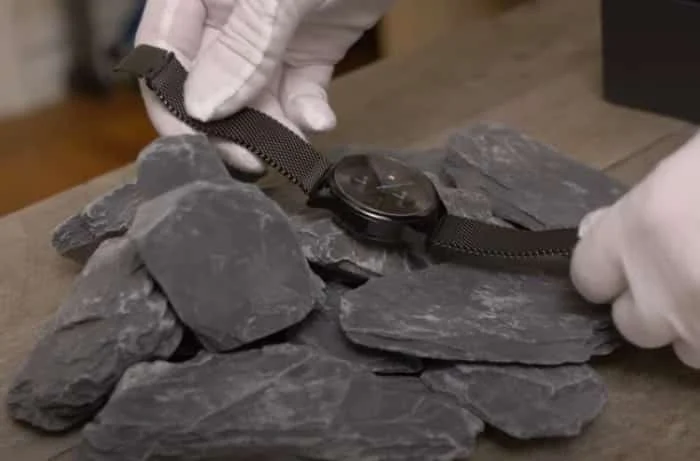
Studio shots, also called individual shots, provide a basic look at the product by itself against a clean, minimalist background. This type of photo is a must-have for any product in every category.
They clearly and attractively display the item, often from multiple angles. Studio shots often have a white backdrop, but alternatives like wood, grass, or stone can convey branding and emotional attributes.
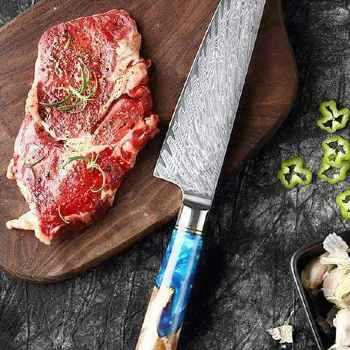
A lifestyle or “in-context” shot shows the product being used, worn, or otherwise displayed in its natural habitat.
Lifestyle shots let customers visualize the product in their lives, connecting on an emotional and practical level. They can supplement or replace some studio shots in your product’s gallery. Try to include a few dynamic, in-context images among simpler photos.
User-generated content, or UGC, can also provide helpful lifestyle and context shots.
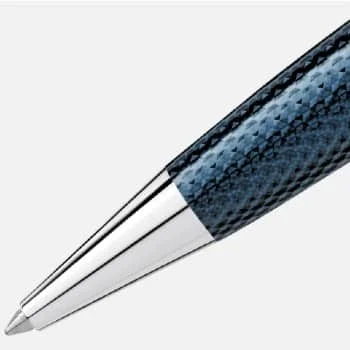
Detail shots, also called macro images, present an up-close view of the product, often focusing on a specific characteristic—like the product’s materials, special features, or signs of quality.
They’re handy for many products, but not all. Even if your item doesn’t have standout details, tossing in at least one macro shot can help customers feel like they’re seeing the item up close.

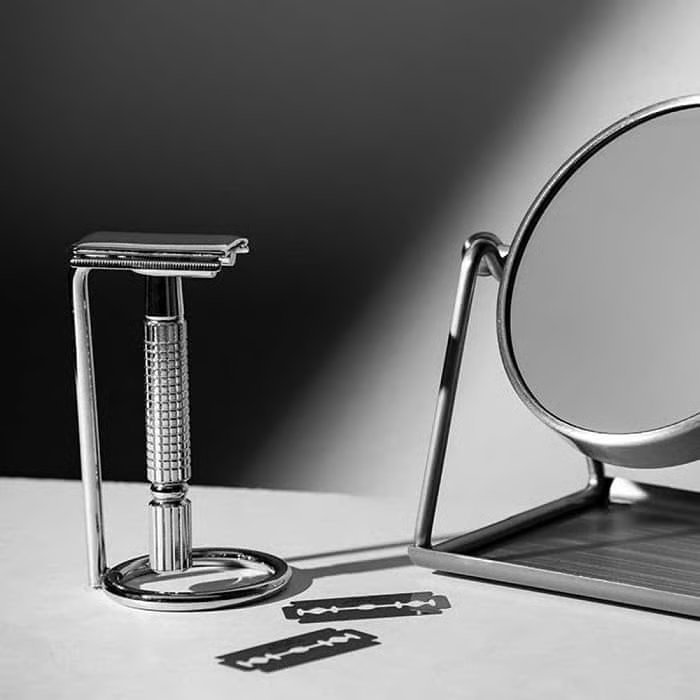
A scale shot demonstrates the size of a product, which may not be crucial for every item but is significant in certain cases. It can be accomplished in multiple ways.
Some photographers will include a well-known, recognizable object next to the item that they’re shooting for scale (like a soda can or a gift card).
A more elegant way to convey size is to display the product relative to its environment—like the scratcher-toy shown above, complete with a cat on top of it.
Group shots display related items together in one scene, which can serve a few different purposes. They can recommend other items in a collection, showcase variations of the same product, or demonstrate what a purchased set looks like.
Adding one to three group photos to your product listing will help viewers get a more complete feel of the product and their options.
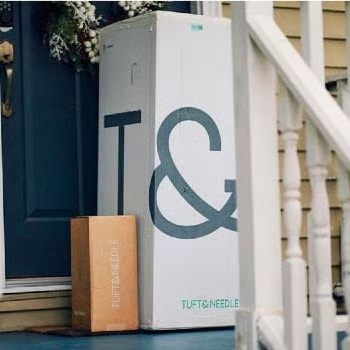
Packaging shots show off how your product is packaged—a detail that might seem minor, but can play a big part in branding and sales for some items. For example, showing how compact a mattress and pillow set is packaged can be a solid selling point.
It’s a smart move to throw in packaging shots for items with unique packaging flair or those likely to be sent as gifts. A photo or two in the product listing does the trick, and they come in handy as promotional tools around the holiday season.
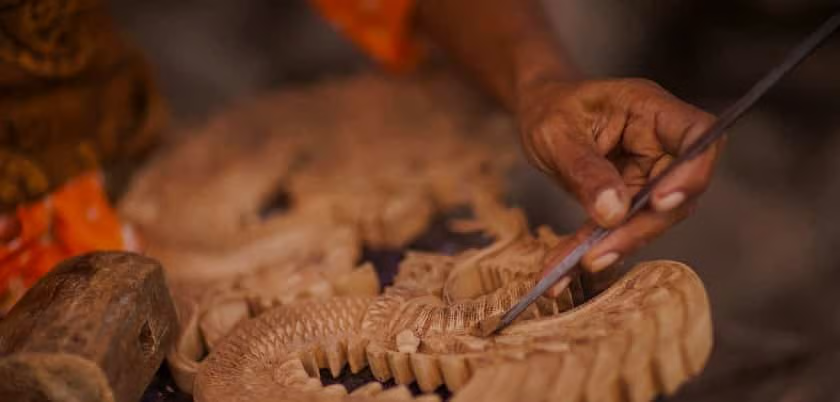
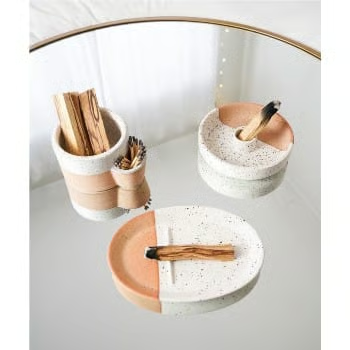
A process shot provides insight into how the product was made.
These images emphasize authenticity and craftsmanship and are helpful selling tools for handmade or artisanal products. They promote an emotional connection with the item as well as its origin and allow your brand to build trust as it connects with your audience.
One or two process shots will augment a product listing, but they’re also useful for social media posts and advertisements.
The right combination of these product photo types will give your customers the information and encouragement they need to make a purchase confidently.
Step 2: Set Up Your Photo Studio
Taking great product photos doesn’t require a high-budget, professional product photography setup—but you’ll need some things other than your camera or iPhone.
Depending on your desired shot and available environment, you may need nothing more than a park bench and the right weather. Other circumstances, however, call for a more complete toolbox.
Here are the basics of a DIY photo studio:
You’ll need a flat platform large enough to easily display the product. This can be your dining table, your desk, a TV tray, a chair, or another similar surface. If you decide to shoot outdoors, make sure your shooting table is portable.
A sweep or infinity curve is a seamless backdrop that smoothly transitions from the horizontal to vertical surfaces in your shot. It creates a distraction-free, shadowless background to let your product take center stage.

The size of your sweep depends on your product. For small items, poster boards or foam sheets can work well. Larger items might need a fabric setup, which can be crafted or purchased affordably (like this backdrop).
To make a sweep, hang the material above the back of your shooting table. If it’s against a wall, a temporary adhesive works. Otherwise, create a stand using something like a coat rack, wooden support, or ladder. Then secure the sweep to your support with clamps or tape and drape the material down over the top of your table.
Alternatively, style your table with brand-aligned materials like wood, marble, or decorative pillows to enhance your item’s look.
When possible, use natural light for your product photography setup as it’s easier to work with and often yields better results. If natural light isn’t an option, use 5000K daylight/cool white LED bulbs to mimic natural light.
Many household bulbs create warm white light, which casts a red-orange tint in photos, while most fluorescent lights cast a greenish hue. Plenty of inexpensive LED options are available online.
Clamp lamps are a budget-friendly way to set up your lighting, or consider tripod stand lights or a studio lighting kit for frequent or varied shooting locations.
For both artificial and natural light sources, reflectors are used to prevent unexpected color variations and contrasts in photos. They also allow you to manipulate and evenly distribute light and shadows, which can make a big difference in product photography.
Small, portable reflectors are available from about $15, but simple white foam boards are highly effective as well.

Keeping your camera or iPhone as stable as possible produces consistently crisp, clear photos. Shooting by hand works, but it may lead to blurry or out-of-focus images.
Tripods are available at very affordable prices for both digital cameras and smartphones, and they’re much easier to use than a DIY version.
However, in a pinch, you can stabilize your device by setting it on an object of the appropriate height—like a stack of books or a piece of furniture. To keep your phone steady in the right position, DIY mounts can be made using many household objects, like the examples shown below.
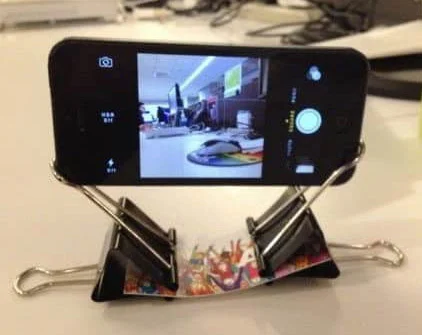
Fastening two binder clips to a strip of paper creates a simple and effective phone stand.
(Source: FixThePhoto)
Product stands or risers help to lift items off your table to reduce hard shadows at the base. They’re also a great part of your product photography setup for staging product assortments, group shots, or incorporating decorative props.
Risers can be made by draping upturned items, like boxes or storage containers, in cloth. They can be the same color as your sweep in order to blend in or to add a pop of attractive color or pattern.
Some products look best when positioned a certain way, making supports useful. Fishing line tied to a rod can lift or hold parts, like a purse handle. Small display easels prop items upright, while glue dots are popular for securing everything in place.
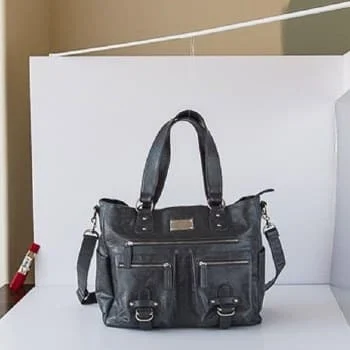
The handle of this purse is held in place by a fishing line tied to a suspended rod.
(Source: SLR Lounge)
Take your product photography a step further by styling your set with props:
Though a standard, white-background studio shot is the product photography go-to, adding some panache to your scenes can help convey emotional attributes of your goods.
Try incorporating props that align with your brand, appeal to your audience, fit in with the scale of your subject, and tell your product’s story.

Items used in manufacturing make compelling props for product photos.
(Source: FixThePhoto)
As an alternative, you can eliminate the need for your own photo studio by using the Square Photo Studio App. It has built-in tools to achieve the right angle, lighting, background, and more.

If you don’t have all the DIY materials on hand, here are our equipment recommendations (with prices at the time of writing):
- Large collapsible backdrop ($19)
- 16-piece clamp set ($17)
- 2-pack clamp lamp lights ($17)
- Full professional studio lighting kit ($79)
- 5-color portable light reflectors ($15)
- 50-inch camera mount tripod ($21)
- Flexible cellphone tripod ($15)
- Glue dots adhesive stickers ($6)
- Mini photography light box ($17)
Step 3: Master Your Lighting
Product photography lighting is key for working with any camera. Here are some tips to make the most of the light you have available.
Shoot Outside for Soft, Natural Light
This is a top product photography tip—a wash of soft, natural light provides the best color balance for product photos and minimizes harsh shadows.
You can find the perfect light outdoors on an overcast day (when the clouds diffuse the sunlight nicely), or at mid-morning and early evening (when the light strikes from a smaller angle).
The unedited product photo below was taken on an outdoor picnic table during an overcast day. This shot was captured using a Samsung Galaxy smartphone on its automatic setting with no additional equipment, and it’s virtually perfect for a product listing.

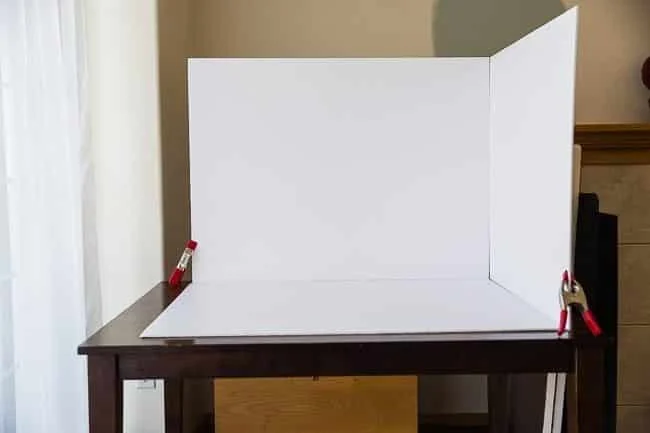
Use Natural Light From a Large Window or Glass Door
If shooting outside isn’t possible or convenient, try the next best thing—setting up indoors next to a large window or glass door.
By arranging your product photography setup next to a bright natural source, you can still capture plenty of light. It may need to be manipulated for your subject to be lit evenly without harsh shadows, so be sure to have reflectors on hand.
Setting up a few pieces of foam board reflectors can make a great window-side stage for your product, like the example shown below.
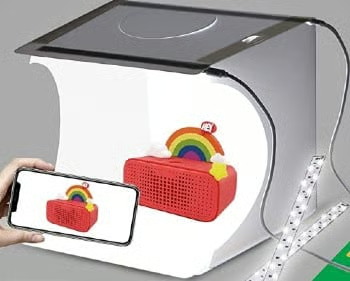
Create Diffused Light Indoors
If the perfect natural light isn’t accessible, you can mimic it in a number of ways. The key is to diffuse (meaning to spread out and soften) the light. This minimizes shadows and enhances colors in product photography lighting.
For small items, you can do this by using a device called a tabletop light tent or lightbox. They’re available to purchase starting at under $20 and many sellers swear by them.
Of course, you can build one yourself using basic household materials, but you’ll need to supply your own studio lights. Here’s a detailed guide to constructing your own DIY lightbox.
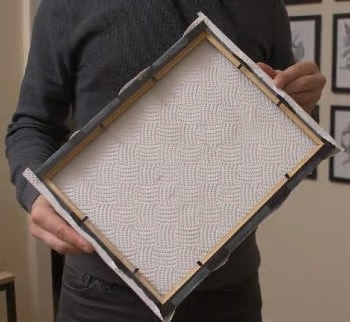
For a simpler DIY approach you can wrap paper towels around a picture frame and hold or secure it to your light as a diffuser.
(Source: B&H Photo Video)
Let More Light in With a Tripod
When you’re short on natural light and don’t have studio lighting, using a tripod or a DIY mount helps get clear, detailed shots without a flash (which can change colors and create harsh shadows).
A stable setup allows for longer exposure time, letting more light into the shot (we’ll cover exposure later in this guide). A tripod also lets you set a shutter delay, capturing a sharp, in-focus image a few seconds after you tap the screen.
Step 4: Adjust Your Camera
Great product photos can be taken with almost any modern device you have on hand (or can borrow from a friend)—whether it’s a digital camera or your iPhone or Android.
If you’ve followed the lighting tips from earlier, both device options can be used on their automatic, point-and-shoot settings to easily yield usable shots. This is one of the best ways to learn how to take product photos.
If your lighting situation is less than ideal or you want to fine-tune your photos, you can adjust the image attributes by trying new settings or switching your device to manual mode. Here’s a look at how it’s done.
Using Phone Auto Mode
Most modern phone cameras have a variety of automatic options to help refine your shots based on the scene. You can switch between them by tapping on the specific mode icon or navigating through the camera settings. When shooting product images, it’s helpful to try a few different settings to see what produces the best look.
Here are some of the options your phone likely has—but remember to keep the flash off:
- Macro/Detail: This setting is useful for creating images that capture close details in focus while blurring the background. They provide a professional look for your detail shots and keep the viewer’s attention on the product.
- Portrait: Some phones have to detect a human face in the frame in order to take a picture in portrait mode, so its use in product photography is limited. If your device allows for it, this setting can take attractive shots of an object by adjusting the camera’s aperture to soften the background.
- Daytime/Outdoor: These settings optimize light and white balance when shooting outdoors or in bright natural light.
- Night: This mode creates a slower exposure to capture more light. When used with a tripod or other stabilized setup, it can help take crisp product shots indoors.
- HDR (High Dynamic Range): This option enhances the lightest and darkest parts of your image while balancing colors. It’s best suited for shooting outdoors, or any scene with a wide range of color attributes. Processing time is increased when shooting in this mode, so it’s important to keep your device stable.
- Focus: Most phone cameras have an auto-focus feature that’s activated by tapping the desired focal point. The result will be a crisp, in-focus image for your web store.
Using Digital Camera Auto Mode
With a DSLR, mirrorless, or compact camera, the auto mode adjusts necessary settings for you, so you just have to point and shoot.
Your camera also has preset modes for specific scenes, making refined shots easier without the hassle of manual mode. You can switch between them by toggling the mode dial on the top of the device. Here’s how these presets can help in product photography:
- Macro: This setting is designed for shooting subjects at close range—particularly small objects. It optimizes the camera’s focus and depth of field for close-ups, so it’s helpful for capturing detail shots.
- Portrait: This setting increases the camera’s aperture to soften the background and allow your subject to pop. On digital cameras, its usage isn’t limited to human subjects, so it can be a handy mode for product photography.
- Night: Using your camera’s night mode will slow down its shutter speed, leaving the shutter open for a longer period of time to capture more light. It can be useful for low-light situations, but if used without a tripod it will leave you with blurry images.
- Scene: If your camera’s settings include a “scene” option, adjusting to it will actually bring up a whole other set of modes to choose from.
Using Phone or Camera Manual Settings
Even with these numerous automatic options, sometimes its hard to capture the perfect shot without manually adjusting your camera settings.
If you’re using a smartphone, look for the Manual or “PRO” mode option in the camera settings.
To enter manual mode on a digital camera, switch the mode dial to “M”, as shown below.

With either type of device, here are the main settings you’ll want to adjust when learning how to take product photos on manual mode:
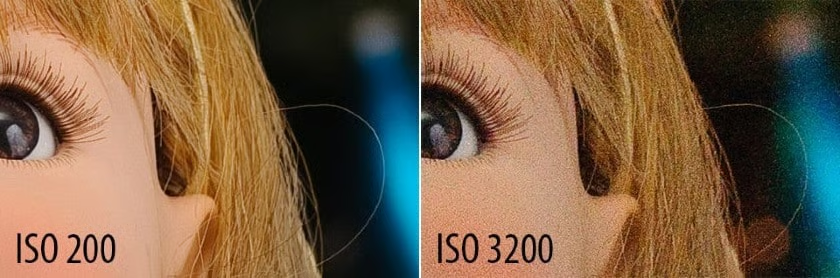
ISO refers to a camera’s sensitivity to light. Its range varies depending on your camera, and the value you set controls the camera’s internal sensor.
A standard ISO range is 200 to 1600. The higher the value, the more sensitive to light your camera will be, and the brighter the scene will appear.
As a general rule, aim to keep your ISO as low as possible. Higher ISO settings result in grainy or “noisy” photos, which compromises image quality.
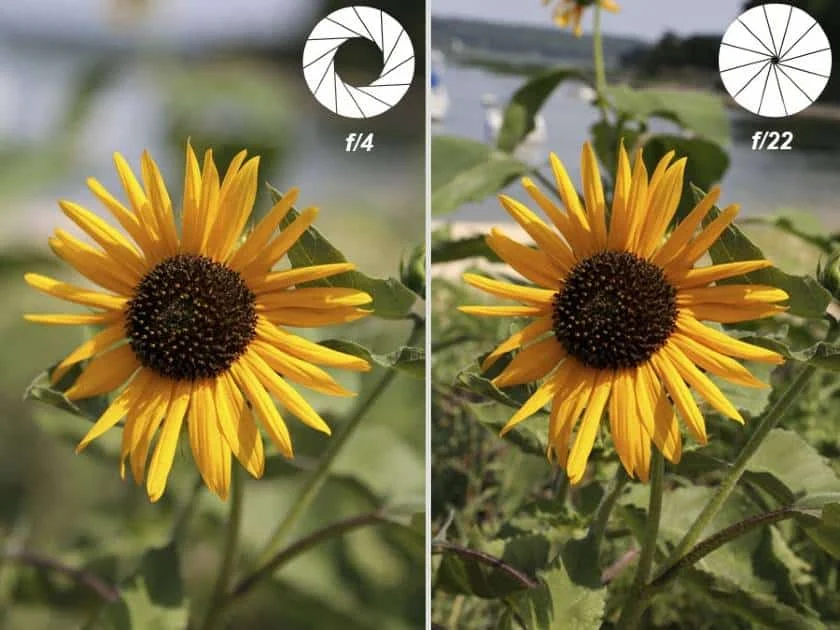
Aperture is the size of the opening of your camera’s lens diaphragm. It’s measured in “f-stops” and a basic modern camera lens has a range of about f/2 to f/38.
While it has an effect on light and exposure (lower f-stop = larger lens opening and more light; higher f-stop = smaller lens opening and less light), aperture is primarily used to control depth of field.
- Lower f-stop values = smaller (or “shallower”) DOF, which blurs the background while keeping the subject in sharp focus.
- Ideal for individual portraits and many types of product photos.
- Higher f-stop values = larger (or “deeper”) DOF, which keeps everything in focus foreground to background.
- Ideal landscape photography, large group portraits, or some product photography lifestyle shots.
Start by trying an aperture between f/4.5 and f/7.1 for your product photos to allow the subject to stand out by slightly blurring the background.
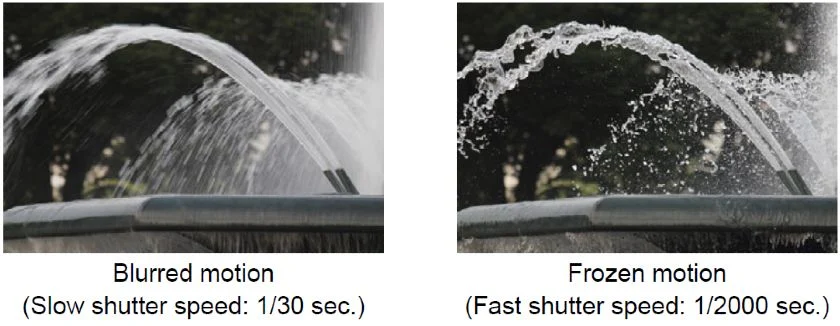
Shutter speed is the length of time that the digital sensor (or film) inside your camera is exposed to light. It’s measured in seconds, and most commonly represented as fractions of a second.
Your camera can likely be adjusted from a shutter speed of 1/4000 to 30, but another manual option—called “bulb” mode—can be used to leave the shutter open as long as you want.
It affects image brightness by controlling light intake. Slower speeds brighten photos, while faster speeds darken them.
It also alters motion capture: slower speeds create a “blur” effect for moving objects, while faster speeds “freeze” motion.
This setting modifies the color temperature, measured in Kelvins (K), ranging from warmer tones at 1,000 K to cooler at 10,000 K.
Direct sunlight at noon, around 5,200-6,000 K, is neutral. Other light sources cast a warm or cool hue, which your camera’s white balance neutralizes by adding the opposite color.
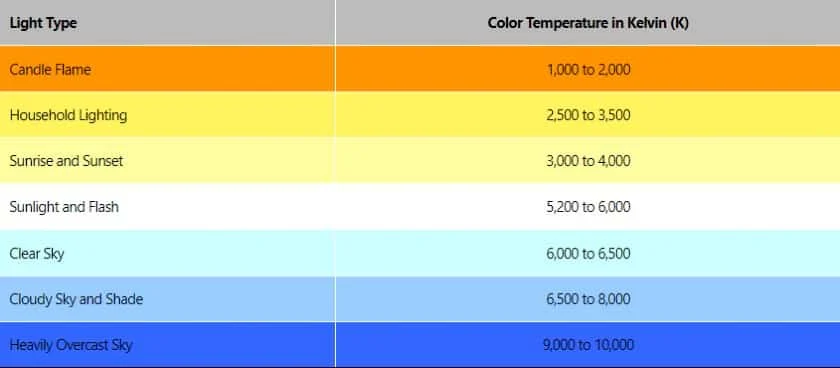
Your camera’s white balance features add the opposite color to the image to neutralize the scene’s color temperature.
The auto WB setting (labeled ‘A’ on your device) effectively detects and adjusts the scene’s K value for neutral tones, making it a go-to for many photographers.
Your camera also offers WB presets like Cloudy, Shade, Fluorescent, and Incandescent, or manual K value selection from 2,500 to 10,000.
Aim for photos with a neutral hue by adjusting lighting and settings, though color temperature can be tweaked during editing, all contributing to a well-exposed photo.

Step 5: Take Photos of Your Product
When it’s time to shoot, be sure to take plenty of photos. Professional photographers often shoot a great excess of pictures in a single session with the intention of picking the top 10%–20% for actual use. And remember that you can tweak your images in the editing phase—which we’ll cover next.
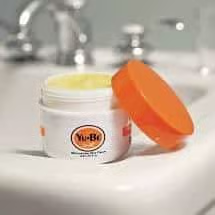
Consider attractive ways to represent how the product looks in action, like removing the lid from a jar of skin cream and propping it up against the item’s side. (Source: Yu-Be)

For more visually stimulating photos, here are some effective and creative composition techniques to try out:
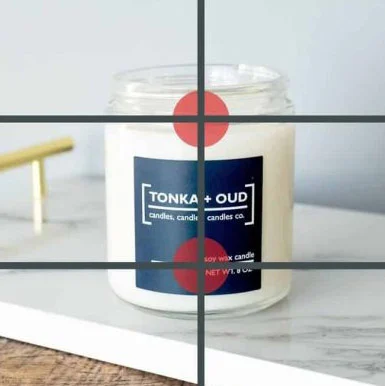
The rule of thirds is a classic photography technique that can enhance your product photos’ appeal while keeping them simple. It involves placing your subject at the intersection of two imaginary horizontal and vertical lines, rather than the center, for a more engaging and natural arrangement.
Sources: Urban Outfitters (left), Amazon (right)
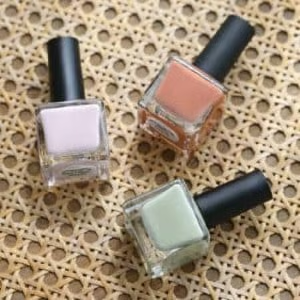
The rule of odds suggests compositions with odd-numbered elements are more appealing and dynamic, creating subconscious tension and intrigue. For a balanced scene, use three items or add two subtle props to a single product.

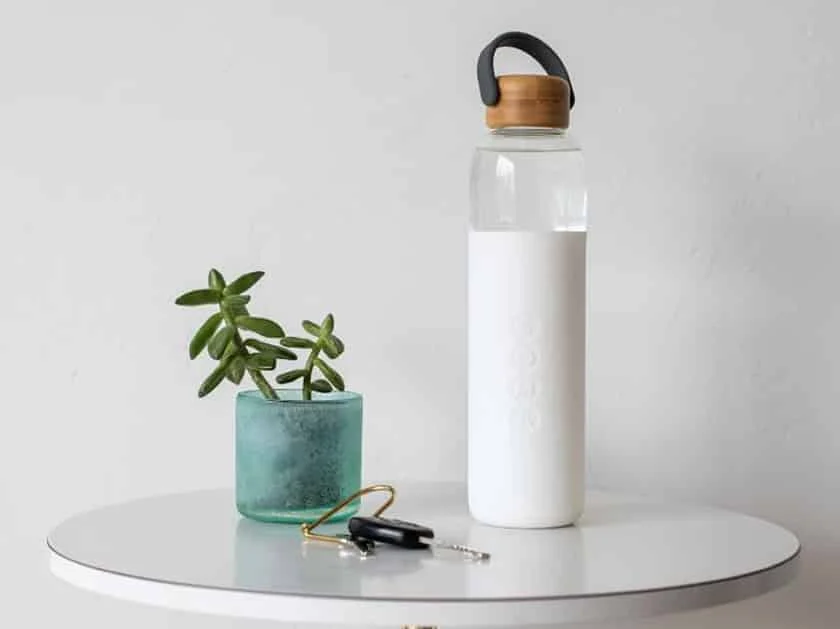
In photography, negative space refers to leaving part of the frame empty, drawing attention to the subject and adding an artistic touch. It also provides room for logos or text.
For effective use, position your product on the right side of the frame, where the eye naturally gravitates.
When selecting and arranging your props, try doing so in a way that connects them to your subject through diagonal lines. This guides the eye around the composition pleasantly, allowing the audience to absorb the image while ultimately drawing focus to the product.
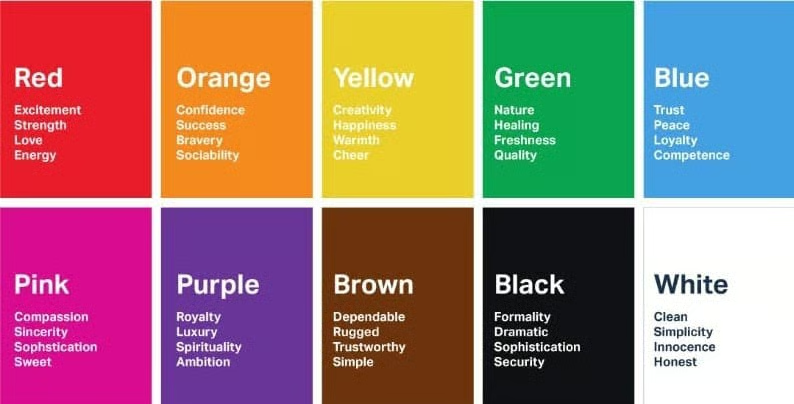
Colors evoke emotions and reflect your product’s attributes through “color psychology,” rooted in survival instincts and cultural conditioning.
Include backgrounds and props with colors that align with your brand traits. Also, match the intended user sentiment with a corresponding color in your composition.
Step 6: Edit Your Photos
Most iPhones, Androids, and computers have basic editing capabilities to adjust and save your pictures, but better photo editing programs and apps offer more options.
These software choices allow you to improve lighting, balance colors, replace backgrounds, remove supports and mannequins, correct distortion, and edit shadows, and more. Plus, they allow you to optimize your files.
Best Free Photo Editing Tools
Try these top-rated free photo editing programs and apps for your product photos:
GIMP
For Windows and Mac
See the user guide with tutorials
GIMP is a free open-source photo editing software that gives you virtually all of the retouching, cropping, and file-saving power of Photoshop—but without the cost. It’s widely regarded as the most sophisticated free image editor online, used by more retailers, scientists, graphic designers, illustrators, and photographers than any other program in its category.
Fotor
For your computer’s browser
See the user guide with tutorials
While it doesn’t have the robust features of Photoshop or GIMP, Fotor makes basic photo editing extremely easy. For those who don’t want to invest time in downloading and learning an image manipulation program, this tool can be used directly from your browser to accomplish great photo edits quickly.
Adobe Photoshop Express
For iOS and Android
See the user guide with tutorials
As a free counterpart to the gold standard of photo editing, Photoshop Express is an app intentionally built for mobile device photography. It offers much of the needed functionality of the computer version with the added benefit of cost-effectiveness and convenience.
Snapseed
For iOS and Android
See the user guide with tutorials
This Google-owned app rivals desktop photo editors by boasting an impressive range of features and a highly intuitive interface. In addition to advanced filter options, Snapseed offers sophisticated tools that are ideal for product photography, like precision masking and “Selective Adjust.”
Best Paid Photo Editing Tools
There are plenty of free photo-editing apps and programs available, but there’s a reason the pros use paid software. Editing suites (like the ubiquitous Photoshop) are considered to be worth the money due to their massive feature sets, versatile compatibility, and extreme user-friendliness.
Here are the three photo editors widely regarded as the best around:
- Adobe Lightroom: $9.99/month after free trial
- Adobe Photoshop: $20.99/month after free trial
- Skylum Luminar: Starts at $14.95/month
In addition to editing, you’ll need to use your software to reformat and optimize your image files, which we’ll go over in the next step.
Step 7: Optimize Your Files
Your photo files need to be optimized for a few purposes—namely ecommerce platform compatibility, load time, and search engine visibility (ecommerce SEO).
Here are the main factors to consider during this step:
Image Size & Resolution
Your ecommerce platform (like Shopify or BigCommerce) will state its preferred image sizes in its setup guide or store management tutorials. Usually, this will be listed and measured in pixels (px). All photo editing apps will let you change your units to this when saving images.
It’s important to heed these recommendations to strike a balance between sharp detail and use of zoom features as well as minimize space and load times. Not only do these factors affect upload capability and buyer experience, but they impact search engine rankings, too.
File Size
In addition to image size, you’ll need to observe your shop host’s file size requirements. These are listed and measured in megabytes (MB) or kilobytes (KB).
An image’s file size is determined by color range, dimensions, and quality. Since controlling your images’ color range isn’t very doable and you want to adhere to the dimensional requirements mentioned above, quality is the main factor to adjust.
Your photo editing software will allow you to toggle the quality of the image to achieve different file sizes. Another option is to use free compression tools such as WeCompress and Optimizilla, which sometimes results in greater retention of image quality.
File Type
While your photo editing software can create files in many different formats, JPG and PNG are the two file types most commonly used for product photos.
- JPG or JPEG files allow for vivid colors at manageable sizes, making them the best choice for most product photos.
- PNG files are similar to JPG but yield a higher quality image. This comes along with larger file sizes and longer load times, so it’s wise to only use the PNG format for product photos that need to have a transparent background.
When saving (or exporting) your edited and optimized image in your program/app of choice, you’ll see a “Select File Type” option—this drop-down menu allows you to choose your photo’s format.
File Name
Though it may seem like a trivial detail, how you name your product photos when saving the final file to your computer has an impact on your store’s search engine rankings.
Google’s “crawlers” use file names and alt tags to interpret photo content, impacting your site’s traffic. When naming a product photo file, consider what a potential buyer might search for. Incorporate keywords, but prioritize the buyer over search engine optimization. Use dashes between words in your file title and omit articles like “a,” “an,” and “the,” for instance, use “rustic-white-ceramic-stoneware-mug.jpg” instead of “mug studio shot front.jpg.”
Apply the same principle to alt text, which describes a picture in HTML code if it can’t be displayed. Use descriptive phrases with standard spacing, like “Rustic white ceramic stoneware mug,” and keep it under 25 characters for optimal SEO results.
Product Photography Tips
In a poll by Etsy, they found that a staggering 90% of their customers ranked the quality of Etsy product photos as the most important factor in their decision to make a purchase. It goes without saying that pictures of your items are vital to your online store.
When it comes to learning how to take good product photos, here are some final do’s and don’ts:
Coordinate your website’s content
Keep all of your listing’s assets on brand and cohesive for an immersive experience. Check out our guide on how to write a good product description that works with your photos, and consider making a product video as well.
Stay organized
Try planning your photoshoot by itemizing your products along with the details of each shot you want to take. A spreadsheet works well for this task and can serve as a style guide to refer to when replicating your shots for future listings.
Prepare products beforehand
Obtain, clean, iron, polish, and style your goods when planning how to take product photos— not during your shoot.
Use a cluttered or distracting background
While props and attractive backdrops can enhance your photos, don’t go overboard. Your product needs to be the star of the show.
Mix light temperatures
Avoid mixing cool and warm-hued lights regardless of your lighting setup, as it can disrupt your camera’s white balance and compromise photo quality.
Stuff text with keywords
For SEO, it might seem sensible to use alt text like “cedar cigar humidor cigar humidifier wooden cigar storage best humidor for fresh cigar” to catch various keywords. However, modern search engines are sophisticated and don’t require keyword repetition, which could actually harm your rankings.
Bottom Line
If you’re selling online, it’s crucial to know how to take good product photos. Pictures are what viewers naturally gravitate toward, and they make the strongest impact of any asset on a webpage.
Thankfully, excellent product photography is attainable on any budget and can be done from the comfort of your own home. With minimal equipment and space, you can learn how to take product photos that engage customers, make sales, and increase your listing’s traffic.